- TypeScript - Home
- TypeScript - Roadmap
- TypeScript - Overview
- TypeScript - Environment Setup
- TypeScript - Basic Syntax
- TypeScript vs. JavaScript
- TypeScript - Features
- TypeScript - Variables
- TypeScript - let & const
- TypeScript - Operators
- TypeScript - Types
- TypeScript - Type Annotations
- TypeScript - Type Inference
- TypeScript - Numbers
- TypeScript - Strings
- TypeScript - Boolean
- TypeScript - Arrays
- TypeScript - Tuples
- TypeScript - Enums
- TypeScript - Any
- TypeScript - Never
- TypeScript - Union
- TypeScript - Literal Types
- TypeScript - Symbols
- TypeScript - null vs. undefined
- TypeScript - Type Aliases
- TypeScript Control Flow
- TypeScript - Decision Making
- TypeScript - If Statement
- TypeScript - If Else Statement
- TypeScript - Nested If Statements
- TypeScript - Switch Statement
- TypeScript - Loops
- TypeScript - For Loop
- TypeScript - While Loop
- TypeScript - Do While Loop
- TypeScript Functions
- TypeScript - Functions
- TypeScript - Function Types
- TypeScript - Optional Parameters
- TypeScript - Default Parameters
- TypeScript - Anonymous Functions
- TypeScript - Function Constructor
- TypeScript - Rest Parameter
- TypeScript - Parameter Destructuring
- TypeScript - Arrow Functions
- TypeScript Interfaces
- TypeScript - Interfaces
- TypeScript - Extending Interfaces
- TypeScript Classes and Objects
- TypeScript - Classes
- TypeScript - Objects
- TypeScript - Access Modifiers
- TypeScript - Readonly Properties
- TypeScript - Inheritance
- TypeScript - Static Methods and Properties
- TypeScript - Abstract Classes
- TypeScript - Accessors
- TypeScript - Duck-Typing
- TypeScript Advanced Types
- TypeScript - Intersection Types
- TypeScript - Type Guards
- TypeScript - Type Assertions
- TypeScript Type Manipulation
- TypeScript - Creating Types from Types
- TypeScript - Keyof Type Operator
- TypeScript - Typeof Type Operator
- TypeScript - Indexed Access Types
- TypeScript - Conditional Types
- TypeScript - Mapped Types
- TypeScript - Template Literal Types
- TypeScript Generics
- TypeScript - Generics
- TypeScript - Generic Constraints
- TypeScript - Generic Interfaces
- TypeScript - Generic Classes
- TypeScript Miscellaneous
- TypeScript - Triple-Slash Directives
- TypeScript - Namespaces
- TypeScript - Modules
- TypeScript - Ambients
- TypeScript - Decorators
- TypeScript - Type Compatibility
- TypeScript - Date Object
- TypeScript - Iterators and Generators
- TypeScript - Mixins
- TypeScript - Utility Types
- TypeScript - Boxing and Unboxing
- TypeScript - tsconfig.json
- From JavaScript To TypeScript
- TypeScript Useful Resources
- TypeScript - Quick Guide
- TypeScript - Cheatsheet
- TypeScript - Useful Resources
- TypeScript - Discussion
TypeScript - Quick Guide
TypeScript - Overview
JavaScript was introduced as a language for the client side. The development of Node.js has marked JavaScript as an emerging server-side technology too. However, as JavaScript code grows, it tends to get messier, making it difficult to maintain and reuse the code. Moreover, its failure to embrace the features of Object Orientation, strong type checking and compile-time error checks prevents JavaScript from succeeding at the enterprise level as a full-fledged server-side technology. TypeScript was presented to bridge this gap.
What is TypeScript?
By definition, TypeScript is JavaScript for application-scale development.
TypeScript is a strongly typed, object oriented, compiled language. It was designed by Anders Hejlsberg (designer of C#) at Microsoft. TypeScript is both a language and a set of tools. TypeScript is a typed superset of JavaScript compiled to JavaScript. In other words, TypeScript is JavaScript plus some additional features.

Features of TypeScript
TypeScript is just JavaScript. TypeScript starts with JavaScript and ends with JavaScript. Typescript adopts the basic building blocks of your program from JavaScript. Hence, you only need to know JavaScript to use TypeScript. All TypeScript code is converted into its JavaScript equivalent for the purpose of execution.
TypeScript supports other JS libraries. Compiled TypeScript can be consumed from any JavaScript code. TypeScript-generated JavaScript can reuse all of the existing JavaScript frameworks, tools, and libraries.
JavaScript is TypeScript. This means that any valid .js file can be renamed to .ts and compiled with other TypeScript files.
TypeScript is portable. TypeScript is portable across browsers, devices, and operating systems. It can run on any environment that JavaScript runs on. Unlike its counterparts, TypeScript doesnt need a dedicated VM or a specific runtime environment to execute.
TypeScript and ECMAScript
The ECMAScript specification is a standardized specification of a scripting language. There are six editions of ECMA-262 published. Version 6 of the standard is codenamed "Harmony". TypeScript is aligned with the ECMAScript6 specification.

TypeScript adopts its basic language features from the ECMAScript5 specification, i.e., the official specification for JavaScript. TypeScript language features like Modules and class-based orientation are in line with the EcmaScript 6 specification. Additionally, TypeScript also embraces features like generics and type annotations that arent a part of the EcmaScript6 specification.
Why Use TypeScript?
TypeScript is superior to its other counterparts like CoffeeScript and Dart programming languages in a way that TypeScript is extended JavaScript. In contrast, languages like Dart, CoffeeScript are new languages in themselves and require language-specific execution environment.
The benefits of TypeScript include −
Compilation − JavaScript is an interpreted language. Hence, it needs to be run to test that it is valid. It means you write all the codes just to find no output, in case there is an error. Hence, you have to spend hours trying to find bugs in the code. The TypeScript transpiler provides the error-checking feature. TypeScript will compile the code and generate compilation errors, if it finds some sort of syntax errors. This helps to highlight errors before the script is run.
Strong Static Typing − JavaScript is not strongly typed. TypeScript comes with an optional static typing and type inference system through the TLS (TypeScript Language Service). The type of a variable, declared with no type, may be inferred by the TLS based on its value.
TypeScript supports type definitions for existing JavaScript libraries. TypeScript Definition file (with .d.ts extension) provides definition for external JavaScript libraries. Hence, TypeScript code can contain these libraries.
TypeScript supports Object Oriented Programming concepts like classes, interfaces, inheritance, etc.
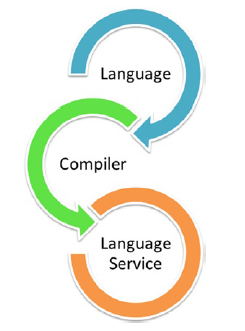
Components of TypeScript
At its heart, TypeScript has the following three components −
Language − It comprises of the syntax, keywords, and type annotations.
The TypeScript Compiler − The TypeScript compiler (tsc) converts the instructions written in TypeScript to its JavaScript equivalent.
The TypeScript Language Service − The "Language Service" exposes an additional layer around the core compiler pipeline that are editor-like applications. The language service supports the common set of a typical editor operations like statement completions, signature help, code formatting and outlining, colorization, etc.
Declaration Files
When a TypeScript script gets compiled, there is an option to generate a declaration file (with the extension .d.ts) that functions as an interface to the components in the compiled JavaScript. The concept of declaration files is analogous to the concept of header files found in C/C++. The declaration files (files with .d.ts extension) provide intellisense for types, function calls, and variable support for JavaScript libraries like jQuery, MooTools, etc.
TypeScript - Environment Setup
We already have set up TypeScript programming online, so that you can execute all the available examples online at the same time when you are doing your theory work. This gives you confidence in what you are reading and to check the result with different options. Feel free to modify any example and execute it online.
var message:string = "Hello World"
console.log(message)
On compiling, it will generate following JavaScript code.
//Generated by typescript 1.8.10
var message = "Hello World";
console.log(message);
In this chapter, we will discuss how to install TypeScript on Windows platform. We will also explain how to install the Brackets IDE.
You may test your scripts online by using The TypeScript at www.typescriptlang.org/Playground. The online editor shows the corresponding JavaScript emitted by the compiler.
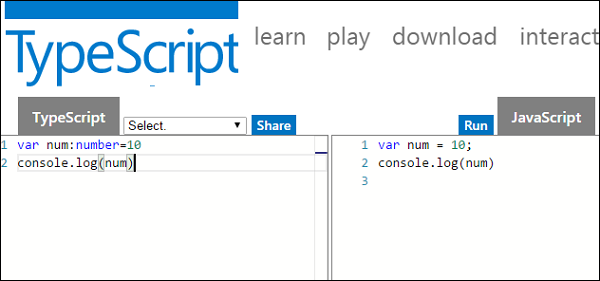
You may try the following example using Playground.
var num:number = 12
console.log(num)
On compiling , it will generate following JavaScript code.
//Generated by typescript 1.8.10
var num = 12;
console.log(num);
The output of the above program is given below −
12
Local Environment Setup
Typescript is an Open Source technology. It can run on any browser, any host, and any OS. You will need the following tools to write and test a Typescript program −
A Text Editor
The text editor helps you to write your source code. Examples of a few editors include Windows Notepad, Notepad++, Emacs, vim or vi, etc. Editors used may vary with Operating Systems.
The source files are typically named with the extension .ts
The TypeScript Compiler
The TypeScript compiler is itself a .ts file compiled down to JavaScript (.js) file. The TSC (TypeScript Compiler) is a source-to-source compiler (transcompiler / transpiler).
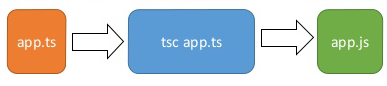
The TSC generates a JavaScript version of the .ts file passed to it. In other words, the TSC produces an equivalent JavaScript source code from the Typescript file given as an input to it. This process is termed as transpilation.
However, the compiler rejects any raw JavaScript file passed to it. The compiler deals with only .ts or .d.ts files.
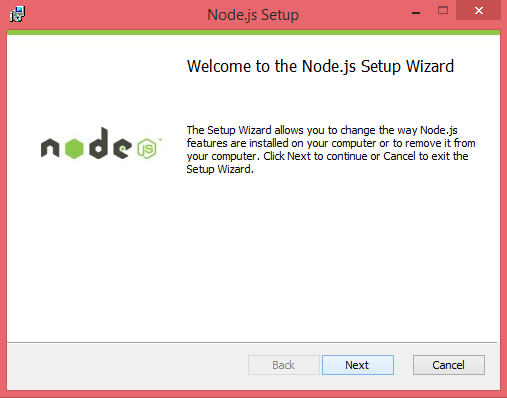
Installing Node.js
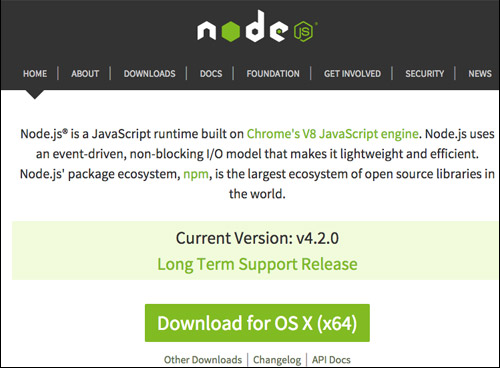
Node.js is an open source, cross-platform runtime environment for server-side JavaScript. Node.js is required to run JavaScript without a browser support. It uses Google V8 JavaScript engine to execute code. You may download Node.js source code or a pre-built installer for your platform. Node is available here − https://nodejs.org/en/download
Installation on Windows
Follow the steps given below to install Node.js in Windows environment.
Step 1 − Download and run the .msi installer for Node.
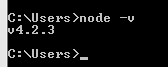
Step 2 − To verify if the installation was successful, enter the command node v in the terminal window.
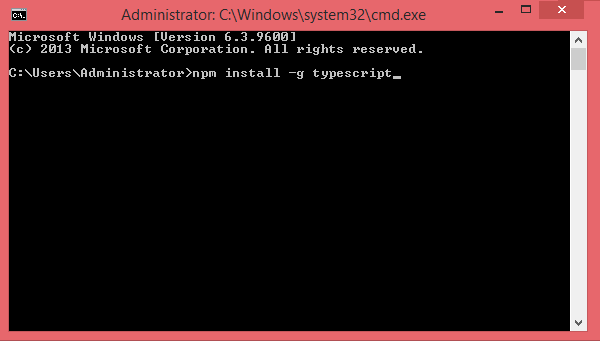
Step 3 − Type the following command in the terminal window to install TypeScript.
npm install -g typescript
Installation on Mac OS X
To install node.js on Mac OS X, you can download a pre-compiled binary package which makes a nice and easy installation. Head over to http://nodejs.org/ and click the install button to download the latest package.
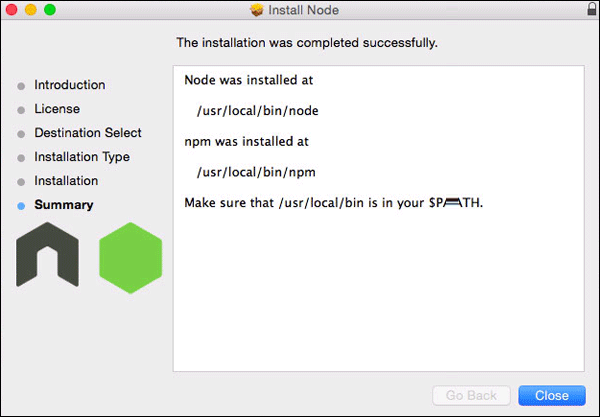
Install the package from the .dmg by following the install wizard which will install both node and npm. npm is Node Package Manager which facilitates installation of additional packages for node.js.
Installation on Linux
You need to install a number of dependencies before you can install Node.js and NPM.
Ruby and GCC. Youll need Ruby 1.8.6 or newer and GCC 4.2 or newer.
Homebrew. Homebrew is a package manager originally designed for Mac, but its been ported to Linux as Linuxbrew. You can learn more about Homebrew at http://brew.sh/ and Linuxbrew at http://brew.sh/linuxbrew
Once these dependencies are installed, you may install Node.js by using the following command on the terminal −
brew install node.
IDE Support
Typescript can be built on a plethora of development environments like Visual Studio, Sublime Text 2, WebStorm/PHPStorm, Eclipse, Brackets, etc. Visual Studio Code and Brackets IDEs are discussed here. The development environment used here is Visual Studio Code (Windows platform).
Visual Studio Code
This is an open source IDE from Visual Studio. It is available for Mac OS X, Linux and Windows platforms. VScode is available at − https://code.visualstudio.com/
Installation on Windows
Step 1 − Download Visual Studio Code for Windows.

Step 2 − Double-click on VSCodeSetup.exe  to launch the setup process. This will only take a minute.
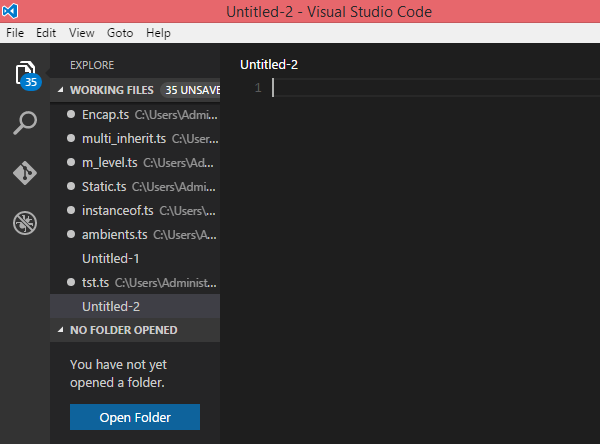
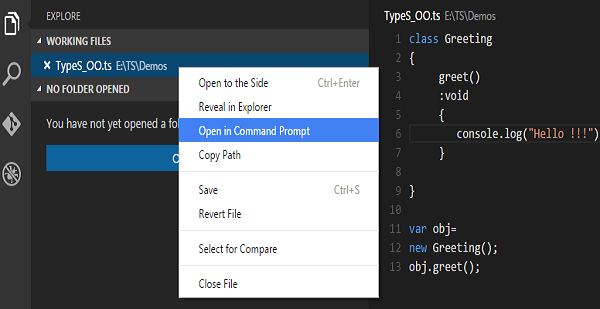
Step 3 − A screenshot of the IDE is given below.
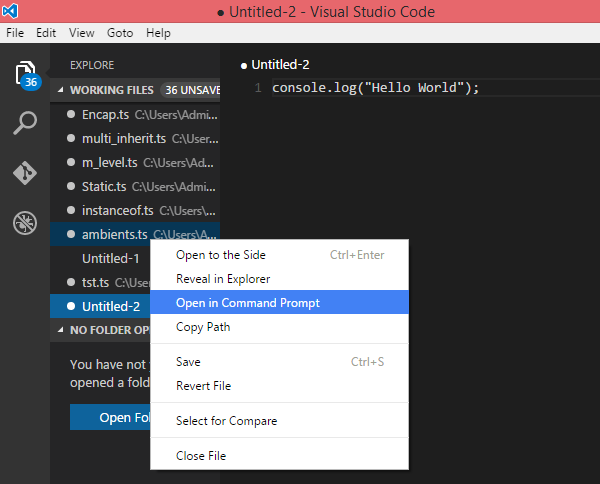
Step 4 − You may directly traverse to the files path by right clicking on the file → open in command prompt. Similarly, the Reveal in Explorer option shows the file in the File Explorer.
Installation on Mac OS X
Visual Studio Codes Mac OS X specific installation guide can be found at
https://code.visualstudio.com/Docs/editor/setup
Installation on Linux
Linux specific installation guide for Visual Studio Code can be found at
https://code.visualstudio.com/Docs/editor/setup
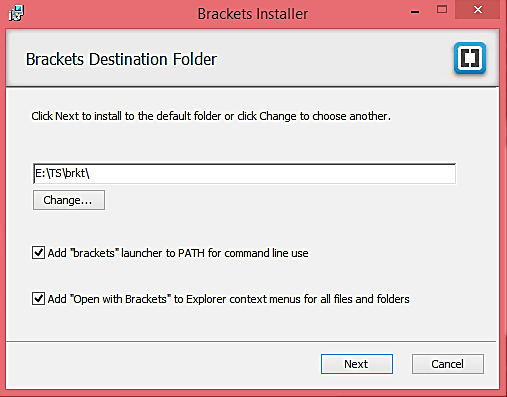
Brackets
Brackets is a free open-source editor for web development, created by Adobe Systems. It is available for Linux, Windows and Mac OS X. Brackets is available at http://brackets.io/
TypeScript Extensions for Brackets
Brackets supports extensions for adding extra functionality via the Extension Manager. The following steps explain installing TypeScript extensions using the same.
Post installation, click on the extension manager icon
 on the right-hand side of the editor. Enter typescript in the search box.
Install the Brackets TSLint and Brackets TypeScript plugins.

You can run DOS prompt / shell within Brackets itself by adding one more extension Brackets Shell.
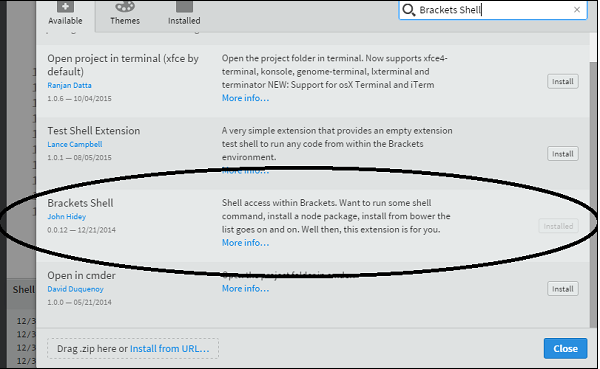
Upon installation, you will find an icon of shell on the right-hand side of the editor  . Once you click on the icon, you will see the shell window as shown below −

Note − Typescript is also available as a plugin for Visual Studio 2012 and 2013 environments (https://www.typescriptlang.org/#Download).VS 2015 and above includes Typescript plugin by default.
Now, you are all set!!!
TypeScript - Basic Syntax
Syntax defines a set of rules for writing programs. Every language specification defines its own syntax. A TypeScript program is composed of −
- Modules
- Functions
- Variables
- Statements and Expressions
- Comments
Your First TypeScript Code
Let us start with the traditional Hello World example −
var message:string = "Hello World"
console.log(message)
On compiling, it will generate following JavaScript code.
//Generated by typescript 1.8.10
var message = "Hello World";
console.log(message);
Line 1 declares a variable by the name message. Variables are a mechanism to store values in a program.
Line 2 prints the variables value to the prompt. Here, console refers to the terminal window. The function log () is used to display text on the screen.
Compile and Execute a TypeScript Program
Let us see how to compile and execute a TypeScript program using Visual Studio Code. Follow the steps given below −
Step 1 − Save the file with .ts extension. We shall save the file as Test.ts. The code editor marks errors in the code, if any, while you save it.
Step 2 − Right-click the TypeScript file under the Working Files option in VS Codes Explore Pane. Select Open in Command Prompt option.
Step 3 − To compile the file use the following command on the terminal window.
tsc Test.ts
Step 4 − The file is compiled to Test.js. To run the program written, type the following in the terminal.
node Test.js
Compiler Flags
Compiler flags enable you to change the behavior of the compiler during compilation. Each compiler flag exposes a setting that allows you to change how the compiler behaves.
The following table lists some common flags associated with the TSC compiler. A typical command-line usage uses some or all switches.
| S.No. | Compiler flag & Description |
|---|---|
| 1. | --help Displays the help manual |
| 2. | --module Load external modules |
| 3. | --target Set the target ECMA version |
| 4. | --declaration Generates an additional .d.ts file |
| 5. | --removeComments Removes all comments from the output file |
| 6. | --out Compile multiple files into a single output file |
| 7. | --sourcemap Generate a sourcemap (.map) files |
| 8. | --module noImplicitAny Disallows the compiler from inferring the any type |
| 9. | --watch Watch for file changes and recompile them on the fly |
Note − Multiple files can be compiled at once.
tsc file1.ts, file2.ts, file3.ts
Identifiers in TypeScript
Identifiers are names given to elements in a program like variables, functions etc. The rules for identifiers are −
Identifiers can include both, characters and digits. However, the identifier cannot begin with a digit.
Identifiers cannot include special symbols except for underscore (_) or a dollar sign ($).
Identifiers cannot be keywords.
They must be unique.
Identifiers are case-sensitive.
Identifiers cannot contain spaces.
The following tables lists a few examples of valid and invalid identifiers −
| Valid identifiers | Invalid identifiers |
|---|---|
| firstName | Var |
| first_name | first name |
| num1 | first-name |
| $result | 1number |
TypeScript Keywords
Keywords have a special meaning in the context of a language. The following table lists some keywords in TypeScript.
| break | as | any | switch |
| case | if | throw | else |
| var | number | string | get |
| module | type | instanceof | typeof |
| public | private | enum | export |
| finally | for | while | void |
| null | super | this | new |
| in | return | true | false |
| any | extends | static | let |
| package | implements | interface | function |
| new | try | yield | const |
| continue | do | catch |
Whitespace and Line Breaks
TypeScript ignores spaces, tabs, and newlines that appear in programs. You can use spaces, tabs, and newlines freely in your program and you are free to format and indent your programs in a neat and consistent way that makes the code easy to read and understand.
TypeScript is Case-sensitive
TypeScript is case-sensitive. This means that TypeScript differentiates between uppercase and lowercase characters.
Semicolons are optional
Each line of instruction is called a statement. Semicolons are optional in TypeScript.
Example
console.log("hello world")
console.log("We are learning TypeScript")
A single line can contain multiple statements. However, these statements must be separated by a semicolon.
Comments in TypeScript
Comments are a way to improve the readability of a program. Comments can be used to include additional information about a program like author of the code, hints about a function/ construct etc. Comments are ignored by the compiler.
TypeScript supports the following types of comments −
Single-line comments ( // ) − Any text between a // and the end of a line is treated as a comment
Multi-line comments (/* */) − These comments may span multiple lines.
Example
//this is single line comment

/* This is a
   Multi-line comment
*/
TypeScript and Object Orientation
TypeScript is Object-Oriented JavaScript. Object Orientation is a software development paradigm that follows real-world modelling. Object Orientation considers a program as a collection of objects that communicate with each other via mechanism called methods. TypeScript supports these object oriented components too.
Object − An object is a real time representation of any entity. According to Grady Brooch, every object must have three features −
State − described by the attributes of an object
Behavior − describes how the object will act
Identity − a unique value that distinguishes an object from a set of similar such objects.
Class − A class in terms of OOP is a blueprint for creating objects. A class encapsulates data for the object.
Method − Methods facilitate communication between objects.
Example: TypeScript and Object Orientation
class Greeting {
   greet():void {
      console.log("Hello World!!!")
   }
}
var obj = new Greeting();
obj.greet();
The above example defines a class Greeting. The class has a method greet (). The method prints the string Hello World on the terminal. The new keyword creates an object of the class (obj). The object invokes the method greet ().
On compiling, it will generate following JavaScript code.
//Generated by typescript 1.8.10
var Greeting = (function () {
   function Greeting() {
   }
   Greeting.prototype.greet = function () {
      console.log("Hello World!!!");
   };
	return Greeting;
}());

var obj = new Greeting();
obj.greet()
The output of the above program is given below −
Hello World!!!
TypeScript - Types
The Type System represents the different types of values supported by the language. The Type System checks the validity of the supplied values, before they are stored or manipulated by the program. This ensures that the code behaves as expected. The Type System further allows for richer code hinting and automated documentation too.
TypeScript provides data types as a part of its optional Type System. The data type classification is as given below −
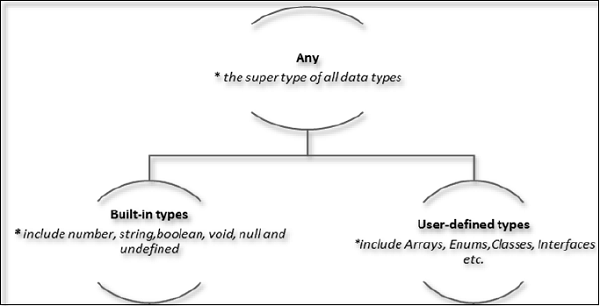
The Any type
The any data type is the super type of all types in TypeScript. It denotes a dynamic type. Using the any type is equivalent to opting out of type checking for a variable.
Built-in types
The following table illustrates all the built-in types in TypeScript −
| Data type | Keyword | Description |
|---|---|---|
| Number | number | Double precision 64-bit floating point values. It can be used to represent both, integers and fractions. |
| String | string | Represents a sequence of Unicode characters |
| Boolean | boolean | Represents logical values, true and false |
| Void | void | Used on function return types to represent non-returning functions |
| Null | null | Represents an intentional absence of an object value. |
| Undefined | undefined | Denotes value given to all uninitialized variables |
Note − There is no integer type in TypeScript and JavaScript.
Null and undefined Are they the same?
The null and the undefined datatypes are often a source of confusion. The null and undefined cannot be used to reference the data type of a variable. They can only be assigned as values to a variable.
However, null and undefined are not the same. A variable initialized with undefined means that the variable has no value or object assigned to it while null means that the variable has been set to an object whose value is undefined.
User-defined Types
User-defined types include Enumerations (enums), classes, interfaces, arrays, and tuple. These are discussed in detail in the later chapters.
TypeScript - Variables
A variable, by definition, is a named space in the memory that stores values. In other words, it acts as a container for values in a program. TypeScript variables must follow the JavaScript naming rules −
Variable names can contain alphabets and numeric digits.
They cannot contain spaces and special characters, except the underscore (_) and the dollar ($) sign.
Variable names cannot begin with a digit.
A variable must be declared before it is used. Use the var keyword to declare variables.
Variable Declaration in TypeScript
The type syntax for declaring a variable in TypeScript is to include a colon (:) after the variable name, followed by its type. Just as in JavaScript, we use the var keyword to declare a variable.
When you declare a variable, you have four options −
Declare its type and value in one statement.

Declare its type but no value. In this case, the variable will be set to undefined.

Declare its value but no type. The variable type will be set to the data type of the assigned value.

Declare neither value not type. In this case, the data type of the variable will be any and will be initialized to undefined.

The following table illustrates the valid syntax for variable declaration as discussed above −
| S.No. | Variable Declaration Syntax & Description |
|---|---|
| 1. | var name:string = mary The variable stores a value of type string |
| 2. | var name:string; The variable is a string variable. The variables value is set to undefined by default |
| 3. | var name = mary The variables type is inferred from the data type of the value. Here, the variable is of the type string |
| 4. | var name; The variables data type is any. Its value is set to undefined by default. |
Example: Variables in TypeScript
var name:string = "John";
var score1:number = 50;
var score2:number = 42.50
var sum = score1 + score2
console.log("name"+name)
console.log("first score: "+score1)
console.log("second score: "+score2)
console.log("sum of the scores: "+sum)
On compiling, it will generate following JavaScript code.
//Generated by typescript 1.8.10
var name = "John";
var score1 = 50;
var score2 = 42.50;
var sum = score1 + score2;
console.log("name" + name);
console.log("first score: " + score1);
console.log("second score : " + score2);
console.log("sum of the scores: " + sum);
The output of the above program is given below −
name:John
first score:50
second score:42.50
sum of the scores:92.50
The TypeScript compiler will generate errors, if we attempt to assign a value to a variable that is not of the same type. Hence, TypeScript follows Strong Typing. The Strong typing syntax ensures that the types specified on either side of the assignment operator (=) are the same. This is why the following code will result in a compilation error −
var num:number = "hello" // will result in a compilation error
Type Assertion in TypeScript
TypeScript allows changing a variable from one type to another. TypeScript refers to this process as Type Assertion. The syntax is to put the target type between < > symbols and place it in front of the variable or expression. The following example explains this concept −
Example
var str = '1'
var str2:number = <number> <any> str   //str is now of type number
console.log(typeof(str2))
If you hover the mouse pointer over the type assertion statement in Visual Studio Code, it displays the change in the variables data type. Basically it allows the assertion from type S to T succeed if either S is a subtype of T or T is a subtype of S.
The reason why it's not called "type casting" is that casting generally implies some sort of runtime support while, type assertions are purely a compile time construct and a way for you to provide hints to the compiler on how you want your code to be analyzed.
On compiling, it will generate following JavaScript code.
"use strict";
var str = '1';
var str2 = str; //str is now of type number
console.log(typeof (str2));
It will produce the following output −
string
Inferred Typing in TypeScript
Given the fact that, Typescript is strongly typed, this feature is optional. TypeScript also encourages dynamic typing of variables. This means that, TypeScript encourages declaring a variable without a type. In such cases, the compiler will determine the type of the variable on the basis of the value assigned to it. TypeScript will find the first usage of the variable within the code, determine the type to which it has been initially set and then assume the same type for this variable in the rest of your code block.
The same is explained in the following code snippet −
Example: Inferred Typing
var num = 2;    // data type inferred as  number
console.log("value of num "+num);
num = "12";
console.log(num);
In the above code snippet −
The code declares a variable and sets its value to 2. Note that the variable declaration doesnt specify the data type. Hence, the program uses inferred typing to determine the data type of the variable, i.e., it assigns the type of the first value that the variable is set to. In this case, num is set to the type number.
When the code tries to set the variables value to string. The compiler throws an error as the variables type is already set to number.
It will produce the following output −
error TS2011: Cannot convert 'string' to 'number'.
TypeScript Variable Scope
The scope of a variable specifies where the variable is defined. The availability of a variable within a program is determined by its scope. TypeScript variables can be of the following scopes −
Global Scope − Global variables are declared outside the programming constructs. These variables can be accessed from anywhere within your code.
Class Scope − These variables are also called fields. Fields or class variables are declared within the class but outside the methods. These variables can be accessed using the object of the class. Fields can also be static. Static fields can be accessed using the class name.
Local Scope − Local variables, as the name suggests, are declared within the constructs like methods, loops etc. Local variables are accessible only within the construct where they are declared.
The following example illustrates variable scopes in TypeScript.
Example: Variable Scope
var global_num = 12          //global variable
class Numbers {
   num_val = 13;             //class variable
   static sval = 10;         //static field

   storeNum():void {
      var local_num = 14;    //local variable
   }
}
console.log("Global num: "+global_num)
console.log(Numbers.sval)   //static variable
var obj = new Numbers();
console.log("Global num: "+obj.num_val)
On transpiling, the following JavaScript code is generated −
var global_num = 12;              //global variable
var Numbers = (function () {
   function Numbers() {
      this.num_val = 13;          //class variable
   }
   Numbers.prototype.storeNum = function () {
      var local_num = 14;        //local variable
   };
   Numbers.sval = 10;            //static field
   return Numbers;
}());

console.log("Global num: " + global_num);
console.log(Numbers.sval);       //static variable

var obj = new Numbers();
console.log("Global num: " + obj.num_val);
It will produce the following output −
Global num: 12
10
Global num: 13
If you try accessing the local variable outside the method, it results in a compilation error.
error TS2095: Could not find symbol 'local_num'.
TypeScript - Operators
What is an Operator?
An operator defines some function that will be performed on the data. The data on which operators work are called operands. Consider the following expression −
7 + 5 = 12
Here, the values 7, 5, and 12 are operands, while + and = are operators.
The major operators in TypeScript can be classified as −
- Arithmetic operators
- Logical operators
- Relational operators
- Bitwise operators
- Assignment operators
- Ternary/conditional operator
- String operator
- Type Operator
Arithmetic Operators
Assume the values in variables a and b are 10 and 5 respectively.
| Operator | Description | Example |
|---|---|---|
| + (Addition) | returns the sum of the operands | a + b is 15 |
| - (Subtraction) | returns the difference of the values | a - b is 5 |
| * (Multiplication) | returns the product of the values | a * b is 50 |
| / (Division) | performs division operation and returns the quotient | a / b is 2 |
| % (Modulus) | performs division operation and returns the remainder | a % b is 0 |
| ++ (Increment) | Increments the value of the variable by one | a++ is 11 |
| -- (Decrement) | Decrements the value of the variable by one | a-- is 9 |
Relational Operators
Relational Operators test or define the kind of relationship between two entities. Relational operators return a Boolean value, i.e., true/ false.
Assume the value of A is 10 and B is 20.
| Operator | Description | Example |
|---|---|---|
| > | Greater than | (A > B) is False |
| < | Lesser than | (A < B) is True |
| >= | Greater than or equal to | (A >= B) is False |
| <= | Lesser than or equal to | (A <= B) is True |
| == | Equality | (A == B) is false |
| != | Not equal | (A != B) is True |
Logical Operators
Logical Operators are used to combine two or more conditions. Logical operators too return a Boolean value. Assume the value of variable A is 10 and B is 20.
| Operator | Description | Example |
|---|---|---|
| && (And) | The operator returns true only if all the expressions specified return true | (A > 10 && B > 10) is False |
| || (OR) | The operator returns true if at least one of the expressions specified return true | (A > 10 || B >10) is True |
| ! (NOT) | The operator returns the inverse of the expressions result. For E.g.: !(>5) returns false | !(A >10 ) is True |
Bitwise Operators
Assume variable A = 2 and B = 3
| Operator | Description | Example |
|---|---|---|
| & (Bitwise AND) | It performs a Boolean AND operation on each bit of its integer arguments. | (A & B) is 2 |
| | (BitWise OR) | It performs a Boolean OR operation on each bit of its integer arguments. | (A | B) is 3 |
| ^ (Bitwise XOR) | It performs a Boolean exclusive OR operation on each bit of its integer arguments. Exclusive OR means that either operand one is true or operand two is true, but not both. | (A ^ B) is 1 |
| ~ (Bitwise Not) | It is a unary operator and operates by reversing all the bits in the operand. | (~B) is -4 |
| << (Left Shift) | It moves all the bits in its first operand to the left by the number of places specified in the second operand. New bits are filled with zeros. Shifting a value left by one position is equivalent to multiplying it by 2, shifting two positions is equivalent to multiplying by 4, and so on. | (A << 1) is 4 |
| >> (Right Shift) | Binary Right Shift Operator. The left operands value is moved right by the number of bits specified by the right operand. | (A >> 1) is 1 |
| >>> (Right shift with Zero) | This operator is just like the >> operator, except that the bits shifted in on the left are always zero. | (A >>> 1) is 1 |
Assignment Operators
| Operator | Description | Example |
|---|---|---|
| = (Simple Assignment) | Assigns values from the right side operand to the left side operand | C = A + B will assign the value of A + B into C |
| += (Add and Assignment) | It adds the right operand to the left operand and assigns the result to the left operand. | C += A is equivalent to C = C + A |
| -= (Subtract and Assignment) | It subtracts the right operand from the left operand and assigns the result to the left operand. | C -= A is equivalent to C = C - A |
| *= (Multiply and Assignment) | It multiplies the right operand with the left operand and assigns the result to the left operand. | C *= A is equivalent to C = C * A |
| /= (Divide and Assignment) | It divides the left operand with the right operand and assigns the result to the left operand. |
Note − Same logic applies to Bitwise operators, so they will become <<=, >>=, >>=, &=, |= and ^=.
Miscellaneous Operators
The negation operator (-)
Changes the sign of a value. Lets take an example.
var x:number = 4
var y = -x;
console.log("value of x: ",x);   //outputs 4
console.log("value of y: ",y);   //outputs -4
On compiling, it will generate following JavaScript code.
//Generated by typescript 1.8.10
var x = 4;
var y = -x;
console.log("value of x: ", x);   //outputs 4
console.log("value of y: ", y);   //outputs -4
It will produce the following output −
value of x:  4
value of y:  -4
String Operators: Concatenation operator (+)
The + operator when applied to strings appends the second string to the first. The following example helps us to understand this concept.
var msg:string = "hello"+"world"
console.log(msg)
On compiling, it will generate following JavaScript code.
//Generated by typescript 1.8.10
var msg = "hello" + "world";
console.log(msg);
It will produce the following output −
helloworld
The concatenation operation doesnt add a space between strings. Multiple strings can be concatenated in a single statement.
Conditional Operator (?)
This operator is used to represent a conditional expression. The conditional operator is also sometimes referred to as the ternary operator. The syntax is as given below −
Test ? expr1 : expr2
Test − refers to the conditional expression
expr1 − value returned if the condition is true
expr2 − value returned if the condition is false
Lets take a look at the following code −
var num:number = -2
var result = num > 0 ?"positive":"non-positive"
console.log(result)
Line 2 checks whether the value in the variable num is greater than zero. If num is set to a value greater than zero, it returns the string positive else the string non-positive is returned.
On compiling, it will generate following JavaScript code.
//Generated by typescript 1.8.10
var num = -2;
var result = num > 0 ? "positive" : "non-positive";
console.log(result);
The above code snippet will produce the following output −
non-positive
Type Operators
typeof operator
It is a unary operator. This operator returns the data type of the operand. Take a look at the following example −
var num = 12
console.log(typeof num);   //output: number
On compiling, it will generate following JavaScript code.
//Generated by typescript 1.8.10
var num = 12;
console.log(typeof num);   //output: number
It will produce the following output −
number
instanceof
This operator can be used to test if an object is of a specified type or not. The use of instanceof operator is discussed in the chapter classes.
TypeScript - Decision Making
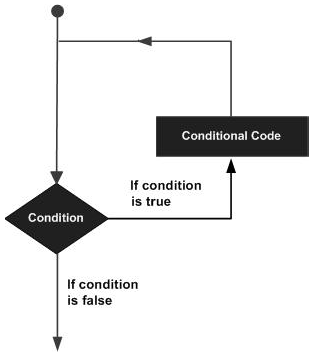
Decision-making structures require that the programmer specifies one or more conditions to be evaluated or tested by the program, along with a statement or statements to be executed if the condition is determined to be true, and optionally, other statements to be executed if the condition is determined to be false.
Shown below is the general form of a typical decision-making structure found in most of the programming languages −
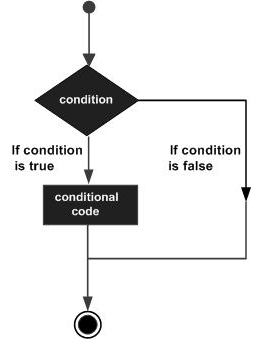
A decision-making construct evaluates a condition before the instructions are executed. Decision-making constructs in TypeScript are classified as follows −
| S.No. | Statement & Description |
|---|---|
| 1. | if statement
An if statement consists of a Boolean expression followed by one or more statements. |
| 2. | if...else statement
An if statement can be followed by an optional else statement, which executes when the Boolean expression is false. |
| 3. | elseif and nested if statements
You can use one if or else if statement inside another if or else if statement(s). |
| 4. | switch statement
A switch statement allows a variable to be tested against a list of values. |
TypeScript - Loops
You may encounter situations, when a block of code needs to be executed several number of times. In general, statements are executed sequentially: The first statement in a function is executed first, followed by the second, and so on.
Programming languages provide various control structures that allow for more complicated execution paths.
A loop statement allows us to execute a statement or group of statements multiple times. Given below is the general form of a loop statement in most of the programming languages.
TypeScript provides different types of loops to handle looping requirements. The following figure illustrates the classification of loops −
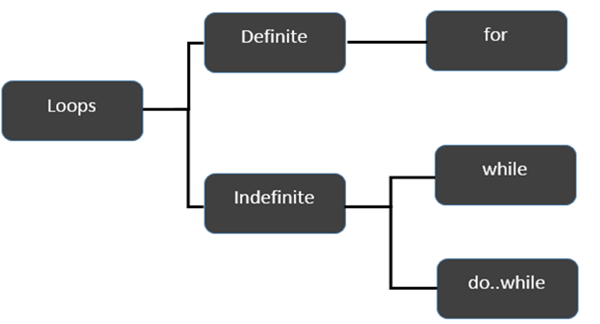
Definite Loop
A loop whose number of iterations are definite/fixed is termed as a definite loop. The for loop is an implementation of a definite loop.
| S.No. | Loops & Description |
|---|---|
| 1. | for loop
The for loop is an implementation of a definite loop. |
Indefinite Loop
An indefinite loop is used when the number of iterations in a loop is indeterminate or unknown.
Indefinite loops can be implemented using −
| S.No | Loops & Description |
|---|---|
| 1. | while loop
The while loop executes the instructions each time the condition specified evaluates to true. |
| 2. | do while
The dowhile loop is similar to the while loop except that the do...while loop doesnt evaluate the condition for the first time the loop executes. |
Example: while versus do..while
var n:number = 5
while(n > 5) {
   console.log("Entered while")
}
do {
   console.log("Entered dowhile")
}
while(n>5)
The example initially declares a while loop. The loop is entered only if the expression passed to while evaluates to true. In this example, the value of n is not greater than zero, hence the expression returns false and the loop is skipped.
On the other hand, the dowhile loop executes statement once. This is because the initial iteration does not consider the Boolean expression. However, for the subsequent iteration, the while checks the condition and takes the control out of the loop.
On compiling, it will generate following JavaScript code −
//Generated by typescript 1.8.10
var n = 5;
while (n > 5) {
   console.log("Entered while");
}

do {
   console.log("Entered dowhile");
} while (n > 5);
The above code will produce the following output −
Entered dowhile
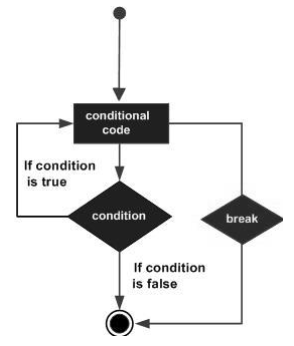
The break Statement
The break statement is used to take the control out of a construct. Using break in a loop causes the program to exit the loop. Its syntax is as follows −
Syntax
break
Flow diagram
Example
Now, take a look at the following example code −
var i:number = 1
while(i<=10) {
   if (i % 5 == 0) {
      console.log ("The first multiple of 5  between 1 and 10 is : "+i)
      break     //exit the loop if the first multiple is found
   }
   i++
}  //outputs 5 and exits the loop
On compiling, it will generate the following JavaScript code −
//Generated by typescript 1.8.10
var i = 1;

while (i <= 10) {
   if (i % 5 == 0) {
      console.log("The first multiple of 5  between 1 and 10 is : " + i);
      break; //exit the loop if the first multiple is found
   }
   i++;
} //outputs 5 and exits the loop
It will produce the following output −
The first multiple of 5 between 1 and 10 is : 5
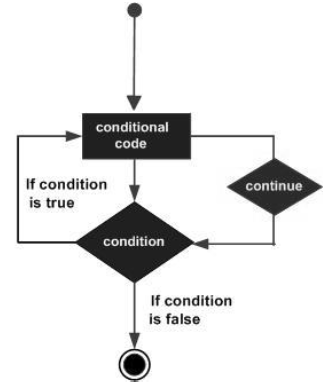
The continue Statement
The continue statement skips the subsequent statements in the current iteration and takes the control back to the beginning of the loop. Unlike the break statement, the continue doesnt exit the loop. It terminates the current iteration and starts the subsequent iteration.
Syntax
continue
Flowchart
Example
An example of the continue statement is given below −
var num:number = 0
var count:number = 0;

for(num=0;num<=20;num++) {
   if (num % 2==0) {
      continue
   }
   count++
}
console.log (" The count of odd values between 0 and 20 is: "+count)    //outputs 10
The above example displays the number of even values between 0 and 20. The loop exits the current iteration if the number is even. This is achieved using the continue statement.
On compiling, it will generate following JavaScript code.
//Generated by typescript 1.8.10
var num = 0;
var count = 0;

for (num = 0; num <= 20; num++) {
   if (num % 2 == 0) {
      continue;
   }
   count++;
}
console.log(" The count of odd values between 0 and 20 is: " + count);     //outputs 10
Output
The count of odd values between 0 and 20 is: 10
The Infinite Loop
An infinite loop is a loop that runs endlessly. The for loop and the while loop can be used to make an endless loop.
Syntax: Infinite Loop using for loop
for(;;) {
   //statements
}
Example: Infinite loop using for loop
for(;;) {
   console.log(This is an endless loop)
}
Syntax: Infinite loop using while loop
while(true) {
   //statements
}
Example: Infinite loop using while loop
while(true) {
   console.log(This is an endless loop)
}
TypeScript - Functions
Functions are the building blocks of readable, maintainable, and reusable code. A function is a set of statements to perform a specific task. Functions organize the program into logical blocks of code. Once defined, functions may be called to access code. This makes the code reusable. Moreover, functions make it easy to read and maintain the programs code.
A function declaration tells the compiler about a function's name, return type, and parameters. A function definition provides the actual body of the function.
| Sr.No | Funtions & Description |
|---|---|
| 1. | Defining a Function
A function definition specifies what and how a specific task would be done. |
| 2. | Calling a Function
A function must be called so as to execute it. |
| 3. | Returning Functions
Functions may also return value along with control, back to the caller. |
| 4. | Parameterized Function
Parameters are a mechanism to pass values to functions. |
Optional Parameters
Optional parameters can be used when arguments need not be compulsorily passed for a functions execution. A parameter can be marked optional by appending a question mark to its name. The optional parameter should be set as the last argument in a function. The syntax to declare a function with optional parameter is as given below −
function function_name (param1[:type], param2[:type], param3[:type])
Example: Optional Parameters
function disp_details(id:number,name:string,mail_id?:string) {
   console.log("ID:", id);
   console.log("Name",name);

   if(mail_id!=undefined)
   console.log("Email Id",mail_id);
}
disp_details(123,"John");
disp_details(111,"mary","mary@xyz.com");
The above example declares a parameterized function. Here, the third parameter, i.e., mail_id is an optional parameter.
If an optional parameter is not passed a value during the function call, the parameters value is set to undefined.
The function prints the value of mail_id only if the argument is passed a value.
On compiling, it will generate following JavaScript code −
//Generated by typescript 1.8.10
function disp_details(id, name, mail_id) {
   console.log("ID:", id);
   console.log("Name", name);

   if (mail_id != undefined)
      console.log("Email Id", mail_id);
}
disp_details(123, "John");
disp_details(111, "mary", "mary@xyz.com");
The above code will produce the following output −
ID:123
Name John
ID: 111
Name  mary
Email Id mary@xyz.com
Rest Parameters
Rest parameters are similar to variable arguments in Java. Rest parameters dont restrict the number of values that you can pass to a function. However, the values passed must all be of the same type. In other words, rest parameters act as placeholders for multiple arguments of the same type.
To declare a rest parameter, the parameter name is prefixed with three periods. Any nonrest parameter should come before the rest parameter.
Example: Rest Parameters
function addNumbers(...nums:number[]) {
   var i;
   var sum:number = 0;

   for(i = 0;i<nums.length;i++) {
      sum = sum + nums[i];
   }
   console.log("sum of the numbers",sum)
}
addNumbers(1,2,3)
addNumbers(10,10,10,10,10)
The function addNumbers() declaration, accepts a rest parameter nums. The rest parameters data type must be set to an array. Moreover, a function can have at the most one rest parameter.
The function is invoked twice, by passing three and six values, respectively.
The for loop iterates through the argument list, passed to the function and calculates their sum.
On compiling, it will generate following JavaScript code −
function addNumbers() {
   var nums = [];
   for (var _i = 0; _i < arguments.length; _i++) {
      nums[_i - 0] = arguments[_i];
   }
	var i;
   var sum = 0;

   for (i = 0; i < nums.length; i++) {
      sum = sum + nums[i];
   }
   console.log("sum of the numbers", sum);
}
addNumbers(1, 2, 3);
addNumbers(10, 10, 10, 10, 10);
The output of the above code is as follows −
sum of numbers 6
sum of numbers 50
Default Parameters
Function parameters can also be assigned values by default. However, such parameters can also be explicitly passed values.
Syntax
function function_name(param1[:type],param2[:type] = default_value) {
}
Note − A parameter cannot be declared optional and default at the same time.
Example: Default parameters
function calculate_discount(price:number,rate:number = 0.50) {
   var discount = price * rate;
   console.log("Discount Amount: ",discount);
}
calculate_discount(1000)
calculate_discount(1000,0.30)
On compiling, it will generate following JavaScript code −
//Generated by typescript 1.8.10
function calculate_discount(price, rate) {
   if (rate === void 0) { rate = 0.50; }
   var discount = price * rate;
   console.log("Discount Amount: ", discount);
}
calculate_discount(1000);
calculate_discount(1000, 0.30);
Its output is as follows −
Discount amount : 500
Discount amount : 300
The example declares the function, calculate_discount. The function has two parameters - price and rate.
The value of the parameter rate is set to 0.50 by default.
The program invokes the function, passing to it only the value of the parameter price. Here, the value of rate is 0.50 (default)
The same function is invoked, but with two arguments. The default value of rate is overwritten and is set to the value explicitly passed.
Anonymous Function
Functions that are not bound to an identifier (function name) are called as anonymous functions. These functions are dynamically declared at runtime. Anonymous functions can accept inputs and return outputs, just as standard functions do. An anonymous function is usually not accessible after its initial creation.
Variables can be assigned an anonymous function. Such an expression is called a function expression.
Syntax
var res = function( [arguments] ) { ... }
Example A Simple Anonymous function
var msg = function() {
   return "hello world";
}
console.log(msg())
On compiling, it will generate the same code in JavaScript.
It will produce the following output −
hello world
Example Anonymous function with parameters
var res = function(a:number,b:number) {
   return a*b;
};
console.log(res(12,2))
The anonymous function returns the product of the values passed to it.
On compiling, it will generate following JavaScript code −
//Generated by typescript 1.8.10
var res = function (a, b) {
   return a * b;
};
console.log(res(12, 2));
The output of the above code is as follows −
24
Function Expression and Function Declaration Are they synonymous?
Function expression and function declaration are not synonymous. Unlike a function expression, a function declaration is bound by the function name.
The fundamental difference between the two is that, function declarations are parsed before their execution. On the other hand, function expressions are parsed only when the script engine encounters it during execution.
When the JavaScript parser sees a function in the main code flow, it assumes Function Declaration. When a function comes as a part of a statement, it is a Function Expression.
The Function Constructor
TypeScript also supports defining a function with the built-in JavaScript constructor called Function ().
Syntax
var res = new Function( [arguments] ) { ... }.
Example
var myFunction = new Function("a", "b", "return a * b");
var x = myFunction(4, 3);
console.log(x);
The new Function() is a call to the constructor which in turn creates and returns a function reference.
On compiling, it will generate the same code in JavaScript.
The output of the above example code is as follows −
12
Recursion and TypeScript Functions
Recursion is a technique for iterating over an operation by having a function call to itself repeatedly until it arrives at a result. Recursion is best applied when you need to call the same function repeatedly with different parameters from within a loop.
Example Recursion
function factorial(number) {
   if (number <= 0) {         // termination case
      return 1;
   } else {
      return (number * factorial(number - 1));     // function invokes itself
   }
};
console.log(factorial(6));      // outputs 720
On compiling, it will generate the same code in JavaScript.
Here is its output −
720
Example: Anonymous Recursive Function
(function () {
   var x = "Hello!!";
   console.log(x)
})()      // the function invokes itself using a pair of parentheses ()
On compiling, it will generate the same code in JavaScript.
Its output is as follows −
Hello!!
Lambda Functions
Lambda refers to anonymous functions in programming. Lambda functions are a concise mechanism to represent anonymous functions. These functions are also called as Arrow functions.
Lambda Function - Anatomy
There are 3 parts to a Lambda function −
Parameters − A function may optionally have parameters
The fat arrow notation/lambda notation (=>) − It is also called as the goes to operator
Statements − represent the functions instruction set
Tip − By convention, the use of single letter parameter is encouraged for a compact and precise function declaration.
Lambda Expression
It is an anonymous function expression that points to a single line of code. Its syntax is as follows −
( [param1, parma2,param n] )=>statement;
Example: Lambda Expression
var foo = (x:number)=>10 + x
console.log(foo(100))      //outputs 110
The program declares a lambda expression function. The function returns the sum of 10 and the argument passed.
On compiling, it will generate following JavaScript code.
//Generated by typescript 1.8.10
var foo = function (x) { return 10 + x; };
console.log(foo(100));      //outputs 110
Here is the output of the above code −
110
Lambda Statement
Lambda statement is an anonymous function declaration that points to a block of code. This syntax is used when the function body spans multiple lines. Its syntax is as follows −
( [param1, parma2,param n] )=> {

   //code block
}
Example: Lambda statement
var foo = (x:number)=> {
   x = 10 + x
   console.log(x)
}
foo(100)
The functions reference is returned and stored in the variable foo.
On compiling, it will generate following JavaScript code −
//Generated by typescript 1.8.10
var foo = function (x) {
   x = 10 + x;
   console.log(x);
};
foo(100);
The output of the above program is as follows −
110
Syntactic Variations
Parameter type Inference
It is not mandatory to specify the data type of a parameter. In such a case the data type of the parameter is any. Let us take a look at the following code snippet −
var func = (x)=> {
   if(typeof x=="number") {
      console.log(x+" is numeric")
   } else if(typeof x=="string") {
      console.log(x+" is a string")
   }
}
func(12)
func("Tom")
On compiling, it will generate the following JavaScript code −
//Generated by typescript 1.8.10
var func = function (x) {
   if (typeof x == "number") {
      console.log(x + " is numeric");
   } else if (typeof x == "string") {
      console.log(x + " is a string");
   }
};
func(12);
func("Tom");
Its output is as follows −
12 is numeric
Tom is a string
Optional parentheses for a single parameter
var display = x=> {
   console.log("The function got "+x)
}
display(12)
On compiling, it will generate following JavaScript code −
//Generated by typescript 1.8.10
var display = function (x) {
   console.log("The function got " + x);
};
display(12);
Its output is as follows −
The function got 12
Optional braces for a single statement, Empty parentheses for no parameter
The following example shows these two Syntactic variations.
var disp =()=> {
   console.log("Function invoked");
}
disp();
On compiling, it will generate following JavaScript code −
//Generated by typescript 1.8.10
var disp = function () {
   console.log("Function invoked");
};
disp();
Its output is as follows −
Function invoked
Function Overloads
Functions have the capability to operate differently on the basis of the input provided to them. In other words, a program can have multiple methods with the same name with different implementation. This mechanism is termed as Function Overloading. TypeScript provides support for function overloading.
To overload a function in TypeScript, you need to follow the steps given below −
Step 1 − Declare multiple functions with the same name but different function signature. Function signature includes the following.
The data type of the parameter
function disp(string):void;
function disp(number):void;
The number of parameters
function disp(n1:number):void;
function disp(x:number,y:number):void;
The sequence of parameters
function disp(n1:number,s1:string):void;
function disp(s:string,n:number):void;
Note − The function signature doesnt include the functions return type.
Step 2 − The declaration must be followed by the function definition. The parameter types should be set to any if the parameter types differ during overload. Additionally, for case b explained above, you may consider marking one or more parameters as optional during the function definition.
Step 3 − Finally, you must invoke the function to make it functional.
Example
Let us now take a look at the following example code −
function disp(s1:string):void;
function disp(n1:number,s1:string):void;

function disp(x:any,y?:any):void {
   console.log(x);
   console.log(y);
}
disp("abc")
disp(1,"xyz");
The first two lines depict the function overload declaration. The function has two overloads −
Function that accepts a single string parameter.
Function that accepts two values of type number and string respectively.
The third line defines the function. The data type of the parameters are set to any. Moreover, the second parameter is optional here.
The overloaded function is invoked by the last two statements.
On compiling, it will generate following JavaScript code −
//Generated by typescript 1.8.10
function disp(x, y) {
   console.log(x);
   console.log(y);
}
disp("abc");
disp(1, "xyz");
The above code will produce the following output −
abc
1
xyz
TypeScript - Numbers
TypeScript like JavaScript supports numeric values as Number objects. A number object converts numeric literal to an instance of the number class. The Number class acts as a wrapper and enables manipulation of numeric literals as they were objects.
Syntax
var var_name = new Number(value)
In case a non-numeric argument is passed as an argument to the Numbers constructor, it returns NaN (NotaNumber)
The following table lists a set of properties of the Number object −
| S.No. | Property & Description |
|---|---|
| 1. | MAX_VALUE The largest possible value a number in JavaScript can have 1.7976931348623157E+308. |
| 2. | MIN_VALUE The smallest possible value a number in JavaScript can have 5E-324. |
| 3. | NaN Equal to a value that is not a number. |
| 4. | NEGATIVE_INFINITY A value that is less than MIN_VALUE. |
| 5. | POSITIVE_INFINITY A value that is greater than MAX_VALUE. |
| 6. | prototype A static property of the Number object. Use the prototype property to assign new properties and methods to the Number object in the current document. |
| 7. | constructor Returns the function that created this object's instance. By default, this is the Number object. |
Example
console.log("TypeScript Number Properties: ");
console.log("Maximum value that a number variable can hold: " + Number.MAX_VALUE);
console.log("The least value that a number variable can hold: " + Number.MIN_VALUE);
console.log("Value of Negative Infinity: " + Number.NEGATIVE_INFINITY);
console.log("Value of Negative Infinity:" + Number.POSITIVE_INFINITY);
On compiling, it will generate the same code in JavaScript.
Its output is as follows −
TypeScript Number Properties:
Maximum value that a number variable can hold: 1.7976931348623157e+308
The least value that a number variable can hold: 5e-324
Value of Negative Infinity: -Infinity
Value of Negative Infinity:Infinity
Example: NaN
var month = 0
if( month<=0 || month >12) {
   month = Number.NaN
   console.log("Month is "+ month)
} else {
   console.log("Value Accepted..")
}
On compiling, it will generate the same code in JavaScript.
Its output is as follows −
Month is NaN
Example: prototye
function employee(id:number,name:string) {
   this.id = id
   this.name = name
}

var emp = new employee(123,"Smith")
employee.prototype.email = "smith@abc.com"

console.log("Employee 's Id: "+emp.id)
console.log("Employee's name: "+emp.name)
console.log("Employee's Email ID: "+emp.email)
On compiling, it will generate the following JavaScript code −
//Generated by typescript 1.8.10
function employee(id, name) {
   this.id = id;
   this.name = name;
}

var emp = new employee(123, "Smith");
employee.prototype.email = "smith@abc.com";

console.log("Employee 's Id: " + emp.id);
console.log("Employee's name: " + emp.name);
console.log("Employee's Email ID: " + emp.email);
Its output is as follows −
Employees Id: 123
Emaployees name: Smith
Employees Email ID: smith@abc.com
Number Methods
The Number object contains only the default methods that are a part of every object's definition. Some of the commonly used methods are listed below −
| S.No. | Methods & Description |
|---|---|
| 1. | toExponential()
Forces a number to display in exponential notation, even if the number is in the range in which JavaScript normally uses standard notation. |
| 2. | toFixed()
Formats a number with a specific number of digits to the right of the decimal. |
| 3. | toLocaleString()
Returns a string value version of the current number in a format that may vary according to a browser's local settings. |
| 4. | toPrecision()
Defines how many total digits (including digits to the left and right of the decimal) to display of a number. A negative precision will throw an error. |
| 5. | toString()
Returns the string representation of the number's value. The function is passed the radix, an integer between 2 and 36 specifying the base to use for representing numeric values. |
| 6. | valueOf()
Returns the number's primitive value. |
TypeScript - Strings
The String object lets you work with a series of characters. It wraps the string primitive data type with a number of helper methods.
Syntax
var var_name = new String(string);
A list of the methods available in String object along with their description is given below −
| S.No. | Property & Description |
|---|---|
| 1. | Constructor
Returns a reference to the String function that created the object. |
| 2. | Length
Returns the length of the string. |
| 3. | Prototype
The prototype property allows you to add properties and methods to an object. |
String Methods
A list of the methods available in String object along with their description is given below −
| S.No. | Method & Description |
|---|---|
| 1. | charAt()
Returns the character at the specified index. |
| 2. | charCodeAt()
Returns a number indicating the Unicode value of the character at the given index. |
| 3. | concat()
Combines the text of two strings and returns a new string. |
| 4. | indexOf()
Returns the index within the calling String object of the first occurrence of the specified value, or -1 if not found. |
| 5. | lastIndexOf()
Returns the index within the calling String object of the last occurrence of the specified value, or -1 if not found. |
| 6. | localeCompare()
Returns a number indicating whether a reference string comes before or after or is the same as the given string in sort order. |
| 7. | match() Used to match a regular expression against a string. |
| 8. | replace()
Used to find a match between a regular expression and a string, and to replace the matched substring with a new substring. |
| 9. | search()
Executes the search for a match between a regular expression and a specified string. |
| 10. | slice()
Extracts a section of a string and returns a new string. |
| 11. | split()
Splits a String object into an array of strings by separating the string into substrings. |
| 12. | substr()
Returns the characters in a string beginning at the specified location through the specified number of characters. |
| 13. | substring()
Returns the characters in a string between two indexes into the string. |
| 14. | toLocaleLowerCase()
The characters within a string are converted to lower case while respecting the current locale. |
| 15. | toLocaleUpperCase()
The characters within a string are converted to upper case while respecting the current locale. |
| 16. | toLowerCase()
Returns the calling string value converted to lower case. |
| 17. | toString()
Returns a string representing the specified object. |
| 18. | toUpperCase()
Returns the calling string value converted to uppercase. |
| 19. | valueOf()
Returns the primitive value of the specified object. |
TypeScript - Arrays
The use of variables to store values poses the following limitations −
Variables are scalar in nature. In other words, a variable declaration can only contain a single at a time. This means that to store n values in a program n variable declarations will be needed. Hence, the use of variables is not feasible when one needs to store a larger collection of values.
Variables in a program are allocated memory in random order, thereby making it difficult to retrieve/read the values in the order of their declaration.
TypeScript introduces the concept of arrays to tackle the same. An array is a homogenous collection of values. To simplify, an array is a collection of values of the same data type. It is a user defined type.
Features of an Array
Here is a list of the features of an array −
An array declaration allocates sequential memory blocks.
Arrays are static. This means that an array once initialized cannot be resized.
Each memory block represents an array element.
Array elements are identified by a unique integer called as the subscript / index of the element.
Like variables, arrays too, should be declared before they are used. Use the var keyword to declare an array.
Array initialization refers to populating the array elements.
Array element values can be updated or modified but cannot be deleted.
Declaring and Initializing Arrays
To declare an initialize an array in Typescript use the following syntax −
Syntax
var array_name[:datatype];        //declaration
array_name = [val1,val2,valn..]   //initialization
An array declaration without the data type is deemed to be of the type any. The type of such an array is inferred from the data type of the arrays first element during initialization.
For example, a declaration like − var numlist:number[] = [2,4,6,8] will create an array as given below −
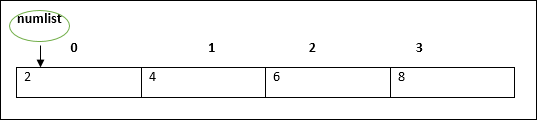
The array pointer refers to the first element by default.
Arrays may be declared and initialized in a single statement. The syntax for the same is −
var array_name[:data type] = [val1,val2valn]
Note − The pair of [] is called the dimension of the array.
Accessing Array Elements
The array name followed by the subscript is used refer to an array element. Its syntax is as follows −
array_name[subscript] = value
Example: Simple Array
var alphas:string[];
alphas = ["1","2","3","4"]
console.log(alphas[0]);
console.log(alphas[1]);
On compiling, it will generate following JavaScript code −
//Generated by typescript 1.8.10
var alphas;
alphas = ["1", "2", "3", "4"];
console.log(alphas[0]);
console.log(alphas[1]);
The output of the above code is as follows −
1
2
Example: Single statement declaration and initialization
var nums:number[] = [1,2,3,3]
console.log(nums[0]);
console.log(nums[1]);
console.log(nums[2]);
console.log(nums[3]);
On compiling, it will generate following JavaScript code −
//Generated by typescript 1.8.10
var nums = [1, 2, 3, 3];
console.log(nums[0]);
console.log(nums[1]);
console.log(nums[2]);
console.log(nums[3]);
Its output is as follows −
1
2
3
3
Array Object
An array can also be created using the Array object. The Array constructor can be passed.
A numeric value that represents the size of the array or
A list of comma separated values.
The following example shows how to create an array using this method.
Example
var arr_names:number[] = new Array(4)

for(var i = 0;i<arr_names.length;i++;) {
   arr_names[i] = i * 2
   console.log(arr_names[i])
}
On compiling, it will generate following JavaScript code.
//Generated by typescript 1.8.10
var arr_names = new Array(4);

for (var i = 0; i < arr_names.length; i++) {
   arr_names[i] = i * 2;
   console.log(arr_names[i]);
}
Its output is as follows −
0
2
4
6
Example: Array Constructor accepts comma separated values
var names:string[] = new Array("Mary","Tom","Jack","Jill")

for(var i = 0;i<names.length;i++) {
   console.log(names[i])
}
On compiling, it will generate following JavaScript code −
//Generated by typescript 1.8.10
var names = new Array("Mary", "Tom", "Jack", "Jill");
for (var i = 0; i < names.length; i++) {
   console.log(names[i]);
}
Its output is as follows −
Mary
Tom
Jack
Jill
Array Methods
A list of the methods of the Array object along with their description is given below.
| S.No. | Method & Description |
|---|---|
| 1. | concat()
Returns a new array comprised of this array joined with other array(s) and/or value(s). |
| 2. | every()
Returns true if every element in this array satisfies the provided testing function. |
| 3. | filter()
Creates a new array with all of the elements of this array for which the provided filtering function returns true. |
| 4. | forEach()
Calls a function for each element in the array. |
| 5. | indexOf()
Returns the first (least) index of an element within the array equal to the specified value, or -1 if none is found. |
| 6. | join()
Joins all elements of an array into a string. |
| 7. | lastIndexOf()
Returns the last (greatest) index of an element within the array equal to the specified value, or -1 if none is found. |
| 8. | map()
Creates a new array with the results of calling a provided function on every element in this array. |
| 9. | pop()
Removes the last element from an array and returns that element. |
| 10. | push()
Adds one or more elements to the end of an array and returns the new length of the array. |
| 11. | reduce()
Apply a function simultaneously against two values of the array (from left-to-right) as to reduce it to a single value. |
| 12. | reduceRight()
Apply a function simultaneously against two values of the array (from right-to-left) as to reduce it to a single value. |
| 13. | reverse()
Reverses the order of the elements of an array -- the first becomes the last, and the last becomes the first. |
| 14. | shift()
Removes the first element from an array and returns that element. |
| 15. | slice()
Extracts a section of an array and returns a new array. |
| 16. | some()
Returns true if at least one element in this array satisfies the provided testing function. |
| 17. | sort()
Sorts the elements of an array. |
| 18. | splice()
Adds and/or removes elements from an array. |
| 19. | toString()
Returns a string representing the array and its elements. |
| 20. | unshift()
Adds one or more elements to the front of an array and returns the new length of the array. |
Array Destructuring
Refers to breaking up the structure of an entity. TypeScript supports destructuring when used in the context of an array.
Example
var arr:number[] = [12,13]
var[x,y] = arr
console.log(x)
console.log(y)
On compiling, it will generate following JavaScript code.
//Generated by typescript 1.8.10
var arr = [12, 13];
var x = arr[0], y = arr[1];
console.log(x);
console.log(y);
Its output is as follows −
12
13
Array Traversal using forin loop
One can use the forin loop to traverse through an array.
var j:any;
var nums:number[] = [1001,1002,1003,1004]

for(j in nums) {
   console.log(nums[j])
}
The loop performs an index based array traversal.
On compiling, it will generate following JavaScript code.
//Generated by typescript 1.8.10
var j;
var nums = [1001, 1002, 1003, 1004];

for (j in nums) {
   console.log(nums[j]);
}
The output of the above code is given below −
1001
1002
1003
1004
Arrays in TypeScript
TypeScript supports the following concepts in arrays −
| S.No. | Concept & Description |
|---|---|
| 1. | Multi-dimensional arrays
TypeScript supports multidimensional arrays. The simplest form of the multidimensional array is the twodimensional array. |
| 2. | Passing arrays to functions
You can pass to the function a pointer to an array by specifying the array's name without an index. |
| 3. | Return array from functions
Allows a function to return an array |
TypeScript - Tuples
At times, there might be a need to store a collection of values of varied types. Arrays will not serve this purpose. TypeScript gives us a data type called tuple that helps to achieve such a purpose.
It represents a heterogeneous collection of values. In other words, tuples enable storing multiple fields of different types. Tuples can also be passed as parameters to functions.
Syntax
var tuple_name = [value1,value2,value3,value n]
For Example
var mytuple = [10,"Hello"];
You can also declare an empty tuple in Typescript and choose to initialize it later.
var mytuple = [];
mytuple[0] = 120
mytuple[1] = 234
Accessing values in Tuples
Tuple values are individually called items. Tuples are index based. This means that items in a tuple can be accessed using their corresponding numeric index. Tuple items index starts from zero and extends up to n-1(where n is the tuples size).
Syntax
tuple_name[index]
Example: Simple Tuple
var mytuple = [10,"Hello"]; //create a  tuple
console.log(mytuple[0])
console.log(mytuple[1])
In the above example, a tuple, mytuple, is declared. The tuple contains values of numeric and string types respectively.
On compiling, it will generate the same code in JavaScript.
Its output is as follows −
10
Hello
Example: Empty Tuple
var tup = []
tup[0] = 12
tup[1] = 23

console.log(tup[0])
console.log(tup[1])
On compiling, it will generate the same code in JavaScript.
Its output is as follows −
12
23
Tuple Operations
Tuples in TypeScript supports various operations like pushing a new item, removing an item from the tuple, etc.
Example
var mytuple = [10,"Hello","World","typeScript"];
console.log("Items before push "+mytuple.length)    // returns the tuple size

mytuple.push(12)                                    // append value to the tuple
console.log("Items after push "+mytuple.length)
console.log("Items before pop "+mytuple.length)
console.log(mytuple.pop()+" popped from the tuple") // removes and returns the last item

console.log("Items after pop "+mytuple.length)
The push() appends an item to the tuple
The pop() removes and returns the last value in the tuple
On compiling, it will generate the same code in JavaScript.
The output of the above code is as follows −
Items before push 4
Items after push 5
Items before pop 5
12 popped from the tuple
Items after pop 4
Updating Tuples
Tuples are mutable which means you can update or change the values of tuple elements.
Example
var mytuple = [10,"Hello","World","typeScript"]; //create a  tuple
console.log("Tuple value at index 0 "+mytuple[0])

//update a tuple element
mytuple[0] = 121
console.log("Tuple value at index 0 changed to   "+mytuple[0])
On compiling, it will generate the same code in JavaScript.
The output of the above code is as follows −
Tuple value at index 0 10
Tuple value at index 0 changed to 121
Destructuring a Tuple
Destructuring refers to breaking up the structure of an entity. TypeScript supports destructuring when used in the context of a tuple.
Example
var a =[10,"hello"]
var [b,c] = a
console.log( b )
console.log( c )
On compiling, it will generate following JavaScript code.
//Generated by typescript 1.8.10
var a = [10, "hello"];
var b = a[0], c = a[1];
console.log(b);
console.log(c);
Its output is as follows −
10
hello
TypeScript - Union
TypeScript 1.4 gives programs the ability to combine one or two types. Union types are a powerful way to express a value that can be one of the several types. Two or more data types are combined using the pipe symbol (|) to denote a Union Type. In other words, a union type is written as a sequence of types separated by vertical bars.
Syntax: Union literal
Type1|Type2|Type3
Example: Union Type Variable
var val:string|number
val = 12
console.log("numeric value of val "+val)
val = "This is a string"
console.log("string value of val "+val)
In the above example, the variables type is union. It means that the variable can contain either a number or a string as its value.
On compiling, it will generate following JavaScript code.
//Generated by typescript 1.8.10
var val;
val = 12;
console.log("numeric value of val " + val);
val = "This is a string";
console.log("string value of val " + val);
Its output is as follows −
numeric value of val  12
string value of val this is a string
Example: Union Type and function parameter
function disp(name:string|string[]) {
   if(typeof name == "string") {
      console.log(name)
   } else {
      var i;

      for(i = 0;i<name.length;i++) {
         console.log(name[i])
      }
   }
}
disp("mark")
console.log("Printing names array....")
disp(["Mark","Tom","Mary","John"])
The function disp() can accept argument either of the type string or a string array.
On compiling, it will generate following JavaScript code.
//Generated by typescript 1.8.10
function disp(name) {
   if (typeof name == "string") {
      console.log(name);
   } else {
      var i;
      for (i = 0; i < name.length; i++) {
         console.log(name[i]);
      }
   }
}

disp("mark");
console.log("Printing names array....");
disp(["Mark", "Tom", "Mary", "John"]);
The output is as follows −
Mark
Printing names array.
Mark
Tom
Mary
John
Union Type and Arrays
Union types can also be applied to arrays, properties and interfaces. The following illustrates the use of union type with an array.
Example: Union Type and Array
var arr:number[]|string[];
var i:number;
arr = [1,2,4]
console.log("**numeric array**")

for(i = 0;i<arr.length;i++) {
   console.log(arr[i])
}

arr = ["Mumbai","Pune","Delhi"]
console.log("**string array**")

for(i = 0;i<arr.length;i++) {
   console.log(arr[i])
}
The program declares an array. The array can represent either a numeric collection or a string collection.
On compiling, it will generate following JavaScript code.
//Generated by typescript 1.8.10
var arr;
var i;
arr = [1, 2, 4];
console.log("**numeric array**");

for (i = 0; i < arr.length; i++) {
   console.log(arr[i]);
}
arr = ["Mumbai", "Pune", "Delhi"];
console.log("**string array**");

for (i = 0; i < arr.length; i++) {
   console.log(arr[i]);
}
Its output is as follows −
**numeric array**
1
2
4
**string array**
Mumbai
Pune
Delhi
TypeScript - Interfaces
An interface is a syntactical contract that an entity should conform to. In other words, an interface defines the syntax that any entity must adhere to.
Interfaces define properties, methods, and events, which are the members of the interface. Interfaces contain only the declaration of the members. It is the responsibility of the deriving class to define the members. It often helps in providing a standard structure that the deriving classes would follow.
Lets consider an object −
var person = {
   FirstName:"Tom",
   LastName:"Hanks",
   sayHi: ()=>{ return "Hi"}
};
If we consider the signature of the object, it could be −
{
   FirstName:string,
   LastName:string,
   sayHi()=>string
}
To reuse the signature across objects we can define it as an interface.
Declaring Interfaces
The interface keyword is used to declare an interface. Here is the syntax to declare an interface −
Syntax
interface interface_name {
}
Example: Interface and Objects
interface IPerson {
   firstName:string,
   lastName:string,
   sayHi: ()=>string
}

var customer:IPerson = {
   firstName:"Tom",
   lastName:"Hanks",
   sayHi: ():string =>{return "Hi there"}
}

console.log("Customer Object ")
console.log(customer.firstName)
console.log(customer.lastName)
console.log(customer.sayHi())

var employee:IPerson = {
   firstName:"Jim",
   lastName:"Blakes",
   sayHi: ():string =>{return "Hello!!!"}
}

console.log("Employee  Object ")
console.log(employee.firstName);
console.log(employee.lastName);
The example defines an interface. The customer object is of the type IPerson. Hence, it will now be binding on the object to define all properties as specified by the interface.
Another object with following signature, is still considered as IPerson because that object is treated by its size or signature.
On compiling, it will generate following JavaScript code.
//Generated by typescript 1.8.10
var customer = { firstName: "Tom", lastName: "Hanks",
   sayHi: function () { return "Hi there"; }
};
console.log("Customer Object ");
console.log(customer.firstName);
console.log(customer.lastName);
console.log(customer.sayHi());
var employee = { firstName: "Jim", lastName: "Blakes",
   sayHi: function () { return "Hello!!!"; } };

console.log("Employee  Object ");
console.log(employee.firstName);
console.log(employee.lastName);
The output of the above example code is as follows −
Customer object
Tom
Hanks
Hi there
Employee  object
Jim
Blakes
Hello!!!
Interfaces are not to be converted to JavaScript. Its just part of TypeScript. If you see the screen shot of TS Playground tool there is no java script emitted when you declare an interface unlike a class. So interfaces have zero runtime JavaScript impact.
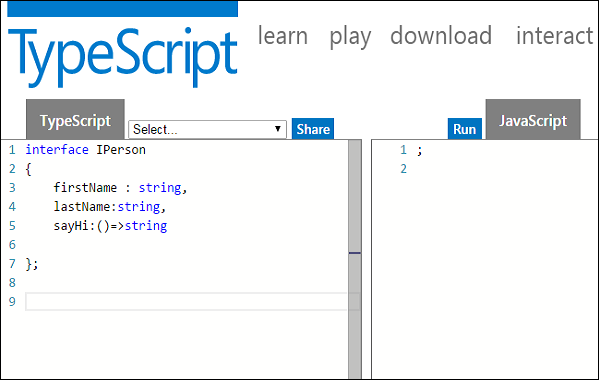
Union Type and Interface
The following example shows the use of Union Type and Interface −
interface RunOptions {
   program:string;
   commandline:string[]|string|(()=>string);
}

//commandline as string
var options:RunOptions = {program:"test1",commandline:"Hello"};
console.log(options.commandline)

//commandline as a string array
options = {program:"test1",commandline:["Hello","World"]};
console.log(options.commandline[0]);
console.log(options.commandline[1]);

//commandline as a function expression
options = {program:"test1",commandline:()=>{return "**Hello World**";}};

var fn:any = options.commandline;
console.log(fn());
On compiling, it will generate following JavaScript code.
//Generated by typescript 1.8.10
//commandline as string
var options = { program: "test1", commandline: "Hello" };
console.log(options.commandline);

//commandline as a string array
options = { program: "test1", commandline: ["Hello", "World"] };
console.log(options.commandline[0]);
console.log(options.commandline[1]);

//commandline as a function expression
options = { program: "test1", commandline: function () { return "**Hello World**"; } };
var fn = options.commandline;
console.log(fn());
Its output is as follows −
Hello
Hello
World
**Hello World**
Interfaces and Arrays
Interface can define both the kind of key an array uses and the type of entry it contains. Index can be of type string or type number.
Example
interface namelist {
   [index:number]:string
}

var list2:namelist = ["John",1,"Bran"] //Error. 1 is not type string
interface ages {
   [index:string]:number
}

var agelist:ages;
agelist["John"] = 15   // Ok
agelist[2] = "nine"   // Error
Interfaces and Inheritance
An interface can be extended by other interfaces. In other words, an interface can inherit from other interface. Typescript allows an interface to inherit from multiple interfaces.
Use the extends keyword to implement inheritance among interfaces.
Syntax: Single Interface Inheritance
Child_interface_name extends super_interface_name
Syntax: Multiple Interface Inheritance
Child_interface_name extends super_interface1_name,
super_interface2_name,,super_interfaceN_name
Example: Simple Interface Inheritance
interface Person {
   age:number
}

interface Musician extends Person {
   instrument:string
}

var drummer = <Musician>{};
drummer.age = 27
drummer.instrument = "Drums"
console.log("Age:  "+drummer.age) console.log("Instrument:  "+drummer.instrument)
On compiling, it will generate following JavaScript code.
//Generated by typescript 1.8.10
var drummer = {};
drummer.age = 27;
drummer.instrument = "Drums";
console.log("Age:  " + drummer.age);
console.log("Instrument:  " + drummer.instrument);
Its output is as follows −
Age: 27
Instrument: Drums
Example: Multiple Interface Inheritance
interface IParent1 {
   v1:number
}

interface IParent2 {
   v2:number
}

interface Child extends IParent1, IParent2 { }
var Iobj:Child = { v1:12, v2:23}
console.log("value 1: "+this.v1+" value 2: "+this.v2)
The object Iobj is of the type interface leaf. The interface leaf by the virtue of inheritance now has two attributes- v1 and v2 respectively. Hence, the object Iobj must now contain these attributes.
On compiling, it will generate following JavaScript code.
//Generated by typescript 1.8.10
var Iobj = { v1: 12, v2: 23 };
console.log("value 1: " + this.v1 + " value 2: " + this.v2);
The output of the above code is as follows −
value 1: 12 value 2: 23
TypeScript - Classes
TypeScript is object oriented JavaScript. TypeScript supports object-oriented programming features like classes, interfaces, etc. A class in terms of OOP is a blueprint for creating objects. A class encapsulates data for the object. Typescript gives built in support for this concept called class. JavaScript ES5 or earlier didnt support classes. Typescript gets this feature from ES6.
Creating classes
Use the class keyword to declare a class in TypeScript. The syntax for the same is given below −
Syntax
class class_name {
   //class scope
}
The class keyword is followed by the class name. The rules for identifiers must be considered while naming a class.
A class definition can include the following −
Fields − A field is any variable declared in a class. Fields represent data pertaining to objects
Constructors − Responsible for allocating memory for the objects of the class
Functions − Functions represent actions an object can take. They are also at times referred to as methods
These components put together are termed as the data members of the class.
Consider a class Person in typescript.
class Person {
}
On compiling, it will generate following JavaScript code.
//Generated by typescript 1.8.10
var Person = (function () {
   function Person() {
   }
   return Person;
}());
Example: Declaring a class
class Car {
   //field
   engine:string;

   //constructor
   constructor(engine:string) {
      this.engine = engine
   }

   //function
   disp():void {
      console.log("Engine is  :   "+this.engine)
   }
}
The example declares a class Car. The class has a field named engine. The var keyword is not used while declaring a field. The example above declares a constructor for the class.
A constructor is a special function of the class that is responsible for initializing the variables of the class. TypeScript defines a constructor using the constructor keyword. A constructor is a function and hence can be parameterized.
The this keyword refers to the current instance of the class. Here, the parameter name and the name of the classs field are the same. Hence to avoid ambiguity, the classs field is prefixed with the this keyword.
disp() is a simple function definition. Note that the function keyword is not used here.
On compiling, it will generate following JavaScript code.
//Generated by typescript 1.8.10
var Car = (function () {
   //constructor
   function Car(engine) {
      this.engine = engine;
   }

   //function
   Car.prototype.disp = function () {
      console.log("Engine is  :   " + this.engine);
   };
   return Car;
}());
Creating Instance objects
To create an instance of the class, use the new keyword followed by the class name. The syntax for the same is given below −
Syntax
var object_name = new class_name([ arguments ])
The new keyword is responsible for instantiation.
The right-hand side of the expression invokes the constructor. The constructor should be passed values if it is parameterized.
Example: Instantiating a class
var obj = new Car("Engine 1")
Accessing Attributes and Functions
A classs attributes and functions can be accessed through the object. Use the . dot notation (called as the period) to access the data members of a class.
//accessing an attribute
obj.field_name

//accessing a function
obj.function_name()
Example: Putting them together
class Car {
   //field
   engine:string;

   //constructor
   constructor(engine:string) {
      this.engine = engine
   }

   //function
   disp():void {
      console.log("Function displays Engine is  :   "+this.engine)
   }
}

//create an object
var obj = new Car("XXSY1")

//access the field
console.log("Reading attribute value Engine as :  "+obj.engine)

//access the function
obj.disp()
On compiling, it will generate following JavaScript code.
//Generated by typescript 1.8.10
var Car = (function () {
   //constructor
   function Car(engine) {
      this.engine = engine;
   }

   //function
   Car.prototype.disp = function () {
      console.log("Function displays Engine is  :   " + this.engine);
   };
   return Car;
}());

//create an object
var obj = new Car("XXSY1");

//access the field
console.log("Reading attribute value Engine as :  " + obj.engine);

//access the function
obj.disp();
The output of the above code is as follows −
Reading attribute value Engine as :  XXSY1
Function displays Engine is  :   XXSY1
Class Inheritance
TypeScript supports the concept of Inheritance. Inheritance is the ability of a program to create new classes from an existing class. The class that is extended to create newer classes is called the parent class/super class. The newly created classes are called the child/sub classes.
A class inherits from another class using the extends keyword. Child classes inherit all properties and methods except private members and constructors from the parent class.
Syntax
class child_class_name extends parent_class_name
However, TypeScript doesnt support multiple inheritance.
Example: Class Inheritance
class Shape {
   Area:number

   constructor(a:number) {
      this.Area = a
   }
}

class Circle extends Shape {
   disp():void {
      console.log("Area of the circle:  "+this.Area)
   }
}

var obj = new Circle(223);
obj.disp()
On compiling, it will generate following JavaScript code.
//Generated by typescript 1.8.10
var __extends = (this && this.__extends) || function (d, b) {
   for (var p in b) if (b.hasOwnProperty(p)) d[p] = b[p];
   function __() { this.constructor = d; }
   d.prototype = b === null ? Object.create(b) : (__.prototype = b.prototype, new __());
};
var Shape = (function () {
   function Shape(a) {
      this.Area = a;
   }
   return Shape;
}());

var Circle = (function (_super) {
   __extends(Circle, _super);
   function Circle() {
      _super.apply(this, arguments);
   }

   Circle.prototype.disp = function () {
      console.log("Area of the circle:  " + this.Area);
   };
   return Circle;
}(Shape));

var obj = new Circle(223);
obj.disp();
The output of the above code is as follows −
Area of the Circle: 223
The above example declares a class Shape. The class is extended by the Circle class. Since there is an inheritance relationship between the classes, the child class i.e. the class Car gets an implicit access to its parent class attribute i.e. area.
Inheritance can be classified as −
Single − Every class can at the most extend from one parent class
Multiple − A class can inherit from multiple classes. TypeScript doesnt support multiple inheritance.
Multi-level − The following example shows how multi-level inheritance works.
Example
class Root {
   str:string;
}

class Child extends Root {}
class Leaf extends Child {} //indirectly inherits from Root by virtue of inheritance

var obj = new Leaf();
obj.str ="hello"
console.log(obj.str)
The class Leaf derives the attributes from Root and Child classes by virtue of multi-level inheritance.
On compiling, it will generate following JavaScript code.
//Generated by typescript 1.8.10
var __extends = (this && this.__extends) || function (d, b) {
   for (var p in b) if (b.hasOwnProperty(p)) d[p] = b[p];
   function __() { this.constructor = d; }
   d.prototype = b === null ? Object.create(b) : (__.prototype = b.prototype, new __());
};

var Root = (function () {
   function Root() {
   }
   return Root;
}());

var Child = (function (_super) {
   __extends(Child, _super);
   function Child() {
      _super.apply(this, arguments);
   }
   return Child;
}(Root));

var Leaf = (function (_super) {
   __extends(Leaf, _super);
   function Leaf() {
      _super.apply(this, arguments);
   }
   return Leaf;
}(Child));

var obj = new Leaf();
obj.str = "hello";
console.log(obj.str);
Its output is as follows −
Output
hello
TypeScript Class inheritance and Method Overriding
Method Overriding is a mechanism by which the child class redefines the superclasss method. The following example illustrates the same −
class PrinterClass {
   doPrint():void {
      console.log("doPrint() from Parent called")
   }
}

class StringPrinter extends PrinterClass {
   doPrint():void {
      super.doPrint()
      console.log("doPrint() is printing a string")
   }
}

var obj = new StringPrinter()
obj.doPrint()
The super keyword is used to refer to the immediate parent of a class. The keyword can be used to refer to the super class version of a variable, property or method. Line 13 invokes the super class version of the doWork() function.
On compiling, it will generate following JavaScript code.
//Generated by typescript 1.8.10
var __extends = (this && this.__extends) || function (d, b) {
   for (var p in b) if (b.hasOwnProperty(p)) d[p] = b[p];
   function __() { this.constructor = d; }
   d.prototype = b === null ? Object.create(b) : (__.prototype = b.prototype, new __());
};

var PrinterClass = (function () {
   function PrinterClass() {
   }
   PrinterClass.prototype.doPrint = function () {
      console.log("doPrint() from Parent called");
   };
   return PrinterClass;
}());

var StringPrinter = (function (_super) {
   __extends(StringPrinter, _super);

   function StringPrinter() {
      _super.apply(this, arguments);
   }

   StringPrinter.prototype.doPrint = function () {
      _super.prototype.doPrint.call(this);
      console.log("doPrint() is printing a string");
   };

   return StringPrinter;
}(PrinterClass));

var obj = new StringPrinter();
obj.doPrint();
The output of the above code is as follows −
doPrint() from Parent called
doPrint() is printing a string
The static Keyword
The static keyword can be applied to the data members of a class. A static variable retains its values till the program finishes execution. Static members are referenced by the class name.
Example
class StaticMem {
   static num:number;

   static disp():void {
      console.log("The value of num is"+ StaticMem.num)
   }
}

StaticMem.num = 12     // initialize the static variable
StaticMem.disp()      // invoke the static method
On compiling, it will generate following JavaScript code.
//Generated by typescript 1.8.10
var StaticMem = (function () {
   function StaticMem() {
   }

   StaticMem.disp = function () {
      console.log("The value of num is" + StaticMem.num);
   };

   return StaticMem;
}());

StaticMem.num = 12;     // initialize the static variable
StaticMem.disp();      // invoke the static method
The output of the above code is as follows −
The value of num is 12
The instanceof operator
The instanceof operator returns true if the object belongs to the specified type.
Example
class Person{ }
var obj = new Person()
var isPerson = obj instanceof Person;
console.log(" obj is an instance of Person " + isPerson);
On compiling, it will generate following JavaScript code.
//Generated by typescript 1.8.10
var Person = (function () {
   function Person() {
   }
   return Person;
}());

var obj = new Person();
var isPerson = obj instanceof Person;
console.log(" obj is an instance of Person " + isPerson);
The output of the above code is as follows −
obj is an instance of Person True
Data Hiding
A class can control the visibility of its data members to members of other classes. This capability is termed as Data Hiding or Encapsulation.
Object Orientation uses the concept of access modifiers or access specifiers to implement the concept of Encapsulation. The access specifiers/modifiers define the visibility of a classs data members outside its defining class.
The access modifiers supported by TypeScript are −
| S.No. | Access Specifier & Description |
|---|---|
| 1. | public A public data member has universal accessibility. Data members in a class are public by default. |
| 2. | private Private data members are accessible only within the class that defines these members. If an external class member tries to access a private member, the compiler throws an error. |
| 3. | protected A protected data member is accessible by the members within the same class as that of the former and also by the members of the child classes. |
Example
Let us now take an example to see how data hiding works −
class Encapsulate {
   str:string = "hello"
   private str2:string = "world"
}

var obj = new Encapsulate()
console.log(obj.str)     //accessible
console.log(obj.str2)   //compilation Error as str2 is private
The class has two string attributes, str1 and str2, which are public and private members respectively. The class is instantiated. The example returns a compile time error, as the private attribute str2 is accessed outside the class that declares it.
Classes and Interfaces
Classes can also implement interfaces.
interface ILoan {
   interest:number
}

class AgriLoan implements ILoan {
   interest:number
   rebate:number

   constructor(interest:number,rebate:number) {
      this.interest = interest
      this.rebate = rebate
   }
}

var obj = new AgriLoan(10,1)
console.log("Interest is : "+obj.interest+" Rebate is : "+obj.rebate )
The class AgriLoan implements the interface Loan. Hence, it is now binding on the class to include the property interest as its member.
On compiling, it will generate following JavaScript code.
//Generated by typescript 1.8.10
var AgriLoan = (function () {
   function AgriLoan(interest, rebate) {
      this.interest = interest;
      this.rebate = rebate;
   }
   return AgriLoan;
}());

var obj = new AgriLoan(10, 1);
console.log("Interest is : " + obj.interest + " Rebate is : " + obj.rebate);
The output of the above code is as follows −
Interest is : 10 Rebate is : 1
TypeScript - Objects
An object is an instance which contains set of key value pairs. The values can be scalar values or functions or even array of other objects. The syntax is given below −
Syntax
var object_name = {
   key1: value1, //scalar value
   key2: value,
   key3: function() {
      //functions
   },
   key4:[content1, content2] //collection
};
As shown above, an object can contain scalar values, functions and structures like arrays and tuples.
Example: Object Literal Notation
var person = {
   firstname:"Tom",
   lastname:"Hanks"
};
//access the object values
console.log(person.firstname)
console.log(person.lastname)
On compiling, it will generate the same code in JavaScript.
The output of the above code is as follows −
Tom
Hanks
TypeScript Type Template
Lets say you created an object literal in JavaScript as −
var person = {
   firstname:"Tom",
   lastname:"Hanks"
};
In case you want to add some value to an object, JavaScript allows you to make the necessary modification. Suppose we need to add a function to the person object later this is the way you can do this.
person.sayHello = function(){ return "hello";}
If you use the same code in Typescript the compiler gives an error. This is because in Typescript, concrete objects should have a type template. Objects in Typescript must be an instance of a particular type.
You can solve this by using a method template in declaration.
Example: Typescript Type template
var person = {
   firstName:"Tom",
   lastName:"Hanks",
   sayHello:function() {  }  //Type template
}
person.sayHello = function() {
   console.log("hello "+person.firstName)
}
person.sayHello()
On compiling, it will generate the same code in JavaScript.
The output of the above code is as follows −
hello Tom
Objects can also be passed as parameters to function.
Example: Objects as function parameters
var person = {
   firstname:"Tom",
   lastname:"Hanks"
};
var invokeperson = function(obj: { firstname:string, lastname :string }) {
   console.log("first name :"+obj.firstname)
   console.log("last name :"+obj.lastname)
}
invokeperson(person)
The example declares an object literal. The function expression is invoked passing person object.
On compiling, it will generate following JavaScript code.
//Generated by typescript 1.8.10
var person = {
   firstname: "Tom",
   lastname: "Hanks"
};

var invokeperson = function (obj) {
   console.log("first name :" + obj.firstname);
   console.log("last name :" + obj.lastname);
};

invokeperson(person);
Its output is as follows −
first name :Tom
last name :Hanks
You can create and pass an anonymous object on the fly.
Example: Anonymous Object
var invokeperson = function(obj:{ firstname:string, lastname :string}) {
   console.log("first name :"+obj.firstname)
   console.log("last name :"+obj.lastname)
}
invokeperson({firstname:"Sachin",lastname:"Tendulkar"});
On compiling, it will generate following JavaScript code.
//Generated by typescript 1.8.10
var invokeperson = function (obj) {
   console.log("first name :" + obj.firstname);
   console.log("last name :" + obj.lastname);
};

invokeperson({ firstname: "Sachin", lastname: "Tendulkar" });
invokeperson({ firstname: "Sachin", lastname: "Tendulkar" });
Its output is as follows −
first name :Sachin
last name :Tendulkar
Duck-typing
In duck-typing, two objects are considered to be of the same type if both share the same set of properties. Duck-typing verifies the presence of certain properties in the objects, rather than their actual type, to check their suitability. The concept is generally explained by the following phrase −
When I see a bird that walks like a duck and swims like a duck and quacks like a duck, I call that bird a duck.
The TypeScript compiler implements the duck-typing system that allows object creation on the fly while keeping type safety. The following example shows how we can pass objects that dont explicitly implement an interface but contain all of the required members to a function.
Example
interface IPoint {
   x:number
   y:number
}
function addPoints(p1:IPoint,p2:IPoint):IPoint {
   var x = p1.x + p2.x
   var y = p1.y + p2.y
   return {x:x,y:y}
}

//Valid
var newPoint = addPoints({x:3,y:4},{x:5,y:1})

//Error
var newPoint2 = addPoints({x:1},{x:4,y:3})
TypeScript - Namespaces
A namespace is a way to logically group related code. This is inbuilt into TypeScript unlike in JavaScript where variables declarations go into a global scope and if multiple JavaScript files are used within same project there will be possibility of overwriting or misconstruing the same variables, which will lead to the global namespace pollution problem in JavaScript.
Defining a Namespace
A namespace definition begins with the keyword namespace followed by the namespace name as follows −
namespace SomeNameSpaceName {
   export interface ISomeInterfaceName {      }
   export class SomeClassName {      }
}
The classes or interfaces which should be accessed outside the namespace should be marked with keyword export.
To access the class or interface in another namespace, the syntax will be namespaceName.className
SomeNameSpaceName.SomeClassName;
If the first namespace is in separate TypeScript file, then it should be referenced using triple slash reference syntax.
/// <reference path = "SomeFileName.ts" />
The following program demonstrates use of namespaces −
FileName :IShape.ts
----------
namespace Drawing {
   export interface IShape {
      draw();
   }
}

FileName :Circle.ts
----------
/// <reference path = "IShape.ts" />
namespace Drawing {
   export class Circle implements IShape {
      public draw() {
         console.log("Circle is drawn");
      }

      FileName :Triangle.ts
      ----------
      /// <reference path = "IShape.ts" />
      namespace Drawing {
         export class Triangle implements IShape {
            public draw() {
               console.log("Triangle is drawn");
            }
         }

         FileName : TestShape.ts
         /// <reference path = "IShape.ts" />
         /// <reference path = "Circle.ts" />
         /// <reference path = "Triangle.ts" />
         function drawAllShapes(shape:Drawing.IShape) {
            shape.draw();
         }
         drawAllShapes(new Drawing.Circle());
         drawAllShapes(new Drawing.Triangle());
      }
   }
}
The above code can be compiled and executed using the following command −
tsc --out app.js TestShape.ts

node app.js
On compiling, it will generate following JavaScript code(app.js).
//Generated by typescript 1.8.10
/// <reference path = "IShape.ts" />
var Drawing;
(function (Drawing) {
   var Circle = (function () {
      function Circle() {
      }
      Circle.prototype.draw = function () {
         console.log("Cirlce is drawn");
      };
      return Circle;
   }());

   Drawing.Circle = Circle;
})(Drawing || (Drawing = {}));

/// <reference path = "IShape.ts" />
var Drawing;
(function (Drawing) {
   var Triangle = (function () {
      function Triangle() {
      }
      Triangle.prototype.draw = function () {
         console.log("Triangle is drawn");
      };
      return Triangle;
   }());
   Drawing.Triangle = Triangle;
})(Drawing || (Drawing = {}));

/// <reference path = "IShape.ts" />
/// <reference path = "Circle.ts" />
/// <reference path = "Triangle.ts" />
function drawAllShapes(shape) {
   shape.draw();
}

drawAllShapes(new Drawing.Circle());
drawAllShapes(new Drawing.Triangle());
When the above code is compiled and executed, it produces the following result −
Circle is drawn
Triangle is drawn
Nested Namespaces
You can define one namespace inside another namespace as follows −
namespace namespace_name1 {
   export namespace namespace_name2 {
      export class class_name {    }
   }
}
You can access members of nested namespace by using the dot (.) operator as follows −
FileName : Invoice.ts
namespace tutorialPoint {
   export namespace invoiceApp {
      export class Invoice {
         public calculateDiscount(price: number) {
            return price * .40;
         }
      }
   }
}
FileName: InvoiceTest.ts

/// <reference path = "Invoice.ts" />
var invoice = new tutorialPoint.invoiceApp.Invoice();
console.log(invoice.calculateDiscount(500));
The above code can be compiled and executed using the following command −
tsc --out app.js InvoiceTest.ts
node app.js
On compiling, it will generate following JavaScript code(app.js).
//Generated by typescript 1.8.10
var tutorialPoint;
(function (tutorialPoint) {
   var invoiceApp;
   (function (invoiceApp) {
      var Invoice = (function () {
         function Invoice() {
         }
         Invoice.prototype.calculateDiscount = function (price) {
            return price * .40;
         };
         return Invoice;
      }());
      invoiceApp.Invoice = Invoice;
   })(invoiceApp = tutorialPoint.invoiceApp || (tutorialPoint.invoiceApp = {}));

})(tutorialPoint || (tutorialPoint = {}));
/// <reference path = "Invoice.ts" />

var invoice = new tutorialPoint.invoiceApp.Invoice();
console.log(invoice.calculateDiscount(500));
When the above code is compiled and executed, it produces the following result −
200
TypeScript - Modules
A module is designed with the idea to organize code written in TypeScript. Modules are broadly divided into −
- Internal Modules
- External Modules
Internal Module
Internal modules came in earlier version of Typescript. This was used to logically group classes, interfaces, functions into one unit and can be exported in another module. This logical grouping is named namespace in latest version of TypeScript. So internal modules are obsolete instead we can use namespace. Internal modules are still supported, but its recommended to use namespace over internal modules.
Internal Module Syntax (Old)
module TutorialPoint {
   export function add(x, y) {
      console.log(x+y);
   }
}
Namespace Syntax (New)
namespace TutorialPoint {
   export function add(x, y) { console.log(x + y);}
}
JavaScript generated in both cases are same
var TutorialPoint;
(function (TutorialPoint) {
   function add(x, y) {
      console.log(x + y);
   }
   TutorialPoint.add = add;
})(TutorialPoint || (TutorialPoint = {}));
External Module
External modules in TypeScript exists to specify and load dependencies between multiple external js files. If there is only one js file used, then external modules are not relevant. Traditionally dependency management between JavaScript files was done using browser script tags (<script></script>). But thats not extendable, as its very linear while loading modules. That means instead of loading files one after other there is no asynchronous option to load modules. When you are programming js for the server for example NodeJs you dont even have script tags.
There are two scenarios for loading dependents js files from a single main JavaScript file.
- Client Side - RequireJs
- Server Side - NodeJs
Selecting a Module Loader
To support loading external JavaScript files, we need a module loader. This will be another js library. For browser the most common library used is RequieJS. This is an implementation of AMD (Asynchronous Module Definition) specification. Instead of loading files one after the other, AMD can load them all separately, even when they are dependent on each other.
Defining External Module
When defining external module in TypeScript targeting CommonJS or AMD, each file is considered as a module. So its optional to use internal module with in external module.
If you are migrating TypeScript from AMD to CommonJs module systems, then there is no additional work needed. The only thing you need to change is just the compiler flag Unlike in JavaScript there is an overhead in migrating from CommonJs to AMD or vice versa.
The syntax for declaring an external module is using keyword export and import.
Syntax
//FileName : SomeInterface.ts
export interface SomeInterface {
   //code declarations
}
To use the declared module in another file, an import keyword is used as given below. The file name is only specified no extension used.
import someInterfaceRef = require(./SomeInterface);
Example
Lets understand this using an example.
// IShape.ts
export interface IShape {
   draw();
}

// Circle.ts
import shape = require("./IShape");
export class Circle implements shape.IShape {
   public draw() {
      console.log("Cirlce is drawn (external module)");
   }
}

// Triangle.ts
import shape = require("./IShape");
export class Triangle implements shape.IShape {
   public draw() {
      console.log("Triangle is drawn (external module)");
   }
}

// TestShape.ts
import shape = require("./IShape");
import circle = require("./Circle");
import triangle = require("./Triangle");

function drawAllShapes(shapeToDraw: shape.IShape) {
   shapeToDraw.draw();
}

drawAllShapes(new circle.Circle());
drawAllShapes(new triangle.Triangle());
The command to compile the main TypeScript file for AMD systems is −
tsc --module amd TestShape.ts
On compiling, it will generate following JavaScript code for AMD.
File:IShape.js
//Generated by typescript 1.8.10
define(["require", "exports"], function (require, exports) {
});
File:Circle.js
//Generated by typescript 1.8.10
define(["require", "exports"], function (require, exports) {
   var Circle = (function () {
      function Circle() {
      }
      Circle.prototype.draw = function () {
         console.log("Cirlce is drawn (external module)");
      };
      return Circle;
   })();
   exports.Circle = Circle;
});
File:Triangle.js
//Generated by typescript 1.8.10
define(["require", "exports"], function (require, exports) {
   var Triangle = (function () {
      function Triangle() {
      }
      Triangle.prototype.draw = function () {
         console.log("Triangle is drawn (external module)");
      };
      return Triangle;
   })();
   exports.Triangle = Triangle;
});
File:TestShape.js
//Generated by typescript 1.8.10
define(["require", "exports", "./Circle", "./Triangle"],
   function (require, exports, circle, triangle) {

   function drawAllShapes(shapeToDraw) {
      shapeToDraw.draw();
   }
   drawAllShapes(new circle.Circle());
   drawAllShapes(new triangle.Triangle());
});
The command to compile the main TypeScript file for Commonjs systems is
tsc --module commonjs TestShape.ts
On compiling, it will generate following JavaScript code for Commonjs.
File:Circle.js
//Generated by typescript 1.8.10
var Circle = (function () {
   function Circle() {
   }
   Circle.prototype.draw = function () {
      console.log("Cirlce is drawn");
   };
   return Circle;
})();

exports.Circle = Circle;
File:Triangle.js
//Generated by typescript 1.8.10
var Triangle = (function () {
   function Triangle() {
   }
   Triangle.prototype.draw = function () {
      console.log("Triangle is drawn (external module)");
   };
   return Triangle;
})();
exports.Triangle = Triangle;
File:TestShape.js
//Generated by typescript 1.8.10
var circle = require("./Circle");
var triangle = require("./Triangle");

function drawAllShapes(shapeToDraw) {
   shapeToDraw.draw();
}
drawAllShapes(new circle.Circle());
drawAllShapes(new triangle.Triangle());
Output
Cirlce is drawn (external module)
Triangle is drawn (external module)
TypeScript - Ambients
Ambient declarations are a way of telling the TypeScript compiler that the actual source code exists elsewhere. When you are consuming a bunch of third party js libraries like jquery/angularjs/nodejs you cant rewrite it in TypeScript. Ensuring typesafety and intellisense while using these libraries will be challenging for a TypeScript programmer. Ambient declarations help to seamlessly integrate other js libraries into TypeScript.
Defining Ambients
Ambient declarations are by convention kept in a type declaration file with following extension (d.ts)
Sample.d.ts
The above file will not be transcompiled to JavaScript. It will be used for type safety and intellisense.
The syntax for declaring ambient variables or modules will be as following −
Syntax
declare module Module_Name {
}
The ambient files should be referenced in the client TypeScript file as shown −
/// <reference path = " Sample.d.ts" />
Example
Lets understand this with help of an example. Assume you been given a third party javascript library which contains code similar to this.
FileName: CalcThirdPartyJsLib.js
var TutorialPoint;
(function (TutorialPoint) {
   var Calc = (function () {
      function Calc() {
      }
      Calc.prototype.doSum = function (limit) {
         var sum = 0;

         for (var i = 0; i <= limit; i++) {
            Calc.prototype.doSum = function (limit) {
               var sum = 0;

               for (var i = 0; i <= limit; i++) {
                  sum = sum + i;
                  return sum;
                  return Calc;
                  TutorialPoint.Calc = Calc;
               })(TutorialPoint || (TutorialPoint = {}));
               var test = new TutorialPoint.Calc();
            }
         }
      }
   }
}
As a typescript programmer you will not have time to rewrite this library to typescript. But still you need to use the doSum() method with type safety. What you could do is ambient declaration file. Let us create an ambient declaration file Calc.d.ts
FileName: Calc.d.ts
declare module TutorialPoint {
   export class Calc {
      doSum(limit:number) : number;
   }
}
Ambient files will not contain the implementations, it is just type declarations. Declarations now need to be included in the typescript file as follows.
FileName : CalcTest.ts
/// <reference path = "Calc.d.ts" />
var obj = new TutorialPoint.Calc();
obj.doSum("Hello"); // compiler error
console.log(obj.doSum(10));
The following line of code will show a compiler error. This is because in the declaration file we specified the input parameter will be number.
obj.doSum("Hello");
Comment the above line and compile the program using the following syntax −
tsc CalcTest.ts
On compiling, it will generate following JavaScript code(CalcTest.js).
//Generated by typescript 1.8.10
/// <reference path = "Calc.d.ts" />
var obj = new TutorialPoint.Calc();

// obj.doSum("Hello");
console.log(obj.doSum(10));
In order to execute the code, let us add an html page with script tags as given below. Add the compiled CalcTest.js file and the third party library file CalcThirdPartyJsLib.js.
<html>
   <body style = "font-size:30px;">
      <h1>Ambient Test</h1>
      <h2>Calc Test</h2>
   </body>

   <script src = "CalcThirdPartyJsLib.js"></script>
   <script src = "CalcTest.js"></script>
</html>
It will display the following page −
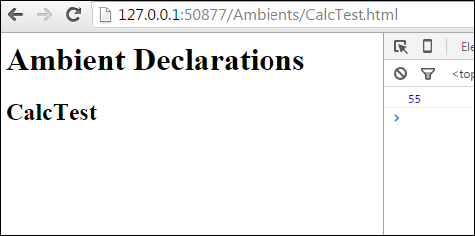
On the console, you can see the following output −
55
Similarly, you can integrate jquery.d.ts or angular.d.ts into a project, based on your requirement.
