
Article Categories
- All Categories
-
 Data Structure
-
 Networking
-
 RDBMS
RDBMS
-
 Operating System
-
 Java
Java
-
 MS Excel
-
 iOS
iOS
-
 HTML
HTML
-
 CSS
CSS
-
 Android
-
 Python
-
 C Programming
-
 C++
C++
-
 C#
C#
-
 MongoDB
-
 MySQL
MySQL
-
 Javascript
-
 PHP
PHP
-
 Economics & Finance
Start and stop an Android notification from broadcast receiver?
This example demonstrate about Start and stop an Android notification from broadcast receiver
Step 1 − Create a new project in Android Studio, go to File ⇒ New Project and fill all required details to create a new project.
Step 2 − Add the following code to res/layout/activity_main.xml.
<? xml version = "1.0" encoding= "utf-8" ?>
<RelativeLayout xmlns: android = "http://schemas.android.com/apk/res/android"
   xmlns: tools = "http://schemas.android.com/tools"
   android :layout_width = "match_parent"
   android :layout_height = "match_parent"
   android :padding = "16dp"
   tools :context = ".MainActivity" / >
Step 3 − Add the following code to src/MainActivity.
package app.tutorialspoint.com.notifyme ;
import android.os.Bundle ;
import android.support.v7.app.AppCompatActivity ;
public class MainActivity extends AppCompatActivity {
   @Override
   protected void onCreate (Bundle savedInstanceState) {
      super .onCreate(savedInstanceState) ;
      setContentView(R.layout. activity_main ) ;
   }
}
Step 4 − Add the following code to src/USBStateReceiver
package app.tutorialspoint.com.notifyme ;
import android.annotation. SuppressLint ;
import android.app.Notification ;
import android.app.NotificationChannel ;
import android.app.NotificationManager ;
import android.content.BroadcastReceiver ;
import android.content.Context ;
import android.content.Intent ;
import android.support.v4.app.NotificationCompat ;
import android.util.Log ;
public class USBStateReceiver extends BroadcastReceiver {
   public static final String NOTIFICATION_CHANNEL_ID = "10001" ;
   private final static String default_notification_channel_id = "default" ;
   boolean connected = true;
   @SuppressLint ( "UnsafeProtectedBroadcastReceiver" )
   @Override
   public void onReceive (Context context , Intent intent) {
      NotificationCompat.Builder builder = new NotificationCompat.Builder(context , default_notification_channel_id ) ;
      builder.setContentTitle( "USB - Notification" ) ;
      String action = intent.getAction() ;
      Log. e ( "USB" , action) ;
      assert action != null;
      builder.setContentText( "Connected" ) ;
      builder.setSmallIcon(R.drawable. ic_launcher_foreground ) ;
      builder.setAutoCancel( true ) ;
      builder.setChannelId( NOTIFICATION_CHANNEL_ID ) ;
      Notification notification = builder.build() ;
      NotificationManager notificationManager = (NotificationManager) context.getSystemService(Context. NOTIFICATION_SERVICE ) ;
      if (android.os.Build.VERSION. SDK_INT > = android.os.Build.VERSION_CODES. O ) {
         int importance = NotificationManager. IMPORTANCE_HIGH ;
         NotificationChannel notificationChannel = new NotificationChannel( NOTIFICATION_CHANNEL_ID , "NOTIFICATION_CHANNEL_NAME" , importance) ;
         assert notificationManager != null;
         notificationManager.createNotificationChannel(notificationChannel) ;
      }
      assert notificationManager != null;
      if ( connected ) {
         notificationManager.notify( 1 , notification) ;
         connected = false;
      } else {
         notificationManager.cancel( 1 ) ;
         connected = true;
      }
   }
}
Step 5− Add the following code to AndroidManifest.xml
<? xml version = "1.0" encoding= "utf-8" ?>
<manifest xmlns: android = "http://schemas.android.com/apk/res/android"
   package = "app.tutorialspoint.com.notifyme" >
   <uses-permission android :name = "android.permission.VIBRATE" /Gt;
   <application
      android :allowBackup= "true"
      android :icon = "@mipmap/ic_launcher"
      android :label = "@string/app_name"
      android :roundIcon = "@mipmap/ic_launcher_round"
      android :supportsRtl = "true"
      android :theme= "@style/AppTheme" >
      <activity android :name = ".MainActivity" >
         <intent-filter>
            <action android :name = "android.intent.action.MAIN" />'
            <category android :name = "android.intent.category.LAUNCHER" / >
         </intent-filter>
      </activity>
      <receiver android :name = ".USBStateReceiver" >
         <intent-filter>
            <action android :name = "android.hardware.usb.action.USB_STATE" />
         </intent-filter>
      </receiver>
   </application>
</manifest>
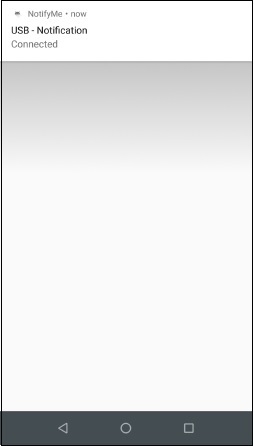
Let's try to run your application. I assume you have connected your actual Android Mobile device with your computer. To run the app from android studio, open one of your project's activity files and click Run ![]() icon from the toolbar. Select your mobile device as an option and then check your mobile device which will display your default screen −
icon from the toolbar. Select your mobile device as an option and then check your mobile device which will display your default screen −
Click here to download the project code

773 Views
