- Python XlsxWriter - Home
- Python XlsxWriter - Overview
- Python XlsxWriter - Environment Setup
- Python XlsxWriter - Hello World
- Python XlsxWriter - Important classes
- Python XlsxWriter - Cell Notation & Ranges
- Python XlsxWriter - Defined Names
- Python XlsxWriter - Formula & Function
- Python XlsxWriter - Date and Time
- Python XlsxWriter - Tables
- Python XlsxWriter - Applying Filter
- Python XlsxWriter - Fonts & Colors
- Python XlsxWriter - Number Formats
- Python XlsxWriter - Border
- Python XlsxWriter - Hyperlinks
- Python XlsxWriter - Conditional Formatting
- Python XlsxWriter - Adding Charts
- Python XlsxWriter - Chart Formatting
- Python XlsxWriter - Chart Legends
- Python XlsxWriter - Bar Chart
- Python XlsxWriter - Line Chart
- Python XlsxWriter - Pie Chart
- Python XlsxWriter - Sparklines
- Python XlsxWriter - Data Validation
- Python XlsxWriter - Outlines & Grouping
- Python XlsxWriter - Freeze & Split Panes
- Python XlsxWriter - Hide/Protect Worksheet
- Python XlsxWriter - Textbox
- Python XlsxWriter - Insert Image
- Python XlsxWriter - Page Setup
- Python XlsxWriter - Header & Footer
- Python XlsxWriter - Cell Comments
- Python XlsxWriter - Working with Pandas
- Python XlsxWriter - VBA Macro
Python XlsxWriter - Freeze and Split Panes
The freeze_panes() method
The freeze_panes() method of Worksheet object in XlsxWriter library divides or splits the worksheet into horizontal or vertical regions known as panes, and "freezes" either or both of these panes so that if we scroll down or scroll down or scroll towards right, the panes (top or left respectively) remains stationary.
The method requires the parameters row and col to specify the location of the split. It should be noted that the split is specified at the top or left of a cell and that the method uses zero based indexing. You can set one of the row and col parameters as zero if you do not want either a vertical or horizontal split.
Example
The worksheet in the following example displays incrementing multiples of the column number in each row, so that each cell displays product of row number and column number.
import xlsxwriter
wb = xlsxwriter.Workbook('hello.xlsx')
worksheet = wb.add_worksheet()
format1=wb.add_format({'bg_color':'#D9D9D9', 'bold':True})
for col in range(0, 15):
worksheet.write(0, col, col+1, format1)
for row in range(1, 51):
for col in range(0,15):
if col==0:
worksheet.write(row,col,(col+1)*(row + 1), format1)
else:
worksheet.write(row,col,(col+1)*(row + 1))
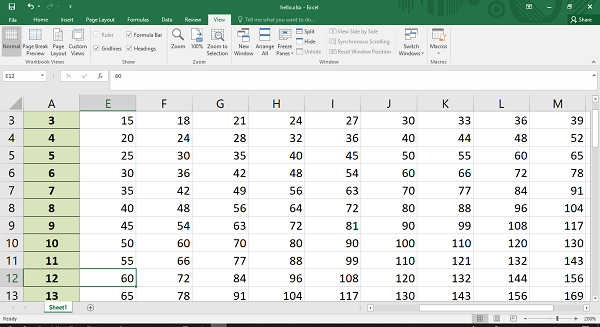
# Freeze pane on the top row.
worksheet.freeze_panes(1, 0)
wb.close()
Output
We then freeze the top row pane. As a result, after opening the worksheet, if the cell pointer is scrolled down, the top row always remains on the worksheet.

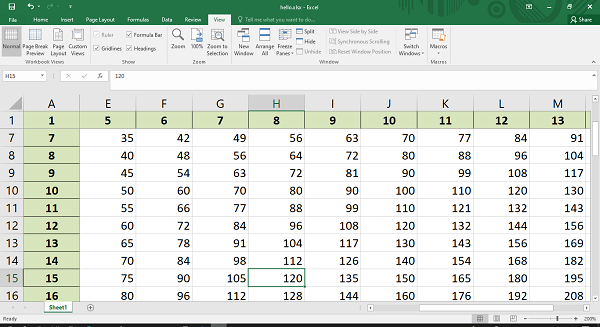
Similarly, we can make the first column stationery.
# Freeze pane on the first column.
worksheet.freeze_panes(0, 1)
The following screenshot shows that column A remains visible even if we scroll towards the right.
By setting row and column parameter in freeze_panes() method to 1, both the top row and leftmost column will freeze.
# Freeze pane on the first row, first column.
worksheet.freeze_panes(1, 1)
Open the resulting worksheet and scroll the cell cursor around. You will find that row and column numbers in top row and leftmost column, which have been formatted in bold and with a background color, are visible always.
The split_panes() method
The split_panes() method also divides the worksheet into horizontal or vertical regions known as panes, but unlike freeze_panes() method, the splits between the panes will be visible to the user and each pane will have its own scroll bars.
The method has the parameters "y" and "x" that are used to specify the vertical and horizontal position of the split. These parameters are in terms of row height and column width used by Excel. The row heights and column widths have default values as 15 for a row and 8.43 for a column.
You can set one of the "y" and "x" parameters as zero if you do not want either a vertical or horizontal split.
To create a split at the 10th row and 7th column, the split_panes() method is used as follows −
worksheet.split_panes(15*10, 8.43*7)
You will find the splitters at 10th row and 7th column of the worksheet. You can scroll the panes to the left and right of vertical splitter and to the top and bottom of horizontal splitter. Note that the other panes will remain constant.
Example
Here's the complete code that creates the splitter, and below that the output is shown −
import xlsxwriter

wb = xlsxwriter.Workbook('hello.xlsx')
worksheet = wb.add_worksheet()
format1=wb.add_format({'bg_color':'#D9D9D9', 'bold':True})

for col in range(0, 15):
   worksheet.write(0, col, col+1, format1)

for row in range(1, 51):
   for col in range(0,15):
      if col==0:
         worksheet.write(row,col,(col+1)*(row + 1), format1)
      else:
         worksheet.write(row,col,(col+1)*(row + 1))
worksheet.split_panes(15*10, 8.43*7)

wb.close()
Output
Run the code and open hello.xlsx using Excel. As we can see, the worksheet is split into different panes at 10th row and 7th column.
