- Puppeteer - Home
- Puppeteer - Introduction
- Puppeteer - Element Handling
- Puppeteer - Usage of Google
- Puppeteer - NodeJS Installation
- Puppeteer VS Code Configuration
- Puppeteer - Installation
- Puppeteer - Basic Test
- Puppeteer - Non Headless Execution
- Comparison Between Puppeteer & Selenium
- Comparison Between Puppeteer & Protractor
- Comparison Between Puppeteer & Cypress
- Puppeteer - Browser Operations
- Puppeteer - Handling Tabs
- Puppeteer - Basic Commands
- Puppeteer - Firefox
- Puppeteer - Chrome
- Puppeteer - Handling Confirm Alerts
- Puppeteer - Handling Drop-downs
- Puppeteer - Locators
- Puppeteer - Xpath Functions
- Puppeteer - Xpath Attributes
- Puppeteer - Xpath Grouping
- Puppeteer - Absolute Xpath
- Puppeteer - Relative Xpath
- Puppeteer - Xpath Axes
- Puppeteer - Type Selector
- Name Selector & Class Name Selector
- Puppeteer - Id Selector
- Puppeteer - Attribute Selector
- Puppeteer - Handling Links/Button
- Handling Edit Boxes & Checkboxes
- Puppeteer - Handling Frames
- Puppeteer - Keyboard Simulation
- Puppeteer - Getting Element Text
- Puppeteer - Getting Element Attribute
- Puppeteer - Device Emulation
- Puppeteer - Disable JavaScript
- Puppeteer - Synchronization
- Puppeteer - Capture Screenshot
- Puppeteer Useful Resources
- Puppeteer - Quick Guide
- Puppeteer - Useful Resources
- Puppeteer - Discussion
Puppeteer - Quick Guide
Puppeteer - Introduction
Puppeteer is used for automation and streamlining of the frontend development and testing respectively. It was introduced by Google. Puppeteer is based on the Node.js library and is open-source.
Puppeteer contains APIs to interact and manage Chrome browser in headless mode or Chromium (following the protocols in DevTools). However, it can also be used for non-headless execution on browsers like Chrome/Chromium/Edge/Firefox.
Puppeteer can be used for the automating majority of UI testing, keyboards, mouse movements, and so on. It can be used to test applications developed in Angular and Angularjs. The actions like web page crawling and scraping can be performed with Puppeteer.
Puppeteer is not considered as an automation tool like Selenium, Cypress, Protractor, and so on. It is mostly used to manage the internal features of the Chromium browser. We can open DevTools in the Chrome browser, by pressing F12 or Command+Option+C(in MacOS).
Puppeteer is like a development tool as it is capable of performing a majority of tasks performed by a developer like handling requests and responses, locating elements, network traffic and performance, and so on.
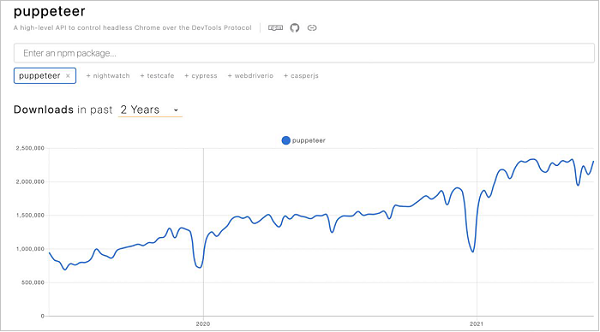
If we follow the npm trends for Puppeteer download for the last few years, we shall observe an upward trend towards the use of Puppeteer (available from the below link) −
Puppeteer Architecture
Puppeteer utilises the Node library that gives a top-class API for managing Chromium or Chrome browsers. This is done by following the protocols of DevTools.
Puppeteer has the below hierarchy −
Browser(with/without headless mode) − The browser performs the actions to be executed on the browser engine.
Chromium Development Project or CDP − The Chromium is the real place where all the operations are executed. The browsers - Microsoft Edge and Chrome utilise Chromium as browser engine.
Puppeteer − This is actually a package based on the node module.
Automation test code − This is also known as the Nodejs level. Here, the actual automation code is developed by the end-user using JavaScript.
Puppeteer - Element Handling
We can handle elements on page with Puppeteer. Once we navigate to a webpage, we have to interact with the webelements available on the page like clicking a link/button, entering text within an edit box, and so on to complete our automation test case.
For this, our first job is to identify the element. To get the property of an element uniquely we need to inspect it (right-click on the element then select the option Inspect). The ElementHandle objects are created by the methods - page.$, page.$$ and page.$x. These objects refer to an element or tag in a page.
Puppeteer Methods to Locate Elements
These methods are listed below −
page.$(locator value)
This method yields a Promise with the ElementHandle. The ElementHandle is an object of the identified element. If there are multiple elements having the same locator value, then only the first matching element from the top left corner of the page shall be returned.
page.$$(locator value)
This method yields a Promise with an array of ElementHandle. If there are multiple elements having the same locator value, then all matching elements shall be returned in the form of an array.
page.$x(xpath value)
This method yields a Promise with an array of ElementHandle. If there are multiple elements having the same xpath value, then all matching elements shall be returned in the form of an array. In case, there is one matching element, then the array returned shall have a single element.
The ElementHandle methods like elementHandle.$, elementHandle.$$ and elementHandle.$x can be applied to an element. In that case, an element shall be searched within the DOM of the present ElementHandle and not in the entire DOM.
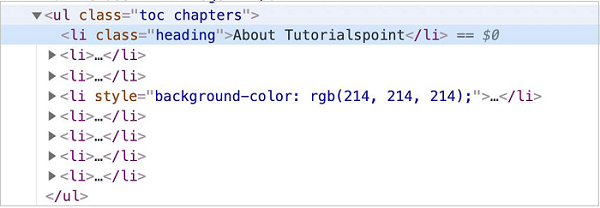
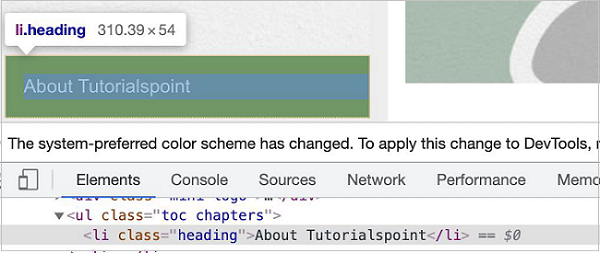
In the below image, let us take the example of an element having the li tag (having a parent element ul) and class attribute value as heading. To identify it using the ElementHandle method on the page, the expression should be as follows −
const n = await page.$(".heading")
To identify it using the ElementHandle method on an element, the expression should be as follows −
const m = await page.$("ul")
const p = await m.$(".heading")
Now, refer the image given below of an element having the li tag
Types of Locators
The types of locators in Puppeteer are listed below −
ID
Class
Type
Xpath
Attribute
Type
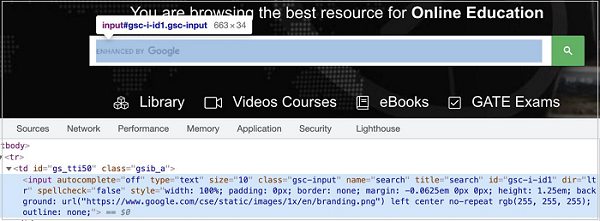
To work with the above locators we should have the basic understanding of HTML code. Let us take an example of an edit box having the below mentioned properties −

Here, input is the tagname. A tag in HTML may or may not have attributes. The type, class, name, id and so on are the attributes of the element.
For example, in the expression class = "gsc-input", text to the left of = is the attribute name (class) and to the right of = is the attribute value (gsc-input).
An attribute may or may not have a value assigned. Also, if a value is assigned, then it should be enclosed in double or single quotes. The value of an attribute is set by a developer as per his choice.
Puppeteer - Usage of Google
Puppeteer usages are listed below −
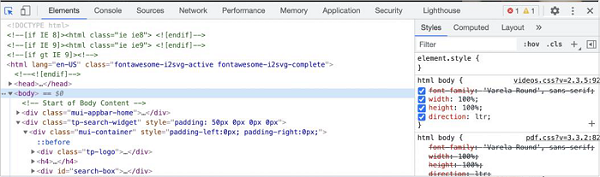
Puppeteer can be used for scrapping contents from a webpage. The scrapping means pulling out data from a particular website.
Puppeteer can be used to capture screenshots. It can be used to export web pages in the form of a PDF.
Puppeteer does not require an external driver or library. It can be run on the actual browser in a headless mode.
It can be used as a good alternative to other browser automation tools like Selenium or Cypress. Sometimes, puppeteer features are even better than both of them.
It is super-fast in execution and can be used to execute tests in headless and headed modes.
Puppeteer has a very agile community support having more than 60,000 starts in GitHub. Refer the link given herewith: https://github.com/puppeteer/puppeteer
Puppeteer supports headless execution and hence it can be used in platforms like Unix, Linux, Cloud, AWS, and so on.
It can be used to crawl a SPA (Single Page Application) and produce pre-rendered content. The crawling means saving a local static object of a webpage and utilising it offline in the absence of the real webpage obtained from the internet.
It can be used for the automating majority of UI testing, keyboards, mouse movements, form submissions etc.
Puppeteer can be used to construct a recent, automated test environment. It can run tests on the latest version Chrome by utilising the most recent features of JavaScript and browser.
Puppeteer can be used to obtain the timeline trace of a web application to determine its performance. Moreover, it can be used to check the Chrome Extensions and to obtain the coverage of HTML and CSS utilized by a webpage.
Puppeteer - NodeJS Installation
Puppeteer code implementation is done using JavaScript. For this, NodeJS has to be installed since it is a JavaScript engine. Only after its installation, we can execute Puppeteer tests.
The steps to configure NodeJS are listed below −
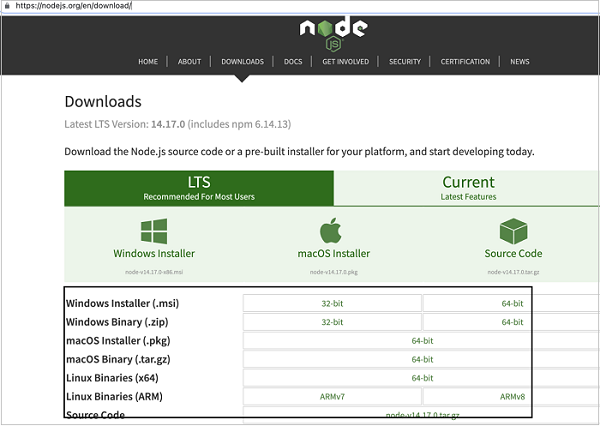
Step 1 − Launch the application having the below link −
https://nodejs.org/en/download/
Step 2 − As per the local operating system (Windows, Mac or Linux) we are using, click on the link to download the Installer.
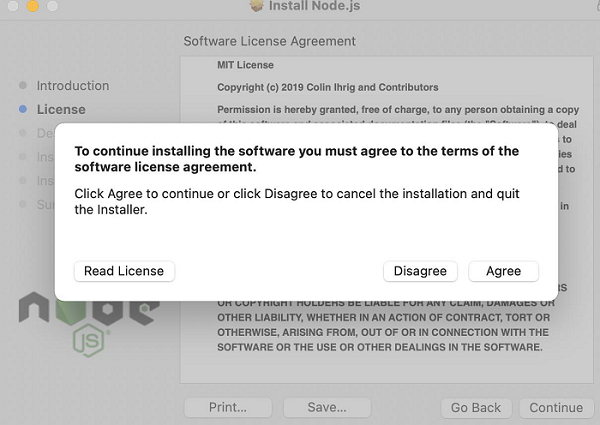
Step 3 − Once the installer is downloaded, click on it. We shall be navigated to the Node.js Installer welcome screen. Click on Continue.

Step 4 − Agree to the terms of agreement of Nodejs.
Step 5 − Click on Install.
Step 6 − Once the success message of Nodejs installation is displayed, click on Close.
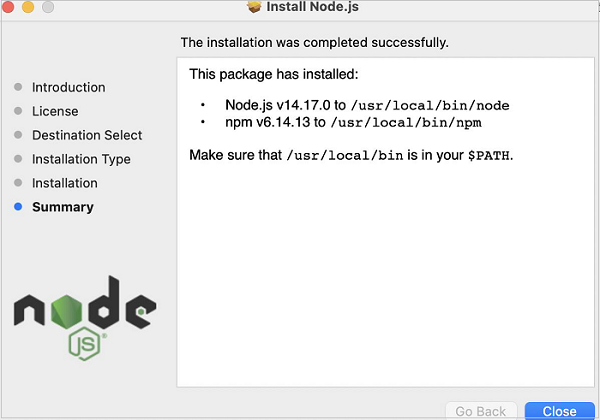
Step 7 − To check if Nodejs is installed successfully, open the terminal and run the command: node.

The version of the Nodejs installed in the machine should get displayed.
Puppeteer - VS Code Configuration
The steps to install the Visual Studio (VS) Code are listed below −
Step 1 − Navigate to the below link −
https://code.visualstudio.com/
Step 2 − Depending on the local operating system we have for example - macOS, Linux or Windows, we need to choose the link for download.
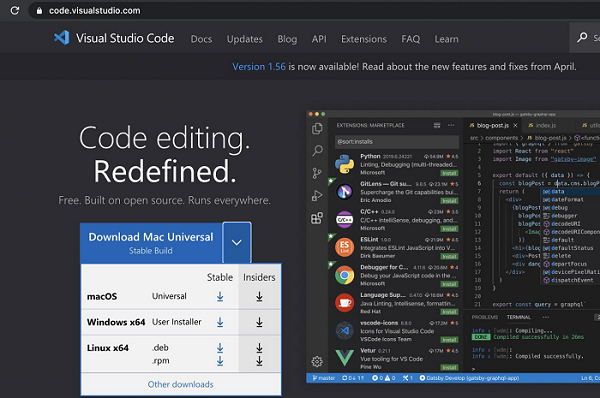
Step 3 − A zip file gets downloaded after clicking the Download button. After downloading this file has completed, click on it and the Visual Studio Code application should become available for use.

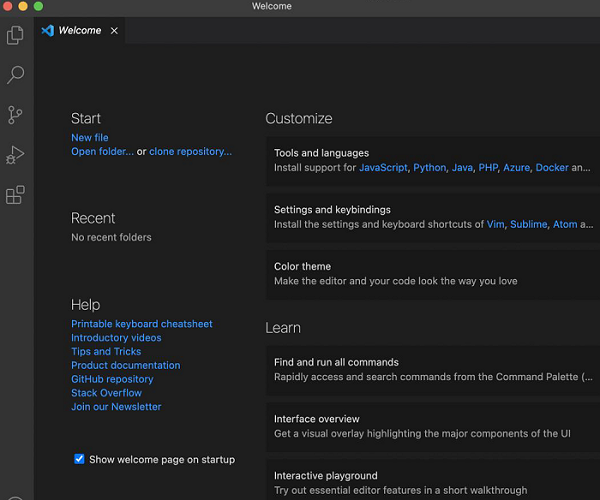
Step 4 − Double-click it and the Visual Studio Code application should launch along with the welcome page.
Puppeteer - Installation
The steps for installation of Puppeteer are listed below −
Step 1 − Install NodeJS.
The details on how to install NodeJs is discussed in detail in the Chapter of Installation of NodeJS.
Step 2 − Create an empty folder, say puppeteer in a location.
Step 3 − Launch the Visual Studio Code application and click on the Open folder link and import the folder we have created in Step2.
The details on how to install VS Code is discussed in detail in the Chapter of VS Code Configuration.
Step 4 − Open the terminal and move from the current directory to the directory of the empty folder that we have created in Step 2. Then run the following command −
npm
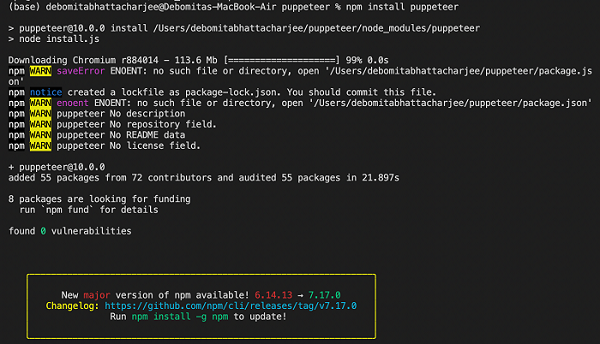
Step 5 − For Puppeteer installation, run the below mentioned command −
npm install puppeteer
Or,
npm i puppeteer
Step 6 − For installation of Puppeteer core, run the below mentioned command −
npm i puppeteer-core
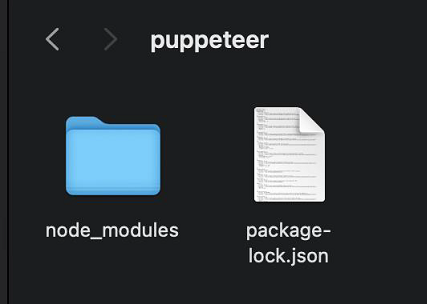
Step 7 − After the installation of Puppeteer and Puppeteer core, we shall find the node_modules folder and package.json file generated within the empty folder we created in Step 2.
Step 8 − While working on a test, we have to add the below Puppeteer library in the code.
const pt = require('puppeteer')
Puppeteer - Basic Test
To start with a basic test on Puppeteer, we have to follow the below mentioned steps −
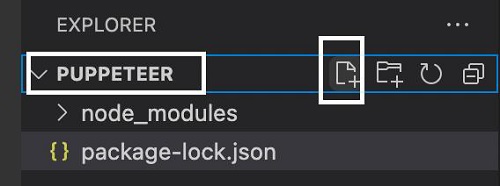
Step 1 − Create a new file within the directory where the node_modules folder is created (location where the Puppeteer and Puppeteer core have been installed).
The details on Puppeteer installation is discussed in the Chapter of Puppeteer Installation.
Right-click on the folder where the node_modules folder is created, then click on the New file button.
Step 2 − Enter a filename, say testcase1.js.
Step 3 − Add the below code in this file −
//adding Puppeteer library
const pt = require('puppeteer');
pt.launch().then(async browser => {
   //browser new page
   const p = await browser.newPage();
   //set viewpoint of browser page
   await p.setViewport({ width: 1000, height: 500 })
   //launch URL
   await p.goto('https://www.tutorialspoint.com/index.htm')
   //capture screenshot
   await p.screenshot({
      path: 'tutorialspoint.png'
   });
   //browser close
   await browser.close()
})
Step 4 − Execute the code with the following command −
node <filename>
So in our example, we shall run the following command −
node testcase1.js
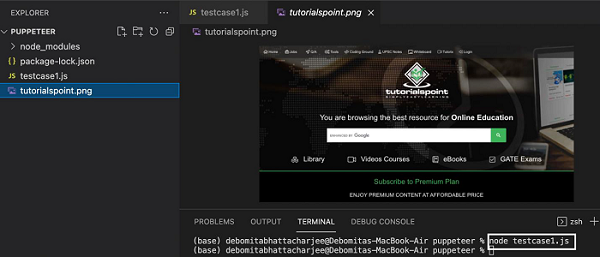
After the command has been successfully executed, a new file called the tutorialspoint.png gets created within the page directory. It contains the captured screenshot of the page launched in the browser in a headless mode.
Puppeteer - Non Headless Execution
By default, Puppeteer executes the test in headless Chromium. This means if we are running a test using Puppeteer, then we won't be able to view the execution in the browser.
To enable execution in the headed mode, we have to add the parameter: headless:false in the code.
To begin, follow Steps 1 to 2 from the Chapter of Basic Test on Puppeteer, which are as follows −
Step 1 − Create a new file within the directory where the node_modules folder is created (location where the Puppeteer and Puppeteer core have been installed).
The details on Puppeteer installation is discussed in the Chapter of Puppeteer Installation.
Right-click on the folder where the node_modules folder is created, then click on the New file button.
Step 2 − Enter a filename, say testcase1.js.
Step 3 − Add the below code within the testcase1.js file created.
//adding Puppeteer library
const pt = require('puppeteer');
//adding headless flag to false
pt.launch({headless:false}).then(async browser => {
   //browser new page
   const p = await browser.newPage();
   //set viewpoint of browser page
   await p.setViewport({ width: 1000, height: 500 })
   //launch URL
   await p.goto('https://www.tutorialspoint.com/about/about_careers.htm');
})
Step 4 − Execute the code with the command given below −
node <filename>
So in our example, we shall run the below mentioned command −
node testcase1.js

After the command has been successfully executed, we shall see the execution getting triggered in a headed mode.
Comparison Between Puppeteer & Selenium
The major differences between Puppeteer and Selenium are given below −
| Sr.No | Puppeteer | Selenium |
|---|---|---|
| 1 | Puppeteer is developed mainly for Chromium so the tests developed are mainly executed in Chrome. | Selenium can be used to execute tests on multiple browsers like Chrome, Firefox, IE, Safari, and so on. |
| 2 | Puppeteer code can be implemented only in JavaScript. | Selenium code can be implemented on multiple languages like Java, Python, JavaScript, C#, and so on. |
| 3 | Puppeteer provides APIs to manage headless execution in Chrome by using the DevTools protocol. | Selenium requires additional external browser drivers that trigger tests as per the user commands. |
| 4 | Puppeteer manages the Chrome browser. | Selenium is primarily used to execute tests to automate the actions performed on the browser. |
| 5 | Puppeteer is faster in executing tests than Selenium. | Selenium is slower in executing tests than Puppeteer. |
| 6 | Puppeteer is a module in node developed for Chromium engine. | Selenium is a dedicated test automation tool. |
| 7 | Puppeteer can be used for API testing by utilising the requests and the responses. | API testing with Selenium is difficult. |
| 8 | Puppeteer can be used to verify the count of CSS and JavaScript files utilised for loading a webpage. | Selenium cannot be used to verify the count of CSS and JavaScript files utilised for loading a webpage. |
| 9 | Puppeteer can be used to work on the majority of features in the DevTools in the Chrome browser. | Selenium cannot be used to work on the majority of features in the DevTools in the Chrome browser. |
| 10 | Puppeteer can be used to execute tests on various devices with the help of the emulators. | Using an emulator with Selenium is not easy. |
| 11 | Puppeteer can be used to obtain the time needed for a page to load. | Selenium cannot be used to obtain the time needed for a page to load. |
| 12 | Puppeteer can be used to save a screenshot in both image and PDF formats. | Selenium can be used to save a screenshot in both image and PDF formats only in the Selenium 4 version. |
| 13 | Puppeteer was first introduced in the year 2017. | Selenium was first introduced in the year 2004. |
| 14 | In Puppeteer, we can verify an application without image loading. | In Selenium, we can verify an application without image loading. |
Comparison Between Puppeteer & Protractor
The major differences between Puppeteer and Protractor are given below −
| Sr.No. | Puppeteer | Protractor |
|---|---|---|
| 1 | Puppeteer is a module in node developed for Chromium engine. | Protractor is a dedicated test automation tool. |
| 2 | Puppeteer is faster in executing tests than Protractor. | Protractor is slower in executing tests than Puppeteer. |
| 3 | Puppeteer is developed mainly for Chromium so the tests developed are mainly executed in Chrome. | Protractor can be used to execute tests on multiple browsers like Chrome, Firefox, IE, Safari, and so on. |
| 4 | Puppeteer can be used for API testing by utilising the requests and the responses. | API testing with Protractor is difficult. |
| 5 | Puppeteer can be used to verify the count of CSS and JavaScript files utilised for loading a webpage. | Protractor cannot be used to verify the count of CSS and JavaScript files utilised for loading a webpage. |
| 6 | Puppeteer can be used to work on the majority of features in the DevTools in the Chrome browser. | Protractor cannot be used to work on the majority of features in the DevTools in the Chrome browser. |
| 7 | Puppeteer can be used to execute tests on various devices with the help of the emulators. | Using an emulator with Protractor is not easy. |
| 8 | Puppeteer can be used to save a screenshot in both image and PDF formats. | Protractor can be used to save a screenshot in only image format. |
| 9 | Puppeteer can be used to obtain the time needed for a page to load. | Protractor cannot be used to obtain the time needed for a page to load. |
| 10 | In Puppeteer, we can verify an application without image loading. | In Protractor, we can verify an application without image loading. |
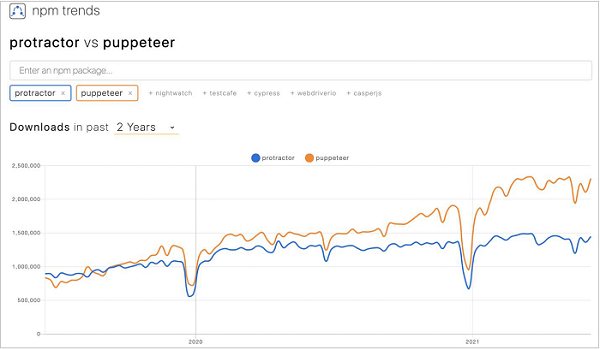
Let us observe the npm trends of Puppeteer and Protractor for the last two years. We shall observe an upward trend towards the use of Puppeteer than Protractor (available from the below link) −
https://www.npmtrends.com/protractor-vs-puppeteer
Comparison Between Puppeteer & Cypress
The major differences between Puppeteer and Cypress are as follows −
| Sr.No | Puppeteer | Cypress |
|---|---|---|
| 1 | Puppeteer is a module in node developed for Chromium engine. | Cypress is a dedicated test automation framework developed in JavaScript. |
| 2 | Puppeteer is mainly used for web page scraping and crawling SPA(Single Page Application). | Cypress is mainly used to automate test cases for a complete application. |
| 3 | Assertions in Puppeteer are based on the Mocha, Jasmine or Jest frameworks. | Cypress has its individual assertions. |
| 4 | VS Code and Webstorm are mostly used as an IDE for Puppeteer. | Cypress has its individual IDE. |
| 5 | Puppeteer is developed mainly for Chromium so the tests developed are mainly executed in Chrome. | Cypress can be used to execute tests on multiple browsers like Chrome, Firefox, Electron and so on. |
| 6 | Puppeteer has no dashboard. | Cypress has its dashboard to see the recorded tests and gives us detail on the events that took place during execution. |
| 7 | Puppeteer is faster in executing tests than Cypress. | Cypress is slower in executing tests than Puppeteer. |
| 8 | Puppeteer APIs are not easier to use than Cypress. | Cypress APIs are easier to use than Puppeteer. |
| 9 | Puppeteer comes free of cost. | Cypress has both free and paid versions. |
| 10 | Puppeteer has no features of fixtures and group fixtures in tests. | Cypress has the features of fixtures and group fixtures applied in tests. |
| 11 | Grouping of tests for execution cannot be done in Puppeteer. | Grouping of tests for execution can be done in Cypress. |
| 12 | Puppeteer has no mocking capabilities. | Cypress has the mocking capabilities. |
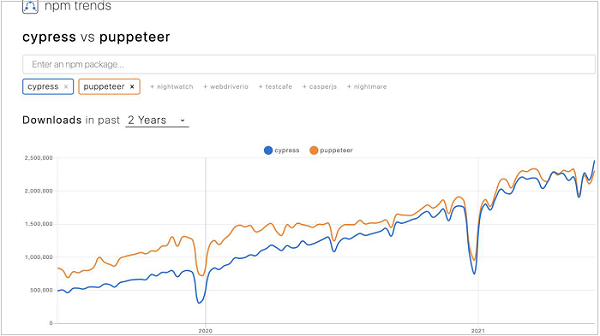
Let us observe the npm trends of Puppeteer and Cypress for the last two years. We shall observe an upward trend towards the use of both Puppeteer and Cypress (available from the below link) −
https://www.npmtrends.com/cypress-vs-puppeteer
Puppeteer - Browser Operations
The browser operations can be done by Puppeteer with the help of below given methods −
launch()
It is used to open new browsers and connect with an instance of Chromium. It has some optional parameters which are as follows −
Product − This is of String type and is used to point to the browser to be launched.
Syntax
The syntax is as follows −
let l = await puppeteer.launch({product : "chrome" })
headless − This is of Boolean type(default value is true) and it has to be set with false value inorder to execute the tests in headed mode.
Syntax
The syntax is as follows −
let l = await puppeteer.launch({headless : false})
devtools − This is of Boolean type. If it is set to true, then DevTools shall open automatically in each browser tab. Also, the headless parameter should be set to false, if devtools is set to true.
Syntax
The syntax is as follows −
let l = await puppeteer.launch({devtools: true})
defaultViewport − This is of type object. It provides a persistent viewport for a page(default value of viewport is 800*600). We can modify the size of the viewport by mentioning integer values in width and height for pixels.
Syntax
The syntax is as follows −
let l = await puppeteer.launch({defaultViewport: { width: 500, height: 459}})
slowMo − This is of type number. This parameter is used to slow down the Puppeteer execution for some time, provided in milliseconds.
Syntax
The syntax is as follows −
let l = await puppeteer.launch({slowMo: 500})
goTo()
It is used to navigate to a webpage. The URL of the page to be navigated is passed as a parameter.
Syntax
The syntax is as follows −
await page.goto('https://www.tutorialspoint.com/index.htm')
close()
It is used to close an opened browser.
Syntax
The syntax is as follows −
await browser.close()
browserContexts()
This yields an array of all opened browser contexts.
createIncognitoBrowserContext()
It opens a new browser in incognito context.
defaultBrowserContext()
It yields a default browser context.
disconnect()
It is used to disconnect Puppeteer from the browser instance.
isConnected()
It is used to verify whether a browser is connected.
newPage()
It yields a Promise with a new page object.
pages()
It yields a Promise with an array of all open page objects.
process()
It yields a browser process if the instance is created with the launch method. Furthermore, it yields a null value if the instance is created with the connect method.
target()
It yields the target for a browser.
targets()
It yields a Promise containing the array of all targets which are active.
Puppeteer - Handling Tabs
We can handle tabs in Puppeteer using the below methods −
newPage()
We can open a new tab using this method available in the browser object.
Syntax
The syntax is as follows −
const p = await browser.newPage()
close()
We can close the tab opened using this method.
Syntax
The syntax is as follows −
await p.close()
close()
We can close all the tabs opened using this method available in the browser object.
Syntax
The syntax is as follows −
await browser.close()
To begin, follow Steps 1 to 2 from the Chapter of Basic Test on Puppeteer which are as follows −
Step 1 − Create a new file within the directory where the node_modules folder is created (location where the Puppeteer and Puppeteer core have been installed).
The details on Puppeteer installation is discussed in the Chapter of Puppeteer Installation.
Right-click on the folder where the node_modules folder is created, then click on the New file button.
Step 2 − Enter a filename, say testcase1.js.
Step 3 − Add the below code within the testcase1.js file created.
//adding Puppeteer library
const pt = require('puppeteer')
pt.launch().then(async browser => {
   //browser new page
   const p = await browser.newPage();
   //set viewpoint of browser page
   await p.setViewport({ width: 1000, height: 500 })
   //launch URL
   await p.goto('https://www.tutorialspoint.com/index.htm')
   //capture screenshot
   await p.screenshot({
      path: 'tutorialspoint.png'
   });
   //browser close
   await browser.close()
})
Step 4 − Execute the code with the command given below −
node <filename>
So in our example, we shall run the following command −
node testcase1.js

After the command has been successfully executed, a new file called the tutorialspoint.png gets created within the page directory. It contains the captured screenshot of the page launched in the browser.
Puppeteer - Basic Commands
Some of the basic commands of Puppeteer are listed below −
title()
This command is used to obtain the title of the present page.
Syntax
The syntax is as follows −
await page.title()
url()
This command is used to obtain the URL of the application currently launched in the browser.
Syntax
The syntax is as follows −
await page.url()
content()
This command is used to obtain the page source code.
Syntax
The syntax is as follows −
await page.content()
To begin, follow Steps 1 to 2 from the Chapter of Basic Test on Puppeteer which are as follows −
Step 1 − Create a new file within the directory where the node_modules folder is created (location where the Puppeteer and Puppeteer core have been installed).
The details on Puppeteer installation is discussed in the Chapter of Puppeteer Installation.
Right-click on the folder where the node_modules folder is created, then click on the New file button.
Step 2 − Enter a filename, say testcase1.js.
Step 3 − Add the below code within the testcase1.js file created.
//adding Puppeteer library
const pt = require('puppeteer');
pt.launch().then(async browser => {
   //browser new page
   const p = await browser.newPage();
   //set viewpoint of browser page
   await p.setViewport({ width: 1000, height: 500 })
   //launch URL
   await p.goto('https://www.tutorialspoint.com/questions/index.php')
   //obtain page title
   console.log("Page title: " + await p.title())
   //obtain URL
   console.log("Url: " + await p.url())
   //browser close
   await browser.close()
})
Step 4 − Execute the code with the command given below −
node <filename>
So in our example, we shall run the following command −
node testcase1.js

After the command has been successfully executed, the page title - The Best Technical Questions and Answers gets printed in the console. Also, the URL - www.tutorialspoint.com/questions/index.php gets printed in the console. The execution has happened in the headless mode.
Puppeteer - Firefox
We can run the tests developed in Puppeteer in Firefox. It must be remembered that while executing the test in Firefox, Puppeteer uses its internal Firefox browser and not the Firefox browser installed in the local system.
Step 1 − We have to first install Puppeteer for the Firefox browser by executing the below command −
npm install puppeteer-firefox
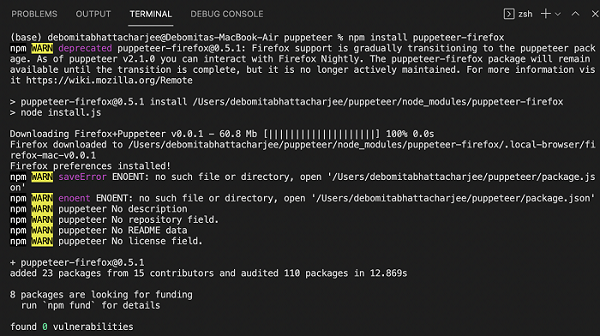
Also, we have to add the Firefox-Puppeteer library in the code.
const f = require('puppeteer-firefox')
To begin, follow Steps 1 to 2 from the Chapter of Basic Test on Puppeteer which are as follows −
Step 1 − Create a new file within the directory where the node_modules folder is created (location where the Puppeteer and Puppeteer core have been installed).
The details on Puppeteer installation is discussed in the Chapter of Puppeteer Installation.
Right-click on the folder where the node_modules folder is created, then click on the New file button.
Step 2 − Enter a filename, say testcase1.js.
Step 3 − Add the below code within the testcase1.js file created.
//adding Puppeteer- Firefox library
const pt = require('puppeteer-firefox');
//adding headless flag to false
pt.launch().then(async browser => {
   //browser new page
   const p = await browser.newPage();
   //set viewpoint of browser page
   await p.setViewport({ width: 1000, height: 500 })
   //launch URL
   await p.goto('https://www.tutorialspoint.com/about/about_careers.htm')
   //get browser
   const v = await p.browser().version();
   console.log("Browser: " + v)
   //browser close
   await browser.close()
})
Step 4 − Execute the code with the command given below −
node <filename>
So in our example, we shall run the following command −
node testcase1.js

After the command has been successfully executed, the browser in which the test is executed - Firefox/65.0 gets printed in the console.
Puppeteer - Chrome
The tests written in Puppeteer are executed in the Chrome or Chromium browser in a headless mode by default. Also, we have to add the below Puppeteer library in the code.
const pt = require('puppeteer')
To begin, follow Steps 1 to 2 from the Chapter of Basic Test on Puppeteer which are as follows −
Step 1 − Create a new file within the directory where the node_modules folder is created (location where the Puppeteer and Puppeteer core have been installed).
The details on Puppeteer installation is discussed in the Chapter of Puppeteer Installation.
Right-click on the folder where the node_modules folder is created, then click on the New file button.
Step 2 − Enter a filename, say testcase1.js.
Step 3 − Add the below code within the testcase1.js file created.
//adding Puppeteer library
const pt = require('puppeteer');
pt.launch().then(async browser => {
   //browser new page
   const p = await browser.newPage();
   //set viewpoint of browser page
   await p.setViewport({ width: 1000, height: 500 })
   //launch URL
   await p.goto('https://www.tutorialspoint.com/index.htm')
   //get browser
   const v = await p.browser().version();
   console.log("Browser: " + v)
   //browser close
   await browser.close()
})
Step 4 − Execute the code with the command given below −
node <filename>
So in our example, we shall run the following command −
node testcase1.js

After the command has been successfully executed, the browser in which the test is executed - HeadlessChrome/92.0.4512.0 gets printed in the console.
Puppeteer - Handling Confirm Alerts
Puppeteer is capable of handling Alerts. The automation tools like Selenium, WebdriverIO, and so on, accept or dismiss an alert after it has appeared on the page.
However in Puppeteer, the user has to give direction whether to accept or dismiss an alert before it appears on the page. For this, the on event listener has to be triggered using Puppeteer.
Methods for Handling Confirm Alerts
Some methods to work with Alerts are listed below −
accept(): Promise<void> − This method is used to accept an alert.
message(): string − This method is used to yield the message obtained in an alert.
type(): DialogType − This method is used to obtain the Dialog type. A Dialog type can be a prompt, confirm or prompt.
dismiss(): Promise<void> − This method is used to dismiss an alert.
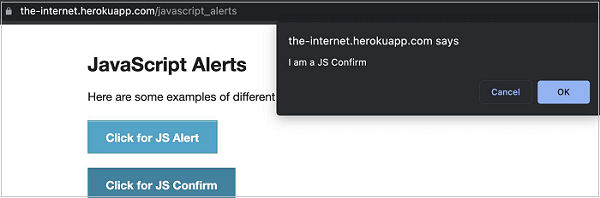
In the below given image, on clicking Click for JS Confirm, a confirm alert is displayed. Let us obtain the text on the alert.
To begin, follow Steps 1 to 2 from the Chapter of Basic Test on Puppeteer which are as follows −
Step 1 − Create a new file within the directory where the node_modules folder is created (location where the Puppeteer and Puppeteer core have been installed).
The details on Puppeteer installation is discussed in the Chapter of Puppeteer Installation.
Right-click on the folder where the node_modules folder is created, then click on the New file button.
Step 2 − Enter a filename, say testcase1.js.
Step 3 − Add the below code within the testcase1.js file created.
//Puppeteer library
const pt= require('puppeteer')
async function confirmAlert(){
   //launch browser in headless mode
   const browser = await pt.launch()
   //browser new page
   const page = await browser.newPage();
   //on event listener trigger
   page.on('dialog', async dialog => {
      //get alert message
      console.log(dialog.message());
      //accept alert
      await dialog.accept();
   })
   //launch URL
   await page.goto('https://the-internet.herokuapp.com/javascript_alerts')
   //identify element with xpath then click
   const b = (await page.$x("//button[text()='Click for JS Confirm']"))[0]
   b.click()
}
confirmAlert()
Step 4 − Execute the code with the following command.
node <filename>
So in our example, we shall run the command given below −
node testcase1.js

After the command has been successfully executed, the confirm alert text - I am a JS Confirm gets printed in the console.
Puppeteer - Handling Drop-downs
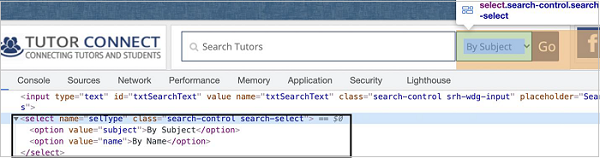
We can handle drop downs in the UI while automating a test using Puppeteer. The static drop downs are identified in the html code with the tagname as select and its options have the tagname as option.
Methods to Handle Dropdown
Some methods to work with static dropdowns −
select()
This method is used to select an option from the dropdown. The value of the option to be selected is passed as a parameter to this method.
Syntax
The syntax is as follows −
const page = await browser.newPage()
   const f = await page.$('[name="selType"]')
await f.select("subject")
We can also select multiple options from a multi-select dropdown.
Syntax
The syntax is as follows −
await f.select("subject", "name")
To obtain select value from the dropdown, we have to use the getProperty method and pass value as a parameter to this field.
const v = await (await n.getProperty("value")).jsonValue()
console.log(v)
type()
This method is used to select an option from the dropdown. The value of the option to be selected is passed as a parameter to this method.
Syntax
The syntax is as follows −
const page = await browser.newPage()
   const f = await page.$('[name="selType"]')
await f.type("subject")
To begin, follow Steps 1 to 2 from the Chapter of Basic Test on Puppeteer which are as follows −
Step 1 − Create a new file within the directory where the node_modules folder is created (location where the Puppeteer and Puppeteer core have been installed).
The details on Puppeteer installation is discussed in the Chapter of Puppeteer Installation.
Right-click on the folder where the node_modules folder is created, then click on the New file button.
Step 2 − Enter a filename, say testcase1.js.
Step 3 − Add the below code within the testcase1.js file created.
//Puppeteer library
const pt= require('puppeteer')
async function dropDownHandle(){
   //launch browser in headless mode
   const browser = await pt.launch()
   //browser new page
   const page = await browser.newPage()
   //launch URL
   await page.goto('https://www.tutorialspoint.com/tutor_connect/index.php')
   //identify dropdown then select an option by value
   const f = await page.$('[name="selType"]')
   await f.select("subject")
   //wait for sometime
   await page.waitForTimeout(4000)
   //get value selected
   const v = await (await f.getProperty("value")).jsonValue()
   console.log(v)
}
dropDownHandle()
Step 4 − Execute the code with the command given below −
node <filename>
So in our example, we shall run the following command −
node testcase1.j

After the command has been executed successfully, the value of the option selected in the dropdown - subject is printed in the console.
Puppeteer - Locators
We can handle elements on page with Puppeteer. Once we navigate to a webpage, we have to interact with the webelements available on the page like clicking a link/button, entering text within an edit box, and so on to complete our automation test case.
For this, our first job is to identify the element. To get the property of an element uniquely we need to inspect it (right-click on the element then select the option Inspect). The ElementHandle objects are created by the methods - page.$, page.$$ and page.$x. These objects refer to an element or tag in a page.
To determine an element uniquely, we can either take the help of any of the attributes within the html tag or we can use a combination of attributes on the html tag. Mostly the id attribute is used since it is unique to a page.
However, if the id attribute is not present, we can use other attributes like the class, name, and so on. In case the attributes like id, name, and class are not present, we can utilise a distinct attribute available to only that tag or a combination of attributes and their values to identify an element. For this, we have to use the xpath expression.
Methods to locate elements
These methods are listed below −
page.$(locator value)
This method yields a Promise with the ElementHandle. The ElementHandle is an object of the identified element. If there are multiple elements having the same locator value, then only the first matching element from the top left corner of the page shall be returned.
page.$$(locator value)
This method yields a Promise with an array of ElementHandle. If there are multiple elements having the same locator value, then all matching elements shall be returned in the form of an array.
page.$x(xpath value)
This method yields a Promise with an array of ElementHandle. If there are multiple elements having the same xpath value, then all matching elements shall be returned in the form of an array. In case, there is one matching element, then the array returned shall have a single element.
The ElementHandle methods like elementHandle.$, elementHandle.$$ and elementHandle.$x can be applied to an element. In that case, an element shall be searched within the DOM of the present ElementHandle and not in the entire DOM.
In the below given image, let us take the example of an element having the li tag(having a parent element ul) and class attribute value as heading.
To identify it using the ElementHandle method on the page, the expression should be as follows −
const n = await page.$(".heading")
To identify it using the ElementHandle method on an element, the expression should be −
const m = await page.$("ul")
const p = await m.$(".heading")
Now, refer the image given below of an element having the li tag

Types of Locators
The types of locators in Puppeteer are listed below −
ID
Class
Type
Xpath
Attribute
Type
To work with the above locators we should have the basic understanding of HTML code. Let us take an example of an edit box having the below properties −
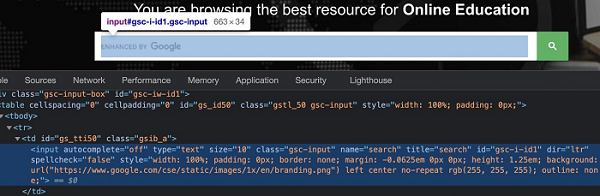
Here, input is the tagname. A tag in HTML may or may not have attributes. The type, class, name, id and so on are the attributes of the element.
For example, in the expression id = "gsc-i-id1", text to the left of = is the attribute name (id) and to the right of = is the attribute value (gsc-i-id1).
An attribute may or may not have a value assigned. Also, if a value is assigned, then it should be enclosed in double or single quotes. The value of an attribute is set by a developer as per his choice.
Let us take an example of an element having the below html code −
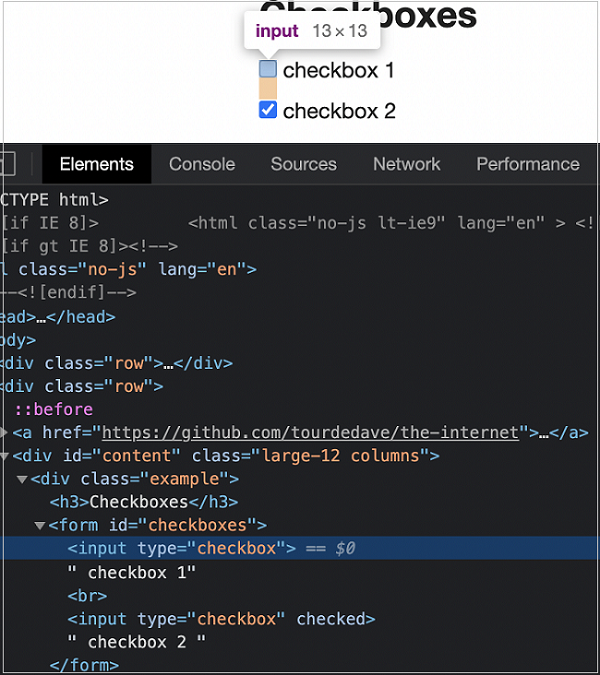
We can identify the first checkbox in the above image, with the expression −
const n = await page.$("input[type='checkbox']")
To begin, follow Steps 1 to 2 from the Chapter of Basic Test on Puppeteer which are as follows −
Step 1 − Create a new file within the directory where the node_modules folder is created (location where the Puppeteer and Puppeteer core have been installed).
The details on Puppeteer installation is discussed in the Chapter of Puppeteer Installation.
Right-click on the folder where the node_modules folder is created, then click on the New file button.
Step 2 − Enter a filename, say testcase1.js.
Step 3 − Add the below code within the testcase1.js file created.
//Puppeteer library
const pt= require('puppeteer')
async function checkBoxHandle(){
   //launch browser in headed mode
   const browser = await pt.launch()
   //browser new page
   const page = await browser.newPage()
   //launch URL
   await page.goto('https://the-internet.herokuapp.com/checkboxes')
   //identify element with xpath then click
   const n = await page.$("input[type='checkbox']")
   n.click()
   //wait for sometime
   await page.waitForTimeout(4000)
   //verify if checkbox is checked
   const v = await (await n.getProperty("checked")).jsonValue()
   console.log(v)
}
checkBoxHandle()
Step 4 − Execute the code with the below mentioned command −
node <filename>
So in our example, we shall run the following command −
node testcase1.js

After the command has been executed successfully, the boolean value true is printed in the console. This is returned by getProperty("checked") which returns true as the checkbox is selected.
Puppeteer - Xpath Functions
To determine an element uniquely, we can either take the help of any of the attributes within the html tag or we can use a combination of attributes on the html tag. Mostly the id attribute is used since it is unique to a page.
However, if the id attribute is not present, we can use other attributes like the class, name, and so on. In case the attributes like id, name, and class are not present, we can utilise a distinct attribute available to only that tag or a combination of attributes and their values to identify an element. For this, we have to use the xpath expression.
If there are duplicate attributes or no attribute for an element, then the function text() is used to identify an element. In order to use the text() function, it is mandatory that the element should have a text visible on the page.
Syntax
The syntax for the use of text() function is as follows −
//tagname[text()='visible text on element']
If the value of an element or the text is partially dynamic in nature or very lengthy, we can use the contains() function. In order to use the contains() function, it is mandatory that the element should either have an attribute value or a text.
Syntax
The syntax for the use of contains() function is as follows −
//tagname[contains(@attribute,'value')]
//tagname[contains(text(),'visible text on element')]
If the text of an element begins with a particular text, we can use the starts-with() function to it.
Syntax
The syntax for the use of starts-with() function is as follows −
//tagname[starts-with(text(),'visible text on element')
In all the above functions, tagname is optional. Instead of tagname, we can use the symbol *.
In the below image, let us identify the element - Library with the help of its displayed text and then click on it.
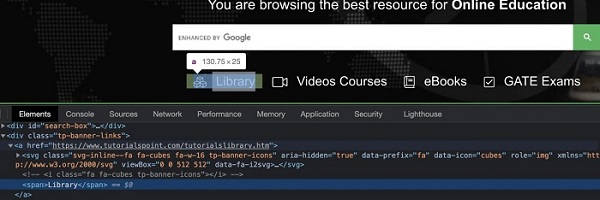
The xpath for the element shall be //*[text()='Library'].
Here, we are working with the xpath selector, so we have to use the method: page.$x(xpath value). The detail on this method is discussed in the Chapter - Puppeteer Locators.
To begin, follow Steps 1 to 2 from the Chapter of Basic Test on Puppeteer which are as follows −
Step 1 − Create a new file within the directory where the node_modules folder is created (location where the Puppeteer and Puppeteer core have been installed).
The details on Puppeteer installation is discussed in the Chapter of Puppeteer Installation.
Right-click on the folder where the node_modules folder is created, then click on the New file button.
Step 2 − Enter a filename, say testcase1.js.
Step 3 − Add the below code within the testcase1.js file created.
//Puppeteer library
const pt= require('puppeteer')
async function selectorFunTextXpath(){
   //launch browser in headless mode
   const browser = await pt.launch()
   //browser new page
   const page = await browser.newPage()
   //launch URL
   await page.goto('https://www.tutorialspoint.com/index.htm')
   //identify element with xpath function - text() then click
   const b = (await page.$x("//*[text()='Library']"))[0]
   b.click()
   //wait for sometime
   await page.waitForTimeout(4000)
   //obtain URL after click
   console.log(await page.url())
}
selectorFunTextXpath()
Step 4 − Execute the code with the command given below −
node <filename>
So in our example, we shall run the following command −
node testcase1.js

After the command has been successfully executed, the URL of the page navigated on clicking the element Library - https://www.tutorialspoint.com/tutorialslibrary.htm gets printed in the console.
Puppeteer - Xpath Attributes
To determine an element uniquely, we can either take the help of any of the attributes within the html tag or we can use a combination of attributes on the html tag. Mostly the id attribute is used since it is unique to a page.
However, if the id attribute is not present, we can use other attributes like the class, name, and so on. In case the attributes like id, name, and class are not present, we can utilise a distinct attribute available to only that tag or a combination of attributes and their values to identify an element. For this, we have to use the xpath expression.
If an xpath expression with a single attribute identifies multiple elements, we can use more than one attribute in the xpath expression to locate a single element.
The format for writing an xpath with only one attribute is as follows −
//tagname[@attribute='value']
For multiple attributes, we can apply AND and OR conditions. The format for writing an xpath with AND condition −
//tagName[@attribute1='value1'] [@attribute2='value2']
Or,
//tagName[@attribute1='value1' and @attribute2='value2']
The format for writing an xpath with OR condition is as follows −
//tagName[@attribute1='value1' or @attribute2='value2']
We can also identify an element by applying the NOT condition on an attribute. The format for writing an xpath with NOT condition −
//tagname[not(@attribute='value')]
Let us identify the below highlighted logo on the page with the help of the alt attribute and then click on it.
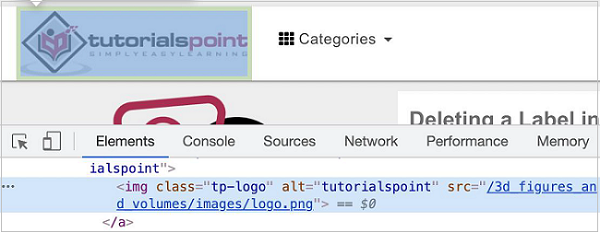
The xpath for the element shall be as follows −
//img[@alt='tutorialspoint'].
Here, we are working with the xpath selector, so we have to use the method: page.$x(xpath value). The detail on this method is discussed in the Chapter of Puppeteer Locators.
To begin, follow Steps 1 to 2 from the Chapter of Basic Test on Puppeteer which are as follows −
Step 1 − Create a new file within the directory where the node_modules folder is created (location where the Puppeteer and Puppeteer core have been installed).
The details on Puppeteer installation is discussed in the Chapter of Puppeteer Installation.
Right-click on the folder where the node_modules folder is created, then click on the New file button.
Step 2 − Enter a filename, say testcase1.js.
Step 3 − Add the below code within the testcase1.js file created.
//Puppeteer library
const pt= require('puppeteer')
async function selectorAttributeXpath(){
   //launch browser in headed mode
   const browser = await pt.launch()
   //browser new page
   const page = await browser.newPage()
   //launch URL
   await page.goto('https://www.tutorialspoint.com/questions/index.php')
   //identify element with relative xpath then click
   const b = (await page.$x("//img[@alt='tutorialspoint']"))[0]
   b.click()
   //wait for sometime
   await page.waitForTimeout(4000)
   //obtain URL after click
   console.log(await page.url())
}
selectorAttributeXpath()
Step 4 − Execute the code with the command given below −
node <filename>
So in our example, we shall run the following command −
node testcase1.js

After the command has been successfully executed, the URL of the page navigated on clicking the logo image - https://www.tutorialspoint.com/index.htm gets printed in the console.
Puppeteer - Xpath Grouping
To determine an element uniquely, we can either take the help of any of the attributes within the html tag or we can use a combination of attributes on the html tag. Mostly the id attribute is used since it is unique to a page.
However, if the id attribute is not present, we can use other attributes like the class, name, and so on. In case the attributes like id, name, class are not present, we can utilise a distinct attribute available to only that tag or a combination of attributes and their values to identify an element. For this, we have to use the xpath expression.
Obtaining one element from a collection of matching elements by utilising the index is known as the group index. If an xpath expression identifies multiple elements, then we can use the group index.
The format for writing a group index is first the xpath expression followed by the index number enclosed in []. It represents an xpath array with index starting from 1. The function last() is used to point to the last element in the xpath array.
Syntax
The syntax for the use of function last() is as follows −
(/table/tbody/tr/td[1]/input)[last()]
Syntax
The function position() is used to obtain an element at a particular position in the xpath array. The syntax is as follows −
(/table/tbody/tr/td[1]/input)[position()=1]
The above xpath expression shall obtain the first element from the group of all the matching elements.
In the below image, let us identify the highlighted edit box and input some text in it.
So the xpath expression shall be as follows −

In the above example, there are two columns (represented by td tags) in the table having the tr tag as their parent. The input box is present in the first column.
So the xpath expression shall be as follows −
//table/tbody/tr/td[1]/input
Here, we are working with the xpath selector, so we have to use the method: page.$x(xpath value). The details on this method are discussed in the Chapter of Puppeteer Locators.
To begin, follow Steps 1 to 2 from the Chapter of Basic Test on Puppeteer which are as follows −
Step 1 − Create a new file within the directory where the node_modules folder is created (location where the Puppeteer and Puppeteer core have been installed).
The details on Puppeteer installation is discussed in the Chapter of Puppeteer Installation.
Right-click on the folder where the node_modules folder is created, then click on the New file button.
Step 2 − Enter a filename, say testcase1.js.
Step 3 − Add the below code within the testcase1.js file created.
//Puppeteer library
const pt= require('puppeteer')
async function selectorGroupXpath(){
   //launch browser in headless mode
   const browser = await pt.launch()
   //browser new page
   const page = await browser.newPage()
   //launch URL
   await page.goto('https://www.tutorialspoint.com/index.htm')
   //identify element with group index xpath then enter text
   const f = (await page.$x("//table/tbody/tr/td[1]/input"))[0]
   f.type("Puppeteer")
   //wait for sometime
   await page.waitForTimeout(4000)
   //capture screenshot
   await page.screenshot({
      path: 'tutorialspoint.png'
   });
   //browser close
   await browser.close()
}
selectorGroupXpath()
Step 4 − Execute the code with the command given below −
node <filename>
So in our example, we shall run the following command −
node testcase1.js
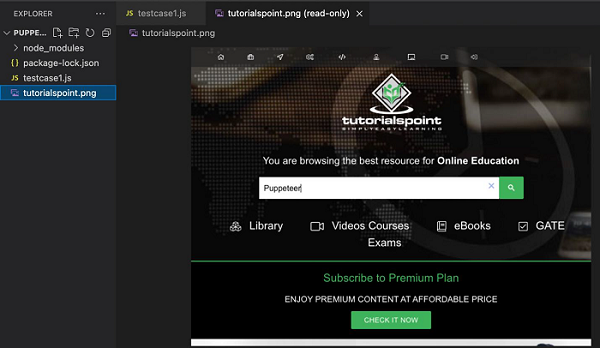
After the command has been successfully executed, a new file called the tutorialspoint.png gets created within the page directory. It contains the captured screenshot of the page launched in the browser with the text Puppeteer.
Puppeteer - Absolute Xpath
To determine an element uniquely, we can either take the help of any of the attributes within the html tag or we can use a combination of attributes on the html tag. Mostly the id attribute is used since it is unique to a page.
However, if the id attribute is not present, we can use other attributes like the class, name, and so on. In case the attributes like id, name, class are not present, we can utilise a distinct attribute available to only that tag or a combination of attributes and their values to identify an element. For this, we have to use the xpath expression. Also, if the element on a page is dynamic, then xpath selector can be a good choice as a selector.
Xpath can be of two types - absolute and relative. The absolute xpath begins with / symbol and starts from the root node upto the element that we want to identify. An example is given below for the same.
/html/body/div[1]/div/div[1]/a
Let us identify the below highlighted logo on the page with the help of the absolute xpath and then click on it.
The absolute xpath for the logo is as follows −
html/body/header/div[4]/div[1]/div[1]/a/img.
Here, we are working with the xpath selector, so we have to use the method: page.$x(xpath value). The detail on this method is discussed in the Chapter of Puppeteer Locators.
To begin, follow Steps 1 to 2 from the Chapter of Basic Test on Puppeteer which are as follows −
Step 1 − Create a new file within the directory where the node_modules folder is created (location where the Puppeteer and Puppeteer core have been installed).
The details on Puppeteer installation is discussed in the Chapter of Puppeteer Installation.
Right-click on the folder where the node_modules folder is created, then click on the New file button.
Step 2 − Enter a filename, say testcase1.js.
Step 3 − Add the below code within the testcase1.js file created.
//Puppeteer library
const pt= require('puppeteer')
async function selectorAbsoluteXpath(){
   //launch browser in headless mode
   const browser = await pt.launch()
   //browser new page
   const page = await browser.newPage()
   //launch URL
   await page.goto('https://www.tutorialspoint.com/about/about_careers.htm')
   //identify element with absolute xpath then click
   const b = (await page.$x("/html/body/header/div[4]/div[1]/div[1]/a/img"))[0]
   b.click()
   //wait for sometime
   await page.waitForTimeout(4000)
   //obtain URL after click
   console.log(await page.url())
}
selectorAbsoluteXpath()
Step 4 − Execute the code with the command mentioned below −
node <filename>
So in our example, we shall run the following command −
node testcase1.js

After the command has been successfully executed, the URL of the page navigated on clicking the logo image - https://www.tutorialspoint.com/index.htm gets printed in the console.
Puppeteer - Relative Xpath
To determine an element uniquely, we can either take the help of any of the attributes within the html tag or we can use a combination of attributes on the html tag. Mostly the id attribute is used since it is unique to a page.
However, if the id attribute is not present, we can use other attributes like the class, name, and so on. In case the attributes like id, name, and class are not present, we can utilise a distinct attribute available to only that tag or a combination of attributes and their values to identify an element.
For this, we have to use the xpath expression. Also, if the element on a page is dynamic, then xpath selector can be a good choice as a selector.
Relative Xpath
Xpath can be of two types - absolute and relative. A relative xpath begins from the element to be located and not from the root.
It begins with the // symbol which refers to any descendant. Its advantage is that even if an element is deleted or added in the DOM, the relative xpath for a specific element remains unaffected.
To obtain a relative path by an attribute, the xpath expression is as follows −
//tagname[@attribute='value'].
Let us identify the below highlighted logo on the page with the help of the alt attribute and then click on it.
The relative xpath for the element is given below
//img[@alt='tutorialspoint'].
Here, we are working with the xpath selector, so we have to use the method: page.$x(xpath value). The detail on this method is discussed in the Chapter - Puppeteer Locators.
To begin, follow Steps 1 to 2 from the Chapter of Basic Test on Puppeteer which are as follows −
Step 1 − Create a new file within the directory where the node_modules folder is created (location where the Puppeteer and Puppeteer core have been installed).
The details on Puppeteer installation is discussed in the Chapter of Puppeteer Installation.
Right-click on the folder where the node_modules folder is created, then click on the New file button.
Step 2 − Enter a filename, say testcase1.js.
Step 3 − Add the below code within the testcase1.js file created.
//Puppeteer library
const pt= require('puppeteer')
async function selectorRelativeXpath(){
   //launch browser in headless mode
   const browser = await pt.launch()
   //browser new page
   const page = await browser.newPage()
   //launch URL
   a wait page.goto('https://www.tutorialspoint.com/questions/index.php')
   //identify element with relative xpath then click
   const b = (await page.$x("//img[@alt='tutorialspoint']"))[0]
   b.click()
   //wait for sometime
   //wait for sometime
   await page.waitForTimeout(4000)
   //obtain URL after click
   console.log(await page.url())
}
selectorRelativeXpath()
Step 4 − Execute the code with the command given below −
node <filename>
So in our example, we shall run the following command −
node testcase1.js

After the command has been successfully executed, the URL of the page navigated on clicking the logo image - https://www.tutorialspoint.com/index.htm gets printed in the console.
Puppeteer - Xpath Axes
To determine an element uniquely, we can either take the help of any of the attributes within the html tag or we can use a combination of attributes on the html tag. Mostly the id attribute is used since it is unique to a page.
However, if the id attribute is not present, we can use other attributes like the class, name, and so on. In case the attributes like id, name, and class are not present, we can utilise a distinct attribute available to only that tag or a combination of attributes and their values to identify an element.
For this, we have to use the xpath expression. Also, if the element on a page is dynamic, then xpath selector can be a good choice as a selector.
The xpath is bi-directional which means we can traverse from the parent to the child element and also from the child to the parent element. The details of xpath axes shall be available in the below link −
https://www.tutorialspoint.com/xpath/xpath_axes.htm
In the below image, let us identify the highlighted edit box and obtain the value of its class attribute - gsc-input.
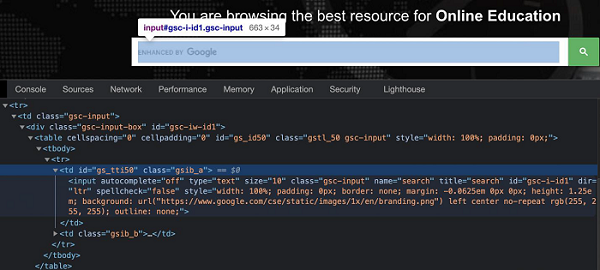
In the above example, there are two columns (represented by td tags) in the table having the tr tag as their parent. The input box is present in the first column.
So the xpath expression shall be as follows −
//table/tbody/tr/child::td.
Here, we are working with the xpath selector, so we have to use the method: page.$x(xpath value). The details on this method are discussed in the Chapter of Puppeteer Locators.
To begin, follow Steps 1 to 2 from the Chapter of Basic Test on Puppeteer which are as follows −
Step 1 − Create a new file within the directory where the node_modules folder is created (location where the Puppeteer and Puppeteer core have been installed).
The details on Puppeteer installation is discussed in the Chapter of Puppeteer Installation.
Right-click on the folder where the node_modules folder is created, then click on the New file button.
Step 2 − Enter a filename, say testcase1.js.
Step 3 − Add the below code within the testcase1.js file created.
//Puppeteer library
const pt= require('puppeteer')
async function selectorAxesXpath(){
   //launch browser in headless mode
   const browser = await pt.launch()
   //browser new page
   const page = await browser.newPage()
   //launch URL
   await page.goto('https://www.tutorialspoint.com/index.htm')
   //identify element with xpath axes
   const n = (await page.$x("//table/tbody/tr/child::td"))[0]
   // get value of class attribute
   let v = await page.$eval("input", n => n.getAttribute("class"))
   console.log(v)
}
selectorAxesXpath()
Step 4 − Execute the code with the command given below −
node <filename>
So in our example, we shall run the following command −
node testcase1.js

After the command has been successfully executed, the value of the class attribute for the element - gsc-input gets printed in the console.
Puppeteer - Type Selector
Once we navigate to a webpage, we have to interact with the webelements available on the page like clicking a link/button, entering text within an edit box, and so on to complete our automation test case.
For this, our first job is to identify the element. If a tag is used only one time in a page, we can use it as a type selector. If there are multiple elements with the same tag, only the first matching element on the page shall be identified.
Syntax
The syntax for type selector is as follows −
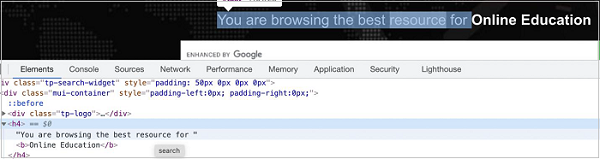
const n = await page.$("h4")
In the below example, let us identify the highlighted element having tagname h4 and obtain its text - You are browsing the best resource for Online Education.
To begin, follow Steps 1 to 2 from the Chapter of Basic Test on Puppeteer which is as follows:
Step 1 − Create a new file within the directory where the node_modules folder is created (location where the Puppeteer and Puppeteer core have been installed).
The details on Puppeteer installation is discussed in the Chapter of Puppeteer Installation.
Right-click on the folder where the node_modules folder is created, then click on the New file button.
Step 2 − Enter a filename, say testcase1.js.
Step 3 − Add the below code within the testcase1.js file created.
//Puppeteer library
const pt= require('puppeteer')
async function selectorType(){
   //launch browser in headless mode
   const browser = await pt.launch()
   //browser new page
   const page = await browser.newPage()
   //launch URL
   await page.goto('https://www.tutorialspoint.com/index.htm')
   //identify element with type selector
   const n = await page.$("h4")
   //obtain text
   const text = await (await n.getProperty('textContent')).jsonValue()
   console.log("Text is: " + text)
}
selectorType()
Step 4 − Execute the code with the command given below −
node <filename>
So in our example, we shall run the following command −
node testcase1.js

After the command has been successfully executed, the text on the element - You are browsing the best resource for Online Education gets printed in the console.
Name Selector and Class Name Selector
Let us begin by learning about name selector.
Name Selector
Once we navigate to a webpage, we have to interact with the webelements available on the page like clicking a link/button, entering text within an edit box, and so on to complete our automation test case.
For this, our first job is to identify the element. If a value of the name attribute is used only one time in a page, we can use it as a name selector. If there are multiple elements with the same name, only the first matching element on the page shall be identified.
Syntax
The syntax for name selector is as follows −
const f = await page.$('[name="search"]')
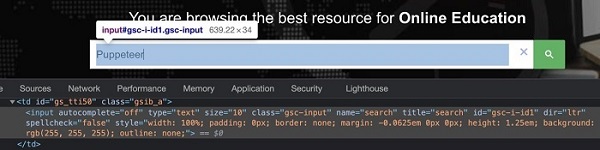
Let us identify the edit box highlighted in the below image and enter text −
The element highlighted in the above image has the name attribute value as search. The name selector expression for the above element shall be [name="search"].
To begin, follow Steps 1 to 2 from the Chapter of Basic Test on Puppeteer which are as follows −
Step 1 − Create a new file within the directory where the node_modules folder is created (location where the Puppeteer and Puppeteer core have been installed).
The details on Puppeteer installation is discussed in the Chapter of Puppeteer Installation.
Right-click on the folder where the node_modules folder is created, then click on the New file button.
Step 2 − Enter a filename, say testcase1.js.
Step 3 − Add the below code within the testcase1.js file created.
//Puppeteer library
const pt= require('puppeteer')
async function selectorName(){
   //launch browser in headless mode
   const browser = await pt.launch()
   //browser new page
   const page = await browser.newPage();
   //launch URL
   await page.goto('https://www.tutorialspoint.com/index.htm')
   //identify edit box with name
   const f = await page.$('[name="search"]')
   //enter text
   f.type("Puppeteer")
   //wait for sometime
   await page.waitForTimeout(4000)
   //browser close
   await browser.close()
}
selectorName()
Step 4 − Execute the code with the command given below −
node <filename>
So in our example, we shall run the following command −
node testcase1.js
Class Name Selector
Once we navigate to a webpage, we have to interact with the webelements available on the page like clicking a link/button, entering text within an edit box, and so on to complete our automation test case.
For this, our first job is to identify the element. If a class name is used only one time in a page, we can use it as a class name selector. If there are multiple elements with the same class name, only the first matching element on the page shall be identified.
Syntax
The syntax for class name selector is as follows −
const n = await page.$(".txtloc")
In the below example, let us identify the highlighted element having class name heading and obtain its text - About Tutorialspoint.
The id selector expression for the above element shall be .heading.
To begin, follow Steps 1 to 2 from the Chapter of Basic Test on Puppeteer which are as follows −
Step 1 − Create a new file within the directory where the node_modules folder is created (location where the Puppeteer and Puppeteer core have been installed).
The details on Puppeteer installation is discussed in the Chapter of Puppeteer Installation.
Right-click on the folder where the node_modules folder is created, then click on the New file button.
Step 2 − Enter a filename, say testcase1.js.
Step 3 − Add the below code within the testcase1.js file created.
//Puppeteer library
const pt= require('puppeteer')
async function getText(){
   //launch browser in headless mode
   const browser = await pt.launch()
   //browser new page
   const page = await browser.newPage()
   //launch URL
   await page.goto('https://www.tutorialspoint.com/about/about_careers.htm')
   //identify element with class name
   const f = await page.$(".heading")
   //obtain text
   const text = await (await f.getProperty('textContent')).jsonValue()
   console.log("Text is: " + text)
}
getText()
Step 4 − Execute the code with the command given below −
node <filename>
So in our example, we shall run the following command −
node testcase1.js

After the command has been successfully executed, the text of the element - About Tutorialspoint gets printed in the console.
Puppeteer - Id Selector
Once we navigate to a webpage, we have to interact with the webelements available on the page like clicking a link/button, entering text within an edit box, and so on to complete our automation test case.
For this, our first job is to identify the element. An id attribute is generally unique in a page and can be used as an id selector. It is a very useful locator and speeds up the execution of automation tests in comparison to all the selectors.
Syntax
The syntax for Id selector is as follows −
const n = await page.$("#loc")
In the below example, let us identify the highlighted element having id txtSearchText and enter text into it.
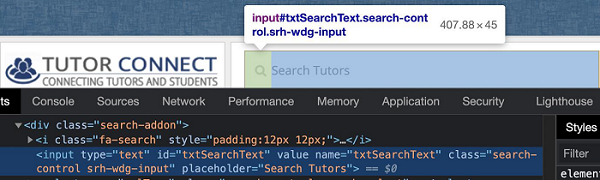
The id selector expression for the above element shall be #txtSearchText.
To begin, follow Steps 1 to 2 from the Chapter of Basic Test on Puppeteer which are as follows −
Step 1 − Create a new file within the directory where the node_modules folder is created (location where the Puppeteer and Puppeteer core have been installed).
The details on Puppeteer installation is discussed in the Chapter of Puppeteer Installation.
Right-click on the folder where the node_modules folder is created, then click on the New file button.
Step 2 − Enter a filename, say testcase1.js.
Step 3 − Add the below code within the testcase1.js file created.
//Puppeteer library
const pt= require('puppeteer')
async function selectorId(){
   //launch browser in headless mode
   const browser = await pt.launch()
   //browser new page
   const page = await browser.newPage();
   //launch URL
   await page.goto('https://www.tutorialspoint.com/tutor_connect/index.php')
   //identify element with id
   const f = await page.$("#txtSearchText")
   //enter text
   f.type("Puppeteer")
   //wait for sometime
   await page.waitForTimeout(4000)
   //browser close
   await browser.close()
}
selectorId()
Step 4 − Execute the code with the command given below −
node <filename>
So in our example, we shall run the following command −
node testcase1.js
Puppeteer - Attribute Selector
Once we navigate to a webpage, we have to interact with the webelements available on the page like clicking a link/button, entering text within an edit box, and so on to complete our automation test case.
For this, our first job is to identify the element. If an attribute and its value is used only one time in a tag, we can use it as an attribute selector. If there are multiple elements with the same attribute value, only the first matching element on the page shall be identified.
Syntax
The syntax for attribute selector is as follows −
const f = await page.$("ul[name='val']")
Here, ul is the tagname and val is the value set for the name attribute.
In the below image, let us obtain the text - About Tutorialspoint for the highlighted element −
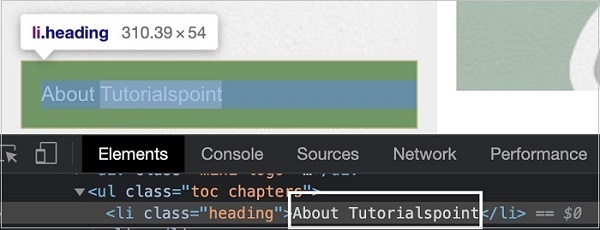
The attribute selector expression for the above element shall be li[class='heading'].
To begin, follow Steps 1 to 2 from the Chapter of Basic Test on Puppeteer which are as follows −
Step 1 − Create a new file within the directory where the node_modules folder is created (location where the Puppeteer and Puppeteer core have been installed).
The details on Puppeteer installation is discussed in the Chapter of Puppeteer Installation.
Right-click on the folder where the node_modules folder is created, then click on the New file button.
Step 2 − Enter a filename, say testcase1.js.
Step 3 − Add the below code within the testcase1.js file created.
//Puppeteer library
const pt= require('puppeteer')
async function selectorAttribute(){
   //launch browser in headed mode
   const browser = await pt.launch()
   //browser new page
   const page = await browser.newPage()
   //launch URL
   await page.goto('https://www.tutorialspoint.com/about/about_careers.htm')
   //identify element with attribute selector
   const n = await page.$("li[class='heading']")
   //obtain text
   const t = await (await n.getProperty('textContent')).jsonValue()
   console.log("Obtained text is: " + t)
}
selectorAttribute()
Step 4 − Execute the code with the command given below −
node <filename>
So in our example, we shall run the following command −
node testcase1.js

After the command has been successfully executed, the text of the element - About Tutorialspoint gets printed in the console.
Puppeteer - Handling Links/Button
Puppeteer is capable of handling a link/button on a page. Before clicking an element we must be able to uniquely identify it with the help of any of the locators. In Puppeteer, we can click an element only if its dimensions are greater than zero pixel.
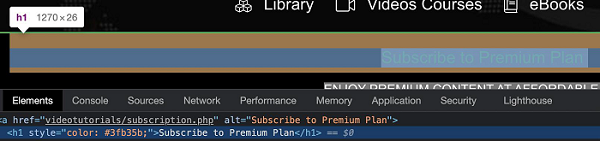
In the below image, we shall click on the below highlighted link - Subscribe to Premium Plan having tagname as h1 −
To begin, follow Steps 1 to 2 from the Chapter of Basic Test on Puppeteer which are as follows −
Step 1 − Create a new file within the directory where the node_modules folder is created (location where the Puppeteer and Puppeteer core have been installed).
The details on Puppeteer installation is discussed in the Chapter of Puppeteer Installation.
Right-click on the folder where the node_modules folder is created, then click on the New file button.
Step 2 − Enter a filename, say testcase1.js.
Step 3 − Add the below code within the testcase1.js file created.
//Puppeteer library
const pt= require('puppeteer')
async function clickElement(){
   //launch browser in headless mode
   const browser = await pt.launch()
   //browser new page
   const page = await browser.newPage()
   //launch URL
   await page.goto('https://www.tutorialspoint.com/index.htm')
   //identify element then click
   await page.click('h1');
   //get page title after click
   console.log(await page.title())
}
clickElement()
Step 4 − Execute the code with the command given below −
node <filename>
So in our example, we shall run the following command −
node testcase1.js

After the command has been successfully executed, the title - Tutorials Point Paid Subscription Packages - Tutorialspoint obtained after clicking the link - Subscribe to Premium Plan gets printed in the console.
Handling Edit Boxes & Checkboxes
Let us understand how Puppeteer can handle edit boxes.
Handling Edit Boxes
Puppeteer is capable of handling edit boxes. An edit box has an HTML tag as input and its type attribute is set to the value as text.
Some methods to work with edit boxes are listed below −
type()
This method is used to input text into an edit box and text area without replacing the already present content.
Syntax
The syntax for type() is as follows −
const n = await page.$("#txt")
await n.type("Puppeteer")
We can enter text in an edit box with some delay. This is done by adding the parameter {delay:time interval}. The time interval is expressed in the milliseconds.
Syntax
The syntax for the same is as follows −
await page.type("[class='loc']", "Tutorialspoint", {delay:700})
To delete a text entered in an edit box, we have to perform the click event three times on the field(with the parameter clickCount) and then press backspace. It is similar to selecting all values in an edit box and then pressing backspace.
Syntax
The syntax is given below −
const n = await page.$("#txt")
await n.type("Puppeteer")
await n.click({clickCount: 3});
await page.keyboard.press('Backspace')
To get value entered in an edit box, we have to use the getProperty method and pass value as a parameter to this field.
const v = await (await n.getProperty("value")).jsonValue()
console.log(v)
In the below image, let us input the text Puppeteer and then clear it.
To begin, follow Steps 1 to 2 from the Chapter of Basic Test on Puppeteer which is as follows −
Step 1 − Create a new file within the directory where the node_modules folder is created (location where the Puppeteer and Puppeteer core have been installed).
The details on Puppeteer installation is discussed in the Chapter of Puppeteer Installation.
Right-click on the folder where the node_modules folder is created, then click on the New file button.
Step 2 − Enter a filename, say testcase1.js.
Step 3 − Add the below code within the testcase1.js file created.
//Puppeteer library
const pt= require('puppeteer')
async function enterText(){
   //launch browser in headless mode
   const browser = await pt.launch()
   //browser new page
   const page = await browser.newPage();
   //launch URL
   await page.goto('https://www.tutorialspoint.com/index.htm')
   //identify edit box
   const f = await page.$("#gsc-i-id1")
   //enter text
   f.type("Puppeteer")
   //clear text entered
   await f.click({clickCount: 3})
   //wait for sometime
   await page.waitForTimeout(4000)
   await page.keyboard.press('Backspace')
   //browser close
   await browser.close()
}
enterText()
Step 4 − Execute the code with the command given below −
node <filename>
So in our example, we shall run the following command −
node testcase1.js
Handling Checkboxes
We can handle checkboxes in the UI while automating a test using Puppeteer. The checkboxes are identified in the html code with the tagname as input and type as checkbox.
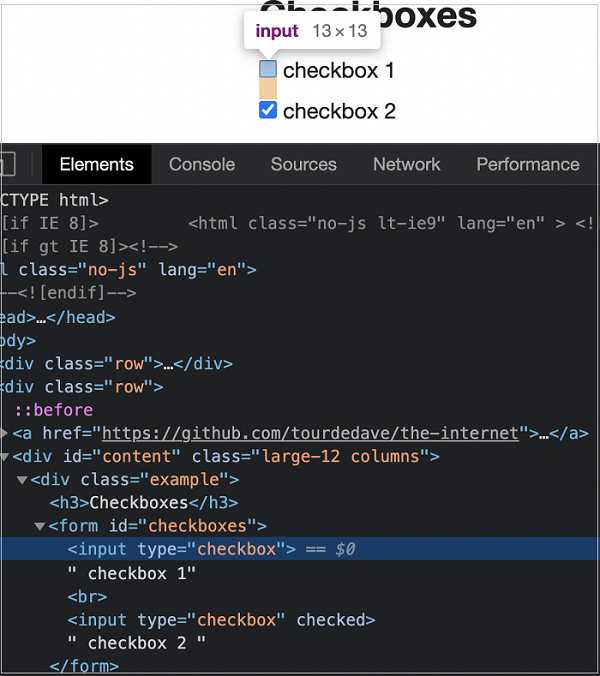
Some methods to work with checkboxes are given below −
click()
It is used to check and uncheck a checkbox. This method is a part of the ElementHandle class.
Syntax
The syntax of click() is as follows −
const n = await page.$("#txt")
n.click()
To verify if a checkbox is checked, we have to use the getProperty method and pass value as a parameter to this field. It returns a Boolean value(true if checked, false if not).
const v = await (await n.getProperty("checked")).jsonValue()
console.log(v)
To begin, follow Steps 1 to 2 from the Chapter of Basic Test on Puppeteer which are as follows −
Step 1 − Create a new file within the directory where the node_modules folder is created (location where the Puppeteer and Puppeteer core have been installed).
The details on Puppeteer installation is discussed in the Chapter of Puppeteer Installation.
Right-click on the folder where the node_modules folder is created, then click on the New file button.
Step 2 − Enter a filename, say testcase1.js.
Step 3 − Add the below code within the testcase1.js file created.
//Puppeteer library
const pt= require('puppeteer')
async function checkBoxHandle(){
   //launch browser in headless mode
   const browser = await pt.launch()
   //browser new page
   const page = await browser.newPage()
   //launch URL
   await page.goto('https://the-internet.herokuapp.com/checkboxes')
   //identify element then click
   const n = await page.$("input[type='checkbox']")
   n.click()
   //wait for sometime
   await page.waitForTimeout(4000)
   //verify if checkbox is checked
   const v = await (await n.getProperty("checked")).jsonValue()
   console.log(v)
}
checkBoxHandle()
Step 4 − Execute the code with the command given below −
node <filename>
So in our example, we shall run the following command −
node testcase1.js

After the command has been executed successfully, the boolean value true is printed in the console. This is returned by the getProperty("checked") which returns true as the checkbox is selected.
Puppeteer - Handling Frames
The frames in an html code are represented by the frames/iframe tag. Puppeteer can handle frames by switching from the main page to the frame. To work with elements inside a frame, first we have to identify the frame with the help of locators. The method contentFrame is used to access the elements inside the frame.
Syntax
The syntax to handle frames is as follows −
const f = await page.$("frame[name='frame-bottom']")
const m = await f.contentFrame()
Let us see the html code of an element inside a frame and obtain the text - BOTTOM inside it.
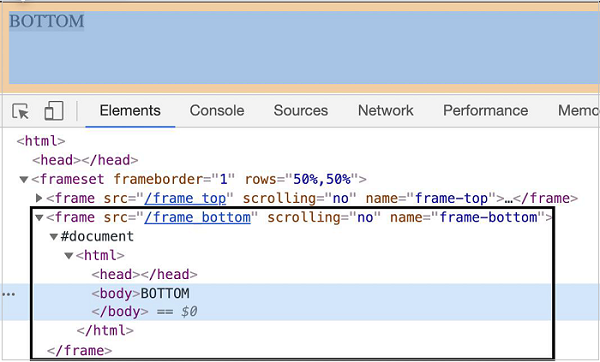
The tagname highlighted in the above image is frame and the value of its name attribute is frame-bottom.
To begin, follow Steps 1 to 2 from the Chapter of Basic Test on Puppeteer which are as follows −
Step 1 − Create a new file within the directory where the node_modules folder is created (location where the Puppeteer and Puppeteer core have been installed).
The details on Puppeteer installation is discussed in the Chapter of Puppeteer Installation.
Right-click on the folder where the node_modules folder is created, then click on the New file button.
Step 2 − Enter a filename, say testcase1.js.
Step 3 − Add the below code within the testcase1.js file created.
//Puppeteer library
const pt= require('puppeteer')
async function frameHandle(){
   //launch browser in headless mode
   const browser = await pt.launch()
   //browser new page
   const page = await browser.newPage()
   //launch URL
   await page.goto('https://the-internet.herokuapp.com/nested_frames')
   //identify frame
   const f = await page.$("frame[name='frame-bottom']")
   //move to frame
   const x = await f.contentFrame();
   //identify element inside frame
   const n = await x.$("body")
   //get text
   const v = await (await n.getProperty("textContent")).jsonValue()
   console.log(v)
}
frameHandle()
Step 4 − Execute the code with the command −
node <filename>
So in our example, we shall run the command −
node testcase1.js

After the command has been successfully executed, the text within the frame - BOTTOM gets printed in the console.
Puppeteer - Keyboard Simulation
Puppeteer can perform keyboard simulation actions like pressing a key in the keyboard, pressing the up, down keys, and so on. All these are done using the keyboard method.
Keyboard Methods
Some of the keyboard methods are as follows −
keyboard.press()
This method is used to simulate a key press. The key to be pressed is passed as a parameter to this method.
The syntax is as follows −
Syntax
keyboard.press('Enter')
keyboard.type()
This method is used to simulate entering text from the keyboard. The text to be entered is passed as a parameter to this method.
The syntax is as follows −
Syntax
keyboard.type('Puppeteer')
keyboard.sendCharacter()
It is same as keyboard.type().
The syntax is as follows −
Syntax
keyboard.sendCharacter('Puppeteer')
keyboard.up()
This method is used to simulate pressing the up arrow from the keyboard.
The syntax is as follows −
Syntax
keyboard.up()
keyboard.down()
This method is used to simulate pressing the down arrow from the keyboard.
The syntax is as follows −
Syntax
keyboard.down()

To begin, follow Steps 1 to 2 from the Chapter of Basic Test on Puppeteer which are as follows −
Step 1 − Create a new file within the directory where the node_modules folder is created (location where the Puppeteer and Puppeteer core have been installed).
The details on Puppeteer installation is discussed in the Chapter of Puppeteer Installation.
Right-click on the folder where the node_modules folder is created, then click on the New file button.
Step 2 − Enter a filename, say testcase1.js.
Step 3 − Add the below code within the testcase1.js file created.
//Puppeteer library
const pt= require('puppeteer')
async function keyboradSimulation(){
   //launch browser in headless mode
   const browser = await pt.launch()
   //browser new page
   const page = await browser.newPage()
   //launch URL
   await page.goto('https://www.tutorialspoint.com/index.htm')
   //identify edit box with id
   const f = await page.$("#gsc-i-id1")
   //enter text
   f.type("Puppeteer")
   //wait for sometime
   await page.waitForTimeout(4000)
   //press Enter
   await page.keyboard.press('Enter')
   //wait for sometime
   await page.waitForTimeout(4000)
   //identify element
   const t = await page.$(".gsc-result-info")
   //obtain text
   const text = await (await t.getProperty('textContent')).jsonValue()
   console.log("Text is: " + text)
}
keyboradSimulation()
Step 4 − Execute the code with the command given below −
node <filename>
So in our example, we shall run the following command −
node testcase1.js

After the command has been successfully executed, the text obtained on pressing Enter after entering Puppeteer - About 39 results (0.15 seconds) gets printed in the console.
Puppeteer - Getting Element Text
We can get element text in Puppeteer. This is done with the help of the textContent property. This property of the element is passed as a parameter to the getProperty method.
Syntax
The syntax of getting element text is as follows −
const n = await page.$("#txt")
const t = await (await n.getProperty('textContent')).jsonValue()
In the below image, let us obtain the text - About Tutorialspoint for the highlighted element −
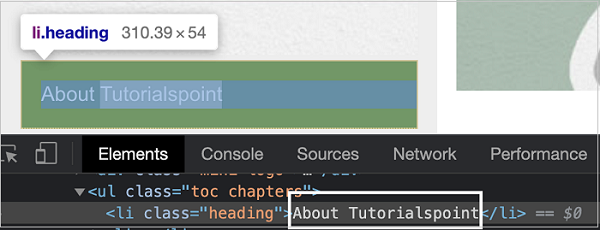
To begin, follow Steps 1 to 2 from the Chapter of Basic Test on Puppeteer which are as follows −
Step 1 − Create a new file within the directory where the node_modules folder is created (location where the Puppeteer and Puppeteer core have been installed).
The details on Puppeteer installation is discussed in the Chapter of Puppeteer Installation.
Right-click on the folder where the node_modules folder is created, then click on the New file button.
Step 2 − Enter a filename, say testcase1.js.
Step 3 − Add the below code within the testcase1.js file created.
//Puppeteer library
const pt= require('puppeteer')
async function getText(){
   //launch browser in headless mode
   const browser = await pt.launch()
   //browser new page
   const page = await browser.newPage()
   //launch URL
   await page.goto('https://www.tutorialspoint.com/about/about_careers.htm')
   //identify element
   const f = await page.$("[class='heading']")
   //obtain text
   const text = await (await f.getProperty('textContent')).jsonValue()
   console.log("Text is: " + text)
}
getText()
Step 4 − Execute the code with the command given below −
node <filename>
So in our example, we shall run the following command −
node testcase1.js

After the command has been successfully executed, the text of the element - About Tutorialspoint gets printed in the console.
Puppeteer - Getting Element Attribute
We can get attribute values of an element using Puppeteer. The attributes are added within the HTML tag. They are used to describe the properties of an element. An attribute and its value are defined in a key-value pair.
Let us take an example of an edit box having the below properties −

Here, input is the tagname. A tag in HTML may or may not have attributes. The type, class , name, id and so on are the attributes of this element. For example, in id = gsc-i-id1, text to the left of = is the attribute name(i.e id) and to the right of = is the attribute value(i.e gsc-i-id1).
An attribute may or may not have a value assigned. Also, if a value is assigned, then it should be enclosed in double or single quotes. The value of an attribute is set by a developer as per his choice.
Methods for Element Attribute
The ways to obtain an element attribute are listed below −
getAttribute()
This method is used to get the value of the attribute which is passed as a parameter to this method.
Syntax
The syntax is as follows −
let v = await page.$eval("input", element=> element.getAttribute("class"))
element.<attribute name>
Syntax
The syntax is as follows −
let v = await page.$eval("input", element=> element.class)
element.getProperty()
This method is used to get the value of the attribute which is passed as a parameter to this method.
The syntax is as follows −
Syntax
const n = await page.$("#txt")
const t = await (await n.getProperty('textContent')).jsonValue()
In the below image, let us identify the highlighted edit box and obtain the value of its class attribute - gsc-input.

To begin, follow Steps 1 to 2 from the Chapter of Basic Test on Puppeteer which are as follows −
Step 1 − Create a new file within the directory where the node_modules folder is created (location where the Puppeteer and Puppeteer core have been installed).
The details on Puppeteer installation is discussed in the Chapter of Puppeteer Installation.
Right-click on the folder where the node_modules folder is created, then click on the New file button.
Step 2 − Enter a filename, say testcase1.js.
Step 3 − Add the below code within the testcase1.js file created.
//Puppeteer library
const pt= require('puppeteer')
async function getElementAttribute(){
   //launch browser in headless mode
   const browser = await pt.launch()
   //browser new page
   const page = await browser.newPage()
   //launch URL
   await page.goto('https://www.tutorialspoint.com/index.htm')
   //identify element with id
   const n = await page.$("#gsc-i-id1")
   //get class attribute
   let v = await page.$eval("input", n => n.getAttribute("class"))
   console.log(v)
}
getElementAttribute()
Step 4 − Execute the code with the command given below −
node <filename>
So in our example, we shall run the following command −
node testcase1.js

After the command has been successfully executed, the value of the class attribute for the element - gsc-input gets printed in the console.
Puppeteer - Device Emulation
We can run tests with mobile configurations in Puppeteer and check the responsive property of a webpage. The list of devices that the Puppeteer supports can be obtained from the Chrome DevTools. Right-click on a page opened in the Chrome browser, then select Inspect.
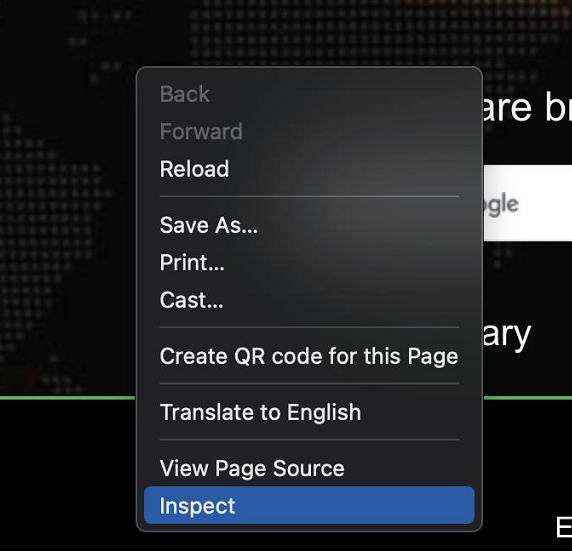
Then, click on the Toggle Device Toolbar.

Click on the dropdown - Responsive to get the list of devices.
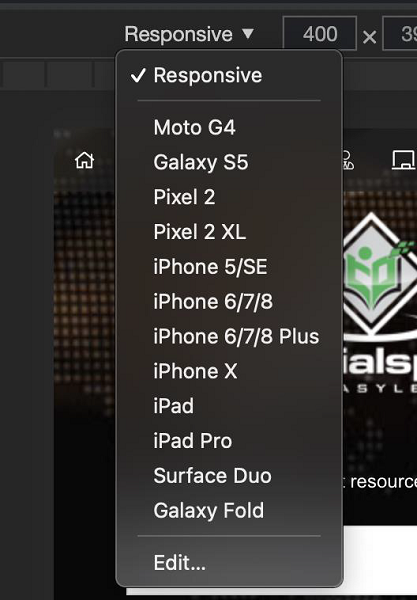
To emulate a device, we have to use the method emulate() and the device to be emulated is passed as a parameter to this method. The syntax for this method is as follows −
const m = puppeteer.devices['iPhone X']
//emulate iPhoneX
await page.emulate(m)
Let us emulate the device iPhone X using the emulate function in Puppeteer.
To begin, follow Steps 1 to 2 from the Chapter of Basic Test on Puppeteer which are as follows −
Step 1 − Create a new file within the directory where the node_modules folder is created (location where the Puppeteer and Puppeteer core have been installed).
The details on Puppeteer installation is discussed in the Chapter of Puppeteer Installation.
Right-click on the folder where the node_modules folder is created, then click on the New file button.
Step 2 − Enter a filename, say testcase1.js.
Step 3 − Add the below code within the testcase1.js file created.
//Puppeteer library
const puppeteer = require('puppeteer')
//launch browser in headed mode
puppeteer.launch({headless:false}).then(async browser => {
   //browser new page
   const page = await browser.newPage()
   //set device to iPhone X
   const m = puppeteer.devices['iPhone X']
   //emulate iPhoneX
   await page.emulate(m)
   //launch URL
   await page.goto('https://www.tutorialspoint.com/index.htm')
   //capture screenshot of emulated device
   await page.screenshot({ path: 'iPhoneDevice.png'})
   //browser close
   await browser.close()
})
Step 4 − Execute the code with the command given below −
node <filename>
So in our example, we shall run the following command −
node testcase1.js
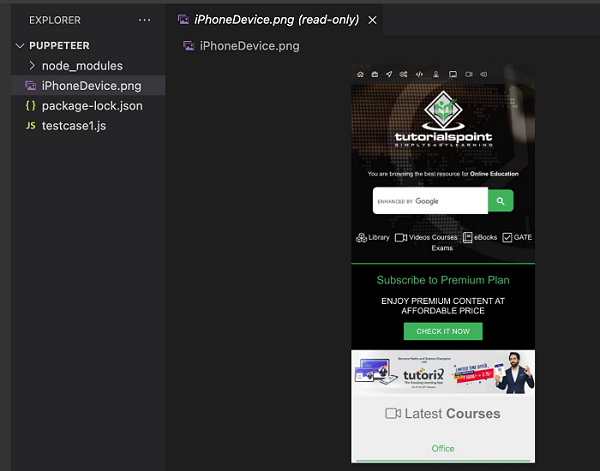
After the command has been successfully executed, a new file called the iPhoneDevice.png gets created within the page directory. It contains the captured screenshot of the emulated webpage for the iPhone X device.
Puppeteer - Disable JavaScript
We can disable JavaScript using Puppeteer. For this, we have to block the requests/response based on its type. Let us make an attempt to launch a page by disabling JavaScript.
To begin, follow Steps 1 to 2 from the Chapter of Basic Test on Puppeteer which are as follows −
Step 1 − Create a new file within the directory where the node_modules folder is created (location where the Puppeteer and Puppeteer core have been installed).
The details on Puppeteer installation is discussed in the Chapter of Puppeteer Installation.
Right-click on the folder where the node_modules folder is created, then click on the New file button.
Step 2 − Enter a filename, say testcase1.js.
Step 3 − Add the below code within the testcase1.js file created.
//Puppeteer library
const pt = require('puppeteer')
pt.launch().then(async browser => {
//browser new page
   const page = await browser.newPage()
   //monitor requests
   await page.setRequestInterception(true)
   //check resourceType is script
   page.on('request', request => {
      if (request.resourceType() === 'script')
         request.abort();
      else
         request.continue();
   })
   //launch application
   await page.goto('https://www.tutorialspoint.com/index.htm')
   //browser close
   await browser.close()
})
Step 4 − Execute the code with the command given below −
node <filename>
So in our example, we shall run the following command −
node testcase1.js
Puppeteer - Synchronization
Puppeteer Page class contains methods to achieve synchronization. These methods are used to wait for an action/element on the page. It waits for criteria to be met (a true value). For example, we often wait for a text to appear on the page.
Synchronization methods
The synchronization methods in Puppeteer are listed below −
waitFor
This method is used to wait for a specific amount of time before resolving a Promise.
Syntax
The syntax is as follows −
await page.waitFor(4000)
waitForSelector
This method is used to wait for an element to be visible or disappear from the webpage.
Syntax
The syntax is as follows −
page.waitForSelector(
   selector,
   {options : value}
)
The waitForSelector accepts two parameters. The first parameter is the selector value of an element. The second parameter is the array of options. The options are listed below −
Visible − Puppeteer shall wait till an element locator is visible on the page. The default value is false.
Hidden − Puppeteer shall wait till an element locator is hidden from the page. The default value is false.
Timeout − The maximum wait time for an element in milliseconds. The default value is 30000. If the timeout is set to zero, this is discarded.
The default wait time can be modified by using the method given below −
page.setDefaultTimeout(6000)
For example,
let l = await page.waitForSelector( "#ltxt", { visible: true } )
waitForXpath
This method is used to wait for element/elements identified by xpath to be visible or disappear from the webpage.
Syntax
The syntax is as follows −
page.waitXpath(
   Xpath value,
   {options : value}
)
The waitForXpath accepts two parameters. The first parameter is the xpath selector value of an element. The second parameter is the array of options. The options are listed below −
Visible − Puppeteer shall wait till an element locator is visible on the page. The default value is false.
Hidden − Puppeteer shall wait till an element locator is hidden from the page. The default value is false.
Timeout − The maximum wait time for an element in milliseconds. The default value is 30000. If the timeout is set to zero, this is discarded.
The default wait time can be modified using the below method −
page.setDefaultTimeout(6000)
For example,
let x= await page.waitForXPath( "//*[@name='search']", { visible: true } )
waitForFunction
This method is used to wait till the provided function returns a true value.
Syntax
The syntax is as follows −
page.waitForFunction(
   pagefunction,
   {options : value},
   pagefunction args
)
The waitForFunction has the following parameters −
The pagefunction is the function to be executed. For example,
page.waitForFunction("document.getElementById('txt').value === 'text'", {})
This function shall wait till the value of the element with id is equal to text.
The option is an array of waiting parameters. They are - polling (the interval at which the pagefunction should be executed in milliseconds) and timeout (The maximum time the Puppeteer shall wait for the pagefunction to return true value).
The pagefunction args are the arguments passed to the pagefunction function.
In the below image, let us input text - Puppeteer and then press Enter.

After pressing Enter, a new window having the search results with text - About 39 results should open up.

To begin, follow Steps 1 to 2 from the Chapter of Basic Test on Puppeteer which are as follows −
Step 1 − Create a new file within the directory where the node_modules folder is created (location where the Puppeteer and Puppeteer core have been installed).
The details on Puppeteer installation is discussed in the Chapter of Puppeteer Installation.
Right-click on the folder where the node_modules folder is created, then click on the New file button.
Step 2 − Enter a filename, say testcase1.js.
Step 3 − Add the below code within the testcase1.js file created.
//Puppeteer library
const pt= require('puppeteer')
async function waitImplementation(){
   //launch browser in headless mode
   const browser = await pt.launch()
   //browser new page
   const page = await browser.newPage()
   //launch URL
   await page.goto('https://www.tutorialspoint.com/index.htm')
   //identify edit box
   const f = await page.$("#gsc-i-id1")
   //enter text
   f.type("Puppeteer")
   //wait for sometime
   await page.waitForTimeout(4000)
   //press Enter
   await page.keyboard.press('Enter')
   //wait for an element xpath
   await page.waitForXPath("//div[@class='gsc-result-info']")
   //identify element
   const t = await page.$(".gsc-result-info")
   //obtain text
   const text = await (await t.getProperty('textContent')).jsonValue()
   console.log("Text is: " + text)
}
waitImplementation()
Step 4 − Execute the code with the command given below −
node <filename>
So in our example, we shall run the following command −
node testcase1.js

Puppeteer - Capture Screenshot
We can capture screenshots while working on automation tests developed in Puppeteer using the screenshot method. A screenshot is generally captured if we encounter an application error, a failure in a test case, and so on.
Syntax
The syntax to capture screenshot in Puppeteer is as follows −
await page.screenshot({
   path: 'tutorialspoint.png'
})
Here, the path where the screenshot is to be saved is passed as a parameter to the method. With this, only the viewable part of the web page shall be captured. To capture the full page screenshot, we have to pass another parameter called the fullPage and set its value to true.
Syntax
The syntax is as follows −
await page.screenshot({
   path: 'tutorialspoint.png', fullPage: true
})
Let us capture the screenshot of the below page −

To begin, follow Steps 1 to 2 from the Chapter of Basic Test on Puppeteer which are as follows −
Step 1 − Create a new file within the directory where the node_modules folder is created (location where the Puppeteer and Puppeteer core have been installed).
The details on Puppeteer installation is discussed in the Chapter of Puppeteer Installation.
Right-click on the folder where the node_modules folder is created, then click on the New file button.
Step 2 − Enter a filename, say testcase1.js.
Step 3 − Add the below code within the testcase1.js file created.
//adding Puppeteer library
const pt = require('puppeteer');
pt.launch().then(async browser => {
   //browser new page
   const p = await browser.newPage();
   //set viewpoint of browser page
   await p.setViewport({ width: 1000, height: 500 })
   //launch URL
   await p.goto('https://www.tutorialspoint.com/index.htm')
   //capture screenshot
   await p.screenshot({
      path: 'tutorialspoint.png'
   });
   //browser close
   await browser.close()
})
Step 4 − Execute the code with the command given below −
node <filename>
So in our example, we shall run the following command −
node testcase1.js

After the command has been successfully executed, a new file called the tutorialspoint.png gets created within the page directory. It contains the captured screenshot of the page launched in the browser.
