- MooTools - Home
- MooTools - Introduction
- MooTools - Installation
- MooTools - Program Structure
- MooTools - Selectors
- MooTools - Using Arrays
- MooTools - Functions
- MooTools - Event Handling
- MooTools - DOM Manipulations
- MooTools - Style Properties
- MooTools - Input Filtering
- MooTools - Drag and Drop
- MooTools - Regular Expression
- MooTools - Periodicals
- MooTools - Sliders
- MooTools - Sortables
- MooTools - Accordion
- MooTools - Tooltips
- MooTools - Tabbed Content
- MooTools - Classes
- MooTools - Fx.Element
- MooTools - Fx.Slide
- MooTools - Fx.Tween
- MooTools - Fx.Morph
- MooTools - Fx.Options
- MooTools - Fx.Events
MooTools - Quick Guide
MooTools - Introduction
MooTools is an object-oriented, lightweight JavaScript framework. The full form of MooTools is My Object-Oriented Tools. It is released under the free, open-source MIT License. It is one of most popular JavaScript libraries.
MooTools is a powerful, lightweight JavaScript library. It creates an easy interaction of JavaScript in web development. It can also do a lot of things as CSS extensions. MooTools has all sorts of nifty extensions, which gives you the ability to create animated effects.
Components of MooTools
MooTools includes a number of components. The following are the different component categories −
Core − A collection of utility functions that all the other components require.
More − An official collection of add-ons that extend the core and provide enhanced functionality.
Class − The base library for class object instantiation.
Natives − A collection of JavaScript native object enhancements. The natives add functionality, compatibility, and new methods that simplify coding.
Element − Contains a large number of enhancements and compatibility standardization to the HTML Element Object.
FX − An Advanced effects-API that helps to animate page elements.
Request − Includes XHR interface, Cookie JSON, and HTML retrieval-specific tools for developers to exploit.
Window − Provides a cross-browser interface to client-specific information, such as the dimensions of the window.
MooTools Advantages
MooTools come with a number of advantages over native JavaScript. These advantages include the following −
MooTools is an extensive and modular framework that allows developers to create their own customized combination of components.
MooTools follows object-oriented paradigm and the DRY principle (Don't Repeat Yourself).
MooTools provides advanced component effects, with optimized transitions. It is mostly used for flash developers.
MooTools provides different enhancements to the DOM. This helps the developers to add, modify, select, and delete DOM elements. And, it also supports storing and retrieving element storage.
MooTools - Installation
MooTools is a powerful, JavaScript library to design DOM objects using object-oriented paradigm. This chapter explains how to install and use MooTools library along with JavaScript.
To install MooTools library, follow the steps given below −
Step 1: Download MooTools Core and MooTools More library
You can download the latest version of MooTools Core and MooTools More libraries from the following link MooTools-Core and MooTools-More. When you click on the links, you will be directed to the following screens in your browser −

And,
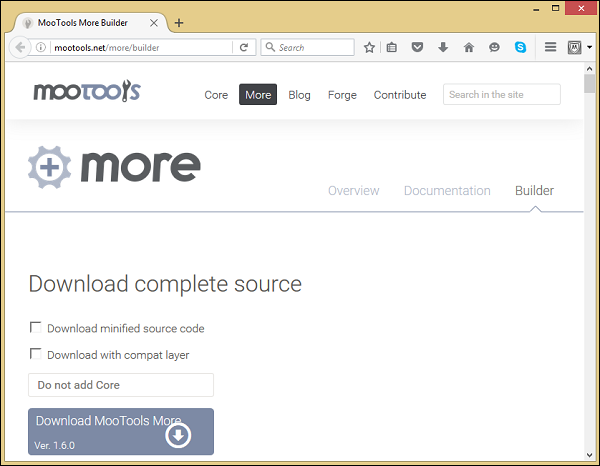
Click on the download buttons, you will get the latest version of MooTools libraries. For this tutorial, we are using MooTools-Core-1.6.0.js and MooTools-More-1.6.0.js libraries.
Step 2: Upload the MooTools Core and More libraries into the server
You now have the MooTools libraries in your file system. We have to copy these libraries into the server (the workspace) where the application web pages are available. For this tutorial, we are using C:\MooTools\workspace\ directory location.
Therefore, copy the MooTools-Core-1.6.0.js and MooTools-More-1.6.0.js files into the given directory location.
Step 3: Link the MooTools Core and More libraries into the script tag
The JavaScript library is a .js file. If you include this library into your JavaScript code, include it with the script tag as follows. Take a look at the following code snippet.
<script type = "text/javascript" src = "MooTools-Core-1.6.0.js"></script>
<script type = "text/javascript" src = "MooTools-More-1.6.0.js"></script>
MooTools - Program Structure
MooTools is a tool which can be used to design object-oriented models. Let us discuss in this chapter a simple example of MooTools library.
Example
Here we will design a model named Rectangle using Class. For this, we need to declare the properties Width and Height.
Take a look at the following code, and save it into sample.html.
<html>

   <head>
      <script type = "text/javascript" src = "MooTools-Core-1.6.0.js"></script>
      <script type = "text/javascript" src = "MooTools-More-1.6.0.js"></script>

      <script type = "text/javaScript">
         var Rectangle = new Class({
            //properties
            width: 0,
            height: 0,

            //methods
            initialize: function(widthVal, heightVal) {
               this.width = widthVal;
               this.height = heightVal;
            },
            details: function() {
               document.write("Welcome to MooTools demo program");
               document.write("Width: "+this.width+" Height: "+this.height);
            },
         });
         var rec = new Rectangle(5,4);
         rec.details();
      </script>
   </head>

   <body>
   </body>

</html>
You will receive the following output −
Output
MooTools - Selectors
Selectors are used to select HTML elements. Whenever you want to make interactive web pages, you need to select some data or an action from that web page. Selectors help us receive data through HTML request from elements.
Basic Selector($)
The $ is the basic selector in MooTools. Using this, you can select DOM element by its ID. For example, suppose you have an HTML element (such as div) named body_id.
<div id = "body_id">

</div>
If you want to select this div, use the following syntax −
Syntax
//selects the element with the ID 'body_id'
$('body_id');
getElement( )
getElement() is a method which extends basic selector ($). It allows you to refine your selection using element ID. getElement() only selects the single element and will return the first if there are multiple options. You can also use Class name to get the first occurrence of an element. But it will not get array of elements.
Multiple Selector ($$)
The $$ is used to select multiple elements and place those multiple elements into an array. From that array we can manipulate, retrieve, and reorder the list in different ways. Take a look at the following syntax. It defines how to select all div elements from a collection of HTML elements on a webpage.
Syntax
<div>
   <div>a div</div>
   <span id = "id_name">a span</span>
</div>
If you want to select all divs, use the following syntax −
Syntax
//all divs in the page
$$('div');
If you want to select multiple divs with the same id name, use the following syntax −
Syntax
//selects the element with the id 'id_name' and all divs
$$('#id_name', 'div');
getElements()
getElements() method is similar to getElement() method. This method returns all elements according to the criteria. You can use either element name (a, div, input) to select those collections or a particular element class name for selecting collection of elements of the same class.
Include and exclude results with operators
MooTools supports different operators used to refine your selections. You can use all these operators in getElements() method. Each of these operators can be used to select an input element by name.
Take a look at the following table. It defines the different operators that MooTools supports.
| Operator | Description | Example |
|---|---|---|
| = (equal to) | Select input element by its name. | $('body_wrap').getElements ('input[name = phone_number]'); |
| ^= (starts with) | Select input element by comparing its starting letters of the name. | $('body_wrap').getElements ('input[name^=phone]'); |
| $= (ends with) | Select the input element by comparing its ending letters of the name. | $('body_wrap').getElements ('input[name$ = number]'); |
| != (is not equal to) | De-select the input element by is name. | $('body_wrap').getElements ('input[name!=address]'); |
| *= (Contains) | Select the input element which contains particular letter pattern. | $('body_wrap').getElements ('input[name*=phone]'); |
Selectors based on element order
MooTools selectors follow a particular order in element selection. The selectors mainly follow two orders; one is even and the other is odd.
Note − This selector starts at 0, so the first element is even.
Even order
In this order, the selector selects the elements which are placed in an even order. Use the following syntax to select all even divs in your HTML page.
Syntax
// selects all even divs
$$('div:even');
Odd order
In this order, the selector selects the element placed in an odd order. Use the following syntax to select all odd divs in your HTML page.
Syntax
// selects all odd divs
$$('div:odd');
Example
The following example shows how a selector works. Suppose, there is a textbox and a list of technologies on a webpage. If you pick one technology from the list by entering that name into the textbox, then the list shows the filtered results based on your input. This is possible using the MooTools selector. Using selector, we can add an event to the textbox. The event listener will pick the data from the textbox and check it from the list. If it is there in the list, then the list shows the filtered results. Take a look at the following code.
<html>

   <head>
      <script type = "text/javascript" src = "MooTools-Core-1.6.0.js"></script>
      <script type = "text/javascript" src = "MooTools-More-1.6.0.js"></script>

      <script type = "text/javascript">
         window.addEvent('domready',function(){
            var input = $('filter');

            // set the title attribute of every element
            // to it's text in lowercase
            $$('ul > li').each(function(item){
               item.set('title', item.get('text').toLowerCase());
            });

            // the function we'll call when the user types
            var filterList = function(){
               var value = input.value.toLowerCase();
               $$('li').setStyle('display','none');

               // check the title attribute if it contains whatever the user is typing
               $$('ul > li[title*=' + value + ']').setStyle('display','');
            };

            // make it happen
            input.addEvent('keyup', filterList);
         });
      </script>
   </head>

   <body>
      <p><input id = "filter" type = "text" /></p>
      <ul>
         <li>C</li>
         <li>Cpp</li>
         <li>Java</li>
         <li>JavaScript</li>
         <li>Hadoop</li>
         <li>Hive</li>
         <li>CouchDB</li>
      </ul>
   </body>

</html>
You will receive the following output −
Output
MooTools - Using Arrays
MooTools is a lightweight JavaScript library which helps to create dynamic web pages. While managing DOM element, we need to select all DOM elements of a web page. This collection can be handled using arrays.
This chapter explains about how to use arrays to manage DOM elements.
each() method
This is the basic method to deal with arrays. It iterates all the elements through a list. You can use this method based on the requirement. For example, if you want to select all the div elements of a page, follow the script given below. Take a look at the following html page which contains multiple divs.
<div>One</div>
<div>Two</div>
You can use the following script to select each individual div from a collection of divs on the page. The script will select each div and pass an alert. Take a look at the following script.
Script
$$('div').each(function() {
   alert('a div');
});
You can use the following syntax to handle the above given example. Take a look at the HTML page.
Script
<div id = "body_div">
   <div>One</div>
   <div>Two</div>
</div>
Here, the two divs are enclosed with another div body_div. While designing a script, we have to select only one external div. Later, by using getElements() method, we can select the two internal divs. Take a look at the following script.
Script
$('body_wrap').getElements('div').each(function() {
   alert('a div');
});
You can use a different method to write the above script as follows. Here, we are using a separate variable to select the body_div.
Script
var myArray = $('body_div').getElements('div');
myArray.each(function() {
   alert('a div');
});
Select Specific Elements from an Array
While manipulating an array of elements, we can select a specific element from an array of elements. The following are some important methods used to manipulate the DOM elements −
getLast()
This method returns the last element of an array. Let us set up an array to understand this method.
var myArray = $('body_div').getElements('div');
We can now grab the last element within the array.
var lastElement = myArray.getLast();
The variable lastElement now represents the last element within myArray.
getRandom()
getRandom() method works the similar way like the getLast() method, but will get a random element from array.
Syntax
var randomElement = myArray.getRandom();
The variable randomElement now represents a randomly chosen element within myArray.
Copy of an Array
MooTools provides a way to copy an array using the $A() function. The following is the syntax for the $A() function.
Syntax
var <variable-name> = $A ( <array-variable>);
Add an Element to an Array
There are two different methods for adding elements into an array. The first method lets you add elements one by one or you can merge two different arrays into one.
include()
include() method is used to add an item into an array of DOM elements. For example, consider the following HTML code which contains two div elements and one span element under a single and enclosed div body_div.
Syntax
<div id = "body_div">
   <div>one</div>
   <div>two</div>
   <span id = "add_to_array">add to array</span>
</div>
In the above code, if we call getElements('div') method on the body_div element, we get one and two div but the span element is not included into the array. If you want to add it into the array you call include() method on the array variable. Take a look at the following script.
Script
//creating array variable by selecting div elements
var myArray = $('body_wrap').getElements('div');

//first add your element to a var
var newToArray = $('add_to_array');

//then include the var in the array
myArray.include(newToArray);
Now, the myArray contains both divs and span element.
combine()
This method is used to combine the elements of one array with the elements of another array. This also takes care of duplicate content. For example, consider the following HTML code which contains two div elements and two span elements under single and enclosed div body_div.
Syntax
<div id = "body_div">
   <div>one</div>
   <div>two</div>
   <span class = "class_name">add to array</span>
   <span class = "class_name">add to array, also</span>
   <span class = "class_name">add to array, too</span>
</div>
In the above code, call getElements('div') method on the body_div element. You get one and two div. Call $$('.class_name') method selects the two span elements. You now have one array of div elements and another array of span elements. If you want to merge these two arrays, then you can use the combine method(). Take a look at the following script.
Script
//create your array just like we did before
var myArray= $('body_wrap').getElements('div');

//then create an array from all elements with .class_name
var newArrayToArray = $$('.class_name');

//then combine newArrayToArray with myArray
myArray.combine(newArrayToArray );
Now, the myArray contains all the elements of newArrayToArray variable.
Example
This will help you understand arrays in MooTools. Suppose, we apply the background color to the array of element which contains divs and span. Take a look at the following code. Here, the second array of elements does not belong to any id or class group and that is why it does not reflect any background color. Take a look at the following code.
<!DOCTYPE html>
<html>

   <head>
      <script type = "text/javascript" src = "MooTools-Core-1.6.0.js"></script>
      <script type = "text/javascript" src = "MooTools-More-1.6.0.js"></script>

      <script type = "text/javascript">
         window.addEvent('domready', function() {
            var myArray = $('body_wrap').getElements('.class_name');
            var addSpan = $('addtoarray');
            var addMany = $$('.addMany');

            myArray.include(addSpan);
            myArray.combine(addMany);

            var myArrayFunction = function(item) {
               item.setStyle('background-color', '#F7DC6F');
            }

            myArray.each(myArrayFunction);
         });
      </script>
   </head>

   <body>
      <div id = "body_wrap">
         <div class = "class_name">one</div>
         <div>two</div>
         <div class = "class_name">three</div>
         <span id = "addtoarray">add to array</span>
         <br /><span class = "addMany">one of many</span>
         <br /><span class = "addMany">two of many</span>
      </div>
   </body>

</html>
You will receive the following output −
Output
MooTools - Functions
Functions in MooTools is a concept from JavaScript. We already know how to use functions in JavaScript. Generally, it is better to keep the function outside the page body in the script tag. In MooTools, we follow the same pattern. Here, you can design your own function according to the requirement. We now have to call all the user-defined functions in the domready function.
Take a look at the following syntax to understand how to use generalized function in MooTools.
Syntax
<script type = "text/javascript">
   /*
   Function definitions go here
   */
   window.addEvent('domready', function() {
      /* Calls to functions go here */
   });
</script>
Basic Structure
There are a few basic ways to define a function in MooTools. There is no difference between the function syntaxes of JavaScript and MooTools but the difference is in calling a function. Let us take a small example that defines a function named demo_function. Take a look at the following code.
Example
<html>

   <head>
      <script type = "text/javascript" src = "MooTools-Core-1.6.0.js"></script>
      <script type = "text/javascript" src = "MooTools-More-1.6.0.js"></script>

      <script type = "text/javascript">
         //Define simple_function as a function
         var simple_function = function(){
            document.write('This is a simple function');
         }

         window.addEvent('domready', function() {
            //Call simple_function when the dom(page) is ready
            simple_function();
         });
      </script>
   </head>

   <body>
   </body>

</html>
You will receive the following output −
Output
Single Parameter Function
You can also create a function that accepts a parameter. To use parameters with functions, you need to add a variable name in the parenthesis. Once you provide it, the variable is available inside for use. Let us take an example that defines a function that takes a single parameter and prints a message along with the parameter.
Take a look at the following code.
Example
<!DOCTYPE html>
<html>

   <head>
      <script type = "text/javascript" src = "MooTools-Core-1.6.0.js"></script>
      <script type = "text/javascript" src = "MooTools-More-1.6.0.js"></script>

      <script type = "text/javascript">
         var single_parameter_function = function(parameter){
            document.write('The parameter is : ' + parameter);
         }

         window.addEvent('domready', function(){
            single_parameter_function('DEMO PARAMETER');
         });
      </script>
   </head>

   <body>
   </body>

</html>
You will receive the following output −
Output
Returning a Value
Whenever you want to use the result of one function as input for another variable, you are required to use the return value for that function. You can use the return keyword for returning a value from the function. Let us take an example that defines a function that will accept two parameter values and return the sum of those two parameters. Take a look at the following code.
Example
<!DOCTYPE html>
<html>

   <head>
      <script type = "text/javascript" src = "MooTools-Core-1.6.0.js"></script>
      <script type = "text/javascript" src = "MooTools-More-1.6.0.js"></script>

      <script type = "text/javascript">
         var two_parameter_returning_function = function(first_number, second_number){
            var third_number = first_number + second_number;
            return third_number;
         }

         window.addEvent('domready', function(){
            var return_value = two_parameter_returning_function(10, 5);
            document.write("Return value is : " + return_value);
         });
      </script>
   </head>

   <body>
   </body>

</html>
You will receive the following output −
Output
MooTools - Event Handling
Like Selectors, Event Handling is also an essential concept of MooTools. This concept is used to create events and actions for events. We also need to have a grasp of the actions and their effects. Let us try a few events in this chapter.
Single left click
The most common event in web development is Single Left Click. For example, Hyperlink recognizes a single click event and takes you to another DOM element. The first step is to add a click event to the DOM element. Let us take an example that adds a click event to the button. When you click on that button, it will display a message.
Example
<!DOCTYPE html>
<html>

   <head>
      <script type = "text/javascript" src = "MooTools-Core-1.6.0.js"></script>
      <script type = "text/javascript" src = "MooTools-More-1.6.0.js"></script>

      <script type = "text/javascript">
         var clickFunction = function(){
            //put whatever you want to happen in here
            document.write('This button element recognizes the click event');
         }

         window.addEvent('domready', function() {
            $('id_name').addEvent('click', clickFunction);
         });
      </script>
   </head>

   <body>
      <input type = "button" id = "id_name" value = "click here"/>
   </body>

</html>
You will receive the following output −
Output
When you click on the button, you will get the following message −
This button element recognizes the click event
Mouse Enter and Mouse Leave
Mouse Enter and Mouse Leave are the most common events in event handling. The action is applied based on the position of the mouse. If the position of the mouse is ENTER into the DOM element, then it will apply one action. If it leaves the DOM element area, then it will apply another action.
Let us take an example that explains how mouse Enter event works. Take a look at the following code.
Example
<!DOCTYPE html>
<html>

   <head>
      <script type = "text/javascript" src = "MooTools-Core-1.6.0.js"></script>
      <script type = "text/javascript" src = "MooTools-More-1.6.0.js"></script>

      <script type = "text/javascript">
         var mouseEnterFunction = function(){
            //put whatever you want to happen in here
            $('result').set('html', "Recognizes the mouse enter event");
         }

         window.addEvent('domready', function() {
            $('id_name').addEvent('mouseenter', mouseEnterFunction);
         });
      </script>
   </head>

   <body>
      <input type = "button" id = "id_name" value = "Mouse Enter"/> <br/><br/>
      <lable id = "result"></lable>
   </body>

</html>
You will receive the following output −
Output
If you keep your mouse pointer on the button, then you will get the following message.
Recognizes the mouse enter event
Let us take an example that explains how the Mouse Leave event works. Take a look at the following code.
Example
<!DOCTYPE html>
<html>

   <head>
      <script type = "text/javascript" src = "MooTools-Core-1.6.0.js"></script>
      <script type = "text/javascript" src = "MooTools-More-1.6.0.js"></script>

      <script type = "text/javascript">
         var mouseLeaveFunction = function(){
            //put whatever you want to happen in here
            $('result').set('html', "Recognizes the mouse leave event");
         }

         window.addEvent('domready', function() {
            $('id_name').addEvent('mouseleave', mouseLeaveFunction);
         });
      </script>
   </head>

   <body>
      <input type = "button" id = "id_name" value = "Mouse Leave"/><br/>
      <lable id = "result"></lable>
   </body>

</html>
You will receive the following output −
Output
If you keep your mouse pointer on the button, then you will get the following message.
Recognizes the mouse leave event
Remove an Event
This method is used to remove an event. Removing an event is just as easy as adding an event and it follows the same structure. Take a look at the following syntax.
Syntax
//works just like the previous examplesuse .removeEvent method
$('id_name').removeEvent('mouseleave', mouseLeaveFunction);
Keystrokes as Input
MooTools can recognize your actions the kind of input you have given through the DOM element. By using the keydown function, you can read each and every key from the input type DOM element.
Let us take an example wherein, there is a text area element. Let us now add a keydown event to the text area that whenever the text area recognizes any keystore, it will respond with an alert message immediately. Take a look at the following code.
Example
<!DOCTYPE html>
<html>

   <head>
      <script type = "text/javascript" src = "MooTools-Core-1.6.0.js"></script>
      <script type = "text/javascript" src = "MooTools-More-1.6.0.js"></script>

      <script type = "text/javascript">
         var keydownEventFunction = function () {
            alert('This textarea can now recognize keystroke value');
         };

         window.addEvent('domready', function() {
            $('myTextarea').addEvent('keydown', keydownEventFunction);
         });
      </script>
   </head>

   <body>
      Write Something: <textarea id = "myTextarea"> </textarea>
   </body>

</html>
You will receive the following output −
Output
Try to enter something into the text area. You will find an alert box along with the following message.
This textarea can now recognize keystroke value
Try to add some text to the same example that reads the value from the textarea when you entered into it. It is possible by using event.key function with the event. Take a look at the following code.
Example
<!DOCTYPE html>
<html>

   <head>
      <script type = "text/javascript" src = "MooTools-Core-1.6.0.js"></script>
      <script type = "text/javascript" src = "MooTools-More-1.6.0.js"></script>

      <script type = "text/javascript">
         //notice the parameter "event" within the function parenthesis
         var keyStrokeEvent = function(event){
            var x = event.key;
            alert("The enter value is: "+x)
         }

         window.addEvent('domready', function() {
            $('myTextarea').addEvent('keydown', keyStrokeEvent);
         });
      </script>
   </head>

   <body>
      <lable>Write Something:</lable> <br/>
      <textarea id = "myTextarea"> </textarea>
   </body>

</html>
You will receive the following output −
Output
Try to enter text in the text area. You will be directed to an alert box along with the value you entered into the text area.
MooTools - DOM Manipulations
We already know that every HTML page is designed using DOM elements. Using MooTools you can manipulate DOM elements which means you can create, remove and change the style of DOM elements.
Basic methods
The following are the basic methods that capture and help to modify the properties of the DOM elements.
get()
This method is used to retrieve the element properties such as src, value, name, etc. The following statement is the syntax of the get method.
Syntax
//this will return the html tag (div, a, span...) of the element
$('id_name').get('tag');
You will receive the following list of properties while retrieving the element using the get() method.
- id
- name
- value
- href
- src
- class (will return all classes if the element)
- text (the text content of an element)
set()
This method is used to set a value to a variable. This is useful when combined with events and lets you change values. The following statement is the syntax of the set method.
Syntax
//this will set the href of #id_name to "http://www.google.com"
$('id_name').set('href', 'http://www.google.com');
erase()
This method helps you erase the value of an elements property. You need to choose which property you want to erase from the element. The following statement is the syntax of the erase() method.
Syntax
//this will erase the href value of #id_name
$('id_name').erase('href');
Moving Elements
Moving element means moving an existing element from one position to another position around the page. You can use the inject() method to move an element around the page. Let us take an example wherein, one HTML page contains three div elements which contains the content A, B, and C respectively in an order. Take a look at the following code.
Example
<!DOCTYPE html>
<html>

   <head>
      <script type = "text/javascript" src = "MooTools-Core-1.6.0.js"></script>
      <script type = "text/javascript" src = "MooTools-More-1.6.0.js"></script>

      <script type = "text/javascript">
         window.addEvent('domready', function() {
            var elementA = $('elemA');
            var elementB = $('elemB');
            var elementC = $('elemC');
         })
      </script>
   </head>

   <body>
      <div id = "body_wrap">
         <div id = "elemA">A</div>
         <div id = "elemB">B</div>
         <div id = "elemC">C</div>
      </div>
   </body>

</html>
You will receive the following output −
Output
Now, using the inject() method in MooTools, we can change the order from ABC to ACB. This means, we need to place elementB after elementC and place the elementC before elementB. Take a look at the following code.
Example
<!DOCTYPE html>
<html>

   <head>
      <script type = "text/javascript" src = "MooTools-Core-1.6.0.js"></script>
      <script type = "text/javascript" src = "MooTools-More-1.6.0.js"></script>

      <script type = "text/javascript">
         window.addEvent('domready', function() {
            var elementA = $('elemA');
            var elementB = $('elemB');
            var elementC = $('elemC');

            //translates to: inject element C before element B
            elementC.inject(elementB, 'before');

            //translates to: inject element B after element C
            elementB.inject(elementC, 'after');
         });
      </script>
   </head>

   <body>
      <div id = "body_wrap">
         <div id = "elemA">A</div>
         <div id = "elemB">B</div>
         <div id = "elemC">C</div>
      </div>
   </body>

</html>
You will receive the following output −
Output
Create New Element
MooTools provides an option to create any type of DOM element and insert it into the HTML page. But, we have to maintain a proper syntax for every element. Let us take an example wherein, the following code snippet is the syntax for creating an (anchor) element.
Syntax
var el = new Element('a', {
   id: 'Awesome',
   title: 'Really?',
   text: 'I\'m awesome',
   href: 'http://MooTools.net',

   events: {
      'click': function(e) {
         e.preventDefault();
         alert('Yes, really.');
      }
   },
   styles: {
      color: '#f00'
   }
});
Let us take an example that will create an anchor element using MooTools library. Take a look at the following code.
Example
<!DOCTYPE html>
<html>

   <head>
      <script type = "text/javascript" src = "MooTools-Core-1.6.0.js"></script>
      <script type = "text/javascript" src = "MooTools-More-1.6.0.js"></script>

      <script type = "text/javascript">
         window.addEvent('domready', function() {

            var el = new Element('a', {
               id: 'Awesome',
               title: 'Really?',
               text: 'I\'m awesome',
               href: 'http://www.tutorialspoint.com',

               events: {
                  'click': function(e) {
                     e.preventDefault();
                     alert('Yes, really.');
                  }
               },
               styles: {
                  color: '#f00'
               }
            });
            el.inject(document.body);
         });
      </script>
   </head>

   <body>
   </body>

</html>
You will receive the following output −
Output
MooTools - Style Properties
MooTools provides some Special methods to set and get style property values for DOM elements. We use different style properties such as width, height, background color, font weight, font color, border, etc. By setting and getting different values to these style properties, we can present HTML elements in different styles.
Set and Get Style Properties
MooTools library contains different methods which are used to set or get the value of a particular style property or multiple style properties.
setStyle()
This method allows you to set the value for a single property of DOM element. This method will work on the selector object of a particular DOM element. Let us take an example that provides background color for div element. Take a look at the following code.
Example
<!DOCTYPE html>
<html>

   <head>
      <script type = "text/javascript" src = "MooTools-Core-1.6.0.js"></script>
      <script type = "text/javascript" src = "MooTools-More-1.6.0.js"></script>

      <script type = "text/javascript">
         window.addEvent('domready', function() {
            $('body_wrap').setStyle('background-color', '#6B8E23');
            $$('.class_name').setStyle('background-color', '#FAEBD7');
         });
      </script>
   </head>

   <body>
      <div id = "body_wrap">A</div>
      <div class = "class_name">B</div>
      <div class = "class_name">C</div>
      <div class = "class_name">D</div>
      <div class = "class_name">E</div>
   </body>

</html>
You will receive the following output −
Output
getStyle()
getStyle() method is to retrieve the value of a style property of an element. Let us take an example that retrieves the background-color of a div named body_wrap. Take a look at the following syntax.
Syntax
//first, set up your variable to hold the style value
var styleValue = $('body_wrap').getStyle('background-color');
Multiple Style Properties
MooTools library contains different methods used to set or get the value of a particular style property or multiple style properties.
setStyle()
If you want to set multiple style properties on a single element or an array of elements then you have to use the setStyle() method. Take a look at the following syntax of the setStyle() method.
Syntax
$('<element-id>').setStyles({
   //use different style properties such as width, height, background-color, etc.
});
Example
<!DOCTYPE html>
<html>

   <head>
      <style>
         #body_div {
            width: 200px;
            height: 200px;
            background-color: #eeeeee;
            border: 3px solid #dd97a1;
         }
      </style>

      <script type = "text/javascript" src = "MooTools-Core-1.6.0.js"></script>
      <script type = "text/javascript" src = "MooTools-More-1.6.0.js"></script>

      <script type = "text/javascript">
         var setWidth = function(){
            $('body_div').setStyles({
               'width': 100
            });
         }
         var setHeight = function(){
            $('body_div').setStyles({
               'height': 100
            });
         }
         var reset = function(){
            $('body_div').setStyles({
               'width': 200,
               'height': 200
            });
         }

         window.addEvent('domready', function() {
            $('set_width').addEvent('click', setWidth);
            $('set_height').addEvent('click', setHeight);
            $('reset').addEvent('click', reset);
         });
      </script>
   </head>

   <body>
      <div id = "body_div"> </div><br/>
      <input type = "button" id = "set_width" value = "Set Width to 100 px"/>
      <input type = "button" id = "set_height" value = "Set Height to 100 px"/>
      <input type = "button" id = "reset" value = "Reset"/>
   </body>

</html>
You will receive the following output −
Output
Try these buttons on the web page, you can see the difference with the div size.
MooTools - Input Filtering
MooTools can filter the user input and it can easily recognize the type of input. The basic input types are Number and String.
Number Functions
Let us discuss a few methods that will check if an input value is a number or not. These methods will also help you manipulate the number input.
toInt()
This method converts any input value to the integer. You can call it on a variable and it will try to give the regular integer from whatever the variable contains.
Let us take an example that design a web page that contain a textbox and a button named TO INT. The button will check and return the value that you entered into the textbox as real integer. If the value is not an integer, then it will return the NaN symbol. Take a look at the following code.
Example
<!DOCTYPE html>
<html>
   <head>
      <script type = "text/javascript" src = "MooTools-Core-1.6.0.js"></script>
      <script type = "text/javascript" src = "MooTools-More-1.6.0.js"></script>

      <script type = "text/javascript">
         var toIntDemo = function(){
            var input = $('input').get('value');
            var number = input.toInt();
            alert ('Value is : ' + number);
         }

         window.addEvent('domready', function() {
            $('toint').addEvent('click', toIntDemo);
         });
      </script>
   </head>

   <body>
      Enter some value: <input type = "text" id = "input" />
      <input type = "button" id = "toint" value = "TO INT"/>
   </body>

</html>
You will receive the following output −
Output
Try different values and convert them into real integers.
typeOf()
This method examines the value of a variable you pass and, it returns the type of that value.
Let us take an example wherein, we design a webpage and check if the input value is Number, String or Boolean. Take a look at the following code.
Example
<!DOCTYPE html>
<html>
   <head>
      <script type = "text/javascript" src = "MooTools-Core-1.6.0.js"></script>
      <script type = "text/javascript" src = "MooTools-More-1.6.0.js"></script>

      <script type = "text/javascript">
         var checkType = function(){
            var input = $('input').get('value');
            var int_input = input.toInt();

            if(typeOf(int_input) != 'number'){
               if(input == 'false' || input == 'true'){
                  alert("Variable type is : Boolean"+" - and value is: "+input);
               } else{
                  alert("Variable type is : "+typeof(input)+" - and value is: "+input);
               }
            } else{
               alert("Variable type is : "+typeof(int_input)+"
                  - and value is:"+int_input);
            }
         }

         window.addEvent('domready', function() {
            $('checktype').addEvent('click', checkType);
         });
      </script>
   </head>

   <body>
      Enter some value: <input type = "text" id = "input" />
      <input type = "button" id = "checktype" value = "CHECK TYPE"/>
   </body>

</html>
You will receive the following output −
Output
Try the different values and check the type.
limit()
The limit() method is used to set the lower bound and upper bound values for a particular number. The number should not exceed the upper bound value. If it exceeds, then the number is changed to the upper bound value. This process is same with the lower bound also.
Let us take an example that provides a text box for entering a value, provide a button to check the limit of that value. The default limit that we used in the example is 0 to 255. Take a look at the following code.
Example
<!DOCTYPE html>
<html>

   <head>
      <script type = "text/javascript" src = "MooTools-Core-1.6.0.js"></script>
      <script type = "text/javascript" src = "MooTools-More-1.6.0.js"></script>

      <script type = "text/javascript">
         var checkLimit = function(){
            var input = $('input').get('value');
            var number = input.toInt();
            var limited_number = number.limit(0, 255);
            alert("Number is : " + limited_number);
         }

         window.addEvent('domready', function() {
            $('check_limit').addEvent('click', checkLimit);
         });
      </script>
   </head>

   <body>
      Enter some value: <input type = "text" id = "input" />
      <input type = "button" id = "check_limit" value = "Check Limit (0 to 255)"/>
   </body>

</html>
You will receive the following output −
Output
Try different numbers to check the limit.
rgbToHex()
The rgbToHex() method is to convert from the red, green, and blue values to the Hexadecimal value. This function deals with numbers and belongs to the Array collection. Let us take an example wherein, we will design a web page to enter the individual values for Red, Green, and Blue. Provide a button to convert all three into hexadecimal values. Take a look at the following code.
Example
<!DOCTYPE html>
<html>

   <head>
      <script type = "text/javascript" src = "MooTools-Core-1.6.0.js"></script>
      <script type = "text/javascript" src = "MooTools-More-1.6.0.js"></script>

      <script type = "text/javascript">
         var rgbToHexa_Demo = function(){
            var red = $('red').get('value');
            var red_value = red.toInt();
            var green = $('green').get('value');
            var green_value = green.toInt();
            var blue = $('blue').get('value');
            var blue_value = blue.toInt();
            var color = [red_value, green_value, blue_value].rgbToHex();
            alert(" Hexa color is : " + color);
         }

         window.addEvent('domready', function() {
            $('rgbtohex').addEvent('click', rgbToHexa_Demo);
         });
      </script>
   </head>

   <body>
      Red Value: <input type = "text" id = "red" /><br/><br/>
      Green Value: <input type = "text" id = "green" /><br/><br/>
      Blue Value: <input type = "text" id = "blue" /><br/><br/>
      <input type = "button" id = "rgbtohex" value = "RGB To HEX"/>
   </body>

</html>
You will receive the following output −
Output
Try different Red, Green, and Blue values and find the hexadecimal values.
String Functions
Let us discuss a few methods of String class which can manipulate the input String value. Before we proceed, let us take a look at the following syntax of how to call a string function.
String
var my_variable = "Heres some text";
var result_of_function = my_variable.someStringFunction();
Or,
var result_of_function = "Heres some text".someStringFunction();
trim()
This method is used to remove the whitespace of the front position and the end position of a given string. It does not touch any white spaces inside the string. Take a look at the following code.
Example
<!DOCTYPE html>
<html>

   <head>
      <script type = "text/javascript" src = "MooTools-Core-1.6.0.js"></script>
      <script type = "text/javascript" src = "MooTools-More-1.6.0.js"></script>

      <script type = "text/javascript">
         window.addEvent('domready', function() {
            var input_str = " This is tutorialspoint.com ";
            document.writeln("<pre>Before trim String is : |-"+input_str+"-|</pre>");

            var trim_string = input_str.trim();
            document.writeln("<pre>After trim String is : |-"+trim_string+"-|</pre>");
         });
      </script>
   </head>

   <body>
   </body>

</html>
You will receive the following output −
Output
In the above alert boxes, you can find the differences in String before calling trim() method and after calling trim() method.
clean()
This method is used to remove all white spaces from the given string and maintain single space between the words. Take a look at the following code.
Example
<!DOCTYPE html>
<html>

   <head>
      <script type = "text/javascript" src = "MooTools-Core-1.6.0.js"></script>
      <script type = "text/javascript" src = "MooTools-More-1.6.0.js"></script>

      <script type = "text/javascript">
         window.addEvent('domready', function() {
            var input_str = " This is tutorialspoint.com ";
            document.writeln("<pre>Before clean String is : |-"+input_str+"-|</pre>");

            var trim_string = input_str.clean();
            document.writeln("<pre>After clean String is : |-"+trim_string+"-|</pre>");
         });
      </script>
   </head>

   <body>
   </body>

</html>
You will receive the following output −
Output
contains()
This method is used to search a sub-string in a given string. If the given string contains the search string, it returns true otherwise it returns false. Take a look at the following code.
Example
<!DOCTYPE html>
<html>

   <head>
      <script type = "text/javascript" src = "MooTools-Core-1.6.0.js"></script>
      <script type = "text/javascript" src = "MooTools-More-1.6.0.js"></script>

      <script type = "text/javascript">
         var containsString = function(){
            var input_string = "Hai this is tutorialspoint";
            var search_string = $('input').get('value');
            var string_contains = input_string.contains(search_string);
            alert("contains : " + string_contains);
         }

         window.addEvent('domready', function() {
            $('contains').addEvent('click', containsString);
         });
      </script>
   </head>

   <body>
      Given String : <p>Hai this is tutorialspoint</p>
      Enter search string: <input type = "text" id = "input" />
      <input type = "button" id = "contains" value = "Search String"/>
   </body>

</html>
You will receive the following output −
Output
substitute()
This method is used to insert the input string into the main string. Take a look at the following code.
Example
<!DOCTYPE html>
<html>

   <head>
      <script type = "text/javascript" src = "MooTools-Core-1.6.0.js"></script>
      <script type = "text/javascript" src = "MooTools-More-1.6.0.js"></script>

      <script type = "text/javascript">
         var containsString = function(){
            var input_string = "One is {one}, Two is {two}, Three is {three}";
            var one_str = $('one').get('value');
            var two_str = $('two').get('value');
            var three_str = $('three').get('value');

            var substitution_string = {
               one : one_str,
               two : two_str,
               three : three_str
            }
            var new_string = input_string.substitute(substitution_string);
            document.write("NEW STRING IS : " + new_string);
         }

         window.addEvent('domready', function() {
            $('contains').addEvent('click', containsString);
         });
      </script>
   </head>

   <body>
      Given String : <p>One is {one}, Two {two}, Three is {three}</p>
      one String : <input type = "text" id = "one" /><br/><br/>
      two String : <input type = "text" id = "two" /><br/><br/>
      three String : <input type = "text" id = "three" /><br/><br/>
      <input type = "button" id = "contains" value = "Substitute String"/>
   </body>

</html>
You will receive the following output −
Output
Enter text in the three text boxes and click on the substitute string button, then you will get to see the substitution string.
MooTools - Drag and Drop
MooTools provides a tremendous feature that helps you add drag and drop drag functionalities to your web page elements. We can do this by creating our own new Drag.Move object. Using this object, you can define your options and events. Drag and Drag.Move classes are from the MooTools More library.
Let us discuss the options and events of Drag.Move object.
Drag.Move
Drag.Move is an Object used to add Drag and Drop feature to the html elements. Drag.Move extends Drag, so we can use all the Options and Events of Drag class by Drag.Move object. Take a look at the following syntax and understand how to use Drag.Move object.
Syntax
var myDrag = new Drag.Move(dragElement, {
   // Drag.Move Options
   droppables: dropElement,
   container: dragContainer,

   // Drag Options
   handle: dragHandle,

   // Drag.Move Events
   // the Drag.Move events pass the dragged element,
   // and the dropped into droppable element
   onDrop: function(el, dr) {
      //will alert the id of the dropped into droppable element
      alert(dr.get('id'));
   },
   // Drag Events
   // Drag events pass the dragged element
   onComplete: function(el) {
      alert(el.get('id'));
   }
});
Drag.Move Options
Drag.Move provides the following options to maintain html elements with Drag and Drop features −
droppable − This helps you set the selector of droppable elements (the elements that register on drop-related events).
container − This helps you set the drag elements container (keeps the element inside).
snap − This helps you set how many px the user must drag the cursor before the draggable element starts dragging. The default is 6, and you can set it to any number of variable representing a number.
handle − This helps you add a handle to your draggable element. Handle becomes the only element that will accept the grab.
Take a look at the following syntax for how and where to define the droppable and container, snap, and handle elements.
Syntax
//here we define a single element by id
var dragElement = $('drag_element');

//here we define an array of elements by class
var dropElements = $$('.drag_element');
var dragContainer = $('drag_container');
var dragHandle = $('drag_handle');

//now we set up our Drag.Move object
var myDrag = new Drag.Move(dragElement , {
   // Drag.Move Options
   // set up our droppables element with the droppables var we defined above
   droppables: dropElements ,

   // set up our container element with the container element var
   container: dragContainer

   // set up pixels the user must drag.
   Snap: 10

   // Adds a handle to your draggable element
   handle: dragHandle
});
Drag.Move events
Drag.Move events provide different functions that can be used in different levels of the action. For example, when you start to drag or drop an object, each Drag.Move event will pass the dragged element or the dropped element as parameters.
The following are the supported events −
onStart()
This raises an event on the start of drag. If you set a long snap, then this event would not raise until the mouse is at a distance. Take a look at the following syntax.
Syntax
var myDrag = new Drag.Move(dragElement , {
   // Drag options will pass the dragged element as a parameter
   onStart: function(el) {
      // put whatever you want to happen on start in here
   }
});
onDrag()
This raises an event continuously while you are dragging an element. Take a look at the following syntax.
Syntax
var myDrag = new Drag.Move(dragElement , {
   // Drag options will pass the dragged element as a parameter
   onDrag: function(el) {
      // put whatever you want to happen on drag in here
   }
});
onDrop()
This raises an event when you drop the draggable element into a droppable element. Take a look at the following syntax.
Syntax
var myDrag = new Drag.Move(dragElement , {
   // It will pass the draggable element ('el' in this case)
   // and the droppable element the draggable is interacting with ('dr' here)
   onDrop: function(el, dr) {
      // put whatever you want to happen on drop in here
   }
});
onLeave()
This raises an event when a draggable element leaves a droppable elements bounds. Take a look at the following syntax.
Syntax
var myDrag = new Drag.Move(dragElement , {
   // It will pass the draggable element ('el' in this case)
   // and the droppable element the draggable is interacting with ('dr' here)
   onLeave: function(el, dr) {
      // put whatever you want to happen on Leave from droppable area in here
   }
});
onEnter()
This raises when a draggable element enters a droppable element area. Take a look at the following syntax.
Syntax
var myDrag = new Drag.Move(dragElement , {
   // It will pass the draggable element ('el' in this case)
   // and the droppable element the draggable is interacting with ('dr' here)
   onEnter: function(el, dr) {
      // this will fire when a draggable enters a droppable element
   }
});
onComplete()
This raises an event. onComplete refers to when you drop a droppable, and it will raise whether or not you land in a droppable. Take a look at the following syntax.
Syntax
var myDrag = new Drag.Move(dragElement , {
   // Drag Options
   // Drag options will pass the dragged element as a parameter
   onComplete: function(el) {
      // put whatever you want to happen on complete
   }
});
Let us take an example that will explore all the features explained in this chapter. The features are Drag, Drag.Move, onEnter, onLeave, onDrop, onStart, onDrag, and onComplete. In this example, we are providing one HANDLE, using that you can drag the draggable object anywhere into the container. For every action, there is a notification on the left side (indicated in blue color). There is a Droppable area in the container. If the Draggable object enters into the Droppable area, then the last three indicators are activated. Take a look at the following code.
Example
<!DOCTYPE html>
<html>

   <head>
      <style>
         /* this is generally a good idea */
         body {
            margin: 0;
            padding: 0;
         }

         /* make sure the draggable element has "position: absolute"
         and then top and left are set for the start position */
         #drag_me {
            width: 100px;
            height: 100px;
            background-color: #333;
            position: absolute;
            top: 0;
            left: 0;
         }
         #drop_here {
            width: 80%;
            height: 200px;
            background-color: #eee;
            margin-left: 100px;
            margin-top: -200px !important;
         }
         /* make sure the drag container is set with position relative */
         #drag_cont {
            background-color: #ccc;
            height: auto;
            width: 500px;
            position:relative;
            margin-top: 20px;
            margin-left: 20px;
            margin-bottom: auto;
         }
         #drag_me_handle {
            width: 100%;
            height: auto;
            background-color: #F5B041;
         }
         #drag_me_handle span {
            display: block;
            padding: 20px;
         }
         .indicator {
            width: 100px;
            height: auto;
            background-color: #0066FF;
            border-bottom: 1px solid #eee;
         }
         .indicator span {
            padding: 10px;
            display: block;
         }
         .draggable {
            width: 200px;
            height: 200px;
            background-color: blue;
         }
      </style>

      <script type = "text/javascript" src = "MooTools-Core-1.6.0.js"></script>
      <script type = "text/javascript" src = "MooTools-More-1.6.0.js"></script>

      <script type = "text/javascript">
         window.addEvent('domready', function() {
            var dragElement = $('drag_me');
            var dragContainer = $('drag_cont');
            var dragHandle = $('drag_me_handle');
            var dropElement = $$('.draggable');
            var startEl = $('start');
            var completeEl = $('complete');
            var dragIndicatorEl = $('drag_ind');
            var enterDrop = $('enter');
            var leaveDrop = $('leave');
            var dropDrop = $('drop_in_droppable');

            var myDrag = new Drag.Move(dragElement, {
               // Drag.Move options
               droppables: dropElement,
               container: dragContainer,

               // Drag options
               handle: dragHandle,

               // Drag.Move Events
               onDrop: function(el, dr) {
                  if (!dr) { }else {
                     dropDrop.highlight('#FB911C'); //flashes orange
                     el.highlight('#fff'); //flashes white
                     dr.highlight('#667C4A'); //flashes green
                  };
               },
               onLeave: function(el, dr) {
                  leaveDrop.highlight('#FB911C'); //flashes orange
               },
               onEnter: function(el, dr) {
                  enterDrop.highlight('#FB911C'); //flashes orange
               },

               // Drag Events
               onStart: function(el) {
                  startEl.highlight('#FB911C'); //flashes orange
               },
               onDrag: function(el) {
                  dragIndicatorEl.highlight('#FB911C'); //flashes orange
               },
               onComplete: function(el) {
                  completeEl.highlight('#FB911C'); //flashes orange
               }
            });
         });
      </script>
   </head>

   <body>

      <p align = "center">Drag and Drop Application</p>
      <div id = "drag_cont">
         <div id = "start" class = "indicator"><span>Start</span></div>
         <div id = "drag_ind" class = "indicator"><span>Drag</span></div>
         <div id = "complete" class = "indicator"><span>Complete</span></div>
         <div id = "enter" class = "indicator"><span>Enter Droppable Element</span></div>
         <div id = "leave" class = "indicator"><span>Leave Droppable Element</span></div>

         <div id = "drop_in_droppable" class = "indicator">
            <span>Dropped in Droppable Element</span>
         </div>

         <div id = "drag_me">
            <div id = "drag_me_handle"><span>HANDLE</span></div>
         </div>

         <div id = "drop_here" class = "draggable">
            <p align = "center">Droppable Area</p>
         </div>

      </div>
   </body>

</html>
You will receive the following output wherein, you have to click on Handle and Drag it. You can now find the notification indications on the left hand side.
Output
MooTools - Regular Expression
MooTools provides a way to create and use Regular Expression (regex). This tutorial will explain the basics and extreme uses of regexes.
Let us discuss a few methods of the regular expressions.
test()
test() is a method used to test the regular expression with the input string. While JavaScript already provides the RegExp object along with the test() function, MooTools adds more features to the RegExp object. Let us take an example and understand how to use the test() method. Take a look at the following code.
Example
<!DOCTYPE html>
<html>

   <head>
      <script type = "text/javascript" src = "MooTools-Core-1.6.0.js"></script>
      <script type = "text/javascript" src = "MooTools-More-1.6.0.js"></script>

      <script type = "text/javascript">
         var regex_demo = function(){
            var test_string = $('regex_value').get('value');
            var regex_value = $('regex_match').get('value');
            var test_result = test_string.test(regex_value);

            if (test_result){
               $('regex_1_result').set('html', "Matched");
            } else {
               $('regex_1_result').set('html', "Not Match");
            }
         }

         window.addEvent('domready', function() {
            $('regex').addEvent('click', regex_demo);
         });
      </script>
   </head>

   <body>
      String: <input type = "text" id = "regex_value"/><br/><br/>
      Reg Exp: <input type = "text" id = "regex_match"/><br/><br/>
      <input type = "button" id = "regex" value = "TEST"/><br/><br/>
      <Lable id = "regex_1_result"></Lable>
   </body>

</html>
You will receive the following output −
Output
Ignore Case
This is one of the important situations in regular expressions concept. If you dont want a regular expression to be case sensitive, you call the test method with an option 'I'. Let us take an example that will explain the ignore case in regular expression. Take a look at the following code.
Example
<!DOCTYPE html>
<html>

   <head>
      <script type = "text/javascript" src = "MooTools-Core-1.6.0.js"></script>
      <script type = "text/javascript" src = "MooTools-More-1.6.0.js"></script>

      <script type = "text/javascript">
         var regex_demo = function(){
            var test_string = $('regex_value').get('value');
            var regex_value = $('regex_match').get('value');
            var test_result = test_string.test(regex_value, "i");

            if (test_result){
               $('regex_1_result').set('html', "Matched");
            } else {
               $('regex_1_result').set('html', "Not Match");
            }
         }

         window.addEvent('domready', function() {
            $('regex').addEvent('click', regex_demo);
         });
      </script>
   </head>

   <body>
      String: <input type = "text" id = "regex_value"/><br/><br/>
      Reg Exp: <input type = "text" id = "regex_match"/><br/><br/>
      <input type = "button" id = "regex" value = "TEST"/><br/><br/>
      <Lable id = "regex_1_result"></Lable>
   </body>

</html>
You will receive the following output −
Output
Regex starts with '^'
The regex '^' (cap) is a special operator that allows you to check the regular expression in the beginning of a given string. This operator is used as prefix to the regular expression. Let us take an example that will explain how to use this operator. Take a look at the following code.
Example
<!DOCTYPE html>
<html>

   <head>
      <script type = "text/javascript" src = "MooTools-Core-1.6.0.js"></script>
      <script type = "text/javascript" src = "MooTools-More-1.6.0.js"></script>

      <script type = "text/javascript">
         var regex_demo = function(){
            var test_string = $('regex_value').get('value');
            var regex_value = $('regex_match').get('value');
            var test_result = test_string.test(regex_value);

            if (test_result){
               $('regex_1_result').set('html', "Matched");
            } else {
               $('regex_1_result').set('html', "Not Match");
            }
         }

         window.addEvent('domready', function() {
            $('regex').addEvent('click', regex_demo);
         });
      </script>
   </head>

   <body>
      String: <input type = "text" id = "regex_value"/><br/><br/>
      Reg Exp: <input type = "text" id = "regex_match"/><br/><br/>
      <input type = "button" id = "regex" value = "Match"/><br/><br/>
      <Lable id = "regex_1_result"></Lable>
   </body>

</html>
You will receive the following output −
Output
Regex ends with '$'
The Regex '$' (dollar) is a special operator that allows you to check the regular expression at the end of a given string. This operator is used as suffix to the regular expression. Let us take an example that will explain how to use this operator. Take a look at the following code.
Example
<!DOCTYPE html>
<html>

   <head>
      <script type = "text/javascript" src = "MooTools-Core-1.6.0.js"></script>
      <script type = "text/javascript" src = "MooTools-More-1.6.0.js"></script>

      <script type = "text/javascript">
         var regex_demo = function(){
            var test_string = $('regex_value').get('value');
            var regex_value = $('regex_match').get('value');
            var test_result = test_string.test(regex_value);

            if (test_result){
               $('regex_1_result').set('html', "Matched");
            } else {
               $('regex_1_result').set('html', "Not Match");
            }
         }

         window.addEvent('domready', function() {
            $('regex').addEvent('click', regex_demo);
         });
      </script>
   </head>

   <body>
      String: <input type = "text" id = "regex_value"/><br/><br/>
      Reg Exp: <input type = "text" id = "regex_match"/><br/><br/>
      <input type = "button" id = "regex" value = "Match"/><br/><br/>
      <Lable id = "regex_1_result"></Lable>
   </body>

</html>
You will receive the following output −
Output
Character Classes
Character classes are a phase of regular expressions that allow you to match specific characters (A or Z) or range of characters (A Z). For example, you want to test if either of the words foo and zoo exist in a string, classes allow you to do this by placing the characters in the box brackets [] with the regular expressions. Take a look at the following code.
Example
<!DOCTYPE html>
<html>
<head>
<script type = "text/javascript" src = "MooTools-Core-1.6.0.js"></script>
<script type = "text/javascript" src = "MooTools-More-1.6.0.js"></script>
<script type = "text/javascript">
var regex_demo_1 = function(){
var test_string = $('regex_value').get('value');
var regex_value = $('regex_match_1').get('value');
var test_result = test_string.test(regex_value);
if (test_result){
$('regex_1_result').set('html', "Matched");
} else {
$('regex_1_result').set('html', "Not Match");
}
}
var regex_demo_2 = function(){
var test_string = $('regex_value').get('value');
var regex_value = $('regex_match_2').get('value');
var test_result = test_string.test(regex_value);
if (test_result){
$('regex_2_result').set('html', "Matched");
} else {
$('regex_2_result').set('html', "Not Match");
}
}
var regex_demo_3 = function(){
var test_string = $('regex_value').get('value');
var regex_value = $('regex_match_3').get('value');
var test_result = test_string.test(regex_value);
if (test_result){
$('regex_3_result').set('html', "Matched");
} else {
$('regex_3_result').set('html', "Not Match");
}
}
window.addEvent('domready', function() {
$('regex_1').addEvent('click', regex_demo_1);
$('regex_2').addEvent('click', regex_demo_2);
$('regex_3').addEvent('click', regex_demo_3);
});
</script>
</head>
<body>
String: <input type = "text" id = "regex_value"/><br/><br/>
Reg Exp 1: <input type = "text" id = "regex_match_1"/>
<input type = "button" id = "regex_1" value = "Match"/> 
<Lable id = "regex_1_result"></Lable><br/><br/>
Reg Exp 2: <input type = "text" id = "regex_match_2"/>
<input type = "button" id = "regex_2" value = "Match"/>
<Lable id = "regex_2_result"></Lable><br/><br/>
Reg Exp 3: <input type = "text" id = "regex_match_3"/>
<input type = "button" id = "regex_3" value = "Match"/>
<Lable id = "regex_3_result"></Lable>
</body>
</html>
You will receive the following output −
Output
escapeRegExp()
This method is used to ignore the escape characters from a given string while checking it with a regular expression. Usually, the escape characters are −
- . * + ? ^ $ { } ( ) | [ ] / \
Let us take an example wherein, we have a given String like "[check-this-stuff] it is $900". If you want to take this whole string you have to declare it like this "\[check\-this\-stuff\] it is \$900". The system accepts only this pattern. We do not use the escakpe character patterns in MooTools. We have the escapeRegExp() method to ignore escape characters. Take a look at the following code.
Example
<!DOCTYPE html>
<html>

   <head>
      <script type = "text/javascript" src = "MooTools-Core-1.6.0.js"></script>
      <script type = "text/javascript" src = "MooTools-More-1.6.0.js"></script>

      <script type = "text/javascript">
         var regex_demo_1 = function(){
            var test_string = $('regex_value').get('value');
            var regex_value = $('regex_match_1').get('value');
            var test_result = test_string.test(regex_value);

            if (test_result){
               $('regex_1_result').set('html', "Matched");
            } else {
               $('regex_1_result').set('html', "Not Match");
            }
         }

         var regex_demo_2 = function(){
            var test_string = $('regex_value').get('value');
            var regex_value = $('regex_match_1').get('value');
            regex_value = regex_value.escapeRegExp();
            var test_result = test_string.test(regex_value);

            if (test_result){
               $('regex_2_result').set('html', "Matched");
            } else {
               $('regex_2_result').set('html', "Not Match");
            }
         }

         window.addEvent('domready', function() {
            $('regex_1').addEvent('click', regex_demo_1);
            $('regex_2').addEvent('click', regex_demo_2);
            $('regex_3').addEvent('click', regex_demo_3);
         });
      </script>
   </head>

   <body>
      String: <input type = "text" id = "regex_value"/><br/><br/>
      Reg Exp 1: <input type = "text" id = "regex_match_1" size = "6"/><br/><br/>
      <input type = "button" id = "regex_1" value = "With escapeRegExp()"/>
      <Lable id = "regex_1_result"></Lable><br/><br/>
      <input type = "button" id = "regex_2" value = "Without escapeRegExp()"/>
      <Lable id = "regex_2_result"></Lable><br/><br/>
   </body>

</html>
You will receive the following output −
Output
MooTools - Periodicals
MooTools provides an option that supports periodicals. With this, it can call a function periodically with same level time frequency. Let us discuss the methods and features of periodicals.
periodical()
This method is used to raise a function periodically with the same level of time frequency. There are a few things we need to define in the beginning. One is the function which you run periodically and the second one is the numeric value that is for how often you want to raise a function (numeric value measured in milliseconds). Let us take an example that explains how a function executes in every 100 milliseconds. Take a look at the following code.
Example
<!DOCTYPE html>
<html>

   <head>
      <script type = "text/javascript" src = "MooTools-Core-1.6.0.js"></script>
      <script type = "text/javascript" src = "MooTools-More-1.6.0.js"></script>

      <script type = "text/javascript">
         var periodicalFunction = function(){
            document. writeln("www.tutorialspoint.com");
         }

         window.addEvent('domready', function() {
            //number at the end indicates how often to fire, measure in milliseconds
            var periodicalFunctionVar = periodicalFunction.periodical(100);
         });
      </script>
   </head>

   <body>
   </body>

</html>
You will receive the following output −
Output
Element as Second Variable
The periodical function also binds a second variable which is outside the domready function(). You can bind the element as second variable into the function which you want to raise periodically. Take a look at the following syntax to understand how to pass a variable.
Syntax
window.addEvent('domready', function() {
   //pass something to a var
   var passedVar = $('elementID');

   //now periodicalFunction will be able to use "this" to refer to "passedVar"
   var periodicalFunctionVar = periodicalFunction.periodical(100, passedVar);
});
Here passedVar is the element variable that holds an html element. And that variable passes to the periodical function periodicalFunctionVar as second variable.
$Clear()
$This method is used to stop the periodical function. This method helps reset the periodical variable value. Take a look at the following syntax to understand how to use $clear() function.
Syntax
//we clear the var that we passed the function and periodical to
$clear(periodicalFunctionVar);
MooTools - Sliders
Slider is a functionality that reflects an action while sliding the knob or any button. You can create your own slider while defining elements, the handler, options, and call back events. Let us discuss more about slider.
Creating a New Slider
We first have to choose the suitable HTML elements for slider. While considering the basic idea, div elements are the most suitable for sliders because using divs, we can create child elements. We now have to set the CSS for those divs to make the div structure as a perfect slider. Here, the parent div is for slider and the child div is for knob.
We now have to use these divs as sliders by passing the elements to the Slider constructor as sliderObject, and knobObject. Take a look at the following syntax for defining slider.
Syntax
var SliderObject = new Slider(sliderObject , knobObject , [,options,],..);
We also have to define the slider options.
Slider Options
Let us discuss a few options that are used for sliders.
Snap
A snap value can be a true or false value. This determines whether the knob snaps to the steps as it is dragged along the slider. By default, it is false.
Offset
This is the relative offset of the knob from the starting position. Try experimenting with this one. By default, it is 0.
Range
This is a very useful option. You can set a range of numbers that the steps will break into. For example, if your range was [0, 200] and you had 10 steps, your steps would be 20 apart. The range can also include negative numbers, for example [-10, 0], which is very useful when inverting the scrolled. By default, it is false.
Wheel
Set wheel to true and the scroller will recognize the mousewheel event. When using the mousewheel, you may have to adjust the range to ensure that the mousewheel event does not appear inverted (again, more on that later).
Steps
The default of 100 steps is very useful as its easy to use as percentage. You can, however, set as many steps (that are usable) within reason. By default, it is 100.
Mode
Mode will define whether a slider registers itself as vertical or horizontal. However, there are a few more necessary steps to convert from horizontal and vertical. By default, it is horizontal.
Callback Events
There are three important callback events that a Slider provides.
onChange
Any change in the present step triggers the execution of the event. Check out the example given below to see when it executes.
onTick
Any change in the position of the handle triggers the execution of this event. Check out the example given below to see what this executes.
onComplete
This event executes whenever the handle is let go of. Check out the example given below to see when it executes.
Example
The following example explains the horizontal and vertical slider along with the event indicators. Take a look at the following code.
<!DOCTYPE html>
<html>

   <head>
      <style "text/css">
         #slider {
            width: 200px;
            height: 20px;
            background-color: #0099FF;
         }
         #knob {
            width: 20px;
            height: 20px;
            background-color: #993333;
         }
         #sliderv {
            width: 20px;
            height: 200px;
            background-color: #0099FF;
         }
         #knobv {
            width: 20px;
            height: 20px;
            background-color: #993333;
         }
         #change{
            background-color: burlywood;
            border: 2px solid black;
            width: 200px;
         }
         #complete{
            background-color: burlywood;
            border: 2px solid black;
            width: 200px;
         }
      </style>

      <script type = "text/javascript" src = "MooTools-Core-1.6.0.js"></script>
      <script type = "text/javascript" src = "MooTools-More-1.6.0.js"></script>

      <script type = "text/javascript">
         window.addEvent('domready', function() {

            var SliderObject = new Slider('slider', 'knob', {
               //options
               range: [0, 10],
               snap: false,
               steps: 10,
               offset: 0,
               wheel: true,
               mode: 'horizontal',

               //callback events
               onChange: function(step){
                  $('change').highlight('#F3F825');
                  $('steps_number').set('html', step);
               },

               onTick: function(pos){
                  $('tick').highlight('#F3F825');
                  $('knob_pos').set('html', pos);

                  //this line is very necessary (left with horizontal)
                  this.knob.setStyle('left', pos);
               },

               onComplete: function(step){
                  $('complete').highlight('#F3F825')
                  $('steps_complete_number').set('html', step);
                  this.set(step);
               }
            });

            var SliderObjectV = new Slider('sliderv', 'knobv', {
               range: [-10, 0],
               snap: true,
               steps: 10,
               offset: 0,
               wheel: true,
               mode: 'vertical',
               onChange: function(step){
                  $('stepsV_number').set('html', step*-1);
               }
            });

            //sets the vertical one to start at 0
            //without this it would start at the top
            SliderObjectV.set(0);

            //sets the slider to step 7
            $('set_knob').addEvent('click', function(){ SliderObject.set(7)});
         });
      </script>
   </head>

   <body>
      <div id = "slider">
         <div id = "knob"></div>
      </div><br/><br/>

      <div id = "sliderv">
         <div id = "knobv"></div>
      </div><br/>

      <span id = "stepsV_number"></span> <br/>

      <div id = "change" class = "indicator">
         <strong>onChange</strong><br/>
         Passes the step you are on: <span id = "steps_number"></span>
      </div></br/>

      <div id = "complete" class = "indicator">
         <strong>onComplete</strong><br />
         passes the current step: <span id = "steps_complete_number"></span>
      </div>

   </body>
</html>
Output
Click on the brown knob on the horizontal or vertical sliders then drag it, you will find the step position and event indication for each action.
MooTools - Sortables
Sortables is an advanced feature in web development and can really open up the options with your user interface designs. It also includes a great function called "serialize" that manages a list of element ids and is useful for server side scripting.
Creating a New Sortable Object
First, we send the list of items to a variable. If you want an array of the list of items, then assign all collection to a variable. And, finally pass that variable to a sortable constructor. Take a look at the following syntax to create a sortable object.
Syntax
var sortableListsArray = $$('#listA, #listB');
var sortableLists = new Sortables(sortableListsArray);
The following is the HTML code for the syntax.
Syntax
<ul id = "listA">
   <li>Item A1</li>
   <li>Item A2</li>
   <li>Item A3</li>
   <li>Item A4</li>
</ul>

<ul id = "listB">
   <li>Item B1</li>
   <li>Item B2</li
   <li>Item B3</li>
   <li>Item B4</li>
</ul>
Sortables Option
Sortable provides different options to customize the sortable object. Let us discuss the options.
Constrain
This option determines whether the list elements can jump between uls within the sortable object. For example, if you have two uls in the sortable object, you can "constrain" the list items to their parent ul by setting "constrain: true". Take a look at the following syntax for setting constrain.
Syntax
var sortableLists = new Sortables(sortableListsArray, {
   constrain: true //false is default
});
Clone
This option helps you to create a clone element under your cursor. It helps in sorting the list elements. Take a look at the following syntax for clone.
Syntax
var sortableLists = new Sortables(sortableListsArray, {
   clone: true //false is default
});
Handle
Handle is an option that accepts an element to act as the drag handle. This is useful whenever you want your list items selectable or you want any actions in your list. If you are not providing any variable it will be considered as false by default. Take a look at the following syntax for using handle.
Syntax
var handleElements = $$('.handlesClass');
var sortableLists = new Sortables(sortableListsArray, {
   handle: handleElements //false is default
});
Opacity
This option lets you adjust the sort element. If you use a clone, opacity affects the element that sorts.
Syntax
var sortableLists = new Sortables(sortableListsArray, {
   opacity: 1 //default is 1
});
Revert
This option accepts either "false" or any Fx option. If you set Fx option within revert, it will create an effect for the sorted element to settle into place. Take a look at the following syntax for revert.
Syntax
var sortableLists = new Sortables(sortableListsArray, {
   revert: false //this is the default
});

//you can also set Fx options
var sortableLists = new Sortables(sortableListsArray, {
   revert: {
      duration: 50
   }
});
Snap
This option lets you see how many px the user will drag the mouse before the element starts following.
Syntax
var sortableLists = new Sortables(sortableListsArray, {
   snap: 10 //user will have to drag 10 px to start the list sorting
});
Sortable Events
Sortable provides the following events that are nice and straight forward.
onStart − executes when the drag starts (once snap kicks over)
onSort − executes when the items change order
onComplete − executes when you drop an element in place
Sortable Methods
The following sortable methods are essentially functions that belong to classes −
detach()
With detach(), you can detach all the current handles, making the entire list object not sortable. This is useful for disabling sort.
attach()
This method will attach the handles to the sort items, works to enable sorting after detach().
addItems()
This allows you to add new items to your sortable list. Lets say that you have a sortable list where the user can add a new item, once you add that new item, you will need to enable sorting on that new item.
removeItems()
This method lets you remove the sorting capability of an item within a sortable list. This is useful when you want to lock a particular item within a specific list and not let it sort with others.
addLists()
Instead of just adding a new item to an existing list, you may want to add a whole new list to the sortable object. This method lets you add multiple lists, making it really easy to add more sortables.
removeLists()
Let us remove the lists from the sortable object. This is useful for when you want to lock a particular list in place. You can remove the list, leaving the other lists still in the object sortable, but locking the content of the removed list.
serialize()
All of that sorting is great, but what if you want to do something with the data? .serialize(); will return a list of the item ids as well as their order on the list. You can choose which list to get data from within the object by index number.
Example
The following example creates an array of div elements with numbering. Later, rearrange those by click, drag, and drop actions using mouse pointer. Take a look at the following code.
<!DOCTYPE html>
<html>

   <head>
      <style>
         #test {
            position: inherit;
         }
         ul#sortables {
            width: 300px;
            margin: 0;
            padding: 0;
         }
         li.sortme {
            padding: 4px 8px;
            color: #fff;
            cursor: pointer;
            list-style: none;
            width: 300px;
            background-color: #222;
            border: 1px solid;
         }
         ul#sortables li {
            margin: 10px 0;
         }
      </style>

      <script type = "text/javascript" src = "MooTools-Core-1.6.0.js"></script>
      <script type = "text/javascript" src = "MooTools-More-1.6.0.js"></script>

      <script type = "text/javascript">
         window.addEvent('domready', function() {
            new Sortables($('test'), {
               initialize: function(){
                  var step = 0;

                  this.elements.each(function(element, i) {
                     var color = [step, 82, 87].hsbToRgb();
                     element.setStyle('background-color', color);
                     step = step + 35;
                     element.setStyle('height', $random(40, 100));
                  });
               }
            });
         });
      </script>
   </head>

   <body>
      <ul id = "test">
         <li class = "sortme">0</li>
         <li class = "sortme">1</li>
         <li class = "sortme">2</li>
         <li class = "sortme">3</li>
         <li class = "sortme">4</li>
         <li class = "sortme">5</li>
         <li class = "sortme">6</li>
         <li class = "sortme">7</li>
         <li class = "sortme">8</li>
         <li class = "sortme">9</li>
         <li class = "sortme">10</li>
      </ul>
   </body>

</html>
You will receive the following output −
Output
MooTools - Accordion
Accordion is the most popular plugin that MooTools provides. It helps in hiding and revealing the data. Let us discuss more about it.
Creating new accordion
The basic elements that an accordion requires are pairs of toggles and their contents. Let us create pairs of headings and contents of the html.
<h3 class = "togglers">Toggle 1</h3>
<p class = "elements">Here is the content of toggle 1</p>
<h3 class = "togglers">Toggle 2</h3>
<p class = "elements">Here is the content of toggle 2</p>
Take a look at the following syntax to understand how to build an accordion based on the above HTML structure.
Syntax
var toggles = $$('.togglers');
var content = $$('.elements');
var AccordionObject = new Fx.Accordion(toggles, content);
Example
Let us take an example that defines the basic functionality of Accordion. Take a look at the following code.
<!DOCTYPE html>
<html>

   <head>
      <style>
         .togglers {
            padding: 4px 8px;
            color: #fff;
            cursor: pointer;
            list-style: none;
            width: 300px;
            background-color: #222;
            border: 1px solid;
         }
      </style>

      <script type = "text/javascript" src = "MooTools-Core-1.6.0.js"></script>
      <script type = "text/javascript" src = "MooTools-More-1.6.0.js"></script>

      <script type = "text/javascript">
         window.addEvent('domready', function() {
            var toggles = $$('.togglers');
            var content = $$('.elements');
            var AccordionObject = new Fx.Accordion(toggles, content);
         });
      </script>
   </head>

   <body>
      <h3 class = "togglers">Toggle 1</h3>
      <p class = "elements">Here is the content of toggle 1</p>
      <h3 class = "togglers">Toggle 2</h3>
      <p class = "elements">Here is the content of toggle 2</p>
      <h3 class = "togglers">Toggle 3</h3>
      <p class = "elements">Here is the content of toggle 3</p>
   </body>

</html>
You will receive the following output −
Output
Accordion Options
Accordion provides tremendous features. These features help in tweaking the options to give customized output.
display
This option determines which element shows on page load. The default is set to 0, so the first element shows. To set another element, just put in another integer that corresponds with its index. Unlike show, display will transition the element open.
Syntax
var AccordionObject = new Accordion(toggles, content {
   display: 0 //default is 0
});
show
Much like display, show determines which element will be open when the page loads, but instead of a transition, show will just make the content display on load without any transition.
Syntax
var AccordionObject = new Accordion(toggles, content {
   show: 0 //default is 0
});
height
When set to true, a height transition effect will take place when switching between displayed elements.. This is the standard accordion setting you see above.
Syntax
var AccordionObject = new Accordion(toggles, content {
   height: true //default is true
});
width
This works the same like the height option. However, instead of transitioning the height to show the content, this helps in transitioning of the width. If you use width with a standard setup, like we used above, then the space between the title toggle will stay the same, based on the height of the content. The content div will then transition from left to right to display in that space.
Syntax
var AccordionObject = new Accordion(toggles, content {
   width: false //default is false
});
opacity
This option determines whether or not to show an opacity transition effect when you hide or display some content. Since we are using the default options above, you can see the effect there.
Syntax
var AccordionObject = new Accordion(toggles, content {
   opacity: true //default is true
});
fixedHeight
To set a fixed height, you need to fix an integer (for example, you could put 100 for the content 100px tall). This should be used with some kind of CSS overflow property if you are planning on having a fixed height smaller than the contents natural height.
Syntax
var AccordionObject = new Accordion(toggles, content {
   fixedHeight: false //default is false
});
fixedWidth
Just like fixedHeight above, this will set the width if you give this option an integer.
Syntax
var AccordionObject = new Accordion(toggles, content {
   fixedWidth: false //default is false
});
alwaysHide
This option lets you add a toggle control to the titles. With this set to true, when you click on an open content title, the content element will close automatically without opening anything else. You can see the execution in the following example.
Syntax
var AccordionObject = new Accordion(toggles, content {
   alwaysHide: false //default is false
});
Accordion Events
These events allow you to create your functionality for every action of Accordion.
onActive
This will execute when you toggle open an element. It will pass the toggle control element and the content element that is opening and also the parameters.
Syntax
var AccordionObject = new Accordion(toggles, content {
   onActive: function(toggler, element) {
      toggler.highlight('#76C83D'); //green
      element.highlight('#76C83D');
   }
});
onBackground
This executes when an element starts to hide and passes all other elements that are closing, but not opening.
Syntax
var AccordionObject = new Accordion(toggles, content {
   onBackground: function(toggler, element) {
      toggler.highlight('#DC4F4D'); //red
      element.highlight('#DC4F4D');
   }
});
onComplete
This is your standard onComplete event. It passes a variable containing the content element.
Syntax
var AccordionObject = new Accordion(toggles, content {
   onComplete: function(one, two, three, four){
      one.highlight('#5D80C8'); //blue
      two.highlight('#5D80C8');
      three.highlight('#5D80C8');
      four.highlight('#5D80C8');
   }
});
Accordion Methods
These methods help you create and manipulate Accordion Sections.
addSection()
With this method, you can add a section (a toggle/content element pair). It works like many of the other methods we have seen. First refer to the accordion object, use .addSection, then you can call the id of the title, the id of the content, and finally state what position you want the new content to appear in (0 being the first spot).
Syntax
AccordionObject.addSection('togglersID', 'elementsID', 2);
Note − When you add a section like this, though it will show up in the spot of index 2, the actual index will be be +1 the last index. So if you have 5 items in your array (0-4) and you add a 6th, its index would be 5 regardless of where you add it with .addSection();
display()
This lets you open a given element. You can select the element by its index (so if you have added an element pair and you want to display it, you will have a different index here than you would use above.
Syntax
AccordionObject.display(5); //would display the newly added element
Example
The following example explains the Accordion feature with a few effects. Take a look at the following code.
<!DOCTYPE html>
<html>

   <head>
      <style>
         .togglers {
            color: #222;
            margin: 0;
            padding: 2px 5px;
            background: #EC7063;
            border-bottom: 1px solid #ddd;
            border-right: 1px solid #ddd;
            border-top: 1px solid #f5f5f5;
            border-left: 1px solid #f5f5f5;
            font-size: 15px;
            font-weight: normal;
            font-family: 'Andale Mono', sans-serif;
         }

         .ind {
            background: #2E86C1;
            border-bottom: 1px solid #ddd;
            border-right: 1px solid #ddd;
            border-top: 1px solid #f5f5f5;
            border-left: 1px solid #f5f5f5;
            font-size: 20px;
            color: aliceblue;
            font-weight: normal;
            font-family: 'Andale Mono', sans-serif;
            width: 200px;
         }
      </style>

      <script type = "text/javascript" src = "MooTools-Core-1.6.0.js"></script>
      <script type = "text/javascript" src = "MooTools-More-1.6.0.js"></script>

      <script type = "text/javascript">
         window.addEvent('domready', function() {
            var toggles = $$('.togglers');
            var content = $$('.elements');

            var AccordionObject = new Fx.Accordion(toggles, content, {
               show: 0,
               height : true,
               width : false,
               opacity: true,
               fixedHeight: false,
               fixedWidth: false,
               alwaysHide: true,

               onActive: function(toggler, element) {
                  toggler.highlight('#DC7633'); //green
                  element.highlight('#DC7633');
                  $('active').highlight('#DC7633');
               },

               onBackground: function(toggler, element) {
                  toggler.highlight('#AED6F1'); //red
                  element.highlight('#AED6F1');
                  $('background').highlight('#F4D03F');
               }
            });
            $('display_section').addEvent('click', function(){
               AccordionObject.display(4);
            });
         });
      </script>
   </head>

   <body>
      <div id = "active" class = "ind">onActive</div>
      <div id = "background" class = "ind">onBackground</div>

      <div id = "accordion_wrap">
         <p class = "togglers">Toggle 1: click here</p>
         <p class = "elements">Here is the content of toggle 1 Here is the content of
            toggle 1 Here is the content of toggle 1 Here is the content of toggle 1 Here
            is the content of toggle 1 Here is the content of toggle 1 Here is the content
            of toggle 1 Here is the content of toggle 1</p>
         <p class = "togglers">Toggle 2: click here</p>
         <p class = "elements">Here is the content of toggle 2</p>
         <p class = "togglers">Toggle 3: click here</p>
         <p class = "elements">Here is the content of toggle 3</p>
         <p class = "togglers">Toggle 4: click here</p>
         <p class = "elements">Here is the content of toggle 4</p>
      </div>

      <p>
         100
         <button id = "display_section" class = "btn btn-primary">
            display section
         </button>
      </p>

   </body>
</html>
Output
Click on each Toggle section, then you will find the hidden data and the event indicators for every action.
MooTools - Tooltips
MooTools provides different tooltips to design custom styles and effects. In this chapter, we will learn the various options and events of tooltips, as well as a few tools that will help you add or remove tooltips from elements.
Creating a New Tooltip
Creating a tooltip is very simple. First, we have to create the element where we will attach the tooltip. Let us take an example that creates an anchor tag and adds that to the Tips class in the constructor. Take a look at the following code.
<a id = "tooltipID" class = "tooltip_demo" title = "1st Tooltip Title"
   rel = "here is the default 'text' for toll tip demo"
   href = "http://www.tutorialspoint.com">Tool tip _demo</a>
Take a look at the code used to create tooltip.
var customTips = $$('.tooltip_demo');
var toolTips = new Tips(customTips);
Example
The following example explains the basic idea of Tooltips. Take a look at the following code.
<!DOCTYPE html>
<html>

   <head>
      <script type = "text/javascript" src = "MooTools-Core-1.6.0.js"></script>
      <script type = "text/javascript" src = "MooTools-More-1.6.0.js"></script>

      <script type = "text/javascript">
         window.addEvent('domready', function() {
            var customTips = $$('.tooltip_demo');
            var toolTips = new Tips(customTips);
         });
      </script>
   </head>

   <body>
      <a id = "tooltipID" class = "tooltip_demo" title = "1st Tooltip Title"
         rel = "here is the default 'text' for toll tip demo"
         href = "http://www.tutorialspoint.com">Tool tip _demo</a>
   </body>

</html>
You will receive the following output −
Output
Tooltip Options
There are only five options in Tips and they are all pretty self-explanatory.
showDelay
An integer measured in milliseconds, this will determine the delay before the tooltip shows once the user mouse onto the element. The default is set at 100.
hideDelay
Just like showDelay above, this integer (also measured in milliseconds) determines how long to wait before hiding the tip once the user leaves the element. The default is set at 100.
className
This lets you set a class name for the tooltip wrap. The default is set to Null.
Offset
This determines how far away from the element the tooltip will appear. x refers to the right offset, where y is the down offset (both relative to the cursor IF the fixed option is set to false, otherwise the offset is relative to the original element). Default is x: 16, y: 16
Fixed
This sets whether or not the tooltip will follow your mouse if you move around the element. If you set it to true, the tooltip will not move when you move your cursor, but will stay fixed relative to the original element. The default is set to false.
Tooltip Events
The tooltip events remain simple, like the rest of this class. There are two events onShow and onHide, and they work as you would expect.
onShow()
This event executes when the tooltip appears. If you set a delay, this event will not execute until the delay is up.
onHide()
The tooltip hides with the execution of this event. If there is a delay, this event will not execute until the delay is up.
Tooltip Methods
There are two methods for tooltips attach and detach. This lets you target a specific element and add it to a tooltip object (and thereby, inherent all the settings in that class instance) or detach a particular element.
attach()
To attach a new element to a tooltip object, just state the tip object, the tack on .attach();, and finally place the element selector within the brackets ().
Syntax
toolTips.attach('#tooltipID3');
dettach()
This method works just as the .attach method, but the outcome is completely the opposite. First, state the tip object, then add .dettach(), and finally place your element selector within ().
Syntax
toolTips.dettach('#tooltipID3');
Example
Let us take an example that explains tooltip. Take a look at the following code.
<!DOCTYPE html>
<html>

   <head>
      <style>
         .custom_tip .tip {
            background-color: #333;
            padding: 5px;
         }
         .custom_tip .tip-title {
            color: #fff;
            background-color: #666;
            font-size: 20px;
            padding: 5px;
         }
         .custom_tip .tip-text {
            color: #fff;
            padding: 5px;
         }
      </style>

      <script type = "text/javascript" src = "MooTools-Core-1.6.0.js"></script>
      <script type = "text/javascript" src = "MooTools-More-1.6.0.js"></script>

      <script type = "text/javascript">
         window.addEvent('domready', function() {
            var customTips = $$('.tooltip_demo');

            var toolTips = new Tips(customTips, {
               showDelay: 1000,    //default is 100
               hideDelay: 100,     //default is 100
               className: 'custom_tip', //default is null

               offsets: {
                  'x': 100,       //default is 16
                  'y': 16         //default is 16
               },

               fixed: false,      //default is false
               onShow: function(toolTipElement){
                  toolTipElement.fade(.8);
                  $('show').highlight('#FFF504');
               },

               onHide: function(toolTipElement){
                  toolTipElement.fade(0);
                  $('hide').highlight('#FFF504');
               }
            });

            var toolTipsTwo = new Tips('.tooltip2', {
               className: 'something_else', //default is null
            });
            $('tooltipID1').store('tip:text',
               'You can replace the href with whatever text you want.');
            $('tooltipID1').store('tip:title', 'Here is a new title.');
            $('tooltipID1').set('rel', 'This will not change the tooltips text');
            $('tooltipID1').set('title', 'This will not change the tooltips title');

            toolTips.detach('#tooltipID2');
            toolTips.detach('#tooltipID4');
            toolTips.attach('#tooltipID4');
         });
      </script>
   </head>

   <body>
      <div id = "show" class = "ind">onShow</div>
      <div id = "hide" class = "ind">onHide</div>

      <p><a id = "tooltipID1" class = "tooltip_demo" title = "1st Tooltip Title"
         rel = "here is the default 'text' of 1"
         href = "http://www.tutorialspoint.com">Tool tip 1</a></p>

      <p><a id = "tooltipID2" class = "tooltip_demo" title = "2nd Tooltip Title"
         rel = "here is the default 'text' of 2"
         href = "http://www.tutorialspoint.com">Tool tip is detached</a></p>

      <p><a id = "tooltipID3" class = "tooltip_demo_2" title = "3rd Tooltip Title"
         rel = "here is the default 'text' of 3"
         href = "http://www.tutorialspoint.com">Tool tip 3</a></p>

      <p><a id = "tooltipID4" class = "tooltip_demo_2" title = "4th Tooltip Title"
         rel = "here is the default 'text' of 4, i was detached then attached"
         href = "http://www.tutorialspoint.com">Tool tip detached then attached
         again. </a></p>

      <p><a id = "tooltipID5" class = "tooltip2" title = "Other Tooltip Title"
         rel = "here is the default 'text' of 'other style'"
         href = "http://www.tutorialspoint.com/">A differently styled tool tip</a></p>

   </body>
</html>
You will receive the following output −
Output
MooTools - Tabbed Content
Tabbed content means the content that is present in the tabbed area and that content is related to the list items. Whenever we apply any actions like hover or click to the list item, the immediate reaction will create an effect on the tabbed content.
Let us discuss more about tabs.
Creating Simple Tabs
Creating simple menu tabs helps you to explore additional information when you hover over a list item. First, create an unordered list with items, then create divs, each one corresponding to the one list item. Let us take a look at the following HTML code.
Script
<!-- here is our menu -->
<ul id = "tabs">
   <li id = "one">One</li>
   <li id = "two">Two</li>
   <li id = "three">Three</li>
   <li id = "four">Four</li>
</ul>

<!-- and here are our content divs -->
<div id = "contentone" class = "hidden">content for one</div>
<div id = "contenttwo" class = "hidden">content for two</div>
<div id = "contentthree" class = "hidden">content for three</div>
<div id = "contentfour" class = "hidden">content for four</div>
Let us provide some basic support to the above HTML code using CSS that helps in hiding the data. Take a look at the following code.
.hidden {
   display: none;
}
Let us now write a MooTools code that exhibits the tab functionality. Take a look at the following code.
Example Snippet
//here are our functions to change the styles
var showFunction = function() {
   this.setStyle('display', 'block');
}
var hideFunction = function() {
   this.setStyle('display', 'none');
}
window.addEvent('domready', function() {
   //here we turn our content elements into vars
   var elOne = $('contentone');
   var elTwo = $('contenttwo');
   var elThree = $('contentthree');
   var elFour = $('contentfour');
   //add the events to the tabs

   $('one').addEvents({
      //set up the events types
      //and bind the function with the variable to pass
      'mouseenter': showFunction.bind(elOne),
      'mouseleave': hideFunction.bind(elOne)
   });

   $('two').addEvents({
      'mouseenter': showFunction.bind(elTwo),
      'mouseleave': hideFunction.bind(elTwo)
   });

   $('three').addEvents({
      'mouseenter': showFunction.bind(elThree),
      'mouseleave': hideFunction.bind(elThree)
   });

   $('four').addEvents({
      'mouseenter': showFunction.bind(elFour),
      'mouseleave': hideFunction.bind(elFour)
   });
});
On combining the above codes, you will get the proper functionality.
Example
<!DOCTYPE html>
<html>

   <head>
      <style>
         .hidden {
            display: none;
         }
      </style>

      <script type = "text/javascript" src = "MooTools-Core-1.6.0.js"></script>

      <script type = "text/javascript">
         //here are our functions to change the styles
         var showFunction = function() {
            this.setStyle('display', 'block');
         }

         var hideFunction = function() {
            this.setStyle('display', 'none');
         }

         window.addEvent('domready', function() {
            //here we turn our content elements into vars
            var elOne = $('contentone');
            var elTwo = $('contenttwo');
            var elThree = $('contentthree');
            var elFour = $('contentfour');
            //add the events to the tabs

            $('one').addEvents({
               //set up the events types
               //and bind the function with the variable to pass
               'mouseenter': showFunction.bind(elOne),
               'mouseleave': hideFunction.bind(elOne)
            });

            $('two').addEvents({
               'mouseenter': showFunction.bind(elTwo),
               'mouseleave': hideFunction.bind(elTwo)
            });

            $('three').addEvents({
               'mouseenter': showFunction.bind(elThree),
               'mouseleave': hideFunction.bind(elThree)
            });

            $('four').addEvents({
               'mouseenter': showFunction.bind(elFour),
               'mouseleave': hideFunction.bind(elFour)
            });
         });
      </script>
   </head>

   <body>
      <!-- here is our menu -->
      <ul id = "tabs">
         <li id = "one">One</li>
         <li id = "two">Two</li>
         <li id = "three">Three</li>
         <li id = "four">Four</li>
      </ul>

      <!-- and here are our content divs -->
      <div id = "contentone" class = "hidden">content for one</div>
      <div id = "contenttwo" class = "hidden">content for two</div>
      <div id = "contentthree" class = "hidden">content for three</div>
      <div id = "contentfour" class = "hidden">content for four</div>
   </body>

</html>
Output
Place your mouse pointer on the list item, then you will get additional info of the respective item.
Marph Content Tabs
By extending the code, we can add some morph functionality when our hidden content is displayed. We can achieve this by using Fx.Morph effect instead of styling.
Take a look at the following code.
Example
<!DOCTYPE html>
<html>

   <head>
      <style>
         .hiddenM {
            display: none;
         }
      </style>

      <script type = "text/javascript" src = "MooTools-Core-1.6.0.js"></script>

      <script type = "text/javascript">
         var showFunction = function() {
            //resets all the styles before it morphs the current one

            $$('.hiddenM').setStyles({
               'display': 'none',
               'opacity': 0,
               'background-color': '#fff',
               'font-size': '16px'
            });

            //here we start the morph and set the styles to morph to
            this.start({
               'display': 'block',
               'opacity': 1,
               'background-color': '#d3715c',
               'font-size': '31px'
            });
         }

         window.addEvent('domready', function() {
            var elOneM = $('contentoneM');
            var elTwoM = $('contenttwoM');
            var elThreeM = $('contentthreeM');
            var elFourM = $('contentfourM');
            //creat morph object

            elOneM = new Fx.Morph(elOneM, {
               link: 'cancel'
            });

            elTwoM = new Fx.Morph(elTwoM, {
               link: 'cancel'
            });

            elThreeM = new Fx.Morph(elThreeM, {
               link: 'cancel'
            });

            elFourM = new Fx.Morph(elFourM, {
               link: 'cancel'
            });

            $('oneM').addEvent('click', showFunction.bind(elOneM));
            $('twoM').addEvent('click', showFunction.bind(elTwoM));
            $('threeM').addEvent('click', showFunction.bind(elThreeM));
            $('fourM').addEvent('click', showFunction.bind(elFourM));
         });
      </script>
   </head>

   <body>
      <!-- here is our menu -->
      <ul id = "tabs">
         <li id = "oneM">One</li>
         <li id = "twoM">Two</li>
         <li id = "threeM">Three</li>
         <li id = "fourM">Four</li>
      </ul>

      <!-- and here are our content divs -->
      <div id = "contentoneM" class = "hiddenM">content for one</div>
      <div id = "contenttwoM" class = "hiddenM">content for two</div>
      <div id = "contentthreeM" class = "hiddenM">content for three</div>
      <div id = "contentfourM" class = "hiddenM">content for four</div>
   </body>

</html>
Output
Click on any one item in the list, then you will get additional information on tabs.
MooTools - Classes
MooTools contains classes of different APIs. Look at the basics of creating and using classes with MooTools. A class is a container for a collection of variables and functions which operate on those variables to perform specific tasks.
Let us discuss the variables, methods, and options in detail.
Variables
Creating a variable is a very simple task. It is like declaring a key/value pairs in hashes. Similarly, you can access the variables in the same manner which means <class_name.variable>. Take a look at the following syntax for creating and accessing variables in classes.
Syntax
//Create a new class named class_one
//with two internal variables
var Class_one = new Class({
   variable_one : "I'm First",
   variable_two : "I'm Second"
});
var run_demo_one = function(){
   //instantiate a Class_one class called demo_1
   var demo_1 = new Class_one();

   //Display the variables inside demo_one
   alert( demo_1.variable_one );
   alert( demo_1.variable_two );
}
Methods
In general, a Method is a function that uses a set of instructions which belongs to a specific class. You can call these functions by using the instance of the class. One more thing whenever you want to call the instance variable into the function you must use this keyword. Take a look at the following syntax for creating and accessing methods.
Syntax
var Class_two = new Class({
   variable_one : "I'm First",
   variable_two : "I'm Second",

   function_one : function(){
      alert('First Value : ' + this.variable_one);
   },
   function_two : function(){
      alert('Second Value : ' + this.variable_two);
   }
});

var run_demo_2 = function(){
   //Instantiate a version of class_two
   var demo_2 = new Class_two();

   //Call function_one
   demo_2.function_one();

   //Call function_two
   demo_2.function_two();
}
initialize
initialize is an option in the class object. This helps you create a class setup This also helps you set up user-configuration options and variables. Take a look at the following syntax of initialize option.
Syntax
var Myclass = new Class({
   //Define an initalization function with one parameter
   initialize : function(user_input){
      //create a value variable belonging to
      //this class and assign it the value
      //of the user input
      this.value = user_input;
   }
})
Implementing Options
Implementing options are very helpful for accepting user inputs and building classes. Adding the options functionality to your class is as simple as adding another key/pair to the initialization options for your class. Once this setup is ready, you can override any or all of the default options by passing key/value pairs. It provides the setOptions method. This method allows you to set the options once the class has been initialized. If you want to access the variable from inside the class, use the following syntax.
Syntax
var Class_four = new Class({
   Implements: Options,

   options: {
      option_one : "Default Value For First Option",
      option_two : "Default Value For Second Option",
   },
   initialize: function(options){
      this.setOptions(options);
   },
   show_options : function(){
      alert(this.options.option_one + "\n" + this.options.option_two);
   },
});

var run_demo_4 = function(){
   var demo_4 = new Class_four({
      option_one : "New Value"
   });
   demo_4.show_options();
}

var run_demo_5 = function(){
   var demo_5 = new Class_four();
   demo_5.show_options();
   demo_5.setOptions({option_two : "New Value"});
   demo_5.show_options();
}

//Create a new class_four class with
//a new option called new_variable
var run_demo_6 = function(){
   var demo_6 = new Class_four({new_option : "This is a new option"});
   demo_6.show_options();
}
MooTools - Fx.Element
Fx.Element allows you to add the Fx functionality to multiple dom elements on a single page. Actually Fx.Element is an extension of the Fx.Morph plugin. The only difference between Fx.Element and Fx.Morph is the syntax. In this syntax, the start({}) method is used to create an effect and the .set({}) method is used to set some styles.
Take a look at the following syntax for Fx.Element.
Syntax
var fxElementsArray = $$('.myElementClass');
var fxElementsObject = new Fx.Elements(fxElementsArray, {
   //Fx Options
   link: 'chain',
   duration: 1000,
   transition: 'sine:in:out',

   //Fx Events
   onStart: function(){
      startInd.highlight('#C3E608');
   }
});
start({}) and set({})
Start and set keyword structures are used to start and set styles. But in this structure, you refer to the element via the index the first element is 0, the second is 1, and so on. Take a look at the following syntax for the Start and Set structures.
Syntax
//you can set your styles with .set({...})
fxElementsObject .set({
   '0': {
      'height': 10,
      'width': 10,
      'background-color': '#333'
   },
   '1': {
      'width': 10,
      'border': '1px dashed #333'
   }
});

//or create a transition effect with .start({...})
fxElementsObject .start({
   '0': {
      'height': [50, 200],
      'width': 50,
      'background-color': '#87AEE1'
   },
   '1': {
      'width': [100, 200],
      'border': '5px dashed #333'
   }
});
Example
Let us take an example that explains the Fx.Element. Take a look at the following code.
<!DOCTYPE html>
<html>

   <head>
      <style>
         .ind {
            width: 200px;
            padding: 10px;
            background-color: #87AEE1;
            font-weight: bold;
            border-bottom: 1px solid white;
         }
         .myElementClass {
            height: 50px;
            width: 100px;
            background-color: #FFFFCC;
            border: 1px solid #FFFFCC;
            padding: 20px;
         }
         #buttons {
            margin: 20px 0;
            display: block;
         }
      </style>

      <script type = "text/javascript" src = "MooTools-Core-1.6.0.js"></script>
      <script type = "text/javascript" src = "MooTools-More-1.6.0.js"></script>

      <script type = "text/javascript">
         var startFXElement = function(){
            this.start({
               '0': {
                  'height': [50, 100],
                  'width': 50,
                  'background-color': '#87AEE1'
               },

               '1': {
                  'width': [100, 200],
                  'border': '5px dashed #333'
               }
            });
         }

         var startFXElementB = function(){
            this.start({
               '0': {
                  'width': 300,
                  'background-color': '#333'
               },

               '1': {
                  'width': 300,
                  'border': '10px solid #DC1E6D'
               }
            });
         }

         var setFXElement = function(){
            this.set({
               '0': {
                  'height': 50,
                  'background-color': '#FFFFCC',
                  'width': 100
               },

               '1': {
                  'height': 50,
                  'width': 100,
                  'border': 'none'
               }
            });
         }

         window.addEvent('domready', function() {
            var fxElementsArray = $$('.myElementClass');
            var startInd = $('start_ind');
            var cancelInd = $('cancel_ind');
            var completeInd = $('complete_ind');
            var chainCompleteInd = $('chain_complete_ind');

            var fxElementsObject = new Fx.Elements(fxElementsArray, {
               //Fx Options
               link: 'chain',
               duration: 1000,
               transition: 'sine:in:out',

               //Fx Events
               onStart: function(){
                  startInd.highlight('#C3E608');
               },

               onCancel: function(){
                  cancelInd.highlight('#C3E608');
               },

               onComplete: function(){
                  completeInd.highlight('#C3E608');
               },

               onChainComplete: function(){
                  chainCompleteInd.highlight('#C3E608');
               }
            });

            $('fxstart').addEvent('click', startFXElement.bind(fxElementsObject));
            $('fxstartB').addEvent('click', startFXElementB.bind(fxElementsObject));
            $('fxset').addEvent('click', setFXElement.bind(fxElementsObject));
            $('fxpause').addEvent('click', function(){
               fxElementsObject.pause();
            });
            $('fxresume').addEvent('click', function(){
               fxElementsObject.resume();
            });
         });
      </script>
   </head>

   <body>
      <div id = "start_ind" class = "ind">onStart</div>
      <div id = "cancel_ind" class = "ind">onCancel</div>
      <div id = "complete_ind" class = "ind">onComplete</div>
      <div id = "chain_complete_ind" class = "ind">onChainComplete</div>

      <span id = 'buttons'>
         <button id = "fxstart">Start A</button>
         <button id = "fxstartB">Start B</button>
         <button id = "fxset">Reset</button>
         <button id = "fxpause">Pause</button>
         <button id = "fxresume">Resume</button>
      </span>

      <div class = "myElementClass">Element 0</div>
      <div class = "myElementClass">Element 1</div>
   </body>

</html>
You will receive the following output −
Output
MooTools - Fx.Slide
Fx.Slides is an option that lets you display the content by sliding into view. It is very simple but enhances the look of your UI.
Let us discuss about creating and initializing an Fx.Slide, its options, and methods.
First, we will initialize the Fx.Slide class with a user-defined instance. For that, we have to create and select an HTML element. After that, we will apply CSS to these elements. Finally, we will initiate a new instance of Fx.Slide with our element variable.
Fx.Slide Options
There are only two Fx.Slide options mode and wrapper.
Mode
Mode gives you two choices, vertical or horizontal. Vertical reveals from top to bottom and horizontal reveals from left to right. There are no options to go from bottom to top or from right to left, tho I understand that hacking the class itself to accomplish this is relatively simple. In my opinion, its an option I would like to see standard, and if anyone has hacked the class to allow this options, please drop us a note.
Wrapper
By default, Fx.Slide throws a wrapper around your slide element, giving it overflow: hidden. Wrapper allows you to set another element as the wrapper. Like I said above, I am not clear on where this would come in handy and would be interested to hear any thoughts (thanks to horseweapon at mooforum.net for helping me clear this up).
Fx.Slide Methods
Fx.Slide also features many methods for showing and hiding your element.
slideIn()
As the name implies, this method will fire the start event and reveal your element.
slideOut()
Slides your element back to the hidden state.
toggle()
This will either slide the element in or out, depending on its current state. Very useful method to add to click events.
hide()
This will hide the element without a slide effect.
show()
This will show the element without a slide effect.
Fx.Slide Shortcuts
The Fx.Slide class also provides some handy shortcuts for adding effects to an element.
set(slide)
Instead of initiating a new class, you can create a new instance if you set slide on an element.
Syntax
slideElement.set('slide');
setting options
You can even set options with the shortcut −
Syntax
slideElement.set('slide', {duration: 1250});
slide()
Once the slide is .set(), you can initiate it with the .slide() method.
Syntax
slideElement.slide('in');
.slide will accept −
- in
- out
- toggle
- show
- hide
each corresponding to the methods above.
Example
Let us take an example that explains about Fx.Slide. Take a look into the following code.
<!DOCTYPE html>
<html>

   <head>
      <style>
         .ind {
            width: 200px;
            padding: 10px;
            background-color: #87AEE1;
            font-weight: bold;
            border-bottom: 1px solid white;
         }
         .slide {
            margin: 20px 0;
            padding: 10px;
            width: 200px;
            background-color: #F9E79F;
         }
         #slide_wrap {
            padding: 30px;
            background-color: #D47000;
         }
      </style>

      <script type = "text/javascript" src = "MooTools-Core-1.6.0.js"></script>
      <script type = "text/javascript" src = "MooTools-More-1.6.0.js"></script>

      <script type = "text/javascript">
         window.addEvent('domready', function() {
            var slideElement = $('slideA');

            var slideVar = new Fx.Slide(slideElement, {
               //Fx.Slide Options
               mode: 'horizontal', //default is 'vertical'

               //wrapper: this.element, //default is this.element
               //Fx Options
               link: 'cancel',
               transition: 'elastic:out',
               duration: 'long',

               //Fx Events
               onStart: function(){
                  $('start').highlight("#EBCC22");
               },

               onCancel: function(){
                  $('cancel').highlight("#EBCC22");
               },

               onComplete: function(){
                  $('complete').highlight("#EBCC22");
               }
            }).hide().show().hide(); //note, .hide and .show do not fire events

            $('openA').addEvent('click', function(){
               slideVar.slideIn();
            });

            $('closeA').addEvent('click', function(){
               slideVar.slideOut();
            });

            //EXAMPLE B
            var slideElementB = $('slideB');
            var slideVarB = new Fx.Slide(slideElementB, {

               //Fx.Slide Options
               mode: 'vertical', //default is 'vertical'
               link: 'chain',

               //Fx Events
               onStart: function(){
                  $('start').highlight("#EBCC22");
               },

               onCancel: function(){
                  $('cancel').highlight("#EBCC22");
               },

               onComplete: function(){
                  $('complete').highlight("#EBCC22");
               }
            });

            $('openB').addEvent('click', function(){
               slideVarB.slideIn();
            });

            $('closeB').addEvent('click', function(){
               slideVarB.slideOut();
            });
         });
      </script>
   </head>

   <body>
      <div id = "start" class = "ind">Start</div>
      <div id = "cancel" class = "ind">Cancel</div>
      <div id = "complete" class = "ind">Complete</div>

      <button id = "openA">open A</button>
      <button id = "closeA">close A</button>

      <div id = "slideA" class = "slide">Here is some content - A. Notice the delay
         before onComplete fires.  This is due to the transition effect, the onComplete
         will not fire until the slide element stops "elasticing." Also, notice that
         if you click back and forth, it will "cancel" the previous call and give the
         new one priority.</div>

      <button id = "openB">open B</button>
      <button id = "closeB">close B</button>

      <div id = "slideB" class = "slide">Here is some content - B. Notice how
         if you click me multiple times quickly I "chain" the events.  This slide is
         set up with the option "link: 'chain'"</div>

   </body>
</html>
Output
Click on the buttons openA, closeA, openB, and closeB. Observe the changes, effect, and event notification on the indicators.
MooTools - Fx.Tween
MooTools provides different FX.Tween shortcuts for different transitions such as flashy effects which translate to smooth animated transitions. Let us discuss a few methods from the Tween shortcuts.
tween()
This method provides smooth transitions between two style property values. Let us take an example that uses tween method to change the width of a div from 100px to 300px. Take a look at the following code.
Example
<!DOCTYPE html>
<html>

   <head>
      <style>
         #body_div {
            width: 100px;
            height: 200px;
            background-color: #1A5276;
            border: 3px solid #dd97a1;
         }
      </style>

      <script type = "text/javascript" src = "MooTools-Core-1.6.0.js"></script>
      <script type = "text/javascript" src = "MooTools-More-1.6.0.js"></script>

      <script type = "text/javascript">
         var tweenFunction = function(){
            $('body_div').tween('width','300px');
         }

         window.addEvent('domready', function() {
            $('tween_button').addEvent('click', tweenFunction);
         });
      </script>
   </head>

   <body>
      <div id = "body_div"> </div><br/>
      <input type = "button" id = "tween_button" value = "Set Width to 300 px"/>
   </body>

</html>
You will receive the following output −
Output
fade()
This method adjusts the element opacity or the transparency. Let us take an example wherein, we provide a button to adjust the opacity of a div using MooTools. Take a look at the following code.
Example
<!DOCTYPE html>
<html>

   <head>
      <style>
         #body_div {
            width: 100px;
            height: 200px;
            background-color: #1A5276;
            border: 3px solid #dd97a1;
         }
      </style>

      <script type = "text/javascript" src = "MooTools-Core-1.6.0.js"></script>
      <script type = "text/javascript" src = "MooTools-More-1.6.0.js"></script>

      <script type = "text/JavaScript">
         var fadeFunction = function(){
            $('body_div').fade('.5');
         }

         window.addEvent('domready', function() {
            $('fade_button').addEvent('click', fadeFunction);
         });
      </script>
   </head>

   <body>
      <div id = "body_div"> </div><br/>
      <input type = "button" id = "fade_button" value = "fade to 50%"/>
   </body>

</html>
You will receive the following output −
Output
Click on the fade to 50% button to reduce the div opacity to 50%.
highlight()
This method highlights an element using different background colors. It contains two main functionalities of the Tween Flash.
In the first functionality, Tween Flash is used to apply different background colors to elements.
Once the Tween Flash sets a different background color, then it switches to another background color.
This method is used to highlight an element after selection. Let us take an example to understand this method. Take a look at the following code.
Example
<!DOCTYPE html>
<html>

   <head>
      <style>
         #div1 {
            width: 100px;
            height: 100px;
            background-color: #1A5276;
            border: 3px solid #dd97a1;
         }
         #div2 {
            width: 100px;
            height: 100px;
            background-color: #145A32;
            border: 3px solid #dd97a1;
         }
      </style>

      <script type = "text/javascript" src = "MooTools-Core-1.6.0.js"></script>
      <script type = "text/javascript" src = "MooTools-More-1.6.0.js"></script>

      <script type = "text/javascript">
         var highlightFunction = function(){
            $('div1').highlight('#eaea16');
         }

         var highlightChangeFunction = function(){
            $('div2').highlight('#eaea16', '#FBFCFC');
         }

         window.addEvent('domready', function() {
            $('div1').addEvent('mouseover', highlightFunction);
            $('div2').addEvent('mouseover', highlightChangeFunction);
         });
      </script>
   </head>

   <body>
      <div id = "div1"> </div><br/>
      <div id = "div2"> </div>
   </body>

</html>
You will receive the following output −
Output
Try to keep the mouse pointer on the colored divs and observe the changes in flash highlights.
MooTools - Fx.Morph
Fx.Morph is a function provided by MooTools. It is used to create new tween for transitions between style properties. While morphing, we have to select the element with an object and then we can apply different functions to it. We also need to bind the element with a newly created tween.
Let us take an example that provides three buttons on a web page. The first one is the SET button that creates an element with style properties such as height, width, and color. The second one is the MORPH button that changes the style properties of an element. The third one is the RESET button that changes all settings to the starting position. Take a look at the following code.
Example
<!DOCTYPE html>
<html>

   <head>
      <script type = "text/javascript" src = "MooTools-Core-1.6.0.js"></script>
      <script type = "text/javascript" src = "MooTools-More-1.6.0.js"></script>

      <script type = "text/javascript">
         var morphSet = function(){
            this.set({
               'width': 100,
               'height': 100,
               'background-color': '#884EA0'
            });
         }

         var morphStart = function(){
            this.start({
               'width': 200,
               'height': 200,
               'background-color': '#d3715c'
            });
         }

         var morphReset = function(){
            this.set({
               'width': 0,
               'height': 0,
               'background-color': '#ffffff'
            });
         }

         window.addEvent('domready', function() {
            var morphElement = $('morph_element');
            var morphObject = new Fx.Morph(morphElement);
            $('set').addEvent('click', morphSet.bind(morphObject));
            $('start').addEvent('click', morphStart.bind(morphObject));
            $('reset').addEvent('click', morphReset.bind(morphObject));
         });
      </script>
   </head>

   <body>
      <div id = "morph_element"> </div><br/>
      <input type = "button" id = "set" value = "SET"/>
      <input type = "button" id = "start" value = "START"/>
      <input type = "button" id = "reset" value = "RESET"/>
   </body>

</html>
You will receive the following output −
Output
MooTools - Fx.Options
MooTools provides different Fx.Options which will help to Fx.Tween and Fx.Morph. These options will give you a control over the effects.
Let us discuss a few options that MooTools provide. Before we proceed, take a look at the following syntax for setting up options.
Syntax
var morphObject = new Fx.Morph(morphElement, {
   //first state the name of the option
   //place a :
   //then define your option
});
fps(frames per second)
This option determines the number of frames per second in the animation while morphing. We can apply these fps to Morph or Tween functionalities. By default, the value of fps is 50. This means any functionality will take 50 frames per second while morphing.
Example
Let us take an example wherein, we will morph a div element using 5 fps. Take a look at the following code.
<!DOCTYPE html>
<html>
<head>
<style>
#morph_element {
width: 100px;
height: 100px;
background-color: #1A5276;
border: 3px solid #dd97a1;
}
</style>
<script type = "text/javascript" src = "MooTools-Core-1.6.0.js"></script>
<script type = "text/javascript" src = "MooTools-More-1.6.0.js"></script>
<script type = "text/javascript">
var morphStart = function(){
this.start({
'width': 200,
'height': 200,
'background-color': '#d3715c'
});
}
window.addEvent('domready', function() {
var morphElement = $('morph_element');
var morphObject = new Fx.Morph(morphElement, {
fps: 5
});
$('start').addEvent('click', morphStart.bind(morphObject));
});
</script>
</head>
<body>
<div id = "morph_element"> </div><br/>
<input type = "button" id = "start"value = "START"/>
</body>
</html>
You will receive the following output −
Output
Click on the START button to find the morphing animation. This helps us observe the number of frames used for animation. Use different values for fps to get the difference in animation. It is recommended to use the fps value less than 10. This will help you get the difference easily.
unit
This option is used to set the unit type for numbers. Generally, we have three different types of units px, %, and ems. Take a look at the following syntax.
Syntax
var morphObject = new Fx.Morph(morphElement, {
   unit: '%'
});
The above syntax is to allocate percentage to units. This means all the values in numbers are treated as percentages.
link
This option provides a way to manage multiple calls to start an animation. If you apply multiple event calls at a time, these calls will be taken in as link calls. Once the first call finishes, then the second call executes automatically. It contains the following three options −
ignore − This is the default option. It ignores any number of calls until it completes the effect.
cancel − This cancels the current effect, when there is another being made. It follows the newest call precedence.
Chain − This lets you chain the effects together and maintain the stack of calls. It executes all the calls until it goes through all the chained calls in the stack.
Take a look at the following syntax for using the link option.
Syntax
var morphObject = new Fx.Morph(morphElement, {
   link: 'chain'
});
Duration
This option is used to define the duration of the animation. For example, if you want an object to move 100px in the duration of 1 second, then it will go slower than an object moving 1000px in 1 second. You can input a number which is measured in milliseconds. Or you can use any of these three options in place of numbers.
- Short = 250ms
- Normal = 500ms (default)
- Long = 1000ms
Take a look at the following syntax for using duration.
Syntax
var morphObject = new Fx.Morph(morphElement, {
   duration: 'long'
});
Or,
var morphObject = new Fx.Morph(morphElement, {
   duration: 1000
});
transition
This option is used to determine the transition type. For example, if it should be a smooth transition or should it start out slowly then speed up towards the end. Take a look at the following syntax to apply transition.
Syntax
var tweenObject = new Fx.Tween(tweenElement, {
   transition: 'quad:in'
});
The following table describes the different types of transitions.
| S.No. | Transition type & Description |
|---|---|
| 1 |
Displays a linear transition with in, out, in-out events |
| 2 |
Displays a quadratic transition with in, out, in-out events |
| 3 |
Displays a cubicular transition with in, out, in-out events |
| 4 |
Displays a quartetic transition with in, out, in-out events |
| 5 |
Displays a quintic transition with in, out, in-out events |
| 6 |
Used to generate Quad, Cubic, Quart and Quint with in, out, in-out events |
| 7 |
Displays an exponential transition with in, out, in-out events |
| 8 |
Displays a circular transition with in, out, in-out events |
| 9 |
Displays a sineousidal transition with in, out, in-out events |
| 10 |
Makes the transition go back, then all forth with in, out, in-out events |
| 11 |
Makes the transition bouncy with in, out, in-out events |
| 12 |
Elastic curve transition with in, out, in-out events |
MooTools - Fx.Events
Fx.Events provides some options to raise some codes at different levels throughout the animation effect. It provides you the control over your tweens and morphs. The option that Fx.Events provides −
onStart − It will raise the code to execute when the Fx starts.
onCancel − It will raise the code to execute when the Fx is cancelled.
onComplete − It will raise the code to execute when the Fx is completed.
onChainComplete − will raise the code to execute when the chained Fx completes.
Example
Let us take an example wherein, there are divs on the web page. We proceed by applying Event methods to the divs. The first method is the onStart() method to highlight the div when mouse pointer enters into the div area.
The second one is the onComplete() method which highlights the div when mouse pointer leaves the div area. And when the mouse pointer enters into the div area automatically the div size increases by 400px. We will try to execute all these functionalities using the Fx.Events methods. Take a look at the following code.
<!DOCTYPE html>
<html>

   <head>
      <style>
         #quadin {
            width: 100px;
            height: 20px;
            background-color: #F4D03F;
            border: 2px solid #808B96;
         }
         #quadout {
            width: 100px;
            height: 20px;
            background-color: #F4D03F;
            border: 2px solid #808B96;
         }
         #quadinout {
            width: 100px;
            height: 20px;
            background-color: #F4D03F;
            border: 2px solid #808B96;
         }
      </style>

      <script type = "text/javascript" src = "MooTools-Core-1.6.0.js"></script>
      <script type = "text/javascript" src = "MooTools-More-1.6.0.js"></script>

      <script type = "text/javascript">
         var enterFunction = function() {
            this.start('width', '400px');
         }
         var leaveFunction = function() {
            this.start('width', '200px');
         }

         window.addEvent('domready', function() {
            var quadIn = $('quadin');
            var quadOut = $('quadout');
            var quadInOut = $('quadinout');

            quadIn = new Fx.Tween(quadIn, {
               link: 'cancel',
               transition: Fx.Transitions.Quad.easeIn,

               onStart: function(passes_tween_element){
                  passes_tween_element.highlight('#C54641');
               },

               onComplete: function(passes_tween_element){
                  passes_tween_element.highlight('#E67F0E');
               }
            });

            quadOut = new Fx.Tween(quadOut, {
               link: 'cancel',
               transition: 'quad:out'
            });

            quadInOut = new Fx.Tween(quadInOut, {
               link: 'cancel',
               transition: 'quad:in:out'
            });

            $('quadin').addEvents({
               'mouseenter': enterFunction.bind(quadIn),
               'mouseleave': leaveFunction.bind(quadIn)
            });

            $('quadout').addEvents({
               'mouseenter': enterFunction.bind(quadOut),
               'mouseleave': leaveFunction.bind(quadOut)
            });

            $('quadinout').addEvents({
               'mouseenter': enterFunction.bind(quadInOut),
               'mouseleave': leaveFunction.bind(quadInOut)
            });
         });
      </script>
   </head>

   <body>
      <div id = "quadin"> Quad : in</div><br/>
      <div id = "quadout"> Quad : out</div><br/>
      <div id = "quadinout"> Quad : in-out</div><br/>
   </body>

</html>
You will receive the following output −
Output
