
Article Categories
- All Categories
-
 Data Structure
-
 Networking
-
 RDBMS
RDBMS
-
 Operating System
-
 Java
Java
-
 MS Excel
-
 iOS
iOS
-
 HTML
HTML
-
 CSS
CSS
-
 Android
-
 Python
-
 C Programming
-
 C++
C++
-
 C#
C#
-
 MongoDB
-
 MySQL
MySQL
-
 Javascript
-
 PHP
PHP
-
 Economics & Finance
Message Encode-Decode using Python Tkinter
In this article, we'll learn how to create a message encoder-decoder application using Python Tkinter. Users can enter a message and select whether to encode or decode it. The encoded or decoded message will be displayed in the GUI window after clicking the respective button.
What is Message Encoding?
Message encoding transforms text into a different format. In our simple example, we'll use string reversal as our encoding method ? reversing the character order makes text unreadable while keeping it easily decodable.
Setting Up the GUI Application
Let's create the Tkinter application step by step ?
Import Required Module
First, import the Tkinter module ?
import tkinter as tk
Define Encoding Function
The encoding function reverses the input message ?
def encode_message():
    message = entry.get()
    encoded_message = message[::-1]
    output_label.config(text="Encoded Message: " + encoded_message)
Define Decoding Function
The decoding function reverses the encoded message back to original ?
def decode_message():
    encoded_message = entry.get()
    decoded_message = encoded_message[::-1]
    output_label.config(text="Decoded Message: " + decoded_message)
Complete Application
Here's the complete message encode-decode application ?
import tkinter as tk

def encode_message():
    message = entry.get()
    encoded_message = message[::-1]
    output_label.config(text="Encoded Message: " + encoded_message)

def decode_message():
    encoded_message = entry.get()
    decoded_message = encoded_message[::-1]
    output_label.config(text="Decoded Message: " + decoded_message)

# Create the main window
window = tk.Tk()
window.title("Message Encode-Decode")
window.geometry("300x200")

# Create input entry field
entry = tk.Entry(window, width=30)
entry.pack(pady=20)

# Create encode button
encode_button = tk.Button(window, text="Encode", command=encode_message)
encode_button.pack()

# Create decode button
decode_button = tk.Button(window, text="Decode", command=decode_message)
decode_button.pack()

# Create output label
output_label = tk.Label(window, text="")
output_label.pack(pady=20)

# Start the main event loop
window.mainloop()
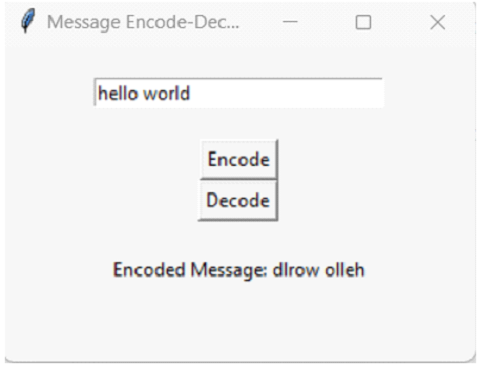
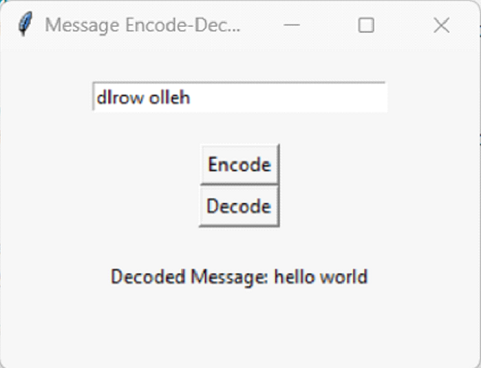
How It Works
The application creates a GUI window with the following components ?
Entry Field ? Accepts user input for the message
Encode Button ? Reverses the input text using
[::-1]slicingDecode Button ? Reverses the encoded message back to original
Output Label ? Displays the result after encoding or decoding
Key Features
Simple Encoding ? Uses string reversal for demonstration
Interactive GUI ? User-friendly interface with buttons
Real-time Results ? Immediate display of encoded/decoded messages
Bidirectional ? Can both encode and decode messages
Output
When you run the application, you'll see a GUI window where you can ?
Enter a message like "Hello World"
Click "Encode" to see "dlroW olleH"
Enter the encoded message and click "Decode" to get back "Hello World"
Conclusion
This Tkinter application demonstrates basic message encoding and decoding using string reversal. The GUI provides an intuitive interface for users to encode messages and decode them back to their original form.

608 Views
