- Laravel - Home
- Laravel - Overview
- Laravel - Installation
- Laravel - Application Structure
- Laravel - Configuration
- Laravel - Routing
- Laravel - Middleware
- Laravel - Namespaces
- Laravel - Controllers
- Laravel - Request
- Laravel - Cookie
- Laravel - Response
- Laravel - Views
- Laravel - Blade Templates
- Laravel - Redirections
- Laravel - Working With Database
- Laravel - Errors & Logging
- Laravel - Forms
- Laravel - Localization
- Laravel - Session
- Laravel - Validation
- Laravel - File Uploading
- Laravel - Sending Email
- Laravel - Ajax
- Laravel - Error Handling
- Laravel - Event Handling
- Laravel - Facades
- Laravel - Contracts
- Laravel - CSRF Protection
- Laravel - Authentication
- Laravel - Authorization
- Laravel - Artisan Console
- Laravel - Encryption
- Laravel - Hashing
- Understanding Release Process
- Laravel - Guest User Gates
- Laravel - Artisan Commands
- Laravel - Pagination Customizations
- Laravel - Dump Server
- Laravel - Action URL
Laravel - Controllers
In the MVC framework, the letter C stands for Controller. It acts as a directing traffic between Views and Models. In this chapter, you will learn about Controllers in Laravel.
Creating a Controller
Open the command prompt or terminal based on the operating system you are using and type the following command to create controller using the Artisan CLI (Command Line Interface).
php artisan make:controller <controller-name> --plain
Replace the <controller-name> with the name of your controller. This will create a plain constructor as we are passing the argument plain. If you dont want to create a plain constructor, you can simply ignore the argument. The created constructor can be seen at app/Http/Controllers.
You will see that some basic coding has already been done for you and you can add your custom coding. The created controller can be called from routes.php by the following syntax.
Syntax
Route::get(base URI,controller@method);
Example
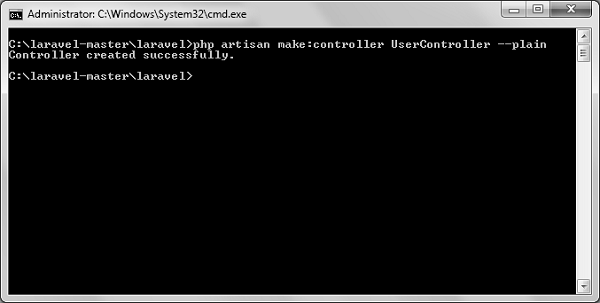
Step 1 − Execute the following command to create UserController.
php artisan make:controller UserController --plain
Step 2 − After successful execution, you will receive the following output.
Step 3 − You can see the created controller at app/Http/Controller/UserController.php with some basic coding already written for you and you can add your own coding based on your need.
<?php

namespace App\Http\Controllers;

use Illuminate\Http\Request;
use App\Http\Requests;
use App\Http\Controllers\Controller;

class UserController extends Controller {
   //
}
Controller Middleware
We have seen middleware before and it can be used with controller also. Middleware can also be assigned to controllers route or within your controllers constructor. You can use the middleware method to assign middleware to the controller. The registered middleware can also be restricted to certain method of the controller.
Assigning Middleware to Route
Route::get('profile', [
   'middleware' => 'auth',
   'uses' => 'UserController@showProfile'
]);
Here we are assigning auth middleware to UserController in profile route.
Assigning Middleware within Controllers constructor
<?php

namespace App\Http\Controllers;

use Illuminate\Http\Request;
use App\Http\Requests;
use App\Http\Controllers\Controller;

class UserController extends Controller {
   public function __construct() {
      $this->middleware('auth');
   }
}
Here we are assigning auth middleware using the middleware method in the UserController constructor.
Example
Step 1 − Add the following lines of code to the app/Http/routes.php file and save it.
routes.php
<?php
Route::get('/usercontroller/path',[
   'middleware' => 'First',
   'uses' => 'UserController@showPath'
]);
Step 2 − Create a middleware called FirstMiddleware by executing the following line of code.
php artisan make:middleware FirstMiddleware
Step 3 − Add the following code into the handle method of the newly created FirstMiddleware at app/Http/Middleware.
FirstMiddleware.php
<?php

namespace App\Http\Middleware;
use Closure;

class FirstMiddleware {
   public function handle($request, Closure $next) {
      echo '<br>First Middleware';
      return $next($request);
   }
}
Step 4 − Create a middleware called SecondMiddleware by executing the following command.
php artisan make:middleware SecondMiddleware
Step 5 − Add the following code in the handle method of the newly created SecondMiddleware at app/Http/Middleware.
SecondMiddleware.php
<?php

namespace App\Http\Middleware;
use Closure;

class SecondMiddleware {
   public function handle($request, Closure $next) {
      echo '<br>Second Middleware';
      return $next($request);
   }
}
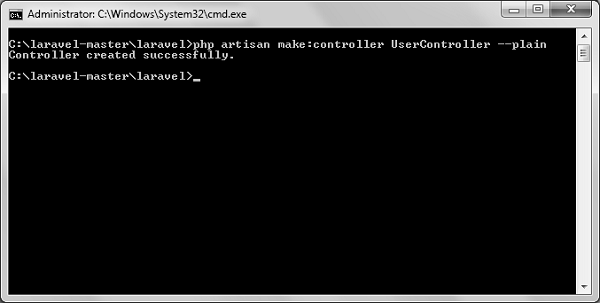
Step 6 − Create a controller called UserController by executing the following line.
php artisan make:controller UserController --plain
Step 7 − After successful execution of the URL, you will receive the following output −
Step 8 − Copy the following code to app/Http/UserController.php file.
app/Http/UserController.php
<?php
namespace App\Http\Controllers;
use Illuminate\Http\Request;
use App\Http\Requests;
use App\Http\Controllers\Controller;
class UserController extends Controller {
public function __construct() {
$this->middleware('Second');
}
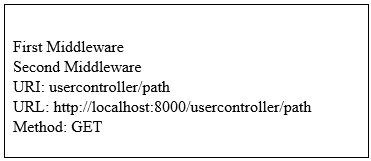
public function showPath(Request $request) {
$uri = $request->path();
echo '<br>URI: '.$uri;
$url = $request->url();
echo '<br>';
echo 'URL: '.$url;
$method = $request->method();
echo '<br>';
echo 'Method: '.$method;
}
}
Step 9 − Now launch the phps internal web server by executing the following command, if you havent executed it yet.
php artisan serve
Step 10 − Visit the following URL.
http://localhost:8000/usercontroller/path
Step 11 − The output will appear as shown in the following image.
Restful Resource Controllers
Often while making an application we need to perform CRUD (Create, Read, Update, Delete) operations. Laravel makes this job easy for us. Just create a controller and Laravel will automatically provide all the methods for the CRUD operations. You can also register a single route for all the methods in routes.php file.
Example
Step 1 − Create a controller called MyController by executing the following command.
php artisan make:controller MyController
Step 2 − Add the following code in
app/Http/Controllers/MyController.php file.
app/Http/Controllers/MyController.php
<?php

namespace App\Http\Controllers;

use Illuminate\Http\Request;
use App\Http\Requests;
use App\Http\Controllers\Controller;

class MyController extends Controller {
   public function index() {
      echo 'index';
   }
   public function create() {
      echo 'create';
   }
   public function store(Request $request) {
      echo 'store';
   }
   public function show($id) {
      echo 'show';
   }
   public function edit($id) {
      echo 'edit';
   }
   public function update(Request $request, $id) {
      echo 'update';
   }
   public function destroy($id) {
      echo 'destroy';
   }
}
Step 3 − Add the following line of code in app/Http/routes.php file.
app/Http/routes.php
Route::resource('my','MyController');
Step 4 − We are now registering all the methods of MyController by registering a controller with resource. Below is the table of actions handled by resource controller.
| Verb | Path | Action | Route Name |
|---|---|---|---|
| GET | /my | index | my.index |
| GET | /my/create | create | my.create |
| POST | /my | store | my.store |
| GET | /my/{my} | show | my.show |
| GET | /my/{my}/edit | edit | my.edit |
| PUT/PATCH | /my/{my} | update | my.update |
| DELETE | /my/{my} | destroy | my.destroy |
Step 5 − Try executing the URLs shown in the following table.
| URL | Description | Output Image |
|---|---|---|
| http://localhost:8000/my | Executes index method of MyController.php | index |
| http://localhost:8000/my/create | Executes create method of MyController.php | create |
| http://localhost:8000/my/1 | Executes show method of MyController.php | show |
| http://localhost:8000/my/1/edit | Executes edit method of MyController.php | edit |
Implicit Controllers
Implicit Controllers allow you to define a single route to handle every action in the controller. You can define it in route.php file with Route:controller method as shown below.
Route::controller(base URI,<class-name-of-the-controller>);
Replace the <class-name-of-the-controller> with the class name that you have given to your controller.
The method name of the controller should start with HTTP verb like get or post. If you start it with get, it will handle only get request and if it starts with post then it will handle the post request. After the HTTP verb you can, you can give any name to the method but it should follow the title case version of the URI.
Example
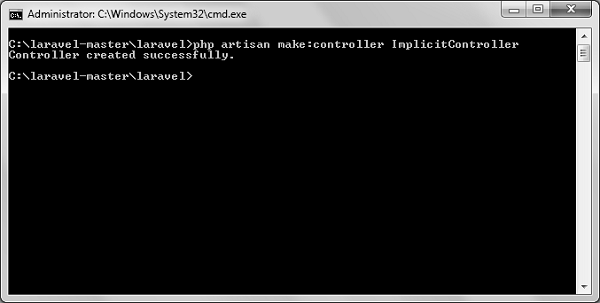
Step 1 − Execute the below command to create a controller. We have kept the class name ImplicitController. You can give any name of your choice to the class.
php artisan make:controller ImplicitController --plain
Step 2 − After successful execution of step 1, you will receive the following output −
Step 3 − Copy the following code to
app/Http/Controllers/ImplicitController.php file.
app/Http/Controllers/ImplicitController.php
<?php

namespace App\Http\Controllers;

use Illuminate\Http\Request;
use App\Http\Requests;
use App\Http\Controllers\Controller;

class ImplicitController extends Controller {
   /**
      * Responds to requests to GET /test
   */
   public function getIndex() {
      echo 'index method';
   }

   /**
      * Responds to requests to GET /test/show/1
   */
   public function getShow($id) {
      echo 'show method';
   }

   /**
      * Responds to requests to GET /test/admin-profile
   */
   public function getAdminProfile() {
      echo 'admin profile method';
   }

   /**
      * Responds to requests to POST /test/profile
   */
   public function postProfile() {
      echo 'profile method';
   }
}
Step 4 − Add the following line to app/Http/routes.php file to route the requests to specified controller.
app/Http/routes.php
Route::controller('test','ImplicitController');
Constructor Injection
The Laravel service container is used to resolve all Laravel controllers. As a result, you are able to type-hint any dependencies your controller may need in its constructor. The dependencies will automatically be resolved and injected into the controller instance.
Example
Step 1 − Add the following code to app/Http/routes.php file.
app/Http/routes.php
class MyClass{
   public $foo = 'bar';
}
Route::get('/myclass','ImplicitController@index');
Step 2 − Add the following code to
app/Http/Controllers/ImplicitController.php file.
app/Http/Controllers/ImplicitController.php
<?php

namespace App\Http\Controllers;

use Illuminate\Http\Request;
use App\Http\Requests;
use App\Http\Controllers\Controller;

class ImplicitController extends Controller {
   private $myclass;

   public function __construct(\MyClass $myclass) {
      $this->myclass = $myclass;
   }
   public function index() {
      dd($this->myclass);
   }
}
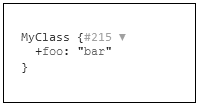
Step 3 − Visit the following URL to test the constructor injection.
http://localhost:8000/myclass
Step 4 − The output will appear as shown in the following image.
Method Injection
In addition to constructor injection, you may also type hint dependencies on your controller's action methods.
Example
Step 1 − Add the following code to app/Http/routes.php file.
app/Http/routes.php
class MyClass{
   public $foo = 'bar';
}
Route::get('/myclass','ImplicitController@index');
Step 2 − Add the following code to
app/Http/Controllers/ImplicitController.php file.
app/Http/Controllers/ImplicitController.php
<?php

namespace App\Http\Controllers;

use Illuminate\Http\Request;
use App\Http\Requests;
use App\Http\Controllers\Controller;

class ImplicitController extends Controller {
   public function index(\MyClass $myclass) {
      dd($myclass);
   }
}
Step 3 − Visit the following URL to test the constructor injection.
http://localhost:8000/myclass
It will produce the following output −
