- JOGL - API for Basic Templates
- JOGL - Canvas with AWT
- JOGL - Canvas with Swing
- JOGL - GLJPanel Class
- JOGL Graphical Shapes
- JOGL - Drawing Basics
- JOGL - Drawing with GL_Lines
- JOGL - Pre-defined shapes
- JOGL Effects & Transformation
- JOGL - Transformation
- JOGL - Coloring
- JOGL - Scaling
- JOGL - Rotation
- JOGL - Lighting
- JOGL 3D Graphics
- JOGL - 3D Basics
- JOGL - 3D Triangle
- JOGL - 3D Cube
- JOGL - Appendix
- JOGL Useful Resources
- JOGL - Quick Guide
- JOGL - Useful Resources
- JOGL - Discussion
JOGL - Quick Guide
JOGL - Overview
This chapter introduces OpenGL, its functions, the OpenGL bindings in java (GL4java, LWJGL, JOGL), and the advantages of JOGL over other OpenGL bindings.
Java binding for OpenGL (JOGL) is the recent binding for OpenGL graphics API in Java. It is a wrapper library, which can access OpenGL API, and it is designed to create 2D and 3D graphics applications coded in Java. JOGL is an open-source library initially developed by former MIT graduate students Ken Russell and Chris Kline. Later, it was adopted by the gaming group at Sun Microsystems, and now it is maintained by Java on Graphics Audio and Processing (JOGAMP). JOGL functions on various operating systems such as Windows, Solaris, Mac OS X, and Linux (on x86).
What is OpenGL?
OpenGL stands for Open Graphics Library, which is a collection of commands to create 2D and 3D graphics. With OpenGL, you can create complicated 3D shapes using very basic primitives such as points, lines, polygons, bitmaps, and images.
Here are a few features of OpenGL −
It can work on multiple platforms.
It has bindings in several languages such as C++, Python, etc
It can render 2D and 3D vector graphics.
It interacts with Graphical Processing Unit (GPU) for achieving speedy and high quality rendering. Rendering is the process of creating an image from a 2D or 3D model.
It is an industry standard API for writing 3D Graphics applications. For example, games, screensavers, etc.
It contains around 150 commands, which programmers can use to specify objects and operations to develop applications.
It contains OpenGL Utility Library (GLU) that provides various modeling features, such as quadric surfaces and NURBS curves. GLU is a standard component of OpenGL.
The design of OpenGL is focused on efficiency, effectiveness, and its implementation on multiple platforms using multiple languages. To maintain simplicity of an OpenGL API, windowing tasks are not included.
Therefore, OpenGL depends on other programming languages for windowing tasks.
Java Binding for OpenGL API
It is a Java Specification Request (JSR) API specification, which allows to use OpenGL on Java platform.
| Specifications | Details |
|---|---|
| JSR 231 | This Java binding package supports Java SE platform. |
| JSR 239 | This Java binding package supports Java ME platform. |
There are various OpenGL bindings in Java. They are discussed below
GL4java
It is known as OpenGL for Java technology. It has links to OpenGL 1.3 and to nearly all vendor extensions. Also, it can be used with Abstract Window Toolkit (AWT) and Swings. It is a game focused OpenGL binding, which is a single window that displays full screen applications.
LWJGL
Light Weight Java Game Library (LWJGL), uses OpenGL 1.5 and works with latest version of java.
It can use full screen capabilities of JSE 1.4. It has limited support for AWT/ Swings.
It is suitable for lightweight devices such as mobile phones, embedded devices, etc.
JOGL
JOGL focuses only on 2D and 3D Rendering. The interfaces dealing with sound and input-output are not included in JOGL.
It includes Graphics Utility Library (GLU), GL Utility toolkit (GLUT), and its own API - Native Windowing Toolkit (NEWT).
Why JOGL?
It provides full access to the OpenGL APIs (version 1.0, 4.3, ES 1, ES 2 and ES 3) as well as nearly all the vendor extensions. Hence, all the features in OpenGL are included in JOGL.
JOGL integrates with the AWT, Swing, and Standard Widget Toolkit (SWT). It also includes its own Native Windowing Toolkit (NEWT). Hence, it provides complete support for windowing.
History of JOGL
1992 − Silicon Graphics Inc. released the first OpenGL specification.
2003 − Java.net website was launched with new features and JOGL was published for the first time on the same website.
2010 − Since year 2010, it has been independent open source project under BSD license, which is a liberal license for computer software.
JOGL - Installation
This chapter covers setting up of the environment to use JOGL on your system using different Integrated Development Environments (IDEs).
Installing JOGL
For JOGL Installation, you need to have following system requirements −
System Requirements
The first requirement is to have the Java Development Kit (JDK) installed on your machine.
| Requirement | Description |
|---|---|
| JDK Version | 1.4 or above |
| Memory | no minimum requirement |
| Disk Space | no minimum requirement |
| Operating System | no minimum requirement |
You need to follow the given steps to setup your environment to start with JOGL application development −
Step 1 - Verifying Java Installation on Your Machine
Open console of your system and execute the following java command −
| Platform | TASK | COMMAND |
|---|---|---|
| Windows | Open Command Console | C:\>java-version |
| Linux | Open Command terminal | $ java -version |
| MAC | Open Terminal | Machine:~ joseph$ java -version |
Verify the output on the respective operating system.
| Platform | Output |
|---|---|
| Windows | Java 1.6.0.21 java(TM) SE Runtime Environment(build 1..6.0_21-b07)Java HotSpot(TM) Client VM(build 17.0-b7, mixed mode, sharing) |
| Linux | Java 1.6.0.21 java(TM) SE Runtime Environment(build 1..6.0_21-b07)Java HotSpot(TM) Client VM(build 17.0-b7, mixed mode, sharing) |
| MAC | Java 1.6.0.21 java(TM) SE Runtime Environment(build 1..6.0_21-b07)Java HotSpot(TM) Client VM(build 17.0-b7, mixed mode, sharing) |
Step 2 Setting up Java Development Kit (JDK)
If Java is not installed on your machine, then you need to install Java SDK from the Oracle website: Oracle. You can find instructions for installing the JDK from the downloaded files. You need to follow the given instructions to install and configure the setup. Finally, set PATH and JAVA_HOME environment variables to refer to the directory that contains java.exe and javac.exe files, typically java_install_dir/bin and java_install_dir respectively.
Set Java-home environment variable to point to the base directory location on the same path, where Java is installed on your machine.
| Platform | Command |
|---|---|
| Windows | Set the environment variable JAVA_HOME to C:\ProgramFiles\Java\Jdk1.6.0_21 |
| Linux | Export JAVA_HOME=/usr/local/java-current |
| MAC | Export JAVA_HOME=/Library/Java/Home |
Append Java compiler location to System Path as follows −
| Platform | Command |
|---|---|
| Windows | Append the string ;%JAVA_HOME% bin at the end of the system variable and path |
| Linux | Export PATH=$PATH:$JAVA_HOME/bin/ |
| MAC | Not required |
Step 3 Downloading JOGL
You can download latest version of JOGL from the website www.jogamp.org
Go to the home page of www.jogamp.org
Click on Builds/Downloads > Current (zip).

This takes you to the list of .jar files for all APIs maintained by the website.
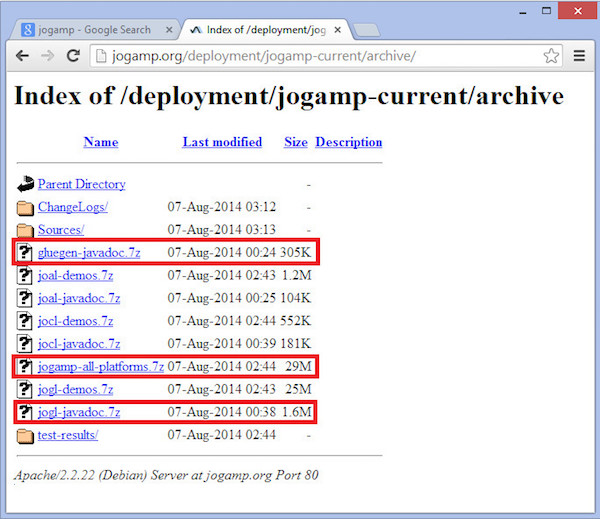
Download the library .jar file jogamp-all-platforms.7z, java documentations for OpenGL native library glugen-javadoc.7z, and JOGL jogl-javadocs.7z.
Extract the downloaded .jar files using any zip extracting software.
When you open the extracted folder, you will find jar folder, source-codes, and other files.
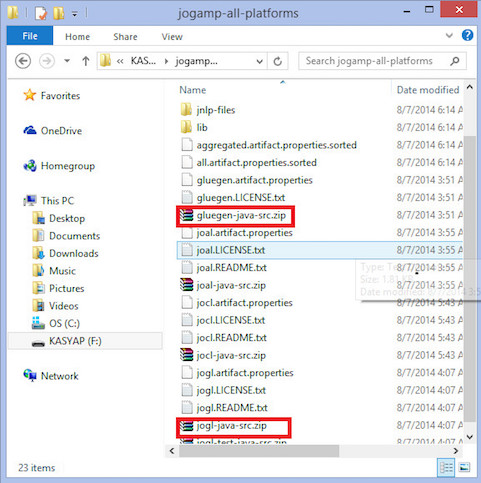
Get the source codes gluegen-java-src.zip and jogl-java-src.zip for supporting IDE. This is optional.
Inside the jar folder, there are multiple .jar files. This collection of files belongs to Glugen and JOGL.
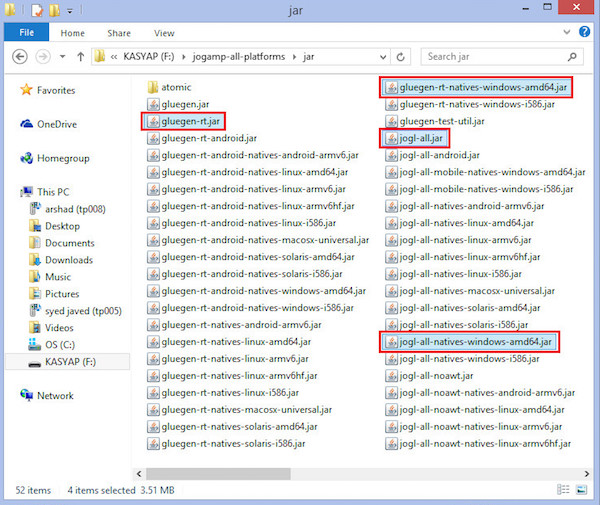
JOAMP provides native libraries that support various operating systems such as Windows, Solaris, Linux and Android. Hence, you need to take appropriate jar files which can execute on your desired platform. For example, if you are using Windows 64-bit operating system, then get the following .jar files from the jar folder −
- gluegenrt.jar
- jogl-all.jar
- gluegen-rt-natives-windows-amd64.jar
- jogl-all-natives-windowsamd64.jar
Setting up JOGL for Eclipse 4.4
Follow the given procedure for setting up JOGL −
Adding Libraries
Step 1 − Open Eclipse.
Step 2 − Create a new project.
Step 3 − Create a new folder named lib in the project folder.
Step 4 − Copy the files gluegen-rt-natives-windows-amd64.jar, gluegenrt.jar, jogl-all-natives-windowsamd64.jar and jogl-all.jar into the lib folder.
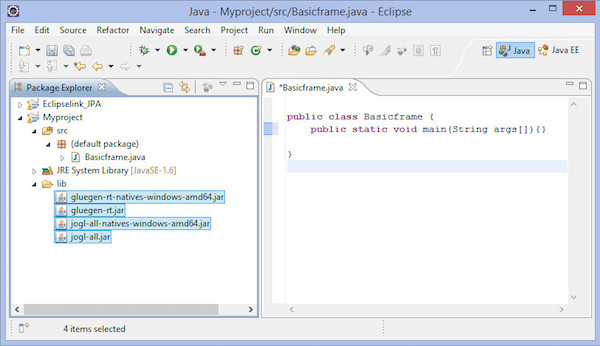
Step 5 − Now select these files and right click your mouse button. A shortcut menu is displayed, which contains Build Path > Add to Build Path.
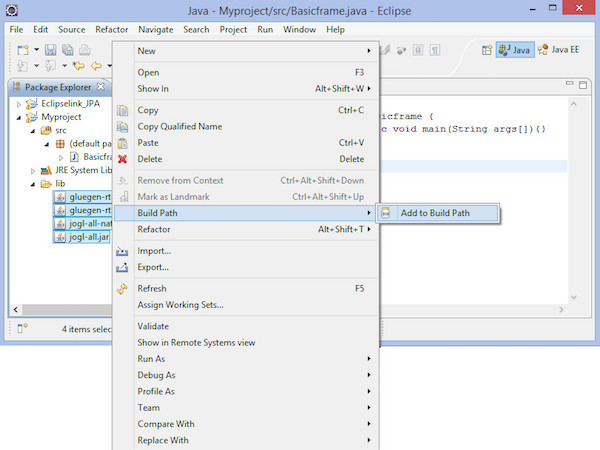
Step 6 − To make all .jar files available to other projects, go to main menu. Select Window > Preferences. The Preferences window appears.


In preferences window, in the drop down menu on the left hand side, follow the hierarchy- Java → Build Path → User Libraries.
Click on New button.
It opens up a dialog box. Enter the library name as jogl2.1.
Add jar files glugen-rt.jar and jogl-all.jar using button Add External JARs....
It creates a new user library named jogl2.1.
In the same way, we can add java documentation and source code for the added.jar files.
Adding Native Libraries
Step 1 − Expand the jogl-all.jar node, select Javadoc location (none).
Step 2 − Click on New button. Enter the name for JOGL Java Document.
Step 3 − Click on Add External JARs button.
Step 4 − It opens a dialog box where you need to select the location of JOGL Java documentation, which we already have downloaded earlier.
Adding source code
Step 1 − Select the node Native library location: (None).
Step 2 − Click on New button.
Step 3 − Enter name for native libraries and click OK button.
Step 4 − Click on Add External JARs button.
Step 5 − Now select the path where native library files ('gluegen-rt-natives-windows-amd64.jar and joglall-natives-windows-amd64.jar') are located.
Step 6 − Repeat the same procedure for source code.
Step 7 − We can set the locations for Javadoc, source code and jar files in the same way as given above for both native library files glegen-rt.jar and glugen-natives-windows-amd64.jar.
Setting up JOGL for NetBeans 4.4
Let us go through the steps for setting up JOGL for NetBeans 4.4 −
Adding Libraries
Step 1 − In the main menu, select Tools > Libraries.
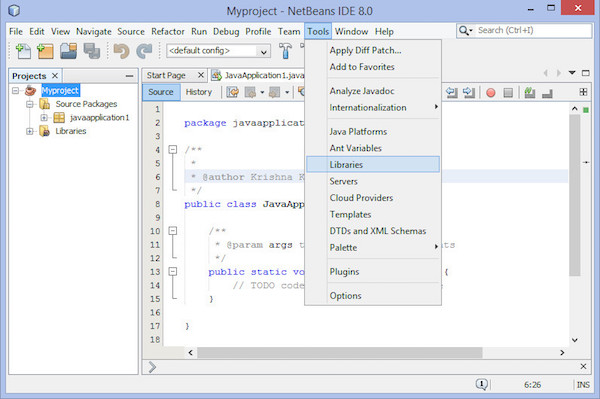
Step 2 − It leads you to Ant Library Manager.
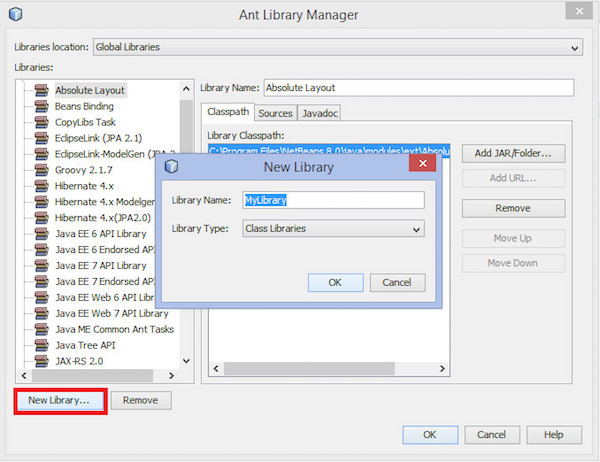
Step 3 − Under the Classpath tab, click New Library button located on the left lower corner. It opens a small dialog box.
Step 4 − Enter Library name as JoGl2.0.
Step 5 − Click on OK button.
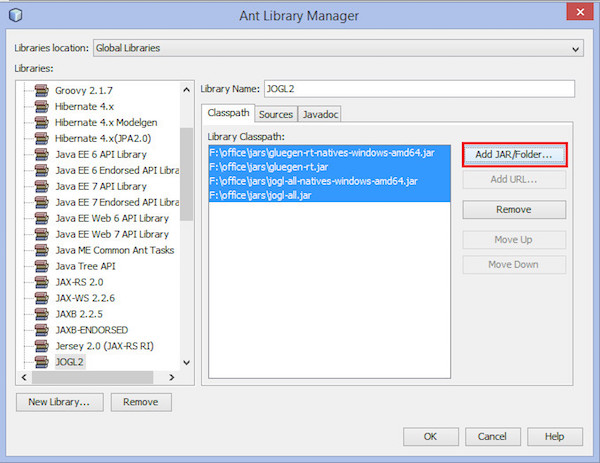
Step 6 − Click on Add JAR/Folder button.
Step 7 − Select the path where .jar files jogl.all.jar and gluegen-rt.jar are located.
To include JOGL library into each project, follow the steps given below −
Step 1 − Right-click on the project name. It shows a short-cut menu.
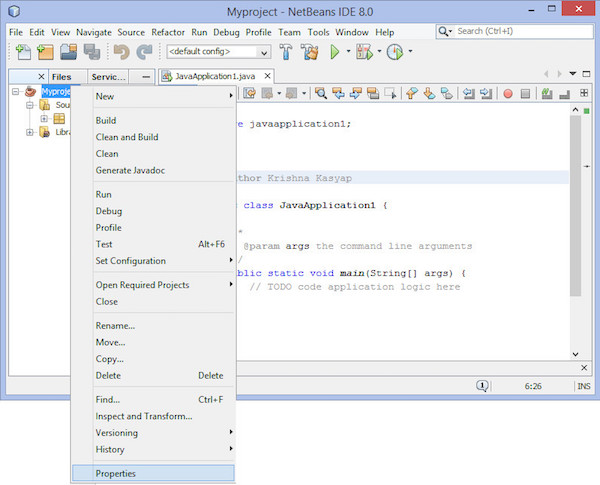
Step 2 − Select Properties. It opens a window named Project properties.
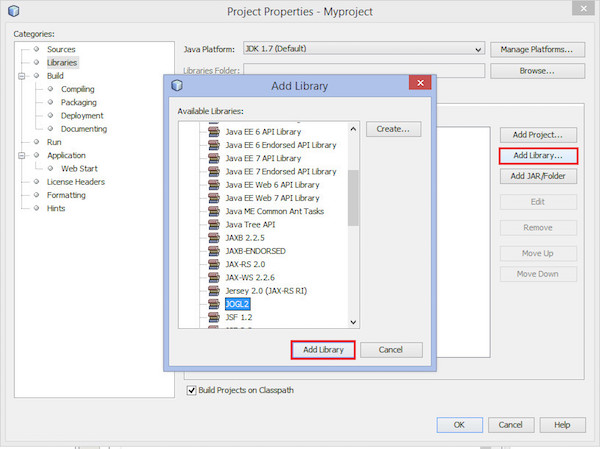
Step 3 − Select Libraries from Categories on the left hand side.
Step 4 − Select Compile tab and click on Add Library... button. Add library dialog box comes up.
Step 5 − Now add JOGL2.0 library, which you created earlier.
Including Native Library in Each Project
Follow the given steps to include native library in each project −
Step 1 − Right-click the project.
Step 2 − Select Set Configuration > Customize
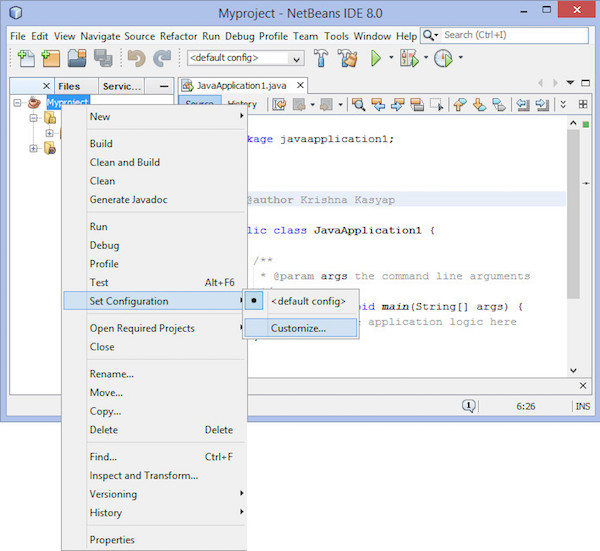
It leads you to the Project Properties window.
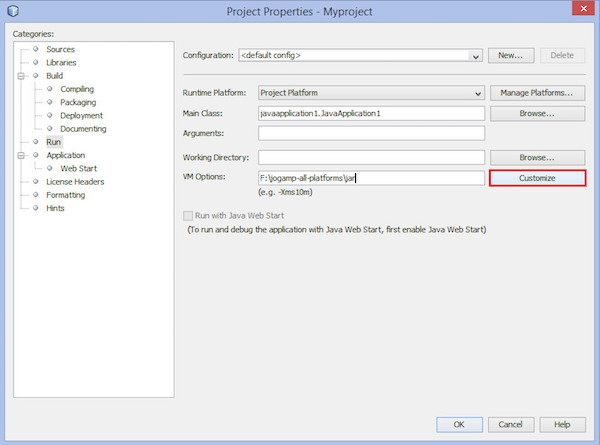
Step 3 − On the right hand side, in VM options, click on Customize button.
Step 4 − Browse for the path that contains JOGL native libraries gluegen-rtnatives-windows-amd64.jar'' and 'jogl-all-natives-windowsamd64.jar.
Adding Java Documentation of Native Libraries
You need to open Ant library manager again to make sources and Javadoc available for each project. Follow the given procedure −
Step 1 − Open main menu.
Step 2 − Select Tools > Libraries. This leads you to Library manager.
Step 3 − Under the JavaDoc tab, click on New Library button.
Step 4 − Enter JOGLJavadoc name. (You can enter any desired name.)
Step 5 − Click on Add jars/libraries button.
Step 6 − Select the path where unzipped JOGL documentation code is located.
Adding Source Code of Native Libraries
Step 1 − Under Sources tab, click on New Library button. Enter JOGLsources name.
Step 2 − Click on Add jars/libraries button. Select the path where unzipped source code is located.
Customizing the JDK Editor
Step 1 − Set Classpath for files jogl.all.jar and gluegen-rt.jar.
Step 2 − Set path to native libraries gluegen-rt-natives-windows-amd64.jar and joglall-natives-windowsamd64.jar or copy all the jar files from the folder where you have downloaded them and paste them into the jse lib folder.
JOGL - API for Basic Template
Using JOGL programming, it is possible to draw various graphical shapes such as straight lines, triangles, 3D shapes including special effects such as rotation, lighting, colors, etc. To draw objects in JOGL first of all we have to construct a basic JOGL frame. Below given are the classes required to construct a basic frame.
GLEventListener Interface
To make your program capable of using JOGL graphical API, you need to implement GLEventListener interface. You can find the GLEventListener interface in the javax.media.opengl package.
The following table provides the details of various methods and descriptions of GLEventListener interface −
| Sr.No. | Methods and Descriptions |
|---|---|
| 1 | Void display(GLAutoDrawable drawable) It is called by the object of GLAutoDrawable interface to initiate OpenGL rendering by the client. i.e., this method contains the logic used to draw graphical elements using OpenGL API. |
| 2 | Void dispose(GLAutoDrawable drawable) This method signals the listener to perform the release of all OpenGL resources per each GLContext, such as memory buffers and GLSL programs. |
| 3 | Void init(GLAutoDrawble drawable) It is called by the object of GLAutoDrawable interface immediately after the OpenGL context is initialized. |
| 4 | Void reshape(GLAutoDrawble drawble, int x, int y, int width, int height) It is called by the object of GLAutoDrawable interface during the first repaint after the component has been resized. It is also called whenever the position of the component on the window, is changed. |
All the methods of GLEventListener require object of GLAutoDrawable interface as a parameter.
GLAutoDrawable Interface
This interface supplies an event-based mechanism (GLEventListener) for performing OpenGL rendering. GLAutoDrawable automatically creates a primary rendering context which is associated with GLAutoDrawable for the lifetime of the object.
The following table provides the details of various methods and descriptions of GLAutoDrawable interface −
| Sr.No | Methods and Descriptions |
|---|---|
| 1 | GL getGL() Returns the GL pipeline object that is used by the current object of GLAutoDrawable interface. |
| 2 | void addGLEventListener(GLEventListener Listener) Adds the given listener to the end of current drawable queue. |
| 3 | void addGLEventListener(int index, GLEventListener listener) Adds the given listener at the given index of this drawable queue. |
| 4 | void destroy() Destroys all resources associated with this object of GLAutoDrawable interface, including the GLContext. |
Note − There are other methods in this package. Only a few important methods pertaining to template are discussed in this interface.
GLCanvas Class
GLCanvas and GLJpanel are the two main classes of JOGL GUI that implement GLAutoDrawable interface, which can be utilized as drawing surfaces for OpenGL commands.
GLCanvas is a heavyweight AWT component which provides OpenGL rendering support. This is the primary implementation of an AWTAutoGLDrawable interface. It also inherits java.awt.Canvas class. Since it is a heavyweight component, in certain cases, GLJCanvas may not integrate with swing component correctly. Therefore, care must be taken while using it with Swing. Whenever you face problems with GLJCanvas, then you must use GLJPanel class.
The hierarchical diagram of class GLCanvas can be as shown below −
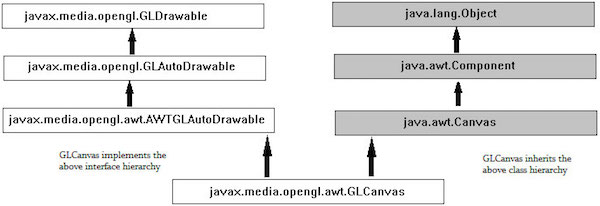
GLEventistener interface works along with GLCanvas class. It responds to the changes in GLCanvas class and to the drawing requests made by them.
Whenever GLCanvas class is instantiated, the init() method of GLEventListener is invoked. You can override this method to initialize the OpenGL state.
Whenever GLCanvas is drawn initially (instantiated) or resized, the reshape() method of GLEventListener is executed. It is used to initialize the OpenGL viewport and projection matrix. It is also called whenever the component's location is changed.
The display() method of GLEventListener contains the code for rendering 3D scene. It is invoked whenever display() method of GLCanvas is invoked.
Below given are the constructors required to instantiate GLCanvas class.
| Sr.No | Constructor and Description |
|---|---|
| 1 | GLCanvas() It creates a new GLCanvas component with a default set of OpenGL capabilities, using the default OpenGL capabilities selection mechanism, on the default screen device. |
| 2 | GLCanvas(GLCapabilitiesImmutable) It creates a new GLCanvas component with the requested set of OpenGL capabilities using the default OpenGL capabilities selection mechanism on the default screen device. |
Below given are the methods used for event handling of GLCanvas class.
| Sr. No. | Methods and Description |
|---|---|
| 1 | void addGLEventListener(GLEventListener listener) Adds the given listener to the end of this drawable queue. |
| 2 | void addGLEventListener(int indexGLEventListener listener) Adds the given listener at the given index of this drawable queue. |
To instantiate GLCanvas class, you need the object of GLCapabilitiesImmutable interface, which specifies an immutable set of OpenGL capabilities.
One of the ways to get an object of CapabilitiesImmutable interface is to instantiate GLCapabilities class, which implements the interface. An instance of GLCapabilities class can be used to serve the purpose.
GLCapabilities Class
This class specifies a set of OpenGL capabilities. It takes GLCapabilities object as a parameter. The GLCapabilities class describes the desired capabilities that a rendering context must support, such as the OpenGL profile.
Below given is a constructor to instantiate GLCapabilities class
| Sr. No. | Methods and Description |
|---|---|
| 1 | GLCapabilities(GLProfile glprofile) It creates a GLCapabilities object. |
To instantiate GLCanvas class, you need an object of GLCapabilitiesImmutable interface, which specifies an immutable set of OpenGL capabilities.
One of the ways to get an object of CapabilitiesImmutable interface is to instantiate GLCapabilities class, which implements the interface. The instance of GLCapabilities class can be used to serve the purpose.
The GLCapabilities class in turn requires a GLProfile object.
GLProfile Class
Since several versions of OpenGL API were released; you need to specify the exact version of OpenGL API being used in your program to your Java Virtual Machine (JVM). This is done using the GLProfile class.
The get() method of this class accepts different predefined String objects as parameters. Each String object is a name of an interface and each interface supports certain versions of OpenGL. If you initialize this class as static and singleton, it gives you singleton GLProfile objects for each available JOGL profile.
Below given is the prototype of the get method of GLProfile class.
| Sr.No. | Method and Description |
|---|---|
| 1 | Static GLProfile get(String profile) Uses the default device. |
As this is a static method, you need to invoke it using the class name, and it requires a predefined static string variable as parameter. There are 12 such variables in this class, each represents an individual implementation of GL interface.
GLProfile.get(GLProfile.GL2);
Parameters of get() method
| Sr.No | Predefined String value (Interface name) and Description |
|---|---|
| 1 | GL2 This interface contains all OpenGL [1.0 3.0] methods as well as most of its extensions defined at the time of this specification. |
| 2 | GLES1 This interface contains all OpenGL ES [1.0 ... 1.1] methods as well as most of its extensions defined at the time of this specification. |
| 3 | GLES2 This interface contains all OpenGL ES 2.0 methods as well as most of its extensions defined at the time of this specification. |
| 4 | GLES3 This interface contains all OpenGL ES 3.0 methods as well as most of its extensions defined at the time of this specification. |
| 5 | GL2ES1 This Interface contains the common subset of GL2 and GLES1. |
| 6 | GL2ES2 This Interface contains the common subset of GL3, GL2, and GLES2. |
| 7 | GL2GL3 This Interface contains the common subset of core GL3 (OpenGL 3.1+) and GL2. |
| 8 | GL3 This interface contains all OpenGL [3.1 ... 3.3] core methods as well as most of its extensions defined at the time of this specification. |
| 9 | GL3bc This interface contains all OpenGL [3.1 ... 3.3] compatibility methods, as well as most of its extensions defined at the time of this specification. |
| 10 | GL3ES3 This interface contains the common subset of core GL3 (OpenGL 3.1+) and GLES3 (OpenGL ES 3.0). |
| 11 | GL4 This interface contains all OpenGL [4.0 ... 4.3] core methods, as well as most of its extensions defined at the time of this specification. |
| 12 | GL4bc This interface contains all OpenGL [4.0 ... 4.3] compatibility profile, as well as most of its extensions defined at the time of this specification. |
| 13 | GL4ES3 Interface containing the common subset of core GL4 (OpenGL 4.0+) and GLES3 (OpenGL ES 3.0). |
GLJPanel Class
It is a lightweight Swing component which provides OpenGL rendering support. It is provided for compatibility with Swing.
GLJPanel Class Hierarchy
Below given is diagram represents the class hierarchey of GLJPanel class.

Below given are various constructors GLJPanel class.
| Sr. No. | Constructors and Description |
|---|---|
| 1 | GJPanel() It creates a new GLJPanel component with a default set of OpenGL capabilities. |
| 2 | (GLCapabilitiesImmutable) It creates a new GLJPanel component with the requested set of OpenGL capabilities. |
| 3 | GLJPanel(GLCapabilitiesImmutable userCapsRequest, GLCapabilitiesChooser chooser) It creates a new GLJPanel component. |
Below given are the methods of GLJPanel class.
| Sr.No. | Methods and Description |
|---|---|
| 1 | void addGLEventListener(GLEventListener listener) This method adds the given listener to the end of this drawable queue. |
| 2 | void addGLEventListener(int indexGLEventListener listener) This method adds the given listener at the given index of this drawable queue. |
JOGL - Canvas with AWT
This chapter explains you how to draw a JOGL basic frame using Canvas with AWT frame. In here we will construct a AWT Frame and add the canvas object to the AWT frame using the add() method of the frame class.
Below given are the steps to write a program which creates a JOGL basic frame with the combination of JOGL's Canvas class and AWT's Frame class.
Step1: Creating the Class
Initially create a class that implements GlEventListener interface and import the package javax.media.opengl. Implement all four methods display(), dispose(), reshape(), init(). Since this is the basic frame, primitive tasks such as creating canvas class, adding it to frame were discussed. All the GLEVentListener interface methods were left unimplemented.
Step2: Preparing the Canvas
(a) Constructing the GLCanvas class object
final GLCanvas glcanvas = new GLCanvas( xxxxxxx );

//here capabilities obj should be passed as parameter
(b) Instantiating the GLCapabilities class
GLCapabilities capabilities = new GLCapabilities( xxxxx );

//here profile obj should be passed as parameter
(c) Generating GLProfile object
As it is the static method, it is invoked using class name. Since this tutorial is about JOGL2, let us generate GL2 interface object.
final GLProfile profile = GLProfile.get( GLProfile.GL2 );

// both, variable and method are static hence both are called using class name.
Let us see the code snippet for canvas.
//getting the capabilities object of GL2 profile

final GLProfile profile = GLProfile.get(GLProfile.GL2);
GLCapabilities capabilities = new GLCapabilities(profile);

// The canvas
final GLCanvas glcanvas = new GLCanvas(capabilities);
(d) Now add GLEventListener to the canvas using the method addGLEventListener(). This method needs object of GLEventListener interface as parameter. Hence, pass object of a class that implements GLEventListener.
BasicFrame basicframe = newBasic Frame( );// class which implements
GLEventListener interface
glcanvas.addGLEventListener( basicframe );
(e) Set size of the frame using setSize() method inherited by GLCanvas from javax.media.opengl.awt.AWTGLAutoDrawable.
glcanvas.setSize( 400, 400 );
Now you are ready with GLCanvas.
Step3: Creating the Frame
Create the frame by instantiating the Frame class Object of JSE AWT frame component.
Add canvas to it and make the frame visible.
//creating frame
final Frame frame = new frame( " Basic Frame" );

//adding canvas to frame
frame.add( glcanvas );
frame.setVisible( true );
Step 4: Viewing the Frame in Full Screen
To view the frame in full screen, get the default screen size using java.awt.Toolkit class. Now, using those default screen size dimensions, set the frame size using setSize() method.
Dimension screenSize = Toolkit.getDefaultToolkit().getScreenSize();
frame.setSize(screenSize.width, screenSize.height);
Let us go through the program to generate the basic frame using AWT −
import javax.media.opengl.GLAutoDrawable;
import javax.media.opengl.GLCapabilities;
import javax.media.opengl.GLEventListener;
import javax.media.opengl.GLProfile;
import javax.media.opengl.awt.GLCanvas;

import javax.swing.JFrame;

public class BasicFrame implements GLEventListener {

   @Override
   public void display(GLAutoDrawable arg0) {
      // method body
   }

   @Override
   public void dispose(GLAutoDrawable arg0) {
      //method body
   }

   @Override
   public void init(GLAutoDrawable arg0) {
      // method body
   }

   @Override
   public void reshape(GLAutoDrawable arg0, int arg1, int arg2, int arg3, int arg4) {
      // method body
   }

   public static void main(String[] args) {

      //getting the capabilities object of GL2 profile
      final GLProfile profile = GLProfile.get(GLProfile.GL2);
      GLCapabilities capabilities = new GLCapabilities(profile);

      // The canvas
      final GLCanvas glcanvas = new GLCanvas(capabilities);
      BasicFrame b = new BasicFrame();
      glcanvas.addGLEventListener(b);
      glcanvas.setSize(400, 400);

      //creating frame
      final Frame frame = new Frame (" Basic Frame");

      //adding canvas to frame
      frame.add(glcanvas);
      frame.setSize( 640, 480 );
      frame.setVisible(true);
   }

}
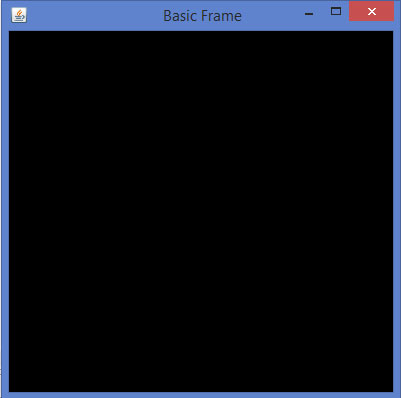
If you compile and execute the above program, the following output is generated. It shows a basic frame formed when we use GLCanvas class with AWT −
JOGL - Canvas with Swing
This chapter explains you how to draw a JOGL basic frame using Canvas, and JFrame class of javax.swing package. In here we will instantiate a JFrame and add the canvas object to the instance of JFrame using the add() method.
Using Canvas with AWT gives you a graphical frame with heavyweight features. For having a lightweight graphical frame, you need to use GLCanvas with Swing. While using GLCanvas with Swing, you can place GLCanvas in the JFrame window directly, or you can add it to JPanel.
Below given is the program which creates a JOGL basic frame with the combination of JOGL's GLCanvas class and JFrame class of the javax.swing package.
import javax.media.opengl.GLAutoDrawable;
import javax.media.opengl.GLCapabilities;
import javax.media.opengl.GLEventListener;
import javax.media.opengl.GLProfile;
import javax.media.opengl.awt.GLCanvas;

import javax.swing.JFrame;

public class BasicFrame implements GLEventListener {

   @Override
   public void display(GLAutoDrawable arg0) {
      // method body
   }

   @Override
   public void dispose(GLAutoDrawable arg0) {
      //method body
   }

   @Override
   public void init(GLAutoDrawable arg0) {
      // method body
   }

   @Override
   public void reshape(GLAutoDrawable arg0, int arg1, int arg2, int arg3, int arg4) {
      // method body
   }

   public static void main(String[] args) {

      //getting the capabilities object of GL2 profile
      final GLProfile profile = GLProfile.get(GLProfile.GL2);
      GLCapabilities capabilities = new GLCapabilities(profile);

      // The canvas
      final GLCanvas glcanvas = new GLCanvas(capabilities);
      BasicFrame b = new BasicFrame();
      glcanvas.addGLEventListener(b);
      glcanvas.setSize(400, 400);

      //creating frame
      final JFrame frame = new JFrame (" Basic Frame");

      //adding canvas to it
      frame.getContentPane().add(glcanvas);
      frame.setSize(frame.getContentPane().getPreferredSize());
      frame.setVisible(true);

   }//end of main

}//end of classimport
If you compile and execute the above program, the following output is generated. It shows a basic frame formed when we use GLCanvas with Swing window.
JOGL - GLJPanel Class
This chapter explains you how to draw a JOGL basic frame using GLJpanel class. It is a lightweight Swing component which provides OpenGL rendering support. It is provided for compatibility with Swing. In here we will instantiate a JFrame and add the GLJpanel object to the instance of JFrame using the add() method.
The following program generates a basic frame using GLJPanel with Swing window −
import javax.media.opengl.GLAutoDrawable;
import javax.media.opengl.GLCapabilities;
import javax.media.opengl.GLEventListener;
import javax.media.opengl.GLProfile;
import javax.media.opengl.awt.GLCanvas;

import javax.swing.JFrame;

public class BasicFrame implements GLEventListener {

   @Override
   public void display(GLAutoDrawable arg0) {
      // method body
   }

   @Override
   public void dispose(GLAutoDrawable arg0) {
      //method body
   }

   @Override
   public void init(GLAutoDrawable arg0) {
      // method body
   }

   @Override
   public void reshape(GLAutoDrawable arg0, int arg1, int arg2, int arg3, int arg4) {
      // method body
   }

   public static void main(String[] args) {

      //getting the capabilities object of GL2 profile
      final GLProfile profile = GLProfile.get(GLProfile.GL2);
      GLCapabilities capabilities = new GLCapabilities(profile);

      // The GLJpanel class
      GLJPanel gljpanel = new GLJPanel( glcapabilities );
      BasicFrame b = new BasicFrame();
      gljpanel.addGLEventListener(b);
      gljpanel.setSize(400, 400);

      //creating frame
      final JFrame frame = new JFrame (" Basic Frame");

      //adding canvas to it
      frame.getContentPane().add( gljpanel);
      frame.setSize(frame.getContentPane().getPreferredSize());
      frame.setVisible(true);

   }//end of main

}//end of classimport
If you compile and execute the above program, the following output is generated. It shows a basic frame formed when we use GLJPanel with swing window −
JOGL - Drawing Basics
OpenGL API has provided primitive methods for drawing basic graphical elements such as point, vertex, line etc. Using these methods, you can develop shapes such as triangle, polygon and circle. In both, 2D and 3D dimensions. This chapter teaches you how to draw a basic line using JOGL in a Java program.
Drawing Objects
To access programs which are specific to a hardware and operating system platforms and where the libraries are written in other languages such as C and C++ (native applications), Java uses a programming framework called Java Native Interface (JNI). JOGL uses this interface internally to access OpenGL functions as shown in the following diagram.
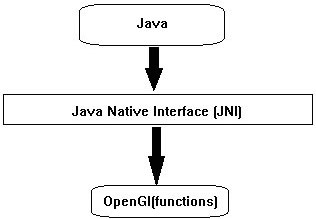
All the four methods of GLEventListener interface have the code (java JOGL methods) to call OpenGL functions internally. Naming of those JOGL methods is also similar to the naming conventions of OpenGL. If the function name in OpenGL is glBegin(), it is used as gl.glBegin().
Whenever the gl.glBegin() method of java JOGL is called, it internally invokes the glBegin() method of OpenGL. This is the reason for installing native library files on the user system at the time of installing JOGL.
The Display() Method
This is an important method which holds the code for developing graphics. It requires the GLAutoDrawable interface object as its parameter.
The display() method initially gets OpenGL context using the object of GL interface (GL inherits GLBase interface which contains methods to generate all OpenGL context objects). Since this tutorial is about JOGL2, let us generate a GL2 object.
The following code snippet shows how to generate a GL2 Object −
//Generating GL object
GL gl = drawable.getGL();
GL gl = drawable.getGL();

//Using this Getting the Gl2 Object
//this can be written in a single line like
final GL2 gl = drawable.getGL().getGL2();
Using the object of GL2 interface, one can access the members of this interface, which in turn provide access to OpenGL [1.0... 3.0] functions.
Drawing a Line
GL2 interface contains a huge list of methods but here three main important methods are discussed namely glBegin(), glVertex(), and glEnd().
| Sr.No. | Methods and Description |
|---|---|
| 1 | glBegin() This method starts the process of drawing a line. It takes predefined string integer GL_LINES as a parameter, which is inherited from GL interface. |
| 2 | glVertex3f()/glVertex2f() This method creates the vertex and we have to pass coordinates as parameters 3f and 2f, which denote 3-dimensional floating point coordinates and 2-dimensional floating point coordinates respectively. |
| 3 | glEnd() ends the line |
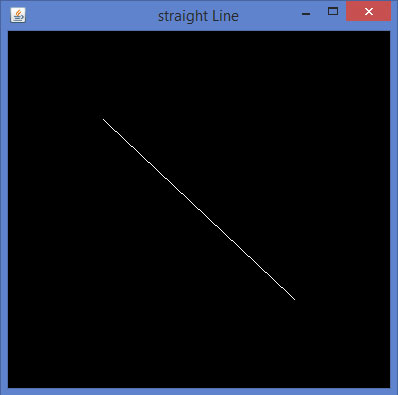
Below given is the program to draws a basic line using JOGL −
import javax.media.opengl.GL2;
import javax.media.opengl.GLAutoDrawable;
import javax.media.opengl.GLCapabilities;
import javax.media.opengl.GLEventListener;
import javax.media.opengl.GLProfile;
import javax.media.opengl.awt.GLCanvas;

import javax.swing.JFrame;

public class Line implements GLEventListener{

   @Override
   public void display(GLAutoDrawable drawable) {
      final GL2 gl = drawable.getGL().getGL2();

      gl.glBegin (GL2.GL_LINES);//static field
      gl.glVertex3f(0.50f,-0.50f,0);
      gl.glVertex3f(-0.50f,0.50f,0);
      gl.glEnd();

   }

   @Override
   public void dispose(GLAutoDrawable arg0) {
      //method body
   }

   @Override
   public void init(GLAutoDrawable arg0) {
      // method body
   }

   public static void main(String[] args) {

      //getting the capabilities object of GL2 profile
      final GLProfile profile = GLProfile.get(GLProfile.GL2);
      GLCapabilities capabilities = new GLCapabilities(profile);

      // The canvas
      final GLCanvas glcanvas = new GLCanvas(capabilities);
      Line l = new Line();
      glcanvas.addGLEventListener(l);
      glcanvas.setSize(400, 400);

      //creating frame
      final JFrame frame = new JFrame ("straight Line");

      //adding canvas to frame
      frame.getContentPane().add(glcanvas);

      frame.setSize(frame.getContentPane().getPreferredSize());
      frame.setVisible(true);

   }//end of main

}//end of classimport javax.media.opengl.GL2;
JOGL - Drawing with GL Lines
In the Previous chapter we have learned how draw a basic line using JOGL. We draw lines by passing a predefined field, Gl_lines to glBegin() method.
This chapter provides examples to draw shapes like triangle, rhombus and a house, using glBegin() method and GL_Lines.
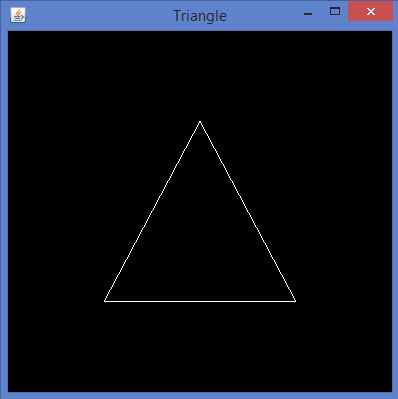
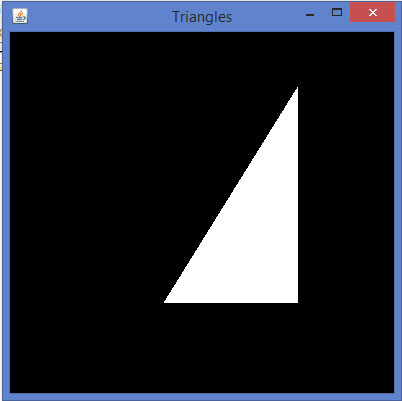
Let us go through a program to draw a triangle using GL_LINES −
import javax.media.opengl.GL2;
import javax.media.opengl.GLAutoDrawable;
import javax.media.opengl.GLCapabilities;
import javax.media.opengl.GLEventListener;
import javax.media.opengl.GLProfile;
import javax.media.opengl.awt.GLCanvas;

import javax.swing.JFrame;

public class Triangle implements GLEventListener{

   @Override
   public void display(GLAutoDrawable drawable) {
      final GL2 gl = drawable.getGL().getGL2();
      gl.glBegin (GL2.GL_LINES);

      //drawing the base
      gl.glBegin (GL2.GL_LINES);
      gl.glVertex3f(-0.50f, -0.50f, 0);
      gl.glVertex3f(0.50f, -0.50f, 0);
      gl.glEnd();

      //drawing the right edge
      gl.glBegin (GL2.GL_LINES);
      gl.glVertex3f(0f, 0.50f, 0);
      gl.glVertex3f(-0.50f, -0.50f, 0);
      gl.glEnd();

      //drawing the lft edge
      gl.glBegin (GL2.GL_LINES);
      gl.glVertex3f(0f, 0.50f, 0);
      gl.glVertex3f(0.50f, -0.50f, 0);
      gl.glEnd();
      gl.glFlush();
   }

   @Override
   public void dispose(GLAutoDrawable arg0) {
      //method body
   }

   @Override
   public void init(GLAutoDrawable arg0) {
      // method body
   }

   @Override
   public void reshape(GLAutoDrawable arg0, int arg1, int arg2, int arg3, int arg4) {
      // method body
   }

   public static void main(String[] args) {

      //getting the capabilities object of GL2 profile
      final GLProfile profile = GLProfile.get(GLProfile.GL2);
      GLCapabilities capabilities = new GLCapabilities(profile);

      // The canvas
      final GLCanvas glcanvas = new GLCanvas(capabilities);
      Triangle l = new Triangle();
      glcanvas.addGLEventListener(l);
      glcanvas.setSize(400, 400);

      //creating frame
      final JFrame frame = new JFrame ("Triangle");

      //adding canvas to frame
      frame.getContentPane().add(glcanvas);

      frame.setSize(frame.getContentPane().getPreferredSize());
      frame.setVisible(true);

   }//end of main

}//end of classimport javax.media.opengl.GL2;
If you compile and execute the above program, the following output is generated. It shows a triangle drawn using GL_LINES of glBegin() method.
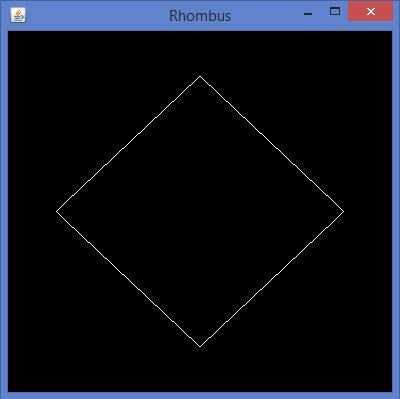
Let us go through a program to draw a rhombus using GL_LINES −
import javax.media.opengl.GL2;
import javax.media.opengl.GLAutoDrawable;
import javax.media.opengl.GLCapabilities;
import javax.media.opengl.GLEventListener;
import javax.media.opengl.GLProfile;
import javax.media.opengl.awt.GLCanvas;

import javax.swing.JFrame;

public class Rhombus implements GLEventListener{

   @Override
   public void display( GLAutoDrawable drawable ) {
      final GL2 gl = drawable.getGL().getGL2();

      //edge1
      gl.glBegin( GL2.GL_LINES );
      gl.glVertex3f( 0.0f,0.75f,0 );
      gl.glVertex3f( -0.75f,0f,0 );
      gl.glEnd();

      //edge2
      gl.glBegin( GL2.GL_LINES );
      gl.glVertex3f( -0.75f,0f,0 );
      gl.glVertex3f( 0f,-0.75f, 0 );
      gl.glEnd();

      //edge3
      gl.glBegin( GL2.GL_LINES );
      gl.glVertex3f( 0f,-0.75f, 0 );
      gl.glVertex3f( 0.75f,0f, 0 );
      gl.glEnd();

      //edge4
      gl.glBegin( GL2.GL_LINES );
      gl.glVertex3f( 0.75f,0f, 0 );
      gl.glVertex3f( 0.0f,0.75f,0 );
      gl.glEnd();
      gl.glFlush();
   }

   @Override
   public void dispose( GLAutoDrawable arg0 ) {
      //method body
   }

   @Override
   public void init(GLAutoDrawable arg0 ) {
      // method body
   }

   @Override
   public void reshape( GLAutoDrawable arg0, int arg1, int arg2, int arg3, int arg4 ) {
      // method body
   }

   public static void main( String[] args ) {

      //getting the capabilities object of GL2 profile
      final GLProfile profile = GLProfile.get( GLProfile.GL2 );
      GLCapabilities capabilities = new GLCapabilities(profile);

      // The canvas
      final GLCanvas glcanvas = new GLCanvas( capabilities );
      Rhombus rhombus = new Rhombus();
      glcanvas.addGLEventListener( rhombus );
      glcanvas.setSize( 400, 400 );

      //creating frame
      final JFrame frame = new JFrame ( "Rhombus" );

      //adding canvas to frame
      frame.getContentPane().add( glcanvas );
      frame.setSize(frame.getContentPane().getPreferredSize() );
      frame.setVisible( true );
   }

}
If you compile and execute the above program, you get the following output. It shows a rhombus generated using GL_LINES of glBegin() method.
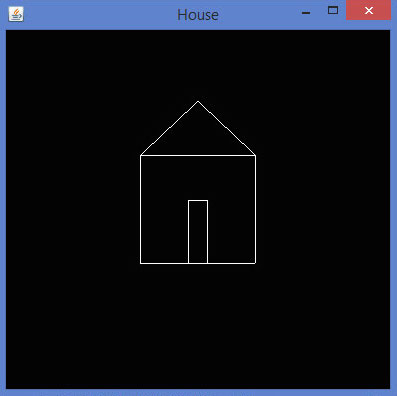
Let us go through a program to draw a house using GL_LINES −
import javax.media.opengl.GL2;
import javax.media.opengl.GLAutoDrawable;
import javax.media.opengl.GLCapabilities;
import javax.media.opengl.GLEventListener;
import javax.media.opengl.GLProfile;
import javax.media.opengl.awt.GLCanvas;

import javax.swing.JFrame;

public class House implements GLEventListener{

   @Override
   public void display( GLAutoDrawable drawable ) {
      final GL2 gl = drawable.getGL().getGL2();

      //drawing top
      gl.glBegin ( GL2.GL_LINES );
      gl.glVertex3f( -0.3f, 0.3f, 0 );
      gl.glVertex3f( 0.3f,0.3f, 0 );
      gl.glEnd();

      //drawing bottom
      gl.glBegin( GL2.GL_LINES );
      gl.glVertex3f( -0.3f,-0.3f, 0 );
      gl.glVertex3f( 0.3f,-0.3f, 0 );
      gl.glEnd();

      //drawing the right edge
      gl.glBegin( GL2.GL_LINES );
      gl.glVertex3f( -0.3f,0.3f, 0 );
      gl.glVertex3f( -0.3f,-0.3f, 0 );
      gl.glEnd();

      //drawing the left edge
      gl.glBegin( GL2.GL_LINES );
      gl.glVertex3f( 0.3f,0.3f,0 );
      gl.glVertex3f( 0.3f,-0.3f,0 );
      gl.glEnd();

      //building roof
      //building lft dia
      gl.glBegin( GL2.GL_LINES );
      gl.glVertex3f( 0f,0.6f, 0 );
      gl.glVertex3f( -0.3f,0.3f, 0 );
      gl.glEnd();

      //building rt dia
      gl.glBegin( GL2.GL_LINES );
      gl.glVertex3f( 0f,0.6f, 0 );
      gl.glVertex3f( 0.3f,0.3f, 0 );
      gl.glEnd();

      //building door
      //drawing top
      gl.glBegin ( GL2.GL_LINES );
      gl.glVertex3f( -0.05f, 0.05f, 0 );
      gl.glVertex3f( 0.05f, 0.05f, 0 );
      gl.glEnd();

      //drawing the left edge
      gl.glBegin ( GL2.GL_LINES );
      gl.glVertex3f( -0.05f, 0.05f, 0 );
      gl.glVertex3f( -0.05f, -0.3f, 0 );
      gl.glEnd();

      //drawing the right edge
      gl.glBegin ( GL2.GL_LINES );
      gl.glVertex3f( 0.05f, 0.05f, 0 );
      gl.glVertex3f( 0.05f, -0.3f, 0 );
      gl.glEnd();
   }

   @Override
   public void dispose( GLAutoDrawable arg0 ) {
      //method body
   }

   @Override
   public void init( GLAutoDrawable arg0 ) {
      // method body
   }

   @Override
   public void reshape( GLAutoDrawable arg0, int arg1, int arg2, int arg3, int arg4 ) {
      // method body
   }

   public static void main( String[] args ) {

      //getting the capabilities object of GL2 profile
      final GLProfile profile = GLProfile.get( GLProfile.GL2 );
      GLCapabilities capabilities = new GLCapabilities(profile);

      // The canvas
      final GLCanvas glcanvas = new GLCanvas( capabilities );
      House house = new House();
      glcanvas.addGLEventListener( house );
      glcanvas.setSize(400, 400);

      //creating frame
      final JFrame frame = new JFrame( "House" );

      //adding canvas to frame
      frame.getContentPane().add( glcanvas );
      frame.setSize(frame.getContentPane().getPreferredSize() );
      frame.setVisible( true );

   }//end of main

}//end of class
If you compile and execute the above program, you get the following output. It shows a house diagram generated using GL_LINES() method.
JOGL - Pre Defined Shapes
In the Previous chapters we have learned how draw a shapes such as line, triangle, rhombus using JOGL. We draw lines by passing a predefined field, Gl_lines to glBegin() method.
Other than GL_LINES, the glBegin() method accepts eight more parameters. You can use them to draw different shapes. These are used the same way as GL_LINES.
The following table shows the glBegin() method parameters along with their description −
| Sr.No | Parameters and Description |
|---|---|
| 1 | GL_LINES Creates each pair of vertices as an independent line segment. |
| 2 | GL_LINE_STRIP Draws a connected group of line segments from the first vertex to the last. |
| 3 | GL_LINE_LOOP Draws a connected group of line segments from the first vertex to the last, again back to the first. |
| 4 | GL_TRIANGLES Treats each triplet of vertices as an independent triangle. |
| 5 | GL_TRIANGLE_STRIP Draws a connected group of triangles. One triangle is defined for each vertex presented after the first two vertices. |
| 6 | GL_TRIANGLE_FAN Draws a connected group of triangles. One triangle is defined for each vertex presented after the first two vertices. |
| 7 | GL_QUADS Treats each group of four vertices as an independent quadrilateral. |
| 8 | GL_QUAD_STRIP Draws a connected group of quadrilaterals. One quadrilateral is defined for each pair of vertices presented after the first pair. |
| 9 | GL_POLYGON Draws a single, convex polygon. Vertices 1,,n define this polygon. |
Let us see some examples using glBegin() parameters.
Program to draw a Line Strip
import javax.media.opengl.GL2;
import javax.media.opengl.GLAutoDrawable;
import javax.media.opengl.GLCapabilities;
import javax.media.opengl.GLEventListener;
import javax.media.opengl.GLProfile;
import javax.media.opengl.awt.GLCanvas;

import javax.swing.JFrame;

public class LineStrip implements GLEventListener{

   @Override
   public void display(GLAutoDrawable drawable) {

      final GL2 gl = drawable.getGL().getGL2();

      gl.glBegin (GL2.GL_LINE_STRIP);
      gl.glVertex3f(-0.50f,-0.75f, 0);
      gl.glVertex3f(0.7f,0.5f, 0);
      gl.glVertex3f(0.70f,-0.70f, 0);
      gl.glVertex3f(0f,0.5f, 0);
      gl.glEnd();
   }

   @Override
   public void dispose(GLAutoDrawable arg0) {
      //method body
   }

   @Override
   public void init(GLAutoDrawable arg0) {
      // method body
   }

   @Override
   public void reshape(GLAutoDrawable arg0, int arg1, int arg2, int arg3, int arg4) {
      // method body
   }

   public static void main(String[] args) {

      //getting the capabilities object of GL2 profile
      final GLProfile profile = GLProfile.get(GLProfile.GL2);
      GLCapabilities capabilities = new GLCapabilities(profile);

      // The canvas
      final GLCanvas glcanvas = new GLCanvas(capabilities);
      LineStrip r = new LineStrip();
      glcanvas.addGLEventListener(r);
      glcanvas.setSize(400, 400);

      //creating frame
      final JFrame frame = new JFrame ("LineStrip");

      //adding canvas to frame
      frame.getContentPane().add(glcanvas);

      frame.setSize(frame.getContentPane().getPreferredSize());
      frame.setVisible(true);

   }//end of main

}//end of classimport javax.media.opengl.GL2;
If you compile and execute the above code, the following output is generated −

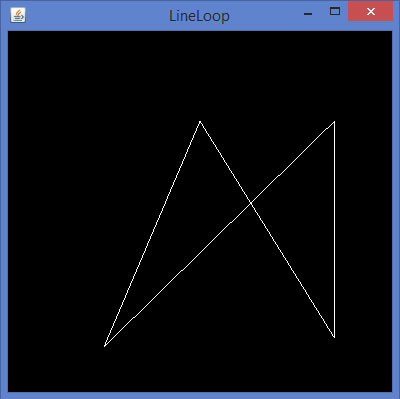
Code snippet for display() method to draw a Line Loop
public void display(GLAutoDrawable drawable) {

   final GL2 gl = drawable.getGL().getGL2();

   gl.glBegin (GL2.GL_LINE_LOOP);

   gl.glVertex3f( -0.50f, -0.75f, 0);
   gl.glVertex3f(0.7f, .5f, 0);
   gl.glVertex3f(0.70f, -0.70f, 0);
   gl.glVertex3f(0f, 0.5f, 0);

   gl.glEnd();
}
If you replace the display() method of any of the basic template programs with the above code, compile, and execute it, the following output is generated −
Code snippet for display() method to draw a triangle using GL_TRIANGLES
public void display(GLAutoDrawable drawable) {

   final GL2 gl = drawable.getGL().getGL2();

   gl.glBegin(GL2.GL_TRIANGLES);        // Drawing Using Triangles

   gl.glVertex3f(0.5f,0.7f,0.0f);       // Top
   gl.glVertex3f(-0.2f,-0.50f,0.0f);    // Bottom Left
   gl.glVertex3f(0.5f,-0.5f,0.0f);      // Bottom Right

   gl.glEnd();
}
If you replace the display() method of any of the basic template programs with the above code, compile, and execute it, the following output is generated −
Code snippet for display() method to draw a Triangle Strip
public void display(GLAutoDrawable drawable) {

   final GL2 gl = drawable.getGL().getGL2();

   gl.glBegin (GL2.GL_TRIANGLE_STRIP);

   gl.glVertex3f(0f,0.5f,0);
   gl.glVertex3f(-0.50f,-0.75f,0);
   gl.glVertex3f(0.28f,0.06f,0);
   gl.glVertex3f(0.7f,0.5f,0);
   gl.glVertex3f(0.7f,-0.7f,0);

   gl.glEnd();
}
If you replace the display() method of any of the basic template programs with the above code, compile and execute it, the following output is generated −

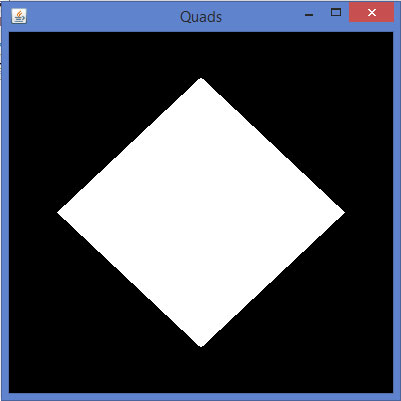
Code snippet for display() method to draw a quadrilateral
public void display(GLAutoDrawable drawable) {

   final GL2 gl = drawable.getGL().getGL2();

   gl.glBegin(GL2.GL_QUADS);

   gl.glVertex3f( 0.0f,0.75f,0);
   gl.glVertex3f(-0.75f,0f,0);
   gl.glVertex3f(0f,-0.75f,0);
   gl.glVertex3f(0.75f,0f,0);

   gl.glEnd();
}
If you replace the display() method of any of the basic template programs with the above code, compile, and execute it, the following output is generated −
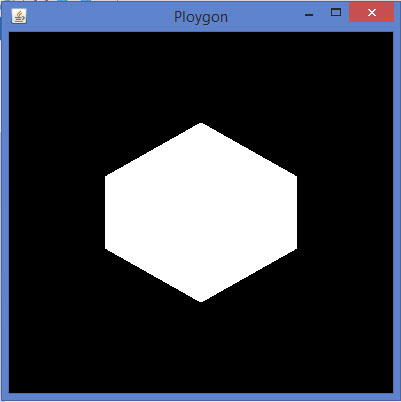
Code snippet for display() method to draw a polygon
public void display(GLAutoDrawable drawable) {

   final GL2 gl = drawable.getGL().getGL2();

   gl.glBegin(GL2.GL_POLYGON);

   gl.glVertex3f(0f,0.5f,0f);
   gl.glVertex3f(-0.5f,0.2f,0f);
   gl.glVertex3f(-0.5f,-0.2f,0f);
   gl.glVertex3f(0f,-0.5f,0f);
   gl.glVertex3f(0f,0.5f,0f);
   gl.glVertex3f(0.5f,0.2f,0f);
   gl.glVertex3f(0.5f,-0.2f,0f);
   gl.glVertex3f(0f,-0.5f,0f);

   gl.glEnd();
}
If you replace display() method of any of the basic template programs with the above code, compile, and execute it, the following output is generated −
JOGL - Transformation
OpenGL provides more features such as applying colors to an object, scaling, lighting, rotating an object, etc. This chapter describes some of the transformations on objects using JOGL.
Moving an Object on the Window
In earlier chapters, we discussed the programs for drawing a line and drawing various shapes using simple lines. The shapes created in this way can be displayed on any location within the window. It is done using the method glTranslatef (float x, float y, float z).
This method belongs to the GLMatrixFunc interface, which is in the javax.media.opengl.fixedfunc package.
GLMatrixFunc Interface
interface − GLMatrixFunc
package − javax.media.opengl.fixedfunc
The following table lists some important methods of this interface −
| Sr.No. | Methods and Description |
|---|---|
| 1 | void glRotatef(float angle, float x, float y, float z) Rotates the current matrix. |
| 2 | void glScalef(float x, float y, float z) Used to scale the current matrix. |
| 3 | void glTranslatef(float x, float y,float z) Used to translate the current matrix. |
| 4 | void glLoadIdentity() Loads the current matrix with identity matrix. |
The glTranslate() method moves the origin of the coordinate system to the point specified by the parameters (x,y,z), passed to the glTranslate() method as
argument. To save and restore the untranslated coordinate system, glPushMatrix() and glPopMatrix() methods are used.
gl.glTranslatef(0f, 0f, -2.5f);
Whenever glTranslate() is used, it changes the position of the component on the screen. Hence, the reshape() method of GLEventListener interface should be overridden and OpenGL viewport and projection matrix should be initialized.
The following code shows the template to initialize a view port and projection matrix −
public void reshape(GLAutoDrawable drawable, int x,  int y, int width, int height) {

   // TODO Auto-generated method stub
   final GL2 gl = drawable.getGL().getGL2();

   // get the OpenGL 2 graphics object
   if(height <=0) height = 1;

   //preventing devided by 0 exception height = 1;
   final float h = (float) width / (float) height;

   // display area to cover the entire window
   gl.glViewport(0, 0, width, height);

   //transforming projection matrix
   gl.glMatrixMode(GL2.GL_PROJECTION);
   gl.glLoadIdentity();
   glu.gluPerspective(45.0f, h, 1.0, 20.0);

   //transforming model view gl.glLoadIdentity();
   gl.glMatrixMode(GL2.GL_MODELVIEW);
   gl.glLoadIdentity();
}
JOGL - Coloring
This chapter teaches you how to apply colours to the objects using JOGL. To apply colour to an object, use the method glColor() of GL2. Below given is the syntax for using glColor method.
Syntax
gl.glColorXY(1f,0f,0f);
where,
X denotes the number of colours used, 3 (red, green, blue) or 4(red, green, blue, alpha). To get various colour combinations, the values of these colours are passed as parameters. The sequence of the colour parameters must be maintained in that order.
Example
If you pass colour values as (1, 0, 0), then you get red colour. Similarly, (1, 1, 0) gives you yellow colour.
Y denotes the data type which accepts parameters such as byte(b), double(d), float(f), int(i), short(s), ubyte(ub), uint(ui), and ushort(us).
gl.glColor3f(1f,0f,0f);   //gives us red
gl.glColor3f(0f,1f,0f);   //gives us green
gl.glColor3f(0f,0f,1f);   //gives us blue
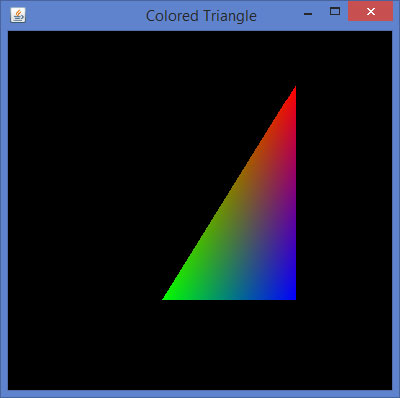
In case of triangle, you can apply different colors for each vertex.
Let us go through the program to apply colors to a triangle −
import javax.media.opengl.GL2;
import javax.media.opengl.GLAutoDrawable;
import javax.media.opengl.GLCapabilities;
import javax.media.opengl.GLEventListener;
import javax.media.opengl.GLProfile;
import javax.media.opengl.awt.GLCanvas;

import javax.swing.JFrame;

public class TriangleColor implements GLEventListener {

   @Override
   public void display( GLAutoDrawable drawable ) {

      final GL2 gl = drawable.getGL().getGL2();
      gl.glBegin( GL2.GL_TRIANGLES );

      // Drawing Using Triangles

      gl.glColor3f( 1.0f, 0.0f, 0.0f );   // Red
      gl.glVertex3f( 0.5f,0.7f,0.0f );    // Top

      gl.glColor3f( 0.0f,1.0f,0.0f );     // green
      gl.glVertex3f( -0.2f,-0.50f,0.0f ); // Bottom Left

      gl.glColor3f( 0.0f,0.0f,1.0f );     // blue
      gl.glVertex3f( 0.5f,-0.5f,0.0f );   // Bottom Right

      gl.glEnd();
   }

   @Override
   public void dispose( GLAutoDrawable arg0 ) {
      //method body
   }

   @Override
   public void init( GLAutoDrawable arg0 ) {
      // method body
   }

   @Override
   public void reshape( GLAutoDrawable arg0, int arg1, int arg2, int arg3, int arg4 ) {
      // method body
   }

   public static void main( String[] args ) {

      //getting the capabilities object of GL2 profile
      final GLProfile profile = GLProfile.get( GLProfile.GL2 );
      GLCapabilities capabilities = new GLCapabilities(profile);

      // The canvas
      final GLCanvas glcanvas = new GLCanvas( capabilities );
      TriangleColor triangle = new TriangleColor();
      glcanvas.addGLEventListener( triangle );
      glcanvas.setSize( 400, 400 );

      //creating frame
      final JFrame frame = new JFrame (" Colored Triangle");

      //adding canvas to it
      frame.getContentPane().add( glcanvas );
      frame.setSize( frame.getContentPane().getPreferredSize());
      frame.setVisible( true );

   } //end of main

} //end of class
When you compile and execute the above program, you get the following colored triangle −
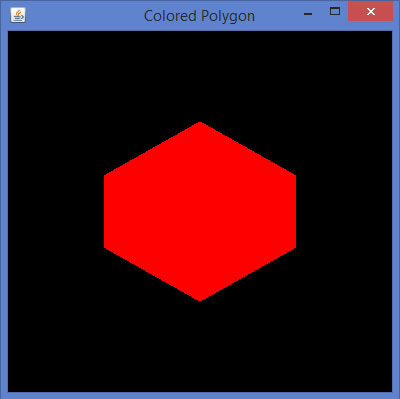
Applying Color to a Polygon
Let us go through the program to apply colors to a polygon −
import javax.media.opengl.GL2;
import javax.media.opengl.GLAutoDrawable;
import javax.media.opengl.GLCapabilities;
import javax.media.opengl.GLEventListener;
import javax.media.opengl.GLProfile;
import javax.media.opengl.awt.GLCanvas;

import javax.swing.JFrame;

public class PolygonColor implements GLEventListener {

   @Override
   public void display( GLAutoDrawable drawable ) {

      final GL2 gl = drawable.getGL().getGL2();
      gl.glColor3f( 1f,0f,0f ); //applying red

      gl.glBegin( GL2.GL_POLYGON );

      gl.glVertex3f( 0f,0.5f,0f  );
      gl.glVertex3f( -0.5f,0.2f,0f );
      gl.glVertex3f( -0.5f,-0.2f,0f );
      gl.glVertex3f( 0f,-0.5f,0f );
      gl.glVertex3f( 0f,0.5f,0f );
      gl.glVertex3f( 0.5f,0.2f,0f );
      gl.glVertex3f( 0.5f,-0.2f,0f );
      gl.glVertex3f( 0f,-0.5f,0f );

      gl.glEnd();
   }

   @Override
   public void dispose( GLAutoDrawable arg0 ) {
      //method body
   }

   @Override
   public void init( GLAutoDrawable arg0 ) {
      // method body
   }

   @Override
   public void reshape( GLAutoDrawable arg0, int arg1, int arg2, int arg3, int arg4 ) {
      // method body
   }

   public static void main( String[] args ) {

      //getting the capabilities object of GL2 profile
      final GLProfile profile = GLProfile.get( GLProfile.GL2 );
      GLCapabilities capabilities = new GLCapabilities(profile);

      // The canvas
      final GLCanvas glcanvas = new GLCanvas( capabilities );
      PolygonColor polygon = new PolygonColor();
      glcanvas.addGLEventListener( polygon );
      glcanvas.setSize( 400, 400 );

      //creating frame
      final JFrame frame = new JFrame ( "Colored Polygon" );

      //adding canvas to frame
      frame.getContentPane().add( glcanvas );
      frame.setSize(frame.getContentPane().getPreferredSize() );
      frame.setVisible( true );

   } //end of main

 } //end of class
When you compile and execute the above program, you get the following coloured Polygon −
JOGL - Scaling
This chapter teaches you how to scale an object ie., increase or decrease the size of an object using JOGL.
Scaling an object is done by using the glScalef(float x, float y, float z) method of GLMatrixFunc interface. This method accepts three floating point parameters, using which we specify the scale factors along the x, y, and z axes respectively.
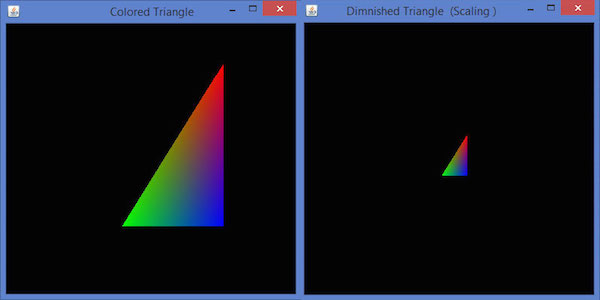
For example, in the following program, a triangle is diminished to 50%. Here, the value 50 is passed as parameter along all the axes.
Let us go through the program to scale a triangle −
import javax.media.opengl.GL2;
import javax.media.opengl.GLAutoDrawable;
import javax.media.opengl.GLCapabilities;
import javax.media.opengl.GLEventListener;
import javax.media.opengl.GLProfile;
import javax.media.opengl.awt.GLCanvas;

import javax.swing.JFrame;

public class Scaling implements GLEventListener {

   @Override

   public void display( GLAutoDrawable drawable ) {

      final GL2 gl = drawable.getGL().getGL2();
      gl.glScalef( 0.50f,0.25f,0.50f );
      gl.glBegin( GL2.GL_TRIANGLES );

      // Drawing Using Triangles
      gl.glColor3f( 1.0f, 0.0f, 0.0f );   // Red
      gl.glVertex3f( 0.5f,0.7f,0.0f );    // Top

      gl.glColor3f( 0.0f,1.0f,0.0f );     // blue
      gl.glVertex3f( -0.2f,-0.50f,0.0f ); // Bottom Left

      gl.glColor3f( 0.0f,0.0f,1.0f );     // green
      gl.glVertex3f( 0.5f,-0.5f,0.0f );   // Bottom Right

      gl.glEnd();
   }

   @Override
   public void dispose( GLAutoDrawable arg0 ) {
      //method body
   }

   @Override
   public void init( GLAutoDrawable arg0 ) {
      // method body
   }

   @Override
   public void reshape( GLAutoDrawable arg0, int arg1, int arg2, int arg3, int arg4 ) {
      // method body
   }

   public static void main( String[] args ) {

      //getting the capabilities object of GL2 profile
      final GLProfile profile = GLProfile.get( GLProfile.GL2 );
      GLCapabilities capabilities = new GLCapabilities(profile);

      // The canvas
      final GLCanvas glcanvas = new GLCanvas( capabilities );
      Scaling scaling = new Scaling();
      glcanvas.addGLEventListener( scaling );
      glcanvas.setSize( 400, 400 );

      //creating frame
      final JFrame frame  = new JFrame (" Dimnished Triangle (Scaling )");

      //adding canvas to it
      frame.getContentPane().add(glcanvas);
      frame.setSize(frame.getContentPane().getPreferredSize());
      frame.setVisible(true);

   } //end of main

} //end of classimport javax.media.opengl.GL2;
On compiling and executing the above program, we get the following output. Here, you can observe a diminished triangle as compared to the original triangle produced by TriangleColor.java −
JOGL - Rotation
In this chapter we explained you how to rotate an object using JOGL. Rotation of objects can be done along any of the three axes, using the glRotatef(float angle, float x, float y, float z) method of GLMatrixFunc interface. You need to pass an angle of rotation and x, y, z axes as parameters to this method.
The following steps guide you to rotate an object successfully −
Clear the color buffer and depth buffer initially using gl.glClear(GL2.GL_COLOR_BUFFER_BIT | GL2.GL_DEPTH_BUFFER_BIT) method. This method erases the previous state of the object and makes the view clear.
Reset the projection matrix using the glLoadIdentity() method.
Instantiate the animator class and start the animator using the start() method.
FPSAnimator Class
Below given ar the various constructors of FPSAnimator class.
| Sr.No. | Methods and Descriptions |
|---|---|
| 1 | FPSAnimator(GLAutoDrawable drawable, int fps) It creates an FPSAnimator with a given target frames-per-second value and an initial drawable to animate. |
| 2 | FPSAnimator(GLAutoDrawable drawable, int fps, boolean cheduleAtFixedRate) It creates an FPSAnimator with a given target frames-per-second value, an initial drawable to animate, and a flag indicating whether to use fixed-rate scheduling. |
| 3 | FPSAnimator(int fps) It creates an FPSAnimator with a given target frames-per-second value. |
| 4 | It creates an FPSAnimator with a given target frames-per-second value and a flag indicating whether to use fixed rate scheduling. |
It creates an FPSAnimator with a given target frames-per-second value and a flag indicating whether to use fixed rate scheduling.
start() and stop() are the two important methods in this class. The following program shows how to rotate a triangle using FPSAnimator class −
import javax.media.opengl.GL2;
import javax.media.opengl.GLAutoDrawable;
import javax.media.opengl.GLCapabilities;
import javax.media.opengl.GLEventListener;
import javax.media.opengl.GLProfile;
import javax.media.opengl.awt.GLCanvas;

import javax.swing.JFrame;

import com.jogamp.opengl.util.FPSAnimator;

public class TriangleRotation implements GLEventListener {
   private float rtri;  //for angle of rotation

   @Override
   public void display( GLAutoDrawable drawable ) {

      final GL2 gl = drawable.getGL().getGL2();
      gl.glClear (GL2.GL_COLOR_BUFFER_BIT |  GL2.GL_DEPTH_BUFFER_BIT );

      // Clear The Screen And The Depth Buffer
      gl.glLoadIdentity();  // Reset The View

      //triangle rotation
      gl.glRotatef( rtri, 0.0f, 1.0f, 0.0f );

      // Drawing Using Triangles
      gl.glBegin( GL2.GL_TRIANGLES );

      gl.glColor3f( 1.0f, 0.0f, 0.0f );   // Red
      gl.glVertex3f( 0.5f,0.7f,0.0f );    // Top
      gl.glColor3f( 0.0f,1.0f,0.0f );     // blue
      gl.glVertex3f( -0.2f,-0.50f,0.0f ); // Bottom Left
      gl.glColor3f( 0.0f,0.0f,1.0f );     // green
      gl.glVertex3f( 0.5f,-0.5f,0.0f );   // Bottom Right

      gl.glEnd();
      gl.glFlush();

      rtri +=0.2f;  //assigning the angle
   }

   @Override
   public void dispose( GLAutoDrawable arg0 ) {
      //method body
   }

   @Override
   public void init( GLAutoDrawable arg0 ) {
      // method body
   }

   @Override
   public void reshape( GLAutoDrawable drawable, int x, int y, int width, int height ) {

      public static void main( String[] args ) {

         //getting the capabilities object of GL2 profile
         final GLProfile profile  = GLProfile.get(GLProfile.GL2 );
         GLCapabilities capabilities  = new GLCapabilities( profile );

         // The canvas
         final GLCanvas glcanvas = new GLCanvas( capabilities);
         TriangleRotation triangle = new TriangleRotation();
         glcanvas.addGLEventListener( triangle );
         glcanvas.setSize( 400, 400 );

         // creating frame
         final JFrame frame = new JFrame ("Rotating Triangle");

         // adding canvas to it
         frame.getContentPane().add( glcanvas );
         frame.setSize(frame.getContentPane() .getPreferredSize());
         frame.setVisible( true );

         //Instantiating and Initiating Animator
         final FPSAnimator animator = new FPSAnimator(glcanvas, 300,true);
         animator.start();
      }

   } //end of main

} //end of class
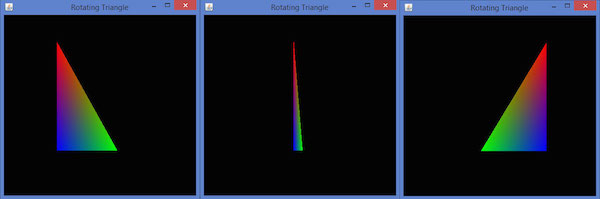
If you compile and execute the above program, it generates the following output. Here, you can observe various snapshots of a rotating the colored triangle around the x-axis.
JOGL - Lighting
This chapter explains you how to apply lighting effect to an object using JOGL.
To set lighting, initially enable lighting using the glEnable() method. Then apply lighting for the objects, using the glLightfv(int light, int pname, float[] params, int params_offset) method of GLLightingFunc interface. This method takes four parameters.
The following table describes the parameters of gllightfv() method.
| Sr.No. | Parameter Name and Description |
|---|---|
| 1 | Light Specifies a light. The number of lights depends on the implementation, but at least eight lights are supported. It accepts ten values, those parameters are discussed in a separate table named Light Source Parameters given below. |
| 2 | Pname Specifies a single valued light source parameter. For light source, there are ten parameters as discussed below. |
| 3 | Params Specifies a pointer to the value or values that is set to the parameter pname of light source light. |
| 4 | Light source parameter You can use any of the light source parameters given below. |
Light source parameters
| Sr.No. | Parameter and Description |
|---|---|
| 1 | GL_AMBIENT It contains the parameters that specify the ambient intensity of the light. |
| 2 | GL_DIFFUSE It contains the parameters that specify the diffuse intensity of the light. |
| 3 | GL_SPECULAR It contains the parameters that specify the specular intensity of the light. |
| 4 | GL_POSITION It contains four integer or floating-point values that specify the position of the light in homogeneous object coordinates. |
| 5 | GL_SPOT_DIRECTION It contains parameters that specify the direction of light in homogeneous object coordinates. |
| 6 | GL_SPOT_EXPONENT Its parameters specify the intensity distribution of light. |
| 7 | GL_SPOT_CUTOFF The single parameter of this specifies the maximum spread angle of the light. |
| 8 | GL_CONSTANT_ATTENUATION or GL_LINEAR_ATTENUATION or GL_QUADRATIC_ATTENUATION You can use any of these attenuation factors, which is represented by a single value. |
Lighting is enabled or disabled using glEnable() and glDisable () methods with the argument GL_LIGHTING.
The following template is given for lighting −
gl.glEnable(GL2.GL_LIGHTING);
gl.glEnable(GL2.GL_LIGHT0);
gl.glEnable(GL2.GL_NORMALIZE);

float[] ambientLight = { 0.1f, 0.f, 0.f,0f };  // weak RED ambient
gl.glLightfv(GL2.GL_LIGHT0, GL2.GL_AMBIENT, ambientLight, 0);

float[] diffuseLight = { 1f,2f,1f,0f };  // multicolor diffuse
gl.glLightfv(GL2.GL_LIGHT0, GL2.GL_DIFFUSE, diffuseLight, 0);
Applying Light to a Rotating Polygon
Follow the given steps for applying light to a rotating polygon.
Rotate the polygon using glRotate() method
gl.glClear(GL2.GL_COLOR_BUFFER_BIT | GL2.GL_DEPTH_BUFFER_BIT);

// Clear The Screen And The Depth Buffer
gl.glLoadIdentity();

// Reset The View
gl.glRotatef(rpoly, 0.0f, 1.0f, 0.0f);
Let us go through the program to apply light to a rotating polygon −
import javax.media.opengl.GL2;
import javax.media.opengl.GLAutoDrawable;
import javax.media.opengl.GLCapabilities;
import javax.media.opengl.GLEventListener;
import javax.media.opengl.GLProfile;
import javax.media.opengl.awt.GLCanvas;

import javax.swing.JFrame;

import com.jogamp.opengl.util.FPSAnimator;

public class PolygonLighting implements GLEventListener {
   private float rpoly;

   @Override

   public void display( GLAutoDrawable drawable ) {

      final GL2 gl = drawable.getGL().getGL2();
      gl.glColor3f(1f,0f,0f); //applying red

      // Clear The Screen And The Depth Buffer
      gl.glClear( GL2.GL_COLOR_BUFFER_BIT |
      GL2.GL_DEPTH_BUFFER_BIT );
      gl.glLoadIdentity();       // Reset The View
      gl.glRotatef( rpoly, 0.0f, 1.0f, 0.0f );

      gl.glBegin( GL2.GL_POLYGON );

      gl.glVertex3f( 0f,0.5f,0f );
      gl.glVertex3f( -0.5f,0.2f,0f );
      gl.glVertex3f( -0.5f,-0.2f,0f );
      gl.glVertex3f( 0f,-0.5f,0f );
      gl.glVertex3f( 0f,0.5f,0f );
      gl.glVertex3f( 0.5f,0.2f,0f );
      gl.glVertex3f( 0.5f,-0.2f,0f );
      gl.glVertex3f( 0f,-0.5f,0f );

      gl.glEnd();

      gl.glFlush();

      rpoly += 0.2f;  //assigning the angle

      gl.glEnable( GL2.GL_LIGHTING );
      gl.glEnable( GL2.GL_LIGHT0 );
      gl.glEnable( GL2.GL_NORMALIZE );

      // weak RED ambient
      float[] ambientLight = { 0.1f, 0.f, 0.f,0f };
      gl.glLightfv(GL2.GL_LIGHT0, GL2.GL_AMBIENT, ambient-Light, 0);

      // multicolor diffuse
      float[] diffuseLight = { 1f,2f,1f,0f };
      gl.glLightfv( GL2.GL_LIGHT0, GL2.GL_DIFFUSE, diffuse-Light, 0 );
   }

   @Override
   public void dispose( GLAutoDrawable arg0 ) {
      //method body
   }

   @Override
   public void init( GLAutoDrawable arg0 ) {
      // method body
   }

   @Override
   public void reshape( GLAutoDrawable arg0, int arg1, int arg2, int arg3, int arg4 ) {
      // method body
   }

   public static void main( String[] args ) {

      //getting the capabilities object of GL2 profile
      final GLProfile profile = GLProfile.get( GLProfile.GL2 );
      GLCapabilities capabilities = new GLCapabilities( profile);

      // The canvas
      final GLCanvas glcanvas = new GLCanvas( capabilities );
      PolygonLighting polygonlighting = new PolygonLighting();
      glcanvas.addGLEventListener( polygonlighting );
      glcanvas.setSize( 400, 400 );

      //creating frame
      final JFrame frame = new JFrame (" Polygon lighting ");

      //adding canvas to it
      frame.getContentPane().add( glcanvas );
      frame.setSize( frame.getContentPane().getPreferredSize());
      frame.setVisible( true );

      //Instantiating and Initiating Animator
      final FPSAnimator animator = new FPSAnimator(glcanvas, 300,true );
      animator.start();

   } //end of main

} //end of class
If you compile and execute the above program, it generates the following output. Here, you can observe various snapshots of a rotating polygon with lighting.

JOGL - 3D Basics
In previous chapters we have seen how to create 2d objects, apply effects to it, and transform the object. This chapter teaches you how to draw a line with 3rd dimension, and some shapes.
Let us draw a simple line with z-axis and see the difference between 2D and 3D lines. Draw a simple line first, then draw the second line 3 units into the window.
Let us go through the program to draw a 3D line −
import javax.media.opengl.GL2;
import javax.media.opengl.GLAutoDrawable;
import javax.media.opengl.GLCapabilities;
import javax.media.opengl.GLEventListener;
import javax.media.opengl.GLProfile;
import javax.media.opengl.awt.GLCanvas;
import javax.media.opengl.glu.GLU;

import javax.swing.JFrame;

public class Line3d implements GLEventListener {
   private GLU glu = new GLU();

   @Override

   public void display( GLAutoDrawable drawable ) {
      final GL2 gl = drawable.getGL().getGL2();
      gl.glTranslatef( 0f, 0f, -2.5f );
      gl.glBegin( GL2.GL_LINES );
      gl.glVertex3f( -0.75f,0f,0 );
      gl.glVertex3f( 0f,-0.75f, 0 );
      gl.glEnd();

      //3d line
      gl.glBegin( GL2.GL_LINES );
      gl.glVertex3f( -0.75f,0f,3f );// 3 units into the window
      gl.glVertex3f( 0f,-0.75f,3f );
      gl.glEnd();
   }

   @Override
   public void dispose( GLAutoDrawable arg0 ) {
      //method body
   }

   @Override
   public void init( GLAutoDrawable arg0 ) {
      // method body
   }

   @Override
   public void reshape( GLAutoDrawable drawable, int x, int y, int width, int height ) {

      GL2 gl = drawable.getGL().getGL2();

      if( height <= 0 )
         height = 1;

      final float h = ( float ) width / ( float ) height;
      gl.glViewport( 0, 0, width, height );
      gl.glMatrixMode( GL2.GL_PROJECTION );
      gl.glLoadIdentity();

      glu.gluPerspective( 45.0f, h, 1.0, 20.0 );
      gl.glMatrixMode( GL2.GL_MODELVIEW );
      gl.glLoadIdentity();
   }

   public static void main( String[] args ) {

      //getting the capabilities object of GL2 profile
      final GLProfile profile = GLProfile.get( GLProfile.GL2 );
      GLCapabilities capabilities = new GLCapabilities(profile);

      // The canvas
      final GLCanvas glcanvas = new GLCanvas( capabilities );
      Line3d line3d = new Line3d();
      glcanvas.addGLEventListener( line3d );
      glcanvas.setSize( 400, 400 );

      //creating frame
      final JFrame frame = new JFrame (" 3d line");

      //adding canvas to it
      frame.getContentPane().add( glcanvas );
      frame.setSize(frame.getContentPane().getPreferredSize() );
      frame.setVisible( true );
   }//end of main

}//end of class
When you compile and execute the above program, the following output is generated −
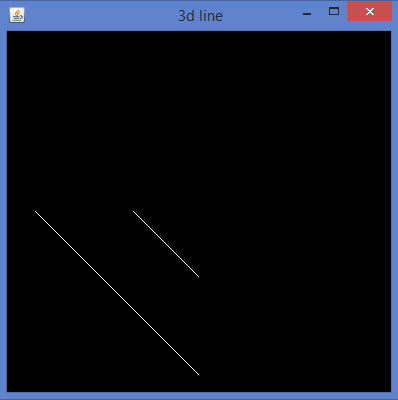
3D shapes can be drawn by giving non-zero values to z quadrant of the glVertex3f() method, which generates the above view. Now joining the remaining lines will lead to a 3D edge.
Now in the same way let us develop an edge with 3rd dimension.
import javax.media.opengl.GL2;
import javax.media.opengl.GLAutoDrawable;
import javax.media.opengl.GLCapabilities;
import javax.media.opengl.GLEventListener;
import javax.media.opengl.GLProfile;
import javax.media.opengl.awt.GLCanvas;
import javax.media.opengl.glu.GLU;

import javax.swing.JFrame;

public class Edge1 implements GLEventListener {
   private GLU glu = new GLU();

   @Override
   public void display(GLAutoDrawable drawable) {

      // TODO Auto-generated method stub
      final GL2 gl = drawable.getGL().getGL2();
      gl.glTranslatef(0f, 0f, -2.5f);
      gl.glBegin(GL2.GL_LINES);
      gl.glVertex3f(-0.75f,0f,0);
      gl.glVertex3f(0f,-0.75f, 0);
      gl.glEnd();

      //3d line
      gl.glBegin(GL2.GL_LINES);

      //3 units in to the window
      gl.glVertex3f(-0.75f,0f,3f);
      gl.glVertex3f(0f,-0.75f,3f);
      gl.glEnd();

      //top
      gl.glBegin(GL2.GL_LINES);
      gl.glVertex3f(-0.75f,0f,0);
      gl.glVertex3f(-0.75f,0f,3f);
      gl.glEnd();

      //bottom
      gl.glBegin(GL2.GL_LINES);
      gl.glVertex3f(0f,-0.75f, 0);
      gl.glVertex3f(0f,-0.75f,3f);
      gl.glEnd();
   }

   @Override
   public void dispose(GLAutoDrawable arg0) {
      //method body
   }

   @Override
   public void init(GLAutoDrawable arg0) {
      // method body
   }

   @Override
   public void reshape(GLAutoDrawable drawable, int x, int y, int width, int height) {

      // TODO Auto-generated method stubfinal
      GL2 gl = drawable.getGL().getGL2();
      if(height <= 0)
         height = 1;

      final float h = (float) width / (float) height;
      gl.glViewport(0, 0, width, height);
      gl.glMatrixMode(GL2.GL_PROJECTION);
      gl.glLoadIdentity();

      glu.gluPerspective(45.0f, h, 1.0, 20.0);
      gl.glMatrixMode(GL2.GL_MODELVIEW);
      gl.glLoadIdentity();

   }

   public static void main(String[] args) {

      //getting the capabilities object of GL2 profile
      final GLProfile profile = GLProfile.get(GLProfile.GL2);
      GLCapabilities capabilities = new GLCapabilities(profile);

      // The canvas
      final GLCanvas glcanvas = new GLCanvas(capabilities);
      Edge1 b = new Edge1();
      glcanvas.addGLEventListener(b);
      glcanvas.setSize(400, 400);

      //creating frame
      final JFrame frame = new JFrame (" 3d edge");

      //adding canvas to it
      frame.getContentPane().add(glcanvas);
      frame.setSize(frame.getContentPane().getPreferredSize());
      frame.setVisible(true);
   }//end of main

}//end of class
When you compile and execute the above program, the following output is generated −
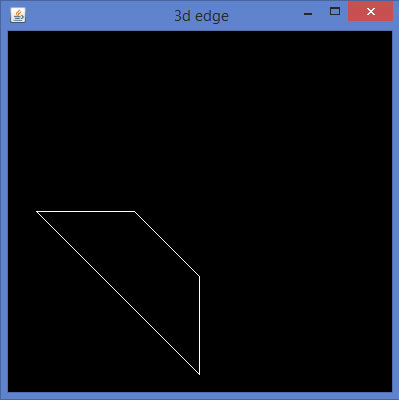
In the same way, by developing 3D edges to corresponding sides of any 2D quadrilateral and joining the adjacent vertices, you can get a 3D quadrilateral.
Below given is a program to draw a rhombus using JOGL.
import javax.media.opengl.GL2;
import javax.media.opengl.GLAutoDrawable;
import javax.media.opengl.GLCapabilities;
import javax.media.opengl.GLEventListener;
import javax.media.opengl.GLProfile;
import javax.media.opengl.awt.GLCanvas;
import javax.media.opengl.glu.GLU;

import javax.swing.JFrame;

public class Rhombus implements GLEventListener {
   private GLU glu = new GLU();

   @Override
   public void display(GLAutoDrawable drawable) {

      final GL2 gl = drawable.getGL().getGL2();
      gl.glTranslatef(0f, 0f, -2.5f);

      //drawing edge1.....
      gl.glBegin(GL2.GL_LINES);
      gl.glVertex3f(-0.75f,0f,0);
      gl.glVertex3f(0f,-0.75f, 0);
      gl.glEnd();

      gl.glBegin(GL2.GL_LINES);
      gl.glVertex3f(-0.75f,0f,3f); // 3 units into the window
      gl.glVertex3f(0f,-0.75f,3f);
      gl.glEnd();

      //top
      gl.glBegin(GL2.GL_LINES);
      gl.glVertex3f(-0.75f,0f,0);
      gl.glVertex3f(-0.75f,0f,3f);
      gl.glEnd();

      // bottom
      gl.glBegin(GL2.GL_LINES);
      gl.glVertex3f(0f,-0.75f, 0);
      gl.glVertex3f(0f,-0.75f,3f);
      gl.glEnd();

      // edge 2....
      gl.glBegin(GL2.GL_LINES);
      gl.glVertex3f(0f,-0.75f, 0);
      gl.glVertex3f(0.75f,0f, 0);
      gl.glEnd();

      gl.glBegin(GL2.GL_LINES);
      gl.glVertex3f(0f,-0.75f, 3f);
      gl.glVertex3f(0.75f,0f, 3f);
      gl.glEnd();

      gl.glBegin(GL2.GL_LINES);
      gl.glVertex3f(0f,-0.75f, 0);
      gl.glVertex3f(0f,-0.75f, 3f);
      gl.glEnd();

      gl.glBegin(GL2.GL_LINES);
      gl.glVertex3f(0.75f,0f, 0);
      gl.glVertex3f(0.75f,0f, 3f);
      gl.glEnd();

      //Edge 3.............
      gl.glBegin(GL2.GL_LINES);
      gl.glVertex3f( 0.0f,0.75f,0);
      gl.glVertex3f(-0.75f,0f,0);
      gl.glEnd();

      gl.glBegin(GL2.GL_LINES);
      gl.glVertex3f( 0.0f,0.75f,3f);
      gl.glVertex3f(-0.75f,0f,3f);
      gl.glEnd();

      gl.glBegin(GL2.GL_LINES);
      gl.glVertex3f( 0.0f,0.75f,0);
      gl.glVertex3f( 0.0f,0.75f,3f);
      gl.glEnd();

      gl.glBegin(GL2.GL_LINES);
      gl.glVertex3f(-0.75f,0f,0);
      gl.glVertex3f(-0.75f,0f,3f);
      gl.glEnd();

      //final edge
      gl.glBegin(GL2.GL_LINES);
      gl.glVertex3f(0.75f,0f, 0);
      gl.glVertex3f( 0.0f,0.75f,0);
      gl.glEnd();

      gl.glBegin(GL2.GL_LINES);
      gl.glVertex3f(0.75f,0f,3f);
      gl.glVertex3f( 0.0f,0.75f,3f);
      gl.glEnd();

      gl.glBegin(GL2.GL_LINES);
      gl.glVertex3f(0.75f,0f, 0);
      gl.glVertex3f(0.75f,0f,3f);
      gl.glEnd();

      gl.glBegin(GL2.GL_LINES);
      gl.glVertex3f( 0.0f,0.75f,0);
      gl.glVertex3f( 0.0f,0.75f,3f);
      gl.glEnd();
   }

   @Override
   public void dispose(GLAutoDrawable arg0) {
      //method body
   }

   @Override
   public void init(GLAutoDrawable arg0) {
      // method body
   }

   @Override
   public void reshape(GLAutoDrawable drawable, int x, int y, int width, int height) {

      // TODO Auto-generated method stub final
      GL2 gl = drawable.getGL().getGL2();
      if(height lt;= 0)
         height = 1;

      final float h = (float) width / (float) height;
      gl.glViewport(3, 6, width, height);
      gl.glMatrixMode(GL2.GL_PROJECTION);
      gl.glLoadIdentity();

      glu.gluPerspective(45.0f, h, 1.0, 20.0);
      gl.glMatrixMode(GL2.GL_MODELVIEW);
      gl.glLoadIdentity();
   }

   public static void main(String[] args) {

      //getting the capabilities object of GL2 profile
      final GLProfile profile = GLProfile.get(GLProfile.GL2);
      GLCapabilities capabilities = new GLCapabilities(profile);

      // The canvas
      final GLCanvas glcanvas = new GLCanvas(capabilities);
      Rhombus b = new Rhombus();
      glcanvas.addGLEventListener(b);
      glcanvas.setSize(400, 400);

      //creating frame
      final JFrame frame = new JFrame (" Rhombus 3d");

      //adding canvas to it
      frame.getContentPane().add(glcanvas);
      frame.setSize(frame.getContentPane().getPreferredSize());
      frame.setVisible(true);
   }//end of main

}//end of classimport javax.media.opengl.GL2;
When you compile and execute the above program, the following output is generated. It shows a rhombus drawn using 3D lines.
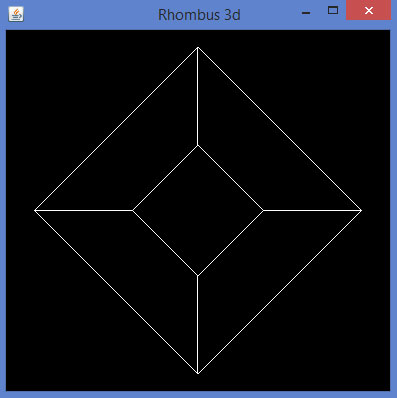
The predefined parameters of glBegin() method can be used for drawing 3D shapes.
JOGL - 3D Triangle
In previous chapter we have seen how to draw 3d shapes, this chapter teaches you how to draw 3d triangle and rotate it.
Below given is the program to draw a 3d triangle an rotate it.
import javax.media.opengl.GL2;
import javax.media.opengl.GLAutoDrawable;
import javax.media.opengl.GLCapabilities;
import javax.media.opengl.GLEventListener;
import javax.media.opengl.GLProfile;
import javax.media.opengl.awt.GLCanvas;
import javax.media.opengl.glu.GLU;

import javax.swing.JFrame;

import com.jogamp.opengl.util.FPSAnimator;

public class Triangle3d implements GLEventListener {

   private GLU glu = new GLU();
   private float rtri = 0.0f;

   @Override
   public void display(GLAutoDrawable drawable) {
      final GL2 gl = drawable.getGL().getGL2();

      // Clear The Screen And The Depth Buffer
      gl.glClear( GL2.GL_COLOR_BUFFER_BIT | GL2.GL_DEPTH_BUFFER_BIT );
      gl.glLoadIdentity(); // Reset The View
      gl.glTranslatef( -0.5f, 0.0f, -6.0f ); // Move the triangle
      gl.glRotatef( rtri, 0.0f, 1.0f, 0.0f );
      gl.glBegin( GL2.GL_TRIANGLES );

      //drawing triangle in all dimensions
      // Front
      gl.glColor3f( 1.0f, 0.0f, 0.0f ); // Red
      gl.glVertex3f( 1.0f, 2.0f, 0.0f ); // Top Of Triangle (Front)

      gl.glColor3f( 0.0f, 1.0f, 0.0f ); // Green
      gl.glVertex3f( -1.0f, -1.0f, 1.0f ); // Left Of Triangle (Front)

      gl.glColor3f( 0.0f, 0.0f, 1.0f ); // Blue
      gl.glVertex3f( 1.0f, -1.0f, 1.0f ); // Right Of Triangle (Front)

      // Right
      gl.glColor3f( 1.0f, 0.0f, 0.0f ); // Red
      gl.glVertex3f( 1.0f, 2.0f, 0.0f ); // Top Of Triangle (Right)

      gl.glColor3f( 0.0f, 0.0f, 1.0f ); // Blue
      gl.glVertex3f( 1.0f, -1.0f, 1.0f ); // Left Of Triangle (Right)

      gl.glColor3f( 0.0f, 1.0f, 0.0f ); // Green
      gl.glVertex3f( 1.0f, -1.0f, -1.0f ); // Right Of Triangle (Right)

      // Left
      gl.glColor3f( 1.0f, 0.0f, 0.0f ); // Red
      gl.glVertex3f( 1.0f, 2.0f, 0.0f ); // Top Of Triangle (Back)

      gl.glColor3f( 0.0f, 1.0f, 0.0f ); // Green
      gl.glVertex3f( 1.0f, -1.0f, -1.0f ); // Left Of Triangle (Back)

      gl.glColor3f( 0.0f, 0.0f, 1.0f ); // Blue
      gl.glVertex3f( -1.0f, -1.0f, -1.0f ); // Right Of Triangle (Back)

      //left
      gl.glColor3f( 0.0f, 1.0f, 0.0f ); // Red
      gl.glVertex3f( 1.0f, 2.0f, 0.0f ); // Top Of Triangle (Left)

      gl.glColor3f( 0.0f, 0.0f, 1.0f ); // Blue
      gl.glVertex3f( -1.0f, -1.0f, -1.0f ); // Left Of Triangle (Left)

      gl.glColor3f( 0.0f, 1.0f, 0.0f ); // Green
      gl.glVertex3f( -1.0f, -1.0f, 1.0f ); // Right Of Triangle (Left)

      gl.glEnd(); // Done Drawing 3d triangle (Pyramid)
      gl.glFlush();
      rtri += 0.2f;
   }

   @Override
   public void dispose( GLAutoDrawable drawable ) {
      //method body
   }

   @Override
   public void init( GLAutoDrawable drawable ) {
      //method body
   }

   @Override
   public void reshape( GLAutoDrawable drawable, int x, int y, int width, int height ) {

      // TODO Auto-generated method stub
      final GL2 gl = drawable.getGL().getGL2();
      if(height lt;=;)
         height = 1;

      final float h = ( float ) width / ( float ) height;
      gl.glViewport( 0, 0, width, height );
      gl.glMatrixMode( GL2.GL_PROJECTION );
      gl.glLoadIdentity();

      glu.gluPerspective( 45.0f, h, 1.0, 20.0 );
      gl.glMatrixMode( GL2.GL_MODELVIEW );
      gl.glLoadIdentity();
   }

   public static void main( String[] args ) {

      // TODO Auto-generated method stub
      final GLProfile profile = GLProfile.get( GLProfile.GL2 );
      GLCapabilities capabilities = new GLCapabilities( profile );

      // The canvas
      final GLCanvas glcanvas = new GLCanvas( capabilities );
      Triangle3d triangle = new Triangle3d();

      glcanvas.addGLEventListener( triangle );
      glcanvas.setSize( 400, 400 );

      final JFrame frame = new JFrame ( "3d Triangle (shallow)" );

      frame.getContentPane().add( glcanvas );
      frame.setSize( frame.getContentPane().getPreferredSize() );
      frame.setVisible( true );

      final FPSAnimator animator = new FPSAnimator(glcanvas,300,true);
      animator.start();
   }

}
When you compile and execute the above program, the following output is generated. Here, you have the snapshots of rotating 3D triangle. Since this program does not includes depth test, the triangle is generated hollow.
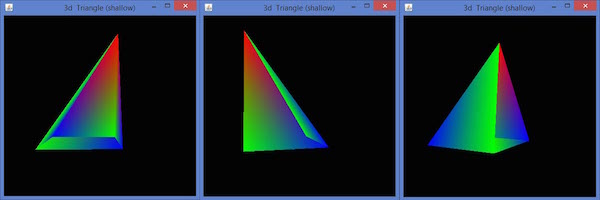
To make the triangle solid, you need to enable depth test by using glEnable(GL_DEPTH_TEST). Enabling the depth buffer gives you a blank screen. This can be cleared by clearing the color using glClear(GL_COLOR_BUFFERBIT | GL_DEPTH_BUFFER_BIT) method. To enable depth test in the init() method or in the glDisplay() method, write the following code −
public void init(GLAutoDrawable drawable) {
   final GL2 gl = drawable.getGL().getGL2();

   gl.glShadeModel(GL2.GL_SMOOTH);
   gl.glClearColor(0f, 0f, 0f, 0f);
   gl.glClearDepth(1.0f);
   gl.glEnable(GL2.GL_DEPTH_TEST);
   gl.glDepthFunc(GL2.GL_LEQUAL);
   gl.glHint(GL2.GL_PERSPECTIVE_CORRECTION_HINT, GL2.GL_NICEST);
 }
Below given is the Program to draw a 3D triangle with depth test.
import javax.media.opengl.GL2;
import javax.media.opengl.GLAutoDrawable;
import javax.media.opengl.GLCapabilities;
import javax.media.opengl.GLEventListener;
import javax.media.opengl.GLProfile;
import javax.media.opengl.awt.GLCanvas;
import javax.media.opengl.glu.GLU;

import javax.swing.JFrame;

import com.jogamp.opengl.util.FPSAnimator;

public class Triangledepthtest implements GLEventListener {

   private GLU glu = new GLU();
   private float rtri = 0.0f;

   @Override
   public void display( GLAutoDrawable drawable ) {

      final GL2 gl = drawable.getGL().getGL2();

      gl.glShadeModel( GL2.GL_SMOOTH );
      gl.glClearColor( 0f, 0f, 0f, 0f );
      gl.glClearDepth( 1.0f );
      gl.glEnable( GL2.GL_DEPTH_TEST );
      gl.glDepthFunc( GL2.GL_LEQUAL );
      gl.glHint(GL2.GL_PERSPECTIVE_CORRECTION_HINT, GL2.GL_NICEST);

      // Clear The Screen And The Depth Buffer
      gl.glClear(GL2.GL_COLOR_BUFFER_BIT | GL2.GL_DEPTH_BUFFER_BIT);
      gl.glLoadIdentity(); // Reset The View
      gl.glTranslatef( -0.5f,0.0f,-6.0f ); // Move the triangle
      gl.glRotatef( rtri, 0.0f, 1.0f, 0.0f );
      gl.glBegin( GL2.GL_TRIANGLES );

      //drawing triangle in all dimensions
      //front
      gl.glColor3f( 1.0f, 0.0f, 0.0f ); // Red
      gl.glVertex3f( 1.0f, 2.0f, 0.0f ); // Top

      gl.glColor3f( 0.0f, 1.0f, 0.0f ); // Green
      gl.glVertex3f( -1.0f, -1.0f, 1.0f ); // Left

      gl.glColor3f( 0.0f, 0.0f, 1.0f ); // Blue
      gl.glVertex3f( 1.0f, -1.0f, 1.0f ); // Right)

      //right
      gl.glColor3f( 1.0f, 0.0f, 0.0f );
      gl.glVertex3f( 1.0f, 2.0f, 0.0f ); // Top

      gl.glColor3f( 0.0f, 0.0f, 1.0f );
      gl.glVertex3f( 1.0f, -1.0f, 1.0f ); // Left

      gl.glColor3f( 0.0f, 1.0f, 0.0f );
      gl.glVertex3f( 1.0f, -1.0f, -1.0f ); // Right

      //left
      gl.glColor3f( 1.0f, 0.0f, 0.0f );
      gl.glVertex3f( 1.0f, 2.0f, 0.0f ); // Top

      gl.glColor3f( 0.0f, 1.0f, 0.0f );
      gl.glVertex3f( 1.0f, -1.0f, -1.0f ); // Left

      gl.glColor3f( 0.0f, 0.0f, 1.0f );
      gl.glVertex3f( -1.0f, -1.0f, -1.0f ); // Right

      //top
      gl.glColor3f( 0.0f, 1.0f, 0.0f );
      gl.glVertex3f( 1.0f, 2.0f, 0.0f ); // Top

      gl.glColor3f( 0.0f, 0.0f, 1.0f );
      gl.glVertex3f( -1.0f, -1.0f, -1.0f ); // Left

      gl.glColor3f( 0.0f, 1.0f, 0.0f );
      gl.glVertex3f( -1.0f, -1.0f, 1.0f ); // Right

      gl.glEnd(); // Done Drawing 3d triangle (Pyramid)

      gl.glFlush();
      rtri += 0.2f;
   }

   @Override
   public void dispose( GLAutoDrawable drawable ) {
   }

   @Override
   public void init( GLAutoDrawable drawable ) {

      final GL2 gl = drawable.getGL().getGL2();

      gl.glShadeModel( GL2.GL_SMOOTH );
      gl.glClearColor( 0f, 0f, 0f, 0f );
      gl.glClearDepth( 1.0f );
      gl.glEnable( GL2.GL_DEPTH_TEST );
      gl.glDepthFunc( GL2.GL_LEQUAL );
      gl.glHint(GL2.GL_PERSPECTIVE_CORRECTION_HINT, GL2.GL_NICEST );
   }

   @Override
   public void reshape(GLAutoDrawable drawable, int x, int y, int width, int height ) {

      // TODO Auto-generated method stub
      final GL2 gl = drawable.getGL().getGL2();
      if( height <= 0 )
         height = 1;

      final float h = ( float ) width / ( float ) height;
      gl.glViewport( 0, 0, width, height );
      gl.glMatrixMode( GL2.GL_PROJECTION );
      gl.glLoadIdentity();

      glu.gluPerspective( 45.0f, h, 1.0, 20.0 );
      gl.glMatrixMode( GL2.GL_MODELVIEW );
      gl.glLoadIdentity();
   }

   public static void main( String[] args ) {

      // TODO Auto-generated method stub
      final GLProfile profile = GLProfile.get( GLProfile.GL2 );
      GLCapabilities capabilities = new GLCapabilities( profile );

      // The canvas
      final GLCanvas glcanvas = new GLCanvas( capabilities );
      Triangledepthtest triangledepthtest = new Triangledepthtest();

      glcanvas.addGLEventListener( triangledepthtest );
      glcanvas.setSize( 400, 400 );

      final JFrame frame = new JFrame ( "3d Triangle (solid)" );
      frame.getContentPane().add(glcanvas);
      frame.setSize( frame.getContentPane().getPreferredSize() );
      frame.setVisible( true );
      final FPSAnimator animator = new FPSAnimator( glcanvas, 300,true);

      animator.start();
   }

}
When you compile and execute the above program, the following output is generated.
Here, you can see the snapshots of a rotating 3D triangle. Since this program includes code for depth test, the triangle is generated solid.
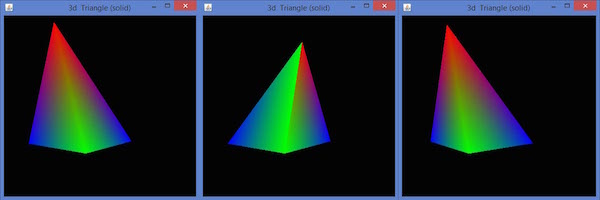
JOGL - 3D Cube
In the previous chapters we have seen how to draw 3d triangle and rotate it. Now in this chapter you can learn how to a 3d cube, how to rotate it, how to attach an image on it. In the same way, This chapter provides examples to draw a 3D cube and apply colours to it and attach image to it.
Below given is the program to draw a 3d cube and apply colours to it.
import java.awt.DisplayMode;
import javax.media.opengl.GL2;
import javax.media.opengl.GLAutoDrawable;
import javax.media.opengl.GLCapabilities;
import javax.media.opengl.GLEventListener;
import javax.media.opengl.GLProfile;
import javax.media.opengl.awt.GLCanvas;
import javax.media.opengl.glu.GLU;

import javax.swing.JFrame;

import com.jogamp.opengl.util.FPSAnimator;

public class Cube implements GLEventListener {

   public static DisplayMode dm, dm_old;
   private GLU glu = new GLU();
   private float rquad = 0.0f;

   @Override
   public void display( GLAutoDrawable drawable ) {

      final GL2 gl = drawable.getGL().getGL2();
      gl.glClear(GL2.GL_COLOR_BUFFER_BIT | GL2.GL_DEPTH_BUFFER_BIT );
      gl.glLoadIdentity();
      gl.glTranslatef( 0f, 0f, -5.0f );

      // Rotate The Cube On X, Y & Z
      gl.glRotatef(rquad, 1.0f, 1.0f, 1.0f);

      //giving different colors to different sides
      gl.glBegin(GL2.GL_QUADS); // Start Drawing The Cube
      gl.glColor3f(1f,0f,0f); //red color
      gl.glVertex3f(1.0f, 1.0f, -1.0f); // Top Right Of The Quad (Top)
      gl.glVertex3f( -1.0f, 1.0f, -1.0f); // Top Left Of The Quad (Top)
      gl.glVertex3f( -1.0f, 1.0f, 1.0f ); // Bottom Left Of The Quad (Top)
      gl.glVertex3f( 1.0f, 1.0f, 1.0f ); // Bottom Right Of The Quad (Top)

      gl.glColor3f( 0f,1f,0f ); //green color
      gl.glVertex3f( 1.0f, -1.0f, 1.0f ); // Top Right Of The Quad
      gl.glVertex3f( -1.0f, -1.0f, 1.0f ); // Top Left Of The Quad
      gl.glVertex3f( -1.0f, -1.0f, -1.0f ); // Bottom Left Of The Quad
      gl.glVertex3f( 1.0f, -1.0f, -1.0f ); // Bottom Right Of The Quad

      gl.glColor3f( 0f,0f,1f ); //blue color
      gl.glVertex3f( 1.0f, 1.0f, 1.0f ); // Top Right Of The Quad (Front)
      gl.glVertex3f( -1.0f, 1.0f, 1.0f ); // Top Left Of The Quad (Front)
      gl.glVertex3f( -1.0f, -1.0f, 1.0f ); // Bottom Left Of The Quad
      gl.glVertex3f( 1.0f, -1.0f, 1.0f ); // Bottom Right Of The Quad

      gl.glColor3f( 1f,1f,0f ); //yellow (red + green)
      gl.glVertex3f( 1.0f, -1.0f, -1.0f ); // Bottom Left Of The Quad
      gl.glVertex3f( -1.0f, -1.0f, -1.0f ); // Bottom Right Of The Quad
      gl.glVertex3f( -1.0f, 1.0f, -1.0f ); // Top Right Of The Quad (Back)
      gl.glVertex3f( 1.0f, 1.0f, -1.0f ); // Top Left Of The Quad (Back)

      gl.glColor3f( 1f,0f,1f ); //purple (red + green)
      gl.glVertex3f( -1.0f, 1.0f, 1.0f ); // Top Right Of The Quad (Left)
      gl.glVertex3f( -1.0f, 1.0f, -1.0f ); // Top Left Of The Quad (Left)
      gl.glVertex3f( -1.0f, -1.0f, -1.0f ); // Bottom Left Of The Quad
      gl.glVertex3f( -1.0f, -1.0f, 1.0f ); // Bottom Right Of The Quad

      gl.glColor3f( 0f,1f, 1f ); //sky blue (blue +green)
      gl.glVertex3f( 1.0f, 1.0f, -1.0f ); // Top Right Of The Quad (Right)
      gl.glVertex3f( 1.0f, 1.0f, 1.0f ); // Top Left Of The Quad
      gl.glVertex3f( 1.0f, -1.0f, 1.0f ); // Bottom Left Of The Quad
      gl.glVertex3f( 1.0f, -1.0f, -1.0f ); // Bottom Right Of The Quad
      gl.glEnd(); // Done Drawing The Quad
      gl.glFlush();
      rquad -= 0.15f;
   }

   @Override
   public void dispose( GLAutoDrawable drawable ) {
      // TODO Auto-generated method stub
   }

   @Override
   public void init( GLAutoDrawable drawable ) {

      final GL2 gl = drawable.getGL().getGL2();
      gl.glShadeModel( GL2.GL_SMOOTH );
      gl.glClearColor( 0f, 0f, 0f, 0f );
      gl.glClearDepth( 1.0f );
      gl.glEnable( GL2.GL_DEPTH_TEST );
      gl.glDepthFunc( GL2.GL_LEQUAL );
      gl.glHint( GL2.GL_PERSPECTIVE_CORRECTION_HINT, GL2.GL_NICEST );
   }

   @Override
   public void reshape( GLAutoDrawable drawable, int x, int y, int width, int height ) {

      // TODO Auto-generated method stub
      final GL2 gl = drawable.getGL().getGL2();
      if( height lt;= 0 )
         height = 1;

      final float h = ( float ) width / ( float ) height;
      gl.glViewport( 0, 0, width, height );
      gl.glMatrixMode( GL2.GL_PROJECTION );
      gl.glLoadIdentity();

      glu.gluPerspective( 45.0f, h, 1.0, 20.0 );
      gl.glMatrixMode( GL2.GL_MODELVIEW );
      gl.glLoadIdentity();
   }

   public static void main( String[] args ) {

      final GLProfile profile = GLProfile.get( GLProfile.GL2 );
      GLCapabilities capabilities = new GLCapabilities( profile );

      // The canvas
      final GLCanvas glcanvas = new GLCanvas( capabilities );
      Cube cube = new Cube();

      glcanvas.addGLEventListener( cube );
      glcanvas.setSize( 400, 400 );

      final JFrame frame = new JFrame ( " Multicolored cube" );
      frame.getContentPane().add( glcanvas );
      frame.setSize( frame.getContentPane().getPreferredSize() );
      frame.setVisible( true );
      final FPSAnimator animator = new FPSAnimator(glcanvas, 300,true);

      animator.start();
   }

}
When you compile and execute the above program, the following output is generated. It shows a colored 3D cube.
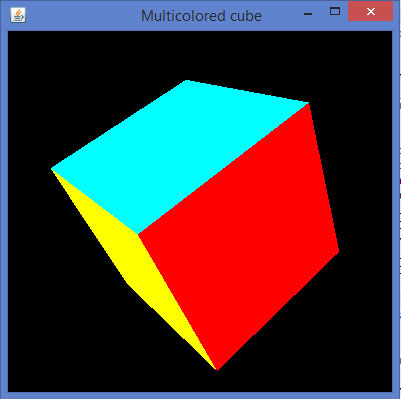
Applying Texture to the Cube
The following steps are given to apply texture to a cube −
You can bind required texture to the cube using the gl.glBindTexture(GL2.GL_TEXTURE_2D.texture) method of the Drawable interface.
This method requires texture (int) argument along with GL2.GL_TEXTURE_2D(int).
Before you execute Display(), you need to create texture variable
In the init() method or in the starting lines of glDisplay() method, enable the texture using gl.glEnable(GL2.GL_TEXTURE_2D) method.
Create the texture object, which needs a file object as a parameter, which in turn needs the path of the image used as the texture to the object.
File file = new File(c:\\pictures\\boy.jpg);
Texture t = textureIO.newTexture(file, true);
texture = t.getTextureObject(gl);
- Handle the file not found exception
Below given is the program to attach image on a cube.
import java.awt.DisplayMode;

import java.io.File;
import java.io.IOException;

import javax.media.opengl.GL2;
import javax.media.opengl.GLAutoDrawable;
import javax.media.opengl.GLCapabilities;
import javax.media.opengl.GLEventListener;
import javax.media.opengl.GLProfile;
import javax.media.opengl.awt.GLCanvas;
import javax.media.opengl.glu.GLU;

import javax.swing.JFrame;

import com.jogamp.opengl.util.FPSAnimator;
import com.jogamp.opengl.util.texture.Texture;
import com.jogamp.opengl.util.texture.TextureIO;

public class CubeTexture implements GLEventListener {

   public static DisplayMode dm, dm_old;
   private GLU glu = new GLU();
   private float xrot,yrot,zrot;
   private int texture;

   @Override
   public void display(GLAutoDrawable drawable) {

      // TODO Auto-generated method stub
      final GL2 gl = drawable.getGL().getGL2();
      gl.glClear(GL2.GL_COLOR_BUFFER_BIT | GL2.GL_DEPTH_BUFFER_BIT);
      gl.glLoadIdentity(); // Reset The View
      gl.glTranslatef(0f, 0f, -5.0f);

      gl.glRotatef(xrot, 1.0f, 1.0f, 1.0f);
      gl.glRotatef(yrot, 0.0f, 1.0f, 0.0f);
      gl.glRotatef(zrot, 0.0f, 0.0f, 1.0f);

      gl.glBindTexture(GL2.GL_TEXTURE_2D, texture);
      gl.glBegin(GL2.GL_QUADS);

      // Front Face
      gl.glTexCoord2f(0.0f, 0.0f); gl.glVertex3f(-1.0f, -1.0f, 1.0f);
      gl.glTexCoord2f(1.0f, 0.0f); gl.glVertex3f( 1.0f, -1.0f, 1.0f);
      gl.glTexCoord2f(1.0f, 1.0f); gl.glVertex3f( 1.0f, 1.0f, 1.0f);
      gl.glTexCoord2f(0.0f, 1.0f); gl.glVertex3f(-1.0f, 1.0f, 1.0f);

      // Back Face
      gl.glTexCoord2f(1.0f, 0.0f); gl.glVertex3f(-1.0f, -1.0f, -1.0f);
      gl.glTexCoord2f(1.0f, 1.0f); gl.glVertex3f(-1.0f, 1.0f, -1.0f);
      gl.glTexCoord2f(0.0f, 1.0f); gl.glVertex3f( 1.0f, 1.0f, -1.0f);
      gl.glTexCoord2f(0.0f, 0.0f); gl.glVertex3f( 1.0f, -1.0f, -1.0f);

      // Top Face
      gl.glTexCoord2f(0.0f, 1.0f); gl.glVertex3f(-1.0f, 1.0f, -1.0f);
      gl.glTexCoord2f(0.0f, 0.0f); gl.glVertex3f(-1.0f, 1.0f, 1.0f);
      gl.glTexCoord2f(1.0f, 0.0f); gl.glVertex3f( 1.0f, 1.0f, 1.0f);
      gl.glTexCoord2f(1.0f, 1.0f); gl.glVertex3f( 1.0f, 1.0f, -1.0f);

      // Bottom Face
      gl.glTexCoord2f(1.0f, 1.0f); gl.glVertex3f(-1.0f, -1.0f, -1.0f);
      gl.glTexCoord2f(0.0f, 1.0f); gl.glVertex3f( 1.0f, -1.0f, -1.0f);
      gl.glTexCoord2f(0.0f, 0.0f); gl.glVertex3f( 1.0f, -1.0f, 1.0f);
      gl.glTexCoord2f(1.0f, 0.0f); gl.glVertex3f(-1.0f, -1.0f, 1.0f);

      // Right face
      gl.glTexCoord2f(1.0f, 0.0f); gl.glVertex3f( 1.0f, -1.0f, -1.0f);
      gl.glTexCoord2f(1.0f, 1.0f); gl.glVertex3f( 1.0f, 1.0f, -1.0f);
      gl.glTexCoord2f(0.0f, 1.0f); gl.glVertex3f( 1.0f, 1.0f, 1.0f);
      gl.glTexCoord2f(0.0f, 0.0f); gl.glVertex3f( 1.0f, -1.0f, 1.0f);

      // Left Face
      gl.glTexCoord2f(0.0f, 0.0f); gl.glVertex3f(-1.0f, -1.0f, -1.0f);
      gl.glTexCoord2f(1.0f, 0.0f); gl.glVertex3f(-1.0f, -1.0f, 1.0f);
      gl.glTexCoord2f(1.0f, 1.0f); gl.glVertex3f(-1.0f, 1.0f, 1.0f);
      gl.glTexCoord2f(0.0f, 1.0f); gl.glVertex3f(-1.0f, 1.0f, -1.0f);
      gl.glEnd();
      gl.glFlush();

      //change the speeds here
      xrot += .1f;
      yrot += .1f;
      zrot += .1f;
   }

   @Override
   public void dispose(GLAutoDrawable drawable) {
      // method body
   }

   @Override
   public void init(GLAutoDrawable drawable) {

      final GL2 gl = drawable.getGL().getGL2();

      gl.glShadeModel(GL2.GL_SMOOTH);
      gl.glClearColor(0f, 0f, 0f, 0f);
      gl.glClearDepth(1.0f);
      gl.glEnable(GL2.GL_DEPTH_TEST);
      gl.glDepthFunc(GL2.GL_LEQUAL);
      gl.glHint(GL2.GL_PERSPECTIVE_CORRECTION_HINT, GL2.GL_NICEST);

      //
      gl.glEnable(GL2.GL_TEXTURE_2D);
      try{

         File im = new File("E:\\office\\boy.jpg ");
         Texture t = TextureIO.newTexture(im, true);
         texture= t.getTextureObject(gl);

      }catch(IOException e){
         e.printStackTrace();
      }
   }

   @Override
   public void reshape(GLAutoDrawable drawable, int x, int y, int width, int height) {

      // TODO Auto-generated method stub
      final GL2 gl = drawable.getGL().getGL2();
      if(height lt;= 0)
         height = 1;

      final float h = (float) width / (float) height;
      gl.glViewport(0, 0, width, height);
      gl.glMatrixMode(GL2.GL_PROJECTION);
      gl.glLoadIdentity();

      glu.gluPerspective(45.0f, h, 1.0, 20.0);
      gl.glMatrixMode(GL2.GL_MODELVIEW);
      gl.glLoadIdentity();
   }

   public static void main(String[] args) {

      // TODO Auto-generated method stub
      final GLProfile profile = GLProfile.get(GLProfile.GL2);
      GLCapabilities capabilities = new GLCapabilities(profile);

      // The canvas
      final GLCanvas glcanvas = new GLCanvas(capabilities);
      CubeTexture r = new CubeTexture();

      glcanvas.addGLEventListener(r);
      glcanvas.setSize(400, 400);

      final JFrame frame = new JFrame (" Textured Cube");
      frame.getContentPane().add(glcanvas);
      frame.setSize(frame.getContentPane().getPreferredSize());
      frame.setVisible(true);
      final FPSAnimator animator = new FPSAnimator(glcanvas, 300, true);

      animator.start();
   }

}
When you compile and execute the above program, the following output is generated. You can see a 3D cube with desired texture applied on it.
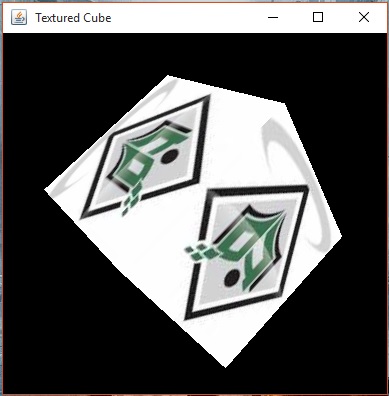
JOGL - Appendix
GPU − Graphical processing unit, it is a special electronic device that accelerates the rendering of images.
JNI − Java Native Interface. Using which, java access native methods.
Model − They are the objects constructed from basic graphics primitives such as points, lines and polygons.
Pixel − Smallest unit of display seen on the screen.
Projection − The method of mapping the coordinates of an object to a two-dimensional plane is called projection.
Projection matrix − It is a linear transformation of an object on the 2D surface.
Rendering − A process by which computer creates images from models.
Viewport − A viewport is a viewing region on the screen in computer graphics.
