- Concurrency - Home
- Concurrency - Overview
- Concurrency - Environment Setup
- Concurrency - Major Operations
- Interthread Communication
- Concurrency - Synchronization
- Concurrency - Deadlock
- Utility Class Examples
- Concurrency - ThreadLocal
- Concurrency - ThreadLocalRandom
- Lock Examples
- Concurrency - Lock
- Concurrency - ReadWriteLock
- Concurrency - Condition
- Atomic Variable Examples
- Concurrency - AtomicInteger
- Concurrency - AtomicLong
- Concurrency - AtomicBoolean
- Concurrency - AtomicReference
- Concurrency - AtomicIntegerArray
- Concurrency - AtomicLongArray
- Concurrency - AtomicReferenceArray
- Executor Examples
- Concurrency - Executor
- Concurrency - ExecutorService
- ScheduledExecutorService
- Thread Pool Examples
- Concurrency - newFixedThreadPool
- Concurrency - newCachedThreadPool
- newScheduledThreadPool
- newSingleThreadExecutor
- Concurrency - ThreadPoolExecutor
- ScheduledThreadPoolExecutor
- Advanced Examples
- Concurrency - Futures and Callables
- Concurrency - Fork-Join framework
- Concurrent Collections
- Concurrency - BlockingQueue
- Concurrency - ConcurrentMap
- ConcurrentNavigableMap
- Concurrency Useful Resources
- Concurrency - Quick Guide
- Concurrency - Useful Resources
- Concurrency - Discussion
Java Concurrency - Overview
Java is a multi-threaded programming language which means we can develop multi-threaded program using Java. A multi-threaded program contains two or more parts that can run concurrently and each part can handle a different task at the same time making optimal use of the available resources specially when your computer has multiple CPUs.
By definition, multitasking is when multiple processes share common processing resources such as a CPU. Multi-threading extends the idea of multitasking into applications where you can subdivide specific operations within a single application into individual threads. Each of the threads can run in parallel. The OS divides processing time not only among different applications, but also among each thread within an application.
Multi-threading enables you to write in a way where multiple activities can proceed concurrently in the same program.
Life Cycle of a Thread
A thread goes through various stages in its life cycle. For example, a thread is born, started, runs, and then dies. The following diagram shows the complete life cycle of a thread.
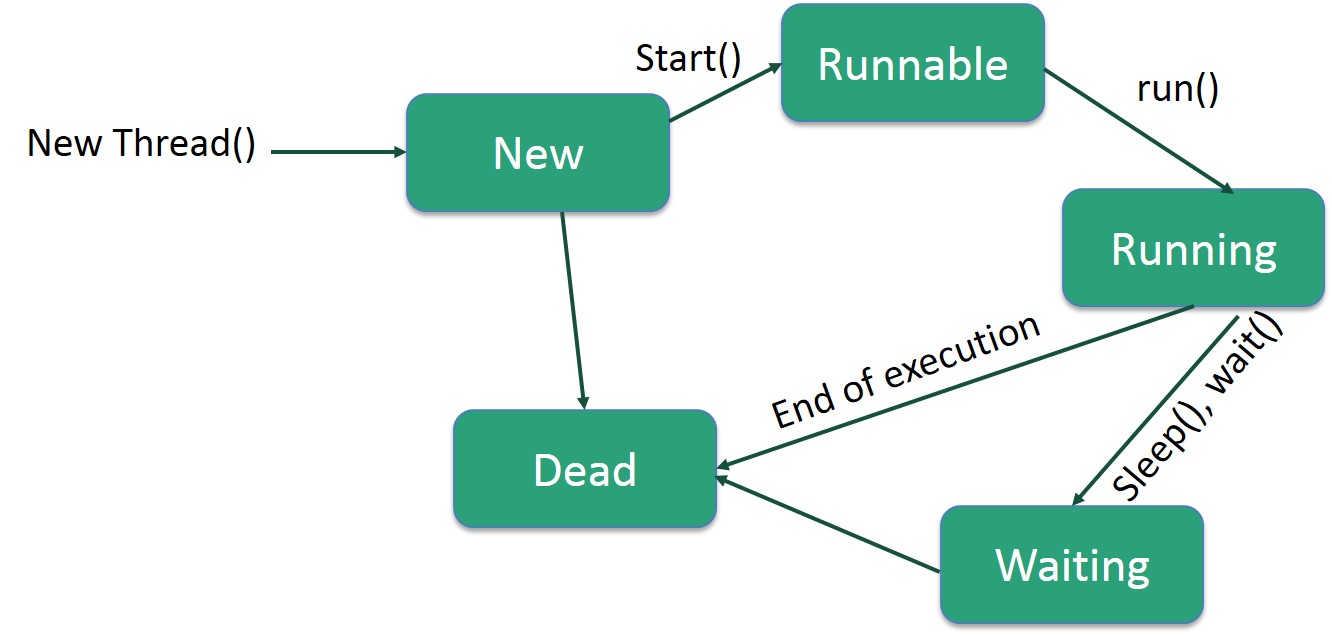
Following are the stages of the life cycle −
New − A new thread begins its life cycle in the new state. It remains in this state until the program starts the thread. It is also referred to as a born thread.
Runnable − After a newly born thread is started, the thread becomes runnable. A thread in this state is considered to be executing its task.
Waiting − Sometimes, a thread transitions to the waiting state while the thread waits for another thread to perform a task. A thread transitions back to the runnable state only when another thread signals the waiting thread to continue executing.
Timed Waiting − A runnable thread can enter the timed waiting state for a specified interval of time. A thread in this state transitions back to the runnable state when that time interval expires or when the event it is waiting for occurs.
Terminated (Dead) − A runnable thread enters the terminated state when it completes its task or otherwise terminates.
Thread Priorities
Every Java thread has a priority that helps the operating system determine the order in which threads are scheduled.
Java thread priorities are in the range between MIN_PRIORITY (a constant of 1) and MAX_PRIORITY (a constant of 10). By default, every thread is given priority NORM_PRIORITY (a constant of 5).
Threads with higher priority are more important to a program and should be allocated processor time before lower-priority threads. However, thread priorities cannot guarantee the order in which threads execute and are very much platform dependent.
Create a Thread by Implementing a Runnable Interface
If your class is intended to be executed as a thread then you can achieve this by implementing a Runnable interface. You will need to follow three basic steps −
Step 1
As a first step, you need to implement a run() method provided by a Runnable interface. This method provides an entry point for the thread and you will put your complete business logic inside this method. Following is a simple syntax of the run() method −
public void run( )
Step 2
As a second step, you will instantiate a Thread object using the following constructor −
Thread(Runnable threadObj, String threadName);
Where, threadObj is an instance of a class that implements the Runnable interface and threadName is the name given to the new thread.
Step 3
Once a Thread object is created, you can start it by calling start() method, which executes a call to run( ) method. Following is a simple syntax of start() method −
void start();
Example
Here is an example that creates a new thread and starts running it −
class RunnableDemo implements Runnable {
   private Thread t;
   private String threadName;

   RunnableDemo(String name) {
      threadName = name;
      System.out.println("Creating " +  threadName );
   }

   public void run() {
      System.out.println("Running " +  threadName );

      try {

         for(int i = 4; i > 0; i--) {
            System.out.println("Thread: " + threadName + ", " + i);

            // Let the thread sleep for a while.
            Thread.sleep(50);
         }
      } catch (InterruptedException e) {
         System.out.println("Thread " +  threadName + " interrupted.");
      }
      System.out.println("Thread " +  threadName + " exiting.");
   }

   public void start () {
      System.out.println("Starting " +  threadName );

      if (t == null) {
         t = new Thread (this, threadName);
         t.start ();
      }
   }
}

public class TestThread {

   public static void main(String args[]) {
      RunnableDemo R1 = new RunnableDemo("Thread-1");
      R1.start();

      RunnableDemo R2 = new RunnableDemo("Thread-2");
      R2.start();
   }
}
This will produce the following result −
Output
Creating Thread-1
Starting Thread-1
Creating Thread-2
Starting Thread-2
Running Thread-1
Thread: Thread-1, 4
Running Thread-2
Thread: Thread-2, 4
Thread: Thread-1, 3
Thread: Thread-2, 3
Thread: Thread-1, 2
Thread: Thread-2, 2
Thread: Thread-1, 1
Thread: Thread-2, 1
Thread Thread-1 exiting.
Thread Thread-2 exiting.
Create a Thread by Extending a Thread Class
The second way to create a thread is to create a new class that extends Thread class using the following two simple steps. This approach provides more flexibility in handling multiple threads created using available methods in Thread class.
Step 1
You will need to override run( ) method available in Thread class. This method provides an entry point for the thread and you will put your complete business logic inside this method. Following is a simple syntax of run() method −
public void run( )
Step 2
Once Thread object is created, you can start it by calling start() method, which executes a call to run( ) method. Following is a simple syntax of start() method −
void start( );
Example
Here is the preceding program rewritten to extend the Thread −
class ThreadDemo extends Thread {
   private Thread t;
   private String threadName;

   ThreadDemo(String name) {
      threadName = name;
      System.out.println("Creating " +  threadName );
   }

   public void run() {
      System.out.println("Running " +  threadName );

      try {

         for(int i = 4; i > 0; i--) {
            System.out.println("Thread: " + threadName + ", " + i);

            // Let the thread sleep for a while.
            Thread.sleep(50);
         }
      } catch (InterruptedException e) {
         System.out.println("Thread " +  threadName + " interrupted.");
      }
      System.out.println("Thread " +  threadName + " exiting.");
   }

   public void start () {
      System.out.println("Starting " +  threadName );

      if (t == null) {
         t = new Thread (this, threadName);
         t.start ();
      }
   }
}

public class TestThread {

   public static void main(String args[]) {
      ThreadDemo T1 = new ThreadDemo("Thread-1");
      T1.start();

      ThreadDemo T2 = new ThreadDemo("Thread-2");
      T2.start();
   }
}
This will produce the following result −
Output
Creating Thread-1
Starting Thread-1
Creating Thread-2
Starting Thread-2
Running Thread-1
Thread: Thread-1, 4
Running Thread-2
Thread: Thread-2, 4
Thread: Thread-1, 3
Thread: Thread-2, 3
Thread: Thread-1, 2
Thread: Thread-2, 2
Thread: Thread-1, 1
Thread: Thread-2, 1
Thread Thread-1 exiting.
Thread Thread-2 exiting.
