- Java - Home
- Java - Overview
- Java - History
- Java - Features
- Java Vs. C++
- JVM - Java Virtual Machine
- Java - JDK vs JRE vs JVM
- Java - Environment Setup
- Java - Hello World Program
- Java - Comments
- Java - Basic Syntax
- Java - Variables
- Java - Data Types
- Java - Type Casting
- Java - Unicode System
- Java - User Input
- Java - Date & Time
- Java Operators
- Java - Operators
- Java - Arithmetic Operators
- Java - Assignment Operators
- Java - Relational Operators
- Java - Logical Operators
- Java - Bitwise Operators
- Java Operator Precedence & Associativity
- Java - Unary Operators
- Java Control Statements
- Java - Decision Making
- Java - If Else Statement
- Java - Switch Statement
- Java - Loop Control
- Java - For Loop
- Java - For-Each Loop
- Java - While Loop
- Java - Do While Loop
- Java - Break Statement
- Java - Continue Statement
- Object Oriented Programming
- Java - OOPs Concepts
- Java - Object & Classes
- Java - Class Attributes
- Java - Class Methods
- Java - Methods
- Java - Variables Scope
- Java - Constructors
- Java - Access Modifiers
- Java - Inheritance
- Java - Aggregation
- Java - Polymorphism
- Java - Overriding
- Java - Method Overloading
- Java - Dynamic Binding
- Java - Static Binding
- Java - Instance Initializer Block
- Java - Abstraction
- Java - Encapsulation
- Java - Interfaces
- Java - Packages
- Java - Inner Classes
- Java - Static Class
- Java - Anonymous Class
- Java - Singleton Class
- Java - Wrapper Classes
- Java - Enums
- Java - Enum Constructor
- Java - Enum Strings
- Java Built-in Classes
- Java - Number
- Java - Boolean
- Java - Characters
- Java - Arrays
- Java - Multi-Dimensional Arrays
- Java - Final Arrays
- Java - Math Class
- Java File Handling
- Java - Files
- Java - Create a File
- Java - Write to File
- Java - Read Files
- Java - Delete Files
- Java - Directories
- Java - I/O Streams
- Java Error & Exceptions
- Java - Exceptions
- Java - try-catch Block
- Java - try-with-resources
- Java - Multi-catch Block
- Java - Nested try Block
- Java - Finally Block
- Java - throw Exception
- Java - Exception Propagation
- Java - Built-in Exceptions
- Java - Custom Exception
- Java - Chained Exception
- Java Multithreading
- Java - Multithreading
- Java - Thread Life Cycle
- Java - Creating a Thread
- Java - Starting a Thread
- Java - Joining Threads
- Java - Naming Thread
- Java - Thread Scheduler
- Java - Thread Pools
- Java - Main Thread
- Java - Thread Priority
- Java - Daemon Threads
- Java - Thread Group
- Java - Shutdown Hook
- Java Synchronization
- Java - Synchronization
- Java - Block Synchronization
- Java - Static Synchronization
- Java - Inter-thread Communication
- Java - Thread Deadlock
- Java - Interrupting a Thread
- Java - Thread Control
- Java - Reentrant Monitor
- Java Networking
- Java - Networking
- Java - Socket Programming
- Java - URL Processing
- Java - URL Class
- Java - URLConnection Class
- Java - HttpURLConnection Class
- Java - Socket Class
- Java - Generics
- Java Collections
- Java - Collections
- Java - Collection Interface
- Java Interfaces
- Java - List Interface
- Java - Queue Interface
- Java - Map Interface
- Java - SortedMap Interface
- Java - Set Interface
- Java - SortedSet Interface
- Java Data Structures
- Java - Data Structures
- Java - Enumeration
- Java Collections Algorithms
- Java - Iterators
- Java - Comparators
- Java - Comparable Interface in Java
- Advanced Java
- Java - Command-Line Arguments
- Java - Lambda Expressions
- Java - Sending Email
- Java - Applet Basics
- Java - Javadoc Comments
- Java - Autoboxing and Unboxing
- Java - File Mismatch Method
- Java - REPL (JShell)
- Java - Multi-Release Jar Files
- Java - Private Interface Methods
- Java - Inner Class Diamond Operator
- Java - Multiresolution Image API
- Java - Collection Factory Methods
- Java - Module System
- Java - Nashorn JavaScript
- Java - Optional Class
- Java - Method References
- Java - Functional Interfaces
- Java - Default Methods
- Java - Base64 Encode Decode
- Java - Switch Expressions
- Java - Teeing Collectors
- Java - Microbenchmark
- Java - Text Blocks
- Java - Dynamic CDS archive
- Java - Z Garbage Collector (ZGC)
- Java - Null Pointer Exception
- Java - Packaging Tools
- Java - Sealed Classes
- Java - Record Classes
- Java - Hidden Classes
- Java - Pattern Matching
- Java - Compact Number Formatting
- Java - Garbage Collection
- Java - JIT Compiler
- Java Miscellaneous
- Java - Recursion
- Java - Regular Expressions
- Java - Serialization
- Java - Strings
- Java - Process API Improvements
- Java - Stream API Improvements
- Java - Enhanced @Deprecated Annotation
- Java - CompletableFuture API Improvements
- Java - Marker Interface
- Java - Streams
- Java - Datetime Api
- Java 8 - New Features
- Java 9 - New Features
- Java 10 - New Features
- Java 11 - New Features
- Java 12 - New Features
- Java 13 - New Features
- Java 14 - New Features
- Java 15 - New Features
- Java 16 - New Features
- Java APIs & Frameworks
- JDBC Tutorial
- SWING Tutorial
- AWT Tutorial
- Servlets Tutorial
- JSP Tutorial
- Java Class References
- Java - Scanner
- Java - Arrays
- Java - Strings
- Java - Date
- Java - ArrayList
- Java - Vector
- Java - Stack
- Java - PriorityQueue
- Java - LinkedList
- Java - ArrayDeque
- Java - HashMap
- Java - LinkedHashMap
- Java - WeakHashMap
- Java - EnumMap
- Java - TreeMap
- Java - IdentityHashMap
- Java - HashSet
- Java - EnumSet
- Java - LinkedHashSet
- Java - TreeSet
- Java - BitSet
- Java - Dictionary
- Java - Hashtable
- Java - Properties
- Java - Collection
- Java - Array
- Java Useful Resources
- Java - Cheatsheet
- Java - Questions and Answers
- Java 8 - Questions and Answers
- Java - Quick Guide
- Java - Useful Resources
- Java - Discussion
- Java - Online Compiler
- Java - Examples
Java - Quick Guide
Java - Overview
Java programming language was originally developed by Sun Microsystems which was initiated by James Gosling and released in 1995 as core component of Sun Microsystems' Java platform (Java 1.0 [J2SE]).
The latest release of the Java Standard Edition is Java SE 8. With the advancement of Java and its widespread popularity, multiple configurations were built to suit various types of platforms. For example: J2EE for Enterprise Applications, J2ME for Mobile Applications.
The new J2 versions were renamed as Java SE, Java EE, and Java ME respectively. Java is guaranteed to be Write Once, Run Anywhere.
Java is −
Object Oriented − In Java, everything is an Object. Java can be easily extended since it is based on the Object model.
Platform Independent − Unlike many other programming languages including C and C++, when Java is compiled, it is not compiled into platform specific machine, rather into platform independent byte code. This byte code is distributed over the web and interpreted by the Virtual Machine (JVM) on whichever platform it is being run on.
Simple − Java is designed to be easy to learn. If you understand the basic concept of OOP Java, it would be easy to master.
Secure − With Java's secure feature it enables to develop virus-free, tamper-free systems. Authentication techniques are based on public-key encryption.
Architecture-neutral − Java compiler generates an architecture-neutral object file format, which makes the compiled code executable on many processors, with the presence of Java runtime system.
Portable − Being architecture-neutral and having no implementation dependent aspects of the specification makes Java portable. Compiler in Java is written in ANSI C with a clean portability boundary, which is a POSIX subset.
Robust − Java makes an effort to eliminate error prone situations by emphasizing mainly on compile time error checking and runtime checking.
Multithreaded − With Java's multithreaded feature it is possible to write programs that can perform many tasks simultaneously. This design feature allows the developers to construct interactive applications that can run smoothly.
Interpreted − Java byte code is translated on the fly to native machine instructions and is not stored anywhere. The development process is more rapid and analytical since the linking is an incremental and light-weight process.
High Performance − With the use of Just-In-Time compilers, Java enables high performance.
Distributed − Java is designed for the distributed environment of the internet.
Dynamic − Java is considered to be more dynamic than C or C++ since it is designed to adapt to an evolving environment. Java programs can carry extensive amount of run-time information that can be used to verify and resolve accesses to objects on run-time.
Hello World using Java Programming.
Just to give you a little excitement about Java programming, I'm going to give you a small conventional C Programming Hello World program, You can try it using Demo link.
public class MyFirstJavaProgram {

   /* This is my first java program.
    * This will print 'Hello World' as the output
    */

   public static void main(String []args) {
      System.out.println("Hello World"); // prints Hello World
   }
}
History of Java
James Gosling initiated Java language project in June 1991 for use in one of his many set-top box projects. The language, initially called 'Oak' after an oak tree that stood outside Gosling's office, also went by the name 'Green' and ended up later being renamed as Java, from a list of random words.
Sun released the first public implementation as Java 1.0 in 1995. It promised Write Once, Run Anywhere (WORA), providing no-cost run-times on popular platforms.
On 13 November, 2006, Sun released much of Java as free and open source software under the terms of the GNU General Public License (GPL).
On 8 May, 2007, Sun finished the process, making all of Java's core code free and open-source, aside from a small portion of code to which Sun did not hold the copyright.
Tools You Will Need
For performing the examples discussed in this tutorial, you will need a Pentium 200-MHz computer with a minimum of 64 MB of RAM (128 MB of RAM recommended).
You will also need the following softwares −
- Linux 7.1 or Windows xp/7/8 operating system
- Java JDK 8
- Microsoft Notepad or any other text editor
This tutorial will provide the necessary skills to create GUI, networking, and web applications using Java.
What is Next?
The next chapter will guide you to how you can obtain Java and its documentation. Finally, it instructs you on how to install Java and prepare an environment to develop Java applications.
Java - Environment Setup
Live Demo Option Online
We have set up the Java Programming environment online, so that you can compile and execute all the available examples online. It gives you confidence in what you are reading and enables you to verify the programs with different options. Feel free to modify any example and execute it online.
Try the following example using Live Demo option available at the top right corner of the below sample code box −
public class MyFirstJavaProgram {
   public static void main(String []args) {
      System.out.println("Hello World");
   }
}
For most of the examples given in this tutorial, you will find a Try it option in our website code sections at the top right corner that will take you to the online compiler. So just make use of it and enjoy your learning.
Local Environment Setup
If you want to set up your own environment for Java programming language, then this section guides you through the whole process. Please follow the steps given below to set up your Java environment.
Java SE is available for download for free. To download click here, please download a version compatible with your operating system.
Follow the instructions to download Java, and run the .exe to install Java on your machine. Once you have installed Java on your machine, you would need to set environment variables to point to correct installation directories.
Setting Up the Path for Windows 2000/XP
Assuming you have installed Java in c:\Program Files\java\jdk directory −
Right-click on 'My Computer' and select 'Properties'.
Click on the 'Environment variables' button under the 'Advanced' tab.
Now, edit the 'Path' variable and add the path to the Java executable directory at the end of it. For example, if the path is currently set to C:\Windows\System32, then edit it the following way
C:\Windows\System32;c:\Program Files\java\jdk\bin.
Setting Up the Path for Windows 95/98/ME
Assuming you have installed Java in c:\Program Files\java\jdk directory −
Edit the 'C:\autoexec.bat' file and add the following line at the end −
SET PATH=%PATH%;C:\Program Files\java\jdk\bin
Setting Up the Path for Linux, UNIX, Solaris, FreeBSD
Environment variable PATH should be set to point to where the Java binaries have been installed. Refer to your shell documentation if you have trouble doing this.
For example, if you use bash as your shell, then you would add the following line at the end of your .bashrc −
export PATH=/path/to/java:$PATH'
Popular Java Editors
To write Java programs, you need a text editor. There are even more sophisticated IDEs available in the market. The most popular ones are briefly described below −
Notepad − On Windows machine, you can use any simple text editor like Notepad (recommended for this tutorial) or WordPad. Notepad++ is also a free text editor which enhanced facilities.
Netbeans − It is a Java IDE that is open-source and free which can be downloaded from www.netbeans.org/index.html.
Eclipse − It is also a Java IDE developed by the Eclipse open-source community and can be downloaded from www.eclipse.org.
IDE or Integrated Development Environment, provides all common tools and facilities to aid in programming, such as source code editor, build tools and debuggers etc.
What is Next?
Next chapter will teach you how to write and run your first Java program and some of the important basic syntaxes in Java needed for developing applications.
Java - Basic Syntax
When we consider a Java program, it can be defined as a collection of objects that communicate via invoking each other's methods. Let us now briefly look into what do class, object, methods, and instance variables mean.
Object − Objects have states and behaviors. Example: A dog has states - color, name, breed as well as behavior such as wagging their tail, barking, eating. An object is an instance of a class.
Class − A class can be defined as a template/blueprint that describes the behavior/state that the object of its type supports.
Methods − A method is basically a behavior. A class can contain many methods. It is in methods where the logics are written, data is manipulated and all the actions are executed.
Instance Variables − Each object has its unique set of instance variables. An object's state is created by the values assigned to these instance variables.
First Java Program
Let us look at a simple code that will print the words Hello World.
Example
public class MyFirstJavaProgram {

   /* This is my first java program.
    * This will print 'Hello World' as the output
    */

   public static void main(String []args) {
      System.out.println("Hello World"); // prints Hello World
   }
}
Let's look at how to save the file, compile, and run the program. Please follow the subsequent steps −
Open notepad and add the code as above.
Save the file as: MyFirstJavaProgram.java.
Open a command prompt window and go to the directory where you saved the class. Assume it's C:\.
Type 'javac MyFirstJavaProgram.java' and press enter to compile your code. If there are no errors in your code, the command prompt will take you to the next line (Assumption : The path variable is set).
Now, type ' java MyFirstJavaProgram ' to run your program.
You will be able to see ' Hello World ' printed on the window.
Output
C:\> javac MyFirstJavaProgram.java
C:\> java MyFirstJavaProgram
Hello World
Basic Syntax
About Java programs, it is very important to keep in mind the following points.
Case Sensitivity − Java is case sensitive, which means identifier Hello and hello would have different meaning in Java.
Class Names − For all class names the first letter should be in Upper Case. If several words are used to form a name of the class, each inner word's first letter should be in Upper Case.
Example: class MyFirstJavaClass
Method Names − All method names should start with a Lower Case letter. If several words are used to form the name of the method, then each inner word's first letter should be in Upper Case.
Example: public void myMethodName()
Program File Name − Name of the program file should exactly match the class name.
When saving the file, you should save it using the class name (Remember Java is case sensitive) and append '.java' to the end of the name (if the file name and the class name do not match, your program will not compile).
But please make a note that in case you do not have a public class present in the file then file name can be different than class name. It is also not mandatory to have a public class in the file.
Example: Assume 'MyFirstJavaProgram' is the class name. Then the file should be saved as 'MyFirstJavaProgram.java'
public static void main(String args[]) − Java program processing starts from the main() method which is a mandatory part of every Java program.
Java Identifiers
All Java components require names. Names used for classes, variables, and methods are called identifiers.
In Java, there are several points to remember about identifiers. They are as follows −
All identifiers should begin with a letter (A to Z or a to z), currency character ($) or an underscore (_).
After the first character, identifiers can have any combination of characters.
A key word cannot be used as an identifier.
Most importantly, identifiers are case sensitive.
Examples of legal identifiers: age, $salary, _value, __1_value.
Examples of illegal identifiers: 123abc, -salary.
Java Modifiers
Like other languages, it is possible to modify classes, methods, etc., by using modifiers. There are two categories of modifiers −
Access Modifiers − default, public , protected, private
Non-access Modifiers − final, abstract, strictfp
We will be looking into more details about modifiers in the next section.
Java Variables
Following are the types of variables in Java −
- Local Variables
- Class Variables (Static Variables)
- Instance Variables (Non-static Variables)
Java Arrays
Arrays are objects that store multiple variables of the same type. However, an array itself is an object on the heap. We will look into how to declare, construct, and initialize in the upcoming chapters.
Java Enums
Enums were introduced in Java 5.0. Enums restrict a variable to have one of only a few predefined values. The values in this enumerated list are called enums.
With the use of enums it is possible to reduce the number of bugs in your code.
For example, if we consider an application for a fresh juice shop, it would be possible to restrict the glass size to small, medium, and large. This would make sure that it would not allow anyone to order any size other than small, medium, or large.
Example
class FreshJuice {
   enum FreshJuiceSize{ SMALL, MEDIUM, LARGE }
   FreshJuiceSize size;
}

public class FreshJuiceTest {

   public static void main(String args[]) {
      FreshJuice juice = new FreshJuice();
      juice.size = FreshJuice.FreshJuiceSize.MEDIUM ;
      System.out.println("Size: " + juice.size);
   }
}
Output
Size: MEDIUM
Note − Enums can be declared as their own or inside a class. Methods, variables, constructors can be defined inside enums as well.
Java Keywords
The following list shows the reserved words in Java. These reserved words may not be used as constant or variable or any other identifier names.
| Sr.No | Reserved Words & Description |
|---|---|
| 1 | abstract
As per dictionary, abstraction is the quality of dealing with ideas rather than events. |
| 2 | assert
assert keyword is used in Java to define assertion. An assertion is a statement in Java which ensures the correctness of any assumptions which have been done in the program. |
| 3 | boolean
boolean datatype is one of the eight primitive datatype supported by Java. It provides means to create boolean type variables which can accept a boolean value as true or false. |
| 4 | break
The break statement in Java programming language has the following two usages −
|
| 5 | byte
byte datatype is one of the eight primitive datatype supported by Java. It provides means to create byte type variables which can accept a byte value. |
| 6 | case
case keyword is part of switch statement which allows a variable to be tested for equality against a list of values. |
| 7 | catch
An exception (or exceptional event) is a problem that arises during the execution of a program. |
| 8 | char
char datatype is one of the eight primitive datatype supported by Java. |
| 9 | class
Java is an Object-Oriented Language. As a language that has the Object-Oriented feature. |
| 10 | const
final keyword is used to define constant value or final methods/classes in Java. |
| 11 | continue
The continue keyword can be used in any of the loop control structures. |
| 12 | default
default keyword is part of switch statement which allows a variable to be tested for equality against a list of values. |
| 13 | do
A do...while loop is similar to a while loop, except that a do...while loop is guaranteed to execute at least one time. |
| 14 | double
double datatype is one of the eight primitive datatype supported by Java. |
| 15 | if
An if statement can be followed by an optional else statement, which executes when the Boolean expression is false. |
| 16 | enum
The Java Enum class is the common base class of all Java language enumeration types. |
| 17 | extends
extends is the keyword used to inherit the properties of a class. Following is the syntax of extends keyword. |
| 18 | final
final keyword is used to define constant value or final methods/classes in Java. |
| 19 | finally
finally keyword is used to define a finally block. The finally block follows a try block or a catch block. A finally block of code always executes, irrespective of occurrence of an Exception. |
| 20 | float
float datatype is one of the eight primitive datatype supported by Java. It provides means to create float type variables which can accept a float value. |
| 21 | for
A for loop is a repetition control structure that allows you to efficiently write a loop that needs to be executed a specific number of times. |
| 22 | goto
goto statement is not supported by Java currrenly. It is kept as a reserved keyword for future. As an alternative, Java supports labels with break and continue statement. |
| 23 | if
An if statement consists of a Boolean expression followed by one or more statements. |
| 24 | implements
Generally, the implements keyword is used with classes to inherit the properties of an interface. |
| 25 | import
import keyboard is used in context of packages. |
| 26 | instanceof
instanceof keyword is an operator which is used only for object reference variables. |
| 27 | int
int datatype is one of the eight primitive datatype supported by Java. |
| 28 | interface
An interface is a reference type in Java. It is similar to class. It is a collection of abstract methods. |
| 29 | long
long datatype is one of the eight primitive datatype supported by Java. |
| 30 | package
Packages are used in Java in order to prevent naming conflicts, to control access, to make searching/locating and usage of classes, interfaces, enumerations and annotations easier, etc. |
| 31 | private
Methods, variables, and constructors that are declared private can only be accessed within the declared class itself. |
| 32 | protected
The protected access modifier cannot be applied to class and interfaces. |
| 33 | public
A class, method, constructor, interface, etc. declared public can be accessed from any other class. |
| 34 | short
By assigning different data types to variables, you can store integers, decimals, or characters in these variables. |
| 35 | static
The static keyword is used to create variables that will exist independently of any instances created for the class. |
| 36 | super
The super keyword is similar to this keyword. |
| 37 | switch
A switch statement allows a variable to be tested for equality against a list of values. |
| 38 | this
this keyword is a very important keyword to identify an object. Following are the usage of this keyword. |
| 39 | throw
If a method does not handle a checked exception, the method must declare it using the throws keyword. |
| 40 | transient
Serialization is a concept using which we can write the state of an object into a byte stream so that we can transfer it over the network (using technologies like JPA and RMI). |
| 41 | try
A method catches an exception using a combination of the try and catch keywords. |
| 42 | while
A while loop statement in Java programming language repeatedly executes a target statement as long as a given condition is true. |
Comments in Java
Java supports single-line and multi-line comments very similar to C and C++. All characters available inside any comment are ignored by Java compiler.
Example
public class MyFirstJavaProgram {

   /* This is my first java program.
    * This will print 'Hello World' as the output
    * This is an example of multi-line comments.
    */

   public static void main(String []args) {
      // This is an example of single line comment
      /* This is also an example of single line comment. */
      System.out.println("Hello World");
   }
}
Output
Hello World
Using Blank Lines
A line containing only white space, possibly with a comment, is known as a blank line, and Java totally ignores it.
Inheritance
In Java, classes can be derived from classes. Basically, if you need to create a new class and here is already a class that has some of the code you require, then it is possible to derive your new class from the already existing code.
This concept allows you to reuse the fields and methods of the existing class without having to rewrite the code in a new class. In this scenario, the existing class is called the superclass and the derived class is called the subclass.
Interfaces
In Java language, an interface can be defined as a contract between objects on how to communicate with each other. Interfaces play a vital role when it comes to the concept of inheritance.
An interface defines the methods, a deriving class (subclass) should use. But the implementation of the methods is totally up to the subclass.
What is Next?
The next section explains about Objects and classes in Java programming. At the end of the session, you will be able to get a clear picture as to what are objects and what are classes in Java.
Java - Variable Types
A variable provides us with named storage that our programs can manipulate. Each variable in Java has a specific type, which determines the size and layout of the variable's memory; the range of values that can be stored within that memory; and the set of operations that can be applied to the variable.
You must declare all variables before they can be used. Following is the basic form of a variable declaration −
data type variable [ = value][, variable [ = value] ...] ;
Here data type is one of Java's datatypes and variable is the name of the variable. To declare more than one variable of the specified type, you can use a comma-separated list.
Following are valid examples of variable declaration and initialization in Java −
Example
int a, b, c;         // Declares three ints, a, b, and c.
int a = 10, b = 10;  // Example of initialization
byte B = 22;         // initializes a byte type variable B.
double pi = 3.14159; // declares and assigns a value of PI.
char a = 'a';        // the char variable a iis initialized with value 'a'
This chapter will explain various variable types available in Java Language. There are three kinds of variables in Java −
- Local variables
- Instance variables
- Class/Static variables
Local Variables
Local variables are declared in methods, constructors, or blocks.
Local variables are created when the method, constructor or block is entered and the variable will be destroyed once it exits the method, constructor, or block.
Access modifiers cannot be used for local variables.
Local variables are visible only within the declared method, constructor, or block.
Local variables are implemented at stack level internally.
There is no default value for local variables, so local variables should be declared and an initial value should be assigned before the first use.
Example
Here, age is a local variable. This is defined inside pupAge() method and its scope is limited to only this method.
public class Test {
   public void pupAge() {
      int age = 0;
      age = age + 7;
      System.out.println("Puppy age is : " + age);
   }

   public static void main(String args[]) {
      Test test = new Test();
      test.pupAge();
   }
}
Output
Puppy age is: 7
Example
Following example uses age without initializing it, so it would give an error at the time of compilation.
public class Test {
   public void pupAge() {
      int age;
      age = age + 7;
      System.out.println("Puppy age is : " + age);
   }

   public static void main(String args[]) {
      Test test = new Test();
      test.pupAge();
   }
}
Output
Test.java:4:variable number might not have been initialized
age = age + 7;
         ^
1 error
Instance Variables
Instance variables are declared in a class, but outside a method, constructor or any block.
When a space is allocated for an object in the heap, a slot for each instance variable value is created.
Instance variables are created when an object is created with the use of the keyword 'new' and destroyed when the object is destroyed.
Instance variables hold values that must be referenced by more than one method, constructor or block, or essential parts of an object's state that must be present throughout the class.
Instance variables can be declared in class level before or after use.
Access modifiers can be given for instance variables.
The instance variables are visible for all methods, constructors and block in the class. Normally, it is recommended to make these variables private (access level). However, visibility for subclasses can be given for these variables with the use of access modifiers.
Instance variables have default values. For numbers, the default value is 0, for Booleans it is false, and for object references it is null. Values can be assigned during the declaration or within the constructor.
Instance variables can be accessed directly by calling the variable name inside the class. However, within static methods (when instance variables are given accessibility), they should be called using the fully qualified name. ObjectReference.VariableName.
Example
import java.io.*;

public class Employee {

   // this instance variable is visible for any child class.
   public String name;

   // salary  variable is visible in Employee class only.
   private double salary;

   // The name variable is assigned in the constructor.
   public Employee (String empName) {
      name = empName;
   }

   // The salary variable is assigned a value.
   public void setSalary(double empSal) {
      salary = empSal;
   }

   // This method prints the employee details.
   public void printEmp() {
      System.out.println("name  : " + name );
      System.out.println("salary :" + salary);
   }

   public static void main(String args[]) {
      Employee empOne = new Employee("Ransika");
      empOne.setSalary(1000);
      empOne.printEmp();
   }
}
Output
name  : Ransika
salary :1000.0
Class/Static Variables
Class variables also known as static variables are declared with the static keyword in a class, but outside a method, constructor or a block.
There would only be one copy of each class variable per class, regardless of how many objects are created from it.
Static variables are rarely used other than being declared as constants. Constants are variables that are declared as public/private, final, and static. Constant variables never change from their initial value.
Static variables are stored in the static memory. It is rare to use static variables other than declared final and used as either public or private constants.
Static variables are created when the program starts and destroyed when the program stops.
Visibility is similar to instance variables. However, most static variables are declared public since they must be available for users of the class.
Default values are same as instance variables. For numbers, the default value is 0; for Booleans, it is false; and for object references, it is null. Values can be assigned during the declaration or within the constructor. Additionally, values can be assigned in special static initializer blocks.
Static variables can be accessed by calling with the class name ClassName.VariableName.
When declaring class variables as public static final, then variable names (constants) are all in upper case. If the static variables are not public and final, the naming syntax is the same as instance and local variables.
Example
import java.io.*;

public class Employee {

   // salary  variable is a private static variable
   private static double salary;

   // DEPARTMENT is a constant
   public static final String DEPARTMENT = "Development ";

   public static void main(String args[]) {
      salary = 1000;
      System.out.println(DEPARTMENT + "average salary:" + salary);
   }
}
Output
Development average salary:1000
Note − If the variables are accessed from an outside class, the constant should be accessed as Employee.DEPARTMENT
What is Next?
You already have used access modifiers (public & private) in this chapter. The next chapter will explain Access Modifiers and Non-Access Modifiers in detail.
Java - Basic Datatypes
Variables are nothing but reserved memory locations to store values. This means that when you create a variable you reserve some space in the memory.
Based on the data type of a variable, the operating system allocates memory and decides what can be stored in the reserved memory. Therefore, by assigning different data types to variables, you can store integers, decimals, or characters in these variables.
There are two data types available in Java −
- Primitive Data Types
- Reference/Object Data Types
Primitive Data Types
There are eight primitive datatypes supported by Java. Primitive datatypes are predefined by the language and named by a keyword. Let us now look into the eight primitive data types in detail.
byte
Byte data type is an 8-bit signed two's complement integer
Minimum value is -128 (-2^7)
Maximum value is 127 (inclusive)(2^7 -1)
Default value is 0
Byte data type is used to save space in large arrays, mainly in place of integers, since a byte is four times smaller than an integer.
Example − byte a = 100, byte b = -50
short
Short data type is a 16-bit signed two's complement integer
Minimum value is -32,768 (-2^15)
Maximum value is 32,767 (inclusive) (2^15 -1)
Short data type can also be used to save memory as byte data type. A short is 2 times smaller than an integer
Default value is 0.
Example − short s = 10000, short r = -20000
int
Int data type is a 32-bit signed two's complement integer.
Minimum value is - 2,147,483,648 (-2^31)
Maximum value is 2,147,483,647(inclusive) (2^31 -1)
Integer is generally used as the default data type for integral values unless there is a concern about memory.
The default value is 0
Example − int a = 100000, int b = -200000
long
- Long data type is a 64-bit signed two's complement integer
- Minimum value is -9,223,372,036,854,775,808(-2^63)
- Maximum value is 9,223,372,036,854,775,807 (inclusive)(2^63 -1)
- This type is used when a wider range than int is needed
- Default value is 0L
- Example − long a = 100000L, long b = -200000L
float
Float data type is a single-precision 32-bit IEEE 754 floating point
Float is mainly used to save memory in large arrays of floating point numbers
Default value is 0.0f
Float data type is never used for precise values such as currency
Example − float f1 = 234.5f
double
double data type is a double-precision 64-bit IEEE 754 floating point
This data type is generally used as the default data type for decimal values, generally the default choice
Double data type should never be used for precise values such as currency
Default value is 0.0d
Example − double d1 = 123.4
boolean
boolean data type represents one bit of information
There are only two possible values: true and false
This data type is used for simple flags that track true/false conditions
Default value is false
Example − boolean one = true
char
char data type is a single 16-bit Unicode character
Minimum value is '\u0000' (or 0)
Maximum value is '\uffff' (or 65,535 inclusive)
Char data type is used to store any character
Example − char letterA = 'A'
Example
Following examples shows the usage of variour primitive data types we've discussed above. We've used add operations on numeric data types whereas boolean and char variables are printed as such.
public class JavaTester {
   public static void main(String args[]) {

      byte byteValue1 = 2;
      byte byteValue2 = 4;
      byte byteResult = (byte)(byteValue1 + byteValue2);

      System.out.println("Byte: " + byteResult);

      short shortValue1 = 2;
      short shortValue2 = 4;
      short shortResult = (short)(shortValue1 + shortValue2);

      System.out.println("Short: " + shortResult);

      int intValue1 = 2;
      int intValue2 = 4;
      int intResult = intValue1 + intValue2;

      System.out.println("Int: " + intResult);

      long longValue1 = 2L;
      long longValue2 = 4L;
      long longResult = longValue1 + longValue2;

      System.out.println("Long: " + longResult);

      float floatValue1 = 2.0f;
      float floatValue2 = 4.0f;
      float floatResult = floatValue1 + floatValue2;

      System.out.println("Float: " + floatResult);

      double doubleValue1 = 2.0;
      double doubleValue2 = 4.0;
      double doubleResult = doubleValue1 + doubleValue2;

      System.out.println("Double: " + doubleResult);

      boolean booleanValue = true;

      System.out.println("Boolean: " + booleanValue);

      char charValue = 'A';

      System.out.println("Char: " + charValue);
   }
}
Output
Byte: 6
Short: 6
Int: 6
Long: 6
Float: 6.0
Double: 6.0
Boolean: true
Char: A
Reference Datatypes
Reference variables are created using defined constructors of the classes. They are used to access objects. These variables are declared to be of a specific type that cannot be changed. For example, Employee, Puppy, etc.
Class objects and various type of array variables come under reference datatype.
Default value of any reference variable is null.
A reference variable can be used to refer any object of the declared type or any compatible type.
Example: Animal animal = new Animal("giraffe");
Java Literals
A literal is a source code representation of a fixed value. They are represented directly in the code without any computation.
Literals can be assigned to any primitive type variable. For example −
byte a = 68;
char a = 'A';
byte, int, long, and short can be expressed in decimal(base 10), hexadecimal(base 16) or octal(base 8) number systems as well.
Prefix 0 is used to indicate octal, and prefix 0x indicates hexadecimal when using these number systems for literals. For example −
int decimal = 100;
int octal = 0144;
int hexa =  0x64;
String literals in Java are specified like they are in most other languages by enclosing a sequence of characters between a pair of double quotes. Examples of string literals are −
Example
"Hello World"
"two\nlines"
"\"This is in quotes\""
String and char types of literals can contain any Unicode characters. For example −
char a = '\u0001';
String a = "\u0001";
Example
Following example shows the usage of variour literals we've discussed above.
public class JavaTester {
   public static void main(String args[]) {

      int decimal = 100;
      int octal = 0144;
      int hexa =  0x64;

      System.out.println(decimal);
      System.out.println(octal);
      System.out.println(hexa);

      String msg1 = "Hello World";
      String msg2 = "two\nlines";
      String msg3 = "\"This is in quotes\"";

      System.out.println(msg1);
      System.out.println(msg2);
      System.out.println(msg3);

      char a = '\u0064';
      String msg4 = "\u0064";

      System.out.println(a);
      System.out.println(msg4);
   }
}
Output
100
100
100
Hello World
two
lines
"This is in quotes"
d
d
Java language supports few special escape sequences for String and char literals as well. They are −
| Notation | Character represented |
|---|---|
| \n | Newline (0x0a) |
| \r | Carriage return (0x0d) |
| \f | Formfeed (0x0c) |
| \b | Backspace (0x08) |
| \s | Space (0x20) |
| \t | tab |
| \" | Double quote |
| \' | Single quote |
| \\ | backslash |
| \ddd | Octal character (ddd) |
| \uxxxx | Hexadecimal UNICODE character (xxxx) |
What is Next?
This chapter explained the various data types. The next topic explains different variable types and their usage. This will give you a good understanding on how they can be used in the Java classes, interfaces, etc.
Java - Basic Operators
Java provides a rich set of operators to manipulate variables. We can divide all the Java operators into the following groups −
- Arithmetic Operators
- Relational Operators
- Bitwise Operators
- Logical Operators
- Assignment Operators
- Misc Operators
The Arithmetic Operators
Arithmetic operators are used in mathematical expressions in the same way that they are used in algebra. The following table lists the arithmetic operators −
Assume integer variable A holds 10 and variable B holds 20, then −
| Operator | Description | Example |
|---|---|---|
| + (Addition) | Adds values on either side of the operator. | A + B will give 30 |
| - (Subtraction) | Subtracts right-hand operand from left-hand operand. | A - B will give -10 |
| * (Multiplication) | Multiplies values on either side of the operator. | A * B will give 200 |
| / (Division) | Divides left-hand operand by right-hand operand. | B / A will give 2 |
| % (Modulus) | Divides left-hand operand by right-hand operand and returns remainder. | B % A will give 0 |
| ++ (Increment) | Increases the value of operand by 1. | B++ gives 21 |
| -- (Decrement) | Decreases the value of operand by 1. | B-- gives 19 |
The Relational Operators
There are following relational operators supported by Java language.
Assume variable A holds 10 and variable B holds 20, then −
| Operator | Description | Example |
|---|---|---|
| == (equal to) | Checks if the values of two operands are equal or not, if yes then condition becomes true. | (A == B) is not true. |
| != (not equal to) | Checks if the values of two operands are equal or not, if values are not equal then condition becomes true. | (A != B) is true. |
| > (greater than) | Checks if the value of left operand is greater than the value of right operand, if yes then condition becomes true. | (A > B) is not true. |
| < (less than) | Checks if the value of left operand is less than the value of right operand, if yes then condition becomes true. | (A < B) is true. |
| >= (greater than or equal to) | Checks if the value of left operand is greater than or equal to the value of right operand, if yes then condition becomes true. | (A >= B) is not true. |
| <= (less than or equal to) | Checks if the value of left operand is less than or equal to the value of right operand, if yes then condition becomes true. | (A <= B) is true. |
The Bitwise Operators
Java defines several bitwise operators, which can be applied to the integer types, long, int, short, char, and byte.
Bitwise operator works on bits and performs bit-by-bit operation. Assume if a = 60 and b = 13; now in binary format they will be as follows −
a = 0011 1100
b = 0000 1101
a&b = 0000 1100
a|b = 0011 1101
a^b = 0011 0001
~a  = 1100 0011
The following table lists the bitwise operators −
Assume integer variable A holds 60 and variable B holds 13 then −
| Operator | Description | Example |
|---|---|---|
| & (bitwise and) | Binary AND Operator copies a bit to the result if it exists in both operands. | (A & B) will give 12 which is 0000 1100 |
| | (bitwise or) | Binary OR Operator copies a bit if it exists in either operand. | (A | B) will give 61 which is 0011 1101 |
| ^ (bitwise XOR) | Binary XOR Operator copies the bit if it is set in one operand but not both. | (A ^ B) will give 49 which is 0011 0001 |
| ⁓ (bitwise compliment) | Binary Ones Complement Operator is unary and has the effect of 'flipping' bits. | (⁓A ) will give -61 which is 1100 0011 in 2's complement form due to a signed binary number. |
| << (left shift) | Binary Left Shift Operator. The left operands value is moved left by the number of bits specified by the right operand. | A << 2 will give 240 which is 1111 0000 |
| >> (right shift) | Binary Right Shift Operator. The left operands value is moved right by the number of bits specified by the right operand. | A >> 2 will give 15 which is 1111 |
| >>> (zero fill right shift) | Shift right zero fill operator. The left operands value is moved right by the number of bits specified by the right operand and shifted values are filled up with zeros. | A >>>2 will give 15 which is 0000 1111 |
The Logical Operators
The following table lists the logical operators −
Assume Boolean variables A holds true and variable B holds false, then −
| Operator | Description | Example |
|---|---|---|
| && (logical and) | Called Logical AND operator. If both the operands are non-zero, then the condition becomes true. | (A && B) is false |
| || (logical or) | Called Logical OR Operator. If any of the two operands are non-zero, then the condition becomes true. | (A || B) is true |
| ! (logical not) | Called Logical NOT Operator. Use to reverses the logical state of its operand. If a condition is true then Logical NOT operator will make false. | !(A && B) is true |
The Assignment Operators
Following are the assignment operators supported by Java language −
| Operator | Description | Example |
|---|---|---|
| = | Simple assignment operator. Assigns values from right side operands to left side operand. | C = A + B will assign value of A + B into C |
| += | Add AND assignment operator. It adds right operand to the left operand and assign the result to left operand. | C += A is equivalent to C = C + A |
| -= | Subtract AND assignment operator. It subtracts right operand from the left operand and assign the result to left operand. | C -= A is equivalent to C = C - A |
| *= | Multiply AND assignment operator. It multiplies right operand with the left operand and assign the result to left operand. | C *= A is equivalent to C = C * A |
| /= | Divide AND assignment operator. It divides left operand with the right operand and assign the result to left operand. | C /= A is equivalent to C = C / A |
| %= | Modulus AND assignment operator. It takes modulus using two operands and assign the result to left operand. | C %= A is equivalent to C = C % A |
| <<= | Left shift AND assignment operator. | C <<= 2 is same as C = C << 2 |
| >>= | Right shift AND assignment operator. | C >>= 2 is same as C = C >> 2 |
| &= | Bitwise AND assignment operator. | C &= 2 is same as C = C & 2 |
| ^= | bitwise exclusive OR and assignment operator. | C ^= 2 is same as C = C ^ 2 |
| |= | bitwise inclusive OR and assignment operator. | C |= 2 is same as C = C | 2 |
Miscellaneous Operators
There are few other operators supported by Java Language.
Conditional Operator ( ? : )
Conditional operator is also known as the ternary operator. This operator consists of three operands and is used to evaluate Boolean expressions. The goal of the operator is to decide, which value should be assigned to the variable. The operator is written as −
variable x = (expression) ? value if true : value if false
Following is an example −
Example
In this example, we're creating two variables a and b and using ternary operator we've decided the values of b and printed it.
public class Test {

   public static void main(String args[]) {
      int a, b;
      a = 10;
      b = (a == 1) ? 20: 30;
      System.out.println( "Value of b is : " +  b );

      b = (a == 10) ? 20: 30;
      System.out.println( "Value of b is : " + b );
   }
}
Output
Value of b is : 30
Value of b is : 20
instanceof Operator
This operator is used only for object reference variables. The operator checks whether the object is of a particular type (class type or interface type). instanceof operator is written as −
( Object reference variable ) instanceof (class/interface type)
If the object referred by the variable on the left side of the operator passes the IS-A check for the class/interface type on the right side, then the result will be true. Following is an example −
Example
In this example, we're creating a String variable name and then using instanceof operator we've checking the name is of String or not.
public class Test {

   public static void main(String args[]) {

      String name = "James";

      // following will return true since name is type of String
      boolean result = name instanceof String;
      System.out.println( result );
   }
}
Output
true
This operator will still return true, if the object being compared is the assignment compatible with the type on the right. Following is one more example −
Example
In this example, we're creating a variable a of class Vehicle and then using instanceof operator we've checking the name is of type Car or not.
class Vehicle {}

public class Car extends Vehicle {

   public static void main(String args[]) {

      Vehicle a = new Car();
      boolean result =  a instanceof Car;
      System.out.println( result );
   }
}
Output
true
Precedence of Java Operators
Operator precedence determines the grouping of terms in an expression. This affects how an expression is evaluated. Certain operators have higher precedence than others; for example, the multiplication operator has higher precedence than the addition operator −
For example, x = 7 + 3 * 2; here x is assigned 13, not 20 because operator * has higher precedence than +, so it first gets multiplied with 3 * 2 and then adds into 7.
Here, operators with the highest precedence appear at the top of the table, those with the lowest appear at the bottom. Within an expression, higher precedence operators will be evaluated first.
| Category | Operator | Associativity |
|---|---|---|
| Postfix | expression++ expression-- | Left to right |
| Unary | ++expression --expression +expression -expression ⁓ ! | Right to left |
| Multiplicative | * / % | Left to right |
| Additive | + - | Left to right |
| Shift | << >> >>> | Left to right |
| Relational | < > <= >= instanceof | Left to right |
| Equality | == != | Left to right |
| Bitwise AND | & | Left to right |
| Bitwise XOR | ^ | Left to right |
| Bitwise OR | | | Left to right |
| Logical AND | && | Left to right |
| Logical OR | || | Left to right |
| Conditional | ?: | Right to left |
| Assignment | = += -= *= /= %= ^= |= <<= >>= >>>= | Right to left |
What is Next?
The next chapter will explain about loop control in Java programming. The chapter will describe various types of loops and how these loops can be used in Java program development and for what purposes they are being used.
Java - Loop Control
There may be a situation when you need to execute a block of code several number of times. In general, statements are executed sequentially: The first statement in a function is executed first, followed by the second, and so on.
Programming languages provide various control structures that allow for more complicated execution paths.
A loop statement allows us to execute a statement or group of statements multiple times and following is the general form of a loop statement in most of the programming languages −
Java programming language provides the following types of loop to handle looping requirements. Click the following links to check their detail.
| Sr.No. | Loop & Description |
|---|---|
| 1 | while loop
Repeats a statement or group of statements while a given condition is true. It tests the condition before executing the loop body. |
| 2 | for loop
Execute a sequence of statements multiple times and abbreviates the code that manages the loop variable. |
| 3 | do...while loop
Like a while statement, except that it tests the condition at the end of the loop body. |
Loop Control Statements
Loop control statements change execution from its normal sequence. When execution leaves a scope, all automatic objects that were created in that scope are destroyed.
Java supports the following control statements. Click the following links to check their detail.
| Sr.No. | Control Statement & Description |
|---|---|
| 1 | break statement
Terminates the loop or switch statement and transfers execution to the statement immediately following the loop or switch. |
| 2 | continue statement
Causes the loop to skip the remainder of its body and immediately retest its condition prior to reiterating. |
Enhanced for loop in Java
As of Java 5, the enhanced for loop was introduced. This is mainly used to traverse collection of elements including arrays.
Syntax
Following is the syntax of enhanced for loop −
for(declaration : expression) {
   // Statements
}
Declaration − The newly declared block variable, is of a type compatible with the elements of the array you are accessing. The variable will be available within the for block and its value would be the same as the current array element.
Expression − This evaluates to the array you need to loop through. The expression can be an array variable or method call that returns an array.
Example
In this example, we're showing the use of a foreach loop to print contents of an array. Here we're creating an array of integers as numbers and initialized it some values. Then using foreach loop, each number is printed. Another array of strings as names is created and is iterated to print each element using foreach loop.
public class Test {

   public static void main(String args[]) {
      int [] numbers = {10, 20, 30, 40, 50};

      for(int x : numbers ) {
         System.out.print( x );
         System.out.print(",");
      }
      System.out.print("\n");
      String [] names = {"James", "Larry", "Tom", "Lacy"};

      for( String name : names ) {
         System.out.print( name );
         System.out.print(",");
      }
   }
}
Output
10, 20, 30, 40, 50,
James, Larry, Tom, Lacy,
More examples of For each Loop
What is Next?
In the following chapter, we will be learning about decision making statements in Java programming.
Java - Decision Making
Decision making structures have one or more conditions to be evaluated or tested by the program, along with a statement or statements that are to be executed if the condition is determined to be true, and optionally, other statements to be executed if the condition is determined to be false.
Following is the general form of a typical decision making structure found in most of the programming languages −
Java programming language provides following types of decision making statements. Click the following links to check their detail.
| Sr.No. | Statement & Description |
|---|---|
| 1 | if statement
An if statement consists of a boolean expression followed by one or more statements. |
| 2 | if...else statement
An if statement can be followed by an optional else statement, which executes when the boolean expression is false. |
| 3 | nested if statement
You can use one if or else if statement inside another if or else if statement(s). |
| 4 | switch statement
A switch statement allows a variable to be tested for equality against a list of values. |
The ? : Operator
We have covered conditional operator ? : in the previous chapter which can be used to replace if...else statements. It has the following general form −
Exp1 ? Exp2 : Exp3;
Where Exp1, Exp2, and Exp3 are expressions. Notice the use and placement of the colon.
To determine the value of the whole expression, initially exp1 is evaluated.
If the value of exp1 is true, then the value of Exp2 will be the value of the whole expression.
If the value of exp1 is false, then Exp3 is evaluated and its value becomes the value of the entire expression.
Example
In this example, we're creating two variables a and b and using ternary operator we've decided the values of b and printed it.
public class Test {

   public static void main(String args[]) {
      int a, b;
      a = 10;
      b = (a == 1) ? 20: 30;
      System.out.println( "Value of b is : " +  b );

      b = (a == 10) ? 20: 30;
      System.out.println( "Value of b is : " + b );
   }
}
Output
Value of b is : 30
Value of b is : 20
What is Next?
In the next chapter, we will discuss about Number class (in the java.lang package) and its subclasses in Java Language.
We will be looking into some of the situations where you will use instantiations of these classes rather than the primitive data types, as well as classes such as formatting, mathematical functions that you need to know about when working with Numbers.
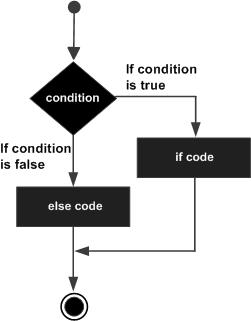
Java - if-else statement
An if statement can be followed by an optional else statement, which executes when the Boolean expression is false.
Syntax
Following is the syntax of an if...else statement −
if(Boolean_expression) {
   // Executes when the Boolean expression is true
}else {
   // Executes when the Boolean expression is false
}
If the boolean expression evaluates to true, then the if block of code will be executed, otherwise else block of code will be executed.
Flow Diagram
Example 1
In this example, we're showing the usage of if else statement. We've created a variable x and initialized it to 30. Then in the if statement, we're checking x with 20. As if statement is false, the statement within the else block is executed.
public class Test {

   public static void main(String args[]) {
      int x = 30;

      if( x < 20 ) {
         System.out.print("This is if statement");
      }else {
         System.out.print("This is else statement");
      }
   }
}
Output
This is else statement
The if...else if...else Statement
An if statement can be followed by an optional else if...else statement, which is very useful to test various conditions using single if...else if statement.
When using if, else if, else statements there are a few points to keep in mind.
An if can have zero or one else's and it must come after any else if's.
An if can have zero to many else if's and they must come before the else.
Once an else if succeeds, none of the remaining else if's or else's will be tested.
Syntax
Following is the syntax of an if...else statement −
if(Boolean_expression 1) {
   // Executes when the Boolean expression 1 is true
}else if(Boolean_expression 2) {
   // Executes when the Boolean expression 2 is true
}else if(Boolean_expression 3) {
   // Executes when the Boolean expression 3 is true
}else {
   // Executes when the none of the above condition is true.
}
Example 2
In this example, we're showing the usage of if...else if...else statement. We've created a variable x and initialized it to 30. Then in the if statement, we're checking x with 10. As if statement is false, control jumps to else if statement checking another value with x and so on.
public class Test {

   public static void main(String args[]) {
      int x = 30;

      if( x == 10 ) {
         System.out.print("Value of X is 10");
      }else if( x == 20 ) {
         System.out.print("Value of X is 20");
      }else if( x == 30 ) {
         System.out.print("Value of X is 30");
      }else {
         System.out.print("This is else statement");
      }
   }
}
Output
Value of X is 30
Example 3
In this example, we're showing the usage of if...else if...else statement. We've created a variable x and initialized it to 30.0. Then in the if statement, we're checking x with 10,0. As if statement is false, control jumps to else if statement checking another value with x and so on.
public class Test {

   public static void main(String args[]) {
      double x = 30.0;

      if( x == 10.0 ) {
         System.out.print("Value of X is 10.0");
      }else if( x == 20.0 ) {
         System.out.print("Value of X is 20.0");
      }else if( x == 30.0 ) {
         System.out.print("Value of X is 30.0");
      }else {
         System.out.print("This is else statement");
      }
   }
}
Output
Value of X is 30.0
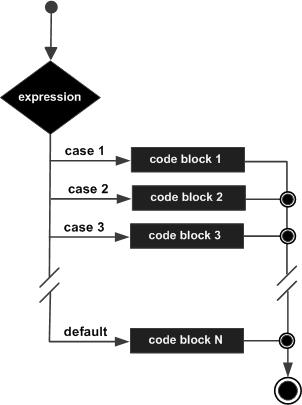
Java - switch statement
A switch statement allows a variable to be tested for equality against a list of values. Each value is called a case, and the variable being switched on is checked for each case.
Syntax
The syntax of enhanced switch statement is −
switch(expression) {
   case value :
      // Statements
      break; // optional

   case value :
      // Statements
      break; // optional

   // You can have any number of case statements.
   default : // Optional
      // Statements
}
The following rules apply to a switch statement −
The variable used in a switch statement can only be integers, convertable integers (byte, short, char), strings and enums.
You can have any number of case statements within a switch. Each case is followed by the value to be compared to and a colon.
The value for a case must be the same data type as the variable in the switch and it must be a constant or a literal.
When the variable being switched on is equal to a case, the statements following that case will execute until a break statement is reached.
When a break statement is reached, the switch terminates, and the flow of control jumps to the next line following the switch statement.
Not every case needs to contain a break. If no break appears, the flow of control will fall through to subsequent cases until a break is reached.
A switch statement can have an optional default case, which must appear at the end of the switch. The default case can be used for performing a task when none of the cases is true. No break is needed in the default case.
Flow Diagram
Example 1
In this example, we're showing use of switch statement where cases are based on a char. We've created a variable grade. Based on value of grade, each case is checked. if a case is satisfied and break statement is present then following cases are not checked.
public class Test {

   public static void main(String args[]) {
      char grade = 'C';

      switch(grade) {
         case 'A' :
            System.out.println("Excellent!");
            break;
         case 'B' :
         case 'C' :
            System.out.println("Well done");
            break;
         case 'D' :
            System.out.println("You passed");
         case 'F' :
            System.out.println("Better try again");
            break;
         default :
            System.out.println("Invalid grade");
      }
      System.out.println("Your grade is " + grade);
   }
}
Compile and run the above program using various command line arguments. This will produce the following result −
Output
Well done
Your grade is C
Example 2
In this example, we're showing use of switch statement where cases are based on a int. We've created a variable grade. Based on value of grade, each case is checked. if a case is satisfied and break statement is present then following cases are not checked.
public class Test {

   public static void main(String args[]) {
      int grade = 3;

      switch(grade) {
         case 1 :
            System.out.println("Excellent!");
            break;
         case 2 :
         case 3 :
            System.out.println("Well done");
            break;
         case 4 :
            System.out.println("You passed");
         case 5 :
            System.out.println("Better try again");
            break;
         default :
            System.out.println("Invalid grade");
      }
      System.out.println("Your grade is " + grade);
   }
}
Compile and run the above program using various command line arguments. This will produce the following result −
Output
Well done
Your grade is 3
Example 3
In this example, we're showing use of switch statement where cases are based on a String. We've created a variable grade. Based on value of grade, each case is checked. if a case is satisfied and break statement is present then following cases are not checked.
public class Test {

   public static void main(String args[]) {
      String grade = "C";

      switch(grade) {
         case "A" :
            System.out.println("Excellent!");
            break;
         case "B" :
         case "C" :
            System.out.println("Well done");
            break;
         case "D" :
            System.out.println("You passed");
         case "F" :
            System.out.println("Better try again");
            break;
         default :
            System.out.println("Invalid grade");
      }
      System.out.println("Your grade is " + grade);
   }
}
Compile and run the above program using various command line arguments. This will produce the following result −
Output
Well done
Your grade is C
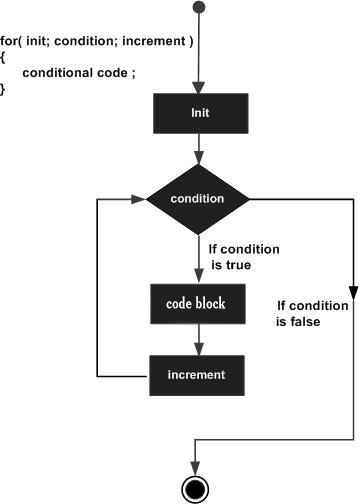
Java - for Loop
A for loop is a repetition control structure that allows you to efficiently write a loop that needs to be executed a specific number of times.
A for loop is useful when you know how many times a task is to be repeated.
Syntax
The syntax of a for loop is −
for(initialization; Boolean_expression; update) {
   // Statements
}
Here is the flow of control in a for loop −
The initialization step is executed first, and only once. This step allows you to declare and initialize any loop control variables and this step ends with a semi colon (;).
Next, the Boolean expression is evaluated. If it is true, the body of the loop is executed. If it is false, the body of the loop will not be executed and control jumps to the next statement past the for loop.
After the body of the for loop gets executed, the control jumps back up to the update statement. This statement allows you to update any loop control variables. This statement can be left blank with a semicolon at the end.
The Boolean expression is now evaluated again. If it is true, the loop executes and the process repeats (body of loop, then update step, then Boolean expression). After the Boolean expression is false, the for loop terminates.
Flow Diagram
Example 1
In this example, we're showing the use of a for loop to print numbers starting from 10 to 19. Here we've initialized an int variable x with a value of 10 within initialization blook of for loop. Then in expression block, we're checking x as less than 20, and in the end under update block, we're incrementing x by 1. Within body of for loop, we're printing the value of x. For loop will run until x becomes 20. Once x is 20, loop will stop execution and program exits.
public class Test {

   public static void main(String args[]) {

      for(int x = 10; x < 20; x = x + 1) {
         System.out.print("value of x : " + x );
         System.out.print("\n");
      }
   }
}
Output
value of x : 10
value of x : 11
value of x : 12
value of x : 13
value of x : 14
value of x : 15
value of x : 16
value of x : 17
value of x : 18
value of x : 19
Example 2
In this example, we're showing the use of a for loop to print contents of an array. Here we're creating an array of integers as numbers and initialized it some values. We've created a variable named index to represent index of the array within for loop, check it against size of the array and incremented it by 1. Within for loop body, we're printing element of the array using index notation. Once index becomes same as array size, for loop exits and program quits.
public class Test {

   public static void main(String args[]) {
      int [] numbers = {10, 20, 30, 40, 50};

      for(int index = 0; index < numbers.length; index++) {
         System.out.print("value of item : " + numbers[index] );
         System.out.print("\n");
      }
   }
}
Output
value of item : 10
value of item : 20
value of item : 30
value of item : 40
value of item : 50
Example 3
In this example, we're showing the infinite loop using for loop. It will keep printing the numbers until you press ctrl+c to terminate the program.
public class Test {

   public static void main(String args[]) {
      int x = 10;

      for( ;; ) {
         System.out.print("value of x : " + x );
         x++;
         System.out.print("\n");
      }
   }
}
Output
value of item : 10
value of item : 11
value of item : 12
value of item : 13
value of item : 14
...
ctrl+c
Java - for each Loop
A for each loop is a special repetition control structure that allows you to efficiently write a loop that needs to be executed a specific number of times.
A for each loop is useful even when you do not know how many times a task is to be repeated.
Syntax
Following is the syntax of enhanced for loop −
for(declaration : expression) {
   // Statements
}
Declaration − The newly declared block variable, is of a type compatible with the elements of the array you are accessing. The variable will be available within the for block and its value would be the same as the current array element.
Expression − This evaluates to the array you need to loop through. The expression can be an array variable or method call that returns an array.
Example 1
In this example, we're showing the use of a foreach loop to print contents of an List of Integers. Here we're creating an List of integers as numbers and initialized it some values. Then using foreach loop, each number is printed.
import java.util.Arrays;
import java.util.List;

public class Test {

   public static void main(String args[]) {
      List<Integer> numbers = Arrays.asList(10, 20, 30, 40, 50);

      for(Integer x : numbers ) {
         System.out.print( x );
         System.out.print(",");
      }
   }
}
Output
10, 20, 30, 40, 50,
Example 2
In this example, we're showing the use of a foreach loop to print contents of an List of String. Here we're creating an array of Strings as names and initialized it some values. Then using foreach loop, each name is printed.
import java.util.Arrays;
import java.util.List;

public class Test {

   public static void main(String args[]) {
      List<String> names = Arrays.asList("James", "Larry", "Tom", "Lacy");

      for( String name : names ) {
         System.out.print( name );
         System.out.print(",");
      }
   }
}
Output
James, Larry, Tom, Lacy,
Example 3
In this example, we're showing the use of a foreach loop to print contents of an array of Student Object. Here we're creating an array of Students as Student object and initialized it some values. Then using foreach loop, each name is printed.
public class Test {

   public static void main(String args[]) {
      Student[] students = { new Student(1, "Julie"), new Student(3, "Adam"), new Student(2, "Robert") };

      for( Students student : students ) {
         System.out.print( student );
         System.out.print(",");
      }
   }
}
class Student {
   int rollNo;
   String name;

   Student(int rollNo, String name){
      this.rollNo = rollNo;
      this.name = name;
   }

   @Override
   public String toString() {
      return "[ " + this.rollNo + ", " + this.name + " ]";
   }
}
Output
[ 1, Julie ],[ 3, Adam ],[ 2, Robert ],
Java - while Loop
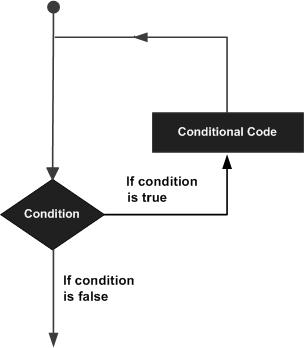
A while loop statement in Java programming language repeatedly executes a target statement as long as a given condition is true.
Syntax
The syntax of a while loop is −
while(Boolean_expression) {
   // Statements
}
Here, statement(s) may be a single statement or a block of statements. The condition may be any expression, and true is any non zero value.
When executing, if the boolean_expression result is true, then the actions inside the loop will be executed. This will continue as long as the expression result is true.
When the condition becomes false, program control passes to the line immediately following the loop.
Flow Diagram

Here, key point of the while loop is that the loop might not ever run. When the expression is tested and the result is false, the loop body will be skipped and the first statement after the while loop will be executed.
Example 1
In this example, we're showing the use of a while loop to print numbers starting from 10 to 19. Here we've initialized an int variable x with a value of 10. Then in while loop, we're checking x as less than 20 and within while loop, we're printing the value of x and incrementing the value of x by 1. While loop will run until x becomes 20. Once x is 20, loop will stop execution and program exits.
public class Test {

   public static void main(String args[]) {
      int x = 10;

      while( x < 20 ) {
         System.out.print("value of x : " + x );
         x++;
         System.out.print("\n");
      }
   }
}
Output
value of x : 10
value of x : 11
value of x : 12
value of x : 13
value of x : 14
value of x : 15
value of x : 16
value of x : 17
value of x : 18
value of x : 19
Example 2
In this example, we're showing the use of a while loop to print contents of an array. Here we're creating an array of integers as numbers and initialized it some values. We've created a variable named index to represent index of the array while iterating it. In while loop we're checking the index to be less than size of the array and printed the element of the array using index notation. index variable is incremented by 1 and loop continues till index becomes the sie of the array and loop exits.
public class Test {

   public static void main(String args[]) {
      int [] numbers = {10, 20, 30, 40, 50};
      int index = 0;

      while( index < 5 ) {
         System.out.print("value of item : " + numbers[index] );
         index++;
         System.out.print("\n");
      }
   }
}
Output
value of item : 10
value of item : 20
value of item : 30
value of item : 40
value of item : 50
Example 3
In this example, we're showing the infinite loop using while loop. It will keep printing the numbers until you press ctrl+c to terminate the program.
public class Test {

   public static void main(String args[]) {
      int x = 10;

      while( true ) {
         System.out.print("value of x : " + x );
         x++;
         System.out.print("\n");
      }
   }
}
Output
value of item : 10
value of item : 20
value of item : 30
value of item : 40
value of item : 50
...
ctrl+c
Java - do...while Loop
A do...while loop is similar to a while loop, except that a do...while loop is guaranteed to execute at least one time.
Syntax
Following is the syntax of a do...while loop −
do {
   // Statements
}while(Boolean_expression);
Notice that the Boolean expression appears at the end of the loop, so the statements in the loop execute once before the Boolean is tested.
If the Boolean expression is true, the control jumps back up to do statement, and the statements in the loop execute again. This process repeats until the Boolean expression is false.
Flow Diagram
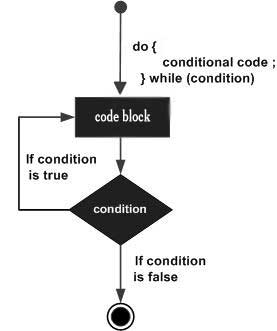
Example 1
In this example, we're showing the use of a while loop to print numbers starting from 10 to 19. Here we've initialized an int variable x with a value of 10. Then in do while loop, we're checking x as less than 20 after do while loop body.In do while loop body we're printing the value of x and incrementing the value of x by 1. While loop will run until x becomes 20. Once x is 20, loop will stop execution and program exits.
public class Test {

   public static void main(String args[]) {
      int x = 10;

      do {
         System.out.print("value of x : " + x );
         x++;
         System.out.print("\n");
      }while( x < 20 );
   }
}
Output
value of x : 10
value of x : 11
value of x : 12
value of x : 13
value of x : 14
value of x : 15
value of x : 16
value of x : 17
value of x : 18
value of x : 19
Example 2
In this example, we're showing the use of a do while loop to print contents of an array. Here we're creating an array of integers as numbers and initialized it some values. We've created a variable named index to represent index of the array while iterating it. In do while loop we're checking the index to be less than size of the array after loop body and printed the element of the array using index notation. Within loop body index variable is incremented by 1 and loop continues till index becomes the sie of the array and loop exits.
public class Test {

   public static void main(String args[]) {
      int [] numbers = {10, 20, 30, 40, 50};
      int index = 0;

      do {
         System.out.print("value of item : " + numbers[index] );
         index++;
         System.out.print("\n");
      } while( index < 5 );
   }
}
Output
value of item : 10
value of item : 20
value of item : 30
value of item : 40
value of item : 50
Example 3
In this example, we're showing the infinite loop using while loop. It will keep printing the numbers until you press ctrl+c to terminate the program.
public class Test {

   public static void main(String args[]) {
      int x = 10;

      do {
         System.out.print("value of x : " + x );
         x++;
         System.out.print("\n");
      } while( true );
   }
}
Output
value of item : 10
value of item : 20
value of item : 30
value of item : 40
value of item : 50
...
ctrl+c
Java - break statement
The break statement in Java programming language has the following two usages −
When the break statement is encountered inside a loop, the loop is immediately terminated and the program control resumes at the next statement following the loop.
It can be used to terminate a case in the switch statement (covered in the next chapter).
Syntax
The syntax of a break is a single statement inside any loop −
break;
Flow Diagram
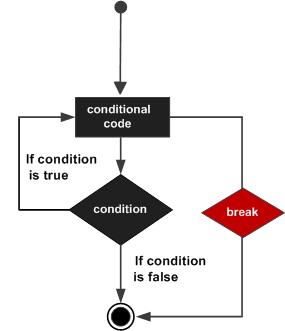
Example 1
In this example, we're showing the use of a break statement to break a while loop to print numbers starting from 10 to 14 which will otherwise print element till 19. Here we've initialized an int variable x with a value of 10. Then in while loop, we're checking x as less than 20 and within while loop, we're printing the value of x and incrementing the value of x by 1. While loop will run until x becomes 15. Once x is 15, break statement will break the while loop and program exits.
public class Test {

   public static void main(String args[]) {
      int x = 10;

      while( x < 20 ) {
         if(x == 15){
            break;
         }
         System.out.print("value of x : " + x );
         x++;
         System.out.print("\n");
      }
   }
}
Output
value of x : 10
value of x : 11
value of x : 12
value of x : 13
value of x : 14
Example 2
In this example, we're showing the use of a break statement within a for loop to print few elements of an array instead of all elements. Here we're creating an array of integers as numbers and initialized it some values. We've created a variable named index to represent index of the array within for loop, check it against size of the array and incremented it by 1. Within for loop body, we're printing element of the array using index notation. Once 30 is encountered as value, break statement breaks the flow of for loop and program quits.
public class Test {

   public static void main(String args[]) {
      int [] numbers = {10, 20, 30, 40, 50};

      for(int index = 0; index < numbers.length; index++) {
         if(numbers[index] == 30){
            break;
         }
         System.out.print("value of item : " + numbers[index] );
         System.out.print("\n");
      }
   }
}
Output
value of item : 10
value of item : 20
Example 3
In this example, we're showing the use of break statement to break an infinite loop using while loop. It will keep printing the numbers until the value of x becomes 15.
public class Test {

   public static void main(String args[]) {
      int x = 10;

      while( true ) {
         System.out.print("value of x : " + x );
         x++;
         if(x == 15) {
            break;
         }
         System.out.print("\n");
      }
   }
}
Output
value of item : 10
value of item : 11
value of item : 12
value of item : 13
value of item : 14
Java - continue statement
The continue keyword can be used in any of the loop control structures. It causes the loop to immediately jump to the next iteration of the loop.
In a for loop, the continue keyword causes control to immediately jump to the update statement.
In a while loop or do/while loop, control immediately jumps to the Boolean expression.
Syntax
The syntax of a continue is a single statement inside any loop −
continue;
Flow Diagram
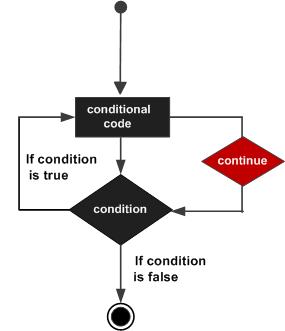
Example 1
In this example, we're showing the use of a continue statement to skip an element 15 in a while loop which is used to print element from 10 to 19. Here we've initialized an int variable x with a value of 10. Then in while loop, we're checking x as less than 20 and within while loop, we're printing the value of x and incrementing the value of x by 1. While loop will run until x becomes 15. Once x is 15, continue statement will jump the while loop while skipping the execution of the body and loop continues.
public class Test {

   public static void main(String args[]) {
      int x = 10;

      while( x < 20 ) {
         x++;
         if(x == 15){
            continue;
         }
         System.out.print("value of x : " + x );
         System.out.print("\n");
      }
   }
}
Output
value of x : 11
value of x : 12
value of x : 13
value of x : 14
value of x : 16
value of x : 17
value of x : 18
value of x : 19
value of x : 20
Example 2
In this example, we're showing the use of a continue statement within a for loop to skip an elements of an array to print. Here we're creating an array of integers as numbers and initialized it some values. We've created a variable named index to represent index of the array within for loop, check it against size of the array and incremented it by 1. Within for loop body, we're printing element of the array using index notation. Once 30 is encountered as value, continue statement jumps to the update section of for loop and loop continues.
public class Test {

   public static void main(String args[]) {
      int [] numbers = {10, 20, 30, 40, 50};

      for(int index = 0; index < numbers.length; index++) {
         if(numbers[index] == 30){
            continue;
         }
         System.out.print("value of item : " + numbers[index] );
         System.out.print("\n");
      }
   }
}
Output
value of item : 10
value of item : 20
value of item : 40
value of item : 50
Example 3
In this example, we're showing the use of a continue statement to skip an element 15 in a do while loop which is used to print element from 10 to 19. Here we've initialized an int variable x with a value of 10. Then in do while loop, we're checking x as less than 20 after body and within while loop, we're printing the value of x and incrementing the value of x by 1. While loop will run until x becomes 15. Once x is 15, continue statement will jump the while loop while skipping the execution of the body and loop continues.
public class Test {

   public static void main(String args[]) {
      int x = 10;

      do {
         x++;
         if(x == 15){
            continue;
         }
         System.out.print("value of x : " + x );
         System.out.print("\n");
      } while( x < 20 );
   }
}
Output
value of x : 11
value of x : 12
value of x : 13
value of x : 14
value of x : 16
value of x : 17
value of x : 18
value of x : 19
value of x : 20
Java - Object and Classes
Java is an Object-Oriented Language. As a language that has the Object-Oriented feature, Java supports the following fundamental concepts −
- Polymorphism
- Inheritance
- Encapsulation
- Abstraction
- Classes
- Objects
- Instance
- Method
- Message Passing
In this chapter, we will look into the concepts - Classes and Objects.
Object − Objects have states and behaviors. Example: A dog has states - color, name, breed as well as behaviors − wagging the tail, barking, eating. An object is an instance of a class.
Class − A class can be defined as a template/blueprint that describes the behavior/state that the object of its type support.
Objects in Java
Let us now look deep into what are objects. If we consider the real-world, we can find many objects around us, cars, dogs, humans, etc. All these objects have a state and a behavior.
If we consider a dog, then its state is - name, breed, color, and the behavior is - barking, wagging the tail, running.
If you compare the software object with a real-world object, they have very similar characteristics.
Software objects also have a state and a behavior. A software object's state is stored in fields and behavior is shown via methods.
So in software development, methods operate on the internal state of an object and the object-to-object communication is done via methods.
Classes in Java
A class is a blueprint from which individual objects are created.
Following is a sample of a class.
Example
public class Dog {
   String breed;
   int age;
   String color;

   void barking() {
   }

   void hungry() {
   }

   void sleeping() {
   }
}
A class can contain any of the following variable types.
Local variables − Variables defined inside methods, constructors or blocks are called local variables. The variable will be declared and initialized within the method and the variable will be destroyed when the method has completed.
Instance variables − Instance variables are variables within a class but outside any method. These variables are initialized when the class is instantiated. Instance variables can be accessed from inside any method, constructor or blocks of that particular class.
Class variables − Class variables are variables declared within a class, outside any method, with the static keyword.
A class can have any number of methods to access the value of various kinds of methods. In the above example, barking(), hungry() and sleeping() are methods.
Following are some of the important topics that need to be discussed when looking into classes of the Java Language.
Constructors
When discussing about classes, one of the most important sub topic would be constructors. Every class has a constructor. If we do not explicitly write a constructor for a class, the Java compiler builds a default constructor for that class.
Each time a new object is created, at least one constructor will be invoked. The main rule of constructors is that they should have the same name as the class. A class can have more than one constructor.
Following is an example of a constructor −
Example
public class Puppy {
   public Puppy() {
   }

   public Puppy(String name) {
      // This constructor has one parameter, name.
   }
}
Java also supports Singleton Classes where you would be able to create only one instance of a class.
Note − We have two different types of constructors. We are going to discuss constructors in detail in the subsequent chapters.
Creating an Object
As mentioned previously, a class provides the blueprints for objects. So basically, an object is created from a class. In Java, the new keyword is used to create new objects.
There are three steps when creating an object from a class −
Declaration − A variable declaration with a variable name with an object type.
Instantiation − The 'new' keyword is used to create the object.
Initialization − The 'new' keyword is followed by a call to a constructor. This call initializes the new object.
Following is an example of creating an object −
Example
In this example, We've created a class named Puppy. In Puppy class constructor, puppy name is printed so that when the object is created, its name is printed. In main method, an object is created using new operator.
public class Puppy {
   public Puppy(String name) {
      // This constructor has one parameter, <i>name</i>.
      System.out.println("Passed Name is :" + name );
   }

   public static void main(String []args) {
      // Following statement would create an object myPuppy
      Puppy myPuppy = new Puppy( "tommy" );
   }
}
If we compile and run the above program, then it will produce the following result −
Output
Passed Name is :tommy
Accessing Instance Variables and Methods
Instance variables and methods are accessed via created objects. To access an instance variable, following is the fully qualified path −
/* First create an object */
ObjectReference = new Constructor();

/* Now call a variable as follows */
ObjectReference.variableName;

/* Now you can call a class method as follows */
ObjectReference.MethodName();
Example
In this example, We've created a class named Puppy. In Puppy class constructor, puppy name is printed so that when the object is created, its name is printed. An instance variable puppyAge is added and using getter/setter method, we can manipulate the age. In main method, an object is created using new operator. Age is updated using setAge() method and using getAge(), the age is printed.
public class Puppy {
   int puppyAge;

   public Puppy(String name) {
      // This constructor has one parameter, <i>name</i>.
      System.out.println("Name chosen is :" + name );
   }

   public void setAge( int age ) {
      puppyAge = age;
   }

   public int getAge( ) {
      System.out.println("Puppy's age is :" + puppyAge );
      return puppyAge;
   }

   public static void main(String []args) {
      /* Object creation */
      Puppy myPuppy = new Puppy( "tommy" );

      /* Call class method to set puppy's age */
      myPuppy.setAge( 2 );

      /* Call another class method to get puppy's age */
      myPuppy.getAge( );

      /* You can access instance variable as follows as well */
      System.out.println("Variable Value :" + myPuppy.puppyAge );
   }
}
If we compile and run the above program, then it will produce the following result −
Output
Name chosen is :tommy
Puppy's age is :2
Variable Value :2
Source File Declaration Rules
As the last part of this section, let's now look into the source file declaration rules. These rules are essential when declaring classes, import statements and package statements in a source file.
There can be only one public class per source file.
A source file can have multiple non-public classes.
The public class name should be the name of the source file as well which should be appended by .java at the end. For example − the class name is public class Employee{} then the source file should be as Employee.java.
If the class is defined inside a package, then the package statement should be the first statement in the source file.
If import statements are present, then they must be written between the package statement and the class declaration. If there are no package statements, then the import statement should be the first line in the source file.
Import and package statements will imply to all the classes present in the source file. It is not possible to declare different import and/or package statements to different classes in the source file.
Classes have several access levels and there are different types of classes; abstract classes, final classes, etc. We will be explaining about all these in the access modifiers chapter.
Apart from the above mentioned types of classes, Java also has some special classes called Inner classes and Anonymous classes.
Java Package
In simple words, it is a way of categorizing the classes and interfaces. When developing applications in Java, hundreds of classes and interfaces will be written, therefore categorizing these classes is a must as well as makes life much easier.
Import Statements
In Java if a fully qualified name, which includes the package and the class name is given, then the compiler can easily locate the source code or classes. Import statement is a way of giving the proper location for the compiler to find that particular class.
For example, the following line would ask the compiler to load all the classes available in directory java_installation/java/io −
import java.io.*;
A Simple Case Study
For our case study, we will be creating two classes. They are Employee and EmployeeTest.
First open notepad and add the following code. Remember this is the Employee class and the class is a public class. Now, save this source file with the name Employee.java.
The Employee class has four instance variables - name, age, designation and salary. The class has one explicitly defined constructor, which takes a parameter.
Example
import java.io.*;
public class Employee {

   String name;
   int age;
   String designation;
   double salary;

   // This is the constructor of the class Employee
   public Employee(String name) {
      this.name = name;
   }

   // Assign the age of the Employee  to the variable age.
   public void empAge(int empAge) {
      age = empAge;
   }

   /* Assign the designation to the variable designation.*/
   public void empDesignation(String empDesig) {
      designation = empDesig;
   }

   /* Assign the salary to the variable	salary.*/
   public void empSalary(double empSalary) {
      salary = empSalary;
   }

   /* Print the Employee details */
   public void printEmployee() {
      System.out.println("Name:"+ name );
      System.out.println("Age:" + age );
      System.out.println("Designation:" + designation );
      System.out.println("Salary:" + salary);
   }
}
As mentioned previously in this tutorial, processing starts from the main method. Therefore, in order for us to run this Employee class there should be a main method and objects should be created. We will be creating a separate class for these tasks.
Following is the EmployeeTest class, which creates two instances of the class Employee and invokes the methods for each object to assign values for each variable.
Save the following code in EmployeeTest.java file.
import java.io.*;
public class EmployeeTest {

   public static void main(String args[]) {
      /* Create two objects using constructor */
      Employee empOne = new Employee("James Smith");
      Employee empTwo = new Employee("Mary Anne");

      // Invoking methods for each object created
      empOne.empAge(26);
      empOne.empDesignation("Senior Software Engineer");
      empOne.empSalary(1000);
      empOne.printEmployee();

      empTwo.empAge(21);
      empTwo.empDesignation("Software Engineer");
      empTwo.empSalary(500);
      empTwo.printEmployee();
   }
}
Now, compile both the classes and then run EmployeeTest to see the result as follows −
Output
C:\> javac Employee.java
C:\> javac EmployeeTest.java
C:\> java EmployeeTest
Name:James Smith
Age:26
Designation:Senior Software Engineer
Salary:1000.0
Name:Mary Anne
Age:21
Designation:Software Engineer
Salary:500.0
What is Next?
In the next session, we will discuss the basic data types in Java and how they can be used when developing Java applications.
Java - Methods
A Java method is a collection of statements that are grouped together to perform an operation. When you call the System.out.println() method, for example, the system actually executes several statements in order to display a message on the console.
Now you will learn how to create your own methods with or without return values, invoke a method with or without parameters, and apply method abstraction in the program design.
Creating Method
Considering the following example to explain the syntax of a method −
Syntax
public static int methodName(int a, int b) {
   // body
}
Here,
public static − modifier
int − return type
methodName − name of the method
a, b − formal parameters
int a, int b − list of parameters
Method definition consists of a method header and a method body. The same is shown in the following syntax −
Syntax
modifier returnType nameOfMethod (Parameter List) {
   // method body
}
The syntax shown above includes −
modifier − It defines the access type of the method and it is optional to use.
returnType − Method may return a value.
nameOfMethod − This is the method name. The method signature consists of the method name and the parameter list.
Parameter List − The list of parameters, it is the type, order, and number of parameters of a method. These are optional, method may contain zero parameters.
method body − The method body defines what the method does with the statements.
Example
Here is the source code of the above defined method called min(). This method takes two parameters num1 and num2 and returns the maximum between the two −
/** the snippet returns the minimum between two numbers */

public static int minFunction(int n1, int n2) {
   int min;
   if (n1 > n2)
      min = n2;
   else
      min = n1;

   return min;
}
Method Calling
For using a method, it should be called. There are two ways in which a method is called i.e., method returns a value or returning nothing (no return value).
The process of method calling is simple. When a program invokes a method, the program control gets transferred to the called method. This called method then returns control to the caller in two conditions, when −
- the return statement is executed.
- it reaches the method ending closing brace.
The methods returning void is considered as call to a statement. Lets consider an example −
System.out.println("This is tutorialspoint.com!");
The method returning value can be understood by the following example −
int result = sum(6, 9);
Following is the example to demonstrate how to define a method and how to call it −
Example
public class ExampleMinNumber {

   public static void main(String[] args) {
      int a = 11;
      int b = 6;
      int c = minFunction(a, b);
      System.out.println("Minimum Value = " + c);
   }

   /** returns the minimum of two numbers */
   public static int minFunction(int n1, int n2) {
      int min;
      if (n1 > n2)
         min = n2;
      else
         min = n1;

      return min;
   }
}
Output
Minimum value = 6
The void Keyword
The void keyword allows us to create methods which do not return a value. Here, in the following example we're considering a void method methodRankPoints. This method is a void method, which does not return any value. Call to a void method must be a statement i.e. methodRankPoints(255.7);. It is a Java statement which ends with a semicolon as shown in the following example.
Example
public class ExampleVoid {

   public static void main(String[] args) {
      methodRankPoints(255.7);
   }

   public static void methodRankPoints(double points) {
      if (points >= 202.5) {
         System.out.println("Rank:A1");
      }else if (points >= 122.4) {
         System.out.println("Rank:A2");
      }else {
         System.out.println("Rank:A3");
      }
   }
}
Output
Rank:A1
Passing Parameters by Value
While working under calling process, arguments is to be passed. These should be in the same order as their respective parameters in the method specification. Parameters can be passed by value or by reference.
Passing Parameters by Value means calling a method with a parameter. Through this, the argument value is passed to the parameter.
Example
The following program shows an example of passing parameter by value. The values of the arguments remains the same even after the method invocation.
public class swappingExample {

   public static void main(String[] args) {
      int a = 30;
      int b = 45;
      System.out.println("Before swapping, a = " + a + " and b = " + b);

      // Invoke the swap method
      swapFunction(a, b);
      System.out.println("\n**Now, Before and After swapping values will be same here**:");
      System.out.println("After swapping, a = " + a + " and b is " + b);
   }

   public static void swapFunction(int a, int b) {
      System.out.println("Before swapping(Inside), a = " + a + " b = " + b);

      // Swap n1 with n2
      int c = a;
      a = b;
      b = c;
      System.out.println("After swapping(Inside), a = " + a + " b = " + b);
   }
}
Output
Before swapping, a = 30 and b = 45
Before swapping(Inside), a = 30 b = 45
After swapping(Inside), a = 45 b = 30

**Now, Before and After swapping values will be same here**:
After swapping, a = 30 and b is 45
Method Overloading
When a class has two or more methods by the same name but different parameters, it is known as method overloading. It is different from overriding. In overriding, a method has the same method name, type, number of parameters, etc.
Let's consider the example discussed earlier for finding minimum numbers of integer type. If, let's say we want to find the minimum number of double type. Then the concept of overloading will be introduced to create two or more methods with the same name but different parameters.
The following example explains the same −
Example
public class ExampleOverloading {

   public static void main(String[] args) {
      int a = 11;
      int b = 6;
      double c = 7.3;
      double d = 9.4;
      int result1 = minFunction(a, b);

      // same function name with different parameters
      double result2 = minFunction(c, d);
      System.out.println("Minimum Value = " + result1);
      System.out.println("Minimum Value = " + result2);
   }

   // for integer
   public static int minFunction(int n1, int n2) {
      int min;
      if (n1 > n2)
         min = n2;
      else
         min = n1;

      return min;
   }

   // for double
   public static double minFunction(double n1, double n2) {
     double min;
      if (n1 > n2)
         min = n2;
      else
         min = n1;

      return min;
   }
}
Output
Minimum Value = 6
Minimum Value = 7.3
Overloading methods makes program readable. Here, two methods are given by the same name but with different parameters. The minimum number from integer and double types is the result.
Using Command-Line Arguments
Sometimes you will want to pass some information into a program when you run it. This is accomplished by passing command-line arguments to main( ).
A command-line argument is the information that directly follows the program's name on the command line when it is executed. To access the command-line arguments inside a Java program is quite easy. They are stored as strings in the String array passed to main( ).
Example
The following program displays all of the command-line arguments that it is called with −
public class CommandLine {

   public static void main(String args[]) {
      for(int i = 0; i<args.length; i++) {
         System.out.println("args[" + i + "]: " +  args[i]);
      }
   }
}
Try executing this program as shown here −
$java CommandLine this is a command line 200 -100
Output
args[0]: this
args[1]: is
args[2]: a
args[3]: command
args[4]: line
args[5]: 200
args[6]: -100
The this keyword
this is a keyword in Java which is used as a reference to the object of the current class, with in an instance method or a constructor. Using this you can refer the members of a class such as constructors, variables and methods.
Note − The keyword this is used only within instance methods or constructors
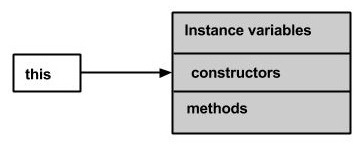
In general, the keyword this is used to −
Differentiate the instance variables from local variables if they have same names, within a constructor or a method.
class Student {
   int age;
   Student(int age) {
      this.age = age;
   }
}
Call one type of constructor (parametrized constructor or default) from other in a class. It is known as explicit constructor invocation.
class Student {
   int age
   Student() {
      this(20);
   }

   Student(int age) {
      this.age = age;
   }
}
Example
Here is an example that uses this keyword to access the members of a class. Copy and paste the following program in a file with the name, This_Example.java.
public class This_Example {
   // Instance variable num
   int num = 10;

   This_Example() {
      System.out.println("This is an example program on keyword this");
   }

   This_Example(int num) {
      // Invoking the default constructor
      this();

      // Assigning the local variable <i>num</i> to the instance variable <i>num</i>
      this.num = num;
   }

   public void greet() {
      System.out.println("Hi Welcome to Tutorialspoint");
   }

   public void print() {
      // Local variable num
      int num = 20;

      // Printing the local variable
      System.out.println("value of local variable num is : "+num);

      // Printing the instance variable
      System.out.println("value of instance variable num is : "+this.num);

      // Invoking the greet method of a class
      this.greet();
   }

   public static void main(String[] args) {
      // Instantiating the class
      This_Example obj1 = new This_Example();

      // Invoking the print method
      obj1.print();

      // Passing a new value to the num variable through parametrized constructor
      This_Example obj2 = new This_Example(30);

      // Invoking the print method again
      obj2.print();
   }
}
Output
This is an example program on keyword this
value of local variable num is : 20
value of instance variable num is : 10
Hi Welcome to Tutorialspoint
This is an example program on keyword this
value of local variable num is : 20
value of instance variable num is : 30
Hi Welcome to Tutorialspoint
Variable Arguments(var-args)
JDK 1.5 enables you to pass a variable number of arguments of the same type to a method. The parameter in the method is declared as follows −
typeName... parameterName
In the method declaration, you specify the type followed by an ellipsis (...). Only one variable-length parameter may be specified in a method, and this parameter must be the last parameter. Any regular parameters must precede it.
Example
public class VarargsDemo {

   public static void main(String args[]) {
      // Call method with variable args
	  printMax(34, 3, 3, 2, 56.5);
      printMax(new double[]{1, 2, 3});
   }

   public static void printMax( double... numbers) {
      if (numbers.length == 0) {
         System.out.println("No argument passed");
         return;
      }

      double result = numbers[0];

      for (int i = 1; i <  numbers.length; i++)
      if (numbers[i] >  result)
      result = numbers[i];
      System.out.println("The max value is " + result);
   }
}
Output
The max value is 56.5
The max value is 3.0
The finalize( ) Method
It is possible to define a method that will be called just before an object's final destruction by the garbage collector. This method is called finalize( ), and it can be used to ensure that an object terminates cleanly.
For example, you might use finalize( ) to make sure that an open file owned by that object is closed.
To add a finalizer to a class, you simply define the finalize( ) method. The Java runtime calls that method whenever it is about to recycle an object of that class.
Inside the finalize( ) method, you will specify those actions that must be performed before an object is destroyed.
The finalize( ) method has this general form −
protected void finalize( ) {
   // finalization code here
}
Here, the keyword protected is a specifier that prevents access to finalize( ) by code defined outside its class.
This means that you cannot know when or even if finalize( ) will be executed. For example, if your program ends before garbage collection occurs, finalize( ) will not execute.
Java - Constructors
A constructor initializes an object when it is created. It has the same name as its class and is syntactically similar to a method. However, constructors have no explicit return type.
Typically, you will use a constructor to give initial values to the instance variables defined by the class, or to perform any other start-up procedures required to create a fully formed object.
All classes have constructors, whether you define one or not, because Java automatically provides a default constructor that initializes all member variables to zero. However, once you define your own constructor, the default constructor is no longer used.
Syntax
Following is the syntax of a constructor −
class ClassName {
   ClassName() {
   }
}
Java allows two types of constructors namely −
- No argument Constructors
- Parameterized Constructors
No argument Constructors
As the name specifies the no argument constructors of Java does not accept any parameters instead, using these constructors the instance variables of a method will be initialized with fixed values for all objects.
Example
Public class MyClass {
   Int num;
   MyClass() {
      num = 100;
   }
}
You would call constructor to initialize objects as follows
public class ConsDemo {
   public static void main(String args[]) {
      MyClass t1 = new MyClass();
      MyClass t2 = new MyClass();
      System.out.println(t1.num + " " + t2.num);
   }
}
Output
100 100
Parameterized Constructors
Most often, you will need a constructor that accepts one or more parameters. Parameters are added to a constructor in the same way that they are added to a method, just declare them inside the parentheses after the constructor's name.
Example
Here is a simple example that uses a constructor −
// A simple constructor.
class MyClass {
   int x;

   // Following is the constructor
   MyClass(int i ) {
      x = i;
   }
}
You would call constructor to initialize objects as follows −
public class ConsDemo {
   public static void main(String args[]) {
      MyClass t1 = new MyClass( 10 );
      MyClass t2 = new MyClass( 20 );
      System.out.println(t1.x + " " + t2.x);
   }
}
Output
10 20
Java - Access Modifiers
Java provides a number of access modifiers to set access levels for classes, variables, methods, and constructors. The four access levels are −
- Visible to the package, the default. No modifiers are needed.
- Visible to the class only (private).
- Visible to the world (public).
- Visible to the package and all subclasses (protected).
Default Access Modifier - No Keyword
Default access modifier means we do not explicitly declare an access modifier for a class, field, method, etc.
A variable or method declared without any access control modifier is available to any other class in the same package. The fields in an interface are implicitly public static final and the methods in an interface are by default public.
Example
Variables and methods can be declared without any modifiers, as in the following examples −
String version = "1.5.1";

boolean processOrder() {
   return true;
}
Private Access Modifier - Private
Methods, variables, and constructors that are declared private can only be accessed within the declared class itself.
Private access modifier is the most restrictive access level. Class and interfaces cannot be private.
Variables that are declared private can be accessed outside the class, if public getter methods are present in the class.
Using the private modifier is the main way that an object encapsulates itself and hides data from the outside world.
Example
The following class uses private access control −
public class Logger {
   private String format;

   public String getFormat() {
      return this.format;
   }

   public void setFormat(String format) {
      this.format = format;
   }
}
Here, the format variable of the Logger class is private, so there's no way for other classes to retrieve or set its value directly.
So, to make this variable available to the outside world, we defined two public methods: getFormat(), which returns the value of format, and setFormat(String), which sets its value.
Public Access Modifier - Public
A class, method, constructor, interface, etc. declared public can be accessed from any other class. Therefore, fields, methods, blocks declared inside a public class can be accessed from any class belonging to the Java Universe.
However, if the public class we are trying to access is in a different package, then the public class still needs to be imported. Because of class inheritance, all public methods and variables of a class are inherited by its subclasses.
Example
The following function uses public access control −
public static void main(String[] arguments) {
   // ...
}
The main() method of an application has to be public. Otherwise, it could not be called by a Java interpreter (such as java) to run the class.
Protected Access Modifier - Protected
Variables, methods, and constructors, which are declared protected in a superclass can be accessed only by the subclasses in other package or any class within the package of the protected members' class.
The protected access modifier cannot be applied to class and interfaces. Methods, fields can be declared protected, however methods and fields in a interface cannot be declared protected.
Protected access gives the subclass a chance to use the helper method or variable, while preventing a nonrelated class from trying to use it.
Example
The following parent class uses protected access control, to allow its child class override openSpeaker() method −
class AudioPlayer {
   protected boolean openSpeaker(Speaker sp) {
      // implementation details
   }
}

class StreamingAudioPlayer extends AudioPlayer {
   boolean openSpeaker(Speaker sp) {
      // implementation details
   }
}
Here, if we define openSpeaker() method as private, then it would not be accessible from any other class other than AudioPlayer. If we define it as public, then it would become accessible to all the outside world. But our intention is to expose this method to its subclass only, that's why we have used protected modifier.
Access Control and Inheritance
The following rules for inherited methods are enforced −
Methods declared public in a superclass also must be public in all subclasses.
Methods declared protected in a superclass must either be protected or public in subclasses; they cannot be private.
Methods declared private are not inherited at all, so there is no rule for them.
Example
In this example, we've created a class with a private variable age and a variable with default scope as name. Using setter/getter method, we're updating age and getting value and name is updated directly.
public class Puppy {
   private int age;
   String name;

   public Puppy() {
   }

   public void setAge( int age ) {
      this.age = age;
   }

   public int getAge( ) {
      return age;
   }

   public static void main(String []args) {
      Puppy myPuppy = new Puppy();

      // update age variable using method call
      myPuppy.setAge( 2 );

      // update name directly
      myPuppy.name = "Tommy";
      System.out.println("Age: " + myPuppy.getAge() +", name: " + myPuppy.name );
   }
}
Output
Age: 2, name: Tommy
Java - Inheritance
Inheritance can be defined as the process where one class acquires the properties (methods and fields) of another. With the use of inheritance the information is made manageable in a hierarchical order.
The class which inherits the properties of other is known as subclass (derived class, child class) and the class whose properties are inherited is known as superclass (base class, parent class).
extends Keyword
extends is the keyword used to inherit the properties of a class. Following is the syntax of extends keyword.
Syntax
class Super {
   .....
   .....
}
class Sub extends Super {
   .....
   .....
}
Sample Code
Following is an example demonstrating Java inheritance. In this example, you can observe two classes namely Calculation and My_Calculation.
Using extends keyword, the My_Calculation inherits the methods addition() and Subtraction() of Calculation class.
Copy and paste the following program in a file with name My_Calculation.java
Example
class Calculation {
   int z;

   public void addition(int x, int y) {
      z = x + y;
      System.out.println("The sum of the given numbers:"+z);
   }

   public void Subtraction(int x, int y) {
      z = x - y;
      System.out.println("The difference between the given numbers:"+z);
   }
}

public class My_Calculation extends Calculation {
   public void multiplication(int x, int y) {
      z = x * y;
      System.out.println("The product of the given numbers:"+z);
   }

   public static void main(String args[]) {
      int a = 20, b = 10;
      My_Calculation demo = new My_Calculation();
      demo.addition(a, b);
      demo.Subtraction(a, b);
      demo.multiplication(a, b);
   }
}
Compile and execute the above code as shown below.
javac My_Calculation.java
java My_Calculation
After executing the program, it will produce the following result −
Output
The sum of the given numbers:30
The difference between the given numbers:10
The product of the given numbers:200
In the given program, when an object to My_Calculation class is created, a copy of the contents of the superclass is made within it. That is why, using the object of the subclass you can access the members of a superclass.
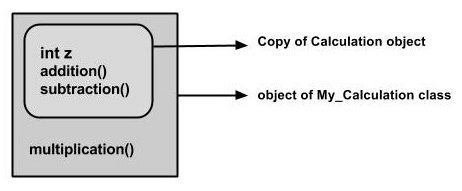
The Superclass reference variable can hold the subclass object, but using that variable you can access only the members of the superclass, so to access the members of both classes it is recommended to always create reference variable to the subclass.
If you consider the above program, you can instantiate the class as given below. But using the superclass reference variable ( cal in this case) you cannot call the method multiplication(), which belongs to the subclass My_Calculation.
Calculation demo = new My_Calculation();
demo.addition(a, b);
demo.Subtraction(a, b);
Note − A subclass inherits all the members (fields, methods, and nested classes) from its superclass. Constructors are not members, so they are not inherited by subclasses, but the constructor of the superclass can be invoked from the subclass.
The super keyword
The super keyword is similar to this keyword. Following are the scenarios where the super keyword is used.
It is used to differentiate the members of superclass from the members of subclass, if they have same names.
It is used to invoke the superclass constructor from subclass.
Differentiating the Members
If a class is inheriting the properties of another class. And if the members of the superclass have the names same as the sub class, to differentiate these variables we use super keyword as shown below.
super.variable
super.method();
Sample Code
This section provides you a program that demonstrates the usage of the super keyword.
In the given program, you have two classes namely Sub_class and Super_class, both have a method named display() with different implementations, and a variable named num with different values. We are invoking display() method of both classes and printing the value of the variable num of both classes. Here you can observe that we have used super keyword to differentiate the members of superclass from subclass.
Copy and paste the program in a file with name Sub_class.java.
Example
class Super_class {
   int num = 20;

   // display method of superclass
   public void display() {
      System.out.println("This is the display method of superclass");
   }
}

public class Sub_class extends Super_class {
   int num = 10;

   // display method of sub class
   public void display() {
      System.out.println("This is the display method of subclass");
   }

   public void my_method() {
      // Instantiating subclass
      Sub_class sub = new Sub_class();

      // Invoking the display() method of sub class
      sub.display();

      // Invoking the display() method of superclass
      super.display();

      // printing the value of variable num of subclass
      System.out.println("value of the variable named num in sub class:"+ sub.num);

      // printing the value of variable num of superclass
      System.out.println("value of the variable named num in super class:"+ super.num);
   }

   public static void main(String args[]) {
      Sub_class obj = new Sub_class();
      obj.my_method();
   }
}
Compile and execute the above code using the following syntax.
javac Super_Demo
java Super
On executing the program, you will get the following result −
Output
This is the display method of subclass
This is the display method of superclass
value of the variable named num in sub class:10
value of the variable named num in super class:20
Invoking Superclass Constructor
If a class is inheriting the properties of another class, the subclass automatically acquires the default constructor of the superclass. But if you want to call a parameterized constructor of the superclass, you need to use the super keyword as shown below.
super(values);
Sample Code
The program given in this section demonstrates how to use the super keyword to invoke the parametrized constructor of the superclass. This program contains a superclass and a subclass, where the superclass contains a parameterized constructor which accepts a integer value, and we used the super keyword to invoke the parameterized constructor of the superclass.
Copy and paste the following program in a file with the name Subclass.java
Example
class Superclass {
   int age;

   Superclass(int age) {
      this.age = age;
   }

   public void getAge() {
      System.out.println("The value of the variable named age in super class is: " +age);
   }
}

public class Subclass extends Superclass {
   Subclass(int age) {
      super(age);
   }

   public static void main(String args[]) {
      Subclass s = new Subclass(24);
      s.getAge();
   }
}
Compile and execute the above code using the following syntax.
javac Subclass
java Subclass
Output
The value of the variable named age in super class is: 24
IS-A Relationship
IS-A is a way of saying: This object is a type of that object. Let us see how the extends keyword is used to achieve inheritance.
public class Animal {
}

public class Mammal extends Animal {
}

public class Reptile extends Animal {
}

public class Dog extends Mammal {
}
Now, based on the above example, in Object-Oriented terms, the following are true −
- Animal is the superclass of Mammal class.
- Animal is the superclass of Reptile class.
- Mammal and Reptile are subclasses of Animal class.
- Dog is the subclass of both Mammal and Animal classes.
Now, if we consider the IS-A relationship, we can say −
- Mammal IS-A Animal
- Reptile IS-A Animal
- Dog IS-A Mammal
- Hence: Dog IS-A Animal as well
With the use of the extends keyword, the subclasses will be able to inherit all the properties of the superclass except for the private properties of the superclass.
We can assure that Mammal is actually an Animal with the use of the instance operator.
Example
class Animal {
}

class Mammal extends Animal {
}

class Reptile extends Animal {
}

public class Dog extends Mammal {

   public static void main(String args[]) {
      Animal a = new Animal();
      Mammal m = new Mammal();
      Dog d = new Dog();

      System.out.println(m instanceof Animal);
      System.out.println(d instanceof Mammal);
      System.out.println(d instanceof Animal);
   }
}
Output
true
true
true
Since we have a good understanding of the extends keyword, let us look into how the implements keyword is used to get the IS-A relationship.
Generally, the implements keyword is used with classes to inherit the properties of an interface. Interfaces can never be extended by a class.
Example
public interface Animal {
}

public class Mammal implements Animal {
}

public class Dog extends Mammal {
}
The instanceof Keyword
Let us use the instanceof operator to check determine whether Mammal is actually an Animal, and dog is actually an Animal.
Example
interface Animal{}
class Mammal implements Animal{}

public class Dog extends Mammal {

   public static void main(String args[]) {
      Mammal m = new Mammal();
      Dog d = new Dog();

      System.out.println(m instanceof Animal);
      System.out.println(d instanceof Mammal);
      System.out.println(d instanceof Animal);
   }
}
Output
true
true
true
HAS-A relationship
These relationships are mainly based on the usage. This determines whether a certain class HAS-A certain thing. This relationship helps to reduce duplication of code as well as bugs.
Lets look into an example −
Example
public class Vehicle{}
public class Speed{}

public class Van extends Vehicle {
   private Speed sp;
}
This shows that class Van HAS-A Speed. By having a separate class for Speed, we do not have to put the entire code that belongs to speed inside the Van class, which makes it possible to reuse the Speed class in multiple applications.
In Object-Oriented feature, the users do not need to bother about which object is doing the real work. To achieve this, the Van class hides the implementation details from the users of the Van class. So, basically what happens is the users would ask the Van class to do a certain action and the Van class will either do the work by itself or ask another class to perform the action.
Types of Inheritance
There are various types of inheritance as demonstrated below.
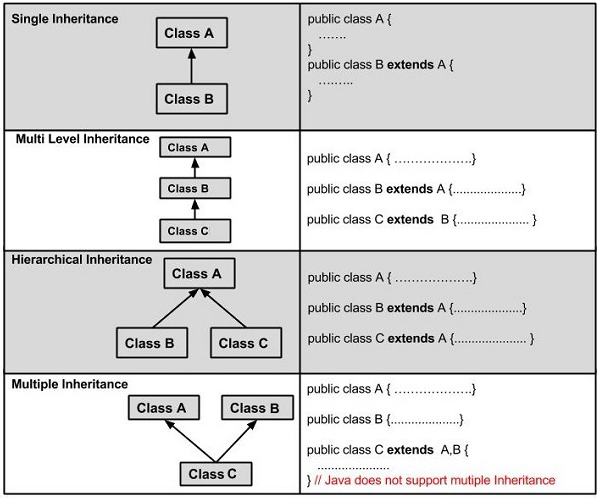
A very important fact to remember is that Java does not support multiple inheritance. This means that a class cannot extend more than one class. Therefore following is illegal −
Example
public class extends Animal, Mammal{}
However, a class can implement one or more interfaces, which has helped Java get rid of the impossibility of multiple inheritance.
Java - Polymorphism
Polymorphism is the ability of an object to take on many forms. The most common use of polymorphism in OOP occurs when a parent class reference is used to refer to a child class object.
Any Java object that can pass more than one IS-A test is considered to be polymorphic. In Java, all Java objects are polymorphic since any object will pass the IS-A test for their own type and for the class Object.
It is important to know that the only possible way to access an object is through a reference variable. A reference variable can be of only one type. Once declared, the type of a reference variable cannot be changed.
The reference variable can be reassigned to other objects provided that it is not declared final. The type of the reference variable would determine the methods that it can invoke on the object.
A reference variable can refer to any object of its declared type or any subtype of its declared type. A reference variable can be declared as a class or interface type.
Example
Let us look at an example.
public interface Vegetarian{}
public class Animal{}
public class Deer extends Animal implements Vegetarian{}
Now, the Deer class is considered to be polymorphic since this has multiple inheritance. Following are true for the above examples −
- A Deer IS-A Animal
- A Deer IS-A Vegetarian
- A Deer IS-A Deer
- A Deer IS-A Object
When we apply the reference variable facts to a Deer object reference, the following declarations are legal −
Example
Deer d = new Deer();
Animal a = d;
Vegetarian v = d;
Object o = d;
All the reference variables d, a, v, o refer to the same Deer object in the heap.
Example
In this example, we're showcasing the above concept by creating the object of a Deer and assigning the same to the references of superclasses or implemented interface.
interface Vegetarian{}
class Animal{}
public class Deer extends Animal implements Vegetarian{
	public static void main(String[] args) {
		Deer d = new Deer();
		Animal a = d;
		Vegetarian v = d;
		Object o = d;

		System.out.println(d instanceof Deer);
		System.out.println(a instanceof Deer);
		System.out.println(v instanceof Deer);
		System.out.println(o instanceof Deer);
	}
}
Output
true
true
true
true
Virtual Methods
In this section, I will show you how the behavior of overridden methods in Java allows you to take advantage of polymorphism when designing your classes.
We already have discussed method overriding, where a child class can override a method in its parent. An overridden method is essentially hidden in the parent class, and is not invoked unless the child class uses the super keyword within the overriding method.
Example
/* File name : Employee.java */
public class Employee {
   private String name;
   private String address;
   private int number;

   public Employee(String name, String address, int number) {
      System.out.println("Constructing an Employee");
      this.name = name;
      this.address = address;
      this.number = number;
   }

   public void mailCheck() {
      System.out.println("Mailing a check to " + this.name + " " + this.address);
   }

   public String toString() {
      return name + " " + address + " " + number;
   }

   public String getName() {
      return name;
   }

   public String getAddress() {
      return address;
   }

   public void setAddress(String newAddress) {
      address = newAddress;
   }

   public int getNumber() {
      return number;
   }
}
Now suppose we extend Employee class as follows −
/* File name : Salary.java */
public class Salary extends Employee {
   private double salary; // Annual salary

   public Salary(String name, String address, int number, double salary) {
      super(name, address, number);
      setSalary(salary);
   }

   public void mailCheck() {
      System.out.println("Within mailCheck of Salary class ");
      System.out.println("Mailing check to " + getName()
      + " with salary " + salary);
   }

   public double getSalary() {
      return salary;
   }

   public void setSalary(double newSalary) {
      if(newSalary >= 0.0) {
         salary = newSalary;
      }
   }

   public double computePay() {
      System.out.println("Computing salary pay for " + getName());
      return salary/52;
   }
}
Now, you study the following program carefully and try to determine its output −
/* File name : VirtualDemo.java */
public class VirtualDemo {

   public static void main(String [] args) {
      Salary s = new Salary("Mohd Mohtashim", "Ambehta, UP", 3, 3600.00);
      Employee e = new Salary("John Adams", "Boston, MA", 2, 2400.00);
      System.out.println("Call mailCheck using Salary reference --");
      s.mailCheck();
      System.out.println("\n Call mailCheck using Employee reference--");
      e.mailCheck();
   }
}

class Employee {
   private String name;
   private String address;
   private int number;

   public Employee(String name, String address, int number) {
      System.out.println("Constructing an Employee");
      this.name = name;
      this.address = address;
      this.number = number;
   }

   public void mailCheck() {
      System.out.println("Mailing a check to " + this.name + " " + this.address);
   }

   public String toString() {
      return name + " " + address + " " + number;
   }

   public String getName() {
      return name;
   }

   public String getAddress() {
      return address;
   }

   public void setAddress(String newAddress) {
      address = newAddress;
   }

   public int getNumber() {
      return number;
   }
}

class Salary extends Employee {
   private double salary; // Annual salary

   public Salary(String name, String address, int number, double salary) {
      super(name, address, number);
      setSalary(salary);
   }

   public void mailCheck() {
      System.out.println("Within mailCheck of Salary class ");
      System.out.println("Mailing check to " + getName()
      + " with salary " + salary);
   }

   public double getSalary() {
      return salary;
   }

   public void setSalary(double newSalary) {
      if(newSalary >= 0.0) {
         salary = newSalary;
      }
   }

   public double computePay() {
      System.out.println("Computing salary pay for " + getName());
      return salary/52;
   }
}
Output
Constructing an Employee
Constructing an Employee

Call mailCheck using Salary reference --
Within mailCheck of Salary class
Mailing check to Mohd Mohtashim with salary 3600.0

Call mailCheck using Employee reference--
Within mailCheck of Salary class
Mailing check to John Adams with salary 2400.0
Here, we instantiate two Salary objects. One using a Salary reference s, and the other using an Employee reference e.
While invoking s.mailCheck(), the compiler sees mailCheck() in the Salary class at compile time, and the JVM invokes mailCheck() in the Salary class at run time.
mailCheck() on e is quite different because e is an Employee reference. When the compiler sees e.mailCheck(), the compiler sees the mailCheck() method in the Employee class.
Here, at compile time, the compiler used mailCheck() in Employee to validate this statement. At run time, however, the JVM invokes mailCheck() in the Salary class.
This behavior is referred to as virtual method invocation, and these methods are referred to as virtual methods. An overridden method is invoked at run time, no matter what data type the reference is that was used in the source code at compile time.
Java - Overriding
In the previous chapter, we talked about superclasses and subclasses. If a class inherits a method from its superclass, then there is a chance to override the method provided that it is not marked final.
The benefit of overriding is: ability to define a behavior that's specific to the subclass type, which means a subclass can implement a parent class method based on its requirement.
In object-oriented terms, overriding means to override the functionality of an existing method.
Example
Let us look at an example.
class Animal {
   public void move() {
      System.out.println("Animals can move");
   }
}

class Dog extends Animal {
   public void move() {
      System.out.println("Dogs can walk and run");
   }
}

public class TestDog {

   public static void main(String args[]) {
      Animal a = new Animal();   // Animal reference and object
      Animal b = new Dog();   // Animal reference but Dog object

      a.move();   // runs the method in Animal class
      b.move();   // runs the method in Dog class
   }
}
Output
Animals can move
Dogs can walk and run
In the above example, you can see that even though b is a type of Animal it runs the move method in the Dog class. The reason for this is: In compile time, the check is made on the reference type. However, in the runtime, JVM figures out the object type and would run the method that belongs to that particular object.
Therefore, in the above example, the program will compile properly since Animal class has the method move. Then, at the runtime, it runs the method specific for that object.
Consider the following example −
Example
class Animal {
   public void move() {
      System.out.println("Animals can move");
   }
}

class Dog extends Animal {
   public void move() {
      System.out.println("Dogs can walk and run");
   }
   public void bark() {
      System.out.println("Dogs can bark");
   }
}

public class TestDog {

   public static void main(String args[]) {
      Animal a = new Animal();   // Animal reference and object
      Animal b = new Dog();   // Animal reference but Dog object

      a.move();   // runs the method in Animal class
      b.move();   // runs the method in Dog class
      b.bark();
   }
}
Output
TestDog.java:26: error: cannot find symbol
      b.bark();
       ^
  symbol:   method bark()
  location: variable b of type Animal
1 error
This program will throw a compile time error since b's reference type Animal doesn't have a method by the name of bark.
Rules for Method Overriding
The argument list should be exactly the same as that of the overridden method.
The return type should be the same or a subtype of the return type declared in the original overridden method in the superclass.
The access level cannot be more restrictive than the overridden method's access level. For example: If the superclass method is declared public then the overridding method in the sub class cannot be either private or protected.
Instance methods can be overridden only if they are inherited by the subclass.
A method declared final cannot be overridden.
A method declared static cannot be overridden but can be re-declared.
If a method cannot be inherited, then it cannot be overridden.
A subclass within the same package as the instance's superclass can override any superclass method that is not declared private or final.
A subclass in a different package can only override the non-final methods declared public or protected.
An overriding method can throw any uncheck exceptions, regardless of whether the overridden method throws exceptions or not. However, the overriding method should not throw checked exceptions that are new or broader than the ones declared by the overridden method. The overriding method can throw narrower or fewer exceptions than the overridden method.
Constructors cannot be overridden.
Using the super Keyword
When invoking a superclass version of an overridden method the super keyword is used.
Example
class Animal {
   public void move() {
      System.out.println("Animals can move");
   }
}

class Dog extends Animal {
   public void move() {
      super.move();   // invokes the super class method
      System.out.println("Dogs can walk and run");
   }
}

public class TestDog {

   public static void main(String args[]) {
      Animal b = new Dog();   // Animal reference but Dog object
      b.move();   // runs the method in Dog class
   }
}
Output
Animals can move
Dogs can walk and run
Java - Abstraction
As per dictionary, abstraction is the quality of dealing with ideas rather than events. For example, when you consider the case of e-mail, complex details such as what happens as soon as you send an e-mail, the protocol your e-mail server uses are hidden from the user. Therefore, to send an e-mail you just need to type the content, mention the address of the receiver, and click send.
Likewise in Object-oriented programming, abstraction is a process of hiding the implementation details from the user, only the functionality will be provided to the user. In other words, the user will have the information on what the object does instead of how it does it.
In Java, abstraction is achieved using Abstract classes and interfaces.
Abstract Class
A class which contains the abstract keyword in its declaration is known as abstract class.
Abstract classes may or may not contain abstract methods, i.e., methods without body ( public void get(); )
But, if a class has at least one abstract method, then the class must be declared abstract.
If a class is declared abstract, it cannot be instantiated.
To use an abstract class, you have to inherit it from another class, provide implementations to the abstract methods in it.
If you inherit an abstract class, you have to provide implementations to all the abstract methods in it.
Example
This section provides you an example of the abstract class. To create an abstract class, just use the abstract keyword before the class keyword, in the class declaration.
/* File name : Employee.java */
public abstract class Employee {
   private String name;
   private String address;
   private int number;

   public Employee(String name, String address, int number) {
      System.out.println("Constructing an Employee");
      this.name = name;
      this.address = address;
      this.number = number;
   }

   public double computePay() {
     System.out.println("Inside Employee computePay");
     return 0.0;
   }

   public void mailCheck() {
      System.out.println("Mailing a check to " + this.name + " " + this.address);
   }

   public String toString() {
      return name + " " + address + " " + number;
   }

   public String getName() {
      return name;
   }

   public String getAddress() {
      return address;
   }

   public void setAddress(String newAddress) {
      address = newAddress;
   }

   public int getNumber() {
      return number;
   }
}
You can observe that except abstract methods the Employee class is same as normal class in Java. The class is now abstract, but it still has three fields, seven methods, and one constructor.
Now you can try to instantiate the Employee class in the following way −
/* File name : AbstractDemo.java */
public class AbstractDemo {

   public static void main(String [] args) {
      /* Following is not allowed and would raise error */
      Employee e = new Employee("George W.", "Houston, TX", 43);
      System.out.println("\n Call mailCheck using Employee reference--");
      e.mailCheck();
   }
}

abstract class Employee {
   private String name;
   private String address;
   private int number;

   public Employee(String name, String address, int number) {
      System.out.println("Constructing an Employee");
      this.name = name;
      this.address = address;
      this.number = number;
   }

   public double computePay() {
     System.out.println("Inside Employee computePay");
     return 0.0;
   }

   public void mailCheck() {
      System.out.println("Mailing a check to " + this.name + " " + this.address);
   }

   public String toString() {
      return name + " " + address + " " + number;
   }

   public String getName() {
      return name;
   }

   public String getAddress() {
      return address;
   }

   public void setAddress(String newAddress) {
      address = newAddress;
   }

   public int getNumber() {
      return number;
   }
}
When you compile the above class, it gives you the following error −
Employee.java:46: Employee is abstract; cannot be instantiated
      Employee e = new Employee("George W.", "Houston, TX", 43);
                   ^
1 error
Inheriting the Abstract Class
We can inherit the properties of Employee class just like concrete class in the following way −
Example
/* File name : Salary.java */
public class Salary extends Employee {
   private double salary;   // Annual salary

   public Salary(String name, String address, int number, double salary) {
      super(name, address, number);
      setSalary(salary);
   }

   public void mailCheck() {
      System.out.println("Within mailCheck of Salary class ");
      System.out.println("Mailing check to " + getName() + " with salary " + salary);
   }

   public double getSalary() {
      return salary;
   }

   public void setSalary(double newSalary) {
      if(newSalary >= 0.0) {
         salary = newSalary;
      }
   }

   public double computePay() {
      System.out.println("Computing salary pay for " + getName());
      return salary/52;
   }
}
Here, you cannot instantiate the Employee class, but you can instantiate the Salary Class, and using this instance you can access all the three fields and seven methods of Employee class as shown below.
/* File name : AbstractDemo.java */
public class AbstractDemo {

   public static void main(String [] args) {
      Salary s = new Salary("Mohd Mohtashim", "Ambehta, UP", 3, 3600.00);
      Employee e = new Salary("John Adams", "Boston, MA", 2, 2400.00);
      System.out.println("Call mailCheck using Salary reference --");
      s.mailCheck();
      System.out.println("\n Call mailCheck using Employee reference--");
      e.mailCheck();
   }
}
abstract class Employee {
   private String name;
   private String address;
   private int number;

   public Employee(String name, String address, int number) {
      System.out.println("Constructing an Employee");
      this.name = name;
      this.address = address;
      this.number = number;
   }

   public double computePay() {
     System.out.println("Inside Employee computePay");
     return 0.0;
   }

   public void mailCheck() {
      System.out.println("Mailing a check to " + this.name + " " + this.address);
   }

   public String toString() {
      return name + " " + address + " " + number;
   }

   public String getName() {
      return name;
   }

   public String getAddress() {
      return address;
   }

   public void setAddress(String newAddress) {
      address = newAddress;
   }

   public int getNumber() {
      return number;
   }
}
class Salary extends Employee {
   private double salary;   // Annual salary

   public Salary(String name, String address, int number, double salary) {
      super(name, address, number);
      setSalary(salary);
   }

   public void mailCheck() {
      System.out.println("Within mailCheck of Salary class ");
      System.out.println("Mailing check to " + getName() + " with salary " + salary);
   }

   public double getSalary() {
      return salary;
   }

   public void setSalary(double newSalary) {
      if(newSalary >= 0.0) {
         salary = newSalary;
      }
   }

   public double computePay() {
      System.out.println("Computing salary pay for " + getName());
      return salary/52;
   }
}
Output
Constructing an Employee
Constructing an Employee
Call mailCheck using Salary reference --
Within mailCheck of Salary class
Mailing check to Mohd Mohtashim with salary 3600.0

 Call mailCheck using Employee reference--
Within mailCheck of Salary class
Mailing check to John Adams with salary 2400.0
Abstract Methods
If you want a class to contain a particular method but you want the actual implementation of that method to be determined by child classes, you can declare the method in the parent class as an abstract.
abstract keyword is used to declare the method as abstract.
You have to place the abstract keyword before the method name in the method declaration.
An abstract method contains a method signature, but no method body.
Instead of curly braces, an abstract method will have a semoi colon (;) at the end.
Following is an example of the abstract method.
Example
public abstract class Employee {
   private String name;
   private String address;
   private int number;

   public abstract double computePay();
   // Remainder of class definition
}
Declaring a method as abstract has two consequences −
The class containing it must be declared as abstract.
Any class inheriting the current class must either override the abstract method or declare itself as abstract.
Note − Eventually, a descendant class has to implement the abstract method; otherwise, you would have a hierarchy of abstract classes that cannot be instantiated.
Suppose Salary class inherits the Employee class, then it should implement the computePay() method as shown below −
/* File name : Salary.java */
public class Salary extends Employee {
   private double salary;   // Annual salary

   public double computePay() {
      System.out.println("Computing salary pay for " + getName());
      return salary/52;
   }
   // Remainder of class definition
}
Example
Following example showcases the concept of abstract method.
/* File name : AbstractDemo.java */
public class AbstractDemo {
   public static void main(String [] args) {
      Salary s = new Salary("Mohd Mohtashim", "Ambehta, UP", 3, 3600.00);
      System.out.println("salary: " + s.computePay());
   }
}
abstract class Employee {
   private String name;
   private String address;
   private int number;

   public Employee(String name, String address, int number) {
      System.out.println("Constructing an Employee");
      this.name = name;
      this.address = address;
      this.number = number;
   }

   public abstract double computePay();
      // Remainder of class definition

   public String getName() {
      return name;
   }

   public void setName(String name) {
      this.name = name;
   }

   public String getAddress() {
      return address;
   }

   public void setAddress(String address) {
      this.address = address;
   }

   public int getNumber() {
      return number;
   }

   public void setNumber(int number) {
      this.number = number;
   }
}
class Salary extends Employee {
   private double salary;   // Annual salary

   public Salary(String name, String address, int number, double salary) {
      super(name, address, number);
      this.salary = salary;
   }

   public double computePay() {
      System.out.println("Computing salary pay for " + getName());
      return salary/52;
   }
   // Remainder of class definition
}
Output
Constructing an Employee
Computing salary pay for Mohd Mohtashim
salary: 69.23076923076923
Java - Encapsulation
Encapsulation is one of the four fundamental OOP concepts. The other three are inheritance, polymorphism, and abstraction.
Encapsulation in Java is a mechanism of wrapping the data (variables) and code acting on the data (methods) together as a single unit. In encapsulation, the variables of a class will be hidden from other classes, and can be accessed only through the methods of their current class. Therefore, it is also known as data hiding.
To achieve encapsulation in Java −
Declare the variables of a class as private.
Provide public setter and getter methods to modify and view the variables values.
Example
Following is an example that demonstrates how to achieve Encapsulation in Java −
/* File name : EncapTest.java */
public class EncapTest {
   private String name;
   private String idNum;
   private int age;

   public int getAge() {
      return age;
   }

   public String getName() {
      return name;
   }

   public String getIdNum() {
      return idNum;
   }

   public void setAge( int newAge) {
      age = newAge;
   }

   public void setName(String newName) {
      name = newName;
   }

   public void setIdNum( String newId) {
      idNum = newId;
   }
}
The public setXXX() and getXXX() methods are the access points of the instance variables of the EncapTest class. Normally, these methods are referred as getters and setters. Therefore, any class that wants to access the variables should access them through these getters and setters.
The variables of the EncapTest class can be accessed using the following program −
/* File name : RunEncap.java */
public class RunEncap {

   public static void main(String args[]) {
      EncapTest encap = new EncapTest();
      encap.setName("James");
      encap.setAge(20);
      encap.setIdNum("12343ms");

      System.out.print("Name : " + encap.getName() + " Age : " + encap.getAge());
   }
}

public class EncapTest {
   private String name;
   private String idNum;
   private int age;

   public int getAge() {
      return age;
   }

   public String getName() {
      return name;
   }

   public String getIdNum() {
      return idNum;
   }

   public void setAge( int newAge) {
      age = newAge;
   }

   public void setName(String newName) {
      name = newName;
   }

   public void setIdNum( String newId) {
      idNum = newId;
   }
}
Output
Name : James Age : 20
Benefits of Encapsulation
The fields of a class can be made read-only or write-only.
A class can have total control over what is stored in its fields.
Java - Interfaces
An interface is a reference type in Java. It is similar to class. It is a collection of abstract methods. A class implements an interface, thereby inheriting the abstract methods of the interface.
Along with abstract methods, an interface may also contain constants, default methods, static methods, and nested types. Method bodies exist only for default methods and static methods.
Writing an interface is similar to writing a class. But a class describes the attributes and behaviors of an object. And an interface contains behaviors that a class implements.
Unless the class that implements the interface is abstract, all the methods of the interface need to be defined in the class.
An interface is similar to a class in the following ways −
An interface can contain any number of methods.
An interface is written in a file with a .java extension, with the name of the interface matching the name of the file.
The byte code of an interface appears in a .class file.
Interfaces appear in packages, and their corresponding bytecode file must be in a directory structure that matches the package name.
However, an interface is different from a class in several ways, including −
You cannot instantiate an interface.
An interface does not contain any constructors.
All of the methods in an interface are abstract.
An interface cannot contain instance fields. The only fields that can appear in an interface must be declared both static and final.
An interface is not extended by a class; it is implemented by a class.
An interface can extend multiple interfaces.
Declaring Interfaces
The interface keyword is used to declare an interface. Here is a simple example to declare an interface −
Example
Following is an example of an interface −
/* File name : NameOfInterface.java */
import java.lang.*;
// Any number of import statements

public interface NameOfInterface {
   // Any number of final, static fields
   // Any number of abstract method declarations\
}
Interfaces have the following properties −
An interface is implicitly abstract. You do not need to use the abstract keyword while declaring an interface.
Each method in an interface is also implicitly abstract, so the abstract keyword is not needed.
Methods in an interface are implicitly public.
Example
/* File name : Animal.java */
interface Animal {
   public void eat();
   public void travel();
}
Implementing Interfaces
When a class implements an interface, you can think of the class as signing a contract, agreeing to perform the specific behaviors of the interface. If a class does not perform all the behaviors of the interface, the class must declare itself as abstract.
A class uses the implements keyword to implement an interface. The implements keyword appears in the class declaration following the extends portion of the declaration.
Example
/* File name : MammalInt.java */
public class MammalInt implements Animal {

   public void eat() {
      System.out.println("Mammal eats");
   }

   public void travel() {
      System.out.println("Mammal travels");
   }

   public int noOfLegs() {
      return 0;
   }

   public static void main(String args[]) {
      MammalInt m = new MammalInt();
      m.eat();
      m.travel();
   }
}
interface Animal {
   public void eat();
   public void travel();
}
Output
Mammal eats
Mammal travels
When overriding methods defined in interfaces, there are several rules to be followed −
Checked exceptions should not be declared on implementation methods other than the ones declared by the interface method or subclasses of those declared by the interface method.
The signature of the interface method and the same return type or subtype should be maintained when overriding the methods.
An implementation class itself can be abstract and if so, interface methods need not be implemented.
When implementation interfaces, there are several rules −
A class can implement more than one interface at a time.
A class can extend only one class, but implement many interfaces.
An interface can extend another interface, in a similar way as a class can extend another class.
Extending Interfaces
An interface can extend another interface in the same way that a class can extend another class. The extends keyword is used to extend an interface, and the child interface inherits the methods of the parent interface.
The following Sports interface is extended by Hockey and Football interfaces.
Example
// Filename: Sports.java
public interface Sports {
   public void setHomeTeam(String name);
   public void setVisitingTeam(String name);
}

// Filename: Football.java
public interface Football extends Sports {
   public void homeTeamScored(int points);
   public void visitingTeamScored(int points);
   public void endOfQuarter(int quarter);
}

// Filename: Hockey.java
public interface Hockey extends Sports {
   public void homeGoalScored();
   public void visitingGoalScored();
   public void endOfPeriod(int period);
   public void overtimePeriod(int ot);
}
The Hockey interface has four methods, but it inherits two from Sports; thus, a class that implements Hockey needs to implement all six methods. Similarly, a class that implements Football needs to define the three methods from Football and the two methods from Sports.
Example
interface Sports {
   public void setHomeTeam(String name);
   public void setVisitingTeam(String name);
}

interface Football extends Sports {
   public void homeTeamScored(int points);
   public void visitingTeamScored(int points);
   public void endOfQuarter(int quarter);
}

interface Hockey extends Sports {
   public void homeGoalScored();
   public void visitingGoalScored();
   public void endOfPeriod(int period);
   public void overtimePeriod(int ot);
}

public class HockeyDemo implements Hockey {

   public void setHomeTeam(String name) {
      System.out.println("Home team: " + name);
   }

   public void setVisitingTeam(String name) {}

   public void homeGoalScored() {}

   public void visitingGoalScored() {}

   public void endOfPeriod(int period) {}

   public void overtimePeriod(int ot) {}

   public static void main(String[] args) {
      Hockey hockeyDemo = new HockeyDemo();
      hockeyDemo.setHomeTeam("India");
   }
}
Output
Home team: India
Extending Multiple Interfaces
A Java class can only extend one parent class. Multiple inheritance is not allowed. Interfaces are not classes, however, and an interface can extend more than one parent interface.
The extends keyword is used once, and the parent interfaces are declared in a comma-separated list.
For example, if the Hockey interface extended both Sports and Event, it would be declared as −
Example
public interface Hockey extends Sports, Event
interface Sports {
   public void setHomeTeam(String name);
   public void setVisitingTeam(String name);
}

interface Football extends Sports {
   public void homeTeamScored(int points);
   public void visitingTeamScored(int points);
   public void endOfQuarter(int quarter);
}

interface Hockey extends Sports {
   public void homeGoalScored();
   public void visitingGoalScored();
   public void endOfPeriod(int period);
   public void overtimePeriod(int ot);
}

interface Event {
   public void organize();
}
public class HockeyDemo implements Hockey, Event {

   public void setHomeTeam(String name) {
      System.out.println("Home team: " + name);
   }

   public void setVisitingTeam(String name) {}

   public void homeGoalScored() {}

   public void visitingGoalScored() {}

   public void endOfPeriod(int period) {}

   public void overtimePeriod(int ot) {}

   public static void main(String[] args) {
      HockeyDemo hockeyDemo = new HockeyDemo();
      hockeyDemo.setHomeTeam("India");
      hockeyDemo.organize();
   }

   public void organize() {
      System.out.println("Match organized. ");
   }
}
Output
Home team: India
Match organized.
Tagging Interfaces
The most common use of extending interfaces occurs when the parent interface does not contain any methods. For example, the MouseListener interface in the java.awt.event package extended java.util.EventListener, which is defined as −
Example
package java.util;
public interface EventListener
{}
An interface with no methods in it is referred to as a tagging interface. There are two basic design purposes of tagging interfaces −
Creates a common parent − As with the EventListener interface, which is extended by dozens of other interfaces in the Java API, you can use a tagging interface to create a common parent among a group of interfaces. For example, when an interface extends EventListener, the JVM knows that this particular interface is going to be used in an event delegation scenario.
Adds a data type to a class − This situation is where the term, tagging comes from. A class that implements a tagging interface does not need to define any methods (since the interface does not have any), but the class becomes an interface type through polymorphism.
Java - Packages
Packages are used in Java in order to prevent naming conflicts, to control access, to make searching/locating and usage of classes, interfaces, enumerations and annotations easier, etc.
A Package can be defined as a grouping of related types (classes, interfaces, enumerations and annotations ) providing access protection and namespace management.
Some of the existing packages in Java are −
java.lang − bundles the fundamental classes
java.io − classes for input , output functions are bundled in this package
Programmers can define their own packages to bundle group of classes/interfaces, etc. It is a good practice to group related classes implemented by you so that a programmer can easily determine that the classes, interfaces, enumerations, and annotations are related.
Since the package creates a new namespace there won't be any name conflicts with names in other packages. Using packages, it is easier to provide access control and it is also easier to locate the related classes.
Creating a Package
While creating a package, you should choose a name for the package and include a package statement along with that name at the top of every source file that contains the classes, interfaces, enumerations, and annotation types that you want to include in the package.
The package statement should be the first line in the source file. There can be only one package statement in each source file, and it applies to all types in the file.
If a package statement is not used then the class, interfaces, enumerations, and annotation types will be placed in the current default package.
To compile the Java programs with package statements, you have to use -d option as shown below.
javac -d Destination_folder file_name.java
Then a folder with the given package name is created in the specified destination, and the compiled class files will be placed in that folder.
Example
Let us look at an example that creates a package called animals. It is a good practice to use names of packages with lower case letters to avoid any conflicts with the names of classes and interfaces.
Following package example contains interface named animals −
/* File name : Animal.java */
package animals;

interface Animal {
   public void eat();
   public void travel();
}
Now, let us implement the above interface in the same package animals −
package animals;
/* File name : MammalInt.java */

public class MammalInt implements Animal {

   public void eat() {
      System.out.println("Mammal eats");
   }

   public void travel() {
      System.out.println("Mammal travels");
   }

   public int noOfLegs() {
      return 0;
   }

   public static void main(String args[]) {
      MammalInt m = new MammalInt();
      m.eat();
      m.travel();
   }
}

interface Animal {
   public void eat();
   public void travel();
}
Now compile the java files as shown below −
$ javac -d . Animal.java
$ javac -d . MammalInt.java
Now a package/folder with the name animals will be created in the current directory and these class files will be placed in it as shown below.
You can execute the class file within the package and get the result as shown below.
Mammal eats
Mammal travels
The import Keyword
If a class wants to use another class in the same package, the package name need not be used. Classes in the same package find each other without any special syntax.
Example
Here, a class named Boss is added to the payroll package that already contains Employee. The Boss can then refer to the Employee class without using the payroll prefix, as demonstrated by the following Boss class.
package payroll;
public class Boss {
   public void payEmployee(Employee e) {
      e.mailCheck();
   }
}
What happens if the Employee class is not in the payroll package? The Boss class must then use one of the following techniques for referring to a class in a different package.
- The fully qualified name of the class can be used. For example −
payroll.Employee
The package can be imported using the import keyword and the wild card (*). For example −
import payroll.*;
- The class itself can be imported using the import keyword. For example −
import payroll.Employee;
Example
package payroll;

public class Employee {
   public void mailCheck() {
      System.out.println("Pay received.");
   }
}
package payroll;

import payroll.Employee;

public class Boss {
   public void payEmployee(Employee e) {
      e.mailCheck();
   }

   public static void main(String[] args) {
      Boss boss = new Boss();
	   Employee e = new Employee();
      boss.payEmployee(e);
   }
}
Output
Pay received.
Note − A class file can contain any number of import statements. The import statements must appear after the package statement and before the class declaration.
The Directory Structure of Packages
Two major results occur when a class is placed in a package −
The name of the package becomes a part of the name of the class, as we just discussed in the previous section.
The name of the package must match the directory structure where the corresponding bytecode resides.
Here is simple way of managing your files in Java −
Put the source code for a class, interface, enumeration, or annotation type in a text file whose name is the simple name of the type and whose extension is .java.
For example −
// File Name :  Car.java
package vehicle;

public class Car {
   // Class implementation.
}
Now, put the source file in a directory whose name reflects the name of the package to which the class belongs −
....\vehicle\Car.java
Now, the qualified class name and pathname would be as follows −
- Class name → vehicle.Car
- Path name → vehicle\Car.java (in windows)
In general, a company uses its reversed Internet domain name for its package names.
Example − A company's Internet domain name is apple.com, then all its package names would start with com.apple. Each component of the package name corresponds to a subdirectory.
Example − The company had a com.apple.computers package that contained a Dell.java source file, it would be contained in a series of subdirectories like this −
....\com\apple\computers\Dell.java
At the time of compilation, the compiler creates a different output file for each class, interface and enumeration defined in it. The base name of the output file is the name of the type, and its extension is .class.
For example −
// File Name: Dell.java
package com.apple.computers;

public class Dell {
}

class Ups {
}
Now, compile this file as follows using -d option −
$javac -d . Dell.java
The files will be compiled as follows −
.\com\apple\computers\Dell.class
.\com\apple\computers\Ups.class
You can import all the classes or interfaces defined in \com\apple\computers\ as follows −
import com.apple.computers.*;
Like the .java source files, the compiled .class files should be in a series of directories that reflect the package name. However, the path to the .class files does not have to be the same as the path to the .java source files. You can arrange your source and class directories separately, as −
<path-one>\sources\com\apple\computers\Dell.java

<path-two>\classes\com\apple\computers\Dell.class
By doing this, it is possible to give access to the classes directory to other programmers without revealing your sources. You also need to manage source and class files in this manner so that the compiler and the Java Virtual Machine (JVM) can find all the types your program uses.
The full path to the classes directory, <path-two>\classes, is called the class path, and is set with the CLASSPATH system variable. Both the compiler and the JVM construct the path to your .class files by adding the package name to the class path.
Say <path-two>\classes is the class path, and the package name is com.apple.computers, then the compiler and JVM will look for .class files in <path-two>\classes\com\apple\computers.
A class path may include several paths. Multiple paths should be separated by a semicolon (Windows) or colon (Unix). By default, the compiler and the JVM search the current directory and the JAR file containing the Java platform classes so that these directories are automatically in the class path.
Set CLASSPATH System Variable
To display the current CLASSPATH variable, use the following commands in Windows and UNIX (Bourne shell) −
- In Windows → C:\> set CLASSPATH
- In UNIX → % echo $CLASSPATH
To delete the current contents of the CLASSPATH variable, use −
- In Windows → C:\> set CLASSPATH =
- In UNIX → % unset CLASSPATH; export CLASSPATH
To set the CLASSPATH variable −
- In Windows → set CLASSPATH = C:\users\jack\java\classes
- In UNIX → % CLASSPATH = /home/jack/java/classes; export CLASSPATH
Java - Inner classes
In this chapter, we will discuss inner classes of Java.
Nested Classes
In Java, just like methods, variables of a class too can have another class as its member. Writing a class within another is allowed in Java. The class written within is called the nested class, and the class that holds the inner class is called the outer class.
Syntax
Following is the syntax to write a nested class. Here, the class Outer_Demo is the outer class and the class Inner_Demo is the nested class.
class Outer_Demo {
   class Inner_Demo {
   }
}
Nested classes are divided into two types −
Non-static nested classes − These are the non-static members of a class.
Static nested classes − These are the static members of a class.
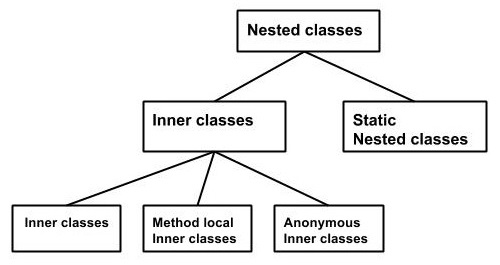
Inner Classes (Non-static Nested Classes)
Inner classes are a security mechanism in Java. We know a class cannot be associated with the access modifier private, but if we have the class as a member of other class, then the inner class can be made private. And this is also used to access the private members of a class.
Inner classes are of three types depending on how and where you define them. They are −
- Inner Class
- Method-local Inner Class
- Anonymous Inner Class
Inner Class
Creating an inner class is quite simple. You just need to write a class within a class. Unlike a class, an inner class can be private and once you declare an inner class private, it cannot be accessed from an object outside the class.
Following is the program to create an inner class and access it. In the given example, we make the inner class private and access the class through a method.
Example
class Outer_Demo {
   int num;

   // inner class
   private class Inner_Demo {
      public void print() {
         System.out.println("This is an inner class");
      }
   }

   // Accessing he inner class from the method within
   void display_Inner() {
      Inner_Demo inner = new Inner_Demo();
      inner.print();
   }
}

public class My_class {

   public static void main(String args[]) {
      // Instantiating the outer class
      Outer_Demo outer = new Outer_Demo();

      // Accessing the display_Inner() method.
      outer.display_Inner();
   }
}
Here you can observe that Outer_Demo is the outer class, Inner_Demo is the inner class, display_Inner() is the method inside which we are instantiating the inner class, and this method is invoked from the main method.
If you compile and execute the above program, you will get the following result −
Output
This is an inner class.
Accessing the Private Members
As mentioned earlier, inner classes are also used to access the private members of a class. Suppose, a class is having private members to access them. Write an inner class in it, return the private members from a method within the inner class, say, getValue(), and finally from another class (from which you want to access the private members) call the getValue() method of the inner class.
To instantiate the inner class, initially you have to instantiate the outer class. Thereafter, using the object of the outer class, following is the way in which you can instantiate the inner class.
Outer_Demo outer = new Outer_Demo();
Outer_Demo.Inner_Demo inner = outer.new Inner_Demo();
The following program shows how to access the private members of a class using inner class.
Example
class Outer_Demo {
   // private variable of the outer class
   private int num = 175;

   // inner class
   public class Inner_Demo {
      public int getNum() {
         System.out.println("This is the getnum method of the inner class");
         return num;
      }
   }
}

public class My_class2 {

   public static void main(String args[]) {
      // Instantiating the outer class
      Outer_Demo outer = new Outer_Demo();

      // Instantiating the inner class
      Outer_Demo.Inner_Demo inner = outer.new Inner_Demo();
      System.out.println(inner.getNum());
   }
}
If you compile and execute the above program, you will get the following result −
Output
This is the getnum method of the inner class: 175
Method-local Inner Class
In Java, we can write a class within a method and this will be a local type. Like local variables, the scope of the inner class is restricted within the method.
A method-local inner class can be instantiated only within the method where the inner class is defined. The following program shows how to use a method-local inner class.
Example
public class Outerclass {
   // instance method of the outer class
   void my_Method() {
      int num = 23;

      // method-local inner class
      class MethodInner_Demo {
         public void print() {
            System.out.println("This is method inner class "+num);
         }
      } // end of inner class

      // Accessing the inner class
      MethodInner_Demo inner = new MethodInner_Demo();
      inner.print();
   }

   public static void main(String args[]) {
      Outerclass outer = new Outerclass();
      outer.my_Method();
   }
}
If you compile and execute the above program, you will get the following result −
Output
This is method inner class 23
Anonymous Inner Class
An inner class declared without a class name is known as an anonymous inner class. In case of anonymous inner classes, we declare and instantiate them at the same time. Generally, they are used whenever you need to override the method of a class or an interface. The syntax of an anonymous inner class is as follows −
Syntax
AnonymousInner an_inner = new AnonymousInner() {
   public void my_method() {
      ........
      ........
   }
};
The following program shows how to override the method of a class using anonymous inner class.
Example
abstract class AnonymousInner {
   public abstract void mymethod();
}

public class Outer_class {

   public static void main(String args[]) {
      AnonymousInner inner = new AnonymousInner() {
         public void mymethod() {
            System.out.println("This is an example of anonymous inner class");
         }
      };
      inner.mymethod();
   }
}
If you compile and execute the above program, you will get the following result −
Output
This is an example of anonymous inner class
In the same way, you can override the methods of the concrete class as well as the interface using an anonymous inner class.
Anonymous Inner Class as Argument
Generally, if a method accepts an object of an interface, an abstract class, or a concrete class, then we can implement the interface, extend the abstract class, and pass the object to the method. If it is a class, then we can directly pass it to the method.
But in all the three cases, you can pass an anonymous inner class to the method. Here is the syntax of passing an anonymous inner class as a method argument −
obj.my_Method(new My_Class() {
   public void Do() {
      .....
      .....
   }
});
The following program shows how to pass an anonymous inner class as a method argument.
Example
// interface
interface Message {
   String greet();
}

public class My_class {
   // method which accepts the object of interface Message
   public void displayMessage(Message m) {
      System.out.println(m.greet() +
         ", This is an example of anonymous inner class as an argument");
   }

   public static void main(String args[]) {
      // Instantiating the class
      My_class obj = new My_class();

      // Passing an anonymous inner class as an argument
      obj.displayMessage(new Message() {
         public String greet() {
            return "Hello";
         }
      });
   }
}
If you compile and execute the above program, it gives you the following result −
Output
Hello, This is an example of anonymous inner class as an argument
Static Nested Class
A static inner class is a nested class which is a static member of the outer class. It can be accessed without instantiating the outer class, using other static members. Just like static members, a static nested class does not have access to the instance variables and methods of the outer class. The syntax of static nested class is as follows −
Syntax
class MyOuter {
   static class Nested_Demo {
   }
}
Instantiating a static nested class is a bit different from instantiating an inner class. The following program shows how to use a static nested class.
Example
public class Outer {
   static class Nested_Demo {
      public void my_method() {
         System.out.println("This is my nested class");
      }
   }

   public static void main(String args[]) {
      Outer.Nested_Demo nested = new Outer.Nested_Demo();
      nested.my_method();
   }
}
If you compile and execute the above program, you will get the following result −
Output
This is my nested class
Java - Character Class
Normally, when we work with characters, we use primitive data types char.
Example
char ch = 'a';

// Unicode for uppercase Greek omega character
char uniChar = '\u039A';

// an array of chars
char[] charArray ={ 'a', 'b', 'c', 'd', 'e' };
However in development, we come across situations where we need to use objects instead of primitive data types. In order to achieve this, Java provides wrapper class Character for primitive data type char.
The Character class offers a number of useful class (i.e., static) methods for manipulating characters. You can create a Character object with the Character constructor −
Character ch = new Character('a');
The Java compiler will also create a Character object for you under some circumstances. For example, if you pass a primitive char into a method that expects an object, the compiler automatically converts the char to a Character for you. This feature is called autoboxing or unboxing, if the conversion goes the other way.
Example
// Here following primitive char 'a'
// is boxed into the Character object ch
Character ch = 'a';

// Here primitive 'x' is boxed for method test,
// return is unboxed to char 'c'
char c = test('x');
Escape Sequences
A character preceded by a backslash (\) is an escape sequence and has a special meaning to the compiler.
The newline character (\n) has been used frequently in this tutorial in System.out.println() statements to advance to the next line after the string is printed.
Following table shows the Java escape sequences −
| Escape Sequence | Description |
|---|---|
| \t | Inserts a tab in the text at this point. |
| \b | Inserts a backspace in the text at this point. |
| \n | Inserts a newline in the text at this point. |
| \r | Inserts a carriage return in the text at this point. |
| \f | Inserts a form feed in the text at this point. |
| \' | Inserts a single quote character in the text at this point. |
| \" | Inserts a double quote character in the text at this point. |
| \\ | Inserts a backslash character in the text at this point. |
When an escape sequence is encountered in a print statement, the compiler interprets it accordingly.
Example
If you want to put quotes within quotes, you must use the escape sequence, \", on the interior quotes −
public class Test {

   public static void main(String args[]) {
      System.out.println("She said \"Hello!\" to me.");
   }
}
Output
She said "Hello!" to me.
Character Methods
Following is the list of the important instance methods that all the subclasses of the Character class implement −
| Sr.No. | Method & Description |
|---|---|
| 1 | isLetter()
Determines whether the specified char value is a letter. |
| 2 | isDigit()
Determines whether the specified char value is a digit. |
| 3 | isWhitespace()
Determines whether the specified char value is white space. |
| 4 | isUpperCase()
Determines whether the specified char value is uppercase. |
| 5 | isLowerCase()
Determines whether the specified char value is lowercase. |
| 6 | toUpperCase()
Returns the uppercase form of the specified char value. |
| 7 | toLowerCase()
Returns the lowercase form of the specified char value. |
| 8 | toString()
Returns a String object representing the specified character value that is, a one-character string. |
For a complete list of methods, please refer to the java.lang.Character API specification.
What is Next?
In the next section, we will be going through the String class in Java. You will be learning how to declare and use Strings efficiently as well as some of the important methods in the String class.
Java - Files and I/O
The java.io package contains nearly every class you might ever need to perform input and output (I/O) in Java. All these streams represent an input source and an output destination. The stream in the java.io package supports many data such as primitives, object, localized characters, etc.
Stream
A stream can be defined as a sequence of data. There are two kinds of Streams −
InPutStream − The InputStream is used to read data from a source.
OutPutStream − The OutputStream is used for writing data to a destination.

Java provides strong but flexible support for I/O related to files and networks but this tutorial covers very basic functionality related to streams and I/O. We will see the most commonly used examples one by one −
Byte Streams
Java byte streams are used to perform input and output of 8-bit bytes. Though there are many classes related to byte streams but the most frequently used classes are, FileInputStream and FileOutputStream. Following is an example which makes use of these two classes to copy an input file into an output file −
Example
import java.io.FileInputStream;
import java.io.FileOutputStream;
import java.io.IOException;

public class CopyFile {

   public static void main(String args[]) throws IOException {
      FileInputStream in = null;
      FileOutputStream out = null;

      try {
         in = new FileInputStream("input.txt");
         out = new FileOutputStream("output.txt");

         int c;
         while ((c = in.read()) != -1) {
            out.write(c);
         }
      }finally {
         if (in != null) {
            in.close();
         }
         if (out != null) {
            out.close();
         }
      }
   }
}
Now let's have a file input.txt with the following content −
This is test for copy file.
As a next step, compile the above program and execute it, which will result in creating output.txt file with the same content as we have in input.txt. So let's put the above code in CopyFile.java file and do the following −
$javac CopyFile.java
$java CopyFile
Character Streams
Java Byte streams are used to perform input and output of 8-bit bytes, whereas Java Character streams are used to perform input and output for 16-bit unicode. Though there are many classes related to character streams but the most frequently used classes are, FileReader and FileWriter. Though internally FileReader uses FileInputStream and FileWriter uses FileOutputStream but here the major difference is that FileReader reads two bytes at a time and FileWriter writes two bytes at a time.
We can re-write the above example, which makes the use of these two classes to copy an input file (having unicode characters) into an output file −
Example
import java.io.FileReader;
import java.io.FileWriter;
import java.io.IOException;

public class CopyFile {

   public static void main(String args[]) throws IOException {
      FileReader in = null;
      FileWriter out = null;

      try {
         in = new FileReader("input.txt");
         out = new FileWriter("output.txt");

         int c;
         while ((c = in.read()) != -1) {
            out.write(c);
         }
      }finally {
         if (in != null) {
            in.close();
         }
         if (out != null) {
            out.close();
         }
      }
   }
}
Now let's have a file input.txt with the following content −
This is test for copy file.
As a next step, compile the above program and execute it, which will result in creating output.txt file with the same content as we have in input.txt. So let's put the above code in CopyFile.java file and do the following −
$javac CopyFile.java
$java CopyFile
Standard Streams
All the programming languages provide support for standard I/O where the user's program can take input from a keyboard and then produce an output on the computer screen. If you are aware of C or C++ programming languages, then you must be aware of three standard devices STDIN, STDOUT and STDERR. Similarly, Java provides the following three standard streams −
Standard Input − This is used to feed the data to user's program and usually a keyboard is used as standard input stream and represented as System.in.
Standard Output − This is used to output the data produced by the user's program and usually a computer screen is used for standard output stream and represented as System.out.
Standard Error − This is used to output the error data produced by the user's program and usually a computer screen is used for standard error stream and represented as System.err.
Following is a simple program, which creates InputStreamReader to read standard input stream until the user types a "q" −
Example
import java.io.InputStreamReader;

public class ReadConsole {

   public static void main(String args[]) throws IOException {
      InputStreamReader cin = null;

      try {
         cin = new InputStreamReader(System.in);
         System.out.println("Enter characters, 'q' to quit.");
         char c;
         do {
            c = (char) cin.read();
            System.out.print(c);
         } while(c != 'q');
      }finally {
         if (cin != null) {
            cin.close();
         }
      }
   }
}
Let's keep the above code in ReadConsole.java file and try to compile and execute it as shown in the following program. This program continues to read and output the same character until we press 'q' −
$javac ReadConsole.java $java ReadConsole Enter characters, 'q' to quit. 1 1 e e q q
Reading and Writing Files
As described earlier, a stream can be defined as a sequence of data. The InputStream is used to read data from a source and the OutputStream is used for writing data to a destination.
Here is a hierarchy of classes to deal with Input and Output streams.
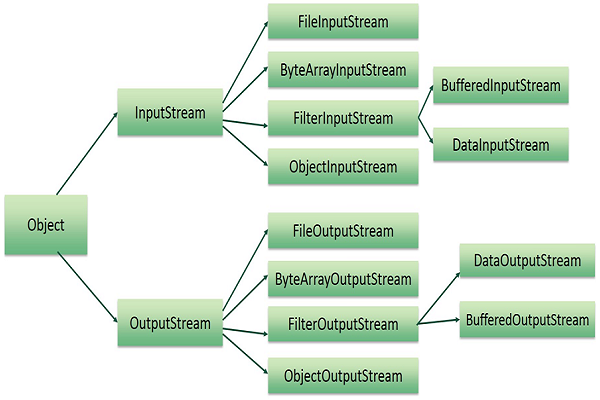
The two important streams are FileInputStream and FileOutputStream, which would be discussed in this tutorial.
FileInputStream
This stream is used for reading data from the files. Objects can be created using the keyword new and there are several types of constructors available.
Following constructor takes a file name as a string to create an input stream object to read the file −
InputStream f = new FileInputStream("C:/java/hello");
Following constructor takes a file object to create an input stream object to read the file. First we create a file object using File() method as follows −
File f = new File("C:/java/hello");
InputStream f = new FileInputStream(f);
Once you have InputStream object in hand, then there is a list of helper methods which can be used to read to stream or to do other operations on the stream.
| Sr.No. | Method & Description |
|---|---|
| 1 | public void close() throws IOException{} This method closes the file output stream. Releases any system resources associated with the file. Throws an IOException. |
| 2 | protected void finalize()throws IOException {} This method cleans up the connection to the file. Ensures that the close method of this file output stream is called when there are no more references to this stream. Throws an IOException. |
| 3 | public int read(int r)throws IOException{} This method reads the specified byte of data from the InputStream. Returns an int. Returns the next byte of data and -1 will be returned if it's the end of the file. |
| 4 | public int read(byte[] r) throws IOException{} This method reads r.length bytes from the input stream into an array. Returns the total number of bytes read. If it is the end of the file, -1 will be returned. |
| 5 | public int available() throws IOException{} Gives the number of bytes that can be read from this file input stream. Returns an int. |
FileOutputStream
FileOutputStream is used to create a file and write data into it. The stream would create a file, if it doesn't already exist, before opening it for output.
Here are two constructors which can be used to create a FileOutputStream object.
Following constructor takes a file name as a string to create an input stream object to write the file −
OutputStream f = new FileOutputStream("C:/java/hello")
Following constructor takes a file object to create an output stream object to write the file. First, we create a file object using File() method as follows −
File f = new File("C:/java/hello");
OutputStream f = new FileOutputStream(f);
Once you have OutputStream object in hand, then there is a list of helper methods, which can be used to write to stream or to do other operations on the stream.
| Sr.No. | Method & Description |
|---|---|
| 1 | public void close() throws IOException{} This method closes the file output stream. Releases any system resources associated with the file. Throws an IOException. |
| 2 | protected void finalize()throws IOException {} This method cleans up the connection to the file. Ensures that the close method of this file output stream is called when there are no more references to this stream. Throws an IOException. |
| 3 | public void write(int w)throws IOException{} This methods writes the specified byte to the output stream. |
| 4 | public void write(byte[] w) Writes w.length bytes from the mentioned byte array to the OutputStream. |
Example
Following is the example to demonstrate InputStream and OutputStream −
import java.io.OutputStream;
public class fileStreamTest {
public static void main(String args[]) {
try {
byte bWrite [] = {11,21,3,40,5};
OutputStream os = new FileOutputStream("test.txt");
for(int x = 0; x < bWrite.length ; x++) {
os.write( bWrite[x] ); // writes the bytes
}
os.close();
InputStream is = new FileInputStream("test.txt");
int size = is.available();
for(int i = 0; i < size; i++) {
System.out.print((char)is.read() + " ");
}
is.close();
} catch (IOException e) {
System.out.print("Exception");
}
}
}
The above code would create file test.txt and would write given numbers in binary format. Same would be the output on the stdout screen.
Directories in Java
A directory is a File which can contain a list of other files and directories. You use File object to create directories, to list down files available in a directory. For complete detail, check a list of all the methods which you can call on File object and what are related to directories.
Creating Directories
There are two useful File utility methods, which can be used to create directories −
The mkdir( ) method creates a directory, returning true on success and false on failure. Failure indicates that the path specified in the File object already exists, or that the directory cannot be created because the entire path does not exist yet.
The mkdirs() method creates both a directory and all the parents of the directory.
Following example creates "/tmp/user/java/bin" directory −
Example
import java.io.File;
public class CreateDir {
public static void main(String args[]) {
String dirname = "/tmp/user/java/bin";
File d = new File(dirname);
// Create directory now.
d.mkdirs();
}
}
Compile and execute the above code to create "/tmp/user/java/bin".
Note − Java automatically takes care of path separators on UNIX and Windows as per conventions. If you use a forward slash (/) on a Windows version of Java, the path will still resolve correctly.
Listing Directories
You can use list( ) method provided by File object to list down all the files and directories available in a directory as follows −
Example
import java.io.File;
public class ReadDir {
public static void main(String[] args) {
File file = null;
String[] paths;
try {
// create new file object
file = new File("/tmp");
// array of files and directory
paths = file.list();
// for each name in the path array
for(String path:paths) {
// prints filename and directory name
System.out.println(path);
}
} catch (Exception e) {
// if any error occurs
e.printStackTrace();
}
}
}
This will produce the following result based on the directories and files available in your /tmp directory −
Output
test1.txt test2.txt ReadDir.java ReadDir.class
Java - Exceptions
An exception (or exceptional event) is a problem that arises during the execution of a program. When an Exception occurs the normal flow of the program is disrupted and the program/Application terminates abnormally, which is not recommended, therefore, these exceptions are to be handled.
An exception can occur for many different reasons. Following are some scenarios where an exception occurs.
A user has entered an invalid data.
A file that needs to be opened cannot be found.
A network connection has been lost in the middle of communications or the JVM has run out of memory.
Some of these exceptions are caused by user error, others by programmer error, and others by physical resources that have failed in some manner.
Based on these, we have three categories of Exceptions. You need to understand them to know how exception handling works in Java.
Checked exceptions − A checked exception is an exception that is checked (notified) by the compiler at compilation-time, these are also called as compile time exceptions. These exceptions cannot simply be ignored, the programmer should take care of (handle) these exceptions.
For example, if you use FileReader class in your program to read data from a file, if the file specified in its constructor doesn't exist, then a FileNotFoundException occurs, and the compiler prompts the programmer to handle the exception.
Example
import java.io.File;
import java.io.FileReader;
public class FilenotFound_Demo {
public static void main(String args[]) {
File file = new File("E://file.txt");
FileReader fr = new FileReader(file);
}
}
If you try to compile the above program, you will get the following exceptions.
Output
C:\>javac FilenotFound_Demo.java
FilenotFound_Demo.java:8: error: unreported exception FileNotFoundException; must be caught or declared to be thrown
FileReader fr = new FileReader(file);
^
1 error
Note − Since the methods read() and close() of FileReader class throws IOException, you can observe that the compiler notifies to handle IOException, along with FileNotFoundException.
Unchecked exceptions − An unchecked exception is an exception that occurs at the time of execution. These are also called as Runtime Exceptions. These include programming bugs, such as logic errors or improper use of an API. Runtime exceptions are ignored at the time of compilation.
For example, if you have declared an array of size 5 in your program, and trying to call the 6th element of the array then an ArrayIndexOutOfBoundsExceptionexception occurs.
Example
public class Unchecked_Demo {
public static void main(String args[]) {
int num[] = {1, 2, 3, 4};
System.out.println(num[5]);
}
}
If you compile and execute the above program, you will get the following exception.
Output
Exception in thread "main" java.lang.ArrayIndexOutOfBoundsException: 5 at Exceptions.Unchecked_Demo.main(Unchecked_Demo.java:8)
Errors − These are not exceptions at all, but problems that arise beyond the control of the user or the programmer. Errors are typically ignored in your code because you can rarely do anything about an error. For example, if a stack overflow occurs, an error will arise. They are also ignored at the time of compilation.
Exception Hierarchy
All exception classes are subtypes of the java.lang.Exception class. The exception class is a subclass of the Throwable class. Other than the exception class there is another subclass called Error which is derived from the Throwable class.
Errors are abnormal conditions that happen in case of severe failures, these are not handled by the Java programs. Errors are generated to indicate errors generated by the runtime environment. Example: JVM is out of memory. Normally, programs cannot recover from errors.
The Exception class has two main subclasses: IOException class and RuntimeException Class.
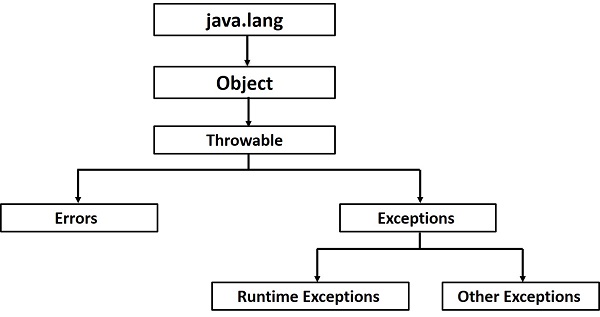
Following is a list of most common checked and unchecked Java's Built-in Exceptions.
Exceptions Methods
Following is the list of important methods available in the Throwable class.
| Sr.No. | Method & Description |
|---|---|
| 1 | public String getMessage() Returns a detailed message about the exception that has occurred. This message is initialized in the Throwable constructor. |
| 2 | public Throwable getCause() Returns the cause of the exception as represented by a Throwable object. |
| 3 | public String toString() Returns the name of the class concatenated with the result of getMessage(). |
| 4 | public void printStackTrace() Prints the result of toString() along with the stack trace to System.err, the error output stream. |
| 5 | public StackTraceElement [] getStackTrace() Returns an array containing each element on the stack trace. The element at index 0 represents the top of the call stack, and the last element in the array represents the method at the bottom of the call stack. |
| 6 | public Throwable fillInStackTrace() Fills the stack trace of this Throwable object with the current stack trace, adding to any previous information in the stack trace. |
Catching Exceptions
A method catches an exception using a combination of the try and catch keywords. A try/catch block is placed around the code that might generate an exception. Code within a try/catch block is referred to as protected code, and the syntax for using try/catch looks like the following −
Syntax
try {
// Protected code
} catch (ExceptionName e1) {
// Catch block
}
The code which is prone to exceptions is placed in the try block. When an exception occurs, that exception occurred is handled by catch block associated with it. Every try block should be immediately followed either by a catch block or finally block.
A catch statement involves declaring the type of exception you are trying to catch. If an exception occurs in protected code, the catch block (or blocks) that follows the try is checked. If the type of exception that occurred is listed in a catch block, the exception is passed to the catch block much as an argument is passed into a method parameter.
Example
In following example, an array is declared with 2 elements. Then the code tries to access the 3rd element of the array which throws an exception.
// File Name : ExcepTest.java
import java.io.*;
public class ExcepTest {
public static void main(String args[]) {
try {
int a[] = new int[2];
System.out.println("Access element three :" + a[3]);
} catch (ArrayIndexOutOfBoundsException e) {
System.out.println("Exception thrown :" + e);
}
System.out.println("Out of the block");
}
}
Output
Exception thrown :java.lang.ArrayIndexOutOfBoundsException: 3 Out of the block
Multiple Catch Blocks
A try block can be followed by multiple catch blocks. The syntax for multiple catch blocks looks like the following −
Syntax
try {
// Protected code
} catch (ExceptionType1 e1) {
// Catch block
} catch (ExceptionType2 e2) {
// Catch block
} catch (ExceptionType3 e3) {
// Catch block
}
The previous statements demonstrate three catch blocks, but you can have any number of them after a single try. If an exception occurs in the protected code, the exception is thrown to the first catch block in the list. If the data type of the exception thrown matches ExceptionType1, it gets caught there. If not, the exception passes down to the second catch statement. This continues until the exception either is caught or falls through all catches, in which case the current method stops execution and the exception is thrown down to the previous method on the call stack.
Example
Here is code segment showing how to use multiple try/catch statements.
try {
file = new FileInputStream(fileName);
x = (byte) file.read();
} catch (IOException i) {
i.printStackTrace();
return -1;
} catch (FileNotFoundException f) // Not valid! {
f.printStackTrace();
return -1;
}
Catching Multiple Type of Exceptions
Since Java 7, you can handle more than one exception using a single catch block, this feature simplifies the code. Here is how you would do it −
catch (IOException|FileNotFoundException ex) {
logger.log(ex);
throw ex;
The Throws/Throw Keywords
If a method does not handle a checked exception, the method must declare it using the throws keyword. The throws keyword appears at the end of a method's signature.
You can throw an exception, either a newly instantiated one or an exception that you just caught, by using the throw keyword.
Try to understand the difference between throws and throw keywords, throws is used to postpone the handling of a checked exception and throw is used to invoke an exception explicitly.
The following method declares that it throws a RemoteException −
Example
import java.io.*;
public class className {
public void deposit(double amount) throws RemoteException {
// Method implementation
throw new RemoteException();
}
// Remainder of class definition
}
A method can declare that it throws more than one exception, in which case the exceptions are declared in a list separated by commas. For example, the following method declares that it throws a RemoteException and an InsufficientFundsException −
Example
import java.io.*;
public class className {
public void withdraw(double amount) throws RemoteException,
InsufficientFundsException {
// Method implementation
}
// Remainder of class definition
}
The Finally Block
The finally block follows a try block or a catch block. A finally block of code always executes, irrespective of occurrence of an Exception.
Using a finally block allows you to run any cleanup-type statements that you want to execute, no matter what happens in the protected code.
A finally block appears at the end of the catch blocks and has the following syntax −
Syntax
try {
// Protected code
} catch (ExceptionType1 e1) {
// Catch block
} catch (ExceptionType2 e2) {
// Catch block
} catch (ExceptionType3 e3) {
// Catch block
}finally {
// The finally block always executes.
}
Example
public class ExcepTest {
public static void main(String args[]) {
int a[] = new int[2];
try {
System.out.println("Access element three :" + a[3]);
} catch (ArrayIndexOutOfBoundsException e) {
System.out.println("Exception thrown :" + e);
}finally {
a[0] = 6;
System.out.println("First element value: " + a[0]);
System.out.println("The finally statement is executed");
}
}
}
Output
Exception thrown :java.lang.ArrayIndexOutOfBoundsException: 3 First element value: 6 The finally statement is executed
Note the following −
A catch clause cannot exist without a try statement.
It is not compulsory to have finally clauses whenever a try/catch block is present.
The try block cannot be present without either catch clause or finally clause.
Any code cannot be present in between the try, catch, finally blocks.
The try-with-resources
Generally, when we use any resources like streams, connections, etc. we have to close them explicitly using finally block. In the following program, we are reading data from a file using FileReader and we are closing it using finally block.
Example
import java.io.File;
import java.io.FileReader;
import java.io.IOException;
public class ReadData_Demo {
public static void main(String args[]) {
FileReader fr = null;
try {
File file = new File("file.txt");
fr = new FileReader(file); char [] a = new char[50];
fr.read(a); // reads the content to the array
for(char c : a)
System.out.print(c); // prints the characters one by one
} catch (IOException e) {
e.printStackTrace();
}finally {
try {
fr.close();
} catch (IOException ex) {
ex.printStackTrace();
}
}
}
}
try-with-resources, also referred as automatic resource management, is a new exception handling mechanism that was introduced in Java 7, which automatically closes the resources used within the try catch block.
To use this statement, you simply need to declare the required resources within the parenthesis, and the created resource will be closed automatically at the end of the block. Following is the syntax of try-with-resources statement.
Syntax
try(FileReader fr = new FileReader("file path")) {
// use the resource
} catch () {
// body of catch
}
}
Following is the program that reads the data in a file using try-with-resources statement.
Example
import java.io.FileReader;
import java.io.IOException;
public class Try_withDemo {
public static void main(String args[]) {
try(FileReader fr = new FileReader("E://file.txt")) {
char [] a = new char[50];
fr.read(a); // reads the contentto the array
for(char c : a)
System.out.print(c); // prints the characters one by one
} catch (IOException e) {
e.printStackTrace();
}
}
}
Following points are to be kept in mind while working with try-with-resources statement.
To use a class with try-with-resources statement it should implement AutoCloseable interface and the close() method of it gets invoked automatically at runtime.
You can declare more than one class in try-with-resources statement.
While you declare multiple classes in the try block of try-with-resources statement these classes are closed in reverse order.
Except the declaration of resources within the parenthesis everything is the same as normal try/catch block of a try block.
The resource declared in try gets instantiated just before the start of the try-block.
The resource declared at the try block is implicitly declared as final.
User-defined Exceptions
You can create your own exceptions in Java. Keep the following points in mind when writing your own exception classes −
All exceptions must be a child of Throwable.
If you want to write a checked exception that is automatically enforced by the Handle or Declare Rule, you need to extend the Exception class.
If you want to write a runtime exception, you need to extend the RuntimeException class.
We can define our own Exception class as below −
class MyException extends Exception {
}
You just need to extend the predefined Exception class to create your own Exception. These are considered to be checked exceptions. The following InsufficientFundsException class is a user-defined exception that extends the Exception class, making it a checked exception. An exception class is like any other class, containing useful fields and methods.
Example
// File Name InsufficientFundsException.java
import java.io.*;
public class InsufficientFundsException extends Exception {
private double amount;
public InsufficientFundsException(double amount) {
this.amount = amount;
}
public double getAmount() {
return amount;
}
}
To demonstrate using our user-defined exception, the following CheckingAccount class contains a withdraw() method that throws an InsufficientFundsException.
// File Name CheckingAccount.java
import java.io.*;
public class CheckingAccount {
private double balance;
private int number;
public CheckingAccount(int number) {
this.number = number;
}
public void deposit(double amount) {
balance += amount;
}
public void withdraw(double amount) throws InsufficientFundsException {
if(amount <= balance) {
balance -= amount;
}else {
double needs = amount - balance;
throw new InsufficientFundsException(needs);
}
}
public double getBalance() {
return balance;
}
public int getNumber() {
return number;
}
}
The following BankDemo program demonstrates invoking the deposit() and withdraw() methods of CheckingAccount.
// File Name BankDemo.java
public class BankDemo {
public static void main(String [] args) {
CheckingAccount c = new CheckingAccount(101);
System.out.println("Depositing $500...");
c.deposit(500.00);
try {
System.out.println("\nWithdrawing $100...");
c.withdraw(100.00);
System.out.println("\nWithdrawing $600...");
c.withdraw(600.00);
} catch (InsufficientFundsException e) {
System.out.println("Sorry, but you are short $" + e.getAmount());
e.printStackTrace();
}
}
}
Compile all the above three files and run BankDemo. This will produce the following result −
Output
Depositing $500...
Withdrawing $100...
Withdrawing $600...
Sorry, but you are short $200.0
InsufficientFundsException
at CheckingAccount.withdraw(CheckingAccount.java:25)
at BankDemo.main(BankDemo.java:13)
Common Exceptions
In Java, it is possible to define two catergories of Exceptions and Errors.
JVM Exceptions − These are exceptions/errors that are exclusively or logically thrown by the JVM. Examples: NullPointerException, ArrayIndexOutOfBoundsException, ClassCastException.
Programmatic Exceptions − These exceptions are thrown explicitly by the application or the API programmers. Examples: IllegalArgumentException, IllegalStateException.
Java - Multithreading
Java is a multi-threaded programming language which means we can develop multi-threaded program using Java. A multi-threaded program contains two or more parts that can run concurrently and each part can handle a different task at the same time making optimal use of the available resources specially when your computer has multiple CPUs.
By definition, multitasking is when multiple processes share common processing resources such as a CPU. Multi-threading extends the idea of multitasking into applications where you can subdivide specific operations within a single application into individual threads. Each of the threads can run in parallel. The OS divides processing time not only among different applications, but also among each thread within an application.
Multi-threading enables you to write in a way where multiple activities can proceed concurrently in the same program.
Life Cycle of a Thread
A thread goes through various stages in its life cycle. For example, a thread is born, started, runs, and then dies. The following diagram shows the complete life cycle of a thread.
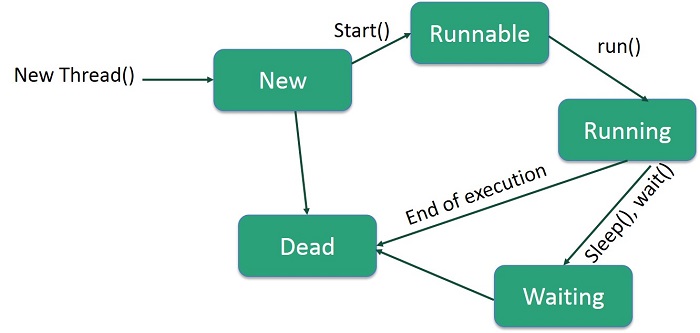
Following are the stages of the life cycle −
New − A new thread begins its life cycle in the new state. It remains in this state until the program starts the thread. It is also referred to as a born thread.
Runnable − After a newly born thread is started, the thread becomes runnable. A thread in this state is considered to be executing its task.
Waiting − Sometimes, a thread transitions to the waiting state while the thread waits for another thread to perform a task. A thread transitions back to the runnable state only when another thread signals the waiting thread to continue executing.
Timed Waiting − A runnable thread can enter the timed waiting state for a specified interval of time. A thread in this state transitions back to the runnable state when that time interval expires or when the event it is waiting for occurs.
Terminated (Dead) − A runnable thread enters the terminated state when it completes its task or otherwise terminates.
Thread Priorities
Every Java thread has a priority that helps the operating system determine the order in which threads are scheduled.
Java thread priorities are in the range between MIN_PRIORITY (a constant of 1) and MAX_PRIORITY (a constant of 10). By default, every thread is given priority NORM_PRIORITY (a constant of 5).
Threads with higher priority are more important to a program and should be allocated processor time before lower-priority threads. However, thread priorities cannot guarantee the order in which threads execute and are very much platform dependent.
Create a Thread by Implementing a Runnable Interface
If your class is intended to be executed as a thread then you can achieve this by implementing a Runnable interface. You will need to follow three basic steps −
Step 1
As a first step, you need to implement a run() method provided by a Runnable interface. This method provides an entry point for the thread and you will put your complete business logic inside this method. Following is a simple syntax of the run() method −
public void run( )
Step 2
As a second step, you will instantiate a Thread object using the following constructor −
Thread(Runnable threadObj, String threadName);
Where, threadObj is an instance of a class that implements the Runnable interface and threadName is the name given to the new thread.
Step 3
Once a Thread object is created, you can start it by calling start() method, which executes a call to run( ) method. Following is a simple syntax of start() method −
void start();
Example
Here is an example that creates a new thread and starts running it −
class RunnableDemo implements Runnable {
private Thread t;
private String threadName;
RunnableDemo( String name) {
threadName = name;
System.out.println("Creating " + threadName );
}
public void run() {
System.out.println("Running " + threadName );
try {
for(int i = 4; i > 0; i--) {
System.out.println("Thread: " + threadName + ", " + i);
// Let the thread sleep for a while.
Thread.sleep(50);
}
} catch (InterruptedException e) {
System.out.println("Thread " + threadName + " interrupted.");
}
System.out.println("Thread " + threadName + " exiting.");
}
public void start () {
System.out.println("Starting " + threadName );
if (t == null) {
t = new Thread (this, threadName);
t.start ();
}
}
}
public class TestThread {
public static void main(String args[]) {
RunnableDemo R1 = new RunnableDemo( "Thread-1");
R1.start();
RunnableDemo R2 = new RunnableDemo( "Thread-2");
R2.start();
}
}
Output
Creating Thread-1 Starting Thread-1 Creating Thread-2 Starting Thread-2 Running Thread-1 Thread: Thread-1, 4 Running Thread-2 Thread: Thread-2, 4 Thread: Thread-1, 3 Thread: Thread-2, 3 Thread: Thread-1, 2 Thread: Thread-2, 2 Thread: Thread-1, 1 Thread: Thread-2, 1 Thread Thread-1 exiting. Thread Thread-2 exiting.
Create a Thread by Extending a Thread Class
The second way to create a thread is to create a new class that extends Thread class using the following two simple steps. This approach provides more flexibility in handling multiple threads created using available methods in Thread class.
Step 1
You will need to override run( ) method available in Thread class. This method provides an entry point for the thread and you will put your complete business logic inside this method. Following is a simple syntax of run() method −
public void run( )
Step 2
Once Thread object is created, you can start it by calling start() method, which executes a call to run( ) method. Following is a simple syntax of start() method −
void start( );
Example
Here is the preceding program rewritten to extend the Thread −
class ThreadDemo extends Thread {
private Thread t;
private String threadName;
ThreadDemo( String name) {
threadName = name;
System.out.println("Creating " + threadName );
}
public void run() {
System.out.println("Running " + threadName );
try {
for(int i = 4; i > 0; i--) {
System.out.println("Thread: " + threadName + ", " + i);
// Let the thread sleep for a while.
Thread.sleep(50);
}
} catch (InterruptedException e) {
System.out.println("Thread " + threadName + " interrupted.");
}
System.out.println("Thread " + threadName + " exiting.");
}
public void start () {
System.out.println("Starting " + threadName );
if (t == null) {
t = new Thread (this, threadName);
t.start ();
}
}
}
public class TestThread {
public static void main(String args[]) {
ThreadDemo T1 = new ThreadDemo( "Thread-1");
T1.start();
ThreadDemo T2 = new ThreadDemo( "Thread-2");
T2.start();
}
}
Output
Creating Thread-1 Starting Thread-1 Creating Thread-2 Starting Thread-2 Running Thread-1 Thread: Thread-1, 4 Running Thread-2 Thread: Thread-2, 4 Thread: Thread-1, 3 Thread: Thread-2, 3 Thread: Thread-1, 2 Thread: Thread-2, 2 Thread: Thread-1, 1 Thread: Thread-2, 1 Thread Thread-1 exiting. Thread Thread-2 exiting.
Thread Methods
Following is the list of important methods available in the Thread class.
| Sr.No. | Method & Description |
|---|---|
| 1 | public void start() Starts the thread in a separate path of execution, then invokes the run() method on this Thread object. |
| 2 | public void run() If this Thread object was instantiated using a separate Runnable target, the run() method is invoked on that Runnable object. |
| 3 | public final void setName(String name) Changes the name of the Thread object. There is also a getName() method for retrieving the name. |
| 4 | public final void setPriority(int priority) Sets the priority of this Thread object. The possible values are between 1 and 10. |
| 5 | public final void setDaemon(boolean on) A parameter of true denotes this Thread as a daemon thread. |
| 6 | public final void join(long millisec) The current thread invokes this method on a second thread, causing the current thread to block until the second thread terminates or the specified number of milliseconds passes. |
| 7 | public void interrupt() Interrupts this thread, causing it to continue execution if it was blocked for any reason. |
| 8 | public final boolean isAlive() Returns true if the thread is alive, which is any time after the thread has been started but before it runs to completion. |
The previous methods are invoked on a particular Thread object. The following methods in the Thread class are static. Invoking one of the static methods performs the operation on the currently running thread.
| Sr.No. | Method & Description |
|---|---|
| 1 | public static void yield() Causes the currently running thread to yield to any other threads of the same priority that are waiting to be scheduled. |
| 2 | public static void sleep(long millisec) Causes the currently running thread to block for at least the specified number of milliseconds. |
| 3 | public static boolean holdsLock(Object x) Returns true if the current thread holds the lock on the given Object. |
| 4 | public static Thread currentThread() Returns a reference to the currently running thread, which is the thread that invokes this method. |
| 5 | public static void dumpStack() Prints the stack trace for the currently running thread, which is useful when debugging a multithreaded application. |
Example
The following ThreadClassDemo program demonstrates some of these methods of the Thread class. Consider a class DisplayMessage which implements Runnable −
// File Name : DisplayMessage.java
// Create a thread to implement Runnable
public class DisplayMessage implements Runnable {
private String message;
public DisplayMessage(String message) {
this.message = message;
}
public void run() {
while(true) {
System.out.println(message);
}
}
}
Following is another class which extends the Thread class −
// File Name : GuessANumber.java
// Create a thread to extentd Thread
public class GuessANumber extends Thread {
private int number;
public GuessANumber(int number) {
this.number = number;
}
public void run() {
int counter = 0;
int guess = 0;
do {
guess = (int) (Math.random() * 100 + 1);
System.out.println(this.getName() + " guesses " + guess);
counter++;
} while(guess != number);
System.out.println("** Correct!" + this.getName() + "in" + counter + "guesses.**");
}
}
Following is the main program, which makes use of the above-defined classes −
// File Name : ThreadClassDemo.java
public class ThreadClassDemo {
public static void main(String [] args) {
Runnable hello = new DisplayMessage("Hello");
Thread thread1 = new Thread(hello);
thread1.setDaemon(true);
thread1.setName("hello");
System.out.println("Starting hello thread...");
thread1.start();
Runnable bye = new DisplayMessage("Goodbye");
Thread thread2 = new Thread(bye);
thread2.setPriority(Thread.MIN_PRIORITY);
thread2.setDaemon(true);
System.out.println("Starting goodbye thread...");
thread2.start();
System.out.println("Starting thread3...");
Thread thread3 = new GuessANumber(27);
thread3.start();
try {
thread3.join();
} catch (InterruptedException e) {
System.out.println("Thread interrupted.");
}
System.out.println("Starting thread4...");
Thread thread4 = new GuessANumber(75);
thread4.start();
System.out.println("main() is ending...");
}
}
class DisplayMessage implements Runnable {
private String message;
public DisplayMessage(String message) {
this.message = message;
}
public void run() {
while(true) {
System.out.println(message);
}
}
}
class GuessANumber extends Thread {
private int number;
public GuessANumber(int number) {
this.number = number;
}
public void run() {
int counter = 0;
int guess = 0;
do {
guess = (int) (Math.random() * 100 + 1);
System.out.println(this.getName() + " guesses " + guess);
counter++;
} while(guess != number);
System.out.println("** Correct!" + this.getName() + "in" + counter + "guesses.**");
}
}
Output
Starting hello thread... Starting goodbye thread... Hello Hello Hello Hello Hello Hello Goodbye Goodbye Goodbye Goodbye Goodbye .......
Major Java Multithreading Concepts
While doing Multithreading programming in Java, you would need to have the following concepts very handy −
Java - Thread Synchronization
When we start two or more threads within a program, there may be a situation when multiple threads try to access the same resource and finally they can produce unforeseen result due to concurrency issues. For example, if multiple threads try to write within a same file then they may corrupt the data because one of the threads can override data or while one thread is opening the same file at the same time another thread might be closing the same file.
So there is a need to synchronize the action of multiple threads and make sure that only one thread can access the resource at a given point in time. This is implemented using a concept called monitors. Each object in Java is associated with a monitor, which a thread can lock or unlock. Only one thread at a time may hold a lock on a monitor.
Java programming language provides a very handy way of creating threads and synchronizing their task by using synchronized blocks. You keep shared resources within this block. Following is the general form of the synchronized statement −
Syntax
synchronized(objectidentifier) {
// Access shared variables and other shared resources
}
Here, the objectidentifier is a reference to an object whose lock associates with the monitor that the synchronized statement represents. Now we are going to see two examples, where we will print a counter using two different threads. When threads are not synchronized, they print counter value which is not in sequence, but when we print counter by putting inside synchronized() block, then it prints counter very much in sequence for both the threads.
Multithreading Example without Synchronization
Here is a simple example which may or may not print counter value in sequence and every time we run it, it produces a different result based on CPU availability to a thread.
Example
class PrintDemo {
public void printCount() {
try {
for(int i = 5; i > 0; i--) {
System.out.println("Counter --- " + i );
}
} catch (Exception e) {
System.out.println("Thread interrupted.");
}
}
}
class ThreadDemo extends Thread {
private Thread t;
private String threadName;
PrintDemo PD;
ThreadDemo( String name, PrintDemo pd) {
threadName = name;
PD = pd;
}
public void run() {
PD.printCount();
System.out.println("Thread " + threadName + " exiting.");
}
public void start () {
System.out.println("Starting " + threadName );
if (t == null) {
t = new Thread (this, threadName);
t.start ();
}
}
}
public class TestThread {
public static void main(String args[]) {
PrintDemo PD = new PrintDemo();
ThreadDemo T1 = new ThreadDemo( "Thread - 1 ", PD );
ThreadDemo T2 = new ThreadDemo( "Thread - 2 ", PD );
T1.start();
T2.start();
// wait for threads to end
try {
T1.join();
T2.join();
} catch ( Exception e) {
System.out.println("Interrupted");
}
}
}
This produces a different result every time you run this program −
Output
Starting Thread - 1 Starting Thread - 2 Counter --- 5 Counter --- 4 Counter --- 3 Counter --- 5 Counter --- 2 Counter --- 1 Counter --- 4 Thread Thread - 1 exiting. Counter --- 3 Counter --- 2 Counter --- 1 Thread Thread - 2 exiting.
Multithreading Example with Synchronization
Here is the same example which prints counter value in sequence and every time we run it, it produces the same result.
Example
class PrintDemo {
public void printCount() {
try {
for(int i = 5; i > 0; i--) {
System.out.println("Counter --- " + i );
}
} catch (Exception e) {
System.out.println("Thread interrupted.");
}
}
}
class ThreadDemo extends Thread {
private Thread t;
private String threadName;
PrintDemo PD;
ThreadDemo( String name, PrintDemo pd) {
threadName = name;
PD = pd;
}
public void run() {
synchronized(PD) {
PD.printCount();
}
System.out.println("Thread " + threadName + " exiting.");
}
public void start () {
System.out.println("Starting " + threadName );
if (t == null) {
t = new Thread (this, threadName);
t.start ();
}
}
}
public class TestThread {
public static void main(String args[]) {
PrintDemo PD = new PrintDemo();
ThreadDemo T1 = new ThreadDemo( "Thread - 1 ", PD );
ThreadDemo T2 = new ThreadDemo( "Thread - 2 ", PD );
T1.start();
T2.start();
// wait for threads to end
try {
T1.join();
T2.join();
} catch ( Exception e) {
System.out.println("Interrupted");
}
}
}
This produces the same result every time you run this program −
Output
Starting Thread - 1 Starting Thread - 2 Counter --- 5 Counter --- 4 Counter --- 3 Counter --- 2 Counter --- 1 Thread Thread - 1 exiting. Counter --- 5 Counter --- 4 Counter --- 3 Counter --- 2 Counter --- 1 Thread Thread - 2 exiting.
Java - Interthread Communication
If you are aware of interprocess communication then it will be easy for you to understand interthread communication. Interthread communication is important when you develop an application where two or more threads exchange some information.
There are three simple methods and a little trick which makes thread communication possible. All the three methods are listed below −
| Sr.No. | Method & Description |
|---|---|
| 1 | public void wait() Causes the current thread to wait until another thread invokes the notify(). |
| 2 | public void notify() Wakes up a single thread that is waiting on this object's monitor. |
| 3 | public void notifyAll() Wakes up all the threads that called wait( ) on the same object. |
These methods have been implemented as final methods in Object, so they are available in all the classes. All three methods can be called only from within a synchronized context.
Example
This examples shows how two threads can communicate using wait() and notify() method. You can create a complex system using the same concept.
class Chat {
boolean flag = false;
public synchronized void Question(String msg) {
if (flag) {
try {
wait();
} catch (InterruptedException e) {
e.printStackTrace();
}
}
System.out.println(msg);
flag = true;
notify();
}
public synchronized void Answer(String msg) {
if (!flag) {
try {
wait();
} catch (InterruptedException e) {
e.printStackTrace();
}
}
System.out.println(msg);
flag = false;
notify();
}
}
class T1 implements Runnable {
Chat m;
String[] s1 = { "Hi", "How are you ?", "I am also doing fine!" };
public T1(Chat m1) {
this.m = m1;
new Thread(this, "Question").start();
}
public void run() {
for (int i = 0; i < s1.length; i++) {
m.Question(s1[i]);
}
}
}
class T2 implements Runnable {
Chat m;
String[] s2 = { "Hi", "I am good, what about you?", "Great!" };
public T2(Chat m2) {
this.m = m2;
new Thread(this, "Answer").start();
}
public void run() {
for (int i = 0; i < s2.length; i++) {
m.Answer(s2[i]);
}
}
}
public class TestThread {
public static void main(String[] args) {
Chat m = new Chat();
new T1(m);
new T2(m);
}
}
Output
Hi Hi How are you ? I am good, what about you? I am also doing fine! Great!
Java - Thread Deadlock
Deadlock describes a situation where two or more threads are blocked forever, waiting for each other. Deadlock occurs when multiple threads need the same locks but obtain them in different order. A Java multithreaded program may suffer from the deadlock condition because the synchronized keyword causes the executing thread to block while waiting for the lock, or monitor, associated with the specified object. Here is an example.
Example
public class TestThread {
public static Object Lock1 = new Object();
public static Object Lock2 = new Object();
public static void main(String args[]) {
ThreadDemo1 T1 = new ThreadDemo1();
ThreadDemo2 T2 = new ThreadDemo2();
T1.start();
T2.start();
}
private static class ThreadDemo1 extends Thread {
public void run() {
synchronized (Lock1) {
System.out.println("Thread 1: Holding lock 1...");
try { Thread.sleep(10); }
catch (InterruptedException e) {}
System.out.println("Thread 1: Waiting for lock 2...");
synchronized (Lock2) {
System.out.println("Thread 1: Holding lock 1 & 2...");
}
}
}
}
private static class ThreadDemo2 extends Thread {
public void run() {
synchronized (Lock2) {
System.out.println("Thread 2: Holding lock 2...");
try { Thread.sleep(10); }
catch (InterruptedException e) {}
System.out.println("Thread 2: Waiting for lock 1...");
synchronized (Lock1) {
System.out.println("Thread 2: Holding lock 1 & 2...");
}
}
}
}
}
When you compile and execute the above program, you find a deadlock situation and following is the output produced by the program −
Output
Thread 1: Holding lock 1... Thread 2: Holding lock 2... Thread 1: Waiting for lock 2... Thread 2: Waiting for lock 1...
The above program will hang forever because neither of the threads in position to proceed and waiting for each other to release the lock, so you can come out of the program by pressing CTRL+C.
Deadlock Solution Example
Let's change the order of the lock and run of the same program to see if both the threads still wait for each other −
Example
public class TestThread {
public static Object Lock1 = new Object();
public static Object Lock2 = new Object();
public static void main(String args[]) {
ThreadDemo1 T1 = new ThreadDemo1();
ThreadDemo2 T2 = new ThreadDemo2();
T1.start();
T2.start();
}
private static class ThreadDemo1 extends Thread {
public void run() {
synchronized (Lock1) {
System.out.println("Thread 1: Holding lock 1...");
try {
Thread.sleep(10);
} catch (InterruptedException e) {}
System.out.println("Thread 1: Waiting for lock 2...");
synchronized (Lock2) {
System.out.println("Thread 1: Holding lock 1 & 2...");
}
}
}
}
private static class ThreadDemo2 extends Thread {
public void run() {
synchronized (Lock1) {
System.out.println("Thread 2: Holding lock 1...");
try {
Thread.sleep(10);
} catch (InterruptedException e) {}
System.out.println("Thread 2: Waiting for lock 2...");
synchronized (Lock2) {
System.out.println("Thread 2: Holding lock 1 & 2...");
}
}
}
}
}
So just changing the order of the locks prevent the program in going into a deadlock situation and completes with the following result −
Output
Thread 1: Holding lock 1... Thread 1: Waiting for lock 2... Thread 1: Holding lock 1 & 2... Thread 2: Holding lock 1... Thread 2: Waiting for lock 2... Thread 2: Holding lock 1 & 2...
The above example is to just make the concept clear, however, it is a complex concept and you should deep dive into it before you develop your applications to deal with deadlock situations.
Java - Thread Control
Core Java provides complete control over multithreaded program. You can develop a multithreaded program which can be suspended, resumed, or stopped completely based on your requirements. There are various static methods which you can use on thread objects to control their behavior. Following table lists down those methods −
| Sr.No. | Method & Description |
|---|---|
| 1 | public void suspend() This method puts a thread in the suspended state and can be resumed using resume() method. |
| 2 | public void stop() This method stops a thread completely. |
| 3 | public void resume() This method resumes a thread, which was suspended using suspend() method. |
| 4 | public void wait() Causes the current thread to wait until another thread invokes the notify(). |
| 5 | public void notify() Wakes up a single thread that is waiting on this object's monitor. |
Be aware that the latest versions of Java has deprecated the usage of suspend( ), resume( ), and stop( ) methods and so you need to use available alternatives.
Example
class RunnableDemo implements Runnable {
public Thread t;
private String threadName;
boolean suspended = false;
RunnableDemo( String name) {
threadName = name;
System.out.println("Creating " + threadName );
}
public void run() {
System.out.println("Running " + threadName );
try {
for(int i = 10; i > 0; i--) {
System.out.println("Thread: " + threadName + ", " + i);
// Let the thread sleep for a while.
Thread.sleep(300);
synchronized(this) {
while(suspended) {
wait();
}
}
}
} catch (InterruptedException e) {
System.out.println("Thread " + threadName + " interrupted.");
}
System.out.println("Thread " + threadName + " exiting.");
}
public void start () {
System.out.println("Starting " + threadName );
if (t == null) {
t = new Thread (this, threadName);
t.start ();
}
}
void suspend() {
suspended = true;
}
synchronized void resume() {
suspended = false;
notify();
}
}
public class TestThread {
public static void main(String args[]) {
RunnableDemo R1 = new RunnableDemo( "Thread-1");
R1.start();
RunnableDemo R2 = new RunnableDemo( "Thread-2");
R2.start();
try {
Thread.sleep(1000);
R1.suspend();
System.out.println("Suspending First Thread");
Thread.sleep(1000);
R1.resume();
System.out.println("Resuming First Thread");
R2.suspend();
System.out.println("Suspending thread Two");
Thread.sleep(1000);
R2.resume();
System.out.println("Resuming thread Two");
} catch (InterruptedException e) {
System.out.println("Main thread Interrupted");
}try {
System.out.println("Waiting for threads to finish.");
R1.t.join();
R2.t.join();
} catch (InterruptedException e) {
System.out.println("Main thread Interrupted");
}
System.out.println("Main thread exiting.");
}
}
The above program produces the following output −
Output
Creating Thread-1 Starting Thread-1 Creating Thread-2 Starting Thread-2 Running Thread-1 Thread: Thread-1, 10 Running Thread-2 Thread: Thread-2, 10 Thread: Thread-1, 9 Thread: Thread-2, 9 Thread: Thread-1, 8 Thread: Thread-2, 8 Thread: Thread-1, 7 Thread: Thread-2, 7 Suspending First Thread Thread: Thread-2, 6 Thread: Thread-2, 5 Thread: Thread-2, 4 Resuming First Thread Suspending thread Two Thread: Thread-1, 6 Thread: Thread-1, 5 Thread: Thread-1, 4 Thread: Thread-1, 3 Resuming thread Two Thread: Thread-2, 3 Waiting for threads to finish. Thread: Thread-1, 2 Thread: Thread-2, 2 Thread: Thread-1, 1 Thread: Thread-2, 1 Thread Thread-1 exiting. Thread Thread-2 exiting. Main thread exiting.
Java - Networking
The term network programming refers to writing programs that execute across multiple devices (computers), in which the devices are all connected to each other using a network.
The java.net package of the J2SE APIs contains a collection of classes and interfaces that provide the low-level communication details, allowing you to write programs that focus on solving the problem at hand.
The java.net package provides support for the two common network protocols −
TCP − TCP stands for Transmission Control Protocol, which allows for reliable communication between two applications. TCP is typically used over the Internet Protocol, which is referred to as TCP/IP.
UDP − UDP stands for User Datagram Protocol, a connection-less protocol that allows for packets of data to be transmitted between applications.
This chapter gives a good understanding on the following two subjects −
Socket Programming − This is the most widely used concept in Networking and it has been explained in very detail.
URL Processing − This would be covered separately. Click here to learn about URL Processing in Java language.
Socket Programming
Sockets provide the communication mechanism between two computers using TCP. A client program creates a socket on its end of the communication and attempts to connect that socket to a server.
When the connection is made, the server creates a socket object on its end of the communication. The client and the server can now communicate by writing to and reading from the socket.
The java.net.Socket class represents a socket, and the java.net.ServerSocket class provides a mechanism for the server program to listen for clients and establish connections with them.
The following steps occur when establishing a TCP connection between two computers using sockets −
The server instantiates a ServerSocket object, denoting which port number communication is to occur on.
The server invokes the accept() method of the ServerSocket class. This method waits until a client connects to the server on the given port.
After the server is waiting, a client instantiates a Socket object, specifying the server name and the port number to connect to.
The constructor of the Socket class attempts to connect the client to the specified server and the port number. If communication is established, the client now has a Socket object capable of communicating with the server.
On the server side, the accept() method returns a reference to a new socket on the server that is connected to the client's socket.
After the connections are established, communication can occur using I/O streams. Each socket has both an OutputStream and an InputStream. The client's OutputStream is connected to the server's InputStream, and the client's InputStream is connected to the server's OutputStream.
TCP is a two-way communication protocol, hence data can be sent across both streams at the same time. Following are the useful classes providing complete set of methods to implement sockets.
ServerSocket Class Methods
The java.net.ServerSocket class is used by server applications to obtain a port and listen for client requests.
The ServerSocket class has four constructors −
| Sr.No. | Method & Description |
|---|---|
| 1 | public ServerSocket(int port) throws IOException Attempts to create a server socket bound to the specified port. An exception occurs if the port is already bound by another application. |
| 2 | public ServerSocket(int port, int backlog) throws IOException Similar to the previous constructor, the backlog parameter specifies how many incoming clients to store in a wait queue. |
| 3 | public ServerSocket(int port, int backlog, InetAddress address) throws IOException Similar to the previous constructor, the InetAddress parameter specifies the local IP address to bind to. The InetAddress is used for servers that may have multiple IP addresses, allowing the server to specify which of its IP addresses to accept client requests on. |
| 4 | public ServerSocket() throws IOException Creates an unbound server socket. When using this constructor, use the bind() method when you are ready to bind the server socket. |
If the ServerSocket constructor does not throw an exception, it means that your application has successfully bound to the specified port and is ready for client requests.
Following are some of the common methods of the ServerSocket class −
| Sr.No. | Method & Description |
|---|---|
| 1 | public int getLocalPort() Returns the port that the server socket is listening on. This method is useful if you passed in 0 as the port number in a constructor and let the server find a port for you. |
| 2 | public Socket accept() throws IOException Waits for an incoming client. This method blocks until either a client connects to the server on the specified port or the socket times out, assuming that the time-out value has been set using the setSoTimeout() method. Otherwise, this method blocks indefinitely. |
| 3 | public void setSoTimeout(int timeout) Sets the time-out value for how long the server socket waits for a client during the accept(). |
| 4 | public void bind(SocketAddress host, int backlog) Binds the socket to the specified server and port in the SocketAddress object. Use this method if you have instantiated the ServerSocket using the no-argument constructor. |
When the ServerSocket invokes accept(), the method does not return until a client connects. After a client does connect, the ServerSocket creates a new Socket on an unspecified port and returns a reference to this new Socket. A TCP connection now exists between the client and the server, and communication can begin.
Socket Class Methods
The java.net.Socket class represents the socket that both the client and the server use to communicate with each other. The client obtains a Socket object by instantiating one, whereas the server obtains a Socket object from the return value of the accept() method.
The Socket class has five constructors that a client uses to connect to a server −
| Sr.No. | Method & Description |
|---|---|
| 1 | public Socket(String host, int port) throws UnknownHostException, IOException. This method attempts to connect to the specified server at the specified port. If this constructor does not throw an exception, the connection is successful and the client is connected to the server. |
| 2 | public Socket(InetAddress host, int port) throws IOException This method is identical to the previous constructor, except that the host is denoted by an InetAddress object. |
| 3 | public Socket(String host, int port, InetAddress localAddress, int localPort) throws IOException. Connects to the specified host and port, creating a socket on the local host at the specified address and port. |
| 4 | public Socket(InetAddress host, int port, InetAddress localAddress, int localPort) throws IOException. This method is identical to the previous constructor, except that the host is denoted by an InetAddress object instead of a String. |
| 5 | public Socket() Creates an unconnected socket. Use the connect() method to connect this socket to a server. |
When the Socket constructor returns, it does not simply instantiate a Socket object but it actually attempts to connect to the specified server and port.
Some methods of interest in the Socket class are listed here. Notice that both the client and the server have a Socket object, so these methods can be invoked by both the client and the server.
| Sr.No. | Method & Description |
|---|---|
| 1 | public void connect(SocketAddress host, int timeout) throws IOException This method connects the socket to the specified host. This method is needed only when you instantiate the Socket using the no-argument constructor. |
| 2 | public InetAddress getInetAddress() This method returns the address of the other computer that this socket is connected to. |
| 3 | public int getPort() Returns the port the socket is bound to on the remote machine. |
| 4 | public int getLocalPort() Returns the port the socket is bound to on the local machine. |
| 5 | public SocketAddress getRemoteSocketAddress() Returns the address of the remote socket. |
| 6 | public InputStream getInputStream() throws IOException Returns the input stream of the socket. The input stream is connected to the output stream of the remote socket. |
| 7 | public OutputStream getOutputStream() throws IOException Returns the output stream of the socket. The output stream is connected to the input stream of the remote socket. |
| 8 | public void close() throws IOException Closes the socket, which makes this Socket object no longer capable of connecting again to any server. |
InetAddress Class Methods
This class represents an Internet Protocol (IP) address. Here are following usefull methods which you would need while doing socket programming −
| Sr.No. | Method & Description |
|---|---|
| 1 | static InetAddress getByAddress(byte[] addr) Returns an InetAddress object given the raw IP address. |
| 2 | static InetAddress getByAddress(String host, byte[] addr) Creates an InetAddress based on the provided host name and IP address. |
| 3 | static InetAddress getByName(String host) Determines the IP address of a host, given the host's name. |
| 4 | String getHostAddress() Returns the IP address string in textual presentation. |
| 5 | String getHostName() Gets the host name for this IP address. |
| 6 | static InetAddress InetAddress getLocalHost() Returns the local host. |
| 7 | String toString() Converts this IP address to a String. |
Socket Client Example
The following GreetingClient is a client program that connects to a server by using a socket and sends a greeting, and then waits for a response.
Example
// File Name GreetingClient.java
import java.net.*;
import java.io.*;
public class GreetingClient {
public static void main(String [] args) {
String serverName = args[0];
int port = Integer.parseInt(args[1]);
try {
System.out.println("Connecting to " + serverName + " on port " + port);
Socket client = new Socket(serverName, port);
System.out.println("Just connected to " + client.getRemoteSocketAddress());
OutputStream outToServer = client.getOutputStream();
DataOutputStream out = new DataOutputStream(outToServer);
out.writeUTF("Hello from " + client.getLocalSocketAddress());
InputStream inFromServer = client.getInputStream();
DataInputStream in = new DataInputStream(inFromServer);
System.out.println("Server says " + in.readUTF());
client.close();
} catch (IOException e) {
e.printStackTrace();
}
}
}
Socket Server Example
The following GreetingServer program is an example of a server application that uses the Socket class to listen for clients on a port number specified by a command-line argument −
Example
// File Name GreetingServer.java
import java.net.*;
import java.io.*;
public class GreetingServer extends Thread {
private ServerSocket serverSocket;
public GreetingServer(int port) throws IOException {
serverSocket = new ServerSocket(port);
serverSocket.setSoTimeout(10000);
}
public void run() {
while(true) {
try {
System.out.println("Waiting for client on port " +
serverSocket.getLocalPort() + "...");
Socket server = serverSocket.accept();
System.out.println("Just connected to " + server.getRemoteSocketAddress());
DataInputStream in = new DataInputStream(server.getInputStream());
System.out.println(in.readUTF());
DataOutputStream out = new DataOutputStream(server.getOutputStream());
out.writeUTF("Thank you for connecting to " + server.getLocalSocketAddress()
+ "\nGoodbye!");
server.close();
} catch (SocketTimeoutException s) {
System.out.println("Socket timed out!");
break;
} catch (IOException e) {
e.printStackTrace();
break;
}
}
}
public static void main(String [] args) {
int port = Integer.parseInt(args[0]);
try {
Thread t = new GreetingServer(port);
t.start();
} catch (IOException e) {
e.printStackTrace();
}
}
}
Compile the client and the server and then start the server as follows −
$ java GreetingServer 6066 Waiting for client on port 6066...
Check the client program as follows −
Output
$ java GreetingClient localhost 6066 Connecting to localhost on port 6066 Just connected to localhost/127.0.0.1:6066 Server says Thank you for connecting to /127.0.0.1:6066 Goodbye!
Java - URL Processing
URL stands for Uniform Resource Locator and represents a resource on the World Wide Web, such as a Web page or FTP directory.
This section shows you how to write Java programs that communicate with a URL. A URL can be broken down into parts, as follows −
protocol://host:port/path?query#ref
Examples of protocols include HTTP, HTTPS, FTP, and File. The path is also referred to as the filename, and the host is also called the authority.
The following is a URL to a web page whose protocol is HTTP −
https://www.amrood.com/index.htm?language=en#j2se
Notice that this URL does not specify a port, in which case the default port for the protocol is used. With HTTP, the default port is 80.
Constructors
The java.net.URL class represents a URL and has a complete set of methods to manipulate URL in Java.
The URL class has several constructors for creating URLs, including the following −
| Sr.No. | Constructors & Description |
|---|---|
| 1 | public URL(String protocol, String host, int port, String file) throws MalformedURLException Creates a URL by putting together the given parts. |
| 2 | public URL(String protocol, String host, String file) throws MalformedURLException Identical to the previous constructor, except that the default port for the given protocol is used. |
| 3 | public URL(String url) throws MalformedURLException Creates a URL from the given String. |
| 4 | public URL(URL context, String url) throws MalformedURLException Creates a URL by parsing together the URL and String arguments. |
The URL class contains many methods for accessing the various parts of the URL being represented. Some of the methods in the URL class include the following −
| Sr.No. | Method & Description |
|---|---|
| 1 | public String getPath() Returns the path of the URL. |
| 2 | public String getQuery() Returns the query part of the URL. |
| 3 | public String getAuthority() Returns the authority of the URL. |
| 4 | public int getPort() Returns the port of the URL. |
| 5 | public int getDefaultPort() Returns the default port for the protocol of the URL. |
| 6 | public String getProtocol() Returns the protocol of the URL. |
| 7 | public String getHost() Returns the host of the URL. |
| 8 | public String getHost() Returns the host of the URL. |
| 9 | public String getFile() Returns the filename of the URL. |
| 10 | public String getRef() Returns the reference part of the URL. |
| 11 | public URLConnection openConnection() throws IOException Opens a connection to the URL, allowing a client to communicate with the resource. |
Example
The following URLDemo program demonstrates the various parts of a URL. A URL is entered on the command line, and the URLDemo program outputs each part of the given URL.
// File Name : URLDemo.java
import java.io.IOException;
import java.net.URL;
public class URLDemo {
public static void main(String [] args) {
try {
URL url = new URL("https://www.tutorialspoint.com/index.htm?language=en#j2se");
System.out.println("URL is " + url.toString());
System.out.println("protocol is " + url.getProtocol());
System.out.println("authority is " + url.getAuthority());
System.out.println("file name is " + url.getFile());
System.out.println("host is " + url.getHost());
System.out.println("path is " + url.getPath());
System.out.println("port is " + url.getPort());
System.out.println("default port is " + url.getDefaultPort());
System.out.println("query is " + url.getQuery());
System.out.println("ref is " + url.getRef());
} catch (IOException e) {
e.printStackTrace();
}
}
}
A sample run of the this program will produce the following result −
Output
URL is https://www.tutorialspoint.com/index.htm?language=en#j2se protocol is https authority is www.tutorialspoint.com file name is /index.htm?language=en host is www.tutorialspoint.com path is /index.htm port is -1 default port is 443 query is language=en ref is j2se
URLConnections Class Methods
The openConnection() method returns a java.net.URLConnection, an abstract class whose subclasses represent the various types of URL connections.
For example −
If you connect to a URL whose protocol is HTTP, the openConnection() method returns an HttpURLConnection object.
If you connect to a URL that represents a JAR file, the openConnection() method returns a JarURLConnection object, etc.
The URLConnection class has many methods for setting or determining information about the connection, including the following −
| Sr.No. | Method & Description |
|---|---|
| 1 | Object getContent() Retrieves the contents of this URL connection. |
| 2 | Object getContent(Class[] classes) Retrieves the contents of this URL connection. |
| 3 | String getContentEncoding() Returns the value of the content-encoding header field. |
| 4 | int getContentLength() Returns the value of the content-length header field. |
| 5 | String getContentType() Returns the value of the content-type header field. |
| 6 | int getLastModified() Returns the value of the last-modified header field. |
| 7 | long getExpiration() Returns the value of the expired header field. |
| 8 | long getIfModifiedSince() Returns the value of this object's ifModifiedSince field. |
| 9 | public void setDoInput(boolean input) Passes in true to denote that the connection will be used for input. The default value is true because clients typically read from a URLConnection. |
| 10 | public void setDoOutput(boolean output) Passes in true to denote that the connection will be used for output. The default value is false because many types of URLs do not support being written to. |
| 11 | public InputStream getInputStream() throws IOException Returns the input stream of the URL connection for reading from the resource. |
| 12 | public OutputStream getOutputStream() throws IOException Returns the output stream of the URL connection for writing to the resource. |
| 13 | public URL getURL() Returns the URL that this URLConnection object is connected to. |
Example
The following URLConnectionDemo program connects to a URL entered from the command line.
If the URL represents an HTTP resource, the connection is cast to HttpURLConnection, and the data in the resource is read one line at a time.
// File Name : URLConnDemo.java
import java.io.BufferedReader;
import java.io.IOException;
import java.io.InputStreamReader;
import java.net.HttpURLConnection;
import java.net.URL;
import java.net.URLConnection;
public static void main(String [] args) {
try {
URL url = new URL("https://www.tutorialspoint.com");
URLConnection urlConnection = url.openConnection();
HttpURLConnection connection = null;
if(urlConnection instanceof HttpURLConnection) {
connection = (HttpURLConnection) urlConnection;
}else {
System.out.println("Please enter an HTTP URL.");
return;
}
BufferedReader in = new BufferedReader(
new InputStreamReader(connection.getInputStream()));
String urlString = "";
String current;
while((current = in.readLine()) != null) {
urlString += current;
}
System.out.println(urlString);
} catch (IOException e) {
e.printStackTrace();
}
}
}
A sample run of this program will produce the following result −
Output
$ java URLConnDemo .....a complete HTML content of home page of tutorialspoint.com.....
Java - Generics
It would be nice if we could write a single sort method that could sort the elements in an Integer array, a String array, or an array of any type that supports ordering.
Java Generic methods and generic classes enable programmers to specify, with a single method declaration, a set of related methods, or with a single class declaration, a set of related types, respectively.
Generics also provide compile-time type safety that allows programmers to catch invalid types at compile time.
Using Java Generic concept, we might write a generic method for sorting an array of objects, then invoke the generic method with Integer arrays, Double arrays, String arrays and so on, to sort the array elements.
Generic Methods
You can write a single generic method declaration that can be called with arguments of different types. Based on the types of the arguments passed to the generic method, the compiler handles each method call appropriately. Following are the rules to define Generic Methods −
All generic method declarations have a type parameter section delimited by angle brackets (< and >) that precedes the method's return type ( < E > in the next example).
Each type parameter section contains one or more type parameters separated by commas. A type parameter, also known as a type variable, is an identifier that specifies a generic type name.
The type parameters can be used to declare the return type and act as placeholders for the types of the arguments passed to the generic method, which are known as actual type arguments.
A generic method's body is declared like that of any other method. Note that type parameters can represent only reference types, not primitive types (like int, double and char).
Example
Following example illustrates how we can print an array of different type using a single Generic method −
public class GenericMethodTest {
// generic method printArray
public static < E > void printArray( E[] inputArray ) {
// Display array elements
for(E element : inputArray) {
System.out.printf("%s ", element);
}
System.out.println();
}
public static void main(String args[]) {
// Create arrays of Integer, Double and Character
Integer[] intArray = { 1, 2, 3, 4, 5 };
Double[] doubleArray = { 1.1, 2.2, 3.3, 4.4 };
Character[] charArray = { 'H', 'E', 'L', 'L', 'O' };
System.out.println("Array integerArray contains:");
printArray(intArray); // pass an Integer array
System.out.println("\nArray doubleArray contains:");
printArray(doubleArray); // pass a Double array
System.out.println("\nArray characterArray contains:");
printArray(charArray); // pass a Character array
}
}
Output
Array integerArray contains: 1 2 3 4 5 Array doubleArray contains: 1.1 2.2 3.3 4.4 Array characterArray contains: H E L L O
Bounded Type Parameters
There may be times when you'll want to restrict the kinds of types that are allowed to be passed to a type parameter. For example, a method that operates on numbers might only want to accept instances of Number or its subclasses. This is what bounded type parameters are for.
To declare a bounded type parameter, list the type parameter's name, followed by the extends keyword, followed by its upper bound.
Example
Following example illustrates how extends is used in a general sense to mean either "extends" (as in classes) or "implements" (as in interfaces). This example is Generic method to return the largest of three Comparable objects −
public class MaximumTest {
// determines the largest of three Comparable objects
public static <T extends Comparable<T>> T maximum(T x, T y, T z) {
T max = x; // assume x is initially the largest
if(y.compareTo(max) > 0) {
max = y; // y is the largest so far
}
if(z.compareTo(max) > 0) {
max = z; // z is the largest now
}
return max; // returns the largest object
}
public static void main(String args[]) {
System.out.printf("Max of %d, %d and %d is %d\n\n",
3, 4, 5, maximum( 3, 4, 5 ));
System.out.printf("Max of %.1f,%.1f and %.1f is %.1f\n\n",
6.6, 8.8, 7.7, maximum( 6.6, 8.8, 7.7 ));
System.out.printf("Max of %s, %s and %s is %s\n","pear",
"apple", "orange", maximum("pear", "apple", "orange"));
}
}
Output
Max of 3, 4 and 5 is 5 Max of 6.6,8.8 and 7.7 is 8.8 Max of pear, apple and orange is pear
Generic Classes
A generic class declaration looks like a non-generic class declaration, except that the class name is followed by a type parameter section.
As with generic methods, the type parameter section of a generic class can have one or more type parameters separated by commas. These classes are known as parameterized classes or parameterized types because they accept one or more parameters.
Example
Following example illustrates how we can define a generic class −
public class Box<T> {
private T t;
public void add(T t) {
this.t = t;
}
public T get() {
return t;
}
public static void main(String[] args) {
Box<Integer> integerBox = new Box<Integer>();
Box<String> stringBox = new Box<String>();
integerBox.add(new Integer(10));
stringBox.add(new String("Hello World"));
System.out.printf("Integer Value :%d\n\n", integerBox.get());
System.out.printf("String Value :%s\n", stringBox.get());
}
}
Output
Integer Value :10 String Value :Hello World
Java - Collections Framework
Prior to Java 2, Java provided ad hoc classes such as Dictionary, Vector, Stack, and Properties to store and manipulate groups of objects. Although these classes were quite useful, they lacked a central, unifying theme. Thus, the way that you used Vector was different from the way that you used Properties.
The collections framework was designed to meet several goals, such as −
The framework had to be high-performance. The implementations for the fundamental collections (dynamic arrays, linked lists, trees, and hashtables) were to be highly efficient.
The framework had to allow different types of collections to work in a similar manner and with a high degree of interoperability.
The framework had to extend and/or adapt a collection easily.
Towards this end, the entire collections framework is designed around a set of standard interfaces. Several standard implementations such as LinkedList, HashSet, and TreeSet, of these interfaces are provided that you may use as-is and you may also implement your own collection, if you choose.
A collections framework is a unified architecture for representing and manipulating collections. All collections frameworks contain the following −
Interfaces − These are abstract data types that represent collections. Interfaces allow collections to be manipulated independently of the details of their representation. In object-oriented languages, interfaces generally form a hierarchy.
Implementations, i.e., Classes − These are the concrete implementations of the collection interfaces. In essence, they are reusable data structures.
Algorithms − These are the methods that perform useful computations, such as searching and sorting, on objects that implement collection interfaces. The algorithms are said to be polymorphic: that is, the same method can be used on many different implementations of the appropriate collection interface.
In addition to collections, the framework defines several map interfaces and classes. Maps store key/value pairs. Although maps are not collections in the proper use of the term, but they are fully integrated with collections.
The Collection Interfaces
The collections framework defines several interfaces. This section provides an overview of each interface −
| Sr.No. | Interface & Description |
|---|---|
| 1 | The Collection Interface
This enables you to work with groups of objects; it is at the top of the collections hierarchy. |
| 2 | The List Interface
This extends Collection and an instance of List stores an ordered collection of elements. |
| 3 | The Set
This extends Collection to handle sets, which must contain unique elements. |
| 4 | The SortedSet
This extends Set to handle sorted sets. |
| 5 | The Map
This maps unique keys to values. |
| 6 | The Map.Entry
This describes an element (a key/value pair) in a map. This is an inner class of Map. |
| 7 | The SortedMap
This extends Map so that the keys are maintained in an ascending order. |
| 8 | The Enumeration
This is legacy interface defines the methods by which you can enumerate (obtain one at a time) the elements in a collection of objects. This legacy interface has been superceded by Iterator. |
The Collection Classes
Java provides a set of standard collection classes that implement Collection interfaces. Some of the classes provide full implementations that can be used as-is and others are abstract class, providing skeletal implementations that are used as starting points for creating concrete collections.
The standard collection classes are summarized in the following table −
| Sr.No. | Class & Description |
|---|---|
| 1 | AbstractCollection Implements most of the Collection interface. |
| 2 | AbstractList Extends AbstractCollection and implements most of the List interface. |
| 3 | AbstractSequentialList Extends AbstractList for use by a collection that uses sequential rather than random access of its elements. |
| 4 | AbstractSet Extends AbstractCollection and implements most of the Set interface. |
| 5 | AbstractMap Implements most of the Map interface. |
The AbstractCollection, AbstractSet, AbstractList, AbstractSequentialList and AbstractMap classes provide skeletal implementations of the core collection interfaces, to minimize the effort required to implement them.
The following legacy classes defined by java.util have been discussed in the previous chapter −
| Sr.No. | Class & Description |
|---|---|
| 1 | Queue
The queue interface is provided in java.util package and it implements the Collection interface. The queue implements FIFO i.e. First In First Out. This means that the elements entered first are the ones that are deleted first. |
The Collection Algorithms
The collections framework defines several algorithms that can be applied to collections and maps. These algorithms are defined as static methods within the Collections class.
Several of the methods can throw a ClassCastException, which occurs when an attempt is made to compare incompatible types, or an UnsupportedOperationException, which occurs when an attempt is made to modify an unmodifiable collection.
Collections define three static variables: EMPTY_SET, EMPTY_LIST, and EMPTY_MAP. All are immutable.
| Sr.No. | Algorithm & Description |
|---|---|
| 1 | The Collection Algorithms
Here is a list of all the algorithm implementation. |
How to Use an Iterator ?
Often, you will want to cycle through the elements in a collection. For example, you might want to display each element.
The easiest way to do this is to employ an iterator, which is an object that implements either the Iterator or the ListIterator interface.
Iterator enables you to cycle through a collection, obtaining or removing elements. ListIterator extends Iterator to allow bidirectional traversal of a list and the modification of elements.
| Sr.No. | Iterator Method & Description |
|---|---|
| 1 | Using Java Iterator
Here is a list of all the methods with examples provided by Iterator and ListIterator interfaces. |
How to Use a Comparator ?
Both TreeSet and TreeMap store elements in a sorted order. However, it is the comparator that defines precisely what sorted order means.
This interface lets us sort a given collection any number of different ways. Also this interface can be used to sort any instances of any class (even classes we cannot modify).
| Sr.No. | Iterator Method & Description |
|---|---|
| 1 | Using Java Comparator
Here is a list of all the methods with examples provided by Comparator Interface. |
How to Use a Comparable ?
Both TreeSet and TreeMap store elements in a sorted order. We can use Comparable interface that defines precisely what sorted order means.
This interface lets us sort a given collection any number of different ways. Also this interface can be used to sort any instances of any class (even classes we cannot modify).
| Sr.No. | Iterator Method & Description |
|---|---|
| 1 | Using Java Comparable
Here is a list of all the methods with examples provided by Comparable Interface. |
Summary
The Java collections framework gives the programmer access to prepackaged data structures as well as to algorithms for manipulating them.
A collection is an object that can hold references to other objects. The collection interfaces declare the operations that can be performed on each type of collection.
The classes and interfaces of the collections framework are in package java.util.
Java - The List Interface
The List interface extends Collection and declares the behavior of a collection that stores a sequence of elements.
Elements can be inserted or accessed by their position in the list, using a zero-based index.
A list may contain duplicate elements.
In addition to the methods defined by Collection, List defines some of its own, which are summarized in the following table.
Several of the list methods will throw an UnsupportedOperationException if the collection cannot be modified, and a ClassCastException is generated when one object is incompatible with another.
| Sr.No. | Method & Description |
|---|---|
| 1 | void add(int index, Object obj) Inserts obj into the invoking list at the index passed in the index. Any pre-existing elements at or beyond the point of insertion are shifted up. Thus, no elements are overwritten. |
| 2 | boolean addAll(int index, Collection c) Inserts all elements of c into the invoking list at the index passed in the index. Any pre-existing elements at or beyond the point of insertion are shifted up. Thus, no elements are overwritten. Returns true if the invoking list changes and returns false otherwise. |
| 3 | Object get(int index) Returns the object stored at the specified index within the invoking collection. |
| 4 | int indexOf(Object obj) Returns the index of the first instance of obj in the invoking list. If obj is not an element of the list, .1 is returned. |
| 5 | int lastIndexOf(Object obj) Returns the index of the last instance of obj in the invoking list. If obj is not an element of the list, .1 is returned. |
| 6 | ListIterator listIterator( ) Returns an iterator to the start of the invoking list. |
| 7 | ListIterator listIterator(int index) Returns an iterator to the invoking list that begins at the specified index. |
| 8 | Object remove(int index) Removes the element at position index from the invoking list and returns the deleted element. The resulting list is compacted. That is, the indexes of subsequent elements are decremented by one. |
| 9 | Object set(int index, Object obj) Assigns obj to the location specified by index within the invoking list. |
| 10 | List subList(int start, int end) Returns a list that includes elements from start to end.1 in the invoking list. Elements in the returned list are also referenced by the invoking object. |
Example 1
The above interface has been implemented using ArrayList. Following is the example to explain few methods from various class implementation of the above collection methods −
import java.util.ArrayList;
import java.util.List;
public class CollectionsDemo {
public static void main(String[] args) {
List<String> a1 = new ArrayList<>();
a1.add("Zara");
a1.add("Mahnaz");
a1.add("Ayan");
System.out.println(" ArrayList Elements");
System.out.print("\t" + a1);
}
}
Output
ArrayList Elements [Zara, Mahnaz, Ayan]
Example 2
The above interface has been implemented using LinkedList. Following is the example to explain few methods from various class implementation of the above collection methods −
import java.util.LinkedList;
import java.util.List;
public class CollectionsDemo {
public static void main(String[] args) {
List<String> a1 = new LinkedList<>();
a1.add("Zara");
a1.add("Mahnaz");
a1.add("Ayan");
System.out.println(" LinkedList Elements");
System.out.print("\t" + a1);
}
}
Output
LinkedList Elements [Zara, Mahnaz, Ayan]
Example 3
The above interface has been implemented using ArrayList. Following is another example to explain few methods from various class implementation of the above collection methods −
import java.util.ArrayList;
import java.util.List;
public class CollectionsDemo {
public static void main(String[] args) {
List<String> a1 = new ArrayList<>();
a1.add("Zara");
a1.add("Mahnaz");
a1.add("Ayan");
System.out.println(" ArrayList Elements");
System.out.print("\t" + a1);
// remove second element
a1.remove(1);
System.out.println("\n ArrayList Elements");
System.out.print("\t" + a1);
}
}
Output
ArrayList Elements [Zara, Mahnaz, Ayan] ArrayList Elements [Zara, Ayan]
Java - Queue Interface
The Queue interface is provided in java.util package and it implements the Collection interface. The queue implements FIFO i.e. First In First Out. This means that the elements entered first are the ones that are deleted first. A queue is generally used to hold elements before processing them. Once an element is processed then it is removed from the queue and next item is picked for processing.
Declaration
public interface Queue<E> extends Collection<E>
Queue Methods
Following is the list of the important queue methods that all the implementation classes of the Queue interface implement −
| Sr.No. | Method & Description |
|---|---|
| 1 | boolean add(E e)
This method inserts the specified element into this queue if it is possible to do so immediately without violating capacity restrictions, returning true upon success and throwing an IllegalStateException if no space is currently available. |
| 2 | E element()
This method retrieves, but does not remove, the head of this queue. |
| 3 | boolean offer(E e)
This method inserts the specified element into this queue if it is possible to do so immediately without violating capacity restrictions. |
| 4 | E peek()
This method retrieves, but does not remove, the head of this queue, or returns null if this queue is empty. |
| 5 | E poll()
This method retrieves and removes the head of this queue, or returns null if this queue is empty. |
| 6 | E remove()
This method retrieves and removes the head of this queue. |
Methods inherited
This interface inherits methods from the following interfaces −
- java.util.Collection
- java.lang.Iterable
Example
In this example, we're using a LinkedList instance to show queue add, peek and size operations.
package com.tutorialspoint;
import java.util.LinkedList;
import java.util.Queue;
public class QueueDemo {
public static void main(String[] args) {
Queue<Integer> q = new LinkedList<>();
q.add(6);
q.add(1);
q.add(8);
q.add(4);
q.add(7);
System.out.println("The queue is: " + q);
int num1 = q.remove();
System.out.println("The element deleted from the head is: " + num1);
System.out.println("The queue after deletion is: " + q);
int head = q.peek();
System.out.println("The head of the queue is: " + head);
int size = q.size();
System.out.println("The size of the queue is: " + size);
}
}
Output
The queue is: [6, 1, 8, 4, 7] The element deleted from the head is: 6 The queue after deletion is: [1, 8, 4, 7] The head of the queue is: 1 The size of the queue is: 4
Java - The Map Interface
The Map interface maps unique keys to values. A key is an object that you use to retrieve a value at a later date.
Given a key and a value, you can store the value in a Map object. After the value is stored, you can retrieve it by using its key.
Several methods throw a NoSuchElementException when no items exist in the invoking map.
A ClassCastException is thrown when an object is incompatible with the elements in a map.
A NullPointerException is thrown if an attempt is made to use a null object and null is not allowed in the map.
An UnsupportedOperationException is thrown when an attempt is made to change an unmodifiable map.
| Sr.No. | Method & Description |
|---|---|
| 1 | void clear( ) Removes all key/value pairs from the invoking map. |
| 2 | boolean containsKey(Object k) Returns true if the invoking map contains k as a key. Otherwise, returns false. |
| 3 | boolean containsValue(Object v) Returns true if the map contains v as a value. Otherwise, returns false. |
| 4 | Set entrySet( ) Returns a Set that contains the entries in the map. The set contains objects of type Map.Entry. This method provides a set-view of the invoking map. |
| 5 | boolean equals(Object obj) Returns true if obj is a Map and contains the same entries. Otherwise, returns false. |
| 6 | Object get(Object k) Returns the value associated with the key k. |
| 7 | int hashCode( ) Returns the hash code for the invoking map. |
| 8 | boolean isEmpty( ) Returns true if the invoking map is empty. Otherwise, returns false. |
| 9 | Set keySet( ) Returns a Set that contains the keys in the invoking map. This method provides a set-view of the keys in the invoking map. |
| 10 | Object put(Object k, Object v) Puts an entry in the invoking map, overwriting any previous value associated with the key. The key and value are k and v, respectively. Returns null if the key did not already exist. Otherwise, the previous value linked to the key is returned. |
| 11 | void putAll(Map m) Puts all the entries from m into this map. |
| 12 | Object remove(Object k) Removes the entry whose key equals k. |
| 13 | int size( ) Returns the number of key/value pairs in the map. |
| 14 | Collection values( ) Returns a collection containing the values in the map. This method provides a collection-view of the values in the map. |
Example 1
Map has its implementation in various classes like HashMap. Following is an example to explain map functionality −
import java.util.HashMap;
import java.util.Map;
public class CollectionsDemo {
public static void main(String[] args) {
Map<String, String> m1 = new HashMap<>();
m1.put("Zara", "8");
m1.put("Mahnaz", "31");
m1.put("Ayan", "12");
m1.put("Daisy", "14");
System.out.println();
System.out.println(" Map Elements");
System.out.print("\t" + m1);
}
}
Output
Map Elements
{Daisy = 14, Ayan = 12, Zara = 8, Mahnaz = 31}
Example 2
Map has its implementation in various classes like TreeMap which sorts the entries based on keys. Following is an example to explain map functionality using TreeMap −
import java.util.Map;
import java.util.TreeMap;
public class CollectionsDemo {
public static void main(String[] args) {
Map<String, String> m1 = new TreeMap<>();
m1.put("Zara", "8");
m1.put("Mahnaz", "31");
m1.put("Ayan", "12");
m1.put("Daisy", "14");
System.out.println();
System.out.println(" Map Elements");
System.out.print("\t" + m1);
}
}
Output
Map Elements
{Ayan=12, Daisy=14, Mahnaz=31, Zara=8}
Example 3
Map has its implementation in various classes like HashMap. Following is an example to explain map functions using HashMap to add and remove elements to the map−
import java.util.HashMap;
import java.util.Map;
public class CollectionsDemo {
public static void main(String[] args) {
Map<String, String> m1 = new HashMap<>();
m1.put("Zara", "8");
m1.put("Mahnaz", "31");
m1.put("Ayan", "12");
m1.put("Daisy", "14");
System.out.println();
System.out.println(" Map Elements");
System.out.print("\t" + m1);
m1.remove("Daisy");
System.out.println(" Map Elements");
System.out.print("\t" + m1);
}
}
Output
Map Elements
{Daisy=14, Ayan=12, Zara=8, Mahnaz=31} Map Elements
{Ayan=12, Zara=8, Mahnaz=31}
Java - The SortedMap Interface
The SortedMap interface extends Map. It ensures that the entries are maintained in an ascending key order.
Several methods throw a NoSuchElementException when no items are in the invoking map. A ClassCastException is thrown when an object is incompatible with the elements in a map. A NullPointerException is thrown if an attempt is made to use a null object when null is not allowed in the map.
The methods declared by SortedMap are summarized in the following table −
| Sr.No. | Method & Description |
|---|---|
| 1 | Comparator comparator( ) Returns the invoking sorted map's comparator. If the natural ordering is used for the invoking map, null is returned. |
| 2 | Object firstKey( ) Returns the first key in the invoking map. |
| 3 | SortedMap headMap(Object end) Returns a sorted map for those map entries with keys that are less than end. |
| 4 | Object lastKey( ) Returns the last key in the invoking map. |
| 5 | SortedMap subMap(Object start, Object end) Returns a map containing those entries with keys that are greater than or equal to start and less than end. |
| 6 | SortedMap tailMap(Object start) Returns a map containing those entries with keys that are greater than or equal to start. |
Example 1
Following is an example showing how TreeMap can be used to get values of a SortedMap −
import java.util.Iterator;
import java.util.Map;
import java.util.Set;
import java.util.SortedMap;
import java.util.TreeMap;
public class MapDemo {
public static void main(String args[]) {
// Create a hash map
SortedMap<String, Double> map = new TreeMap<>();
// Put elements to the map
map.put("Zara", Double.valueOf(3434.34));
map.put("Mahnaz", Double.valueOf(123.22));
map.put("Ayan", Double.valueOf(1378.00));
map.put("Daisy", Double.valueOf(99.22));
map.put("Qadir", Double.valueOf(-19.08));
// Get a set of the entries
Set<Map.Entry<String, Double>> set = map.entrySet();
// Get an iterator
Iterator<Map.Entry<String, Double>> i = set.iterator();
// Display elements
while(i.hasNext()) {
Map.Entry<String, Double> me = i.next();
System.out.print(me.getKey() + ": ");
System.out.println(me.getValue());
}
}
}
Output
Daisy: 99.22 Ayan: 1378.0 Zara: 3434.34 Qadir: -19.08 Mahnaz: 123.22
Example 2
Following is an example showing how TreeMap can be used to set values of a SortedMap −
import java.util.Iterator;
import java.util.Map;
import java.util.Set;
import java.util.SortedMap;
import java.util.TreeMap;
public class MapDemo {
public static void main(String args[]) {
// Create a hash map
SortedMap<String, Double> map = new TreeMap<>();
// Put elements to the map
map.put("Zara", Double.valueOf(3434.34));
map.put("Mahnaz", Double.valueOf(123.22));
map.put("Ayan", Double.valueOf(1378.00));
map.put("Daisy", Double.valueOf(99.22));
map.put("Qadir", Double.valueOf(-19.08));
// Get a set of the entries
Set<Map.Entry<String, Double>> set = map.entrySet();
// Get an iterator
Iterator<Map.Entry<String, Double>> i = set.iterator();
// Display elements
while(i.hasNext()) {
Map.Entry<String, Double> me = i.next();
me.setValue(me.getValue() * 10);
System.out.print(me.getKey() + ": ");
System.out.println(me.getValue());
}
}
}
Output
Daisy: 992.2 Ayan: 13780.0 Zara: 34343.4 Qadir: -190.79999999999998 Mahnaz: 1232.2
Example 3
Following is an example showing how a TreeMap can be used to get key of a sortedMap entry −
import java.util.Iterator;
import java.util.Map;
import java.util.Set;
import java.util.SortedMap;
import java.util.TreeMap;
public class MapDemo {
public static void main(String args[]) {
// Create a hash map
SortedMap<String, Double> map = new TreeMap<>();
// Put elements to the map
map.put("Zara", Double.valueOf(3434.34));
map.put("Mahnaz", Double.valueOf(123.22));
map.put("Ayan", Double.valueOf(1378.00));
map.put("Daisy", Double.valueOf(99.22));
map.put("Qadir", Double.valueOf(-19.08));
// Get a set of the entries
Set<Map.Entry<String, Double>> set = map.entrySet();
// Get an iterator
Iterator<Map.Entry<String, Double>> i = set.iterator();
// Display elements
while(i.hasNext()) {
Map.Entry<String, Double> me = i.next();
System.out.println(me.getKey());
}
}
}
Output
Daisy Ayan Zara Qadir Mahnaz
Java - The Set Interface
A Set is a Collection that cannot contain duplicate elements. It models the mathematical set abstraction.
The Set interface contains only methods inherited from Collection and adds the restriction that duplicate elements are prohibited.
Set also adds a stronger contract on the behavior of the equals and hashCode operations, allowing Set instances to be compared meaningfully even if their implementation types differ.
The methods declared by Set are summarized in the following table −
| Sr.No. | Method & Description |
|---|---|
| 1 | add( ) Adds an object to the collection. |
| 2 | clear( ) Removes all objects from the collection. |
| 3 | contains( ) Returns true if a specified object is an element within the collection. |
| 4 | isEmpty( ) Returns true if the collection has no elements. |
| 5 | iterator( ) Returns an Iterator object for the collection, which may be used to retrieve an object. |
| 6 | remove( ) Removes a specified object from the collection. |
| 7 | size( ) Returns the number of elements in the collection. |
Example 1
Set has its implementation in various classes like HashSet, TreeSet, LinkedHashSet. Following is an example to explain Set functionality using HashSet −
import java.util.HashSet;
import java.util.Set;
public class SetDemo {
public static void main(String args[]) {
int count[] = {34, 22,10,60,30,22};
Set<Integer> set = new HashSet<>();
try {
for(int i = 0; i < 5; i++) {
set.add(count[i]);
}
System.out.println(set);
}
catch(Exception e) {}
}
}
Output
[34, 22, 10, 60, 30] The sorted list is: [10, 22, 30, 34, 60] The First element of the set is: 10 The last element of the set is: 60
Example 2
Set has its implementation in various classes like HashSet, TreeSet, LinkedHashSet. Following is an example to explain Set functionality using TreeSet −
import java.util.HashSet;
import java.util.Set;
import java.util.TreeSet;
public class SetDemo {
public static void main(String args[]) {
int count[] = {34, 22,10,60,30,22};
Set<Integer> set = new HashSet<>();
try {
for(int i = 0; i < 5; i++) {
set.add(count[i]);
}
System.out.println(set);
TreeSet<Integer> sortedSet = new TreeSet<>(set);
System.out.println("The sorted list is:");
System.out.println(sortedSet);
System.out.println("The First element of the set is: "+ (Integer)sortedSet.first());
System.out.println("The last element of the set is: "+ (Integer)sortedSet.last());
}
catch(Exception e) {}
}
}
Output
[34, 22, 10, 60, 30] The sorted list is: [10, 22, 30, 34, 60] The First element of the set is: 10 The last element of the set is: 60
Example 3
Set has its implementation in various classes like HashSet, TreeSet, LinkedHashSet. Following is an example to explain Set functionality using TreeSet opearations −
import java.util.HashSet;
import java.util.Set;
import java.util.TreeSet;
public class SetDemo {
public static void main(String args[]) {
int count[] = {34, 22,10,60,30,22};
Set<Integer> set = new HashSet<>();
try {
for(int i = 0; i < 5; i++) {
set.add(count[i]);
}
System.out.println(set);
TreeSet<Integer> sortedSet = new TreeSet<>(set);
System.out.println("The sorted list is:");
System.out.println(sortedSet);
sortedSet.clear();
System.out.println("The sorted list is:");
System.out.println(sortedSet);
}
catch(Exception e) {}
}
}
Output
[34, 22, 10, 60, 30] The sorted list is: [10, 22, 30, 34, 60] The sorted list is: []
Java - The SortedSet Interface
The SortedSet interface extends Set and declares the behavior of a set sorted in an ascending order. In addition to those methods defined by Set, the SortedSet interface declares the methods summarized in the following table −
Several methods throw a NoSuchElementException when no items are contained in the invoking set. A ClassCastException is thrown when an object is incompatible with the elements in a set.
A NullPointerException is thrown if an attempt is made to use a null object and null is not allowed in the set.
| Sr.No. | Method & Description |
|---|---|
| 1 | Comparator comparator( ) Returns the invoking sorted set's comparator. If the natural ordering is used for this set, null is returned. |
| 2 | Object first( ) Returns the first element in the invoking sorted set. |
| 3 | SortedSet headSet(Object end) Returns a SortedSet containing those elements less than end that are contained in the invoking sorted set. Elements in the returned sorted set are also referenced by the invoking sorted set. |
| 4 | Object last( ) Returns the last element in the invoking sorted set. |
| 5 | SortedSet subSet(Object start, Object end) Returns a SortedSet that includes those elements between start and end.1. Elements in the returned collection are also referenced by the invoking object. |
| 6 | SortedSet tailSet(Object start) Returns a SortedSet that contains those elements greater than or equal to start that are contained in the sorted set. Elements in the returned set are also referenced by the invoking object. |
Example 1
SortedSet have its implementation in various classes like TreeSet. Following is an example of a TreeSet class with add operation−
import java.util.Iterator;
import java.util.SortedSet;
import java.util.TreeSet;
public class SortedSetDemo {
public static void main(String[] args) {
// Create the sorted set
SortedSet<String> set = new TreeSet<>();
// Add elements to the set
set.add("b");
set.add("c");
set.add("a");
// Iterating over the elements in the set
Iterator it = set.iterator();
while (it.hasNext()) {
// Get element
Object element = it.next();
System.out.println(element.toString());
}
}
}
Output
a b c
Example 2
SortedSet have its implementation in various classes like TreeSet. Following is an example of a TreeSet class with add and remove operation −
import java.util.Iterator;
import java.util.SortedSet;
import java.util.TreeSet;
public class SortedSetDemo {
public static void main(String[] args) {
// Create the sorted set
SortedSet<String> set = new TreeSet<>();
// Add elements to the set
set.add("b");
set.add("c");
set.add("a");
set.add("d");
set.add("e");
set.add("f");
// remove elements
set.remove("c");
set.remove("f");
// Iterating over the elements in the set
Iterator it = set.iterator();
while (it.hasNext()) {
// Get element
Object element = it.next();
System.out.println(element.toString());
}
}
}
Output
a b d e
Example 3
SortedSet have its implementation in various classes like TreeSet. Following is an example of a TreeSet class with add and clear operation −
import java.util.Iterator;
import java.util.SortedSet;
import java.util.TreeSet;
public class SortedSetDemo {
public static void main(String[] args) {
// Create the sorted set
SortedSet<String> set = new TreeSet<>();
// Add elements to the set
set.add("b");
set.add("c");
set.add("a");
set.add("d");
set.add("e");
set.add("f");
System.out.println(set);
// remove elements
set.clear();
System.out.println(set);
}
}
Output
[a, b, c, d, e, f] []
Java - Data Structures
The data structures provided by the Java utility package are very powerful and perform a wide range of functions. These data structures consist of the following interface and classes −
- Enumeration
- BitSet
- Vector
- Stack
- Dictionary
- Hashtable
- Properties
All these classes are now legacy and Java-2 has introduced a new framework called Collections Framework, which is discussed in the next chapter −
The Enumeration
The Enumeration interface isn't itself a data structure, but it is very important within the context of other data structures. The Enumeration interface defines a means to retrieve successive elements from a data structure.
For example, Enumeration defines a method called nextElement that is used to get the next element in a data structure that contains multiple elements.
Example
Following is an example showing usage of Enumeration for a Vector.
import java.util.Vector;
import java.util.Enumeration;
public class EnumerationTester {
public static void main(String args[]) {
Enumeration<String> days;
Vector<String> dayNames = new Vector<>();
dayNames.add("Sunday");
dayNames.add("Monday");
dayNames.add("Tuesday");
dayNames.add("Wednesday");
dayNames.add("Thursday");
dayNames.add("Friday");
dayNames.add("Saturday");
days = dayNames.elements();
while (days.hasMoreElements()) {
System.out.println(days.nextElement());
}
}
}
Output
Sunday Monday Tuesday Wednesday Thursday Friday Saturday
To have more detail about this interface, check The Enumeration.
The BitSet
The BitSet class implements a group of bits or flags that can be set and cleared individually.
This class is very useful in cases where you need to keep up with a set of Boolean values; you just assign a bit to each value and set or clear it as appropriate.
Example
The following program illustrates several of the methods supported by this data structure −
import java.util.BitSet;
public class BitSetDemo {
public static void main(String args[]) {
BitSet bits1 = new BitSet(16);
BitSet bits2 = new BitSet(16);
// set some bits
for(int i = 0; i < 16; i++) {
if((i % 2) == 0) bits1.set(i);
if((i % 5) != 0) bits2.set(i);
}
System.out.println("Initial pattern in bits1: ");
System.out.println(bits1);
System.out.println("\nInitial pattern in bits2: ");
System.out.println(bits2);
// AND bits
bits2.and(bits1);
System.out.println("\nbits2 AND bits1: ");
System.out.println(bits2);
// OR bits
bits2.or(bits1);
System.out.println("\nbits2 OR bits1: ");
System.out.println(bits2);
// XOR bits
bits2.xor(bits1);
System.out.println("\nbits2 XOR bits1: ");
System.out.println(bits2);
}
}
Output
Initial pattern in bits1:
{0, 2, 4, 6, 8, 10, 12, 14}
Initial pattern in bits2:
{1, 2, 3, 4, 6, 7, 8, 9, 11, 12, 13, 14}
bits2 AND bits1:
{2, 4, 6, 8, 12, 14}
bits2 OR bits1:
{0, 2, 4, 6, 8, 10, 12, 14}
bits2 XOR bits1:
{}
The Vector
The Vector class is similar to a traditional Java array, except that it can grow as necessary to accommodate new elements.
Like an array, elements of a Vector object can be accessed via an index into the vector.
The nice thing about using the Vector class is that you don't have to worry about setting it to a specific size upon creation; it shrinks and grows automatically when necessary.
Example
The following program illustrates several of the methods supported by this collection −
import java.util.*;
public class VectorDemo {
public static void main(String args[]) {
// initial size is 3, increment is 2
Vector v = new Vector(3, 2);
System.out.println("Initial size: " + v.size());
System.out.println("Initial capacity: " + v.capacity());
v.addElement(new Integer(1));
v.addElement(new Integer(2));
v.addElement(new Integer(3));
v.addElement(new Integer(4));
System.out.println("Capacity after four additions: " + v.capacity());
v.addElement(new Double(5.45));
System.out.println("Current capacity: " + v.capacity());
v.addElement(new Double(6.08));
v.addElement(new Integer(7));
System.out.println("Current capacity: " + v.capacity());
v.addElement(new Float(9.4));
v.addElement(new Integer(10));
System.out.println("Current capacity: " + v.capacity());
v.addElement(new Integer(11));
v.addElement(new Integer(12));
System.out.println("First element: " + (Integer)v.firstElement());
System.out.println("Last element: " + (Integer)v.lastElement());
if(v.contains(new Integer(3)))
System.out.println("Vector contains 3.");
// enumerate the elements in the vector.
Enumeration vEnum = v.elements();
System.out.println("\nElements in vector:");
while(vEnum.hasMoreElements())
System.out.print(vEnum.nextElement() + " ");
System.out.println();
}
}
Output
Initial size: 0 Initial capacity: 3 Capacity after four additions: 5 Current capacity: 5 Current capacity: 7 Current capacity: 9 First element: 1 Last element: 12 Vector contains 3. Elements in vector: 1 2 3 4 5.45 6.08 7 9.4 10 11 12
The Stack
The Stack class implements a last-in-first-out (LIFO) stack of elements.
You can think of a stack literally as a vertical stack of objects; when you add a new element, it gets stacked on top of the others.
When you pull an element off the stack, it comes off the top. In other words, the last element you added to the stack is the first one to come back off.
Example
The following program illustrates several of the methods supported by this collection −
import java.util.*;
public class StackDemo {
static void showpush(Stack st, int a) {
st.push(new Integer(a));
System.out.println("push(" + a + ")");
System.out.println("stack: " + st);
}
static void showpop(Stack st) {
System.out.print("pop -> ");
Integer a = (Integer) st.pop();
System.out.println(a);
System.out.println("stack: " + st);
}
public static void main(String args[]) {
Stack st = new Stack();
System.out.println("stack: " + st);
showpush(st, 42);
showpush(st, 66);
showpush(st, 99);
showpop(st);
showpop(st);
showpop(st);
try {
showpop(st);
} catch (EmptyStackException e) {
System.out.println("empty stack");
}
}
}
Output
stack: [ ] push(42) stack: [42] push(66) stack: [42, 66] push(99) stack: [42, 66, 99] pop -> 99 stack: [42, 66] pop -> 66 stack: [42] pop -> 42 stack: [ ] pop -> empty stack
The Dictionary
The Dictionary class is an abstract class that defines a data structure for mapping keys to values.
This is useful in cases where you want to be able to access data via a particular key rather than an integer index.
Since the Dictionary class is abstract, it provides only the framework for a key-mapped data structure rather than a specific implementation.
Example
The following example shows the usage of Java Dictionary keys() method. We're creating a dictionary instance using Hashtable object of Integer, Integer. Then we've added few elements to it. An enumeration is retrieved using keys() method and enumeration is then iterated to print the keys of the dictionary.
package com.tutorialspoint;
import java.util.Enumeration;
import java.util.Dictionary;
import java.util.Hashtable;
public class DictionaryDemo {
public static void main(String[] args) {
// create a new hashtable
Dictionary<Integer, Integer> dictionary = new Hashtable<>();
// add 2 elements
dictionary.put(1, 1);
dictionary.put(2, 2);
Enumeration<Integer> enumeration = dictionary.keys();
while(enumeration.hasMoreElements()) {
System.out.println(enumeration.nextElement());
}
}
}
Output
2 1
The Hashtable
The Hashtable class provides a means of organizing data based on some user-defined key structure.
For example, in an address list hash table you could store and sort data based on a key such as ZIP code rather than on a person's name.
The specific meaning of keys with regard to hash tables is totally dependent on the usage of the hash table and the data it contains.
Example
The following example shows the usage of Java Hashtable contains() method to check if a value is present in a Hashtable or not. We've created a Hashtable object of Integer,Integer. Then few entries are added, table is printed and using contains() we're checking about two values in the table.
package com.tutorialspoint;
import java.util.Hashtable;
public class HashtableDemo {
public static void main(String args[]) {
// create hash table
Hashtable<Integer,Integer> hashtable = new Hashtable<>();
// populate hash table
hashtable.put(1, 1);
hashtable.put(2, 2);
hashtable.put(3, 3);
System.out.println("Initial table elements: " + hashtable);
System.out.println("Hashtable contains 2 as value: " + hashtable.contains(2));
System.out.println("Hashtable contains 4 as value: " + hashtable.contains(4));
}
}
Output
Initial table elements: {3=3, 2=2, 1=1}
Hashtable contains 2 as value: true
Hashtable contains 4 as value: false
The Properties
Properties is a subclass of Hashtable. It is used to maintain lists of values in which the key is a String and the value is also a String.
The Properties class is used by many other Java classes. For example, it is the type of object returned by System.getProperties( ) when obtaining environmental values.
Example
The following example shows the usage of Java Properties getProperty(String key) method to get a value based on a key from a Properties. We've created a Properties object. Then few entries are added. Using getProperty() method, a value is retrieved and printed.
package com.tutorialspoint;
import java.util.Properties;
public class PropertiesDemo {
public static void main(String[] args) {
Properties properties = new Properties();
//populate properties object
properties.put("1", "tutorials");
properties.put("2", "point");
properties.put("3", "is best");
System.out.println("Properties elements: " + properties);
System.out.println("Value: " + properties.getProperty("1"));
}
}
Output
Properties elements: {1=tutorials, 2=point, 3=is best}
Value: tutorials
Java - The Enumeration Interface
The Enumeration interface defines the methods by which you can enumerate (obtain one at a time) the elements in a collection of objects.
This legacy interface has been superceded by Iterator. Although not deprecated, Enumeration is considered obsolete for new code. However, it is used by several methods defined by the legacy classes such as Vector and Properties, is used by several other API classes, and is currently in widespread use in application code.
The methods declared by Enumeration are summarized in the following table −
| Sr.No. | Method & Description |
|---|---|
| 1 | boolean hasMoreElements( ) When implemented, it must return true while there are still more elements to extract, and false when all the elements have been enumerated. |
| 2 | Object nextElement( ) This returns the next object in the enumeration as a generic Object reference. |
Example 1
Following is an example showing usage of Enumeration for a Vector.
import java.util.Vector;
import java.util.Enumeration;
public class EnumerationTester {
public static void main(String args[]) {
Enumeration<String> days;
Vector<String> dayNames = new Vector<>();
dayNames.add("Sunday");
dayNames.add("Monday");
dayNames.add("Tuesday");
dayNames.add("Wednesday");
dayNames.add("Thursday");
dayNames.add("Friday");
dayNames.add("Saturday");
days = dayNames.elements();
while (days.hasMoreElements()) {
System.out.println(days.nextElement());
}
}
}
Output
Sunday Monday Tuesday Wednesday Thursday Friday Saturday
Example 2
Following is an example showing usage of Enumeration for a Properties to print the values.
import java.util.Vector;
import java.util.Enumeration;
import java.util.Properties;
public class EnumerationTester {
public static void main(String args[]) {
Enumeration<Object> days;
Properties dayNames = new Properties();
dayNames.put(1, "Sunday");
dayNames.put(2,"Monday");
dayNames.put(3,"Tuesday");
dayNames.put(4,"Wednesday");
dayNames.put(5,"Thursday");
dayNames.put(6,"Friday");
dayNames.put(7,"Saturday");
days = dayNames.elements();
while (days.hasMoreElements()) {
System.out.println(days.nextElement());
}
}
}
Output
Sunday Monday Tuesday Wednesday Thursday Friday Saturday
Java - The Collection Algorithms
The collections framework defines several algorithms that can be applied to collections and maps.
These algorithms are defined as static methods within the Collections class. Several of the methods can throw a ClassCastException, which occurs when an attempt is made to compare incompatible types, or an UnsupportedOperationException, which occurs when an attempt is made to modify an unmodifiable collection.
The methods defined in collection framework's algorithm are summarized in the following table −
| Sr.No. | Method & Description |
|---|---|
| 1 | static int binarySearch(List list, Object value, Comparator c) Searches for value in the list ordered according to c. Returns the position of value in list, or -1 if value is not found. |
| 2 | static int binarySearch(List list, Object value) Searches for value in the list. The list must be sorted. Returns the position of value in list, or -1 if value is not found. |
| 3 | static void copy(List list1, List list2) Copies the elements of list2 to list1. |
| 4 | static Enumeration enumeration(Collection c) Returns an enumeration over c. |
| 5 | static void fill(List list, Object obj) Assigns obj to each element of the list. |
| 6 | static int indexOfSubList(List list, List subList) Searches list for the first occurrence of subList. Returns the index of the first match, or .1 if no match is found. |
| 7 | static int lastIndexOfSubList(List list, List subList) Searches list for the last occurrence of subList. Returns the index of the last match, or .1 if no match is found. |
| 8 | static ArrayList list(Enumeration enum) Returns an ArrayList that contains the elements of enum. |
| 9 | static Object max(Collection c, Comparator comp) Returns the maximum element in c as determined by comp. |
| 10 | static Object max(Collection c) Returns the maximum element in c as determined by natural ordering. The collection need not be sorted. |
| 11 | static Object min(Collection c, Comparator comp) Returns the minimum element in c as determined by comp. The collection need not be sorted. |
| 12 | static Object min(Collection c) Returns the minimum element in c as determined by natural ordering. |
| 13 | static List nCopies(int num, Object obj) Returns num copies of obj contained in an immutable list. num must be greater than or equal to zero. |
| 14 | static boolean replaceAll(List list, Object old, Object new) Replaces all occurrences of old with new in the list. Returns true if at least one replacement occurred. Returns false, otherwise. |
| 15 | static void reverse(List list) Reverses the sequence in list. |
| 16 | static Comparator reverseOrder( ) Returns a reverse comparator. |
| 17 | static void rotate(List list, int n) Rotates list by n places to the right. To rotate left, use a negative value for n. |
| 18 | static void shuffle(List list, Random r) Shuffles (i.e., randomizes) the elements in the list by using r as a source of random numbers. |
| 19 | static void shuffle(List list) Shuffles (i.e., randomizes) the elements in list. |
| 20 | static Set singleton(Object obj) Returns obj as an immutable set. This is an easy way to convert a single object into a set. |
| 21 | static List singletonList(Object obj) Returns obj as an immutable list. This is an easy way to convert a single object into a list. |
| 22 | static Map singletonMap(Object k, Object v) Returns the key/value pair k/v as an immutable map. This is an easy way to convert a single key/value pair into a map. |
| 23 | static void sort(List list, Comparator comp) Sorts the elements of list as determined by comp. |
| 24 | static void sort(List list) Sorts the elements of the list as determined by their natural ordering. |
| 25 | static void swap(List list, int idx1, int idx2) Exchanges the elements in the list at the indices specified by idx1 and idx2. |
| 26 | static Collection synchronizedCollection(Collection c) Returns a thread-safe collection backed by c. |
| 27 | static List synchronizedList(List list) Returns a thread-safe list backed by list. |
| 28 | static Map synchronizedMap(Map m) Returns a thread-safe map backed by m. |
| 29 | static Set synchronizedSet(Set s) Returns a thread-safe set backed by s. |
| 30 | static SortedMap synchronizedSortedMap(SortedMap sm) Returns a thread-safe sorted set backed by sm. |
| 31 | static SortedSet synchronizedSortedSet(SortedSet ss) Returns a thread-safe set backed by ss. |
| 32 | static Collection unmodifiableCollection(Collection c) Returns an unmodifiable collection backed by c. |
| 33 | static List unmodifiableList(List list) Returns an unmodifiable list backed by the list. |
| 34 | static Map unmodifiableMap(Map m) Returns an unmodifiable map backed by m. |
| 35 | static Set unmodifiableSet(Set s) Returns an unmodifiable set backed by s. |
| 36 | static SortedMap unmodifiableSortedMap(SortedMap sm) Returns an unmodifiable sorted map backed by sm. |
| 37 | static SortedSet unmodifiableSortedSet(SortedSet ss) Returns an unmodifiable sorted set backed by ss. |
Example 1
Following is an example, which demonstrates various algorithms using LinkedList to add elements and sort its elements in reverse order. Using iterator, list is iterated then shuffled and lastly minimum and maximum values are retrieved and printed.
import java.util.Collections;
import java.util.Comparator;
import java.util.Iterator;
import java.util.LinkedList;
import java.util.List;
public class AlgorithmsDemo {
public static void main(String args[]) {
// Create and initialize linked list
List<Integer< ll = new LinkedList<<();
ll.add(Integer.valueOf(-8));
ll.add(Integer.valueOf(20));
ll.add(Integer.valueOf(-20));
ll.add(Integer.valueOf(8));
// Create a reverse order comparator
Comparator<Integer< r = Collections.reverseOrder();
// Sort list by using the comparator
Collections.sort(ll, r);
// Get iterator
Iterator<Integer< li = ll.iterator();
System.out.print("List sorted in reverse: ");
while(li.hasNext()) {
System.out.print(li.next() + " ");
}
System.out.println();
}
}
Output
List sorted in reverse: 20 8 -8 -20
Example 2
Following is an example, which demonstrates various algorithms using LinkedList to add elements and sort its elements in natural order. Using iterator, list is iterated then shuffled and lastly minimum and maximum values are retrieved and printed.
import java.util.Collections;
import java.util.Comparator;
import java.util.Iterator;
import java.util.LinkedList;
import java.util.List;
public class AlgorithmsDemo {
public static void main(String args[]) {
// Create and initialize linked list
List<Integer> ll = new LinkedList<>();
ll.add(Integer.valueOf(-8));
ll.add(Integer.valueOf(20));
ll.add(Integer.valueOf(-20));
ll.add(Integer.valueOf(8));
// Sort list by using the default comparator
Collections.sort(ll);
// Get iterator
Iterator<Integer> li = ll.iterator();
System.out.print("List sorted: ");
while(li.hasNext()) {
System.out.print(li.next() + " ");
}
System.out.println();
Collections.shuffle(ll);
// display randomized list
li = ll.iterator();
System.out.print("List shuffled: ");
while(li.hasNext()) {
System.out.print(li.next() + " ");
}
System.out.println();
System.out.println("Minimum: " + Collections.min(ll));
System.out.println("Maximum: " + Collections.max(ll));
}
}
Output
List sorted: -20 -8 8 20 List shuffled: -20 -8 20 8 Minimum: -20 Maximum: 20
Example 3
Following is an example, which demonstrates various algorithms using LinkedList to add String elements and sort its elements in natural order. List is printed then shuffled and lastly minimum and maximum values are retrieved and printed.
import java.util.Collections;
import java.util.Comparator;
import java.util.Iterator;
import java.util.LinkedList;
import java.util.List;
public class AlgorithmsDemo {
public static void main(String args[]) {
// Create and initialize linked list
List<String> list = new LinkedList<>();
list.add("Ram");
list.add("Mohan");
list.add("Julie");
list.add("Raheem");
// Sort list by using the default comparator
Collections.sort(list);
// print the sorted list
System.out.println("Sorted List: " + list);
// shuffle the list
Collections.shuffle(list);
// print the shuffled list
System.out.println("Shuffled List: " + list);
System.out.println("Minimum: " + Collections.min(list));
System.out.println("Maximum: " + Collections.max(list));
}
}
Output
Sorted List: [Julie, Mohan, Raheem, Ram] Shuffled List: [Mohan, Raheem, Julie, Ram] Minimum: Julie Maximum: Ram
Java - How to Use Iterator?
Often, you will want to cycle through the elements in a collection. For example, you might want to display each element. The easiest way to do this is to employ an iterator, which is an object that implements either the Iterator or the ListIterator interface.
Iterator enables you to cycle through a collection, obtaining or removing elements. ListIterator extends Iterator to allow bidirectional traversal of a list, and the modification of elements.
Before you can access a collection through an iterator, you must obtain one. Each of the collection classes provides an iterator( ) method that returns an iterator to the start of the collection. By using this iterator object, you can access each element in the collection, one element at a time.
In general, to use an iterator to cycle through the contents of a collection, follow these steps −
Obtain an iterator to the start of the collection by calling the collection's iterator( ) method.
Set up a loop that makes a call to hasNext( ). Have the loop iterate as long as hasNext( ) returns true.
Within the loop, obtain each element by calling next( ).
For collections that implement List, you can also obtain an iterator by calling ListIterator.
The Methods Declared by Iterator
| Sr.No. | Method & Description |
|---|---|
| 1 | boolean hasNext( ) Returns true if there are more elements. Otherwise, returns false. |
| 2 | Object next( ) Returns the next element. Throws NoSuchElementException if there is not a next element. |
| 3 | void remove( ) Removes the current element. Throws IllegalStateException if an attempt is made to call remove( ) that is not preceded by a call to next( ). |
The Methods Declared by ListIterator
| Sr.No. | Method & Description |
|---|---|
| 1 | void add(Object obj) Inserts obj into the list in front of the element that will be returned by the next call to next( ). |
| 2 | boolean hasNext( ) Returns true if there is a next element. Otherwise, returns false. |
| 3 | boolean hasPrevious( ) Returns true if there is a previous element. Otherwise, returns false. |
| 4 | Object next( ) Returns the next element. A NoSuchElementException is thrown if there is not a next element. |
| 5 | int nextIndex( ) Returns the index of the next element. If there is not a next element, returns the size of the list. |
| 6 | Object previous( ) Returns the previous element. A NoSuchElementException is thrown if there is not a previous element. |
| 7 | int previousIndex( ) Returns the index of the previous element. If there is not a previous element, returns -1. |
| 8 | void remove( ) Removes the current element from the list. An IllegalStateException is thrown if remove( ) is called before next( ) or previous( ) is invoked. |
| 9 | void set(Object obj) Assigns obj to the current element. This is the element last returned by a call to either next( ) or previous( ). |
Example 1
Here is an example demonstrating Iterator. It uses an ArrayList object, but the general principles apply to any type of collection.
import java.util.ArrayList;
import java.util.Iterator;
import java.util.List;
public class IteratorDemo {
public static void main(String args[]) {
// Create an array list
List<String> al = new ArrayList<>();
// add elements to the array list
al.add("C");
al.add("A");
al.add("E");
al.add("B");
al.add("D");
al.add("F");
// Use iterator to display contents of al
System.out.print("Original contents of al: ");
Iterator itr = al.iterator();
while(itr.hasNext()) {
Object element = itr.next();
System.out.print(element + " ");
}
System.out.println();
}
}
Output
Original contents of al: C A E B D F
Example 2
Here is an example demonstrating ListIterator. It uses an ArrayList object, but the general principles apply to any type of collection.
Of course, ListIterator is available only to those collections that implement the List interface.
import java.util.ArrayList;
import java.util.Iterator;
import java.util.List;
import java.util.ListIterator;
public class IteratorDemo {
public static void main(String args[]) {
// Create an array list
List<String> al = new ArrayList<>();
// add elements to the array list
al.add("C");
al.add("A");
al.add("E");
al.add("B");
al.add("D");
al.add("F");
// Use iterator to display contents of al
System.out.print("Original contents of al: ");
Iterator<String> itr = al.iterator();
while(itr.hasNext()) {
Object element = itr.next();
System.out.print(element + " ");
}
}
}
Output
Original contents of al: C A E B D F
Example 3
Here is an example demonstrating ListIterator to modify the list while iterating. It uses an ArrayList object, but the general principles apply to any type of collection.
import java.util.ArrayList;
import java.util.Iterator;
import java.util.List;
import java.util.ListIterator;
public class IteratorDemo {
public static void main(String args[]) {
// Create an array list
List<String> al = new ArrayList<>();
// add elements to the array list
al.add("C");
al.add("A");
al.add("E");
al.add("B");
al.add("D");
al.add("F");
// Use iterator to display contents of al
System.out.print("Original contents of al: ");
Iterator<String> itr = al.iterator();
while(itr.hasNext()) {
Object element = itr.next();
System.out.print(element + " ");
}
System.out.println();
// Modify objects being iterated
ListIterator<String> litr = al.listIterator();
while(litr.hasNext()) {
Object element = litr.next();
litr.set(element + "+");
}
System.out.print("Modified contents of al: ");
itr = al.iterator();
while(itr.hasNext()) {
Object element = itr.next();
System.out.print(element + " ");
}
System.out.println();
// Now, display the list backwards
System.out.print("Modified list backwards: ");
while(litr.hasPrevious()) {
Object element = litr.previous();
System.out.print(element + " ");
}
System.out.println();
}
}
Output
Original contents of al: C A E B D F Modified contents of al: C+ A+ E+ B+ D+ F+ Modified list backwards: F+ D+ B+ E+ A+ C+
Java - How to Use Comparator?
Both TreeSet and TreeMap store elements in sorted order. However, it is the comparator that defines precisely what sorted order means.
The Comparator interface defines two methods: compare( ) and equals( ). The compare( ) method, shown here, compares two elements for order −
The compare Method
int compare(Object obj1, Object obj2)
obj1 and obj2 are the objects to be compared. This method returns zero if the objects are equal. It returns a positive value if obj1 is greater than obj2. Otherwise, a negative value is returned.
By overriding compare( ), you can alter the way that objects are ordered. For example, to sort in a reverse order, you can create a comparator that reverses the outcome of a comparison.
The equals Method
The equals( ) method, shown here, tests whether an object equals the invoking comparator −
boolean equals(Object obj)
obj is the object to be tested for equality. The method returns true if obj and the invoking object are both Comparator objects and use the same ordering. Otherwise, it returns false.
Overriding equals( ) is unnecessary, and most simple comparators will not do so.
Example 1
In this example, we're using Comparator interface to sort a custom object Dog based on comparison criterias.
import java.util.ArrayList;
import java.util.Collections;
import java.util.Comparator;
import java.util.List;
class Dog implements Comparator<Dog>, Comparable<Dog> {
private String name;
private int age;
Dog() {
}
Dog(String n, int a) {
name = n;
age = a;
}
public String getDogName() {
return name;
}
public int getDogAge() {
return age;
}
// Overriding the compareTo method
public int compareTo(Dog d) {
return (this.name).compareTo(d.name);
}
// Overriding the compare method to sort the age
public int compare(Dog d, Dog d1) {
return d.age - d1.age;
}
@Override
public String toString() {
return this.name + "," + this.age;
}
}
public class ComparatorDemo {
public static void main(String args[]) {
// Takes a list o Dog objects
List<Dog> list = new ArrayList<>();
list.add(new Dog("Shaggy", 3));
list.add(new Dog("Lacy", 2));
list.add(new Dog("Roger", 10));
list.add(new Dog("Tommy", 4));
list.add(new Dog("Tammy", 1));
Collections.sort(list); // Sorts the array list
System.out.println("Sorted by name:");
// printing the sorted list of names
System.out.print(list);
// Sorts the array list using comparator
Collections.sort(list, new Dog());
System.out.println(" ");
System.out.println("Sorted by age:");
// printing the sorted list of ages
System.out.print(list);
}
}
Output
Sorted by name: [Lacy,2, Roger,10, Shaggy,3, Tammy,1, Tommy,4] Sorted by age: [Tammy,1, Lacy,2, Shaggy,3, Tommy,4, Roger,10]
Note − Sorting of the Arrays class is as the same as the Collections.
Example 2
In this example, we're using Comparator interface to reverse sort the Dog objects.
import java.util.ArrayList;
import java.util.Collections;
import java.util.Comparator;
import java.util.List;
class Dog implements Comparator<Dog>, Comparable<Dog> {
private String name;
private int age;
Dog() {
}
Dog(String n, int a) {
name = n;
age = a;
}
public String getDogName() {
return name;
}
public int getDogAge() {
return age;
}
// Overriding the compareTo method
public int compareTo(Dog d) {
return (this.name).compareTo(d.name);
}
// Overriding the compare method to sort the age
public int compare(Dog d, Dog d1) {
return d.age - d1.age;
}
@Override
public String toString() {
return this.name + "," + this.age;
}
}
public class ComparatorDemo {
public static void main(String args[]) {
// Takes a list o Dog objects
List<Dog> list = new ArrayList<>();
list.add(new Dog("Shaggy", 3));
list.add(new Dog("Lacy", 2));
list.add(new Dog("Roger", 10));
list.add(new Dog("Tommy", 4));
list.add(new Dog("Tammy", 1));
Collections.sort(list, Collections.reverseOrder()); // Sorts the array list
System.out.println("Sorted by name in reverse order:");
// printing the sorted list of names
System.out.print(list);
}
}
Output
Sorted by name in reverse order: [Tommy,4, Tammy,1, Shaggy,3, Roger,10, Lacy,2]
In this example, we're using Comparator interface to sort String values in reverse order.
Example 3
import java.util.ArrayList;
import java.util.Collections;
import java.util.List;
public class ComparatorDemo {
public static void main(String args[]) {
// Takes a list o Dog objects
List<String> list = new ArrayList<>();
list.add("Shaggy");
list.add("Lacy");
list.add("Roger");
list.add("Tommy");
list.add("Tammy");
Collections.sort(list, Collections.reverseOrder()); // Sorts the array list
System.out.println("Sorted by name in reverse order:");
// printing the sorted list of names
System.out.print(list);
}
}
Output
Sorted by name in reverse order: [Tommy, Tammy, Shaggy, Roger, Lacy]
Java - Regular Expressions
Java provides the java.util.regex package for pattern matching with regular expressions. Java regular expressions are very similar to the Perl programming language and very easy to learn.
A regular expression is a special sequence of characters that helps you match or find other strings or sets of strings, using a specialized syntax held in a pattern. They can be used to search, edit, or manipulate text and data.
The java.util.regex package primarily consists of the following three classes −
Pattern Class − A Pattern object is a compiled representation of a regular expression. The Pattern class provides no public constructors. To create a pattern, you must first invoke one of its public static compile() methods, which will then return a Pattern object. These methods accept a regular expression as the first argument.
Matcher Class − A Matcher object is the engine that interprets the pattern and performs match operations against an input string. Like the Pattern class, Matcher defines no public constructors. You obtain a Matcher object by invoking the matcher() method on a Pattern object.
PatternSyntaxException − A PatternSyntaxException object is an unchecked exception that indicates a syntax error in a regular expression pattern.
Capturing Groups
Capturing groups are a way to treat multiple characters as a single unit. They are created by placing the characters to be grouped inside a set of parentheses. For example, the regular expression (dog) creates a single group containing the letters "d", "o", and "g".
Capturing groups are numbered by counting their opening parentheses from the left to the right. In the expression ((A)(B(C))), for example, there are four such groups −
- ((A)(B(C)))
- (A)
- (B(C))
- (C)
To find out how many groups are present in the expression, call the groupCount method on a matcher object. The groupCount method returns an int showing the number of capturing groups present in the matcher's pattern.
There is also a special group, group 0, which always represents the entire expression. This group is not included in the total reported by groupCount.
Example
Following example illustrates how to find a digit string from the given alphanumeric string −
import java.util.regex.Matcher;
import java.util.regex.Pattern;
public class RegexMatches {
public static void main( String args[] ) {
// String to be scanned to find the pattern.
String line = "This order was placed for QT3000! OK?";
String pattern = "(.*)(\\d+)(.*)";
// Create a Pattern object
Pattern r = Pattern.compile(pattern);
// Now create matcher object.
Matcher m = r.matcher(line);
if (m.find( )) {
System.out.println("Found value: " + m.group(0) );
System.out.println("Found value: " + m.group(1) );
System.out.println("Found value: " + m.group(2) );
}else {
System.out.println("NO MATCH");
}
}
}
Output
Found value: This order was placed for QT3000! OK? Found value: This order was placed for QT300 Found value: 0
Regular Expression Syntax
Here is the table listing down all the regular expression metacharacter syntax available in Java −
| Subexpression | Matches |
|---|---|
| ^ | Matches the beginning of the line. |
| $ | Matches the end of the line. |
| . | Matches any single character except newline. Using m option allows it to match the newline as well. |
| [...] | Matches any single character in brackets. |
| [^...] | Matches any single character not in brackets. |
| \A | Beginning of the entire string. |
| \z | End of the entire string. |
| \Z | End of the entire string except allowable final line terminator. |
| re* | Matches 0 or more occurrences of the preceding expression. |
| re+ | Matches 1 or more of the previous thing. |
| re? | Matches 0 or 1 occurrence of the preceding expression. |
| re{ n} | Matches exactly n number of occurrences of the preceding expression. |
| re{ n,} | Matches n or more occurrences of the preceding expression. |
| re{ n, m} | Matches at least n and at most m occurrences of the preceding expression. |
| a| b | Matches either a or b. |
| (re) | Groups regular expressions and remembers the matched text. |
| (?: re) | Groups regular expressions without remembering the matched text. |
| (?> re) | Matches the independent pattern without backtracking. |
| \w | Matches the word characters. |
| \W | Matches the nonword characters. |
| \s | Matches the whitespace. Equivalent to [\t\n\r\f]. |
| \S | Matches the nonwhitespace. |
| \d | Matches the digits. Equivalent to [0-9]. |
| \D | Matches the nondigits. |
| \A | Matches the beginning of the string. |
| \Z | Matches the end of the string. If a newline exists, it matches just before newline. |
| \z | Matches the end of the string. |
| \G | Matches the point where the last match finished. |
| \n | Back-reference to capture group number "n". |
| \b | Matches the word boundaries when outside the brackets. Matches the backspace (0x08) when inside the brackets. |
| \B | Matches the nonword boundaries. |
| \n, \t, etc. | Matches newlines, carriage returns, tabs, etc. |
| \Q | Escape (quote) all characters up to \E. |
| \E | Ends quoting begun with \Q. |
Methods of the Matcher Class
Here is a list of useful instance methods −
Index Methods
Index methods provide useful index values that show precisely where the match was found in the input string −
| Sr.No. | Method & Description |
|---|---|
| 1 | public int start() Returns the start index of the previous match. |
| 2 | public int start(int group) Returns the start index of the subsequence captured by the given group during the previous match operation. |
| 3 | public int end() Returns the offset after the last character matched. |
| 4 | public int end(int group) Returns the offset after the last character of the subsequence captured by the given group during the previous match operation. |
Study Methods
Study methods review the input string and return a Boolean indicating whether or not the pattern is found −
| Sr.No. | Method & Description |
|---|---|
| 1 | public boolean lookingAt() Attempts to match the input sequence, starting at the beginning of the region, against the pattern. |
| 2 | public boolean find() Attempts to find the next subsequence of the input sequence that matches the pattern. |
| 3 | public boolean find(int start) Resets this matcher and then attempts to find the next subsequence of the input sequence that matches the pattern, starting at the specified index. |
| 4 | public boolean matches() Attempts to match the entire region against the pattern. |
Replacement Methods
Replacement methods are useful methods for replacing text in an input string −
| Sr.No. | Method & Description |
|---|---|
| 1 | public Matcher appendReplacement(StringBuffer sb, String replacement) Implements a non-terminal append-and-replace step. |
| 2 | public StringBuffer appendTail(StringBuffer sb) Implements a terminal append-and-replace step. |
| 3 | public String replaceAll(String replacement) Replaces every subsequence of the input sequence that matches the pattern with the given replacement string. |
| 4 | public String replaceFirst(String replacement) Replaces the first subsequence of the input sequence that matches the pattern with the given replacement string. |
| 5 | public static String quoteReplacement(String s) Returns a literal replacement String for the specified String. This method produces a String that will work as a literal replacement s in the appendReplacement method of the Matcher class. |
The start and end Methods
Following is the example that counts the number of times the word "cat" appears in the input string −
Example
import java.util.regex.Matcher;
import java.util.regex.Pattern;
public class RegexMatches {
private static final String REGEX = "\\bcat\\b";
private static final String INPUT = "cat cat cat cattie cat";
public static void main( String args[] ) {
Pattern p = Pattern.compile(REGEX);
Matcher m = p.matcher(INPUT); // get a matcher object
int count = 0;
while(m.find()) {
count++;
System.out.println("Match number "+count);
System.out.println("start(): "+m.start());
System.out.println("end(): "+m.end());
}
}
}
Output
Match number 1 start(): 0 end(): 3 Match number 2 start(): 4 end(): 7 Match number 3 start(): 8 end(): 11 Match number 4 start(): 19 end(): 22
You can see that this example uses word boundaries to ensure that the letters "c" "a" "t" are not merely a substring in a longer word. It also gives some useful information about where in the input string the match has occurred.
The start method returns the start index of the subsequence captured by the given group during the previous match operation, and the end returns the index of the last character matched, plus one.
The matches and lookingAt Methods
The matches and lookingAt methods both attempt to match an input sequence against a pattern. The difference, however, is that matches requires the entire input sequence to be matched, while lookingAt does not.
Both methods always start at the beginning of the input string. Here is the example explaining the functionality −
Example
import java.util.regex.Matcher;
import java.util.regex.Pattern;
public class RegexMatches {
private static final String REGEX = "foo";
private static final String INPUT = "fooooooooooooooooo";
private static Pattern pattern;
private static Matcher matcher;
public static void main( String args[] ) {
pattern = Pattern.compile(REGEX);
matcher = pattern.matcher(INPUT);
System.out.println("Current REGEX is: "+REGEX);
System.out.println("Current INPUT is: "+INPUT);
System.out.println("lookingAt(): "+matcher.lookingAt());
System.out.println("matches(): "+matcher.matches());
}
}
Output
Current REGEX is: foo Current INPUT is: fooooooooooooooooo lookingAt(): true matches(): false
The replaceFirst and replaceAll Methods
The replaceFirst and replaceAll methods replace the text that matches a given regular expression. As their names indicate, replaceFirst replaces the first occurrence, and replaceAll replaces all occurrences.
Here is the example explaining the functionality −
Example
import java.util.regex.Matcher;
import java.util.regex.Pattern;
public class RegexMatches {
private static String REGEX = "dog";
private static String INPUT = "The dog says meow. " + "All dogs say meow.";
private static String REPLACE = "cat";
public static void main(String[] args) {
Pattern p = Pattern.compile(REGEX);
// get a matcher object
Matcher m = p.matcher(INPUT);
INPUT = m.replaceAll(REPLACE);
System.out.println(INPUT);
}
}
Output
The cat says meow. All cats say meow.
The appendReplacement and appendTail Methods
The Matcher class also provides appendReplacement and appendTail methods for text replacement.
Here is the example explaining the functionality −
Example
import java.util.regex.Matcher;
import java.util.regex.Pattern;
public class RegexMatches {
private static String REGEX = "a*b";
private static String INPUT = "aabfooaabfooabfoob";
private static String REPLACE = "-";
public static void main(String[] args) {
Pattern p = Pattern.compile(REGEX);
// get a matcher object
Matcher m = p.matcher(INPUT);
StringBuffer sb = new StringBuffer();
while(m.find()) {
m.appendReplacement(sb, REPLACE);
}
m.appendTail(sb);
System.out.println(sb.toString());
}
}
Output
-foo-foo-foo-
PatternSyntaxException Class Methods
A PatternSyntaxException is an unchecked exception that indicates a syntax error in a regular expression pattern. The PatternSyntaxException class provides the following methods to help you determine what went wrong −
| Sr.No. | Method & Description |
|---|---|
| 1 | public String getDescription() Retrieves the description of the error. |
| 2 | public int getIndex() Retrieves the error index. |
| 3 | public String getPattern() Retrieves the erroneous regular expression pattern. |
| 4 | public String getMessage() Returns a multi-line string containing the description of the syntax error and its index, the erroneous regular expression pattern, and a visual indication of the error index within the pattern. |
Java - Serialization
Java provides a mechanism, called object serialization where an object can be represented as a sequence of bytes that includes the object's data as well as information about the object's type and the types of data stored in the object.
After a serialized object has been written into a file, it can be read from the file and deserialized that is, the type information and bytes that represent the object and its data can be used to recreate the object in memory.
Most impressive is that the entire process is JVM independent, meaning an object can be serialized on one platform and deserialized on an entirely different platform.
Classes ObjectInputStream and ObjectOutputStream are high-level streams that contain the methods for serializing and deserializing an object.
The ObjectOutputStream class contains many write methods for writing various data types, but one method in particular stands out −
public final void writeObject(Object x) throws IOException
The above method serializes an Object and sends it to the output stream. Similarly, the ObjectInputStream class contains the following method for deserializing an object −
public final Object readObject() throws IOException, ClassNotFoundException
This method retrieves the next Object out of the stream and deserializes it. The return value is Object, so you will need to cast it to its appropriate data type.
To demonstrate how serialization works in Java, I am going to use the Employee class that we discussed early on in the book. Suppose that we have the following Employee class, which implements the Serializable interface −
Example
public class Employee implements java.io.Serializable {
public String name;
public String address;
public transient int SSN;
public int number;
public void mailCheck() {
System.out.println("Mailing a check to " + name + " " + address);
}
}
Notice that for a class to be serialized successfully, two conditions must be met −
The class must implement the java.io.Serializable interface.
All of the fields in the class must be serializable. If a field is not serializable, it must be marked transient.
If you are curious to know if a Java Standard Class is serializable or not, check the documentation for the class. The test is simple: If the class implements java.io.Serializable, then it is serializable; otherwise, it's not.
Serializing an Object
The ObjectOutputStream class is used to serialize an Object. The following SerializeDemo program instantiates an Employee object and serializes it to a file.
When the program is done executing, a file named employee.ser is created. The program does not generate any output, but study the code and try to determine what the program is doing.
Note − When serializing an object to a file, the standard convention in Java is to give the file a .ser extension.
Example
import java.io.FileOutputStream;
import java.io.IOException;
import java.io.ObjectOutputStream;
public class SerializeDemo {
public static void main(String [] args) {
Employee e = new Employee();
e.name = "Reyan Ali";
e.address = "Phokka Kuan, Ambehta Peer";
e.SSN = 11122333;
e.number = 101;
try {
FileOutputStream fileOut = new FileOutputStream("employee.ser");
ObjectOutputStream out = new ObjectOutputStream(fileOut);
out.writeObject(e);
out.close();
fileOut.close();
System.out.printf("Serialized data is saved in /tmp/employee.ser");
} catch (IOException i) {
i.printStackTrace();
}
}
}
class Employee implements java.io.Serializable {
private static final long serialVersionUID = 1L;
public String name;
public String address;
public transient int SSN;
public int number;
public void mailCheck() {
System.out.println("Mailing a check to " + name + " " + address);
}
}
Output
Serialized data is saved in employee.ser
Deserializing an Object
The following DeserializeDemo program deserializes the Employee object created in the earlier program. Study the program and try to determine its output −
Example
import java.io.FileInputStream;
import java.io.IOException;
import java.io.ObjectInputStream;
public class DeserializeDemo {
public static void main(String [] args) {
Employee e = null;
try {
FileInputStream fileIn = new FileInputStream("employee.ser");
ObjectInputStream in = new ObjectInputStream(fileIn);
e = (Employee) in.readObject();
in.close();
fileIn.close();
} catch (IOException i) {
i.printStackTrace();
return;
} catch (ClassNotFoundException c) {
System.out.println("Employee class not found");
c.printStackTrace();
return;
}
System.out.println("Deserialized Employee...");
System.out.println("Name: " + e.name);
System.out.println("Address: " + e.address);
System.out.println("SSN: " + e.SSN);
System.out.println("Number: " + e.number);
}
}
class Employee implements java.io.Serializable {
private static final long serialVersionUID = 1L;
public String name;
public String address;
public transient int SSN;
public int number;
public void mailCheck() {
System.out.println("Mailing a check to " + name + " " + address);
}
}
Output
Deserialized Employee... Name: Reyan Ali Address:Phokka Kuan, Ambehta Peer SSN: 0 Number:101
Here are following important points to be noted −
The try/catch block tries to catch a ClassNotFoundException, which is declared by the readObject() method. For a JVM to be able to deserialize an object, it must be able to find the bytecode for the class. If the JVM can't find a class during the deserialization of an object, it throws a ClassNotFoundException.
Notice that the return value of readObject() is cast to an Employee reference.
The value of the SSN field was 11122333 when the object was serialized, but because the field is transient, this value was not sent to the output stream. The SSN field of the deserialized Employee object is 0.
Java - Sending Email
To send an e-mail using your Java Application is simple enough but to start with you should have JavaMail API and Java Activation Framework (JAF) installed on your machine.
You can download latest version of JavaMail (Version 1.2) from Java's standard website.
You can download latest version of JAF (Version 1.1.1) from Java's standard website.
Download and unzip these files, in the newly created top level directories you will find a number of jar files for both the applications. You need to add mail.jar and activation.jar files in your CLASSPATH.
Send a Simple E-mail
Here is an example to send a simple e-mail from your machine. It is assumed that your localhost is connected to the Internet and capable enough to send an e-mail.
Example
// File Name SendEmail.java
import java.util.*;
import javax.mail.*;
import javax.mail.internet.*;
import javax.activation.*;
public class SendEmail {
public static void main(String [] args) {
// Recipient's email ID needs to be mentioned.
String to = "abcd@gmail.com";
// Sender's email ID needs to be mentioned
String from = "web@gmail.com";
// Assuming you are sending email from localhost
String host = "localhost";
// Get system properties
Properties properties = System.getProperties();
// Setup mail server
properties.setProperty("mail.smtp.host", host);
// Get the default Session object.
Session session = Session.getDefaultInstance(properties);
try {
// Create a default MimeMessage object.
MimeMessage message = new MimeMessage(session);
// Set From: header field of the header.
message.setFrom(new InternetAddress(from));
// Set To: header field of the header.
message.addRecipient(Message.RecipientType.TO, new InternetAddress(to));
// Set Subject: header field
message.setSubject("This is the Subject Line!");
// Now set the actual message
message.setText("This is actual message");
// Send message
Transport.send(message);
System.out.println("Sent message successfully....");
} catch (MessagingException mex) {
mex.printStackTrace();
}
}
}
Output
Compile and run this program to send a simple e-mail −
$ java SendEmail Sent message successfully....
If you want to send an e-mail to multiple recipients then the following methods would be used to specify multiple e-mail IDs −
void addRecipients(Message.RecipientType type, Address[] addresses) throws MessagingException
Here is the description of the parameters −
type − This would be set to TO, CC or BCC. Here CC represents Carbon Copy and BCC represents Black Carbon Copy. Example: Message.RecipientType.TO
addresses − This is an array of e-mail ID. You would need to use InternetAddress() method while specifying email IDs.
Send an HTML E-mail
Here is an example to send an HTML e-mail from your machine. Here it is assumed that your localhost is connected to the Internet and capable enough to send an e-mail.
This example is very similar to the previous one, except here we are using setContent() method to set content whose second argument is "text/html" to specify that the HTML content is included in the message.
Using this example, you can send as big as HTML content you like.
Example
// File Name SendHTMLEmail.java
import java.util.*;
import javax.mail.*;
import javax.mail.internet.*;
import javax.activation.*;
public class SendHTMLEmail {
public static void main(String [] args) {
// Recipient's email ID needs to be mentioned.
String to = "abcd@gmail.com";
// Sender's email ID needs to be mentioned
String from = "web@gmail.com";
// Assuming you are sending email from localhost
String host = "localhost";
// Get system properties
Properties properties = System.getProperties();
// Setup mail server
properties.setProperty("mail.smtp.host", host);
// Get the default Session object.
Session session = Session.getDefaultInstance(properties);
try {
// Create a default MimeMessage object.
MimeMessage message = new MimeMessage(session);
// Set From: header field of the header.
message.setFrom(new InternetAddress(from));
// Set To: header field of the header.
message.addRecipient(Message.RecipientType.TO, new InternetAddress(to));
// Set Subject: header field
message.setSubject("This is the Subject Line!");
// Send the actual HTML message, as big as you like
message.setContent("<h1>This is actual message</h1>", "text/html");
// Send message
Transport.send(message);
System.out.println("Sent message successfully....");
} catch (MessagingException mex) {
mex.printStackTrace();
}
}
}
Compile and run this program to send an HTML e-mail −
Output
$ java SendHTMLEmail Sent message successfully....
Send Attachment in E-mail
Here is an example to send an e-mail with attachment from your machine. Here it is assumed that your localhost is connected to the internet and capable enough to send an e-mail.
Example
// File Name SendFileEmail.java
import java.util.*;
import javax.mail.*;
import javax.mail.internet.*;
import javax.activation.*;
public class SendFileEmail {
public static void main(String [] args) {
// Recipient's email ID needs to be mentioned.
String to = "abcd@gmail.com";
// Sender's email ID needs to be mentioned
String from = "web@gmail.com";
// Assuming you are sending email from localhost
String host = "localhost";
// Get system properties
Properties properties = System.getProperties();
// Setup mail server
properties.setProperty("mail.smtp.host", host);
// Get the default Session object.
Session session = Session.getDefaultInstance(properties);
try {
// Create a default MimeMessage object.
MimeMessage message = new MimeMessage(session);
// Set From: header field of the header.
message.setFrom(new InternetAddress(from));
// Set To: header field of the header.
message.addRecipient(Message.RecipientType.TO,new InternetAddress(to));
// Set Subject: header field
message.setSubject("This is the Subject Line!");
// Create the message part
BodyPart messageBodyPart = new MimeBodyPart();
// Fill the message
messageBodyPart.setText("This is message body");
// Create a multipar message
Multipart multipart = new MimeMultipart();
// Set text message part
multipart.addBodyPart(messageBodyPart);
// Part two is attachment
messageBodyPart = new MimeBodyPart();
String filename = "file.txt";
DataSource source = new FileDataSource(filename);
messageBodyPart.setDataHandler(new DataHandler(source));
messageBodyPart.setFileName(filename);
multipart.addBodyPart(messageBodyPart);
// Send the complete message parts
message.setContent(multipart );
// Send message
Transport.send(message);
System.out.println("Sent message successfully....");
} catch (MessagingException mex) {
mex.printStackTrace();
}
}
}
Compile and run this program to send an HTML e-mail −
Output
$ java SendFileEmail Sent message successfully....
User Authentication Part
If it is required to provide user ID and Password to the e-mail server for authentication purpose, then you can set these properties as follows −
props.setProperty("mail.user", "myuser");
props.setProperty("mail.password", "mypwd");
Rest of the e-mail sending mechanism would remain as explained above.
Java - Applet Basics
An applet is a Java program that runs in a Web browser. An applet can be a fully functional Java application because it has the entire Java API at its disposal.
There are some important differences between an applet and a standalone Java application, including the following −
An applet is a Java class that extends the java.applet.Applet class.
A main() method is not invoked on an applet, and an applet class will not define main().
Applets are designed to be embedded within an HTML page.
When a user views an HTML page that contains an applet, the code for the applet is downloaded to the user's machine.
A JVM is required to view an applet. The JVM can be either a plug-in of the Web browser or a separate runtime environment.
The JVM on the user's machine creates an instance of the applet class and invokes various methods during the applet's lifetime.
Applets have strict security rules that are enforced by the Web browser. The security of an applet is often referred to as sandbox security, comparing the applet to a child playing in a sandbox with various rules that must be followed.
Other classes that the applet needs can be downloaded in a single Java Archive (JAR) file.
Life Cycle of an Applet
Four methods in the Applet class gives you the framework on which you build any serious applet −
init − This method is intended for whatever initialization is needed for your applet. It is called after the param tags inside the applet tag have been processed.
start − This method is automatically called after the browser calls the init method. It is also called whenever the user returns to the page containing the applet after having gone off to other pages.
stop − This method is automatically called when the user moves off the page on which the applet sits. It can, therefore, be called repeatedly in the same applet.
destroy − This method is only called when the browser shuts down normally. Because applets are meant to live on an HTML page, you should not normally leave resources behind after a user leaves the page that contains the applet.
paint − Invoked immediately after the start() method, and also any time the applet needs to repaint itself in the browser. The paint() method is actually inherited from the java.awt.
A "Hello, World" Applet
Following is a simple applet named HelloWorldApplet.java −
import java.applet.*;
import java.awt.*;
public class HelloWorldApplet extends Applet {
public void paint (Graphics g) {
g.drawString ("Hello World", 25, 50);
}
}
These import statements bring the classes into the scope of our applet class −
- java.applet.Applet
- java.awt.Graphics
Without those import statements, the Java compiler would not recognize the classes Applet and Graphics, which the applet class refers to.
The Applet Class
Every applet is an extension of the java.applet.Applet class. The base Applet class provides methods that a derived Applet class may call to obtain information and services from the browser context.
These include methods that do the following −
- Get applet parameters
- Get the network location of the HTML file that contains the applet
- Get the network location of the applet class directory
- Print a status message in the browser
- Fetch an image
- Fetch an audio clip
- Play an audio clip
- Resize the applet
Additionally, the Applet class provides an interface by which the viewer or browser obtains information about the applet and controls the applet's execution. The viewer may −
- Request information about the author, version, and copyright of the applet
- Request a description of the parameters the applet recognizes
- Initialize the applet
- Destroy the applet
- Start the applet's execution
- Stop the applet's execution
The Applet class provides default implementations of each of these methods. Those implementations may be overridden as necessary.
The "Hello, World" applet is complete as it stands. The only method overridden is the paint method.
Invoking an Applet
An applet may be invoked by embedding directives in an HTML file and viewing the file through an applet viewer or Java-enabled browser.
The <applet> tag is the basis for embedding an applet in an HTML file. Following is an example that invokes the "Hello, World" applet −
<html>
<title>The Hello, World Applet</title>
<hr>
<applet code = "HelloWorldApplet.class" width = "320" height = "120">
If your browser was Java-enabled, a "Hello, World"
message would appear here.
</applet>
<hr>
</html>
Note − You can refer to HTML Applet Tag to understand more about calling applet from HTML.
The code attribute of the <applet> tag is required. It specifies the Applet class to run. Width and height are also required to specify the initial size of the panel in which an applet runs. The applet directive must be closed with an </applet> tag.
If an applet takes parameters, values may be passed for the parameters by adding <param> tags between <applet> and </applet>. The browser ignores text and other tags between the applet tags.
Non-Java-enabled browsers do not process <applet> and </applet>. Therefore, anything that appears between the tags, not related to the applet, is visible in non-Java-enabled browsers.
The viewer or browser looks for the compiled Java code at the location of the document. To specify otherwise, use the codebase attribute of the <applet> tag as shown −
<applet codebase = "https://amrood.com/applets" code = "HelloWorldApplet.class" width = "320" height = "120">
If an applet resides in a package other than the default, the holding package must be specified in the code attribute using the period character (.) to separate package/class components. For example −
<applet = "mypackage.subpackage.TestApplet.class" width = "320" height = "120">
Getting Applet Parameters
The following example demonstrates how to make an applet respond to setup parameters specified in the document. This applet displays a checkerboard pattern of black and a second color.
The second color and the size of each square may be specified as parameters to the applet within the document.
CheckerApplet gets its parameters in the init() method. It may also get its parameters in the paint() method. However, getting the values and saving the settings once at the start of the applet, instead of at every refresh, is convenient and efficient.
The applet viewer or browser calls the init() method of each applet it runs. The viewer calls init() once, immediately after loading the applet. (Applet.init() is implemented to do nothing.) Override the default implementation to insert custom initialization code.
The Applet.getParameter() method fetches a parameter given the parameter's name (the value of a parameter is always a string). If the value is numeric or other non-character data, the string must be parsed.
The following is a skeleton of CheckerApplet.java −
import java.applet.*;
import java.awt.*;
public class CheckerApplet extends Applet {
int squareSize = 50; // initialized to default size
public void init() {}
private void parseSquareSize (String param) {}
private Color parseColor (String param) {}
public void paint (Graphics g) {}
}
Here are CheckerApplet's init() and private parseSquareSize() methods −
public void init () {
String squareSizeParam = getParameter ("squareSize");
parseSquareSize (squareSizeParam);
String colorParam = getParameter ("color");
Color fg = parseColor (colorParam);
setBackground (Color.black);
setForeground (fg);
}
private void parseSquareSize (String param) {
if (param == null) return;
try {
squareSize = Integer.parseInt (param);
} catch (Exception e) {
// Let default value remain
}
}
The applet calls parseSquareSize() to parse the squareSize parameter. parseSquareSize() calls the library method Integer.parseInt(), which parses a string and returns an integer. Integer.parseInt() throws an exception whenever its argument is invalid.
Therefore, parseSquareSize() catches exceptions, rather than allowing the applet to fail on bad input.
The applet calls parseColor() to parse the color parameter into a Color value. parseColor() does a series of string comparisons to match the parameter value to the name of a predefined color. You need to implement these methods to make this applet work.
Specifying Applet Parameters
The following is an example of an HTML file with a CheckerApplet embedded in it. The HTML file specifies both parameters to the applet by means of the <param> tag.
Example
<html>
<title>Checkerboard Applet</title>
<hr>
<applet code = "CheckerApplet.class" width = "480" height = "320">
<param name = "color" value = "blue">
<param name = "squaresize" value = "30">
</applet>
<hr>
</html>
Note − Parameter names are not case sensitive.
Application Conversion to Applets
It is easy to convert a graphical Java application (that is, an application that uses the AWT and that you can start with the Java program launcher) into an applet that you can embed in a web page.
Following are the specific steps for converting an application to an applet.
Make an HTML page with the appropriate tag to load the applet code.
Supply a subclass of the JApplet class. Make this class public. Otherwise, the applet cannot be loaded.
Eliminate the main method in the application. Do not construct a frame window for the application. Your application will be displayed inside the browser.
Move any initialization code from the frame window constructor to the init method of the applet. You don't need to explicitly construct the applet object. The browser instantiates it for you and calls the init method.
Remove the call to setSize; for applets, sizing is done with the width and height parameters in the HTML file.
Remove the call to setDefaultCloseOperation. An applet cannot be closed; it terminates when the browser exits.
If the application calls setTitle, eliminate the call to the method. Applets cannot have title bars. (You can, of course, title the web page itself, using the HTML title tag.)
Don't call setVisible(true). The applet is displayed automatically.
Event Handling
Applets inherit a group of event-handling methods from the Container class. The Container class defines several methods, such as processKeyEvent and processMouseEvent, for handling particular types of events, and then one catch-all method called processEvent.
In order to react to an event, an applet must override the appropriate event-specific method.
Example
import java.awt.event.MouseListener;
import java.awt.event.MouseEvent;
import java.applet.Applet;
import java.awt.Graphics;
public class ExampleEventHandling extends Applet implements MouseListener {
StringBuffer strBuffer;
public void init() {
addMouseListener(this);
strBuffer = new StringBuffer();
addItem("initializing the apple ");
}
public void start() {
addItem("starting the applet ");
}
public void stop() {
addItem("stopping the applet ");
}
public void destroy() {
addItem("unloading the applet");
}
void addItem(String word) {
System.out.println(word);
strBuffer.append(word);
repaint();
}
public void paint(Graphics g) {
// Draw a Rectangle around the applet's display area.
g.drawRect(0, 0,
getWidth() - 1,
getHeight() - 1);
// display the string inside the rectangle.
g.drawString(strBuffer.toString(), 10, 20);
}
public void mouseEntered(MouseEvent event) {
}
public void mouseExited(MouseEvent event) {
}
public void mousePressed(MouseEvent event) {
}
public void mouseReleased(MouseEvent event) {
}
public void mouseClicked(MouseEvent event) {
addItem("mouse clicked! ");
}
}
Now, let us call this applet as follows −
<html>
<title>Event Handling</title>
<hr>
<applet code = "ExampleEventHandling.class"
width = "300" height = "300">
</applet>
<hr>
</html>
Initially, the applet will display "initializing the applet. Starting the applet." Then once you click inside the rectangle, "mouse clicked" will be displayed as well.
Displaying Images
An applet can display images of the format GIF, JPEG, BMP, and others. To display an image within the applet, you use the drawImage() method found in the java.awt.Graphics class.
Following is an example illustrating all the steps to show images −
Example
import java.applet.*;
import java.awt.*;
import java.net.*;
public class ImageDemo extends Applet {
private Image image;
private AppletContext context;
public void init() {
context = this.getAppletContext();
String imageURL = this.getParameter("image");
if(imageURL == null) {
imageURL = "java.jpg";
}
try {
URL url = new URL(this.getDocumentBase(), imageURL);
image = context.getImage(url);
} catch (MalformedURLException e) {
e.printStackTrace();
// Display in browser status bar
context.showStatus("Could not load image!");
}
}
public void paint(Graphics g) {
context.showStatus("Displaying image");
g.drawImage(image, 0, 0, 200, 84, null);
g.drawString("www.javalicense.com", 35, 100);
}
}
Now, let us call this applet as follows −
<html>
<title>The ImageDemo applet</title>
<hr>
<applet code = "ImageDemo.class" width = "300" height = "200">
<param name = "image" value = "java.jpg">
</applet>
<hr>
</html>
Playing Audio
An applet can play an audio file represented by the AudioClip interface in the java.applet package. The AudioClip interface has three methods, including −
public void play() − Plays the audio clip one time, from the beginning.
public void loop() − Causes the audio clip to replay continually.
public void stop() − Stops playing the audio clip.
To obtain an AudioClip object, you must invoke the getAudioClip() method of the Applet class. The getAudioClip() method returns immediately, whether or not the URL resolves to an actual audio file. The audio file is not downloaded until an attempt is made to play the audio clip.
Following is an example illustrating all the steps to play an audio −
Example
import java.applet.*;
import java.awt.*;
import java.net.*;
public class AudioDemo extends Applet {
private AudioClip clip;
private AppletContext context;
public void init() {
context = this.getAppletContext();
String audioURL = this.getParameter("audio");
if(audioURL == null) {
audioURL = "default.au";
}
try {
URL url = new URL(this.getDocumentBase(), audioURL);
clip = context.getAudioClip(url);
} catch (MalformedURLException e) {
e.printStackTrace();
context.showStatus("Could not load audio file!");
}
}
public void start() {
if(clip != null) {
clip.loop();
}
}
public void stop() {
if(clip != null) {
clip.stop();
}
}
}
Now, let us call this applet as follows −
<html>
<title>The ImageDemo applet</title>
<hr>
<applet code = "ImageDemo.class" width = "0" height = "0">
<param name = "audio" value = "test.wav">
</applet>
<hr>
</html>
You can use test.wav on your PC to test the above example.
Java - Documentation Comments
The Java language supports three types of comments −
| Sr.No. | Comment & Description |
|---|---|
| 1 | /* text */ The compiler ignores everything from /* to */. |
| 2 | //text The compiler ignores everything from // to the end of the line. |
| 3 | /** documentation */ This is a documentation comment and in general its called doc comment. The JDK javadoc tool uses doc comments when preparing automatically generated documentation. |
This chapter is all about explaining Javadoc. We will see how we can make use of Javadoc to generate useful documentation for Java code.
What is Javadoc?
Javadoc is a tool which comes with JDK and it is used for generating Java code documentation in HTML format from Java source code, which requires documentation in a predefined format.
Following is a simple example where the lines inside /*.*/ are Java multi-line comments. Similarly, the line which preceeds // is Java single-line comment.
Example
/**
* The HelloWorld program implements an application that
* simply displays "Hello World!" to the standard output.
*
* @author Zara Ali
* @version 1.0
* @since 2014-03-31
*/
public class HelloWorld {
public static void main(String[] args) {
// Prints Hello, World! on standard output.
System.out.println("Hello World!");
}
}
Output
Hello World!
You can include required HTML tags inside the description part. For instance, the following example makes use of <h1>....</h1> for heading and <p> has been used for creating paragraph break −
Example
/**
* <h1>Hello, World!</h1>
* The HelloWorld program implements an application that
* simply displays "Hello World!" to the standard output.
* <p>
* Giving proper comments in your program makes it more
* user friendly and it is assumed as a high quality code.
*
*
* @author Zara Ali
* @version 1.0
* @since 2014-03-31
*/
public class HelloWorld {
public static void main(String[] args) {
// Prints Hello, World! on standard output.
System.out.println("Hello World!");
}
}
Output
Hello World!
The javadoc Tags
The javadoc tool recognizes the following tags −
| Tag | Description | Syntax |
|---|---|---|
| @author | Adds the author of a class. | @author name-text |
| {@code} | Displays text in code font without interpreting the text as HTML markup or nested javadoc tags. | {@code text} |
| {@docRoot} | Represents the relative path to the generated document's root directory from any generated page. | {@docRoot} |
| @deprecated | Adds a comment indicating that this API should no longer be used. | @deprecated deprecatedtext |
| @exception | Adds a Throws subheading to the generated documentation, with the classname and description text. | @exception class-name description |
| {@inheritDoc} | Inherits a comment from the nearest inheritable class or implementable interface. | Inherits a comment from the immediate surperclass. |
| {@link} | Inserts an in-line link with the visible text label that points to the documentation for the specified package, class, or member name of a referenced class. | {@link package.class#member label} |
| {@linkplain} | Identical to {@link}, except the link's label is displayed in plain text than code font. | {@linkplain package.class#member label} |
| @param | Adds a parameter with the specified parameter-name followed by the specified description to the "Parameters" section. | @param parameter-name description |
| @return | Adds a "Returns" section with the description text. | @return description |
| @see | Adds a "See Also" heading with a link or text entry that points to reference. | @see reference |
| @serial | Used in the doc comment for a default serializable field. | @serial field-description | include | exclude |
| @serialData | Documents the data written by the writeObject( ) or writeExternal( ) methods. | @serialData data-description |
| @serialField | Documents an ObjectStreamField component. | @serialField field-name field-type field-description |
| @since | Adds a "Since" heading with the specified since-text to the generated documentation. | @since release |
| @throws | The @throws and @exception tags are synonyms. | @throws class-name description |
| {@value} | When {@value} is used in the doc comment of a static field, it displays the value of that constant. | {@value package.class#field} |
| @version | Adds a "Version" subheading with the specified version-text to the generated docs when the -version option is used. | @version version-text |
Example
Following program uses few of the important tags available for documentation comments. You can make use of other tags based on your requirements.
The documentation about the AddNum class will be produced in HTML file AddNum.html but at the same time a master file with a name index.html will also be created.
import java.io.*;
/**
* <h1>Add Two Numbers!</h1>
* The AddNum program implements an application that
* simply adds two given integer numbers and Prints
* the output on the screen.
* <p>
* <b>Note:</b> Giving proper comments in your program makes it more
* user friendly and it is assumed as a high quality code.
*
* @author Zara Ali
* @version 1.0
* @since 2014-03-31
*/
public class AddNum {
/**
* This method is used to add two integers. This is
* a the simplest form of a class method, just to
* show the usage of various javadoc Tags.
* @param numA This is the first paramter to addNum method
* @param numB This is the second parameter to addNum method
* @return int This returns sum of numA and numB.
*/
public int addNum(int numA, int numB) {
return numA + numB;
}
/**
* This is the main method which makes use of addNum method.
* @param args Unused.
* @return Nothing.
* @exception IOException On input error.
* @see IOException
*/
public static void main(String args[]) throws IOException {
AddNum obj = new AddNum();
int sum = obj.addNum(10, 20);
System.out.println("Sum of 10 and 20 is :" + sum);
}
}
Let us compile and run the above program, this will produce the following result −
Sum of 10 and 20 is :30
Now, process the above AddNum.java file using javadoc utility as follows −
$ javadoc AddNum.java Loading source file AddNum.java... Constructing Javadoc information... Standard Doclet version 1.7.0_51 Building tree for all the packages and classes... Generating /AddNum.html... AddNum.java:36: warning - @return tag cannot be used in method with void return type. Generating /package-frame.html... Generating /package-summary.html... Generating /package-tree.html... Generating /constant-values.html... Building index for all the packages and classes... Generating /overview-tree.html... Generating /index-all.html... Generating /deprecated-list.html... Building index for all classes... Generating /allclasses-frame.html... Generating /allclasses-noframe.html... Generating /index.html... Generating /help-doc.html... 1 warning $
You can check all the generated documentation here − AddNum. If you are using JDK 1.7 then javadoc does not generate a great stylesheet.css, so we suggest to download and use standard stylesheet from
