- IndexedDB - Home
- IndexedDB - Introduction
- IndexedDB - Installation
- IndexedDB - Connection
- IndexedDB - Object Stores
- IndexedDB - Creating Data
- IndexedDB - Reading Data
- IndexedDB - Updating Data
- IndexedDB - Deleting Data
- Using getAll() Functions
- IndexedDB - Indexes
- IndexedDB - Ranges
- IndexedDB - Transactions
- IndexedDB - Error Handling
- IndexedDB - Searching
- IndexedDB - Cursors
- IndexedDB - Promise Wrapper
- IndexedDB - Ecmascript Binding
- IndexedDB Useful Resources
- IndexedDB - Quick Guide
- IndexedDB - Useful Resources
- IndexedDB - Discussion
IndexedDB - Quick Guide
IndexedDB - Introduction
A database management system provides a mechanism for the storage and retrieval of data. There are various kinds of databases available mostly used ones among them are −
- Hierarchical databases
- Network databases
- Object-oriented databases
- Relational databases
- NoSQL databases
NoSQL databases
A NoSQL database (sometimes called Not Only SQL) is a database that provides a mechanism to store and retrieve data other than the tabular relations used in relational databases. These databases are schema-free, support easy replication, have simple API, are eventually consistent, and can handle huge amounts of data (big data).
There are different types of NoSQL databases also like −
- Document databases.
Key-value stores.
Column-oriented databases.
Graph databases.
What is IndexedDB
Indexed Database is a type of NoSQL database or Non−relational structured query language. It is a transactional database system, like an SQL−based RDBMS. However, unlike SQL−based RDBMSs, which use fixed-column tables, IndexedDB is a JavaScript−based object-oriented database.
It is used when we need to store significant amounts of data on the server side and faster than local storage. Since it stores the data in the browser it can be used online and offline too. Using this, you can create a web application (with rich query abilities) that can run whether an internet connection is available or not.
Key Characteristics of IndexedDB
Following are the key characters of the IndexedDB database −
IndexedDB is a NoSQL database that stores key−value pairs. It can store almost any kind of value by keys or multiple key types.
As mentioned, IndexedDB follows a transactional database model − Transaction is a wrapper class around the operation or group of operations so that data integrity is maintained. You don't want data to be altered or missed so if the transaction is failed a callback is rolled out.
IndexedDB does not use Structured Query Language − Since IndexedDB uses a NoSQL database it doesnt use SQL, instead, it uses queries on Indexes to produce data via cursors or the getAll() method to iterate around different sets.
IndexedDB uses a lot of requests − Requests are objects that receive the success or failure of DOM events (DOM - HTML DOM events allow JavaScript to register different event handlers on elements in an HTML document). DOM events are success or error which has a target property that indicates the flow of the request.
Success events cant be canceled but, error events can be canceled. There are a lot of requests in IndexedDB like on success, onerror and addEventListener(), removeEventListener() on them. For getting to know the status of the request we also have ready state, result, and error code properties.
IndexedDB needs to follow the same origin − Origin is the URL of the document in which the script is being written, each origin has some databases under it and each database has its name to be identified by the origin. The security boundary imposed on IndexedDB prevents applications from accessing data with a different origin.
For example, if we take a URL and take different subdirectories of it, it can retrieve data but if we change location to port 8080 and try to retrieve data from the usual URL and the changed port, we cannot retrieve the data.
Terminology
Following are various important terms in indexedDB that you should know before proceeding further −
Database − In IndexedDB database is the highest level which contains the object stores that contain the data.
Object Stores − Object stores are the data storage entities of IndexedDB. Think of it as tables in RDBMS where we store data based on the type of data we want to store (ex: id, name, roll no, etc).
Transaction − For any database operation we do the following process.
- Get database object
- Open transaction on the database
- Open object store on the transaction and then, operate on object store.
So basically, a transaction is a wrapper function that is connected to every database and it ensures data integrity such that if the transaction is canceled or any error happens it will call back to where the transaction has not yet been begun.
Index − Think of object store as a table and we use indexes to retrieve data of a single property from them. Ex: Name, age, etc.
Cursor − In a database, if we need to traverse multiple records from object stores we use cursors.
Support for IndexedDB
IndexedDB is a database in a browser so, we need to check if it is supported by the current/existing browser. To do so, paste the following code in an text editor save it as test.html and run it your browser.
const indexedDB =
   window.indexedDB ||
   window.mozIndexedDB ||
   window.webkitIndexedDB ||
   window.msIndexedDB ||
   window.shimIndexedDB;

if (!indexedDB) {
   document.write("IndexedDB could not be found in this browser.");
}
const request = indexedDB.open("MyDatabase", 1);
If IndexedDB is supported by your browser this program gets executed successfully, an a database will be created.
IndexedDB - Installation
Visual Studio Code is a code editor redefined and optimized for building and debugging modern web and cloud applications.
You can download the visual studio code from its official website - https://code.visualstudio.com
Select the version you want based on your PC configuration and OS.
Once downloaded you can install it directly on your computer.
Installing the Visual Studio Code installer on Windows
First of all download the Visual Studio Code installer for Windows as specified above −
- Once it is downloaded, run the installer.

- Then, accept the agreement and click on next.

- Now, click on create a desktop icon so that it can be accessed from the desktop, and click on Next.
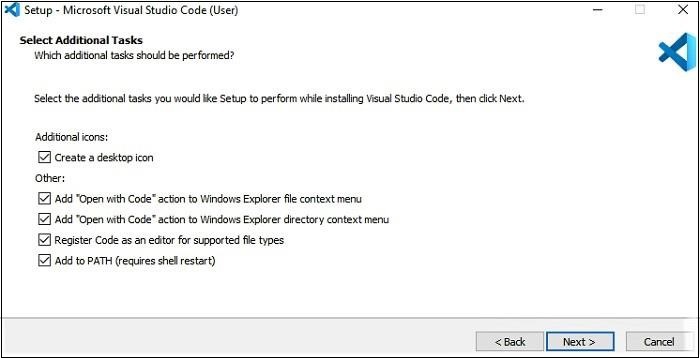
- Then, click on the install button.

Finally, after installation completes, click on the finish button, and the visual studio code will open.
- Now Visual Studio code is successfully installed on your device, start writing code on this code editor.
Downloading, Installing, and Creating a Node.js project (optional)
Now after installing the visual studio code we need to install Node.js
Downloading Node.JS
You can download Node.js from its official website which is https://nodejs.org/en/.
Select the version of your choice based on your computer's configuration.
The LTS version is preferable as it is a more stable version and it stands for Long Term Support.
Installing Node.js
Follow the steps given below to install Node.js in your system −
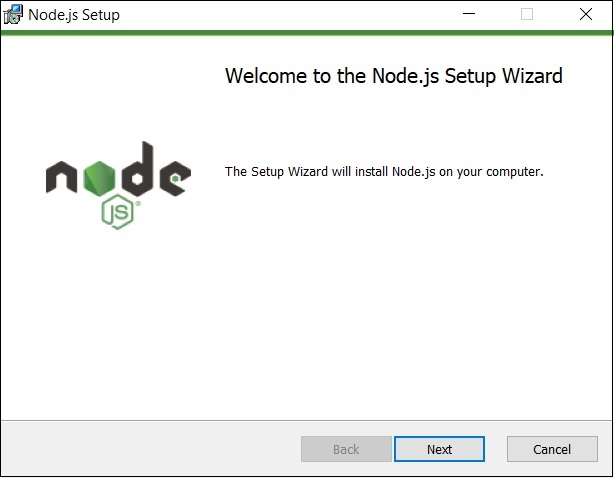
Step 1 − Now that the Node.js has opened. Youll find this window pop up Click on next.
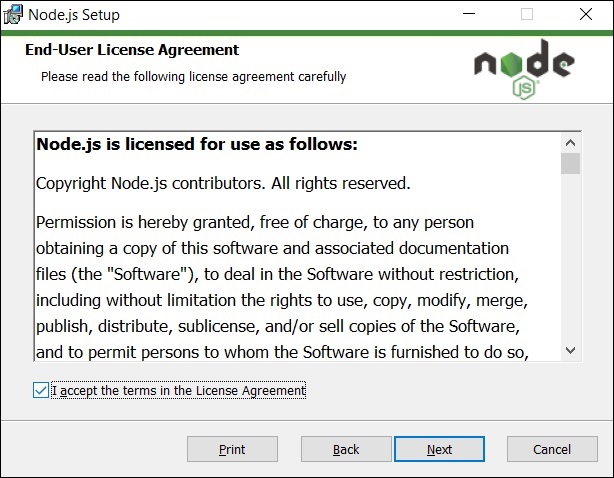
Step 2 − You will be redirected to the End-User License Agreement window. Accept the agreement and click on Next.
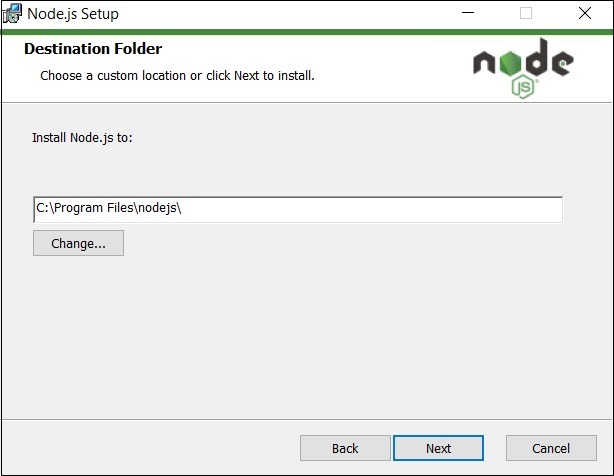
Step 3 − In the next window you need to select the Destination Folder. Change the existing folder or, use the default folder mentioned and then click Next.
Step 4 − Click Next in the Custom Setup and Tools For Native Modules windows.
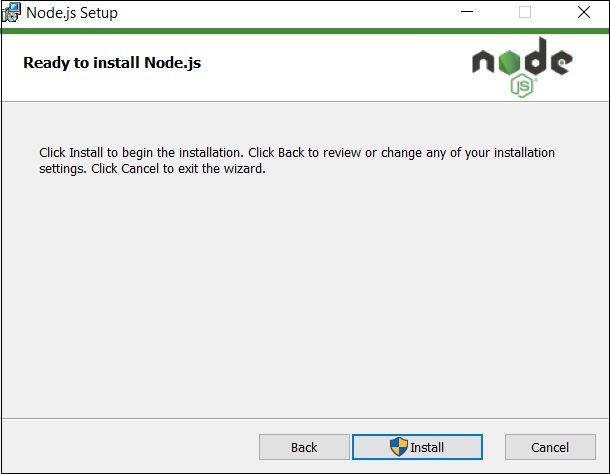
Step 5 − Now, thw setup is ready click Install, to install the selected modules.
IndexedDB - Connection
A database is an organized collection of structured data stored in a computer system. To perform operations on data we need to connect to a database. In this chapter, we will discuss how to create/connect to a database, open a database, and delete a database.
Creating a database − You can create a database in IndexedDB using the open() function. Following is the syntax of this function.
let openRequest = indexedDB.open(name, version);
Where,
- name is the name of the database you need to create.
- version is the version of the database that is to be created. The default value of this parameter is 1. If you omit this value, the version is considered as 1.
The version value you pass to this function should not be less than the current version (of the IndexedDB). This function returns 1 if the database is created successfully and it returns 0 in case of a failure.
Example
Following is the example to create a database in IndexedDB
<!DOCTYPE html>
<html lang="en">
<head>
   <title>Indexed db</title>
</head>
<body>
   <script>
      //Creating a database
      const request = indexedDB.open("myDatabase", 1);
      if(indexedDB){
         document.write("Database Created......");
      }
   </script>
</body>
</html>
Output
If you save the above code in a file test.html and run it, the following message will be displayed on the browser −
Database Created......
Verification
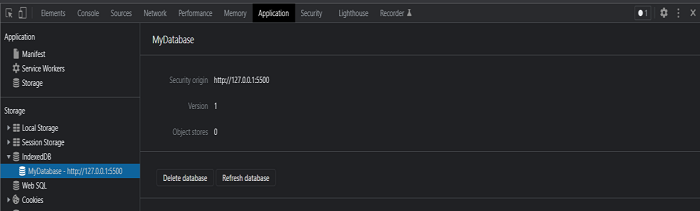
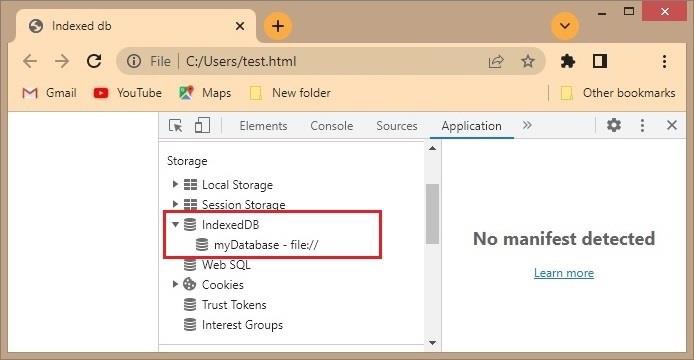
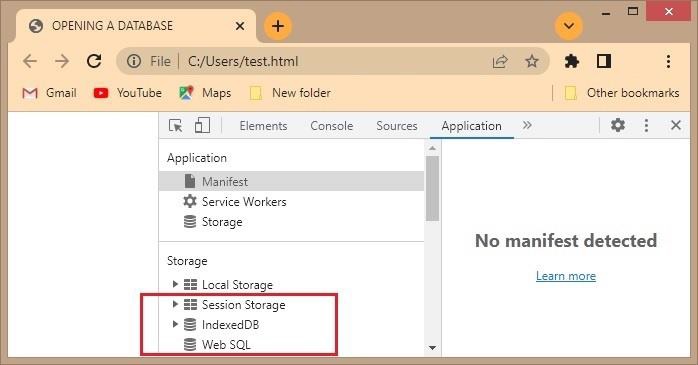
Since IndexedDB is the browser's built-in database you observe the created database in the browser itself.
Right-click on the resultant page, click on inspect element and select the Application tab. You can see the IndexedDB database there if you expand it you can see the created database file as shown below −
Generating Handlers
An event is an action performed on an HTML element. Using JavaScript we can handle these events. From now on we use JavaScript handlers (to make this clearer).
If the request is a success, we use the onsuccess event.
request.onerror = event => {
   // Do something (ex: document.write("error");
};
If the request is a failure, we use onerror event.
request.onsuccess = event => {
   // Do something (ex : document.write("success");
};
When you create a database or increase the version number of an existing database we use onupgradeneeded event.
request.onupgradeneeded = event => {
   var db = event.target.result;
};
Example
Following example displays the message database creation success. If the database creation is successful. In here we are using the onsuccess and onerror handlers to display these messages.
<!DOCTYPE html>
<html lang="en">
<head>
   <title>Handlers</title>
</head>
<body>
   <script>
      const request = indexedDB.open("DATABASE", 1);
      request.onsuccess = function (){
         document.write("Database created successfully...")
      }
      request.onerror = function(){
         document.write("database creation error");
      }
      request.onupgradeneeded = function(event){
         var db = event.target.result;
      }
   </script>
</body>
</html>
Output
If you save the above code in a file test.html and run it, the following message will be displayed on the browser −
Database created successfully...
Connecting to an existing database
To interact with IndexedDB, we use JavaScript. The code we write in JavaScript doesn't interact with databases directly. We need to connect with the database using a connection object to manipulate the objects of the database.
Opening a database directly creates a connection. There can be multiple connections to a database. When a connection is initially created it is in the open state.
You can connect to an IndexedDB database using the open() function (which we used to create a database).
Syntax
Following is the syntax to connect to an existing database.
let openRequest = indexedDB.open(name, version);
Example
A JavaScript example that interacts with an existing database using a connection object is given below −
<!DOCTYPE html>
<html lang="en">
<head>
<title>OPENING A DATABASE</title>
</head>
<body>
<script>
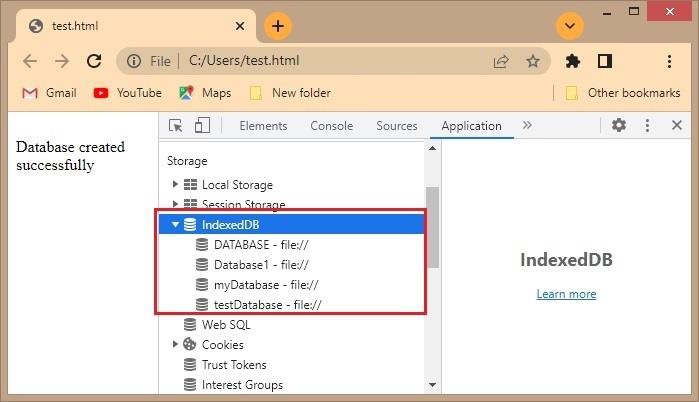
const request = indexedDB.open("DATABASE", 1);
request.onsuccess = function (){
document.write("<br> Database created successfully")
}
const requestone = indexedDB.open("Database1",2);
requestone.onsuccess = function(){
document.write("<br> Database created successfully");
}
const requesttwo = indexedDB.open("DATABASE",1);
requesttwo.onsuccess = function(){
document.write("<br> Database opened successfully");
}
</script>
</body>
</html>
Output
The above program prints the following output on the browser −
Database created successfully
Database opened successfully
Database created successfully
If the request is a success, then the event named onsuccess will be called.
Another way to check databases in the browser
In addition to the inspect element, there is another way to check the IndexedDB database in the browser.
In the top right corner, there will be a customize and control button, Click it.
Select the More tools option in the list and then select Developer tools.
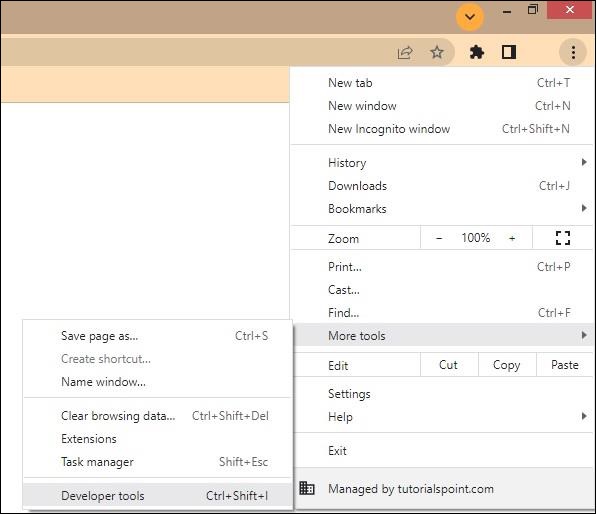
On the next page select the Application tab where you can see the IndexedDB database.
Deleting a database
If there is an excess of any database which we do not need or it unnecessarily occupies space, we can delete it. To delete a database we can use the deleteDatabase() function.
Following is the syntax of the deleteDatabase() function −
let deleteRequest = indexedDB.deleteDatabase(name)
Here, the name parameter is the name of the database that we want to delete.
Example
Following example creates a database named TestDatabase and deletes it using the deleteDatabase() function.
<!DOCTYPE html>
<html lang="en">
<head>
   <title>Indexed db</title>
</head>
<body>
   <script>
      const request = indexedDB.open("TestDatabase", 1);
      request.onsuccess = function () {
         document.write("Database Created Successfully");
      };
      var req = indexedDB.deleteDatabase("TestDatabase");
      req.onsuccess = function () {
         document.write("Database Deleted Successfully");
      };
      req.onerror = function () {
         document.write("Couldn't delete the database");
      };
   </script>
</body>
</html>
Deleting a database Directly From the browser
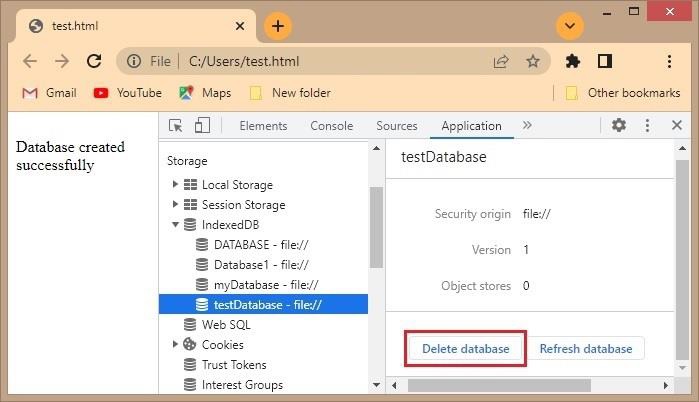
Once you create a database, you can directly delete it database from the browser. To do so, follow the steps given below −
Step 1 − Open the page where you can see the IndexedDB database (storage) in the browser, using one of the following ways
Inspect option − Right−click → Inspect → Application or,
Developer tools − Customize and Control Options → More tools → Developers tools → Application
Step 2 − If you expand the IndexedDB storage, you can observe the list of databases created as shown below.
Step 3 − Click on the database you want to delete. On the right−hand side, you will find the Delete Database button. If you click on it, this database will be deleted.
Closing a database
To close a database we need to use the function IDBDatabase.close()
Syntax
IDBDatabase.close();
The close() method of the IDBDatabase interface returns immediately and closes the connection.
The connection is not closed until all transactions are complete but, new transactions cannot be created for this connection and methods throw exceptions if the closing operation is pending.
IndexedDB - Object Stores
Object stores are the data storage of IndexedDB. It is where data is stored. A database may have multiple object stores. Think of them as tables in RDBMS where we store data based on the type of data we want to store.
To ensure database integrity, object stores can only be created and removed using the callback function idb.open(). It contains a method named createObjectStore() which is used to create an object-store.
Creating object Stores
You can create an object store using the createObjectStore() method. Following is the syntax of this method −
IDBDatabase.createObjectStore(name);
Or,
IDBDatabase.createObjectStore(name, options);
Where,
- The name is the name of the object store.
- The options object can let us define various configuration properties.
Example
Following example creates a new database and creates a object store in it −
<!DOCTYPE html>
<html lang="en">
<head>
   <title>Creating Object Store</title>
</head>
<body>
   <script>
      var request = indexedDB.open("myDatabase", 2);
      request.onupgradeneeded = event => {
         var db = event.target.result;
         var objectStore = db.createObjectStore("customers");
         document.write("Object store Created Successfully...");
      };
   </script>
</body>
</html>
Output
On executing, the above program displays the following message on the browser.
Object store Created Successfully...
Verification
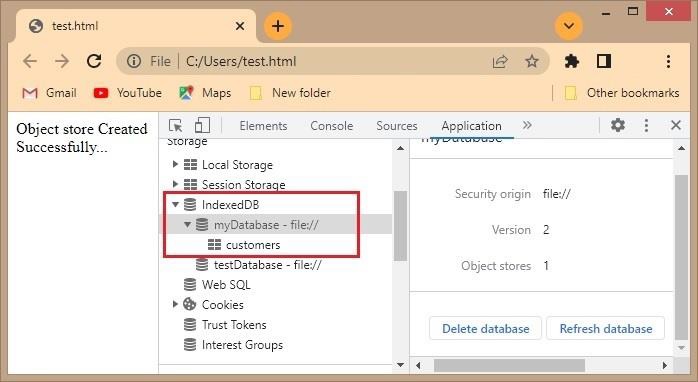
If the above program is executed successfully if you expand myDatabase you can see the newly created object-store.
Defining primary keys
Similar to RDBMS we need primary keys to uniquely define some data in an object store. It can be done in 2 ways using a key path or a key generator.
Keypath and Key generator
A key path is a property that always exists and contains a unique value. We can choose a unique value such as an email address for example.
A key generator creates a unique value for every object added to the object store. By default, if we don't mention a key generator comes into the picture. Ex, auto-increment.
Syntax
Following is the syntax ro create a keypath on an object store.
var objectStore = db.createObjectStore("ObjectStoreName", { keyPath: "primary key, autoincrement/autoDecrement : true" });
Example
In the example given below, we are creating a keypath to an object store using JavaScript −
<!DOCTYPE html>
<html lang="en">
<head>
   <title>keypath</title>
</head>
<body>
   <script>
      var request = indexedDB.open("myDtabase", 2);
      request.onupgradeneeded = event => {
         var db = event.target.result;
         var objectStore = db.createObjectStore("customers",{keyPath:"id", autoIncrement:true});
         document.write("Object store Created Successfully...");
      };
   </script>
</body>
</html>
Output
On executing the above example, it will display the following text on the browser −
Object store Created Successfully...
Verification
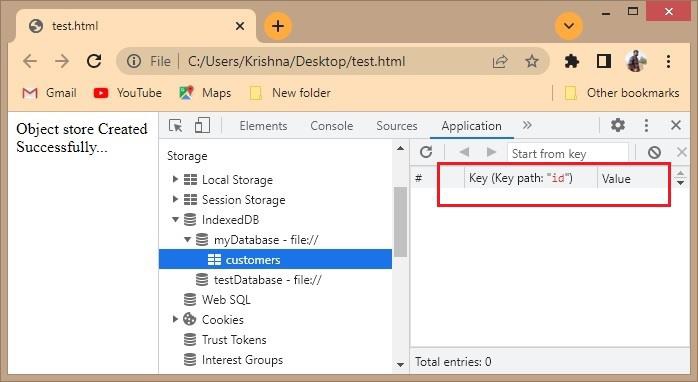
If the above program is executed successfully if you expand myDatabase you can see the newly created object store, if you click on it you can observe that the keypath is created for id.
When new object stores are created they are mentioned in the IndexedDB folders like above.
You can use both a keypath and a key generator. If the data is always unique we can use a keypath else if the value changes you can use a key generator, if you want to change the values for every value but want to give a value that uniquely represents the store we can use both.
Defining Indexes
Indexes are a kind of object-store. They are used to retrieve data from the reference object, stored by a specified property. An index uses the specified property as its key path instead of the reference store's primary key.
To create an index, you need to call the createIndex() method on an object store instance.
Syntax
Following is the syntax of the createIndex() method −
var myIDBIndex = objectStore.createIndex(indexName, keyPath);
var myIDBIndex = objectStore.createIndex(indexName, keyPath, Parameters);
Where,
An indexName is the name of the index created.
Keypath is the primary definition while creating an object store
The value of the last parameter can be unique or multi-entry
In case you pass unique: true. The index will not allow duplicate values for a single key.
If you pass multi-entry: true. The index will add an entry for each array element when the keyPath resolves to an Array. If false, it will add one single entry containing the Array.
Example
The following JavaScript example demonstrates how to create indexes.
<!DOCTYPE html>
<html lang="en">
<head>
   <title>OPENING A DATABASE</title>
</head>
<body>
   <script>
      const dbName = "myDB";
      const studentdata = [
         {name : "jason" , rollno: "160218737028" , branch : "IT"},
         {name : "lokesh" , rollno: "160218735020" , branch : "CSE"},
         {name : "tarun" , rollno: "160218733057" , branch : "EEE"},
         {name : "pranith" , rollno: "160218737029" , branch : "IT"}
      ];
      var request = indexedDB.open("myDB", 2);
      request.onupgradeneeded = event => {
         var db = event.target.result;
         var objectStore = db.createObjectStore("student",{ keyPath :"rollno" });
         objectStore.createIndex("name", "name", { unique: false });
         objectStore.createIndex("branch", "branch", { unique: false });
         objectStore.transaction.oncomplete = event => {
            var objectStore = db.transaction("student", "readwrite").objectStore("student");
            studentdata.forEach(function(student) {
               objectStore.add(student);
            });
         };
      };
   </script>
</body>
</html>
Output
If you go and verify the contents of the IndexedDB database myDB and expand it youj can observe the created table as −
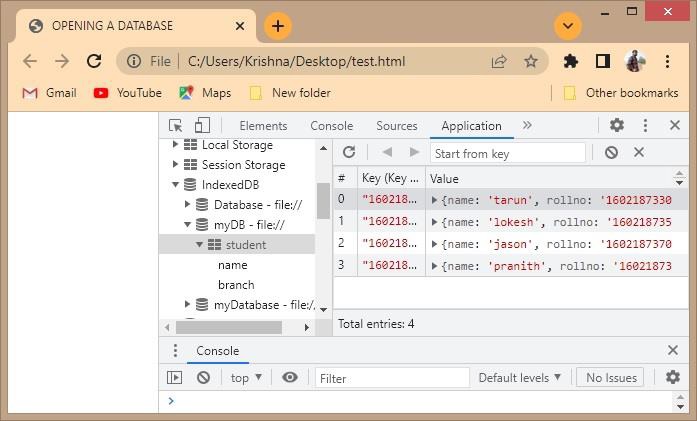
If you click on the name and student values you can observe the index values as −
Name index
| # | Key(Key path:"name") | Primary key (Key path:"rollno") | Value |
|---|---|---|---|
| 0 | "jason" | "160218737028" | {name: 'jason', rollno: '160218737028', branch: 1. branch: "IT" 2. name: "jason" 3. rollno: "160218737028" |
| 1 | "lokesh" | "160218735020" | {name: 'lokesh', rollno: '160218735020', branch: 'CSE'} 1. branch: "CSE" 2. name: "lokesh" 3. rollno: "160218735020" |
| 2 | "pranith" | "160218737029" | {name: 'pranith', rollno: '160218737029', branch: 'IT'} 1. branch: "IT" 2. name: "pranith" 3. rollno: "160218737029" |
| 3 | "tarun" | "160218733057" | {name: 'tarun', rollno: '160218733057', branch: 'EEE'} 1. branch: "EEE" 2. name: "tarun" 3. rollno: "160218733057" |
Branch Index
| # | Key(Key path:"branch") | Primary key (Key path:"rollno") | Value |
|---|---|---|---|
| 0 | "CSE" | "160218735020" | {name:'lokesh', rollno:'160218735020', branch: 'CSE'} 1. branch: "CSE" 2. name: "lokesh" 3. rollno: "160218735020" |
| 1 | "EEE" | "160218733057" | {name:'tarun', rollno: '160218733057', branch: 'EEE'} 1. branch: "EEE" 2. name: "tarun" 3. rollno: "160218733057" |
| 2 | "IT" | "160218737028" | {name:'jason', rollno: '160218737028', branch: 'IT'} 1. branch: "IT" 2. name: "jason" 3. rollno: "160218737028" |
| 3 | "IT" | "160218737029" | {name:'pranith', rollno: '160218737029', branch: 'IT'} 1. branch: "IT" 2. name: "pranith" 3. rollno: "160218737029" |
Deleting Object Store
Object stores are similar to tables in a database and when a table is not needed we delete it. Similarly, you can delete an object store if it is no longer in use. To delete the object store you need to invoke the deleteObjectStore() function.
Syntax
Following is the syntax of the deleteObjectStore() function −
db.deleteObjectStore("store_name");
Where, store_name is the name of the object store you need to delete.
Example
Let us look at a JavaScript example that deletes an object store which is no longer necessary −
<!DOCTYPE html>
<html lang="en">
<head>
   <title>OPENING A DATABASE</title>
</head>
<body>
   <script>
      const dbName = "Database";
      var request = indexedDB.open("Database", 2);
      request.onupgradeneeded = event => {
         var db = event.target.result;
         var objectStore = db.createObjectStore("student",{ keyPath :"rollno" } );
         var objstore = db.createObjectStore("college",{autoIncrement : true});
         db.deleteObjectStore("college");
      };
   </script>
</body>
</html>
Output
Before and After deleting the object store in the IndexedDB folder in the browser.
Database
   College − object store
   Student − object store
      Name − index
      Branch − index

Database
   Student − object store
      Name − index
      Branch − index
IndexedDB - Creating Data
Before creating data we need to know how data is transferred. IndexedDB opens transactions and each of its data operations are carried out inside each of these transactions. Each operation has four steps −
- Get database object
- Open transaction on the database
- Open object store on the transaction
- Operate on the object store
Operations in IndexedDB are −
- create
- read
- update
- delete
Firstly, to perform any operation in our database, we need to open a transaction. After a transaction is opened, we need to get the object store we require. These object stores are provided only according the requirements mentioned when the transaction is created. Then whatever data that is needed can be added later.
Functions are used to perform the given operation (if any). For example, we use the add() function to add data into the database or to add a new entry.
Syntax
Following is the syntax of creating data into a database −
ar request = objectStore.add(data);
We can add data to an object store by using the add() or put() function.
Example
In the following example, we are inserting data into the object store using the add() method in JavaScript −
<!DOCTYPE html>
<html lang="en">
<head>
   <title>creating data</title>
</head>
<body>
   <script>
      const dbName = "Database";
      var request = indexedDB.open("Database", 2);
      request.onupgradeneeded = event => {
         var db = event.target.result;
         var objectStore = db.createObjectStore("student",{ keyPath :"rollno" } );
      };
      request.onsuccess = event => {
         document.write("Database opened successfully");
         var db = event.target.result;
         var transaction = db.transaction("student", "readwrite");
         var objectStore = transaction.objectStore("student");
         objectStore.add({ rollno: 160218737028, name: "jason", branch: "IT" });
         objectStore.add({ rollno: 160218733028, name: "tarun", branch: "EEE" });
         objectStore.add({ rollno: 160218732028, name: "lokesh", branch: "CSE" });
         objectStore.add({ rollno: 160218737025, name: "abdul", branch: "IT" });
         objectStore.add({ rollno: 160218736055, name: "palli", branch: "MECH" });
      }
      transaction.oncomplete = function () {
         db.close();
      };
   </script>
</body>
</html>
Output
0 160218732028
{rollno: 160218732028, name: 'lokesh', branch: 'CSE'}
1 160218733028
{rollno: 160218733028, name: 'tarun', branch: 'EEE'}
2 160218736055
{rollno: 160218736055, name: 'palli', branch: 'CSE'}
3 160218737025
{rollno: 160218737025, name: 'abdul', branch: 'IT'}
4 160218737028
{rollno: 160218737028, name: 'jason', branch: 'IT'}
IndexedDB - Reading Data
We enter data into the database, and we need to call the data to view the changes and also for various other purposes.
We must call the get() method on the object store to read this data. The get method takes the primary key of the object you want to retrieve from the store.
Syntax
var request = objectstore.get(data);
Here, we are requesting the objectstore to get the data using get() function.
Example
Following example is an implementation of requesting the objectstore to get the data −
<!DOCTYPE html>
<html lang="en">
<head>
   <title>Document</title>
</head>
<body>
   <script>
      const request = indexedDB.open("botdatabase",1);
      request.onupgradeneeded = function(){
         const db = request.result;
         const store = db.createObjectStore("bots",{ keyPath: "id"});
      }
      request.onsuccess = function(){
         document.write("database opened successfully");
         const db = request.result;
         const transaction=db.transaction("bots","readwrite");
         const store = transaction.objectStore("bots");
         store.add({id: 1, name: "jason",branch: "IT"});
         store.add({id: 2, name: "praneeth",branch: "CSE"});
         store.add({id: 3, name: "palli",branch: "EEE"});
         store.add({id: 4, name: "abdul",branch: "IT"});
         const idquery = store.get(4);
         idquery.onsuccess = function(){
            document.write("idquery",idquery.result);
         }
         transaction.oncomplete = function(){
            db.close;
         }
      }
   </script>
</body>
</html>
Output
database opened successfully
idquery {id: 4, name: 'abdul', branch: 'IT'}
IndexedDB - Updating Data
After we created the data, the next step is to perform various operations on it; so we need to update the data regularly. We also need to update the data in the case where we entered data incorrectly into the database. Here, we have to specify a read−write transaction because we want to write to the database, not just read from it.
If we want to modify it or make an entry which is already present in the database we use the put() function.
Syntax
var requestUpdate = objectStore.put(data);
We use the put() function on the object store for which the transaction happened and we need to update data.
Example
Let us look at the script below to understand how to update or modify the data in objectstore using put() function −
<!DOCTYPE html>
<html lang="en">
<head>
   <title>Document</title>
</head>
<body>
   <script>
      const request = indexedDB.open("botdatabase",1);
      request.onupgradeneeded = function(){
         const db = request.result;
         const store = db.createObjectStore("bots",{ keyPath: "id"});
      }
      request.onsuccess = function(){
         document.write("database opened successfully");
         const db = request.result;
         const transaction=db.transaction("bots","readwrite");
         const store = transaction.objectStore("bots");
         store.add({id: 1, name: "jason",branch: "IT"});
         store.add({id: 2, name: "praneeth",branch: "CSE"});
         store.add({id: 3, name: "palli",branch: "EEE"});
         store.add({id: 4, name: "abdul",branch: "IT"});
         store.put({id: 4, name: "deevana",branch: "CSE"});
         const idquery = store.get(4);
         idquery.onsuccess = function(){
            document.write("idquery",idquery.result);
         }
         transaction.oncomplete = function(){
            db.close;
         }
      }
   </script>
</body>
</html>
Output
database opened successfully
idquery {id: 4, name: 'deevana', branch: 'CSE'}
Previously the data stored in id: 4 was
Name: abdul Branch : IT
But as we updated the entry the values are changed.
IndexedDB - Deleting Data
There are many situations where we need to delete data from the database; be it for storage purposes or just removing unwanted data to free up space. If we want to delete this unnecessary data from a database we can use the .delete() function
Syntax
const request = objectStore.delete(data);
We use the delete() function to delete the fields of the database which are not required.
Example
Let us look at an example script to delete data −
<!DOCTYPE html>
<html lang="en">
<head>
   <title>Document</title>
</head>
<body>
   <script>
      const request = indexedDB.open("botdatabase",1);
      request.onupgradeneeded = function(){
         const db = request.result;
         const store = db.createObjectStore("bots",{ keyPath: "id"});
      }
      request.onsuccess = function(){
         document.write("database opened successfully");
         const db = request.result;
         const transaction=db.transaction("bots","readwrite");
         const store = transaction.objectStore("bots");
         store.add({id: 1, name: "jason",branch: "IT"});
         store.add({id: 2, name: "praneeth",branch: "CSE"});
         store.add({id: 3, name: "palli",branch: "EEE"});
         store.add({id: 4, name: "abdul",branch: "IT"});
         store.put({id: 4, name: "deevana",branch: "CSE
         const deletename = store.delete(1);
         deletename.onsuccess = function(){
            document.write("id : 1 has been deleted");
         }
         transaction.oncomplete = function(){
            db.close;
         }
      }
   </script>
</body>
</html>
Output
database opened successfully
id : 1 has been deleted
The database after deletion of id:1 =
0  2
{id: 2, name: 'praneeth', branch: 'CSE'}
1  3
{id: 3, name: 'palli', branch: 'EEE'}
2  4
{id: 4, name: 'deevana', branch: 'CSE'}
IndexedDB - Using getAll() Function
In the previous sections, we only retrieved objects from the store one at a time. Now we can retrieve all the data or subsets of the object stores. The get all method returns all the objects in the object store using the getAll() function
Syntax
ObjectStore.getAll(optionalConstraint);
We can directly call getAll() to return all the objects stored in the object store or else we can specify an optional constraint for example red colored cars from a car database
Example
In the following example script, we are calling the getAll() method to return all the objects stored in the object store at once −
<!DOCTYPE html>
<html lang="en">
<head>
   <title>Document</title>
</head>
<body>
   <script>
      const request = indexedDB.open("botdatabase",1);
      request.onupgradeneeded = function(){
         const db = request.result;
         const store = db.createObjectStore("bots",{ keyPath: "id"});
         store.createIndex("branch_db",["branch"],{unique: false});
      }
      request.onsuccess = function(){
         document.write("database opened successfully");
         const db = request.result;
         const transaction=db.transaction("bots","readwrite");
         const store = transaction.objectStore("bots");
         const branchIndex = store.index("branch_db");
         store.add({id: 1, name: "jason",branch: "IT"});
         store.add({id: 2, name: "praneeth",branch: "CSE"});
         store.add({id: 3, name: "palli",branch: "EEE"});
         store.add({id: 4, name: "abdul",branch: "IT"});
         store.put({id: 4, name: "deevana",branch: "CSE"});
         const query = branchIndex.getAll(["IT"]);
         query.onsuccess = function(){
            document.write("query",query.result);
         }
         transaction.oncomplete = function(){
            db.close;
         }
      }
   </script>
</body>
</html>
Output
database opened successfully
query (1) [{...}]
arg1:(1) [{...}]
0:{id: 1, name: 'jason', branch: 'IT'}
length:1
[[Prototype]]:Array(0)
[[Prototype]]:Object
IndexedDB - Indexes
Indexes are a kind of object store used to retrieve data from the reference object stored by a specified property. Even though an index is inside the reference object store and contains the same data, instead of the reference store's primary key it uses the specified property as its key path.
Indexes are used to define a unique constraint on your data and they are made when the object stores are created. To create an index, call the createIndex method on an object store instance −
Syntax
var myIDBIndex = objectStore.createIndex(indexName, keyPath);
var myIDBIndex = objectStore.createIndex(indexName, keyPath, objectParameters);
This method creates and returns an index object. The method creates an index that takes the following arguments −
Index name − The name of the index.
Keypath − We mention the primary key here.
Object Parameters − There are two object parameters.
Unique − Duplicate values cannot be added.
Multi entry − If true, the index will add an entry in the index for each array element when the keyPath resolves to an Array. If false, it will add one single entry containing the Array.
Example
The following example shows the implementation of indexes in an object store −
<!DOCTYPE html>
<html lang="en">
<head>
   <title>Document</title>
</head>
<body>
   <script>
      const request = indexedDB.open("botdatabase",1);
      request.onupgradeneeded = function(){
         const db = request.result;
         const store = db.createObjectStore("bots",{ keyPath: "id"});
         store.createIndex("branch_db",["branch"],{unique: false});
      }
      request.onsuccess = function(){
         document.write("database opened successfully");
         const db = request.result;
         const transaction=db.transaction("bots","readwrite");
         const store = transaction.objectStore("bots");
         const branchIndex = store.index("branch_db");
         store.add({id: 1, name: "jason",branch: "IT"});
         store.add({id: 2, name: "praneeth",branch: "CSE"});
         store.add({id: 3, name: "palli",branch: "EEE"});
         store.add({id: 4, name: "abdul",branch: "IT"});
         store.put({id: 4, name: "deevana",branch: "CSE"});
         transaction.oncomplete = function(){
            db.close;
         }
      }
   </script>
</body>
</html>
Output
branchIndex:
1
['CSE']
0: "CSE"
length: 1
4
{id: 4, name: 'deevana', branch: 'CSE'}
branch: "CSE"
id: 4
name: "deevana"
2
['EEE']
0: "EEE"
length: 1
3
{id: 3, name: 'palli', branch: 'EEE'}
branch: "EEE"
id: 3
name: "palli"
3
['IT']
0: "IT"
length: 1
1
{id: 1, name: 'jason', branch: 'IT'}
branch: "IT"
id: 1
name: "jason"
IndexedDB - Ranges
When we dont want to get all the data at once we use ranges. When we want to get data in a specific range only we use ranges. We define the range using the IDBKeyRange object. This object has 4 methods which are −
- upperBound()
- lowerBound()
- bound()
- only()
Syntax
IDBKeyRange.lowerBound(indexKey);
IDBKeyRange.upperBound(indexKey);
IDBKeyRange.bound(lowerIndexKey, upperIndexKey);
Following is the list of various range codes −
| S.No. | Range Codes & Description |
|---|---|
| 1 | All keys ≥ a DBKeyRange.lowerBound(a) |
| 2 | All keys > a IDBKeyRange.lowerBound(a, true) |
| 3 | All keys ≤ b IDBKeyRange.upperBound(b) |
| 4 | All keys < b IDBKeyRange.upperBound(b, true) |
| 5 | All keys ≥ a && ≤ b IDBKeyRange.bound(a, b) |
| 6 | All keys > a &&< b IDBKeyRange.bound(a, b, true, true) |
| 7 | All keys > a && ≤ b IDBKeyRange.bound(a, b, true, false) |
| 8 | All keys ≥ a && < b IDBKeyRange.bound(a, b, false, true) |
| 9 | The key = c IDBKeyRange.only(c) |
We generally use the indexes for using range and in the syntax, the index key represents the indexes keypath value.
Examples
Various examples to retrieve the range codes using get() and getAll() methods is as follows −
class.get(student)
class.getAll(IDBKeyRange.bound(science,math)
class.getAll(IDBKeyRange.upperbound(science,true)
class.getAll()
class.getAllKeys(IDBKeyRange.lowerbound(student,true))
HTML Example
Consider the HTML example below to obtain the range codes −
<!DOCTYPE html>
<html lang="en">
<head>
   <title>Document</title>
</head>
<body>
   <script>
      const request = indexedDB.open("botdatabase",1);
      request.onupgradeneeded = function(){
         const db = request.result;
         const store = db.createObjectStore("bots",{ keyPath: "id"});
         store.createIndex("branch_db",["branch"],{unique: false});
      }
      request.onsuccess = function(){
         document.write("database opened successfully");
         const db = request.result;
         const transaction=db.transaction("bots","readwrite");
         const store = transaction.objectStore("bots");
         const branchIndex = store.index("branch_db");
         store.add({id: 1, name: "jason",branch: "IT"});
         store.add({id: 2, name: "praneeth",branch: "CSE"});
         store.add({id: 3, name: "palli",branch: "EEE"});
         store.add({id: 4, name: "abdul",branch: "IT"});
         store.put({id: 4, name: "deevana",branch: "CSE"});
         const upperquery =store.getAll(IDBKeyRange.upperBound('2', true));
         upperquery.onsuccess = function(){
            document.write("upperquery",upperquery.result);
         }
         transaction.oncomplete = function(){
            db.close;
         }
      }
   </script>
</body>
</html>
Output
database opened successfully
upperquery (4) [{...}, {...}, {...}, {...}]
arg1: (4) [{...}, {...}, {...}, {...}]
0: {id: 1, name: 'jason', branch: 'IT'}
1: {id: 2, name: 'praneeth', branch: 'CSE'}
2: {id: 3, name: 'palli', branch: 'EEE'}
3: {id: 4, name: 'deevana', branch: 'CSE'}
length: 4
[[Prototype]]: Array(0)
[[Prototype]]: Object
IndexedDB - Transactions
A transaction is a group of operations, that should either all succeed, or all fail. For example, if we pay from UPI to a merchant and the transaction declines then the money must fall back to the senders' account. A transaction maintains this integrity.
Following is the syntax for opening a transaction −
db.transaction(store[, type]);
The store here is the object store where we want to do the transaction. The type of the transaction is of 2 types −
read-only − can only read, by default it is given.
read-write − we can only read and write the data but we cannot create, remove or alter it from object stores.
Transaction life cycle
The transaction is a connection between object stores to perform any operations. Each transaction has a state which can be −
active − When a transaction is first created. or when a request is associated with a transaction. New requests can be made against the transaction when it is in this state.
inactive − A transaction is in this state after control returns to the event after its creation. No requests can be made against the transaction when it is in this state.
committing − Once all the requests associated with a transaction are completed then it attempts to commit. During the commit state, no new requests can be made.
finished − After a transaction is committed or aborted then it is in the finished state. During the finished state, no new requests can be made.
The lifetime of a transaction
A transaction with a scope and a mode is formed. A transaction's state is originally active when it is generated.
To begin the transaction, the implementation must queue a task.
A success or, error event will be fired when each request connected with a transaction is handled. The transaction state is set to active when the event is sent, allowing subsequent requests to be made against the transaction. The transaction's status is set to inactive once the event dispatch is completed.
A transaction can be canceled at any point before it is completed, even if it isn't currently active or hasn't begun.
When all requests made against the database are successful, the implementation must attempt to commit the transaction.
When a transaction is committed or aborted its state is set to finish.
Transaction scheduling
When a transaction can be started, there are some limitations.
When there is no read or write transactions that: a. were established before transactions tx b. have an overlapping scope with tx c. are not in a final state, a read-only transaction tx can commence.
A read/write-only transaction tx can begin when there are no other transactions that −
- were formed before tx,
- have an overlapping scope with tx, or
- are not in a completed state.
Upgrade transactions
A transaction with the mode "versionchange" is an upgrade transaction.
Object stores and indexes in a database can be created, renamed, and deleted using upgrade operations.
If a version greater than the current version is given, an upgrade transaction is automatically produced when completing the steps to run an upgrade transaction after a connection to a database is opened. Within the upgradeneeded event handler, this transaction will be active.
Committing a transaction
The following steps must be completed to commit a transaction −
- The transaction state is first set to committing.
- Wait until all of the transaction requests on the list have been processed.
- Abort the transaction if an error occurs.
- If the transaction is an upgrade transaction, set the database upgrade transaction's transactions connections to NULL.
- Change the transaction state to complete.
- fire the transaction's entire event
- If a transaction is an upgrade transaction, set the request's transaction to null and make the request that is associated with the transaction.
Syntax
transaction.commit()
Attempts to commit the transaction. All pending requests will be allowed to complete, but no new requests will be accepted.
The transaction will abort if a pending request fails. The success events for successful requests will still fire, but throwing an exception in an event handler will not abort the transaction calling preventDefault() will not prevent the transaction from aborting.
Event Handlers
Various event handler attributes are as follows
attribute EventHandler onabort;
attribute EventHandler oncomplete;
attribute EventHandler onerror;
Transactions Example
A simple JavaScript program to demonstrate the usage of a transaction is given below −
<!DOCTYPE html>
<html lang="en">
<head>
   <title>Document</title>
</head>
<body>
   <script>
      const request = indexedDB.open("botdatabase",1);
      request.onupgradeneeded = function(){
         const db = request.result;
         const store = db.createObjectStore("bots",{ keyPath: "id"});
      }
      request.onsuccess = function(){
         document.write("database opened successfully");
         const db = request.result;
         const transaction=db.transaction("bots","readwrite");
         const store = transaction.objectStore("bots");
         store.add({id: 1, name: "jason",branch: "IT"});
         store.add({id: 2, name: "praneeth",branch: "CSE"});
         store.add({id: 3, name: "palli",branch: "EEE"});
         store.add({id: 4, name: "abdul",branch: "IT"});
         store.put({id: 4, name: "deevana",branch: "CSE"});
         transaction.oncomplete = function(){
            document.write("transaction complete");
            db.close;
         };
      }
   </script>
</body>
</html>
Output
database opened successfully
transaction complete
Here a transaction is created, only when a transaction is created can we add data into the object store and finally after the transaction is complete we close the database.
Example
The following example shows the usage of a transaction attribute oncomplete −
function student(db, names) {
   let transaction = db.transaction(['names'], 'readwrite');
   let store = transaction.objectStore('names');
   for (let i = 0; i < messages.length; i++) {
      store.add({text: names[i]});
   }
   transaction.oncomplete = function()
   {document.write('transaction complete')};
}
Abort transactions
To abort a transaction, follow these steps −
All transaction-related modifications to the database are undone.
Changes in object stores, indexes, and versions are likewise reverted during upgrade transactions.
Complete the transaction state.
Set transactions error to error if the error is not null.
Set the request processed flag to true for each request in the transactions request list.
Set the requests done flag to true and the results to define.
If the transaction is an upgrade transaction, set the upgrade transaction associated with the transaction's connection to null.
Create an abort at transaction event with the bubbles attribute set to true.
If the transaction is an upgrade transaction, assume that request is the transaction's open request.
IndexedDB - Error Handling
Not all requests we write will return an output. This may happen due to −
- possible errors while writing the code.
- If the storage limit has been exceeded.
- If transactions have failed etc.
In a failed request the transaction is canceled, and all the changes are reverted. But sometimes we want to handle the failure without reverting all the changes to do that we use the request.onerror handler. It can prevent the transaction abort by calling event.preventDefault().
Example
An example to show error handling in IndexedDB is given below −
<!DOCTYPE html>
<html lang="en">
<head>
   <title>IndexedDB</title>
</head>
<body>
   <script>
      const request = indexedDB.open("DATABASE", 1);
      request.onsuccess = function (){
         document.write("database creation success")
      }
      request.onerror = function(event){
         document.write("Database not created " + event.target.errorCode);
      }
   </script>
</body>
</html>
Output
Database not created undefined
We can catch errors using the db.onerror handler for it.
db.onerror = function(event) {
   let request = event.target;
   document.write("Error is found", request.error);
};
The constraint error is occured when an object with the same id already exists. But sometimes if any of an error is fully handled and we don't want to report it we can stop the bubbling by using event.stopPropagation() in request.onerror.
request.onerror = function(event) {
   if (request.error.name == "ConstraintError") {
      document.write("id already exists");
      event.preventDefault();
      event.stopPropagation();
   }
}
IndexedDB - Searching
We encounter many situations where we need to search for values in an object store. Object stores are sorted internally. It can be done by −
- Searching by a key value or a key range.
- Searching based on another object field.
Searching by Key
We can search for exact key values or a range of key values by using IDBKeyRange objects with an acceptable key Range. IDBKeyRange object has the following calls −
IDBKeyRange.lowerBound(lower, [open]) for >=lower
IDBKeyRange.upperBound(upper, [open]) for >=upper
IDBKeyRange.bound(lower, upper, [lowerOpen] , [upperOpen]) between lower and upper
IDBKeyRange.only(key) if the range contains only one key.
To perform the actual search we use the query argument on the object store. The different types of methods to perform these operations are
store.get(query) − Search for the first value in the store by a key or a range
store.getAll([query],[count]) − Search for all values in the store till the limit of the count mentioned.
store.getKey(query) − search for the first key for which the query is satisfied.
store.getAllKeys([query],[count]) − search for all the keys for which the query is satisfied till the limit of the count is completed.
store.count([query]) − get the total count of the keys for which the query is satisfied.
Example
In this example, we are retrieving all the objects using the getAll() method and searching for objects by their key −
class.get(student)
class.getAll(IDBKeyRange.bound(science,math)
class.getAll(IDBKeyRange.upperbound(science,true)
class.getAll()
class.getAllKeys(IDBKeyRange.lowerbound(student,true))
Searching by a field or index
To search based on other object fields we need to use indexes. An index stores a list of keys for objects that have the value required. Indexes are also internally sorted like object stores.
Syntax
objectStore.createIndex(name, keyPath, [options]);
name − Index Name
keyPath − Searching will be done on the path to the object field
options − options are of 2 types
unique − Objects in the store with a unique value will be present at the key path and duplicates cannot be made of them.
multi−entry − if the value on the keypath is an array then by default the index will treat the whole array as a key but if we use multi-entry the array members will become index keys.
Example
If we want to search for phones based on price, the example program is as follows −
openRequest.onupgradeneeded = function() {
   let books = db.createObjectStore('phone', {keyPath: 'id'});
   let index = books.createIndex('pricephone', 'price');
};
To create an index we need to use the upgrade needed.
- the index will track the price field.
- If the price is not unique we can't set the unique option.
- If the price is not an array then multiEntry is not applicable.
Example
In the following example, we create a transaction and retrieve all the objects using the getAll() function. Once they are retrieved, we search for object values in that transaction. If found, return the object; if not, return false.
let transaction = db.transaction("phones");
let books = transaction.objectStore("phones");
let priceIndex = books.index("price_index");
let request = priceIndex.getAll(7);
request.onsuccess = function() {
   if (request.result !== undefined) {
      document.write("Phones", request.result);
   } else {
      document.write("There are no such phones");
   }
};
HTML Example
The HTML script implementation to search for values in object store is given below −
<!DOCTYPE html>
<html lang="en">
<head>
   <title>Document</title>
</head>
<body>
   <script>
      const request = indexedDB.open("botdatabase",1);
      request.onupgradeneeded = function(){
         const db = request.result;
         const store = db.createObjectStore("bots",{ keyPath: "id"});
         store.createIndex("branch_db",["branch"],{unique: false});
      }
      request.onsuccess = function(){
         document.write("database opened successfully");
         const db = request.result;
         const transaction=db.transaction("bots","readwrite");
         const store = transaction.objectStore("bots");
         const branchIndex = store.index("branch_db");
         store.add({id: 1, name: "jason",branch: "IT"});
         store.add({id: 2, name: "praneeth",branch: "CSE"});
         store.add({id: 3, name: "palli",branch: "EEE"});
         store.add({id: 4, name: "abdul",branch: "IT"});
         store.put({id: 4, name: "deevana",branch: "CSE"});
         const req = branchIndex.getAll(["CSE"]);
         req.onsuccess = function(){
            if(req.result!==undefined){
               document.write("bots",req.result);
            } else{
               document.write("There are no such bots");
            }
         };
         transaction.oncomplete = function(){
            db.close;
         }
      }
   </script>
</body>
</html>
Output
database opened successfully
bots (2) [{...}, {...}]
arg1:(2) [{...}, {...}]
0:{id: 2, name: 'praneeth', branch: 'CSE'}
1:{id: 4, name: 'deevana', branch: 'CSE'}
length:2
[[Prototype]]:Array(0)
[[Prototype]]:Object
IndexedDB - Cursors
In retrieving data we used the get() function when we knew what key we wanted to retrieve but if we want to step through all the values of the object store we can use cursors.
Firstly we use the open cursor function and then we can add our arguments to it. The arguments which we can insert in openCursor() function are −
- Limit the range of objects by using a key range
- The direction in which we want to iterate
Following is the syntax of cursors
Syntax
ObjectStore.openCursor(optionalKeyRange, optionalDirection);
For the object store, we use the openCursor()
optionalKeyRange − we can limit the range of how many objects we need to retrieve.
optionalDirection − we can specify the direction we want to iterate.
Example 1
In this example, we learn how to open a cursor function using JavaScript −
var objectStore = db.transaction("student").objectStore("student);
objectStore.openCursor().onsuccess = event => {
   var cursor = event.target.result;
   if (cursor) {
      document.write("Name" + cursor.key + cursor.value.name);
      cursor.continue();
   } else {
      document.write("entries closed");
   }
};
Example 2
When we want to retrieve all objects from the object store and place them in an array.
var student = [];
objectStore.openCursor().onsuccess = event => {
   var cursor = event.target.result;
   if (cursor) {
      student.push(cursor.value);
      cursor.continue();
   } else {
      document.write(student);
   }
};
Example 3
Given below is another example to implement the openCursor() function in JavaScript −
var singleKeyRange = IDBKeyRange.only("Jason");
var lowerBoundKeyRange = IDBKeyRange.lowerBound("Praneeth");
var lowerBoundOpenKeyRange = IDBKeyRange.lowerBound("jason", true);
var upperBoundOpenKeyRange = IDBKeyRange.upperBound("praneeth", true);
var boundKeyRange = IDBKeyRange.bound("jason", "praneeth", false, true);

index.openCursor(boundKeyRange).onsuccess = event => {
   var cursor = event.target.result;
   if (cursor) {
      cursor.continue();
   }
};
or else if we want to give the direction −
objectStore.openCursor(boundKeyRange, "prev").onsuccess = event => {
   var cursor = event.target.result;
   if (cursor) {
      cursor.continue();
   }
};
HTML Example
The HTML script to implement the usage of cursor function is given as follows −
<!DOCTYPE html>
<html lang="en">
<head>
   <title>Document</title>
</head>
<body>
   <script>
      const request = indexedDB.open("botdatabase",1);
      request.onupgradeneeded = function(){
         const db = request.result;
         const store = db.createObjectStore("bots",{ keyPath: "id"});
         store.createIndex("branch_db",["branch"],{unique: false});
      }
      request.onsuccess = function(){
         document.write("database opened successfully");
         const db = request.result;
         const transaction=db.transaction("bots","readwrite");
         const store = transaction.objectStore("bots");
         const branchIndex = store.index("branch_db");
         store.add({id: 1, name: "jason",branch: "IT"});
         store.add({id: 2, name: "praneeth",branch: "CSE"});
         store.add({id: 3, name: "palli",branch: "EEE"});
         store.add({id: 4, name: "abdul",branch: "IT"});
         store.put({id: 4, name: "deevana",branch: "CSE"});
         const req = store.openCursor();
         req.onsuccess = function(){
            const cursor = req.result;
            if(cursor){
               const key = cursor.key;
               const value = cursor.value;
               document.write(key,value);
               cursor.continue();
            } else {
               document.write("bots completed");
            }
         }
         transaction.oncomplete = function(){
            db.close;
         }
      }
   </script>
</body>
</html>
Output
database opened successfully
1 {id: 1, name: 'jason', branch: 'IT'}
2 {id: 2, name: 'praneeth', branch: 'CSE'}
3 {id: 3, name: 'palli', branch: 'EEE'}
4 {id: 4, name: 'deevana', branch: 'CSE'}
bots completed
IndexedDB - Promise Wrapper
Promises, like callbacks, are a technique of telling what you want your code to perform once an asynchronous operation completes without stopping the runtimes thread of javascript.
Instead of supplying a callback to an asynchronous function to run after it completes, promises can be used instead.
Promise library was created by Jake Archibald and it uses promises rather than events.
It is easier to use than the traditional IndexedDB. It simplifies the API while still maintaining its structure.
Here we are showing the enhancements only as to why we can use the Promised library to know more about it you can visit the following website −
It has a few enhancements −
- IDBDatabase
- IDBTransaction
- IDBCursor
IDBDatabase
Shortcuts to get or set from an object store
const value = await db.get(storeName, key);
await db.put(storeName, value, key);
Shortcuts to get from an Index
const value = await db.getFromIndex(storeName, indexName, key);
IDBTransaction
tx.store
If a transaction is a single store the store property references the store or else it is undefined then we use
const tx = db.transaction('any transaction');
const store = tx.store;
tx.objectStore(storeName);
tx.done
The .done promise resolves when a transaction is completed successfully else it rejects with a transaction error.
const tx = db.transaction(storeName, 'readwrite');
await Promise.all([
   tx.store.add('one', 'two'),
   tx.store.put('three', 'four'),
   tx.done,
]);
IDBCursor
The cursor advance methods are −
- Advance
- Continue
- ContinuePrimaryKey
They return a promise to cursor or else it returns null.
let cursor = await db.transaction(storeName).store.openCursor();
while (cursor) {
   document.write(cursor.key, cursor.value);
   cursor = await cursor.continue();
}
IndexedDB - ECMAScript Binding
Firstly, what is ECMAScript?
ECMAScript (European Computer Manufacturers Association Script) is a scripting language based on JavaScript.
JavaScript ES6 adds new syntaxes and features so that the code is more easily readable and we can write less code for the same functionality. ES6 has many new features like arrow functions, template strings, class destruction, etc.
Binding - Bind an object to a function and reference it using the this keyword.
ECMAScript deals with keys, values, and keypaths.
It defines how key values defined in this specification are converted to and from ECMAScript values.
Extract a key from a value
To extract a key from a value using a key path with value, keyPath, and an optional multi-entry flag we need to follow the following steps. The results can be a key, invalid, failure, or even an exception.
Where r is the result of evaluating a keypath on a value with value and keypath. Rethrow any exceptions. If r is a failure return failure.
key be the result of converting a value to a key with r if the multi-entry flag is false, and the result of converting a value to a multi-entry key with r otherwise. Rethrow any exceptions.
If the key is invalid, return invalid.
Return key.
