- HTML Canvas - Home
- HTML Canvas - Introduction
- Environmental Setup
- HTML Canvas - First Application
- HTML Canvas - Drawing 2D Shapes
- HTML Canvas - Path Elements
- 2D Shapes Using Path Elements
- HTML Canvas - Colors
- HTML Canvas - Adding Styles
- HTML Canvas - Adding Text
- HTML Canvas - Adding Images
- HTML Canvas - Canvas Clock
- HTML Canvas - Transformations
- Composting and Clipping
- HTML Canvas - Basic Animations
- Advanced Animations
- HTML Canvas API Functions
- HTML Canvas - Element
- HTML Canvas - Rectangles
- HTML Canvas - Lines
- HTML Canvas - Paths
- HTML Canvas - Text
- HTML Canvas - Colors and Styles
- HTML Canvas - Images
- HTML Canvas - Shadows and Transformations
- HTML Canvas Useful Resources
- HTML Canvas - Quick Guide
- HTML Canvas - Useful Resources
- HTML Canvas - Discussion
HTML Canvas - Basic Animations
The canvas element completely uses JavaScript to draw shapes and add styles to them. The same JavaScript can be used to make very attractive animations on the Canvas element. Since animations are dynamic, the objects inside the Canvas element take some time to render.
Controlling the Animation
Canvas element shapes are generally constructed using methods or custom functions. Hence, we cannot add animation to them unless they are rendered correctly on the canvas element. Since animations change the nature of the canvas, scheduled updating must be a compulsory operation. There are some animation methods used to control the functionality of the animations on the Canvas element. Each of the methods is described below
| S.No | Method & Description |
|---|---|
| 1 | setInterval(callback_function, time) This method is used to repeat a given task in each timeframe. It takes a function which contains the required task and time in milliseconds as its parameters. |
| 2 | setTimeout(callback_function, time) When a task should be done once for a certain period, this method is used. It takes the executable function and time in milliseconds as its parameters. |
| 3 | requestAnimationFrame(callback_function) This method updates the browser to perform an animation request before the next animation or update. |
These animation methods are generally used in the Canvas element to develop 2D games and interactive UI designs.
Steps to add basic animations
To add animations to the Canvas element, there are some steps to be followed which are listed below
Step 1 − Clear the complete Canvas element − To add any animations to the Canvas element, there must be no drawings inside which do not fill the complete canvas space. This can be done by calling the clearRect() method.
Step 2 − Save the default Canvas state − Since we apply various styles and add different settings such as transformations, slicing, etc, we have to save the main canvas state to make sure we can roll back to the main state when needed. Save() function is used to achieve this.
Step 3 − Draw the shapes with added animations − We render the drawn shapes with different animations available. This is the first step where animations are applied to the Canvas element.
Step 4 − Restore the Canvas element when needed − Since we have already saved the canvas states using the save() method, we can restore them before drawing a new frame using the restore() function.
Example 1
The following program demonstrates how clearRect() method works and how to use it to perform animations.
<!DOCTYPE html>
<html lang="en">
   <head>
      <title>Animations</title>
      <style>
         #button {
            position: absolute;
            top: 350px;
            left: 150px;
         }
      </style>
   </head>
   <body onload="animation();">
      <canvas id="canvas" width="600" height="400" style="border: 1px solid black;"></canvas>
      <script>
         function animation() {
            var canvas = document.getElementById("canvas");
            var context = canvas.getContext("2d");
            context.fillStyle = 'purple';
            context.fillRect(75, 75, 300, 150);
            context.font = '25px Verdana';
            context.fillText('To remove text and rect, press the button', 10, 300);
            document.getElementById('clear').addEventListener('click', function() {
               context.clearRect(0, 0, canvas.width, canvas.height);
            }, false);
         }
      </script>
      <div id="button">
         <input type="button" id="clear" value="Clear the whole Canvas element">
      </div>
   </body>
</html>
Output
The output returned by the above program is given below
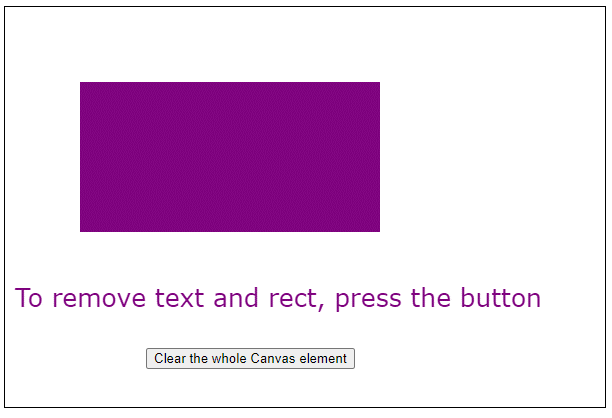
If you press the button, the canvas changes to the image shown below
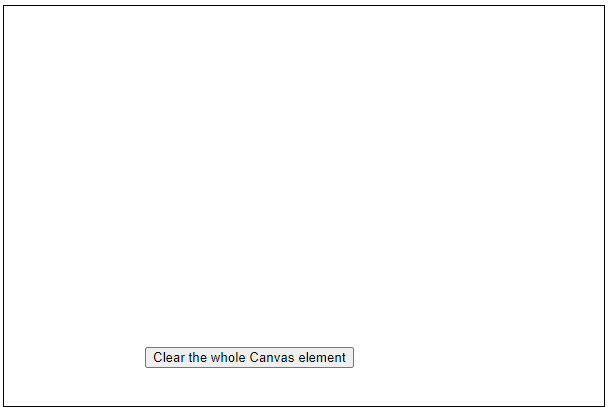
To see the text and shape again, refresh the page.
Example 2
The following code shows how simple animations can be performed to the Canvas element.
<!DOCTYPE html>
<html lang="en">
<head>
<title>Animations</title>
<style>
body {
margin: 10px;
padding: 10px;
}
</style>
</head>
<body onload="animate();">
<canvas id="canvas" width="600" height="200" style="border: 1px solid black;"></canvas>
<script>
function animate() {
window.requestAnimFrame = (function(callback) {
return window.requestAnimationFrame || window.webkitRequestAnimationFrame || window.mozRequestAnimationFrame || window.oRequestAnimationFrame || window.msRequestAnimationFrame || function(callback) {
window.setTimeout(callback, 1000);
};
})();
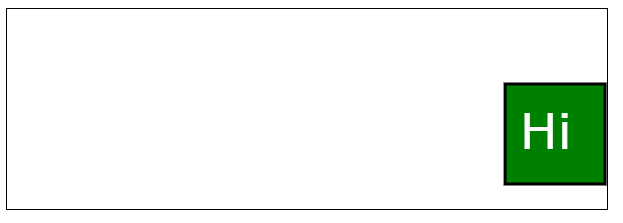
function drawShapes(square, context) {
context.beginPath();
context.rect(square.x, square.y, square.width, square.height);
context.fillStyle = 'green';
context.fill();
context.lineWidth = square.borderWidth;
context.strokeStyle = 'black';
context.stroke();
context.closePath();
context.font = '50px Verdana';
context.fillStyle = 'white';
context.fillText('Hi', square.x + 15, square.height + 40);
}
function animation(square, canvas, context, startTime) {
// updating the time and speed of movement parameters
var time = (new Date()).getTime() - startTime;
var speed = 100;
var X = speed * time / 1000;
if (X < canvas.width - square.width - square.borderWidth / 2) {
square.x = X;
}
// clearing the Canvas element space
context.clearRect(0, 0, canvas.width, canvas.height);
drawShapes(square, context);
// requesting new frame for animation
requestAnimFrame(function() {
animation(square, canvas, context, startTime);
});
}
var canvas = document.getElementById('canvas');
var context = canvas.getContext('2d');
var square = {
x: 0,
y: 75,
width: 100,
height: 100,
borderWidth: 3
};
drawShapes(square, context);
// buffer time before starting animation
setTimeout(function() {
var startTime = (new Date()).getTime();
animation(square, canvas, context, startTime);
}, 1000);
}
</script>
</body>
</html>
Output
The animated output returned by the above code is
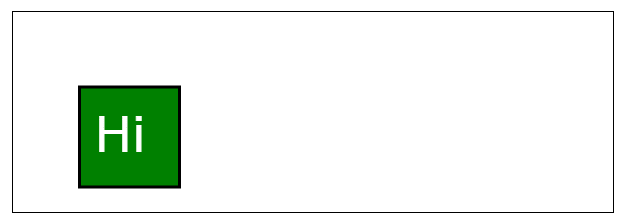
After the animation, the position of the square is changed as shown below
Example 3
The following code demonstrates a simple looping of TutorialsPoint logo in the Canvas element frame.
<!DOCTYPE html>
<html lang="en">
   <head>
      <title>Animations</title>
      <style>
         body {
            margin: 10px;
            padding: 10px;
         }
      </style>
   </head>
   <body onload="animate()">
      <canvas id="context" width="350" height="120" style="border: 1px solid black;background-color: brown;"></canvas>
      <script>
         function animate() {
            var image = new Image();
            image.src = 'https://www.tutorialspoint.com/themes/home/tp-diamond-logo-white.png';
            var X = 600;
            var Y = 150;
            var velocity = 30;
            var scale = 1.05;
            var y = -4.5;
            var disx = 0.75;
            var imgwidth;
            var imgheight;
            var x = 0;
            var RemoveX;
            var RemoveY;
            var context;
            image.onload = function() {
               imgwidth = image.width * scale;
               imgheight = image.height * scale;
               if (imgwidth > X) {
                  x = X - imgwidth;
               }
               if (imgwidth > X) {
                  RemoveX = imgwidth;
               } else {
                  RemoveX = X;
               }
               if (imgheight > Y) {
                  RemoveY = imgheight;
               } else {
                  RemoveY = Y;
               }
               var canvas = document.getElementById('context')
               context = canvas.getContext('2d');
               return setInterval(draw, velocity);
            }

            function draw() {
               context.clearRect(0, 0, RemoveX, RemoveY);
               if (imgwidth <= X) {
                  if (x > X) {
                     x = -imgwidth + x;
                  }
                  if (x > 0) {
                     context.drawImage(image, -imgwidth + x, y, imgwidth, imgheight);
                  }
                  if (x - imgwidth > 0) {
                     context.drawImage(image, -imgwidth * 2 + x, y, imgwidth, imgheight);
                  }
               } else {
                  if (x > (X)) {
                     x = X - imgwidth;
                  }
                  if (x > (X - imgwidth)) {
                     context.drawImage(image, x - imgwidth + 1, y, imgwidth, imgheight);
                  }
               }
               context.drawImage(image, x, y, imgwidth, imgheight);
               x += disx;
            }
         }
      </script>
   </body>
</html>
Output
The code returns loop output as shown below