- HTML Canvas - Home
- HTML Canvas - Introduction
- Environmental Setup
- HTML Canvas - First Application
- HTML Canvas - Drawing 2D Shapes
- HTML Canvas - Path Elements
- 2D Shapes Using Path Elements
- HTML Canvas - Colors
- HTML Canvas - Adding Styles
- HTML Canvas - Adding Text
- HTML Canvas - Adding Images
- HTML Canvas - Canvas Clock
- HTML Canvas - Transformations
- Composting and Clipping
- HTML Canvas - Basic Animations
- Advanced Animations
- HTML Canvas API Functions
- HTML Canvas - Element
- HTML Canvas - Rectangles
- HTML Canvas - Lines
- HTML Canvas - Paths
- HTML Canvas - Text
- HTML Canvas - Colors and Styles
- HTML Canvas - Images
- HTML Canvas - Shadows and Transformations
- HTML Canvas Useful Resources
- HTML Canvas - Quick Guide
- HTML Canvas - Useful Resources
- HTML Canvas - Discussion
HTML Canvas - 2D Shapes Using Path Elements
In this chapter we are going to discuss how to draw various 2D shapes using various path elements of HTML5.
There is a method named rect() used to create rectangles in the Canvas element. It uses the concept of the path, and its syntsx isrect(x, y, width, height)
This method draws a rectangle whose top-left corner is specified by (x, y) with a given width and height. To execute this method, moveTo() must be called with parameters x and y so the pointer moves to the coordinates from which the rectangle can be drawn.
In the same way we can create other 2D shapes using these path elements.The steps involved in making shapes using paths in the Canvas element areStep 1 − Creating the path: This step is usually done using the beginPath() function which creates the path by which the actual shape is constructed.
Step 2 − Using drawing commands to draw into the path: To draw a shape using Canvas, we use functions like lineTo() and moveTo() to draw the required path.
Step 3 − Use methods like stroke or fill to construct the shape: After drawing the path, we use fill() and stroke() methods to make the path shape generated more understandable. Then we will complete the path by using the closePath() function.
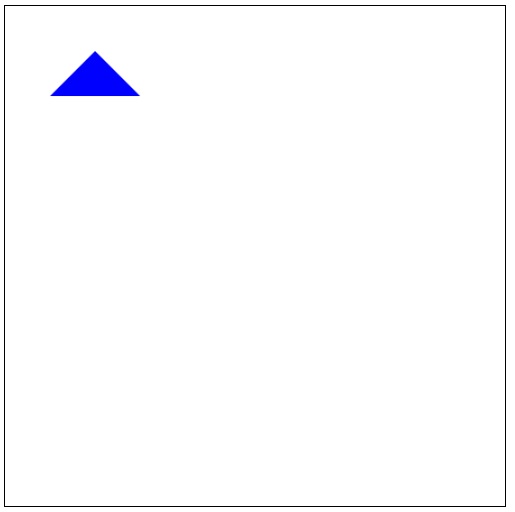
Drawing Triangles
Mathematically, the Intersection of three lines is considered a triangle. It consists of three intersected lines at a particular angle. The intersected lines are called vertices of the triangle.
To draw a triangle, we must use Path functions. The triangle is drawn using three lines by the lineTo() function. We first begin the path and move to the point where we draw a line and then use lineTo() until a triangle is formed. We must make sure the coordinates given to the functions must form a triangle. We can add properties to the triangle formed by using the required functions such as shape, gradient, etc.
The syntax of lineTo() function isCanvas.lineTo(x, y);
Where the parameters involved are x and y which denotes the point to which the line is to be drawn. We have to first initialize the starting point using the moveTo() function.
Example
Following example draws a triangle using path operations. The program code is given below
<!DOCTYPE html>
<html lang="en">
<head>
   <title>Triangle</title>
</head>
<body onload="triangle();">
   <canvas id="canvas" width="555" height="555" style="border: 1px solid black;"></canvas>
   <script>
      function triangle() {
         var canvas = document.getElementById('canvas');
         if (canvas.getContext) {
            var ctx = canvas.getContext('2d');
            ctx.beginPath();
            ctx.moveTo(50, 100);
            ctx.lineTo(100, 50);
            ctx.lineTo(150, 100);
            ctx.lineTo(50, 100);
            ctx.fillStyle = "blue";
            ctx.fill()
         }
      }
   </script>
</body>
</html>
Output
The triangle formed for the above code is shown below. We can play with the coordinates and make other triangles such as right-angled and isosceles triangles. We can also add the closePath() function at the end. If we do not give closePath() at the end of the script, the path is still running and is not stopped.
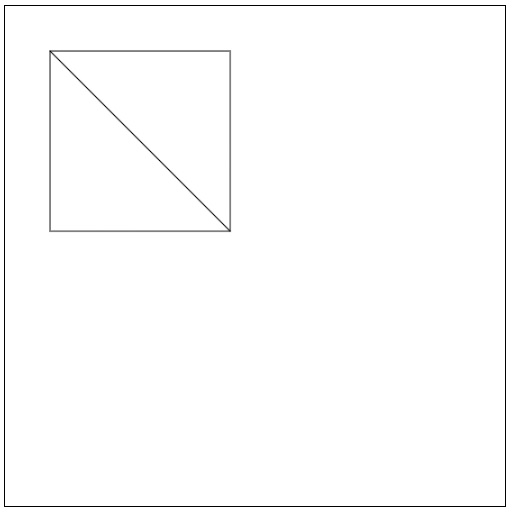
Drawing Lines
A line is a shape formed when two points are joined with a minimum distance between them. It is a common mathematical shape that is used to draw most of the shapes in geometry.
To draw a line using HTML5 Canvas by using Paths, we should use two methods, moveTo(x, y) and lineTo(x, y). To identify the line on Canvas, we must use stroke() or fill(). The moveTo() method defines the position of the cursor to draw on the canvas, whereas the lineTo() method defines the coordinates of the end point of the line, and the stroke() or fill() method is used to make the line visible on the canvas element. The color of stroke() or fill() is black unless specified by the user.
The syntax of the functions used to draw the line are
Canvas.moveTo(x,y);
The canvas cursor is moved from the origin to the point (x, y).
Canvas.lineTo(x, y);
A line is drawn from the cursor point to the given parameter points (x, y).
Example
We will work on some examples to understand it clearly. The following example will take a square on canvas and draw its diagonal using lines. The implementation is given below.
<!DOCTYPE html>
<html lang="en">
   <head>
      <title>Line-Diagonal</title>
      <style>
         <style>body {
            margin: 10px;
            padding: 10px;
         }
      </style>
   </head>
   <body onload="line1();">
      <canvas id="canvas" width="555" height="555" style="border: 1px solid black;"></canvas>
      <script>
         function line1() {
            var canvas = document.getElementById('canvas');
            var context = canvas.getContext('2d');
            var x = 50;
            var y = 50;
            var width = 200;
            var height = 200;
            context.strokeRect(x, y, width, height);
            context.moveTo(50, 50);
            context.lineTo(250, 250);
            context.stroke();
         }
      </script>
   </body>
</html>
Output
We have first constructed a square using a rectangle on canvas with its dimensions given above and drawn a line from its top-left coordinates (x, y) to the bottom right coordinates adding the x and y values (x+width, y+height) as they are away from the origin. Refer to Canvas coordinates to understand this clearly. The output for the above code is given below.
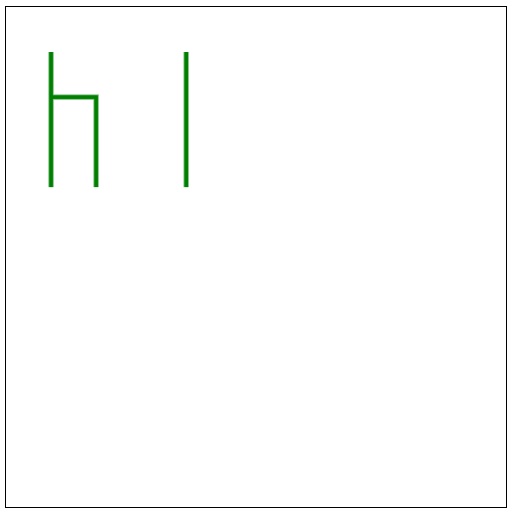
Example
We will work on another example in which only lines are drawn. Let us draw the letters 'h' and 'i' using the lines. We will be using lineWidth() and strokeStyle() to make the output easily understandable and make it look attractive. The code for the program is given below.
<!DOCTYPE html>
<html lang="en">
   <head>
      <title>Line-'hI'</title>
      <style>
         body {
            margin: 10px;
            padding: 10px;
         }
      </style>
   </head>
   <body onload="line2();">
      <canvas id="canvas" width="555" height="555" style="border: 1px solid black;"></canvas>
      <script>
         function line2() {
            var canvas = document.getElementById('canvas');
            var context = canvas.getContext('2d');
            context.lineWidth = 5.0;
            context.beginPath();
            context.strokeStyle = 'green';
            context.moveTo(50, 50);
            context.lineTo(50, 200);
            context.lineTo(50, 100);
            context.lineTo(100, 100);
            context.lineTo(100, 200);
            context.stroke();
            context.beginPath();
            context.strokeStyle = 'green';
            context.moveTo(200, 50);
            context.lineTo(200, 200);
            context.stroke();
         }
      </script>
   </body>
</html>
Output
The output of the following code is shown below. We can create text using lines in the Canvas element, but it is very difficult to implement. Canvas also has text drawing functions to make it easier to work on. We will be using text in the later part of the tutorial.
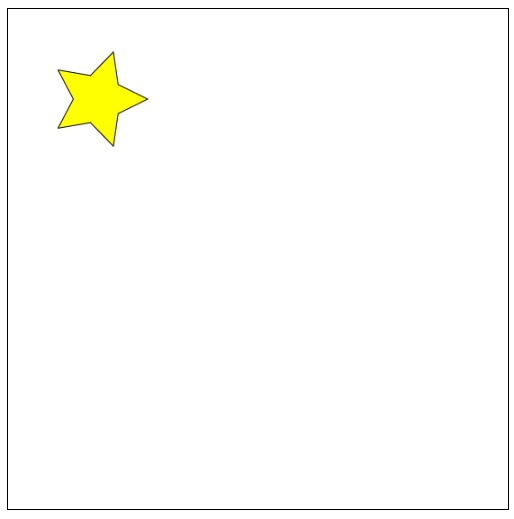
An interesting star shape using lines
We will draw stars using path methods. Star can be simply drawn by combining a group of lines with the help of path objects. We have to write a JavaScript function that takes input and gives the output as the star. The function which draws stars is the star(R, X, Y, N) where R is the center of a star, X and Y are centered coordinates, and N is the number of spikes needed to be drawn on the star. The implementation is given below.
Example
<!DOCTYPE html>
<html lang="en">
   <head>
      <title>Star</title>
      <style>
         body {
            margin: 10px;
            padding: 10px;
         }
      </style>
   </head>
   <body onload="star();">
      <canvas id="canvas" width="555" height="555" style="border: 1px solid black;"></canvas>
      <script>
         var ctx = document.getElementById("canvas").getContext("2d");

         function star(R, X, Y, N) {
            ctx.beginPath();
            ctx.moveTo(X + R, Y);
            for (var i = 1; i <= N * 2; i++) {
               if (i % 2 == 0) {
                  var theta = i * (Math.PI * 2) / (N * 2);
                  var x = X + (R * Math.cos(theta));
                  var y = Y + (R * Math.sin(theta));
               } else {
                  var theta = i * (Math.PI * 2) / (N * 2);
                  var x = X + ((R / 2) * Math.cos(theta));
                  var y = Y + ((R / 2) * Math.sin(theta));
               }
               ctx.lineTo(x, y);
            }
            ctx.closePath();
            ctx.fillStyle = "yellow";
            ctx.fill();
            ctx.fillStyle = "green";
            ctx.stroke();
         }
         star(55, 100, 100, 5);
      </script>
   </body>
</html>
Output
The star formed on the canvas is shown below.
Drawing Arcs
To draw any shape with arcs, we have to use two available methods arc() and arcTo(). Let us understand how each method is functions.
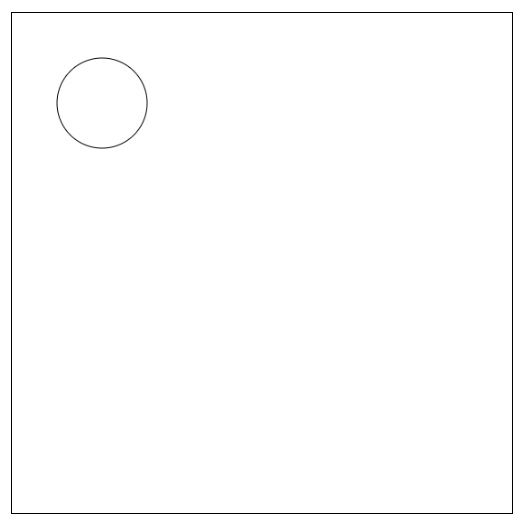
Drawing Circle using Arc
We can draw a circle using Arcs very easily. The effective way to draw a circle is to use arc() and beginPath() methods. The implementation of Circle is given below.
Example
<!DOCTYPE html>
<html lang="en">
   <head>
      <meta charset="UTF-8">
      <meta http-equiv="X-UA-Compatible" content="IE=edge">
      <meta name="viewport" content="width=device-width, initial-scale=1.0">
      <title>arc()</title>
      <style>
         body {
            margin: 10px;
            padding: 10px;
         }
      </style>
   </head>
   <body onload="circle();">
      <canvas id="canvas" width="555" height="555" style="border: 1px solid black;"></canvas>
      <script>
         function circle() {
            var canvas = document.getElementById('canvas');
            var context = canvas.getContext('2d');
            context.beginPath();
            context.arc(100, 100, 50, 1 * Math.PI, 5 * Math.PI);
            context.stroke();
         }
      </script>
   </body>
</html>
Output
This code draws a circle inside the canvas using the path() and arc() methods. Output for the code is shown below.
Drawing Curves
In mathematics, the curve is an abstract path used to describe a continuously moving point. Such paths are generated using an equation.
Curves are the most common mathematical representations which have many applications. These can be represented on Canvas using methods based on their contact points. The types of curves that can be drawn using Canvas are quadratic and cubic Bezier curves. The methods are given below.
How do Bezier quadratic and cubic differ?
The basic difference between quadratic and Bezier curves is that a quadratic Bezier curve has a start and an end point (x, y) and just a single control point while a cubic Bezier curve uses two control points with one end point (x,y).
Using these methods might be quite difficult to create complex shapes as we do not have any visual support while writing the code. So, it is advised to not use these methods to draw complex shapes until you excel in all the above methods.
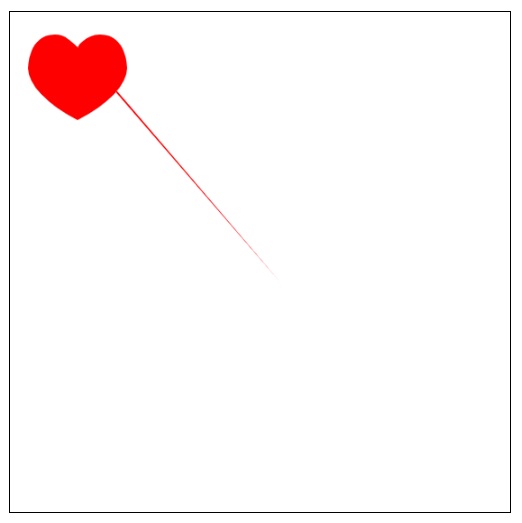
Simple heart program using curves
Let us draw a simple organic heart shape using curves. The code for the drawing is shown below.
Example
<!DOCTYPE html>
<html lang="en">
   <head>
      <meta charset="UTF-8">
      <meta http-equiv="X-UA-Compatible" content="IE=edge">
      <meta name="viewport" content="width=device-width, initial-scale=1.0">
      <title>Heart</title>
      <style>
         body {
            margin: 10px;
            padding: 10px;
         }
      </style>
   </head>
   <body onload="curve();">
      <canvas id="canvas" width="555" height="555" style="border: 1px solid black;"></canvas>
      <script>
         function curve() {
            var canvas = document.getElementById('canvas');
            var ctx = canvas.getContext('2d');
            ctx.lineWidth = 5;
            ctx.beginPath();
            ctx.moveTo(300, 300);
            ctx.bezierCurveTo(75, 37, 70, 25, 50, 25);
            ctx.bezierCurveTo(20, 25, 20, 62.5, 20, 62.5);
            ctx.bezierCurveTo(20, 80, 40, 102, 75, 120);
            ctx.bezierCurveTo(110, 102, 130, 80, 130, 62.5);
            ctx.bezierCurveTo(130, 62.5, 130, 25, 100, 25);
            ctx.bezierCurveTo(85, 25, 75, 37, 75, 40);
            ctx.fillStyle = "red";
            ctx.fill();
         }
      </script>
   </body>
</html>
Output
This code gives a red-colored heart with a diagonal line. The line is formed due to the input co-ordinates given in the functions as the point is outside of the shape. The heart drawn on the Canvas using the above code is
Combination of Shapes
We can draw a combination of one or more shapes on the Canvas element. The only thing that should be kept in mind is that the coordinates given are matched with the desired output. Since we combine one or more shapes, the values must be assigned accordingly. Refer to Grid to understand the concept of assigning coordinate values.
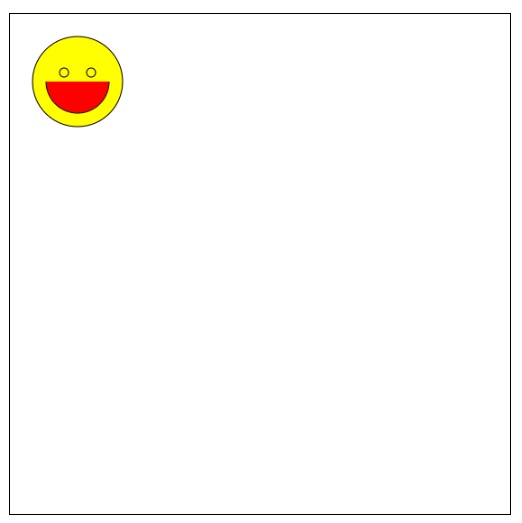
The face of the duck using Curves and arcs
We will draw a simple duck face drawing using Circles and arc. The face and eyes are drawn using circles, mouth using arc. Implementation using code is given below.
Example
<!DOCTYPE html>
<html lang="en">
   <head>
      <title>duck smile</title>
      <style>
         body {
            margin: 10px;
            padding: 10px;
         }
      </style>
   </head>
   <body onload="smile();">
      <canvas id="canvas" width="555" height="555" style="border: 1px solid black;"></canvas>
      <script>
         function smile() {
            var canvas = document.getElementById('canvas');
            if (canvas.getContext) {
               var ctx = canvas.getContext('2d');
               ctx.beginPath();
               ctx.arc(75, 75, 50, 0, Math.PI * 2, true);
               ctx.moveTo(110, 75);
               ctx.fillStyle = "red";
               ctx.fill();
               ctx.arc(75, 75, 35, 0, Math.PI, false);
               ctx.moveTo(65, 65);
               ctx.fillStyle = "yellow";
               ctx.fill();
               ctx.arc(60, 65, 5, 0, Math.PI * 2, true);
               ctx.moveTo(95, 65);
               ctx.arc(90, 65, 5, 0, Math.PI * 2, true);
               ctx.stroke();
            }
         }
      </script>
   </body>
</html>
Output
Path 2D
We can use any number of paths and commands to draw objects onto canvas. To make it easy, Path2D is introduced by the Canvas which helps us to construct the drawing easily. The Path2D constructor returns initialized path object, with another path as an argument. Let us implement the Path2D object in a program.
Example
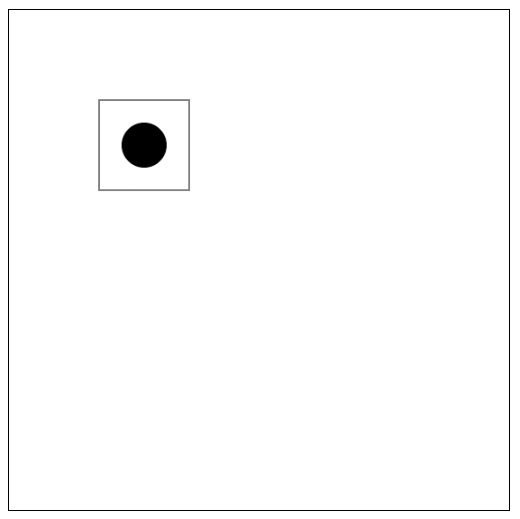
The following example inserts a circle into square using Path2D object. The implementation is given below.
<!DOCTYPE html>
<html lang="en">
   <head>
      <title>Path2D</title>
      <style>
         body {
            margin: 10px;
            padding: 10px;
         }
      </style>
      <script>
         function draw() {
            var canvas = document.getElementById('canvas');
            if (canvas.getContext) {
               var ctx = canvas.getContext('2d');
               var rectangle = new Path2D();
               rectangle.rect(100, 100, 100, 100);
               var circle = new Path2D();
               circle.arc(150, 150, 25, 0, 2 * Math.PI);
               ctx.stroke(rectangle);
               ctx.fill(circle);
            }
         }
      </script>
   </head>
   <body onload="draw();">
      <canvas id="canvas" width="555" height="555" style="border: 1px solid black;"></canvas>
   </body>
</html>
Output
The output for the code is shown below