
Article Categories
- All Categories
-
 Data Structure
-
 Networking
-
 RDBMS
RDBMS
-
 Operating System
-
 Java
Java
-
 MS Excel
-
 iOS
iOS
-
 HTML
HTML
-
 CSS
CSS
-
 Android
-
 Python
-
 C Programming
-
 C++
C++
-
 C#
C#
-
 MongoDB
-
 MySQL
MySQL
-
 Javascript
-
 PHP
PHP
-
 Economics & Finance
How to start tensorflow Docker jupyter notebook?
Introduction
Jupyter notebooks are useful for writing, testing, and debugging code. TensorFlow is a machine learning framework that can be used with Jupyter notebooks.
In this article, we will explore how to use Docker to start a TensorFlow Jupyter notebook, which will allow us to take advantage of the benefits of both of these tools.
Prerequisites
Before getting started, you will need to have Docker and Docker Compose installed on your machine. You can check if it is installed using the following commands ?
$ docker --version
$ docker-compose --version
You can follow the installation instructions for your operating system here ?
https://docs.docker.com/get-docker/.
Additionally, if you wish to use TensorFlow, you must have a Jupyter notebook file. By visiting the Jupyter homepage and selecting "New," you can make a new Jupyter notebook if you don't already have one.
Methods
There are a number of different ways you can utilize Docker to start a TensorFlow Jupyter notebook.
These are the three common ways to do this which we will be discussing here ?
-
Using Docker Pull command
-
Using a Custom Docker Image
Let us explore these three methods in detail with some examples to solidify our understanding.
Using Docker Pull command
The docker pull command is used to download a Docker image from a registry. This can be useful when you want to start a TensorFlow Docker Jupyter notebook because it allows you to pull a pre-built image that has TensorFlow and Jupyter already installed, rather than building the image yourself.
Example
Here is an example of how we can use the Docker Pull command to start a Jupyter notebook server with TensorFlow.
Step 1 ? Pull the TensorFlow Jupyter notebook Docker image from Docker Hub by running the following command in your terminal ?
$ docker pull tensorflow/tensorflow:latest-jupyter
Output
latest-jupyter: Pulling from tensorflow/tensorflow
eaead16dc43b: Pulling fs layer
83bb66f4018d: Pulling fs layer
a9d243755566: Pulling fs layer
38d8f03945ed: Waiting
0e62e78ef96b: Pulling fs layer
311604e9ab28: Waiting
584c5149ce07: Waiting
3b5c5b94152b: Waiting
bc4c0cbbecee: Pulling fs layer
e54d9b2b9c14: Waiting
744251fdb607: Pull complete
4b8f13a1718e: Pull complete
576cd80cf2ef: Pull complete
ab9e5d943e8a: Pull complete
948afa4f3678: Pull complete
2881ce411453: Pull complete
3b726e62f5fc: Pull complete
2f02f34d5aa5: Pull complete
b294ff4151bd: Pull complete
48f3a326b505: Pull complete
72ab8332d21f: Pull complete
d6381c50d9a3: Pull complete
77237dfb2f16: Pull complete
Digest: sha256:553be1359899095780cfcfc5bf1c26bca487a606f07a37ba31e1808a98072785
Status: Downloaded newer image for tensorflow/tensorflow:latest-jupyter
docker.io/tensorflow/tensorflow:latest-jupyter
Step 2 ? Run the TensorFlow Jupyter notebook Docker container by using the following command ?
$ docker run -it -p 8888:8888 tensorflow/tensorflow:latest-jupyter
This command will start the TensorFlow Jupyter notebook in a Docker container and expose port 8888.
Output
docker run -it -p 8888:8888 tensorflow/tensorflow:latest-jupyter
[I 12:23:48.212 NotebookApp] Writing notebook server cookie secret to /root/.local/share/jupyter/runtime/notebook_cookie_secret
jupyter_http_over_ws extension initialized. Listening on /http_over_websocket
[I 12:23:50.824 NotebookApp] Serving notebooks from local directory: /tf
[I 12:23:50.825 NotebookApp] Jupyter Notebook 6.5.2 is running at:
[I 12:23:50.825 NotebookApp] http://2f07aa29bf45:8888/?token=d2b59435738257715a8a74b73d6c6f13e305008d4451c937
[I 12:23:50.825 NotebookApp] or http://127.0.0.1:8888/?token=d2b59435738257715a8a74b73d6c6f13e305008d4451c937
[I 12:23:50.826 NotebookApp] Use Control-C to stop this server and shut down all kernels (twice to skip confirmation).
[C 12:23:50.845 NotebookApp]
To access the notebook, open this file in a browser:
file:///root/.local/share/jupyter/runtime/nbserver-1-open.html
Or copy and paste one of these URLs:
http://2f07aa29bf45:8888/?token=d2b59435738257715a8a74b73d6c6f13e305008d4451c937
or http://127.0.0.1:8888/?token=d2b59435738257715a8a74b73d6c6f13e305008d4451c937
[I 12:24:09.148 NotebookApp] 302 GET / (172.17.0.1) 3.370000ms
[I 12:24:09.212 NotebookApp] 302 GET /tree? (172.17.0.1) 2.230000ms
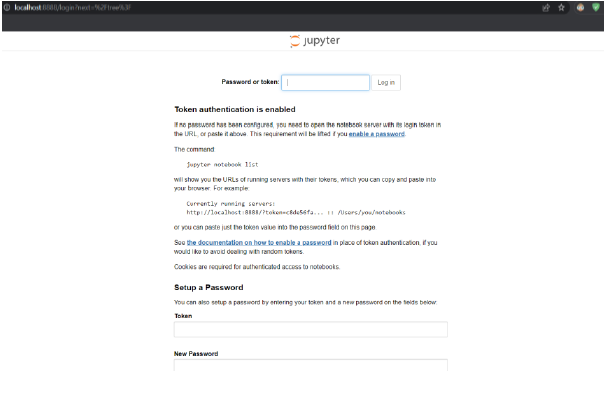
Step 3 ? Once the TensorFlow Jupyter notebook is up and running, you can access it by visiting http://localhost:8888 in your web browser ?
Step 3 ? To stop the TensorFlow Jupyter notebook, press "Ctrl+C" in the terminal window where the Docker container is running.
Output
^C[I 12:42:41.867 NotebookApp] interrupted
Serving notebooks from local directory: /tf 0 active kernels Jupyter Notebook 6.5.2 is running at: http://2f07aa29bf45:8888/?token=d2b59435738257715a8a74b73d6c6f13e305008d4451c937 or http://127.0.0.1:8888/?token=d2b59435738257715a8a74b73d6c6f13e305008d4451c937 Shutdown this notebook server (y/[n])? y [C 12:42:43.742 NotebookApp] Shutdown confirmed [I 12:42:43.766 NotebookApp] Shutting down 0 kernels [I 12:42:43.804 NotebookApp] Shutting down 0 terminals
Step 4 ? To start the TensorFlow Jupyter notebook again, you can use the same Docker run command as before ?
$ docker run -it -p 8888:8888 tensorflow/tensorflow:latest-jupyter
Using a Custom Docker Image
You can make your own Docker image to customize the environment for your TensorFlow Jupyter notebook. You must write a Dockerfile that details the base image and any additional dependencies you wish to include in order to accomplish this.
To create a custom Docker image, you will need to create a Dockerfile that defines your image.
Example
Here is an example of a Dockerfile that installs TensorFlow and Jupyter.
Step 1 ? Create a new directory for your project and navigate to it.
Step 2 ? Create a file called "Dockerfile" in the project directory with the following content ?
FROM python:3.8
RUN pip install tensorflow
RUN pip install jupyter
These commands are used to install TensorFlow and Jupyter from the Python 3.8 version.
Step 2 ? To build the image, you can run the following command in your terminal ?
$ docker build -t mytensorflow .
The build is going to take a while to build this Tensorflow image. The result will be an image called "mytensorflow."
Output
[+] Building 465.6s (7/7) FINISHED
=> [internal] load build definition from Dockerfile 0.1s
=> => transferring dockerfile: 107B 0.0s
=> [internal] load .dockerignore 0.0s
=> => transferring context: 2B 0.0s
=> [internal] load metadata for docker.io/library/python:3.8 2.9s
=> CACHED [1/3] FROM docker.io/library/python:3.8@sha256:3a519327ab069a4e356a8aa279e80b7ef6270e17c5df1493dd0a5b2817 0.0s
=> [2/3] RUN pip install tensorflow 311.0s
=> [3/3] RUN pip install jupyter 75.9s
=> exporting to image 75.4s
=> => exporting layers 75.3s
=> => writing image sha256:14ff4caa7e8b3d2fef9e2a911839f682f720873bd35b8402efda52e8c8ff754f 0.0s
=> => naming to docker.io/library/mytensorflow 0.0s
Use 'docker scan' to run Snyk tests against images to find vulnerabilities and learn how to fix them
Step 3 ? Run the following command in the terminal to launch a Jupyter notebook server using this image ?
$ docker run -it -p 8888:8888 mytensorflow
If this command does not seem to work, try the below command ?
$ docker run -it -p 8888:8888 tensorflow/tensorflow:latest-jupyter
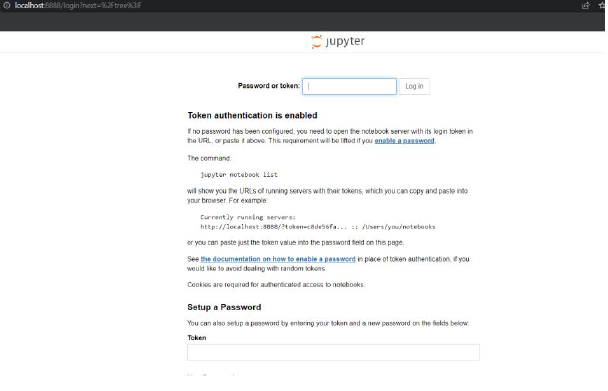
Step 4 ? If the former command works, you should see a link printed in the terminal, and in case of the alternate command, use this link to start TensorFlow Jupyter Notebook in a new window ?
http://localhost:8888
Conclusion
In this article, we explored how to start a TensorFlow Docker Jupyter notebook. We looked at three different methods for starting a TensorFlow Jupyter notebook, including using the TensorFlow Docker image, creating a custom Docker image, and using Docker Compose. With any of these methods, you can easily set up a TensorFlow Jupyter notebook and start working with TensorFlow in a Docker container.

2K+ Views
