
Article Categories
- All Categories
-
 Data Structure
-
 Networking
-
 RDBMS
RDBMS
-
 Operating System
-
 Java
Java
-
 MS Excel
-
 iOS
iOS
-
 HTML
HTML
-
 CSS
CSS
-
 Android
-
 Python
-
 C Programming
-
 C++
C++
-
 C#
C#
-
 MongoDB
-
 MySQL
MySQL
-
 Javascript
-
 PHP
PHP
-
 Economics & Finance
How to Remove Duplicate Rows But Keep the One With Latest Date in Excel?
Effective cleaning and organisation of your datasets is crucial since duplicate data can muddle your research and make it inaccurate. This step-by-step tutorial will show you how to find duplicate rows in an Excel spreadsheet and remove them while keeping the most current entry based on a date column.
It will provide you the abilities to organise your data and guarantee the correctness of your analysis, regardless of whether you're working with sales records, personnel data, or any other form of dataset. You'll be able to confidently manage duplicates and retain only the most pertinent information at the end of this session, which will help you save time and improve the quality of your data. So let's get started and discover how to effectively remove duplicate rows from Microsoft Excel while maintaining the most recent date!
Remove Duplicate Rows But Keep the One With Latest Date
Here we will first create a VBA module and then run it to complete the task. So let us see a simple process to know how to remove duplicate rows but keep the one with the latest date in Excel.
Step 1
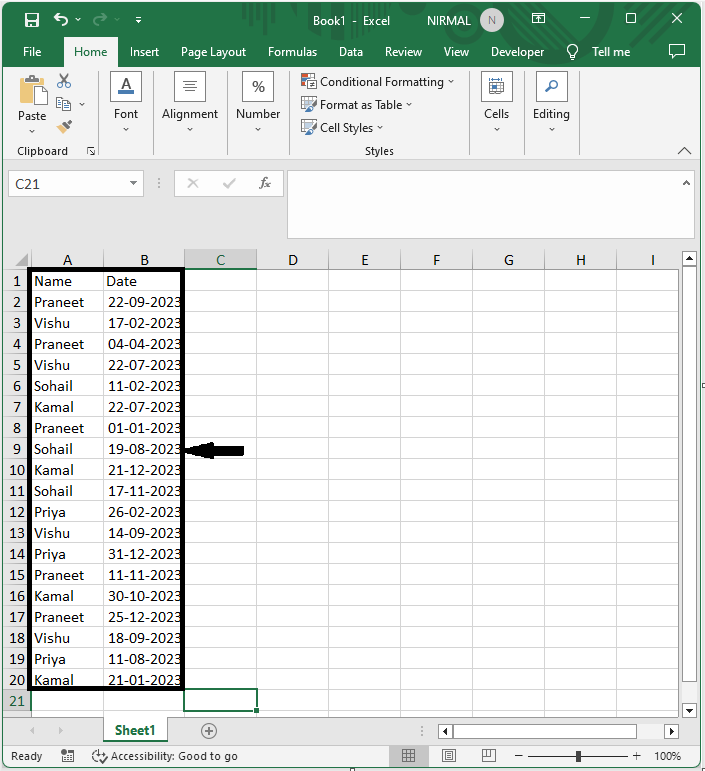
Consider an Excel sheet where you have duplicate rows but with different dates, similar to the below image.
First, right-click the sheet name or select View Code to open the VBA application.
Right-click > View Code.
Step 2
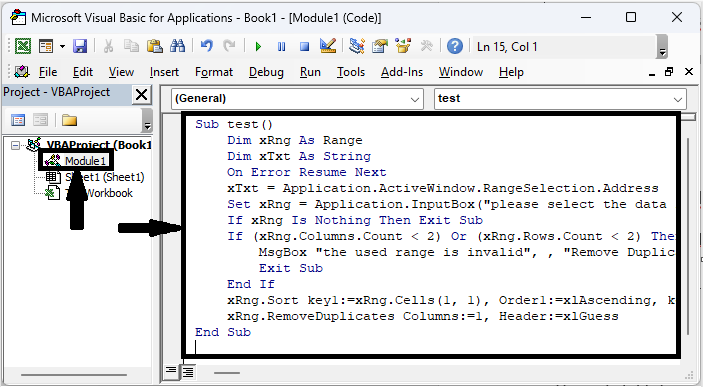
Then click on Insert and select Module, then copy the below code into the text box.
Insert > Module > Copy.
Code
Sub test()
   Dim xRng As Range
   Dim xTxt As String
   On Error Resume Next
   xTxt = Application.ActiveWindow.RangeSelection.Address
   Set xRng = Application.InputBox("please select the data range:", "Remove Duplicate Latest", xTxt, , , , , 8)
   If xRng Is Nothing Then Exit Sub
   If (xRng.Columns.Count < 2) Or (xRng.Rows.Count < 2) Then
      MsgBox "the used range is invalid", , "Remove Duplicate Rows"
      Exit Sub
   End If
   xRng.Sort key1:=xRng.Cells(1, 1), Order1:=xlAscending, key2:=xRng.Cells(1, 2), Order2:=xlDescending, Header:=xlGuess
   xRng.RemoveDuplicates Columns:=1, Header:=xlGuess
End Sub
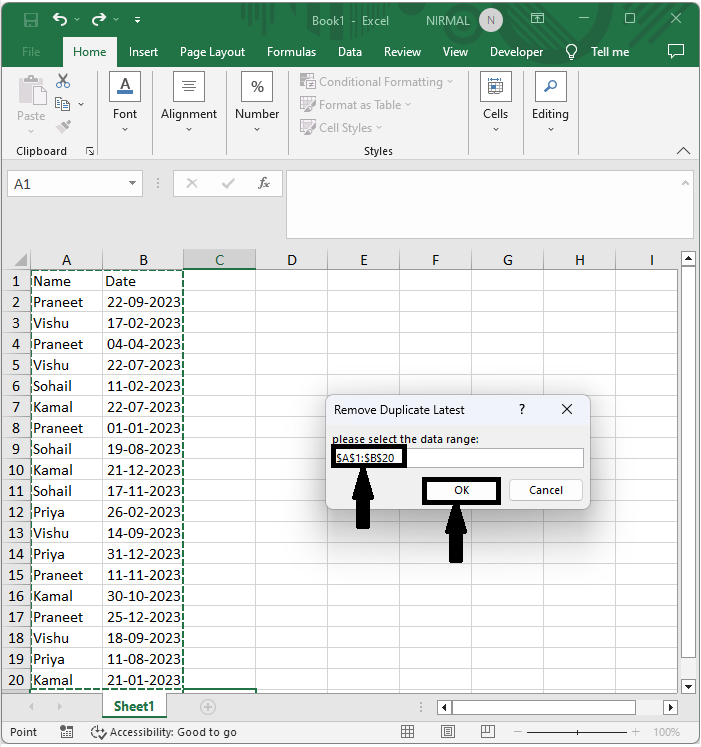
Step 3
Then click F5 to run the module. Then select the range of cells and click OK to complete the task.
F5 > Select Cells > Ok.
This is how you can remove duplicate rows based on dates in Excel.
Conclusion
In this tutorial, we have used a simple example to demonstrate how to remove duplicate rows but keep the one with the latest date in Excel to highlight a particular set of data.

2K+ Views
