
Article Categories
- All Categories
-
 Data Structure
-
 Networking
-
 RDBMS
RDBMS
-
 Operating System
-
 Java
Java
-
 MS Excel
-
 iOS
iOS
-
 HTML
HTML
-
 CSS
CSS
-
 Android
-
 Python
-
 C Programming
-
 C++
C++
-
 C#
C#
-
 MongoDB
-
 MySQL
MySQL
-
 Javascript
-
 PHP
PHP
-
 Economics & Finance
How to Move Specific Files from One Folder to Another in Excel?
Effective file management is essential for data organisation and workflow optimisation. Using Excel's ability, you may automate file management operations like transferring particular files between folders, which will save you time and effort.
We will examine a step-by-step procedure to accomplish this goal in this lesson. We will use some VBA (Visual Basic for Applications) programming as well as Excel's built-in features. If you're unfamiliar with VBA, don't worry; we'll walk you through the procedure with simple explanations and examples.
Move Specific Files from One Folder to Another
Here, we will first create a VBA module and then run it to complete the task. So let us see a simple process to learn how you can move specific files from one folder to another in Excel.
Step 1
Consider any Excel workbook. First, right-click on the sheet name and select View Code to open the VBA application.
Right Click > View Code.
Then click on Insert and select Module, then copy the below code into the text box.
Insert > Module > Copy.
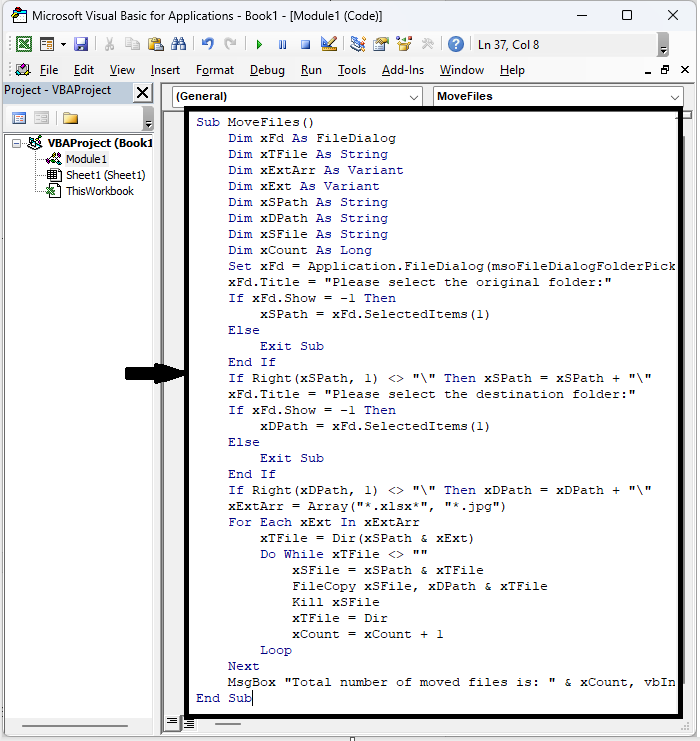
Code
Sub MoveFiles()
   Dim xFd As FileDialog
   Dim xTFile As String
   Dim xExtArr As Variant
   Dim xExt As Variant
   Dim xSPath As String
   Dim xDPath As String
   Dim xSFile As String
   Dim xCount As Long
   Set xFd = Application.FileDialog(msoFileDialogFolderPicker)
   xFd.Title = "Please select the original folder:"
   If xFd.Show = -1 Then
      xSPath = xFd.SelectedItems(1)
   Else
      Exit Sub
   End If
   If Right(xSPath, 1) <> "" Then xSPath = xSPath + ""
   xFd.Title = "Please select the destination folder:"
   If xFd.Show = -1 Then
      xDPath = xFd.SelectedItems(1)
   Else
      Exit Sub
   End If
   If Right(xDPath, 1) <> "" Then xDPath = xDPath + ""
   xExtArr = Array("*.xlsx*", "*.jpg")
   For Each xExt In xExtArr
      xTFile = Dir(xSPath & xExt)
      Do While xTFile <> ""
         xSFile = xSPath & xTFile
         FileCopy xSFile, xDPath & xTFile
         Kill xSFile
         xTFile = Dir
         xCount = xCount + 1
      Loop
   Next
   MsgBox "Total number of moved files is: " & xCount, vbInformation, "Move Specific Files"
End Sub
In the above code, "*.xlsx*" and "*.jpg" are the file types you want to move; you can change them to others or add other file types as you need.
Step 2
Then click F5 to run the module. Then select the source folder and click OK.
F5 > Source Folder > Ok.

Step 3
Then select the destination folder and click OK.
Destination Folder > Ok.

This is how you can move specific files from one folder to another in Excel.
Conclusion
In this tutorial, we have used a simple example to demonstrate how you can move specific files from one folder to another in Excel to highlight a particular set of data.

2K+ Views
