
Article Categories
- All Categories
-
 Data Structure
-
 Networking
-
 RDBMS
RDBMS
-
 Operating System
-
 Java
Java
-
 MS Excel
-
 iOS
iOS
-
 HTML
HTML
-
 CSS
CSS
-
 Android
-
 Python
-
 C Programming
-
 C++
C++
-
 C#
C#
-
 MongoDB
-
 MySQL
MySQL
-
 Javascript
-
 PHP
PHP
-
 Economics & Finance
How to add a Submit button after the end of the tableview using Swift?
To add a submit button at the end of a table view, we can make use of table view footers. Let’s see this with help of an example where we’ll add a footer view to our table, and inside the table, we will add code for adding button at the bottom of the table view.
Create a new project first, then inside the view controller add the following code which will initialize the table, add a section and a few rows to the table.
func initTableView() {
   let tableView = UITableView()
   tableView.frame = self.view.frame
   tableView.dataSource = self
   tableView.delegate = self
   tableView.backgroundColor = colorLiteral(red: 0.6000000238, green: 0.6000000238, blue: 0.6000000238, alpha: 1)
   tableView.register(UITableViewCell.self, forCellReuseIdentifier: "cell")
   self.view.addSubview(tableView)
}
func numberOfSections(in tableView: UITableView) -> Int {
   return 1
}
func tableView(_ tableView: UITableView, numberOfRowsInSection section: Int) -> Int {
   return 2
}
func tableView(_ tableView: UITableView, cellForRowAt indexPath: IndexPath) -> UITableViewCell {
   let cell = tableView.dequeueReusableCell(withIdentifier: "cell")
   cell?.layer.backgroundColor = colorLiteral(red: 0.2392156869, green:
   0.6745098233, blue: 0.9686274529, alpha: 1)
   cell?.textLabel?.text = "cell at \(indexPath.row)"
   return cell!
}
Now, call the first function, initTableView() inside the view did a load or viewDidAppear method of your view controller.
Now add the following code which will tell the table to give some height to its rows and footer.
func tableView(_ tableView: UITableView, heightForRowAt indexPath: IndexPath) -> CGFloat {
   return 60
}
func tableView(_ tableView: UITableView, heightForFooterInSection section: Int) -> CGFloat {
   return 100
}
Make sure you have confirmed your class to UITableViewDataSource and UITableViewDelegate, otherwise these methods above will appear as an error.
Now, let’s add a footer view and a button to the footer view.
func tableView(_ tableView: UITableView, viewForFooterInSection section: Int) -> UIView? {
   let footerView = UIView()
   footerView.backgroundColor = colorLiteral(red: 0.9686274529, green:
   0.78039217, blue: 0.3450980484, alpha: 1)
   footerView.frame = CGRect(x: 0, y: 0, width: self.view.frame.width, height:
   100)
   let button = UIButton()
   button.frame = CGRect(x: 20, y: 10, width: 300, height: 50)
   button.setTitle("CustomButton", for: .normal)
   button.setTitleColor( colorLiteral(red: 0, green: 0, blue: 0, alpha: 1), for: .normal)
   button.backgroundColor = colorLiteral(red: 0.721568644, green:
   0.8862745166, blue: 0.5921568871, alpha: 1)
   footerView.addSubview(button)
   return footerView
}
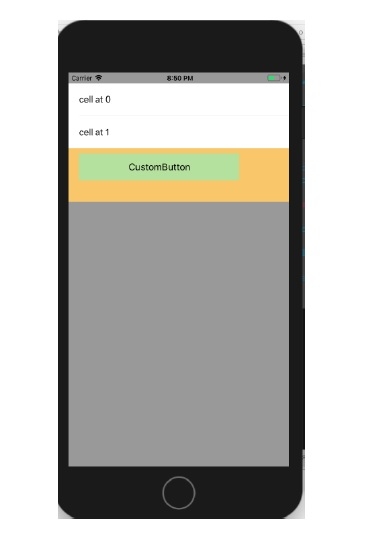
When we run the above code on our device, below is the result that’s produced. You can add a custom action to the button and customize it according to requirement.

2K+ Views
