
Article Categories
- All Categories
-
 Data Structure
-
 Networking
-
 RDBMS
RDBMS
-
 Operating System
-
 Java
Java
-
 MS Excel
-
 iOS
iOS
-
 HTML
HTML
-
 CSS
CSS
-
 Android
-
 Python
-
 C Programming
-
 C++
C++
-
 C#
C#
-
 MongoDB
-
 MySQL
MySQL
-
 Javascript
-
 PHP
PHP
-
 Economics & Finance
Dynamically change TableView Cell height in Swift
To change the height of tableView cell in ios dynamically, i.e resizing the cell according to the content available, we’ll need to make use of automatic dimension property. We’ll see this with the help of an sample project.
Create an empty project and go to it’s viewController class, conform it to UITableViewDataSource and UITableViewDelegate.
Now, In the below code, we will first create a table, then register a cell for that table, and add some table properties.
We’ll set the table view delegate and table view datasource.
Finally we’ll add the table view to view. Then we’ll call this function inside the viewDidLoad method of our view controller.
Note: We have set a property called estimatedRowHeight
func initTableView() {
   let tableView = UITableView()
   tableView.frame = self.view.frame
   tableView.dataSource = self
   tableView.delegate = self
   tableView.backgroundColor = colorLiteral(red: 0.6000000238, green: 0.6000000238, blue: 0.6000000238, alpha: 1)
   tableView.register(UITableViewCell.self, forCellReuseIdentifier: "cell")
   tableView.estimatedRowHeight = UITableView.automaticDimension
   self.view.addSubview(tableView)
}
Now, this code will add a table to our view, we also need to tell the table how many sections and rows we want in our code.
func numberOfSections(in tableView: UITableView) -> Int {
   return 1
}
func tableView(_ tableView: UITableView, numberOfRowsInSection section: Int) -> Int {
   return 5
}
func numberOfSections(in tableView: UITableView) -> Int {
   return 1
}
func tableView(_ tableView: UITableView, numberOfRowsInSection section: Int) -> Int {
   return 5
}
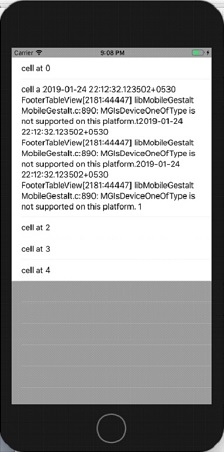
This code will create some big line of text at the second row in our table view so that it gets the height according to content size.
Note: The UITableViewCell has a label property by default, and a label has 1 line of length by default, so we need to change that to see automatic dimension work.
Now we need to tell the table what height its cell should have.
func tableView(_ tableView: UITableView, heightForRowAt indexPath: IndexPath) -> CGFloat {
   return UITableView.automaticDimension
}
When we run the above code we get the following result.

7K+ Views
