- GraphQL - Home
- GraphQL - Introduction
- GraphQL - Environment Setup
- GraphQL - Architecture
- GraphQL - Application Components
- GraphQL - Example
- GraphQL - Type System
- GraphQL - Schema
- GraphQL - Resolver
- GraphQL - Query
- GraphQL - Mutation
- GraphQL - Validation
- GraphQL - JQuery Integration
- GraphQL - React Integration
- GraphQL - Apollo Client
- GraphQL - Authenticating Client
- GraphQL - Caching
GraphQL - Quick Guide
GraphQL - Introduction
GraphQL is an open source server-side technology which was developed by Facebook to optimize RESTful API calls. It is an execution engine and a data query language. In this chapter, we discuss about the advantages of using GraphQL.
Why GraphQL
RESTful APIs follow clear and well-structured resource-oriented approach. However, when the data gets more complex, the routes get longer. Sometimes it is not possible to fetch data with a single request. This is where GraphQL comes handy. GraphQL structures data in the form of a graph with its powerful query syntax for traversing, retrieving, and modifying data.
The following are advantages of using GraphQL query Language −
Ask for what you want − and get it
Send a GraphQL query to your API and get exactly what you need. GraphQL queries always return predictable results. Applications using GraphQL are fast and stable. Unlike Restful services, these applications can restrict data that should be fetched from the server.
The following example will help you understand this better −
Let us consider a business object Student with the attributes id, firstName, lastName and collegeName. Suppose a mobile application needs to fetch only the firstName and id. If we design a REST endpoint like /api/v1/students, it will end up fetching data for all the fields for a student object. This means, data is over fetched by the RESTful service. This problem can be solved by using GraphQL.
Consider the GraphQL query given below −
{
   students {
      id
      firstName
   }
}
This will return values only for the id and firstname fields. The query will not fetch values for other attributes of the student object. The response of the query illustrated above is as shown below −
{
   "data": {
      "students": [
         {
            "id": "S1001",
            "firstName": "Mohtashim"
         },
         {
            "id": "S1002",
            "firstName": "Kannan"
         }
      ]
   }
}
Get many resources in a single request
GraphQL queries help to smoothly retrieve associated business objects, while typical REST APIs require loading from multiple URLs. GraphQL APIs fetch all the data your application need in a single request. Applications using GraphQL can be quick even on slow mobile network connections.
Let us consider one more business object, College which has the attributes: name and location. The Student business object has an association relationship with the College object. If we were to use a REST API in order to fetch the details of students and their college, we will end up making two requests to the server like /api/v1/students and /api/v1/colleges. This will lead to under fetching of data with each request. So mobile applications are forced to make multiple calls to the server to get the desired data.
However, the mobile application can fetch details for both Student and College objects in a single request by using GraphQL.
The following is a GraphQL query to fetch data −
{
   students{
      id
      firstName
      lastName
      college{
         name
         location
      }
   }
}
The output of the above query contains exactly those fields we have requested for as shown below −
{
   "data": {
      "students": [
         {
            "id": "S1001",
            "firstName": "Mohtashim",
            "lastName": "Mohammad",
            "college": {
               "name": "CUSAT",
               "location": "Kerala"
            }
         },

         {
            "id": "S1002",
            "firstName": "Kannan",
            "lastName": "Sudhakaran",
            "college": {
               "name": "AMU",
               "location": "Uttar Pradesh"
            }
         },

         {
            "id": "S1003",
            "firstName": "Kiran",
            "lastName": "Panigrahi",
            "college": {
               "name": "AMU",
               "location": "Uttar Pradesh"
            }
         }
      ]
   }
}
Describe whats possible with a type system
GraphQL is strongly typed and the queries are based on fields and their associated data types. If there is type mismatch in a GraphQL query, server applications return clear and helpful error messages. This helps in smooth debugging and easy detection of bugs by client applications. GraphQL also provides client side libraries that can help in reducing explicit data conversion and parsing.
An example of the Student and College data types is given below −
type Query {
   students:[Student]
}

type Student {
   id:ID!
   firstName:String
   lastName:String
   fullName:String
   college:College
}

type College {
   id:ID!
   name:String
   location:String
   rating:Float
   students:[Student]
}
Move faster with powerful developer tools
GraphQL provides rich developer tools for documentation and testing queries. GraphiQL is an excellent tool which generates documentation of the query and its schema. It also gives a query editor to test GraphQL APIs and intelligent code completion capability while building queries.
GraphQL - Environment Setup
In this chapter, we will learn about the environmental setup for GraphQL. To execute the examples in this tutorial you will need the following −
A computer running Linux, macOS, or Windows.
A web browser, preferably the latest version of Google Chrome.
A recent version of Node.js installed. The latest LTS version is recommended.
Visual Studio Code with extension GraphQL for VSCode installed or any code editor of your choice.
How to Build a GraphQL server with Nodejs
We will go through a detailed step-wise approach to build GraphQL server with Nodejs as shown below −
Step 1 − Verify Node and Npm Versions
After installing NodeJs, verify the version of node and npm using following commands on the terminal −
C:\Users\Admin>node -v
v8.11.3

C:\Users\Admin>npm -v
5.6.0
Step 2 − Create a Project Folder and Open in VSCode
The root folder of project can be named as test-app.
Open the folder using visual studio code editor by using the instructions below −
C:\Users\Admin>mkdir test-app
C:\Users\Admin>cd test-app
C:\Users\Admin\test-app>code.
Step 3 − Create package.json and Install the Dependencies
Create a package.json file which will contain all the dependencies of the GraphQL server application.
{
   "name": "hello-world-server",
   "private": true,
   "scripts": {
      "start": "nodemon --ignore data/ server.js"
   },

   "dependencies": {
      "apollo-server-express": "^1.4.0",
      "body-parser": "^1.18.3",
      "cors": "^2.8.4",
      "express": "^4.16.3",
      "graphql": "^0.13.2",
      "graphql-tools": "^3.1.1"
   },

   "devDependencies": {
      "nodemon": "1.17.1"
   }
}
Install the dependencies by using the command as given below −
C:\Users\Admin\test-app>npm install
Step 4 − Create Flat File Database in Data Folder
In this step, we use flat files to store and retrieve data. Create a folder data and add two files students.json and colleges.json.
Following is the colleges.json file −
[
   {
      "id": "col-101",
      "name": "AMU",
      "location": "Uttar Pradesh",
      "rating":5.0
   },

   {
      "id": "col-102",
      "name": "CUSAT",
      "location": "Kerala",
      "rating":4.5
   }
]
Following is the students.json file −
[
   {
      "id": "S1001",
      "firstName":"Mohtashim",
      "lastName":"Mohammad",
      "email": "mohtashim.mohammad@tutorialpoint.org",
      "password": "pass123",
      "collegeId": "col-102"
   },

   {
      "id": "S1002",
      "email": "kannan.sudhakaran@tutorialpoint.org",
      "firstName":"Kannan",
      "lastName":"Sudhakaran",
      "password": "pass123",
      "collegeId": "col-101"
   },

   {
      "id": "S1003",
      "email": "kiran.panigrahi@tutorialpoint.org",
      "firstName":"Kiran",
      "lastName":"Panigrahi",
      "password": "pass123",
      "collegeId": "col-101"
   }
]
Step 5 − Create a Data Access Layer
We need to create a datastore that loads the data folder contents. In this case, we need collection variables, students and colleges. Whenever the application needs data, it makes use of these collection variables.
Create file db.js with in the project folder as follows −
const { DataStore } = require('notarealdb');

const store = new DataStore('./data');

module.exports = {
   students:store.collection('students'),
   colleges:store.collection('colleges')
};
Step 6 − Create Schema File, schema.graphql
Create a schema file in the current project folder and add the following contents −
type Query  {
   test: String
}
Step 7 − Create Resolver File, resolvers.js
Create a resolver file in the current project folder and add the following contents −
const Query = {
   test: () => 'Test Success, GraphQL server is up & running !!'
}
module.exports = {Query}
Step 8 − CreateServer.jsand Configure GraphQL
Create a server file and configure GraphQL as follows −
const bodyParser = require('body-parser');
const cors = require('cors');
const express = require('express');
const db = require('./db');

const port = process.env.PORT || 9000;
const app = express();

const fs = require('fs')
const typeDefs = fs.readFileSync('./schema.graphql',{encoding:'utf-8'})
const resolvers = require('./resolvers')

const {makeExecutableSchema} = require('graphql-tools')
const schema = makeExecutableSchema({typeDefs, resolvers})

app.use(cors(), bodyParser.json());

const  {graphiqlExpress,graphqlExpress} = require('apollo-server-express')
app.use('/graphql',graphqlExpress({schema}))
app.use('/graphiql',graphiqlExpress({endpointURL:'/graphql'}))

app.listen(
   port, () => console.info(
      `Server started on port ${port}`
   )
);
Step 9 − Run the Application and Test with GraphiQL
Verify the folder structure of project test-app as follows −
test-app /
   -->package.json
   -->db.js
   -->data
      students.json
      colleges.json
   -->resolvers.js
   -->schema.graphql
   -->server.js
Run the command npm start as given below −
C:\Users\Admin\test-app>npm start
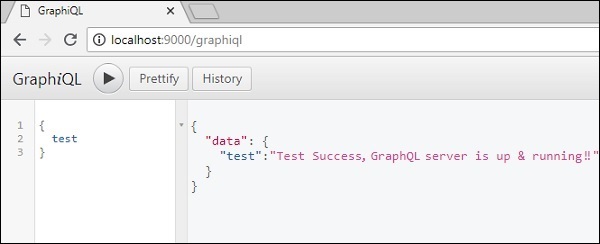
The server is running in 9000 port, so we can test the application using GraphiQL tool. Open the browser and enter the URL http://localhost:9000/graphiql. Type the following query in the editor −
{
   Test
}
The response from the server is given below −
{
   "data": {
      "test": "Test Success, GraphQL server is running !!"
   }
}
GraphQL - Architecture
GraphQL is a specification that describes the behavior of a GraphQL server. It is a set of guidelines on how requests and responses should be handled like supported protocols, format of the data that can be accepted by the server, format of the response returned by the server, etc. The request made by a client to the GraphQL server is called a Query. Another important concept of GraphQL is its transport layer agnostics. It can be used with any available network protocol like TCP, websocket or any other transport layer protocol. It is also neutral to databases, so you can use it with relational or NoSQL databases.
GraphQL Server can be deployed by using any of the three methods listed below −
- GraphQL server with connected database
- GraphQL server that integrates existing systems
- Hybrid approach
GraphQL Server with Connected Database
This architecture has a GraphQL Server with an integrated database and can often be used with new projects. On the receipt of a Query, the server reads the request payload and fetches data from the database. This is called resolving the query. The response returned to the client adheres to the format specified in the official GraphQL specification.
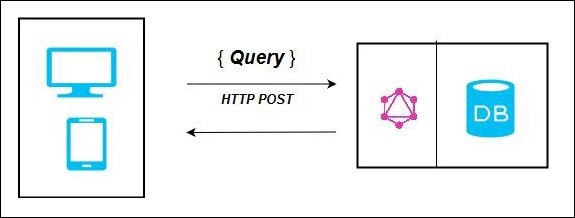
In the above diagram, GraphQL server and the database are integrated on a single node. The client (desktop/mobile) communicates with GraphQL server over HTTP. The server processes the request, fetches data from the database and returns it to the client.
GraphQL Server Integrating Existing Systems
This approach is helpful for companies which have legacy infrastructure and different APIs. GraphQL can be used to unify microservices, legacy infrastructure and third-party APIs in the existing system.
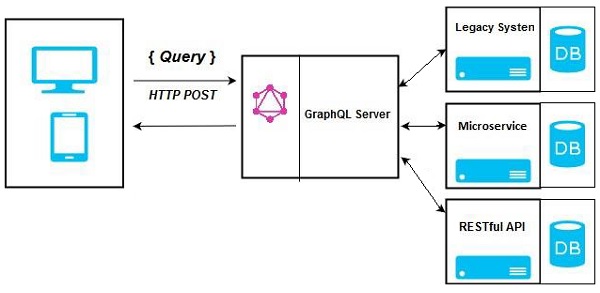
In the above diagram, a GraphQL API acts as an interface between the client and the existing systems. Client applications communicate with the GraphQL server which in turn resolves the query.
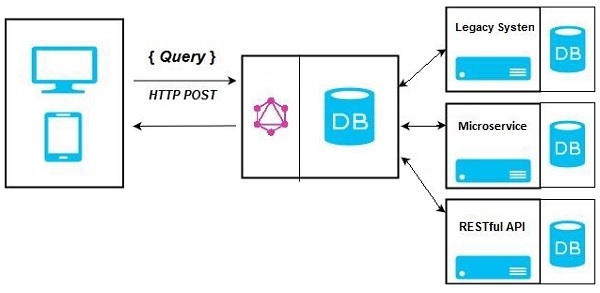
Hybrid Approach
Finally, we can combine the above two approaches and build a GraphQL server. In this architecture, the GraphQL server will resolve any request that is received. It will either retrieve data from connected database or from the integrated APIs. This is represented in the below figure −
GraphQL - Application Components
This chapter discusses different GraphQL components and the way they communicate with each other. The entire application components can be distinguished as below −
- Server-side Components
- Client-side Components
Server-Side Components
GraphQL server forms the core component on the server side and allows to parse the queries coming from GraphQL client applications. Apollo Server is most commonly used implementation of GraphQL specification. Other server programming components include the following −
| Sr.No. | Server Essentials & Description |
|---|---|
| 1 | Schema A GraphQL schema is at the center of any GraphQL server implementation and describes the functionality available to the clients which connect to it. |
| 2 | Query A GraphQL query is the client application request to retrieve data from database or legacy API's. |
| 3 | Resolver Resolvers provide the instructions for turning a GraphQL operation into data. They resolve the query to data by defining resolver functions. |
Client-side Components
Given below are the client-side components −
| Sr.No. | Tool & Description |
|---|---|
| 1 | GraphiQL Browser based interface for editing and testing GraphQL queries and mutations. |
| 2 | ApolloClient Best tool to build GraphQL client applications. Integrates well with all javascript front-end. |
The below diagram shows a Client-Server architecture. The web server is built on NodeJs and Express framework. A request is made to the Apollo GraphQL Server by ReactJS application (built using Apollo Client library) or GraphiQL browser application. The query will be parsed and validated against a schema defined in the server. If the request schema passes the validation, then the associated resolver functions will be executed. The resolver will contain code to fetch data from an API or a database.

GraphQL - Example
In this chapter, we will create a simple API that returns a greeting message, HelloWorld, and access it using GraphiQL.
Example
This example is based on NodeJS, Express and Apollo server. We will learn to put all the concepts together with the following steps −
Step 1 − Setting up Express
ExpressJS is a web application framework that helps to build websites and web applications. In this example, we will build a GraphQL API on top of the Express framework.
Next step is to create a folder hello-world-server and navigate to the same folder from the terminal. Add package.json, and give a name to the package. Since this package is only used internally, we can declare it private.
{
   "name":"hello-world-server",
   "private":true
}
Install the dependencies for Express server as shown below −
C:\Users\Admin\hello-world-server>npm install express body-parser cors
body-parser is a middleware package which helps Express to handle HTTP Post requests efficiently. cors is another middleware package that handles cross-origin resource sharing.
Create a server.js file within the project folder and type the following in it −
const bodyParser = require('body-parser')
   const cors = require('cors')
   const express = require('express')
   const port = process.env.PORT|| 9000
   const app = express()

   //register middleware
   app.use(bodyParser.json() , cors())
   app.listen(port, () =>  console.log(`server is up and running at ${port}`)
To verify if the Express server is up and running, execute the following code in the terminal window −
C:\Users\Admin\hello-world-server>node server.js
The following output is displayed in the server console. This shows that the express server is running on port 9000.
server is up and running at 9000
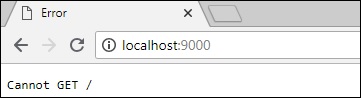
If you open the browser and typehttp://localhost:9000, you will get the following screen −
To stop the server, pressCtrl + C.
Step 2 − Install GraphQL and Apollo Server
Now that Express is configured, the next step is to download the following GraphQL dependencies −
- graphql
- graphql-tools
- apollo-server-express@1
We shall use Apollo server v1.0 as it is a stable release. Type the following commands to install these dependencies −
C:\Users\Admin\hello-world-server>npm install graphql graphql-tools apollo-server-express@1
We can verify if these dependencies are installed successfully by checking thepackage.jsonfile that we created previously.
{
   "name": "hello-world-server",
   "private": true,

   "dependencies": {
      "apollo-server-express": "^1.4.0",
      "body-parser": "^1.18.3",
      "cors": "^2.8.4",
      "express": "^4.16.3",
      "graphql": "^0.13.2",
      "graphql-tools": "^3.1.1"
   }
}
Step 3 − Define the Schema
A GraphQL schema defines what kind of object can be fetched from a service, and what fields it has. The schema can be defined using GraphQL Schema Definition Language. Now, add the following code snippet in the server.js file −
// Adding Type Definitions
const typeDefinition = `
   type Query  {
      greeting: String
   }
Here, the query contains a greeting attribute that returns a string value.
Step 4 − Create a Resolver
The first step in creating a resolver is to add some code to process the request for greeting field. This is specified in a resolver. The structure of the resolver function must match the schema. Add the following code snippet in the server.jsfile.
// Adding resolver
const  resolverObject = {
   Query : {
      greeting: () => 'Hello GraphQL  From TutorialsPoint !!'
   }
}
The second step is to bind the schema and resolver using makeExecutableSchema. This function is pre-defined in the graphql-tools module. Add the following code snippet in theserver.jsfile.
const {makeExecutableSchema} = require('graphql-tools')
const schema = makeExecutableSchema({typeDefs:typeDefinition, resolvers:resolverObject})
Step 5 − Define Routes to Fetch Data from ReactJS/GraphiQL Application
Add the following code snippet in the server.js file −
const {graphqlExpress, graphiqlExpress} = require('apollo-server-express')

   //create routes for graphql and graphiql
   app.use('/graphql',graphqlExpress({schema}))

   app.use('/graphiql',graphiqlExpress({endpointURL:'/graphql'}))
The graphqlExpress function helps to register the route http://localhost:9000/graphql. The ReactJS application can use this endpoint to query data. Similarly, the graphqliExpress function helps to register the route http://localhost:9000/graphiql. This will be used by the GraphiQL browser client to test the API.
The complete server.js code is as given below −
const bodyParser = require('body-parser')
const cors = require('cors')
const express = require('express')
const port = process.env.PORT||9000
const app = express()

app.use(bodyParser.json() , cors())
const typeDefinition = `
type Query  {
   greeting: String
}`
const  resolverObject = {
   Query : {
      greeting: () => 'Hello GraphQL  From TutorialsPoint !!'
   }
}
const {makeExecutableSchema} = require('graphql-tools')

const schema = makeExecutableSchema({typeDefs:typeDefinition, resolvers:resolverObject})

const {graphqlExpress,graphiqlExpress} = require('apollo-server-express')

app.use('/graphql',graphqlExpress({schema}))
app.use('/graphiql',graphiqlExpress({endpointURL:'/graphql'}))
app.listen(port, () =>  console.log(`server is up and running ${port}`))
Step 6 − Start the Application
Execute server.js using Node.js as follows −
C:\Users\Admin\hello-world-server>node server.js
Step 7 − Test the GraphQL API
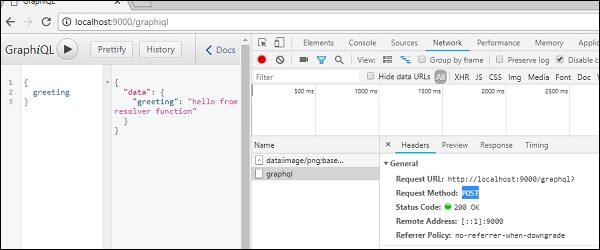
Open the browser and type http://localhost:9000/graphiql. In the query tab of GraphiQL, enter the following −
{
   greeting
}
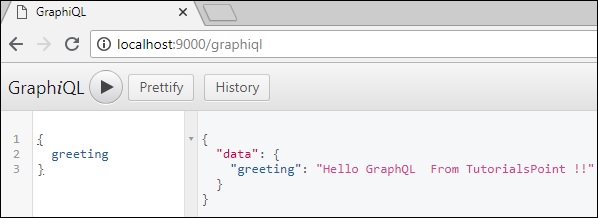
The response from the server is given below −
{
   "data": {
      "greeting": "Hello GraphQL From TutorialsPoint !!"
   }
}
The following image illustrates the response −
Note − Please ensure that Apollo Server Version 1.0 is used.
GraphQL - Type System
GraphQL is a strongly typed language. Type System defines various data types that can be used in a GraphQL application. The type system helps to define the schema, which is a contract between client and server. The commonly used GraphQL data types are as follows −
| Sr.No. | Types & Description |
|---|---|
| 1 | Scalar Stores a single value |
| 2 | Object Shows what kind of object can be fetched |
| 3 | Query Entry point type to other specific types |
| 4 | Mutation Entry point for data manipulation |
| 5 | Enum Useful in a situation where you need the user to pick from a prescribed list of options |
Scalar Type
Scalar types are primitive data types that can store only a single value. The default scalar types that GraphQL offers are −
Int − Signed 32-bit Integer
Float − Signed double precision floating point value
String − UTF - 8-character sequence
Boolean − True or false
ID − A unique identifier, often used as a unique identifier to fetch an object or as the key for a cache.
The syntax for defining a scalar type is as follows −
field: data_type
The snippet given below defines a field named greeting which returns String value.
greeting: String
Object Type
The object type is the most common type used in a schema and represents a group of fields. Each field inside an object type maps to another type, thereby allowing nested types. In other words, an object type is composed of multiple scalar types or object types.
The syntax for defining an object type is given below −
type object_type_name
{
   field1: data_type
   field2:data_type
   ....
   fieldn:data_type
}
You can consider the following code snippet −
--Define an object type--

type Student {
   stud_id:ID
   firstname: String
   age: Int
   score:Float
}
--Defining a GraphQL schema--

type Query
{
   stud_details:[Student]
}
The example given above defines an object data-type Student. The stud_details field in the root Query schema will return a list of Student objects.
Query Type
A GraphQL query is used to fetch data. It is like requesting a resource in REST-based APIs. To keep it simple, the Query type is the request sent from a client application to the GraphQL server. GraphQL uses the Schema Definition Language (SDL) to define a Query. Query type is one of the many root-level types in GraphQL.
The syntax for defining a Query is as given below −
type Query {
   field1: data_type
   field2:data_type
   field2(param1:data_type,param2:data_type,...paramN:data_type):data_type
}
An example of defining a Query −
type Query  {
   greeting: String
}
Mutation Type
Mutations are operations sent to the server to create, update or delete data. These are analogous to the PUT, POST, PATCH and DELETE verbs to call REST-based APIs.
Mutation is one of the root-level data-types in GraphQL. The Query type defines the entry-points for data-fetching operations whereas the Mutation type specifies the entry points for data-manipulation operations.
The syntax for defining a Mutation type is given below −
type Mutation {
   field1: data_type
   field2(param1:data_type,param2:data_type,...paramN:data_type):data_type
}
For example, we can define a mutation type to add a new Student as below −
type Mutation {
   addStudent(firstName: String, lastName: String): Student
}
Enum Type
An Enum is similar to a scalar type. Enums are useful in a situation where the value for a field must be from a prescribed list of options.
The syntax for defining an Enum type is −
type enum_name{
   value1
   value2
}
Following snippet illustrates how an enum type can be defined −
type Days_of_Week{
   SUNDAY
   MONDAY
   TUESDAY
   WEDNESDAY
   THURSDAY
   FRIDAY
   SATURDAY
}
List Type
Lists can be used to represent an array of values of specific type. Lists are defined with a type modifier [] that wraps object types, scalars, and enums.
The following syntax can be used to define a list type −
field:[data_type]
The below example defines a list type todos −
type Query {
   todos: [String]
}
Non-Nullable Type
By default, each of the core scalar types can be set to null. In other words, these types can either return a value of the specified type or they can have no value. To override this default and specify that a field must be defined, an exclamation mark (!) can be appended to a type. This ensures the presence of value in results returned by the query.
The following syntax can be used to define a non-nullable field −
field:data_type!
In the below example, stud_id is declared as a mandatory field.
type Student {
   stud_id:ID!
   firstName:String
   lastName:String
   fullName:String
   college:College
}
GraphQL - Schema
A GraphQL schema is at the core of any GraphQL server implementation. It describes the functionality available to the client applications that connect to it. We can use any programming language to create a GraphQL schema and build an interface around it.
The GraphQL runtime defines a generic graph-based schema to publish the capabilities of the data service it represents. Client applications can query the schema within its capabilities. This approach decouples clients from servers and allows both to evolve and scale independently.
In this chapter, we use Apollo server to execute GraphQL queries. The makeExecutableSchema function in graphql-tools helps you to bind schema and resolvers.
makeExecutableSchema Function Syntax
The makeExecutableSchema function takes a single argument {} of Object type. The syntax for using this function is given below −
import { makeExecutableSchema } from 'graphql-tools';

const jsSchema = makeExecutableSchema({
   typeDefs,
   resolvers, // optional
   logger, // optional
   allowUndefinedInResolve = false, // optional
   resolverValidationOptions = {}, // optional
   directiveResolvers = null, // optional
   schemaDirectives = null,  // optional
   parseOptions = {},  // optional
   inheritResolversFromInterfaces = false  // optional
});
| Sr.No. | Parameter & Description |
|---|---|
| 1 | typeDefs This is a required argument. It represents a GraphQL query as a UTF-8 string. |
| 2 | Resolvers This is an optional argument (empty object by default). This has functions that handle the query. |
| 3 | logger This is an optional argument and can be used to print errors to the server console. |
| 4 | parseOptions This is an optional argument and allows customization of parse when specifying typeDefs as a string. |
| 5 | allowUndefinedInResolve This is true by default. When set to false, causes your resolve functions to throw errors if they return undefined. |
| 6 | resolverValidationOptions This is an optional argument and accepts an object with Boolean properties. |
| 7 | inheritResolversFromInterfaces This is an optional argument and accepts a Boolean argument to check resolvers object inheritance. |
Illustration
Let us create a simple application to understand this schema. This will create a schema for querying list of students from the server. The student data will be stored in a flat file and we will use a node module called notarealdb to fake a database and read from the flat file.
Step 1 − Download and Install Required Dependencies for the Project
Create a folder named schema-app. Change your directory to schema-app from the terminal. Then, follow steps 3 to 5 explained in the Environment Setup chapter to complete the download and the installation process.
Step 2 − Create a Schema
Add schema.graphql file in the project folder, schema-app and add the following code −
type Query {
   greeting:String
   students:[Student]
}

type Student {
   id:ID!
   firstName:String
   lastName:String
   password:String
   collegeId:String
}
The root of the schema will be Query type. The query has two fields − greeting and Students that returns String and a list of students respectively. Student is declared as an Object type since it contains multiple fields. The ID field is declared as non-nullable.
Step 3 − Create Resolver
Create a file resolvers.js in the project folder and add the following code −
const db = require('./db')
const Query = {
   greeting:() => {
      return "hello from  TutorialsPoint !!!"
   },
   students:() => db.students.list()
}

module.exports = {Query}
Here greeting and students are the resolvers that handle the query. students resolver function returns a list of students from the data access layer. To access resolver functions outside the module, Query object has to be exported using module.exports.
Step 4 − Run the Application
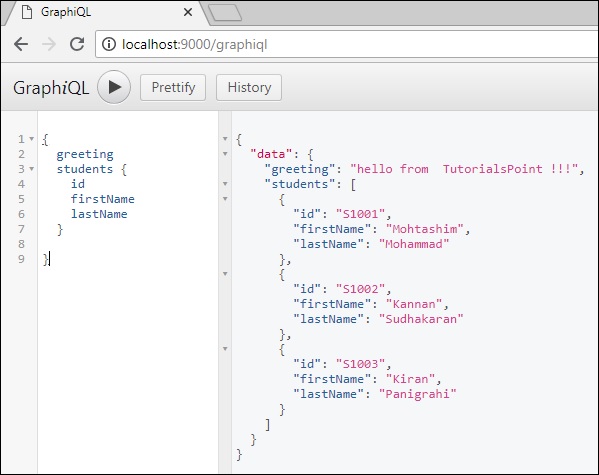
Create a server.js file and refer step 8 in the Environment Setup Chapter. The next step is to execute the command npm start in the terminal. The server will be up and running on 9000 port. Here, we use GraphiQL as a client to test the application. Open browser and type the URL, http://localhost:9000/graphiql.
Type the following query in the editor −
{
   greeting
   students {
      id
      firstName
      lastName
   }
}
The query will display the output as shown below −
Note − We can replace the students.json with a RESTful API call to retrieve student data or even a real database like MySQL or MongoDB. GraphQL becomes a thin wrapper around your original application layer to improve performance.
GraphQL - Resolver
Resolver is a collection of functions that generate response for a GraphQL query. In simple terms, a resolver acts as a GraphQL query handler. Every resolver function in a GraphQL schema accepts four positional arguments as given below −
fieldName:(root, args, context, info) => { result }
An example of resolver functions is shown below −
//resolver function  with no parameters and returning string
greeting:() => {
   return "hello from  TutorialsPoint !!!"
}

//resolver function with no parameters and returning list
students:() => db.students.list()

//resolver function with arguments and returning object
studentById:(root,args,context,info) => {
   return db.students.get(args.id);
}
Given below are the positional arguments and their description −
| Sr.No. | Arguments & Description |
|---|---|
| 1 | root The object that contains the result returned from the resolver on the parent field. |
| 2 | args An object with the arguments passed into the field in the query. |
| 3 | context This is an object shared by all resolvers in a particular query. |
| 4 | info It contains information about the execution state of the query, including the field name, path to the field from the root. |
Resolver Result Format
Resolvers in GraphQL can return different types of values as given below −
| Sr.No. | Arguments and Description |
|---|---|
| 1 | null or undefined this indicates the object could not be found |
| 2 | array this is only valid if the schema indicates that the result of a field should be a list |
| 3 | promise resolvers often do asynchronous actions like fetching from a database or backend API, so they can return promises |
| 4 | scalar or object a resolver can also return other values |
Illustration
Let us create a simple application to understand resolver. This will create schema for querying a student by id from the server. The student data will be stored in a flat file and we will use a node module called notarealdb to fake a database and read from flat file.
The following is a step-wise process to create a simple application −
Step 1 − Download and Install Required Dependencies for the Project
Create a folder named resolver-app. Change your directory to resolver-app from the terminal. Later, follow steps 3 to 5 in the Environment Setup chapter.
Step 2 − Create a Schema
Add schema.graphql file in the project folder resolver-app and add the following code −
type Query {
   greeting:String
   students:[Student]
   studentById(id:ID!):Student
}

type Student {
   id:ID!
   firstName:String
   lastName:String
   password:String
   collegeId:String
}
The schema file shows that user can query for greeting, students and studentById. To retrieve students with specific id, we use data type ID! which shows a non nullable unique identifier field. The students field returns an array of students, and greeting returns a simple string value.
Step 3 − Create Resolver
Create a file resolvers.js in the project folder and add the following code −
const db = require('./db')
const Query = {
   //resolver function for greeting
   greeting:() => {
      return "hello from  TutorialsPoint !!!"
   },

   //resolver function for students returns list
   students:() => db.students.list(),

   //resolver function for studentbyId
   studentById:(root,args,context,info) => {
      //args will contain parameter passed in query
      return db.students.get(args.id);
   }
}
module.exports = {Query}
Here, studentById takes in three parameters. As discussed in this chapter, the studentId can be retrieved from args; root will contain the Query object itself. To return a specific student, we need to call get method with id parameter in the students collection.
Here greeting, students, studentById are the resolvers that handle the query. students resolver function returns a list of students from the data access layer. To access resolver functions outside the module, Query object has to be exported using module.exports.
Step 4 − Run the Application
Create a server.js file. Refer step 8 in the Environment Setup Chapter. Execute the command npm start in the terminal. The server will be up and running on 9000 port. Here, we use GraphiQL as a client to test the application.
Open the browser and enter the url, http://localhost:9000/graphiql. Type the following query in the editor −
{
   studentById(id:"S1001") {
      id
      firstName
      lastName
   }
}
The output for the above query is as shown below −
{
   "data": {
      "studentById": {
         "id": "S1001",
         "firstName": "Mohtashim",
         "lastName": "Mohammad"
      }
   }
}
GraphQL - Query
A GraphQL operation can either be a read or a write operation. A GraphQL query is used to read or fetch values while a mutation is used to write or post values. In either case, the operation is a simple string that a GraphQL server can parse and respond to with data in a specific format. The popular response format that is usually used for mobile and web applications is JSON.
The syntax to define a query is as follows −
//syntax 1
query query_name{ someField }

//syntax 2
{ someField }
Following is an example of a query −
//query with name myQuery
query myQuery{
   greeting
}

// query without any name
{
   greeting
}
It is clear from the above example that the query keyword is optional.
GraphQL queries help to reduce over fetching of data. Unlike a Restful API, GraphQL allows a user to restrict fields that should be fetched from the server. This means smaller queries and lesser traffic over the network; which in turn reduces the response time.
Illustration 1 - Query Student Model with a Custom Field
In this example, we have a set of students stored in a json file. Each student model has fields like firstName, lastName and id but no fullName. Here, we will discuss how to make a query to retrieve fullName of all students. For this, we need to create fullName field in both schema resolver.
Let us see how to do this illustration using the below steps −
Step 1 − Download and Install Required Dependencies for the Project
Create a folder named query-app. Change your directory to query-app from the terminal. Later, follow steps 3 to 5 explained in the Environment Setup chapter.
Step 2 − Create a Schema
Add schema.graphql file in the project folder query-app and add the following code −
type Query {
   greeting:String
   students:[Student]
   studentById(id:ID!):Student
}

type Student {
   id:ID!
   firstName:String
   lastName:String
   fullName:String
}
Note that there is no fullName field in the students.json file. However, we need to fetch the fullname of the student via a query. The fullName, in this case will be a custom field that isn't available with the data source.
Step 3 − Create Resolver
Create a file resolvers.js in the project folder and add the following code −
const db = require('./db')
const Query = {
   //resolver function for greeting
   greeting:() => {
      return "hello from  TutorialsPoint !!!"
   },

   //resolver function for students returns list
   students:() => db.students.list(),

   //resolver function for studentbyId
   studentById:(root,args,context,info) => {
      //args will contain parameter passed in query
      return db.students.get(args.id);
   }
}

//for each single student object returned,resolver is invoked

const Student = {
   fullName:(root,args,context,info) => {
      return root.firstName+":"+root.lastName
   }
}

module.exports = {Query,Student}
Step 4 − Run the Application
Create a server.js file. Refer step 8 in the Environment Setup Chapter. Execute the commandnpm startin the terminal. The server will be up and running on 9000 port. Here, we use GraphiQL as a client to test the application.
Open browser and type the URL http://localhost:9000/graphiql. Type the following query in the editor −
{
   students{
      id
      fullName
   }
}
The response for the query is given below −
{
   "data": {
      "students": [
         {
            "id": "S1001",
            "fullName": "Mohtashim:Mohammad"
         },

         {
            "id": "S1002",
            "fullName": "Kannan:Sudhakaran"
         },

         {
            "id": "S1003",
            "fullName": "Kiran:Panigrahi"
         }
      ]
   }
}
Create a server.js and add the following code −
const bodyParser = require('body-parser');
const cors = require('cors');
const express = require('express');

const db = require('./db');
const port = 9000;
const app = express();

//loading type definitions from schema file
const fs = require('fs')
const typeDefs = fs.readFileSync('./schema.graphql',{encoding:'utf-8'})

//loading resolvers
const resolvers = require('./resolvers')

//binding schema and resolver
const {makeExecutableSchema} = require('graphql-tools')
const schema = makeExecutableSchema({typeDefs, resolvers})

//enabling cross domain calls and form post
app.use(cors(), bodyParser.json());

//enabling routes
const  {graphiqlExpress,graphqlExpress} = require('apollo-server-express')
app.use('/graphql',graphqlExpress({schema}))
app.use('/graphiql',graphiqlExpress({endpointURL:'/graphql'}))

//registering port
app.listen(port, () => console.info(`Server started on port ${port}`));
Execute the command npm start in the terminal. The server will be up and running on 9000 port. Here, we use GraphiQL as a client to test the application.
Open the browser and type the URL http://localhost:9000/graphiql. Type the following query in the editor −
{
   students{
      id
      fullName
   }
}
The response for the query is given below −
{
   "data": {
      "students": [
         {
            "id": "S1001",
            "fullName": "Mohtashim:Mohammad"
         },
         {
            "id": "S1002",
            "fullName": "Kannan:Sudhakaran"
         },
         {
            "id": "S1003",
            "fullName": "Kiran:Panigrahi"
         }
      ]
   }
}
Illustration 2 - Nested Query
Let us create a nested query for fetching the student details and their college details. We will work with the same project folder.
Step 1 − Edit the Schema
The schema file already has the student field. Let us add a field college and define its type.
type College {
   id:ID!
   name:String
   location:String
   rating:Float
}

type Student {
   id:ID!
   firstName:String
   lastName:String
   fullName:String
   college:College
}
Step 2 − Modify the resolver.js
We need to add a college resolver function as below. The college resolver function will be executed for each student object returned. The root parameter of resolver in this case will contain student.
const Student = {
   fullName:(root,args,context,info) => {
      return root.firstName+":"+root.lastName
   },
   college:(root) => {
      return db.colleges.get(root.collegeId);
   }
}
module.exports = {Query,Student}
The resolver returns college of each student by calling the get method of college collection and passing the collegeId. We have association relationship between Student and College through the collegeId.
Step 3 − Test the Application
Open the terminal window and navigate to the project folder. Type the command -npm start. Launch the browser and enter the URL http://localhost:9000/graphiql.
Enter the following query in the GraphiQL window −
{
   students{
      id
      firstName
      college {
         id
         name
         location
         rating
      }
   }
}
The response for the query is as given below −
{
   "data": {
      "students": [
         {
            "id": "S1001",
            "firstName": "Mohtashim",
            "college": {
               "id": "col-102",
               "name": "CUSAT",
               "location": "Kerala",
               "rating": 4.5
            }
         },

         {
            "id": "S1002",
            "firstName": "Kannan",
            "college": {
               "id": "col-101",
               "name": "AMU",
               "location": "Uttar Pradesh",
               "rating": 5
            }
         },

         {
            "id": "S1003",
            "firstName": "Kiran",
            "college": {
               "id": "col-101",
               "name": "AMU",
               "location": "Uttar Pradesh",
               "rating": 5
            }
         }
      ]
   }
}
What is a Query Variable?
If a query has some dynamic values to be passed, then represent these dynamic values using variables. Hence, the query can be reused by the client applications.
Illustration
Let us create a simple application to understand the query variable.
Step 1 − Edit Schema File
Add a sayHello field which takes a string parameter and returns a string. The name values will be dynamic in client application.
type Query {
   sayHello(name:String!):String
}
Step 2 − Edit resolver.js File
Add a sayHello resolver which takes parameter as below −
sayHello:(root,args,context,info) => `Hi ${args.name} GraphQL server says Hello to you!!`
Step 3 − Declare Query Variable in GraphiQL
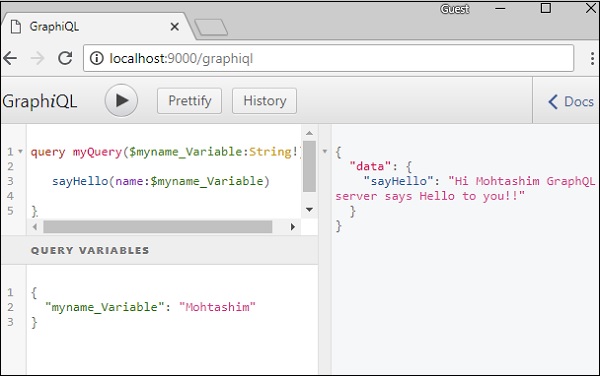
A variable is declared with $ followed by name of the variable. For example: $myname_Variable.
Once $myname_Variable is declared, it has to be used with a named query syntax. The query, myQuery takes string value and passes it on to sayHello as shown below −
query myQuery($myname_Variable:String!) {
   sayHello(name:$myname_Variable)
}
Set the value for $myname_Variable as a JSON object in the Query Variables section of the GraphiQL client.
{
   "myname_Variable": "Mohtashim"
}
The output of the above code is as follows −
{
   "data": {
      "sayHello": "Hi Mohtashim GraphQL server says Hello to you!!"
   }
}
How to use Query Variable with Enum
Let us see how to use a query variable when field parameter is enum type.
Step 1 − Edit schema.graphql File
enum ColorType {
   RED
   BLUE
   GREEN
}

type Query {
   setFavouriteColor(color:ColorType):String
}
The setFavouriteColor function takes enum as input and returns a string value.
Step 2 − Edit resolvers.js File
The resolver function setFavouriteColor takes root and args. The enum value passed to function at runtime can be accessed through args parameter.
setFavouriteColor:(root,args) => {
   return  "Your Fav Color is :"+args.color;
}
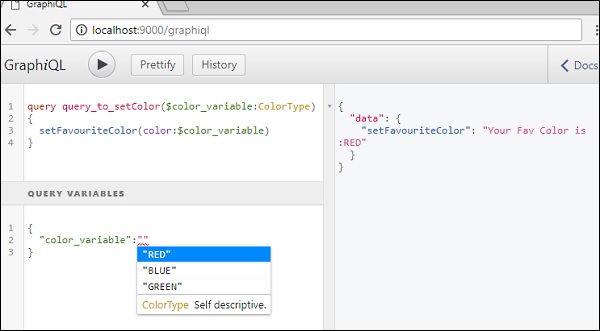
Step 3 − Declare a Query Variable in GraphiQL
The query is named query_to_setColor which takes a variable of the name color_variable of ColorType. This variable is passed on to method setFavouriteColor.
query query_to_setColor($color_variable:ColorType) {
   setFavouriteColor(color:$color_variable)
}
In the query variable section of GraphiQL, type the following code −
{
   "color_variable":"RED"
}
The response is shown below −
{
   "data": {
      "setFavouriteColor": "Your Fav Color is: RED"
   }
}
GraphQL - Mutation
In this chapter, we will learn mutation queries in GraphQL.
Mutation queries modify data in the data store and returns a value. It can be used to insert, update, or delete data. Mutations are defined as a part of the schema.
The syntax of a mutation query is given below −
mutation{
   someEditOperation(dataField:"valueOfField"):returnType
}
Illustration
Let us understand how to add new student record into the datastore using a mutation query.
Step 1 − Download and Install Required Dependencies for the Project
Create a project folder by the namemutation-app. Change your directory tomutation-appfrom the terminal. Follow steps 3 to 5 explained in the Environment Setup chapter.
Step 2 − Create aschema.graphqlFile
Add schema.graphql file in the project folder mutation-app and add the following code −
type Query {
   greeting:String
}

type Mutation {
   createStudent(collegeId:ID,firstName:String,lastName:String):String
}
Note that the function createStudent returns a String type. This is a unique identifier (ID) which is generated after creating a student.
Step 3 − Create a resolver.js File
Create a file resolvers.js in the project folder and add the following code −
const db = require('./db')
const Mutation = {
   createStudent:(root,args,context,info) => {
      return db.students.create({collegeId:args.collegeId,
      firstName:args.firstName,
      lastName:args.lastName})
   }
}
const Query = {
   greeting:() => "hello"
}

module.exports = {Query,Mutation}
The mutation function points to students collection in the datastore. To add a new student, invoke the create method in students collection. The args object will contain the parameters which are passed in the query. The create method of students collection will return the id of a newly created student object.
Step 4 − Run the Application
Create a server.js file. Refer to step 8 in the Environment Setup Chapter. Execute the commandnpm startin the terminal. The server will be up and running on 9000 port. Here, we use GraphiQL as a client to test the application.
Next step is to open browser and type the URLhttp://localhost:9000/graphiql.Type the following query in the editor −
//college Id should be matched with data from colleges.json for easy retrieval

mutation {
   createStudent(collegeId:"col-2",firstName:"Tim",lastName:"George")
}
The above query will create a student object instudent.jsonfile. The query will return a unique identifier. The response of the query is as shown below −
{
   "data": {
      "createStudent": "SkQtxYBUm"
   }
}
To verify if the student object is created, we can use thestudentByIdquery. You can also open thestudents.jsonfile fromdatafolder to verify the id.
To usestudentByIdquery, edit the schema.graphql as given below −
type Query {
   studentById(id:ID!):Student
}

type Student {
   id:ID!
   firstName:String
   lastName:String
   collegeId:String
}
Edit the resolver.js file as given below −
const db = require('./db')
const Query = {
   studentById:(root,args,context,info) => {
      return db.students.get(args.id);
   }
}

const Mutation = {
   createStudent:(root,args,context,info) => {
      return db.students.create({collegeId:args.collegeId,
      firstName:args.firstName,
      lastName:args.lastName})
   }
}

module.exports = {Query,Mutation}
Given below is the query to get student by unique id returned from the mutation query −
{
    studentById(id:"SkQtxYBUm") {
    id
    firstName
    lastName
  }
}
The response from the server is as follows −
{
   "data": {
      "studentById": {
         "id": "SkQtxYBUm",
         "firstName": "Tim",
         "lastName":"George"
      }
   }
}
Returning an Object in Mutation
It is best practice to return an object in mutation. For example, the client application wants to fetch student and college details. In this case, rather than making two different requests, we can create a query that returns an object containing students and their college details.
Step 1 − Edit Schema File
Add a new method named addStudent which returns objectin mutation type ofschema.graphql.
Let us learn how to access the college details through student details. Add college type in the schema file.
type Mutation {
   addStudent_returns_object(collegeId:ID,firstName:String,lastName:String):Student

   createStudent(collegeId:ID,firstName:String,lastName:String):String
}

type College {
   id:ID!
   name:String
   location:String
   rating:Float
}

type Student {
   id:ID!
   firstName:String
   lastName:String
   college:College
}
Step 2 − Update theresolvers.jsFile
Update a fileresolvers.jsin the project folder and add the following code −
const Mutation = {
   createStudent:(root,args,context,info) => {

      return db.students.create({
         collegeId:args.collegeId,
         firstName:args.firstName,
         lastName:args.lastName
      })
   },

   // new resolver function
   addStudent_returns_object:(root,args,context,info) => {
      const id = db.students.create({
         collegeId:args.collegeId,
         firstName:args.firstName,
         lastName:args.lastName
      })

      return db.students.get(id)
   }
}

//for each single student object returned,resolver is invoked
const Student = {
   college:(root) => {
      return db.colleges.get(root.collegeId);
   }
}

module.exports = {Query,Student,Mutation}
Step 3 − Start the Server and Type the Request Query in GraphiQL
Next, we shall start the server and request query in GraphiQL with the following code −
mutation {
   addStudent_returns_object(collegeId:"col-101",firstName:"Susan",lastName:"George") {
      id
      firstName
      college{
         id
         name
      }
   }
}
The above query adds a new student and retrieves the student object along with college object. This saves round trips to the server.
The response is as given below −
{
   "data": {
      "addStudent_returns_object": {
         "id": "rklUl08IX",
         "firstName": "Susan",
         "college": {
            "id": "col-101",
            "name": "AMU"
         }
      }
   }
}
GraphQL - Validation
While adding or modifying data, it is important to validate the user input. For example, we may need to ensure that the value of a field is always not null. We can use ! (non-nullable) type marker in GraphQL to perform such validation.
The syntax for using the ! type marker is as given below −
type TypeName {
   field1:String!,
   field2:String!,
   field3:Int!
}
The above syntax ensures that all the fields are not null.
If we want to implement additional rules like checking a string's length or checking if a number is within a given range, we can define custom validators. The custom validation logic will be a part of the resolver function. Let us understand this with the help of an example.
Illustration - Implementing Custom Validators
Let us create a signup form with basic validation. The form will have email, firstname and password fields.
Step 1 − Download and Install Required Dependencies for the Project
Create a folder namedvalidation-app.Change the directory tovalidation-appfrom the terminal. Follow steps 3 to 5 explained in the Environment Setup chapter.
Step 2 − Create a Schema
Add schema.graphql file in the project foldervalidation-appand add the following code −
type Query {
   greeting:String
}

type Mutation {
   signUp(input:SignUpInput):String
}

input SignUpInput {
   email:String!,
   password:String!,
   firstName:String!
}
Note − We can use the input type SignUpInput to reduce the number of parameters in signUp function. So, signUp function takes only one parameter of typeSignUpInput.
Step 3 − Create Resolvers
Create a fileresolvers.jsin the project folder and add the following code −
const Query = {
   greeting:() => "Hello"
}

const Mutation ={
   signUp:(root,args,context,info) => {

      const {email,firstName,password} = args.input;

      const emailExpression = /^(([^<>()\[\]\\.,;:\s@"]+(\.[^<>()\[\]\\.,;:\s@"]+)*)|(".+"))@((\[[0-9]{1,3}\.[0-9]{1,3}\.[0-9]{1,3}\.[0-9]{1,3}\])|(([a-zA-Z\-0-9]+\.)+[a-zA-Z]{2,}))$/;

      const isValidEmail =  emailExpression.test(String(email).toLowerCase())
      if(!isValidEmail)
      throw new Error("email not in proper format")

      if(firstName.length > 15)
      throw new Error("firstName should be less than 15 characters")

      if(password.length < 8 )
      throw new Error("password should be minimum 8 characters")

      return "success";
   }
}
module.exports = {Query,Mutation}
The resolver function,signUpaccepts parametersemail, passwordandfirstName. These will be passed throughinput variable so that it can be accessed throughargs.input.
Step 4 − Run the Application
Create a server.js file. Refer step 8 in the Environment Setup Chapter. Execute the command npm start in the terminal. The server will be up and running on 9000 port. Here, we will use GraphiQL as a client to test the application.
Open the browser and enter the URLhttp://localhost:9000/graphiql.Type the following query in the editor −
mutation doSignUp($input:SignUpInput) {
   signUp(input:$input)
}
Since input to signup function is a complex type, we need to use query variables in graphiql. For this, we need to first give a name to the query and call it doSignUp, the$inputis a query variable.
The following query variable must be entered in query variables tab of graphiql −
{
   "input":{
      "email": "abc@abc",
      "firstName": "kannan",
      "password": "pass@1234"
   }
}
The errors array contains the details of validation errors as shown below −
{
   "data": {
      "signUp": null
   },

   "errors": [
      {
         "message": "email not in proper format",
         "locations": [
            {
               "line": 2,
               "column": 4
            }
         ],
         "path": [
            "signUp"
         ]
      }
   ]
}
We have to enter a proper input for each field as given below −
{
   "input":{
      "email": "abc@abc.com",
      "firstName": "kannan",
      "password": "pass@1234"
   }
}
The response is as follows −
{
   "data": {
      "signUp": "success"
   }
}
Here, in the below query, we are not assigning any password.
{
   "input":{
      "email": "abc@abc.com",
      "firstName": "kannan"
   }
}
If a required field is not provided, then qraphql server will display the following error −
{
   "errors": [
      {
         "message": "Variable \"$input\" got invalid value {\"email\":\"abc@abc.com\",\"firstName\":\"kannan\"}; Field value.password of required type String! was not provided.",
         "locations": [
            {
               "line": 1,
               "column": 19
            }
         ]
      }
   ]
}
GraphQL - JQuery Integration
Web applications send and retrieve data asynchronously (in the background). AJAX allows websites to load content onto the screen without refreshing the page. jQuery provides several methods for AJAX functionality thus making it easier to use AJAX. In this chapter, we shall learn how we can integrate GraphQL with jQuery.
Consider an application using client server architecture. We can build a front end webpage that requests data from a GraphQL server. The webpage will make AJAX calls using jQuery to the GraphQL server.
To integrate GraphQL with JQuery, let us inspect the GraphiQL request headers and understand the request parameters.
Start the hello-world app (refer to chapter 6 for the relevant illustration). Type the graphql query{greeting}in the GraphiQL window. Right-click and inspect or press (ctrl + shift + I) on chrome to go to the network tab as shown below −
From the simple hello-world example, we can understand that http method used isPOST.Now in the browser, scroll down to the header section to view therequest payload.
Once you click onview code,you will see the following in the request payload section of chrome.
{"query":"{\n greeting\n}","variables":null,"operationName":null}
Also note the request URL,http://localhost:9000/graphqlthat should be called from client application.
Illustration
Let us understand how to integrate GraphQL with JQuery using a step-wise process.
Setting up the Server
We will learn to set up the server using the following steps −
Step 1 − Download and Install Required Dependencies for the Project
Create a folder named jquery-server-app. Change your directory to jquery-server-app from the terminal. Follow steps 3 to 5 explained in the Environment Setup chapter.
Step 2 − Create a Schema
Add schema.graphql file in the project folder jquery-server-app and add the following code −
type Query
{
   greeting: String
   sayHello(name:String!):String
}
The file has defined two queries greeting and sayHello. ThesayHelloquery accepts a string parameter and returns another string. The parameter to thesayHello()function is not null.
Step 3 − Create Resolvers
Create a file resolvers.js in the project folder and add the following code −
const Query =
{
   greeting: () => 'Hello GraphQL  From TutorialsPoint !!' ,
   sayHello:(root,args,context,info) =>  `Hi ${args.name} GraphQL server says Hello to you!!`
}
module.exports = {Query}
Here, greeting and sayHello are two resolvers. InsayHelloresolver, the value passed to the name parameter can be accessed throughargs. To access resolver functions outside the module, Query object has to be exported using module.exports.
Step 4 − Run the Application
Create a server.js file. Refer to step 8 in the Environment Setup Chapter. Execute the command npm start in the terminal. The server will be up and running on 9000 port. Here, we use GraphiQL as a client to test the application.
Open browser and type the URLhttp://localhost:9000/graphiql.Type the following query in the editor −
{
   greeting,
   sayHello(name:"Mohtashim")
}
The response from the server is as given below −
{
   "data": {
      "greeting": "Hello GraphQL From TutorialsPoint !!",
      "sayHello": "Hi Mohtashim GraphQL server says Hello to you!!"
   }
}
Setting up the Client
Since, we have already set up the server, now we will learn how to set up the client.
Step 1 − Create a new folderjquery-client-appoutside the current project folder
First, we will create a folder named jquery-client-app outside the project folder.
Step 2 − Create a HTML Pageindex.htmlfor jQuery Integration
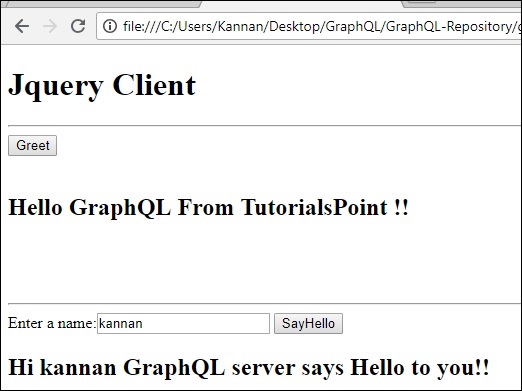
We will create a client application in jquery and invoke both the methods. Following is the code forindex.htmlfile. Theindex.htmlpage sends requests to the server when the buttons Greet and SayHello are clicked. We will make asynchronous request using$.ajax()function.
<!DOCTYPE html>
<html>
   <head>
      <script src = "https://ajax.googleapis.com/ajax/libs/jquery/3.3.1/jquery.min.js"></script>
      <script>
         $(document).ready(function() {

            $("#btnSayhello").click(function() {

               const name = $("#txtName").val();
               console.log(name);
               $("#SayhelloDiv").html('loading....');

               $.ajax({url: "http://localhost:9000/graphql",
                  contentType: "application/json",type:'POST',
                  data: JSON.stringify({ query:`{
                     sayHello(name:"${name}")}`
                  }),
                  success: function(result) {
                     console.log(JSON.stringify(result))
                     $("#SayhelloDiv").html("<h1>"+result.data.sayHello +"</h1>");
                  }
               });
            });

            $("#btnGreet").click(function() {
               $("#greetingDiv").html('loading....');
               //https://kannan-first-graphql-app.herokuapp.com/graphql
               $.ajax({url: "http://localhost:9000/graphql",
                  contentType: "application/json",
                  type:'POST',
                  data: JSON.stringify({
                     query:`{greeting}`
                  }),
                  success: function(result) {
                     $("#greetingDiv").html("<h1>"+result.data.greeting+"</h1>");
                  }
               });
            });
         });
      </script>
   </head>

   <body>
      <h1>Jquery Client </h1>

      <hr/>
      <section>
         <button id = "btnGreet">Greet</button>
         <br/> <br/>
         <div id = "greetingDiv"> </div>
      </section>

      <br/> <br/> <br/>
      <hr/>

      <section>
         Enter a name:<input id = "txtName" type = "text" value = "kannan"/>
         <button id = "btnSayhello">SayHello</button>
         <div id = "SayhelloDiv"> </div>
      </section>
   </body>
</html>
Open this file in the browser and click on the button to see the response. The output will be as given below −
GraphQL - React Integration
React is a Javascript library for building user interfaces. This chapter explains how one can integrate GraphQL with a React application.
Illustration
The quickest way to set up a react project is by using theCreate React Apptool. In the subsequent sections, we will learn how to set up both the Server and the Client.
Setting up the Server
For setting up the Server, follow the below steps −
Step 1 − Download and Install Required Dependencies for the Project
Create a folder react-server-app. Change your directory toreact-server-appfrom the terminal. Follow steps 3 to 5 explained in the Environment Setup chapter.
Step 2 − Create a Schema
Add schema.graphql file in the project folderreact-server-appand add the following code −
type Query
{
   greeting: String
   sayHello(name:String!):String
}
The file has defined two queries greetingandsayHello. ThesayHelloquery accepts a string parameter and returns another string. The parameter to thesayHello()function is not null.
Step 3 − Create Resolvers
Create a file resolvers.js in the project folder and add the following code −
const Query =
{
   greeting: () => 'Hello GraphQL  From TutorialsPoint !!' ,
   sayHello:(root,args,context,info) =>  `Hi ${args.name} GraphQL server says Hello to you!!`
}
module.exports = {Query}
HeregreetingandsayHelloare two resolvers. In the sayHelloresolver, the value passed to the name parameter can be accessed throughargs. To access resolver functions outside the module, Query object has to be exported usingmodule.exports.
Step 4 − Run the Application
Create a server.js file. Refer step 8 in the Environment Setup Chapter. Execute the command npm start in the terminal. The server will be up and running on 9000 port. Here, we use GraphiQL as a client to test the application.
Open browser and type the URLhttp://localhost:9000/graphiql. Type the following query in the editor −
{
   greeting,
   sayHello(name:"Mohtashim")
}
The response from the server is given below −
{
   "data": {
      "greeting": "Hello GraphQL  From TutorialsPoint !!",
      "sayHello": "Hi Mohtashim GraphQL server says Hello to you!!"
   }
}
Setting up the Client
Open a new terminal for client. The server terminal should be kept running before executing the client application. React application will be running on port number 3000 and server application on port number 9000.
Step 1 − Create a React Project hello-world-client
In the client terminal, type the following command −
npx create-react-app hello-world-client
This will install everything needed for a typical react application. The npx utility and create-react-app tool create a project with name hello-world-client. Once the installation is completed, open the project in VSCode.
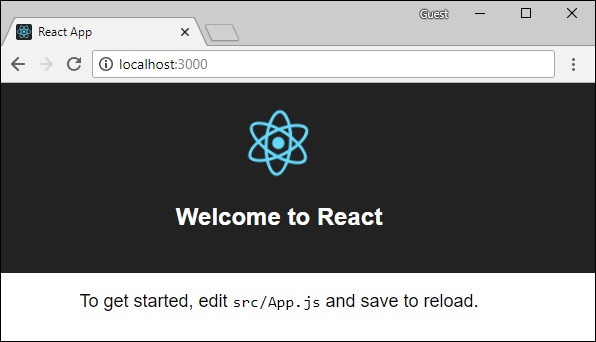
Step 2 − Start hello-world-client
Change the current folder path in the terminal to hello-world-client. Typenpm startto launch the project. This will run a development server at port 3000 and will automatically open the browser and load the index page.
This is shown in the screenshot given below −
Step 3 − Modify the App Component
In the App.js inside src folder, add two functions, one to load greeting and another to load sayHello messages.
Following is theloadGreetingfunction which sends GraphQL query for greeting.
async function loadGreeting() {
   const response = await fetch('http://localhost:9000/graphql', {
      method:'POST',

      headers:{'content-type':'application/json'},
      body:JSON.stringify({query:'{greeting}'})
   })

   const rsponseBody = await response.json();
   return rsponseBody.data.greeting;

   console.log("end of function")
}
Following is the loadSayhello function which sends GraphQL query forsayHello −
async function  loadSayhello(name) {
   const response = await fetch('http://localhost:9000/graphql', {
      method:'POST',
      headers:{'content-type':'application/json'},
      body:JSON.stringify({query:`{sayHello(name:"${name}")}`})
   })
}
The complete App.js file is shown below −
import React, { Component } from 'react';
import logo from './logo.svg';
import './App.css';

async function loadGreeting() {
   const response =  await fetch('http://localhost:9000/graphql', {
      method:'POST',
      headers:{'content-type':'application/json'},
      body:JSON.stringify({query:'{greeting}'})
   })
   const rsponseBody =  await response.json();
   return rsponseBody.data.greeting;
   console.log("end of function")
}

async function  loadSayhello(name) {
   const response =  await fetch('http://localhost:9000/graphql', {
      method:'POST',
      headers:{'content-type':'application/json'},
      body:JSON.stringify({query:`{sayHello(name:"${name}")}`})
   })
   const rsponseBody =  await response.json();
   return rsponseBody.data.sayHello;
}

class App extends Component {
   constructor(props) {
      super(props);
      this.state =  {greetingMessage:'',sayHelloMessage:'',userName:''}
      this.updateName =  this.updateName.bind(this);
      this.showSayHelloMessage =  this.showSayHelloMessage.bind(this);
      this.showGreeting =  this.showGreeting.bind(this);
   }

   showGreeting() {
      loadGreeting().then(g => this.setState({greetingMessage:g+" :-)"}))
   }

   showSayHelloMessage() {
      const name = this.state.userName;
      console.log(name)
      loadSayhello(name).then(m => this.setState({sayHelloMessage:m}))
   }

   updateName(event) {
      this.setState({userName:event.target.value})
   }
   render() {
      return (
         <div className = "App">
            <header className = "App-header">
               <img src = {logo} className = "App-logo" alt = "logo" />
               <h1 className = "App-title">Welcome to React</h1>
            </header>
            <br/><br/>
            <section>
               <button id = "btnGreet" onClick = {this.showGreeting}>Greet</button>
               <br/> <br/>
               <div id = "greetingDiv">
                  <h1>{this.state.greetingMessage}</h1>
               </div>
            </section>

            <hr/>

            <section>
               Enter a name:<input id = "txtName" type = "text" onChange = {this.updateName}
               value = {this.state.userName}/>
               <button id = "btnSayhello" onClick = {this.showSayHelloMessage}>SayHello</button>
               <br/>
               user name is:{this.state.userName}    <br/>
               <div id = "SayhelloDiv">
                  <h1>{this.state.sayHelloMessage}</h1>
               </div>
            </section>
         </div>
      );
   }
}

export default App;
Once both the applications are running, click on the greet button. Next, enter a name in the textbox and click on sayHello button. The output will be as given below −
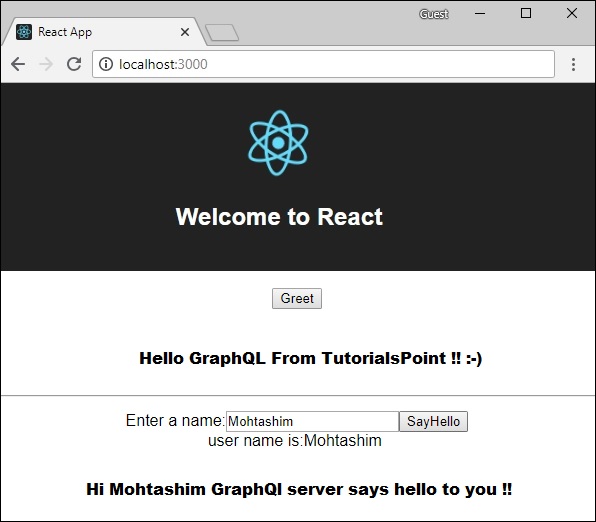
GraphQL - Apollo Client
We have used Apollo Server to build graphql specification on server side. It is quick and easy to build production ready GraphQL server. Now let us understand the client side.
Apollo Client is the best way to use GraphQL to build client applications. The client is designed to help developer quickly build a UI that fetches data with GraphQL and can be used with any JavaScript front-end.
Apollo Client supports the following platforms −
| Sr.No. | Platform & Framework |
|---|---|
| 1 | Javascript React,Angular,Vue,Meteor,Ember |
| 2 | WebComponents Polymer, lit-apollo |
| 3 | Native Mobile Native Android with Java, Native iOS with Swift |
Caching is one of the major features of Apollo Client.apollo-boostis a convenience package which brings in a bunch of other dependencies.
Illustration
Let us see how to use Apollo Client to build client applications using the following steps −
Setting up Server
We have to follow the below steps for setting up a server −
Step 1 − Download and Install Required Dependencies for the Project
Create a folderapollo-server-app. Change your directory toapollo-server-appfrom the terminal. Then, follow steps 3 to 5 explained in the Environment Setup chapter.
Step 2 − Create a Schema
Add schema.graphql file in the project folderapollo-server-appand add the following code −
type Query
{
   students:[Student]
}

type Student {
   id:ID!
   firstName:String
   lastName:String
   college:College
}

type College {
   id:ID!
   name:String
   location:String
   rating:Float
}
Step 3 − Add Resolvers
Create a file resolvers.js in the project folder and add the following code −
const db = require('./db')

const Query = {
   //resolver function for students returns list
   students:() => db.students.list(),
}

const Student = {
   college:(root) => {
      return db.colleges.get(root.collegeId);
   }
}
module.exports = {Query,Student}
Step 4 − Run the Application
Create a server.js file. Refer step 8 in the Environment Setup Chapter. Execute the commandnpm startin the terminal. The server will be up and running on 9000 port. Here, we will use GraphiQL as a client to test the application.
Open browser and type the URLhttp://localhost:9000/graphiql. Type the following query in the editor.
{
   students{
      id
      firstName
      college{
         name
      }
   }
}
The response for the query is as given below −
{
   "data": {
      "students": [
         {
            "id": "S1001",
            "firstName": "Mohtashim",
            "college": {
               "name": "CUSAT"
            }
         },

         {
            "id": "S1002",
            "firstName": "Kannan",
            "college": {
               "name": "AMU"
            }
         },

         {
            "id": "S1003",
            "firstName": "Kiran",
            "college": {
               "name": "AMU"
            }
         }
      ]
   }
}
Setting up the Client
Open a new terminal for client. The server terminal should be kept running before executing the client application. React application will be running on port number 3000 and server application on port number 9000.
Step 1 − Create a React Application
In the client terminal, type the following command −
npx create-react-app hello-world-client
This will install everything needed for a typical react application. The npx utility and create-react-app tool create a project with name hello-world-client. Once the installation is completed, open the project in VSCode.
Step 2 − Start hello-world-client
Change the current folder path in the terminal to hello-world-client. Typenpm startto launch the project. This will run a development server at port 3000 and will automatically open the browser and load the index page.
This is shown in the screenshot given below −
Step 3 − Install Apollo Client Libraries
To install an Apollo Client, open a new terminal and be in current project folder path. Type the following command −
npm install apollo-boost graphql
This will download the graphql libraries for client side and also the Apollo Boost package. We can cross check this by typingnpm view in apollo-boost dependencies. This will have many dependencies as shown below −
{
   'apollo-cache': '^1.1.15',
   'apollo-cache-inmemory': '^1.2.8',
   'apollo-client': '^2.4.0',
   'apollo-link': '^1.0.6',
   'apollo-link-error': '^1.0.3',
   'apollo-link-http': '^1.3.1',
   'apollo-link-state': '^0.4.0',
   'graphql-tag': '^2.4.2'
}
We can clearly see that Apollo-Client library is installed.
Step 4 − Modify the App Component in index.js File
With Apollo Client, we can directly call server without the use offetchAPI. Also, the queries and mutations should not be embedded in a string made with back tick notation. This is because, the gql function directly parses the queries. This means, a programmer can directly write queries in the same way when writing queries in GraphiQL tool.gqlis a tag function which will parse the template string written in back tick notation to graphql query object. The Apollo Client query method returns a promise.
Following code snippet shows how to import Apollo Client −
import {ApolloClient, HttpLink, InMemoryCache} from 'apollo-boost'

const endPointUrl = 'http://localhost:9000/graphql'
const client = new ApolloClient({
   link: new HttpLink({uri:endPointUrl}),
   cache:new InMemoryCache()
});
In the previous chapter, we discussed how to usefetchAPI for HTTP requests. The following code shows how to use gql function. The loadStudentsAsync function uses graphql client to query the server.
async function loadStudentsAsync() {
   const query = gql`
   {
      students{
         id
         firstName
         lastName
         college{
            name
         }
      }
   }`
   const {data} = await client.query({query}) ;
   return data.students;
}
You only need to keep the index.js in src folder and index.html in public folder; all other files that are auto generated can be removed.
The directory structure is given below −
hello-world-client /
   -->node_modules
   -->public
         index.html
   -->src
         index.js
   -->package.json
Following is theindex.jsin react application −
import React, {Component} from 'react';
import ReactDOM from 'react-dom';

// apollo client

import {ApolloClient, HttpLink, InMemoryCache} from 'apollo-boost'
import gql from 'graphql-tag'

const endPointUrl = 'http://localhost:9000/graphql'
const client = new ApolloClient({
   link: new HttpLink({uri:endPointUrl}),
   cache:new InMemoryCache()
});

async function loadStudentsAsync() {
   const query = gql`
   {
      students{
         id
         firstName
         lastName
         college{
            name
         }
      }
   }
   `
   const {data} = await client.query({query}) ;
   return data.students;
}
class  App  extends Component {
   constructor(props) {
      super(props);
      this.state = {
         students:[]
      }
      this.studentTemplate =  [];
   }
   async loadStudents() {
      const studentData =  await loadStudentsAsync();
      this.setState({
         students: studentData
      })
      console.log("loadStudents")
   }
   render() {
      return(
         <div>
            <input type = "button"  value = "loadStudents" onClick = {this.loadStudents.bind(this)}/>
            <div>
               <br/>
               <hr/>
               <table border = "3">
                  <thead>
                     <tr>
                        <td>First Name</td>
                        <td>Last Name</td>
                        <td>college Name</td>
                     </tr>
                  </thead>

                  <tbody>
                     {
                        this.state.students.map(s => {
                           return (
                              <tr key = {s.id}>
                                 <td>
                                    {s.firstName}
                                 </td>
                                 <td>
                                    {s.lastName}
                                 </td>
                                 <td>
                                    {s.college.name}
                                 </td>
                              </tr>
                           )
                        })
                     }
                  </tbody>
               </table>
            </div>
         </div>
      )
   }
}
ReactDOM.render(<App/>, document.getElementById('root'));
The react application will load students from GraphQL server, once we click on loadStudents button as shown below −
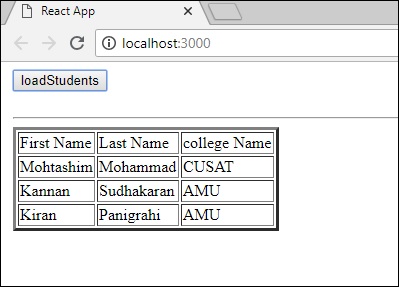
GraphQL - Authenticating Client
Authentication is the process or action of verifying the identity of a user or a process. It is important that an application authenticates a user to ensure that the data is not available to an anonymous user. In this section, we will learn how to authenticate a GraphQL client.
Express JWT
In this example, we will use jQuery to create a client application. To authenticate requests, we will useexpress-jwt module on the server-side.
Theexpress-jwtmodule is a middleware that lets you authenticate HTTP requests using JWT tokens. JSON Web Token (JWT) is a long string that identifies the logged in user.
Once the user logs in successfully, the server generates a JWT token. This token distinctly identifies a log. In other words, the token is a representation of user's identity. So next time, when the client comes to the server, it has to present this token to get the required resources. The client can be either a mobile application or a web application.
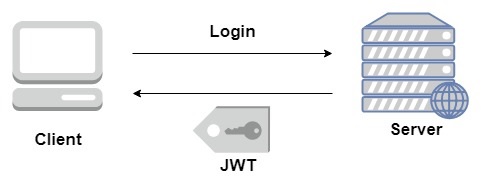
Illustration
We will follow a step-wise procedure to understand this illustration.
Setting up the Server
Following are the steps for setting up the server −
Step 1 − Download and Install Required Dependencies for the Project
Create a folderauth-server-app. Change your directory toauth-server-appfrom the terminal. Follow steps 3 to 5 explained in the Environment Setup chapter.
Step 2 − Create a Schema
Add schema.graphql file in the project folderauth-server-appand add the following code −
type Query
{
   greetingWithAuth:String
}
Step 3 − Add Resolvers
Create a file resolvers.js in the project folder and add the following code −
The resolver will verify if an authenticated user object is available in the context object of GraphQL. It will raise an exception if an authenticated user is not available.
const db = require('./db')

const Query = {
   greetingWithAuth:(root,args,context,info) => {

      //check if the context.user is null
      if (!context.user) {
         throw new Error('Unauthorized');
      }
      return "Hello from TutorialsPoint, welcome back : "+context.user.firstName;
   }
}

module.exports = {Query}
Step 4 − Create Server.js File
The authentication middleware authenticates callers using a JSON Web Token. The URL for authentication ishttp://localhost:9000/login.
This is a post operation. The user has to submit his email and password which will be validated from the backend. If a valid token is generated usingjwt.signmethod, the client will have to send this in header for subsequent requests.
If the token is valid,req.userwill be set with the JSON object decoded to be used by later middleware for authorization and access control.
The following code uses two modules −jsonwebtokenandexpress-jwtto authenticate requests −
When the user clicks on the greet button, a request for the /graphql route is issued. If the user is not authenticated, he will be prompted to authenticate himself.
The user is presented with a form that accepts email id and password. In our example, the /login route is responsible for authenticating the user.
The /login route verifies if a match is found in the database for credentials provided by the user.
If the credentials are invalid, a HTTP 401 exception is returned to the user.
If the credentials are valid, a token is generated by the server. This token is sent as a part of response to the user. This is done by thejwt.signfunction.
const expressJwt = require('express-jwt');
const jwt = require('jsonwebtoken');

//private key
const jwtSecret = Buffer.from('Zn8Q5tyZ/G1MHltc4F/gTkVJMlrbKiZt', 'base64');

app.post('/login', (req, res) => {
   const {email, password} = req.body;

   //check database
   const user = db.students.list().find((user) =>  user.email === email);
   if (!(user && user.password === password)) {
      res.sendStatus(401);
      return;
   }

   //generate a token based on private key, token doesn't have an expiry
   const token = jwt.sign({sub: user.id}, jwtSecret);
   res.send({token});
});
For every request, theapp.use()function will be called. This in turn will invoke the expressJWT middleware. This middleware will decode the JSON Web Token. The user id stored in the token will be retrieved and stored as a propertyuser in the request object.
//decodes the JWT and stores in request object
app.use(expressJwt({
   secret: jwtSecret,
   credentialsRequired: false
}));
To make available the user property within GraphQL context, this property is assigned to thecontextobject as shown below −
//Make req.user available to GraphQL context
app.use('/graphql', graphqlExpress((req) => ({
   schema,
   context: {user: req.user &&apm; db.students.get(req.user.sub)}
})));
Createserver.jsin current folder path. The complete server.js file is as follows −
const bodyParser = require('body-parser');
const cors = require('cors');
const express = require('express');
const expressJwt = require('express-jwt'); //auth
const jwt = require('jsonwebtoken'); //auth
const db = require('./db');

var port = process.env.PORT || 9000
const jwtSecret = Buffer.from('Zn8Q5tyZ/G1MHltc4F/gTkVJMlrbKiZt', 'base64');
const app = express();

const fs = require('fs')
const typeDefs = fs.readFileSync('./schema.graphql',{encoding:'utf-8'})
const resolvers = require('./resolvers')
const {makeExecutableSchema} = require('graphql-tools')

const schema = makeExecutableSchema({typeDefs, resolvers})

app.use(cors(), bodyParser.json(), expressJwt({
   secret: jwtSecret,
   credentialsRequired: false
}));

const  {graphiqlExpress,graphqlExpress} = require('apollo-server-express')

app.use('/graphql', graphqlExpress((req) => ({
   schema,
   context: {user: req.user && db.students.get(req.user.sub)}
})));
app.use('/graphiql',graphiqlExpress({endpointURL:'/graphql'}))

//authenticate students
app.post('/login', (req, res) => {
   const email = req.body.email;
   const password = req.body.password;

   const user = db.students.list().find((user) =>  user.email === email);
   if (!(user && user.password === password)) {
      res.sendStatus(401);
      return;
   }
   const token = jwt.sign({sub: user.id}, jwtSecret);
   res.send({token});
});

app.listen(port, () => console.info(`Server started on port ${port}`));
Step 5 − Run the Application
Execute the commandnpm startin the terminal. The server will be up and running on 9000 port. Here, we use GraphiQL as a client to test the application.
Open browser and type the URLhttp://localhost:9000/graphiql.Type the following query in the editor −
{
   greetingWithAuth
}
In the below response, we got an error as we are not authenticated user.
{
   "data": {
      "greetingWithAuth": null
   },
   "errors": [
      {
         "message": "Unauthorized",
         "locations": [
            {
               "line": 2,
               "column": 3
            }
         ],
         "path": [
            "greetingWithAuth"
         ]
      }
   ]
}
In the next section, let us create a client application to authenticate.
Setting up the JQuery Client
In the client application, a greet button is provided which will invoke the schema greetingWithAuth. If you click the button without login, it will give you the error message as below −
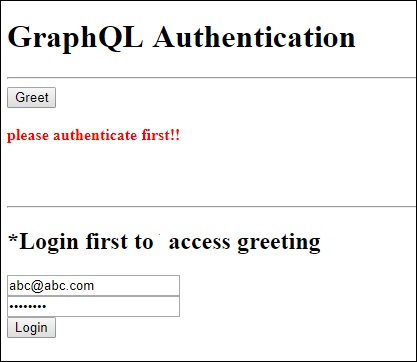
Once you log in with a user available in database, the following screen will appear −
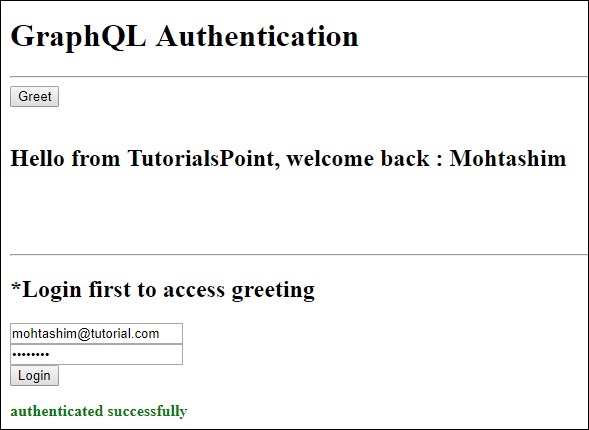
To access greeting, we need to first accessthe URL http://localhost:9000/loginroute as below.
The response will contain the token generated from the server.
$.ajax({
   url:"http://localhost:9000/login",
   contentType:"application/json",
   type:"POST",
   data:JSON.stringify({email,password}),
   success:function(response) {
      loginToken = response.token;
      $('#authStatus')
      .html("authenticated successfully")
      .css({"color":"green",'font-weight':'bold'});
      $("#greetingDiv").html('').css({'color':''});
   },
   error:(xhr,err) =>  alert('error')
})
After a successful login, we can access greetingWithAuth schema as given below. There should be anAuthorizationheader for all the subsequent requests withbearertoken.
{
   url: "http://localhost:9000/graphql",
   contentType: "application/json",
   headers: {"Authorization": 'bearer '+loginToken},  type:'POST',
   data: JSON.stringify({
   query:`{greetingWithAuth}`
}
The following is the code for index.html −
<!DOCTYPE html>
<html>
   <head>
      <script src = "https://ajax.googleapis.com/ajax/libs/jquery/3.3.1/jquery.min.js"></script>
      <script>
         $(document).ready(function() {
            let loginToken = "";
            $("#btnGreet").click(function() {
                  $.ajax({url: "http://localhost:9000/graphql",
                  contentType: "application/json",
                  headers: {"Authorization": 'bearer '+loginToken},
                  type:'POST',
                  data: JSON.stringify({
                  query:`{greetingWithAuth}` }),
                  success: function(result) {
                  $("#greetingDiv").html("<h1>"+result.data.greetingWithAuth+"</h1>")
                  },
                  error:function(jQxhr,error) {
                     if(jQxhr.status == 401) {
                        $("#greetingDiv").html('please authenticate first!!')
                        .css({"color":"red",'font-weight':'bold'})
                        return;
                     }
                     $("#greetingDiv").html('error').css("color","red");
                  }
               });
            });
            $('#btnAuthenticate').click(function() {
               var email =  $("#txtEmail").val();
               var password =  $("#txtPwd").val();
               if(email && password) {
                  $.ajax({
                     url:"http://localhost:9000/login",
                     contentType:"application/json",
                     type:"POST",
                     data:JSON.stringify({email,password}),
                     success:function(response) {
                        loginToken =  response.token;
                        $('#authStatus')
                        .html("authenticated successfully")
                        .css({"color":"green",'font-weight':'bold'});
                        $("#greetingDiv").html('').css({'color':''});
                     },
                     error:(xhr,err) =>  alert('error')
                  })
               }else alert("email and pwd empty")
            })
         });
      </script>
   </head>

   <body>
      <h1> GraphQL Authentication </h1>
      <hr/>
      <section>
         <button id = "btnGreet">Greet</button>
         <br/> <br/>
         <div id = "greetingDiv"></div>
      </section>
      <br/> <br/> <br/>
      <hr/>

      <section id = "LoginSection">
         <header>
            <h2>*Login first to  access greeting </h2>
         </header>
         <input type = "text" value = "mohtashim.mohammad@tutorialpoint.org" placeholder = "enter email" id = "txtEmail"/>
         <br/>

         <input type = "password" value = "pass123" placeholder = "enter password" id = "txtPwd"/>
         <br/>

         <input type = "button" id = "btnAuthenticate"  value = "Login"/>
         <p id = "authStatus"></p>
      </section>
   </body>
</html>
GraphQL - Caching
Caching is the process of storing data in a temporary storage area calledcache. When you return to a page you've recently visited, the browser can get those files from the cache rather than the original server. This saves your time, and network from the burden of additional traffic.
Client applications interacting with GraphQL are responsible for caching data at their end. One possible pattern for this is reserving a field, likeid, to be a globally unique identifier.
InMemory Cache
InMemoryCache is a normalized data store commonly used in GraphQL client applications without use of other library like Redux.
The sample code to use InMemoryCache with ApolloClient is given below −
import {ApolloClient, HttpLink, InMemoryCache} from 'apollo-boost'
const cache = new InMemoryCache();

const client = new ApolloClient({
   link: new HttpLink(),
   cache
});
The InMemoryCache constructor takes an optional config object with properties to customize your cache.
| Sr.No. | Parameter & Description |
|---|---|
| 1 | addTypename A boolean to determine whether to add __typename to the document (default: true) |
| 2 | dataIdFromObject A function that takes a data object and returns a unique identifier to be used when normalizing the data in the store |
| 3 | fragmentMatcher By default, the InMemoryCache uses a heuristic fragment matcher |
| 4 | cacheRedirects A map of functions to redirect a query to another entry in the cache before a request takes place. |
Illustration
We will create a single page application in ReactJS with two tabs one for the home tab and another for students. The students tab will load data from a GraphQL server API. The application will query for students data when the user navigates from the home tab to the students tab. The resulting data will be cached by the application.
We will also query the server time using getTime field to verify if the page is cached. If data is returned from the cache, the page will display the time of very first request sent to the server. If the data is a result of a fresh request made to the sever, it will always show the latest time from server.
Setting up the Server
Following are the steps for setting up the server −
Step 1 − Download and Install Required Dependencies for the Project
Create a foldercache-server-app. Change your directory tocache-server-appfrom the terminal. Follow steps 3 to 5 explained in the Environment Setup chapter.
Step 2 − Create a Schema
Add schema.graphql file in the project folder cache-server-app and add the following code −
type Query {
   students:[Student]
   getTime:String
}

type Student {
   id:ID!
   firstName:String
   lastName:String
   fullName:String
}
Step 3 − Add Resolvers
Create a file resolvers.js in the project folder, and add the following code −
const db = require('./db')

const Query = {
      students:() => db.students.list(),
      getTime:() => {
      const today = new Date();
      var h = today.getHours();
      var m = today.getMinutes();
      var s = today.getSeconds();
      return `${h}:${m}:${s}`;
   }
}
module.exports = {Query}
Step 4 − Run the Application
Create a server.js file. Refer step 8 in the Environment Setup Chapter. Execute the command npm start in the terminal. The server will be up and running on 9000 port. Here, we will use GraphiQL as a client to test the application.
Open browser and enter the URLhttp://localhost:9000/graphiql.Type the following query in the editor −
{
   getTime
   students {
      id
      firstName
   }
}
The sample response shows the students names and the server time.
{
   "data": {
      "getTime": "22:18:42",
      "students": [
         {
            "id": "S1001",
            "firstName": "Mohtashim"
         },
         {
            "id": "S1002",
            "firstName": "Kannan"
         },
         {
            "id": "S1003",
            "firstName": "Kiran"
         }
      ]
   }
}
Setting up the ReactJS Client
Open a new terminal for client. The server terminal should be kept running before executing the client application. React application will be running on port number 3000 and server application on port number 9000.
Step 1 − Create a React Application
In the client terminal, type the following command −
npx create-react-app hello-world-client
This will install everything needed for a typical react application. The npx utility and create-react-app tools create a project with name hello-world-client. Once the installation is completed, open the project in VSCode.
Install router modules for react using following command npm install react-router-dom.
Step 2 − Start hello-world-client
Change the current folder path in the terminal to hello-world-client. Typenpm startto launch the project. This will run a development server at port 3000 and will automatically open the browser and load the index page.
This is shown in the screenshot given below −
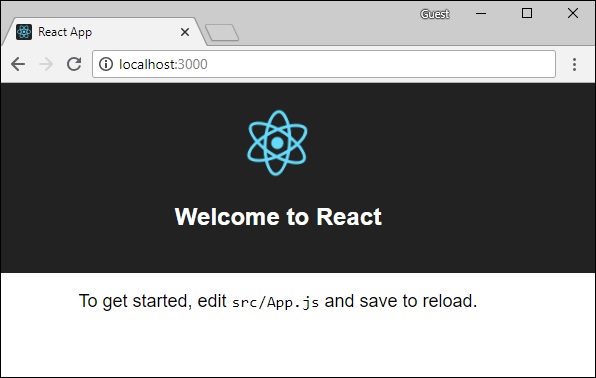
Step 3 − Install Apollo Client Libraries
To install an Apollo Client, open a new terminal and be in current project folder path. Type the following command −
npm install apollo-boost graphql
This will download the graphql libraries for client side and also the Apollo Boost package. We can cross verify this by typingnpm view apollo-boost dependencies. This will have many dependencies as shown below −
{
   'apollo-cache': '^1.1.15',
   'apollo-cache-inmemory': '^1.2.8',
   'apollo-client': '^2.4.0',
   'apollo-link': '^1.0.6',
   'apollo-link-error': '^1.0.3',
   'apollo-link-http': '^1.3.1',
   'apollo-link-state': '^0.4.0',
   'graphql-tag': '^2.4.2'
}
We can clearly see that apollo-client library is installed.
Step 4 − Modify the App Component in index.js File
For a simple react application, you only need to keep the index.js in src folder and index.html in public folder; all other files that are auto generated can be removed.
The directory structure is given below −
hello-world-client /
   -->node_modules
   -->public
      index.html
   -->src
      index.js
      students.js
   -->package.json
Add an additional file students.js which will contain Students Component. Student details are fetched through the Student Component. In the App Component, we are using a HashRouter.
Following is theindex.jsin react application −
import React, {Component} from 'react';
import ReactDOM from 'react-dom';
import {HashRouter, Route, Link} from 'react-router-dom'

//components
import Students from './students'
class App extends Component {
   render() {
      return(
         <div><h1>Home !!</h1>
         <h2>Welcome to React Application !! </h2>
         </div>
      )
   }
}

function getTime() {
   var d = new Date();
   return d.getHours()+":"+d.getMinutes()+":"+d.getSeconds()
}

const routes = <HashRouter>
   <div>
      <h4>Time from react app:{getTime()}</h4>
      <header>
         <h1>  <Link to="/">Home</Link>
         <Link to = "/students">Students</Link>  </h1>
      </header>
      <Route exact path = "/students" component = {Students}></Route>
      <Route exact path = "/" component = {App}></Route>
   </div>
</HashRouter>

ReactDOM.render(routes, document.querySelector("#root"))
Step 5 − Edit Component Students in Students.js
In Students Component, we will use the following two approaches to load data −
Fetch API (loadStudents_noCache) − This will trigger a new request everytime the clicks the student tab.
Apollo Client (loadWithApolloclient) − This will fetch data from the cache.
Add a function loadWithApolloclient which queries for students and time from server. This function will enable caching. Here we use a gql function to parse the query.
async loadWithApolloclient() {
   const query = gql`{
      getTime
      students {
         id
         firstName
      }
   }`;

   const {data} = await  client.query({query})
   return data;
}
The Fetch API is a simple interface for fetching resources. Fetch makes it easier to make web requests and handle responses than with the older XMLHttpRequest. Following method shows loading data directly using fetch api −
async  loadStudents_noCache() {
      const response = await fetch('http://localhost:9000/graphql', {
      method:'POST',
      headers:{'content-type':'application/json'},
      body:JSON.stringify({query:`{
         getTime
         students {
            id
            firstName
         }
      }`})
   })

   const rsponseBody = await response.json();
   return rsponseBody.data;
}
In the constructor of StudentsComponent, call the loadWithApolloClient method. The completeStudent.jsfile is below −
import React, {Component} from 'react';
import { Link} from 'react-router-dom'

//Apollo Client
import {ApolloClient, HttpLink, InMemoryCache} from 'apollo-boost'
import gql from 'graphql-tag'
const client = new ApolloClient({
   link: new HttpLink({uri:`http://localhost:9000/graphql`}),
   cache:new InMemoryCache()
})

class Students extends Component {
   constructor(props) {
      super(props);
      this.state = {
         students:[{id:1,firstName:'test'}],
         serverTime:''
      }
      this.loadWithApolloclient().then(data => {
         this.setState({
            students:data.students,
            serverTime:data.getTime
         })
      })
   }

   async  loadStudents_noCache() {
      const response = await fetch('http://localhost:9000/graphql', {
         method:'POST',
         headers:{'content-type':'application/json'},
         body:JSON.stringify({query:`{
            getTime
            students {
               id
               firstName
            }
         }`})
      })
      const rsponseBody =  await response.json();
      return rsponseBody.data;
   }

   async loadWithApolloclient() {
      console.log("inside apollo client function")
      const query = gql`{
         getTime
         students {
            id
            firstName
         }
      }`;
      const {data} = await  client.query({query})
      return data;
   }

   render() {
      return(
         <div>
            <h3>Time from GraphQL server :{this.state.serverTime}</h3>
            <p>Following Students Found </p>
            <div>
               <ul>
                  {
                     this.state.students.map(s => {
                        return(
                           <li key = {s.id}>
                              {s.firstName}
                           </li>
                        )
                     })
                  }
               </ul>
            </div>
         </div>
      )
   }
}
export default Students
Step 6 − Run the React Application with npm start
You can test the react application by switching from home tab to students tab. Once the students tab is loaded with data from server. It will cache the data. You can test it by switching from home to students tab multiple times. The output will be as shown below −
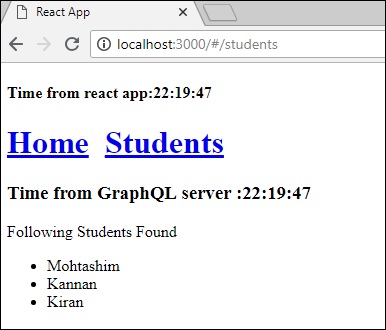
If you have loaded the students page first by typing the URL,http://localhost:3000/#/students,you can see that the load time for react app and GraphQL would be approximately same. After that if you switch to home view and return to the GraphQL server, the time will not change. This shows the data is cached.
Step 7 − Change loadWithApolloclient Call to loadStudents_noCache
If you change the load method to loadStudents_noCache in the constructor of StudentComponent, the output will not cache the data. This shows the difference between caching and non-caching.
this.loadStudents_noCache().then(data => {
   this.setState({
      students:data.students,
      serverTime:data.getTime
   })
})
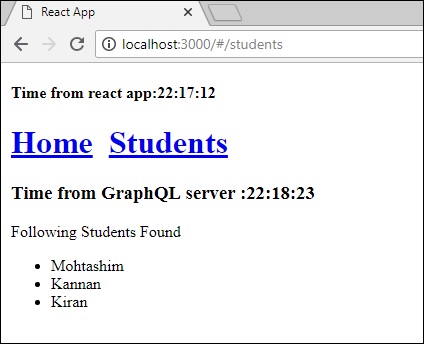
From the above output, it is clear that if you switch back and forth between the tabs, the time from graphql server will always be the latest which means the data is not cached.
