- GraphQL - Home
- GraphQL - Introduction
- GraphQL - Environment Setup
- GraphQL - Architecture
- GraphQL - Application Components
- GraphQL - Example
- GraphQL - Type System
- GraphQL - Schema
- GraphQL - Resolver
- GraphQL - Query
- GraphQL - Mutation
- GraphQL - Validation
- GraphQL - JQuery Integration
- GraphQL - React Integration
- GraphQL - Apollo Client
- GraphQL - Authenticating Client
- GraphQL - Caching
GraphQL - Environment Setup
In this chapter, we will learn about the environmental setup for GraphQL. To execute the examples in this tutorial you will need the following −
A computer running Linux, macOS, or Windows.
A web browser, preferably the latest version of Google Chrome.
A recent version of Node.js installed. The latest LTS version is recommended.
Visual Studio Code with extension GraphQL for VSCode installed or any code editor of your choice.
How to Build a GraphQL server with Nodejs
We will go through a detailed step-wise approach to build GraphQL server with Nodejs as shown below −
Step 1 − Verify Node and Npm Versions
After installing NodeJs, verify the version of node and npm using following commands on the terminal −
C:\Users\Admin>node -v
v8.11.3

C:\Users\Admin>npm -v
5.6.0
Step 2 − Create a Project Folder and Open in VSCode
The root folder of project can be named as test-app.
Open the folder using visual studio code editor by using the instructions below −
C:\Users\Admin>mkdir test-app
C:\Users\Admin>cd test-app
C:\Users\Admin\test-app>code.
Step 3 − Create package.json and Install the Dependencies
Create a package.json file which will contain all the dependencies of the GraphQL server application.
{
   "name": "hello-world-server",
   "private": true,
   "scripts": {
      "start": "nodemon --ignore data/ server.js"
   },

   "dependencies": {
      "apollo-server-express": "^1.4.0",
      "body-parser": "^1.18.3",
      "cors": "^2.8.4",
      "express": "^4.16.3",
      "graphql": "^0.13.2",
      "graphql-tools": "^3.1.1"
   },

   "devDependencies": {
      "nodemon": "1.17.1"
   }
}
Install the dependencies by using the command as given below −
C:\Users\Admin\test-app>npm install
Step 4 − Create Flat File Database in Data Folder
In this step, we use flat files to store and retrieve data. Create a folder data and add two files students.json and colleges.json.
Following is the colleges.json file −
[
   {
      "id": "col-101",
      "name": "AMU",
      "location": "Uttar Pradesh",
      "rating":5.0
   },

   {
      "id": "col-102",
      "name": "CUSAT",
      "location": "Kerala",
      "rating":4.5
   }
]
Following is the students.json file −
[
   {
      "id": "S1001",
      "firstName":"Mohtashim",
      "lastName":"Mohammad",
      "email": "mohtashim.mohammad@tutorialpoint.org",
      "password": "pass123",
      "collegeId": "col-102"
   },

   {
      "id": "S1002",
      "email": "kannan.sudhakaran@tutorialpoint.org",
      "firstName":"Kannan",
      "lastName":"Sudhakaran",
      "password": "pass123",
      "collegeId": "col-101"
   },

   {
      "id": "S1003",
      "email": "kiran.panigrahi@tutorialpoint.org",
      "firstName":"Kiran",
      "lastName":"Panigrahi",
      "password": "pass123",
      "collegeId": "col-101"
   }
]
Step 5 − Create a Data Access Layer
We need to create a datastore that loads the data folder contents. In this case, we need collection variables, students and colleges. Whenever the application needs data, it makes use of these collection variables.
Create file db.js with in the project folder as follows −
const { DataStore } = require('notarealdb');

const store = new DataStore('./data');

module.exports = {
   students:store.collection('students'),
   colleges:store.collection('colleges')
};
Step 6 − Create Schema File, schema.graphql
Create a schema file in the current project folder and add the following contents −
type Query  {
   test: String
}
Step 7 − Create Resolver File, resolvers.js
Create a resolver file in the current project folder and add the following contents −
const Query = {
   test: () => 'Test Success, GraphQL server is up & running !!'
}
module.exports = {Query}
Step 8 − CreateServer.jsand Configure GraphQL
Create a server file and configure GraphQL as follows −
const bodyParser = require('body-parser');
const cors = require('cors');
const express = require('express');
const db = require('./db');

const port = process.env.PORT || 9000;
const app = express();

const fs = require('fs')
const typeDefs = fs.readFileSync('./schema.graphql',{encoding:'utf-8'})
const resolvers = require('./resolvers')

const {makeExecutableSchema} = require('graphql-tools')
const schema = makeExecutableSchema({typeDefs, resolvers})

app.use(cors(), bodyParser.json());

const  {graphiqlExpress,graphqlExpress} = require('apollo-server-express')
app.use('/graphql',graphqlExpress({schema}))
app.use('/graphiql',graphiqlExpress({endpointURL:'/graphql'}))

app.listen(
   port, () => console.info(
      `Server started on port ${port}`
   )
);
Step 9 − Run the Application and Test with GraphiQL
Verify the folder structure of project test-app as follows −
test-app /
   -->package.json
   -->db.js
   -->data
      students.json
      colleges.json
   -->resolvers.js
   -->schema.graphql
   -->server.js
Run the command npm start as given below −
C:\Users\Admin\test-app>npm start
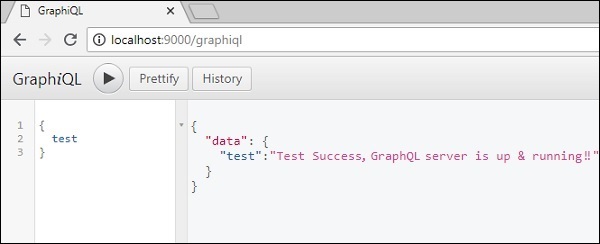
The server is running in 9000 port, so we can test the application using GraphiQL tool. Open the browser and enter the URL http://localhost:9000/graphiql. Type the following query in the editor −
{
   Test
}
The response from the server is given below −
{
   "data": {
      "test": "Test Success, GraphQL server is running !!"
   }
}