- GraphQL - Home
- GraphQL - Introduction
- GraphQL - Environment Setup
- GraphQL - Architecture
- GraphQL - Application Components
- GraphQL - Example
- GraphQL - Type System
- GraphQL - Schema
- GraphQL - Resolver
- GraphQL - Query
- GraphQL - Mutation
- GraphQL - Validation
- GraphQL - JQuery Integration
- GraphQL - React Integration
- GraphQL - Apollo Client
- GraphQL - Authenticating Client
- GraphQL - Caching
GraphQL - Query
A GraphQL operation can either be a read or a write operation. A GraphQL query is used to read or fetch values while a mutation is used to write or post values. In either case, the operation is a simple string that a GraphQL server can parse and respond to with data in a specific format. The popular response format that is usually used for mobile and web applications is JSON.
The syntax to define a query is as follows −
//syntax 1
query query_name{ someField }

//syntax 2
{ someField }
Following is an example of a query −
//query with name myQuery
query myQuery{
   greeting
}

// query without any name
{
   greeting
}
It is clear from the above example that the query keyword is optional.
GraphQL queries help to reduce over fetching of data. Unlike a Restful API, GraphQL allows a user to restrict fields that should be fetched from the server. This means smaller queries and lesser traffic over the network; which in turn reduces the response time.
Illustration 1 - Query Student Model with a Custom Field
In this example, we have a set of students stored in a json file. Each student model has fields like firstName, lastName and id but no fullName. Here, we will discuss how to make a query to retrieve fullName of all students. For this, we need to create fullName field in both schema resolver.
Let us see how to do this illustration using the below steps −
Step 1 − Download and Install Required Dependencies for the Project
Create a folder named query-app. Change your directory to query-app from the terminal. Later, follow steps 3 to 5 explained in the Environment Setup chapter.
Step 2 − Create a Schema
Add schema.graphql file in the project folder query-app and add the following code −
type Query {
   greeting:String
   students:[Student]
   studentById(id:ID!):Student
}

type Student {
   id:ID!
   firstName:String
   lastName:String
   fullName:String
}
Note that there is no fullName field in the students.json file. However, we need to fetch the fullname of the student via a query. The fullName, in this case will be a custom field that isn't available with the data source.
Step 3 − Create Resolver
Create a file resolvers.js in the project folder and add the following code −
const db = require('./db')
const Query = {
   //resolver function for greeting
   greeting:() => {
      return "hello from  TutorialsPoint !!!"
   },

   //resolver function for students returns list
   students:() => db.students.list(),

   //resolver function for studentbyId
   studentById:(root,args,context,info) => {
      //args will contain parameter passed in query
      return db.students.get(args.id);
   }
}

//for each single student object returned,resolver is invoked

const Student = {
   fullName:(root,args,context,info) => {
      return root.firstName+":"+root.lastName
   }
}

module.exports = {Query,Student}
Step 4 − Run the Application
Create a server.js file. Refer step 8 in the Environment Setup Chapter. Execute the commandnpm startin the terminal. The server will be up and running on 9000 port. Here, we use GraphiQL as a client to test the application.
Open browser and type the URL http://localhost:9000/graphiql. Type the following query in the editor −
{
   students{
      id
      fullName
   }
}
The response for the query is given below −
{
   "data": {
      "students": [
         {
            "id": "S1001",
            "fullName": "Mohtashim:Mohammad"
         },

         {
            "id": "S1002",
            "fullName": "Kannan:Sudhakaran"
         },

         {
            "id": "S1003",
            "fullName": "Kiran:Panigrahi"
         }
      ]
   }
}
Create a server.js and add the following code −
const bodyParser = require('body-parser');
const cors = require('cors');
const express = require('express');

const db = require('./db');
const port = 9000;
const app = express();

//loading type definitions from schema file
const fs = require('fs')
const typeDefs = fs.readFileSync('./schema.graphql',{encoding:'utf-8'})

//loading resolvers
const resolvers = require('./resolvers')

//binding schema and resolver
const {makeExecutableSchema} = require('graphql-tools')
const schema = makeExecutableSchema({typeDefs, resolvers})

//enabling cross domain calls and form post
app.use(cors(), bodyParser.json());

//enabling routes
const  {graphiqlExpress,graphqlExpress} = require('apollo-server-express')
app.use('/graphql',graphqlExpress({schema}))
app.use('/graphiql',graphiqlExpress({endpointURL:'/graphql'}))

//registering port
app.listen(port, () => console.info(`Server started on port ${port}`));
Execute the command npm start in the terminal. The server will be up and running on 9000 port. Here, we use GraphiQL as a client to test the application.
Open the browser and type the URL http://localhost:9000/graphiql. Type the following query in the editor −
{
   students{
      id
      fullName
   }
}
The response for the query is given below −
{
   "data": {
      "students": [
         {
            "id": "S1001",
            "fullName": "Mohtashim:Mohammad"
         },
         {
            "id": "S1002",
            "fullName": "Kannan:Sudhakaran"
         },
         {
            "id": "S1003",
            "fullName": "Kiran:Panigrahi"
         }
      ]
   }
}
Illustration 2 - Nested Query
Let us create a nested query for fetching the student details and their college details. We will work with the same project folder.
Step 1 − Edit the Schema
The schema file already has the student field. Let us add a field college and define its type.
type College {
   id:ID!
   name:String
   location:String
   rating:Float
}

type Student {
   id:ID!
   firstName:String
   lastName:String
   fullName:String
   college:College
}
Step 2 − Modify the resolver.js
We need to add a college resolver function as below. The college resolver function will be executed for each student object returned. The root parameter of resolver in this case will contain student.
const Student = {
   fullName:(root,args,context,info) => {
      return root.firstName+":"+root.lastName
   },
   college:(root) => {
      return db.colleges.get(root.collegeId);
   }
}
module.exports = {Query,Student}
The resolver returns college of each student by calling the get method of college collection and passing the collegeId. We have association relationship between Student and College through the collegeId.
Step 3 − Test the Application
Open the terminal window and navigate to the project folder. Type the command -npm start. Launch the browser and enter the URL http://localhost:9000/graphiql.
Enter the following query in the GraphiQL window −
{
   students{
      id
      firstName
      college {
         id
         name
         location
         rating
      }
   }
}
The response for the query is as given below −
{
   "data": {
      "students": [
         {
            "id": "S1001",
            "firstName": "Mohtashim",
            "college": {
               "id": "col-102",
               "name": "CUSAT",
               "location": "Kerala",
               "rating": 4.5
            }
         },

         {
            "id": "S1002",
            "firstName": "Kannan",
            "college": {
               "id": "col-101",
               "name": "AMU",
               "location": "Uttar Pradesh",
               "rating": 5
            }
         },

         {
            "id": "S1003",
            "firstName": "Kiran",
            "college": {
               "id": "col-101",
               "name": "AMU",
               "location": "Uttar Pradesh",
               "rating": 5
            }
         }
      ]
   }
}
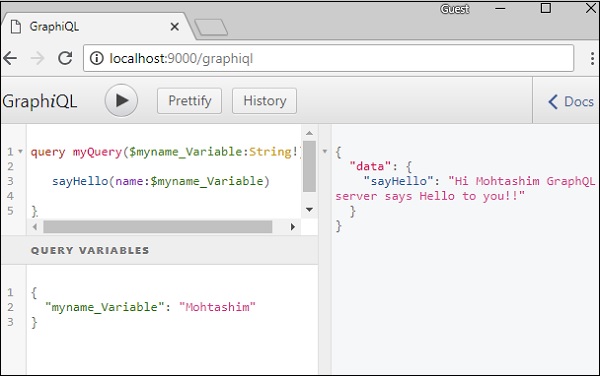
What is a Query Variable?
If a query has some dynamic values to be passed, then represent these dynamic values using variables. Hence, the query can be reused by the client applications.
Illustration
Let us create a simple application to understand the query variable.
Step 1 − Edit Schema File
Add a sayHello field which takes a string parameter and returns a string. The name values will be dynamic in client application.
type Query {
   sayHello(name:String!):String
}
Step 2 − Edit resolver.js File
Add a sayHello resolver which takes parameter as below −
sayHello:(root,args,context,info) => `Hi ${args.name} GraphQL server says Hello to you!!`
Step 3 − Declare Query Variable in GraphiQL
A variable is declared with $ followed by name of the variable. For example: $myname_Variable.
Once $myname_Variable is declared, it has to be used with a named query syntax. The query, myQuery takes string value and passes it on to sayHello as shown below −
query myQuery($myname_Variable:String!) {
   sayHello(name:$myname_Variable)
}
Set the value for $myname_Variable as a JSON object in the Query Variables section of the GraphiQL client.
{
   "myname_Variable": "Mohtashim"
}
The output of the above code is as follows −
{
   "data": {
      "sayHello": "Hi Mohtashim GraphQL server says Hello to you!!"
   }
}
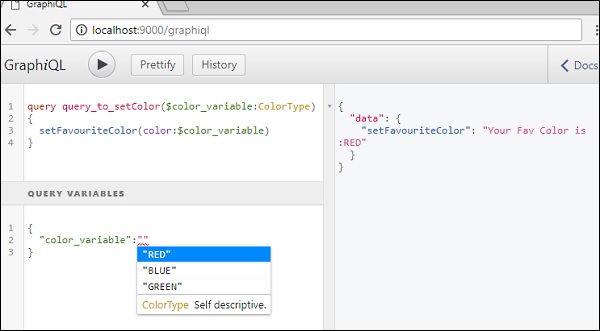
How to use Query Variable with Enum
Let us see how to use a query variable when field parameter is enum type.
Step 1 − Edit schema.graphql File
enum ColorType {
   RED
   BLUE
   GREEN
}

type Query {
   setFavouriteColor(color:ColorType):String
}
The setFavouriteColor function takes enum as input and returns a string value.
Step 2 − Edit resolvers.js File
The resolver function setFavouriteColor takes root and args. The enum value passed to function at runtime can be accessed through args parameter.
setFavouriteColor:(root,args) => {
   return  "Your Fav Color is :"+args.color;
}
Step 3 − Declare a Query Variable in GraphiQL
The query is named query_to_setColor which takes a variable of the name color_variable of ColorType. This variable is passed on to method setFavouriteColor.
query query_to_setColor($color_variable:ColorType) {
   setFavouriteColor(color:$color_variable)
}
In the query variable section of GraphiQL, type the following code −
{
   "color_variable":"RED"
}
The response is shown below −
{
   "data": {
      "setFavouriteColor": "Your Fav Color is: RED"
   }
}