- Grails - Home
- Grails - Overview
- Grails - Installation
- Grails - MVC Architecture
- Grails - Creating an Application
- Grails - The Command Line
- Grails - Convention vs Configuration
- Object Relational Mapping (GORM)
- Grails - The Web Layer
- Grails - Groovy Server Pages
- Grails - Web Services
- Grails - Validation
- Grails - Plugins
Grails Useful Resources
Grails - Quick Guide
Grails - Overview
What is Grails?
Grails is an open source, full stack, web application framework based on Groovy and Java programming language.
History
Grails is developed by Graeme Rocher and is initially released in October 2005 under the licence Apache 2.0. The latest stable release is 6.2.3.
Components of Grails
Grails includes many out-of-the-box components where each component owns a feature.
GORM, an object mapping library supporting SQL, MongoDB, Neo4j and many more.
View technologies to render HTML and JSON.
Spring Boot to build controller layer.
Plugin ecosystem having hundreds of plugins.
Profiles to create application using angular, react and so on.
Command Line Environment to build system using Gradle.
Embedded Tomcat container to test application and on the fly reloading.
Sub-projects of Grails
Grails ecosystem is made up of various sub-projects which makes Grails highly modular. Some of the key sub-projects are following −
GORM for Hibernate − An Object Mapping implementation for SQL databases like MySQL, Oracle.
GORM for MongoDB − An Object Mapping implementation for the Document Database like MongoDB.
GORM for Neo4j − An Object Mapping implementation for Graph Database like Neo4j.
JSON Views − A View technology to render JSON on the server side.
Groovy Server Pages − A View technology for to render HTML and other markup on the server.
Async Framework − Asynchronous programming support for RxJava, GPars and more.
Why to use Grails?
It has a very responsive community support for both new as well as seasoned users.
It makes a Java developer very easy to get started with using grails web-application development.
It easily integrates with the Java code that is already written.
It has a large amount of plugins available.
It provides a mechanism to reload and apply your changes.
Features
It works on the principal of DRY and Convention over Configuration pattern.
It provides an interactive mode for faster execution of Grails commands.
It provides the integration with the Quartz Scheduler.
It has a built-in support for Ajax, validation, unit and functional testing.
It provides a stand-alone development environment and hides the configuration from the developer.
Grails - Environment
There are a variety of ways to get the Grails environment setup.
Binary download and installation − Go to the link https://grails.incubator.apache.org/ to get the zip file. Click on this option to start the download of the Groovy binary distribution.
As Grails is Groovy based, JDK should be installed prior to Grails installation. We're using JDK 19. You can follow Java - Environment Setup to install JDK. For Groovy 6, JDK 11 is the minimum version required.
Install using SDKMAN
Latest version of Grails can be installed using following command.
$ sdk install grails
Manual Installation - Windows
Step 1: Extract file
Extract the downloaded grails-cli-6.2.3.zip file and extract in any suitable folder. We've extracted the zip file in c:/grails directory.
Step 2: Set Environment Variables
Set/Update the environment variables as shown below −
GRAILS_HOME − C:\grails\grails-cli-6.2.3
PATH − C:\grails\grails-cli-6.2.3\bin
Verify the installation
Open Command Prompt, and check grails version −
C:\> grails --version
Grails Version: 6.2.3
JVM Version: 24.0.1
Manual Installation - Unix/Linux
Step 1: Extract file
Extract the downloaded grails-cli-6.2.3.zip file and extract in any suitable folder. We've extracted the zip file in /etc/grails directory.
Step 2: Set Environment Variables
export GRAILS_HOME=/etc/grails/grails-cli-6.2.3
export PATH="$PATH:$GRAILS_HOME/bin
Verify the installation
Open Command Prompt, and check grails version −
$ etc > grails --version
Grails Version: 6.2.3
JVM Version: 24.0.1
Now as grails is installed successfully, we can create grails based application easily as covered in next chapters.
Grails - MVC Architecture
Grails follows MVC platform for web application development. Grails has built-in MVC architecture support. The pattern is organized in 3 layers:
Model − It is representing and managing data stored in our application.
View − It is responsible for showing the state of our data models, and also the actions that they can execute.
Controller − This component receive orders from the user, manage the interaction between model and view, and decides which view should be displayed.
MVC pattern is a software architecture that isolates the application logic from the user interface layer. The MVC design pattern allows efficient code reuse and parallel development. The MVC concept can be graphically represented as follows.
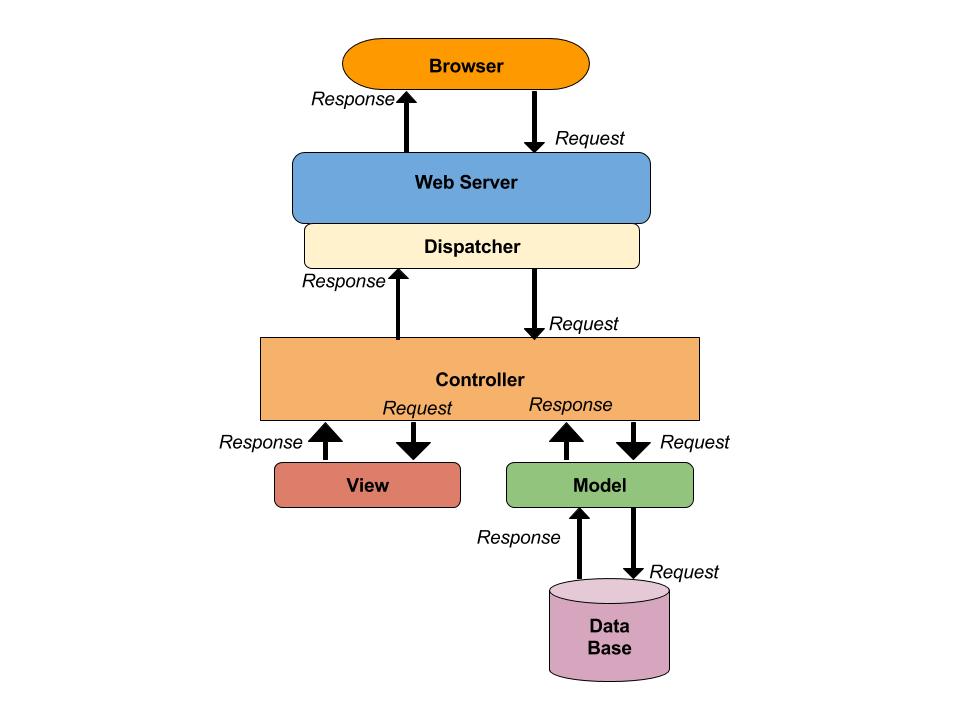
The Controller
The controller responds to user input and performs interactions on the data model objects. The controller receives input, validates it, and then performs required operations that modify the state of the data model. The controller is responsible for transferring the domain to view, and also determines which gsp should render the view.
The Model
The model is responsible for managing application data. It responds to the instructions from controller to update itself and it will request the controller for view of the data. Grails provides you a binded mechanism that help you references your model from the grails UI components. In Grails, data models are defined as domain classes.
The View
A presentation of data in a particular format, triggered by the controller's decision to present the data. Views in Grails are developed using Groovy Server Pages (GSP), which is a simplified JSP version. JSP version allows to place expressions within HTML code and use JSTL like tags.
Grails - Creating Application
Description
We can do Grails development with just JDK and Grails installed on our machine. In this chapter, we will see how to create our first Grails application. For that, you must be familier with the usage of Grails command that is defined in the following way:
grails <<command_name>>
Create an Application
To create an application, open the command line and type the following command:
grails create-app helloworld
The above command will create a directory named helloworld as shown below −
D:\Projects>grails create-app helloworld
| Application created at D:\Projects\helloworld
D:\Projects>
Start Grails interactive Console
Now, let's display a simple message "Welcome to Grails" on the browser. The important point in Grails application that a browser talks to is a Controller. To create a controller, navigate to your directory and type the below commands:
D:\Projects>cd helloworld

D:\Projects\helloworld>grails
WARNING: A restricted method in java.lang.System has been called
WARNING: java.lang.System::load has been called by org.fusesource.jansi.internal.JansiLoader in an unnamed module (file:/C:/grails/grails-cli-6.2.3/lib/jansi-2.4.1.jar)
WARNING: Use --enable-native-access=ALL-UNNAMED to avoid a warning for callers in this module
WARNING: Restricted methods will be blocked in a future release unless native access is enabled

grails>
Create a Controller
grails> create-controller hello
| Rendered controller to grails-app/controllers/helloworld/HelloController.groovy
| Rendered controller to src/test/groovy/helloworld/HelloControllerSpec.groovy
grails>
This will create a controller in the grails-app/controllers/helloworld directory named HelloController.groovy.
Edit the controller
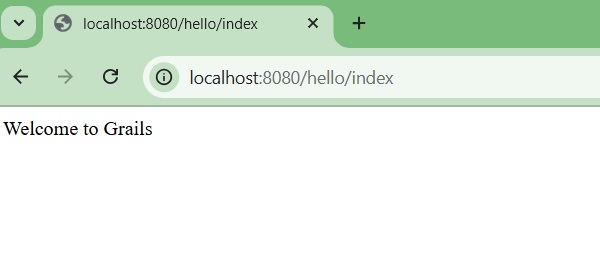
Now, let's edit the generated HelloController.groovy file so it looks like this −
package helloworld

class HelloController {
    def index() {
        render "Welcome to Grails"
    }
}
Running the Application
Go to your command line, exit from grails console and type the below command −
grails> exit
D:\Projects\helloworld> gradlew bootRun
Grails depends from gradle tasks to run the application. We're running the application using bootRun command.
The prompt should look like this:
D:\Projects\helloworld> gradlew bootRun
Starting a Gradle Daemon, 1 incompatible Daemon could not be reused, use --status for details

> Task :bootRun
Grails application running at http://localhost:8080 in environment: development
<===========--> 85% EXECUTING [7m 8s]
> IDLE
> IDLE
> IDLE
> IDLE
> IDLE
> IDLE
> IDLE
> IDLE
> IDLE
> :bootRun
> IDLE
> IDLE
The bootRun command will host your application by starting an embedded server on port 8080. Now, you can access your application at the URL http://localhost:8080/.
The below image shows an intro page of Grails provided by grails-app/view/index.gsp file.
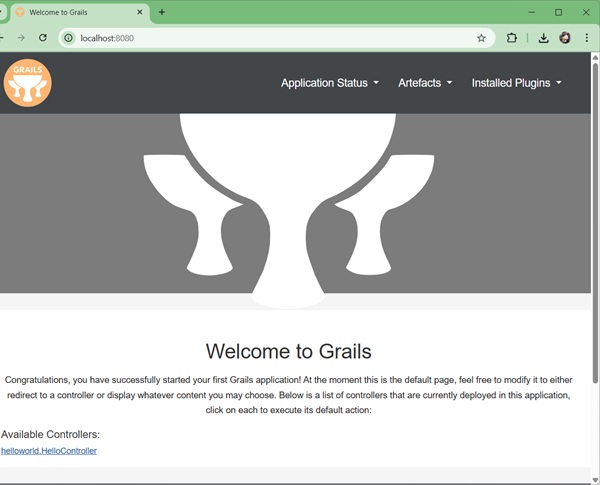
To see our custom page displaying "Welcome to Grails" message, click on the HelloController link.
Grails - The Command Line
Description
The command line system of the Grails is used for building an application by using APIs and creating the code generation. You can search the repository of a current application by using the below command line:
grails <<command name>>
For instance:
The command grails create-controller is used for create a Spring Boot based controller in application to allow interaction with the user. It will create a controller in the project −
grails> create-controller hello
| Rendered controller to grails-app/controllers/helloworld/HelloController.groovy
| Rendered controller to src/test/groovy/helloworld/HelloControllerSpec.groovy
grails>
You can get list of Grails commands by using the grails help command and displays the list as shown below −
D:\Projects\helloworld>grails help
Unmatched argument at index 0: 'help'
Usage: grails [-hvVx] [COMMAND]
Grails CLI command line interface for generating projects and services.
Application generation commands are:

*  create-app NAME
*  create-webapp NAME
*  create-restapi NAME
*  create-plugin NAME
*  create-webplugin NAME

Options:
  -h, --help         Show this help message and exit.
  -v, --verbose      Create verbose output.
  -V, --version      Print version information and exit.
  -x, --stacktrace   Show full stack trace when exceptions occur.

Commands:
  create-app           Creates an application
  create-webapp        Creates an application
  create-plugin        Creates an Grails Plugin
  create-web-plugin    Creates an Grails Web Plugin
  create-restapi       Creates an REST API
  create-interceptor   Creates a Interceptor Class
  create-controller    Creates a Grails Controller
  create-taglib        Creates a Grails TagLib
  create-service       Creates a Service Class
  create-domain-class  Creates a Domain Class

D:\Projects\helloworld>
The command line system includes below concepts:
| S.N. | Concept & Description |
|---|---|
| 1 |
Interactive Mode It runs the JVM and provides the commands for quicker execution. |
| 2 |
Building with Gradle It is used for performing some tasks such as compilation, runnings tests etc on your application. |
Grails - Interactive Mode
Description
It runs the JVM and provides the commands for quicker execution. Type the grails at command line to activate the interactive mode and use the TAB completion to specify the different command types.
D:\Projects\helloworld>grails
grails>
You can also create a service by using the below command:
grails> create-service [name]
For instance, we will create a service class "team" and "players" will be the associated unit test for the given base name:
D:\Projects\helloworld>grails
grails> create-service team.players
| Rendered service class to grails-app/services/team/PlayersService.groovy
| Rendered service class to src/test/groovy/team/PlayersServiceSpec.groovy
grails>
The above command creates the service under grails-app/services folder and its associated unit test of a service will be created under src/test folder.
You can list down the other commands to run external process by using the below command:
grails> ls
Unmatched argument at index 0: 'ls'
Usage: grails [-hvVx] [COM
MAND]
Grails CLI command line interface for generating projects and services.
Application generation commands are:

*  create-app NAME
*  create-webapp NAME
*  create-restapi NAME
*  create-plugin NAME
*  create-webplugin NAME

Options:
  -h, --help         Show this help message and exit.
  -v, --verbose      Create verbose output.
  -V, --version      Print version information and exit.
  -x, --stacktrace   Show full stack trace when exceptions occur.

Commands:
  create-app           Creates an application
  create-webapp        Creates an application
  create-plugin        Creates an Grails Plugin
  create-web-plugin    Creates an Grails Web Plugin
  create-restapi       Creates an REST API
  create-interceptor   Creates a Interceptor Class
  create-controller    Creates a Grails Controller
  create-taglib        Creates a Grails TagLib
  create-service       Creates a Service Class
  create-domain-class  Creates a Domain Class
grails>
To exit from the interactive mode, use the exit command which will exit from the interactive mode console by terminating the JVM.
grails> exit
D:\Projects\helloworld>
Grails - Building with Gradle
Description
The gradle is used for performing some tasks such as compilation, running tests etc on your application. You can get the version of the project, dependencies of the project, and repositories for finding dependencies in the build.gradle file.
buildscript {
   repositories {
      maven { url "https://repo.grails.org/grails/core" }
      mavenCentral()
   }
   dependencies { // Not Published to Gradle Plugin Portal
      classpath "org.grails:grails-gradle-plugin:6.2.4"
      classpath "org.grails.plugins:hibernate5:8.1.0"
   }
}
Dependencies with Gradle
You can find the dependencies of the project in the dependencies section of the build.gradle file as shown below−
dependencies {
    profile "org.grails.profiles:web"
    implementation "org.grails:grails-core"
    implementation "org.grails:grails-logging"
    implementation "org.grails:grails-plugin-databinding"
    implementation "org.grails:grails-plugin-i18n"
    implementation "org.grails:grails-plugin-interceptors"
    implementation "org.grails:grails-plugin-rest"
    implementation "org.grails:grails-plugin-services"
    implementation "org.grails:grails-plugin-url-mappings"
    implementation "org.grails:grails-web-boot"
    implementation "org.grails.plugins:gsp"
    implementation "org.grails.plugins:hibernate5"
    implementation "org.grails.plugins:scaffolding"
    implementation "org.springframework.boot:spring-boot-autoconfigure"
    implementation "org.springframework.boot:spring-boot-starter"
    implementation "org.springframework.boot:spring-boot-starter-actuator"
    implementation "org.springframework.boot:spring-boot-starter-logging"
    implementation "org.springframework.boot:spring-boot-starter-tomcat"
    implementation "org.springframework.boot:spring-boot-starter-validation"
    compileOnly "io.micronaut:micronaut-inject-groovy"
    console "org.grails:grails-console"
    runtimeOnly "com.bertramlabs.plugins:asset-pipeline-grails:4.5.1"
    runtimeOnly "com.h2database:h2"
    runtimeOnly "org.apache.tomcat:tomcat-jdbc"
    runtimeOnly "org.fusesource.jansi:jansi:1.18"
    testImplementation "io.micronaut:micronaut-inject-groovy"
    testImplementation "org.grails:grails-gorm-testing-support"
    testImplementation "org.grails:grails-web-testing-support"
    testImplementation "org.grails.plugins:geb"
    testImplementation "org.seleniumhq.selenium:selenium-api:4.19.1"
    testImplementation "org.seleniumhq.selenium:selenium-remote-driver:4.19.1"
    testImplementation "org.seleniumhq.selenium:selenium-support:4.19.1"
    testImplementation "org.spockframework:spock-core"
    testRuntimeOnly "org.seleniumhq.selenium:selenium-chrome-driver:4.19.1"
    testRuntimeOnly "org.seleniumhq.selenium:selenium-firefox-driver:4.19.1"
    testRuntimeOnly "org.seleniumhq.selenium:selenium-safari-driver:4.19.1"
}
Working with Gradle Tasks
The below table provides list of Grails command for performing Gradle task:
| S.N. | Grails Command | Gradle Task |
|---|---|---|
| 1 | clean | clean |
| 2 | compile | classes |
| 3 | package | assemble |
| 4 | run-app | bootRun |
| 5 | test-app | test |
| 6 | test-app --integration | integrationTest |
| 7 | war | assemble |
Gradle Plugins
You can find the set of Gradle plugins in the build.gradle file for building the Grails project−
apply plugin:"eclipse"
apply plugin:"idea"
apply plugin:"war"
apply plugin:"org.grails.grails-web"
apply plugin:"asset-pipeline"
apply plugin:"org.grails.grails-gsp"
In the above plugins, you will be having war and asset-pipeline plugins as default. The war plugin provides War file from the project and asset-pipeline plugin enables the static assets of the project.
There are many other plugins specified by the Gradle or third party plugins as listed below:
| S.N. | Grails Plugins |
|---|---|
| 1 |
org.grails.grails-core It is a primary Grails plugin used for operating with all profiles. |
| 2 |
org.grails.grails-gsp It provides the adds precompilation of GSP files for production deployments. |
| 3 |
org.grails.grails-doc It is used for Grails documentation engine. |
| 4 |
org.grails.grails-plugin It builds the Grails plugins for Gradle. |
| 5 |
org.grails.grails-plugin-publish It publishes the Grails plugins in the central repository. |
| 6 |
org.grails.grails-profile It is used for creating Grails profiles. |
| 7 |
org.grails.grails-profile-publish It publishes the Grails profiles in the central repository. |
| 8 |
org.grails.grails-web It is a web gradle plugin used for configuring Grails conventions and directory structure. |
Grails - Object Relational Mapping (GORM)
Description
The Grails is a full stack open source framework which uses Hibernate framework as well as implements its own Object Relational Mapping (ORM) layer for groovy known as GORM.
GORM is the persistence component of Grails for handling relational databases. The Object Relational Mapping is implemented in Grails called Domain Class.
In this chapter we will see how GORM implements its Object model in the domain class. You can create a domain class by using the following command−
grails create-domain-class Employee
Creating a domain class
D:\Projects\helloworld>grails
grails> create-domain-class Employee
| Rendered domain class to grails-app/domain/helloworld/Employee.groovy
| Rendered domain class to src/test/groovy/helloworld/EmployeeSpec.groovy
grails>
The above command will create a file Employee.groovy which looks like−
package helloworld

class Employee {

    static constraints = {
    }
}
Let's modify the generated file by adding the properties−
package helloworld

class Employee {
    String Firstname
    Integer age
    static constraints = {
    }
}
Once done, use the below command in shell or console to load an interactive GUI to run Groovy commands−
grails
Grails - Web Layer
Description
Grails provides different types of web layers such as controllers, models, views, scopes etc as listed in the table below:
\| S.N. | Layers & Description |
|---|---|
| 1 |
Controllers and Actions Controller is used for handling web requests along with a default action. |
| 2 |
Controllers and Scopes You can use the scopes for storing the variables. |
| 3 |
Models and Views Use the models and views for managing application data and showing the state of data models respectively. |
| 4 |
Data Binding It binds an incoming request on the object properties or graph of objects. |
Grails - Controllers and Actions
Description
Controller is used for handling web requests along with some actions such as redirecting, rendering views etc. You can use the below command to create a controller in your project.
grails> create-controller [name]
Create a Controller
D:\Projects\helloworld>grails
grails> create-controller mycontroller
| Rendered controller to grails-app/controllers/helloworld/MycontrollerController.groovy
| Rendered controller to src/test/groovy/helloworld/MycontrollerControllerSpec.groovy
grails>
After running the above command, it will create a controller in the grails-app/controllers/helloworld/MycontrollerController.groovy file.
package helloworld

class MycontrollerController {

    def index() { }
}
The helloworld is a name of an application and MycontrollerController maps to /Mycontroller URI by default.
Creating Actions
You can create actions for a controller which maps to an URI.
package helloworld

class MycontrollerController {

   def display() {

      //logic for controller

      //creating model

      return model
   }
}
The above example maps to /Mycontroller/display URI. There are some rules to be followed when an action is requested for default URI.
It is said to be default, if there is only one action.
It can be default, if an action has name called "index".
You can use the defaultAction property to set it explicitly.
Grails - Controllers and Scopes
Description
You can use the scopes for storing the variables. The below list shows available scopes to the controllers−
servletContext− It is an instance of ServletContext which allows to share the state of the web application.
session− It is an instance of HttpSession which associates with user state and connects a session with a client by using cookies.
request− It is an instance of HttpServletRequest which stores the object for the current request only.
params− These are the POST parameters or incoming request query string of mutable map.
flash− It can be used as temporary store that provides the attributes for the given request.
Accessing Scopes
The above variables can be used along with Groovy's array index operator to access the scopes.
For instance−
class HelloController {
   def find()
   {
      def findBy = params["findBy"]
      def loggedUser = session["logged_user"]
   }
}
The above values can be accessed within scopes by using the de-reference operator as shown below−
class HelloController {
   def find()
   {
      def findBy = params.findBy
      def loggedUser = session.logged_user
   }
}
The flash scope (temporary store that provides the attributes for the given request) can be used for displaying message before redirecting.
For instance−
class HelloController {
   def delete_info()
   {
     def info = Team.get(params.id)
        if (!info) {
           flash.message = "Sorry..No user found the id − ${params.id}"
           redirect(action−list)
        }
    // other code
   }
}
The message value of the scopes can be used to display the message when you request the delete_info action and will be removed from the flash scope after the second request.
There are some supported controller scopes available in the Grails−
prototype (default)− It is a default scope which creates a new controller for each request.
session− It uses the single controller for the scope of a user session.
singleton− It provides the only one instance of the controller and it is recommended for actions as methods.
You can add the static scope property to the class along with the above specified scope values to enable the scope.
static scope = "singleton"
Grails - Models and Views
Description
Use the models and views for managing application data and showing the state of data models respectively. You can return the model instance explicitly as shown below−
def info() {
    [team: Team.get(params.id)]
}
You can return an instance of the Spring ModelAndView class, by using the advanced approach as specified below:
import org.springframework.web.servlet.ModelAndView

def index() {
    // defines the team for the index page
    def myTeam = ...

    // further move to players view to display them
    return new ModelAndView("/team/players", [ teamPlayers : myTeam ])
}
The view can be selected by using the info.gsp file present in the grails-app/views folder.
class MycontrollerController {

   def info() {
      [team: Team.get(params.id)]

      //use the render method to display different view
      render(view: "display", model: map)
   }
}
Rendering a Response
The result of the code or text can be displayed easily by using the rendor method.
render "Welcome..!"
You can display the particular view as:
render(view: 'team')
Even you can display a template for each item in a collection as:
render(template: 'team_template', collection: Team.list())
Display the text along with encoding and content type as:
render(text: "<xml>xml text</xml>", contentType: "text/xml", encoding: "UTF-8")
Grails - Data Binding
Description
Data binding is a process of binding an incoming request on the object properties or graph of objects.
def info() {
    [team: Team.get(params.id)]
}
The data binder converts Map values to object properties and updates the collections and map.
For instance, the below code snippet occupies List of objects in domain class−
class Team {
    String name
    static hasMany = [teams: Team1]
    List teams
}

class Team1 {
    String player
    Integer age
}

def bindingMap = [name: 'India',
                  'teams[0]': [player: 'Sachin', age: '40'],
                  'teams[1]': [player: 'Dravid', age: '38']]

def team = new Team(bindingMap)

assert team.name == 'India'
assert team.teams.size() == 2
assert team.teams[0].player == 'Sachin'
assert team.teams[0].age == 40
assert team.teams[1].player == 'Dravid'
assert team.teams[1].age == 38
Binding Data to Model
The dotted request parameter names can be converted into nested maps by using the controller's params object. For instance, if you have request parameters as person.name.fname and person.name.lname with values 'John' and 'Smith', then params will include entries as shown below−
[person: [name: [fname: 'John', lname: 'Smith']]]
The requested parameters can be bound on properties of a domain class by using map constructor of domain classes'.
def save() {
    def myteam = new Team(params)
    myteam.save()
}
You can bind the data to multiple domain classes from the params object. For instance, consider the below incoming request:
/team/save?team.player=MS%20Dhoni&board.name=ICC%20Board
In the above code, each parameter has a prefix called board. or team. which isolates which parameters belong to which type. Use the Grails' params object to bind the subset of parameters.
def var = new Team(params.team)
def var1 = new Board(params.board)
Data Binding and Type Conversion Errors
Sometimes you can't able to convert particular string into particular target type which results in type conversion error. For example, consider a domain class 'Team' which uses java.net.URL class to specify the URLs for the below incoming request−
/team/save?publisherURL=wrong-url
You can't bind wrong-url to publisherURL property which specifies the mismatch error.
def myvar = new Team(params)

if (myvar.hasErrors()) {
    println "The value ${myvar.errors.getFieldError('publisherURL').rejectedValue}" +
            " is not a valid URL!"
}
You can define the custom binding mechanism for a particular field by using the BindUsing annotation which contains two arguments (one is object in which data binding is applied and other one is DataSourceBinding source for the data binding).
For instance:
import grails.databinding.BindUsing

class SomeClass {
    @BindUsing({obj, source

        //'source' is DataSourceBinding for the data binding
        source['name']?.toUpperCase()
    })
    String name
}
Date Formats for Data Binding
The date format can be set for data binding by using the @BindingFormat annotation to Date field.
For instance:
import grails.databinding.BindingFormat

class Person {
    @BindingFormat('MMddyyyy')
    Date birthDate
}
You can configure the different types of date formats in the application.groovy file as shown below−
grails.databinding.dateFormats = ['MMddyyyy', 'yyyy-MM-dd HH:mm:ss.S', "yyyy-MM-dd'T'hh:mm:ss'Z'"]
Following are the different date formats which are configured by default:
yyyy-MM-dd HH:mm:ss.S
yyyy-MM-ddThh:mm:ssZ'
yyyy-MM-dd HH:mm:ss.S z
yyy-MM-ddTHH:mm:ss.SSSX
Grails - Groovy Server Pages
Description
The technology used to render the views in Grails framework for the client response is known as Groovy Server Pages (GSP) and is responsible for how to display the model to user.
Developing GSP is similar to JSP and it resides in views directory under grails-app.
GSPs can be rendered by using the render method as shown below:
render(view: "index")
Usually a GSP is a combination of mark-up and GSP tags and has a model consisting variables used to render a view. For instance, consider the controller given below:
def show() {
    [store: Store.get(params.id)]
}
The above code creates a model that has a key named store using which you can then reference it within the GSP view with the name store as shown below:
${store.title}
Grails - Web Services
Description
Web Services means providing a web API onto your web application and are typically implemented in either REST or SOAP.
| S.N. | Types & Description |
|---|---|
| 1 |
Domain classes as REST resources Creating Profiles helps you to setup a default set of commands and plugins that are tailored to a particular technology or organisation. |
| 2 | The AngularJS Profile You can define inheritance of a profile and define the profile dependences and You can publish your profiles to Grails Central Repository and also to an Internal Repository. |
| 3 | Creating JSON Views and Templates Understanding profile means contents of directories containing the "commands", "skeleton" and "templates" defined by the profile. |
Grails - Domain classes as REST resources
Description
You can create a RESTful API in Grails, the simple way to do this is by using a domain class as a REST resource. You should add grails.rest.Resource transformation to domain class as shown below snippet−
OrderDemo.groovy
import grails.rest.*

@Resource(uri='/api/orders', formats=['json', 'xml'])
class Orderdemo {
   Long id
   String stock
   String side
   Double price
   Long size

   static mapping = {
      version false
      table 'orders'
      id column: 'id', generator:'native', params:[sequence:'order_seq']
   }

   static constraints = {
      stock blank:false
      price blank:false
      quantity blank:false
   }
}
Your domain class will be available as a REST resource in either XML or JSON formats, by just adding the Resource transformation and specifying a URI. Registering the required RESTful URL mapping and creating a controller called OrderdemoController will be done with the help of transformation.
If you want to test, you can add sample data in BootStrap.groovy file as shown below−
BootStrap.groovy
import grails.rest.example.Orderdemo

class BootStrap {
   def init = { servletContext ->
      new Orderdemo(stock:"Nokia", price:20000, quantity:100).save()
      new Orderdemo(stock:"Samsung", price:30000, quantity:200).save()
	  new Orderdemo(stock:"HTC", price:15000, quantity:300).save()
   }
   def destroy = {
   }
}
The JSON response can be obtained by using the ACCEPT header or by using the file extension in the URI. The table below shows to obtain JSON response using the Unix curl tool−
| S.N. | Method & Description | Syntax |
|---|---|---|
| 1 | GET To display the record GET method is used. |
curl -i -H "Accept: application/json" localhost:8080/api/orders |
| 2 |
POST To create a new resource, you can use POST request: |
curl -i -X POST -H "Content-Type: application/json" -d
'{"price": 200,"side": "S","size": 5000,"stock": "TWT"}' localhost:8080/api/orders
|
| 3 |
PUT To update a record, PUT request is used. |
curl -i -X PUT -H "Content-Type: application/json" -d
'{"price": 210,"size": 500}' localhost:8080/api/orders/1
|
| 4 |
DELETE To delete a resource, DELETE request is used: |
curl -i -X DELETE localhost:8080/api/orders/1 |
Grails - The AngularJS Profile
Description
AngularJS applications are supported by Grails 3.1. Grails has angular profile for applications involving AngularJS. This profile is focused set of dependencies and commands. The angular profile has all the commands and properties that the REST profile has, because it is inherited from REST profile.
The angular profile for applications can be started by using following command:
grails create-app grail-angularjs --profile angularjs
The above command will create new application with name grail-angularjs and it will have following features:
Asset Pipeline plugins to ease development.
Gradle plugin to execute client side unit tests and to manage client side dependencies.
Default set of commands for creating AngularJS artefacts.
AngularJS profile has GSP support to provide the index page. This is necessary because the profile is designed around asset pipeline. The available new commands will be as follows:
Asset Pipeline plugins to ease development.
Gradle plugin to execute client side unit tests and to manage client side dependencies.
Default set of commands for creating AngularJS artefacts.
Project structure
AngularJS profile is drawn with a specific project structure. Modules will be created with the help of create-ng command.
grails create-ng-controller mycontroller
The above command will create mycontroller.js file in C:\grail-angularjs\grails-app\assets\javascripts\grail\angularjs\controllers.
grails create-ng-domain mydomain
The above command will create mydomain.js file in C:\grail-angularjs\grails-app\assets\javascripts\grail\angularjs\domain.
grails create-ng-module mymodule
The above command will create grail.angularjs.mymodule.js file in C:\grail-angularjs\grails-app\assets\javascripts\grail\angularjs\mymodule. You will notice that Note the naming convention for modules is different than other artefacts.
grails create-ng-controller myservice --type constant
The above command will create myserviceService.js file in C:\grail-angularjs\grails-app\assets\javascripts\grail\angularjs\services. The above command accepts a flag-type which are as follows service, factory -default, value, provider and constant.
Client side dependencies and Unit Testing
| S.N. | Plugins & Description |
|---|---|
| 1 |
Gradle Bower Plugin It is used to manage dependencies with bower. |
| 2 |
Gradle Karma Plugin It is used to execute client side unit tests |
Asset Pipeline
Several asset pipeline plugins are included with in AngularJS profile, some of the plugins are listed in below table:
| S.N. | Plugins & Description |
|---|---|
| 1 |
JS Closure Wrap Asset Pipeline This plugin will enclose Angular code in immediately invoked function expressions. |
| 2 |
Annotate Asset Pipeline This plugin will interpret dependencies to be safe for minification. |
| 3 |
Template Asset Pipeline It will put templates into the $templateCache to avoid http requests to retrieve the templates. |
Grails - Creating JSON Views and Templates
Description
JSON views are stored with .gson suffix in grails-app/views directory. These files are Groovy script files which can be edited in any Groovy editor.
The format for JSON view is shown below:
json.student {
   name "jhonson"
}
json is an inbuilt variable, which is a sample shown in StreamingJsonBuilder. The above code will be displayed as shown below−
{"student":{"name":"jhonson"}}
Templates can be defined with underscore _. The following sample code file is named as _student.gson−
model {
   Student student
}
json {
   name student.name
   rollno student.rollno
}
Templates can be presented with views as shown below:
model {
   Division division
}
json {
   name division.teacher.name
   rollno division.student.rollno
   addChild g.render(template:"student", model:[student: division.children.max { Student s -> s.rollno } ])
   children g.render(template:"student", collection: division.children, var:'student')
}
You can use tmpl variable for presenting the above code in more compact way:
model {
   Division division
}
json {
   name division.teacher.name
   rollno division.student.rollno
   addChild tmpl.student( division.children.max { Person s -> s.rollno } ] )
   children tmpl.student( division.children )
}
Grails - Validation
Description
Grails validation functionality uses Springs Validator API for data binding and validation efficiency. Grails uses this package to specify the validation constraints within constraints system.
Consider the below code for declaring constraints in a domain class with constraints property.
class UserInfo {
    String fname
    String lname
    Integer age

    static constraints = {
      ...
    }
}
The method calls can be used to that match property name to specify the constraints as shown below:
class UserInfo {
    ...

    static constraints = {
      fname size: 5..10, blank:false   //it specifies that first name should be 5 and 10 characters long
      lname size: 5..10, blank:false
      age min:20                       //it specifies age should be minimum of 20
    }
}
Grails provides different types of validation concepts as shown in the table below:
| S.N. | Type & Description |
|---|---|
| 1 |
Validating Constraints The constraints can be validated by using the validate() method. |
| 2 |
Validation on the Client It display the errors, if you get errors on validating the client side. |
| 3 |
Validation and Internationalization Grails displays the error messages by using the FieldError class from message bundles. |
Grails - Validating Constraints
Description
The constraints can be validated by using the validate() method on domain class instance.
For instance:
def info = new UserInfo(params)

if (info.validate()) {
   //code here
}
else
{
   info.errors.allErrors.each {
      println it
   }
}
The errors property is an instance of the Spring Errors interface on domain classes which displays the validation errors by using methods and fetches the original values.
Validation Phases
Grails includes two types of validation phases. The first phase can be used in the data binding process in which request parameters can be bind on to an instance as shown below:
def info = new UserInfo(params)
If you get any errors in the errors property, then you can check these errors and get the actual input values by using the Errors API:
if (info.hasErrors()) {
   if (info.errors.hasFieldErrors("fname")) {
      println info.errors.getFieldError("fname").rejectedValue
   }
}
When you call the validate() or save() method, the second phase of validation takes place, when you validate the bound values opposed to defined constraints.
For instance:
By default, validate will be called by the save() method before executing as written in the below code:
if (info.save()) {
   return info
}
else {
   info.errors.allErrors.each {
      println it
   }
}
Grails - Validation on the Client
Description
It displays the errors, if you get errors on validating the client side and redirect back to view for rendering. Grails provides different types of tags for associating with errors and use the renderErrors tag for displaying the list of errors.
<g:renderErrors bean="${team}" as="list" field="name"/>
The above format contains below attributes:
as: It is an optional attribute which displays the options as list and xml. The default option is list.
bean: It is an optional attribute which is used for checking errors with the bean name.
field: It is an optional attribute which is used for checking errors within bean or model.
Displaying Errors
You can check for any other errors in bean, request scope or model by using the hasErrors tag and loop through the bean or model for checking errors by using the eachError tag.
<g:hasErrors bean="${team}">
  <ul>
   <g:eachError var="teamerr" bean="${team}">
       <li>${teamerr}</li>
   </g:eachError>
  </ul>
</g:hasErrors>
The errors can be highlighted using some red color or indicator, when a field contains incorrect input. This can be determined by invoking the hasErrors tag as a method.
<div class='value ${hasErrors(bean:team,field:'fname','errors')}'>
   <input type="text" name="fname" value="${fieldValue(bean:team,field:'fname')}"/>
</div>
In the above code, if there are any errors for the fname field of the team bean, then it will add an errors CSS class to the div to highlight the div.
The input value can be retrieved by using the fieldValue tag as shown below:
<input type="text" name="fname" value="${fieldValue(bean:team,field:'fname')}"/>
Grails - Validation and Internationalization
Description
Grails displays the error messages by using the FieldError class from message bundles with i18n support. Grails supports internationalization by using the Locale class which specifies the geographical, political, or cultural region. A Locale includes language and country code, for instance "en_US" is the code for US English.
Grails provides the below error codes, if you ignore a constraint:
| S.N. | Constraint | Error Code |
|---|---|---|
| 1 | blank | className.propertyName.blank |
| 2 | creditCard | className.propertyName.creditCard.invalid |
| 3 | className.propertyName.email.invalid | |
| 4 | inList | className.propertyName.not.inList |
| 5 | matches | className.propertyName.matches.invalid |
| 6 | max | className.propertyName.max.exceeded |
| 7 | maxSize | className.propertyName.maxSize.exceeded |
| 8 | min | className.propertyName.min.notmet |
| 9 | minSize | className.propertyName.minSize.notmet |
| 10 | notEqual | className.propertyName.notEqual |
| 11 | nullable | className.propertyName.nullable |
| 12 | range | className.propertyName.range.toosmall or className.propertyName.range.toobig |
| 13 | size | className.propertyName.size.toosmall or className.propertyName.size.toobig |
| 14 | unique | className.propertyName.unique |
| 15 | url | className.propertyName.url.invalid |
| 16 | validator | classname.propertyName. + String returned by Closure |
For instance
Consider the blank constraint which could be written as team.name.blank that can be specified in your grails-app/i18n/messages.properties file to display the following message:
team.name.blank=please enter the name!!!
Displaying Messages
The messages can be displayed from the message bundles by using the message tag.
<g:hasErrors bean="${team}">
<ul>
<g:eachError var="msgerror" bean="${team}">
<li><g:message error="${msgerror}" /></li>
</g:eachError>
</ul>
</g:hasErrors>
In the above code snippet, the message tag is used within the body of the eachError tag along with an error argument to display the message for the given error.
Grails - Plugins
Description
Grails is web application framework and platform. Grails can stasify any needs of the application, because it can be extended from the command line interface to the runtime configuration. To attach into this platform, you need to create a plugin. You can create your own plugin, only if you know how to build a Grails application.
| S.N. | Types & Description |
|---|---|
| 1 |
Creating and Installing Plugins In Grails, you should consider requirement of the plugin like, does it requires a web environment or it can be used with other profiles. |
| 2 |
Understanding Plugin Load Order Plugins usually work on dependence of other plugins. These plugins can adapt themselves, depending on other plugins. |
Grails - Creating and Installing Plugins
Description
In Grails, plugin can be created by running the following command
grails create-plugin myplugin
The above command will create plugin directory with name myplugin. In Grails, you should consider requirement of the plugin like, does the plugin requires a web environment or it can be used with other profiles. Depending on the requirement the profiles can be used like plugin or web-pluginprofile. The usage of profile with create-plugin command is shown below:
grails create-plugin myplugin --profile=plugin
You have to note that, the plugin name should not contain more than one capital letter. As it is a grails project (web profile), you can immediately test your plugin by running the following command:
grails run-app
The structure of a Grails plugin should contain MypluginGrailsPlugin.groovy file in C:\myplugin\src\main\groovy\myplugin, otherwise it is not regarded as a plugin. The plugin class defines metadata about the plugin.
Table below shows additional information, that can be mentioned about the plugin:
| S.N. | Types & Description |
|---|---|
| 1 |
title It indicates one-line heading of your plugin. |
| 2 |
grailsVersion It shows the range of Grails that the plugin supports. |
| 3 |
author It indicates plugin authors name. |
| 4 |
authorEmail It represents plugin authors contact e-mail. |
| 5 |
developers Any additional developers beyond the author specified above. |
| 6 |
description A brief description of plugin and its features features. |
| 7 |
documentation URL of the plugins documentation. |
| 8 |
license This field indicates license of the plugin. |
| 9 |
issueManagement This field indicates issue tracker of the plugin. |
| 10 |
scm This field indicates source code management location of the plugin. |
You can check the sample file Quartz Grails plugin for demonstration.
Installation
Plugins can be made available for application use by running the below command:
grails install
After running the above command, plugin will be installed in your local Maven cache. You have to declare a dependency of the plugin in your build.gradle file to use it in the application as shown below:
compile "org.grails.plugins:quartz:0.1"
You can setup the plugin as part of multi project build by following below steps:
-
Step 1: Create the application and the plugin
Run the following commands for creating the application and the plugin:
grails create-app myapplication
grails create-plugin multiproplugin
-
Step 2: Create a settings.gradle file
Now create settings.gradle file in the project directory and place the following code in the file:
include "myapplication", "multiproplugin"
The directory structure should be as follows:
grailsproject - settings.gradle - myapplication - build.gradle - multiproplugin - build.gradle -
Step 3: Declare a project dependency on the plugin
In build.gradle file of application folder, mention below code to declare a dependency on the plugin:.
grails { plugins { compile project(':multiproplugin') } } -
Step 4: Run the application
Now move into the app folder and run the application using below command.
cd myapplication
$ grails run-app
Grails - Understanding Plugin Load Order
Description
Usually, plugins depend on other plugins and can they adapt depending on the presence of others. There are two ways to implement this, the first way is dependsOn. The below code taken from the Hibernate plugin will demonstrate this:
class HibernateGrailsPlugin {

    def version = "1.0"

    def dependsOn = [dataSource: "1.0",
                     domainClass: "1.0",
                     i18n: "1.0",
                     core: "1.0"]
}
The above snipet shows that the Hibernate plugin is dependent on the dataSource, domainClass, i18n and core plugins. The Hibernate plugin will not load, if all dependencies are not loaded. The dependsOn property supports version ranges, so that user can mention version of particular plugin, the syntax is shown below:
def dependsOn = [pluginname: "* > 1.0"]
def dependsOn = [pluginname: "1.0 > 1.1"]
def dependsOn = [pluginname: "1.0 > *"]
The disadvantage of dependsOn property is, if any one of the dependent plugin is not loaded the plugin will give up and wont load. To avoid this you can use loadAfter and loadBefore properties as shown below:
def loadAfter = ['controllers']
Similarly, you can use the loadBefore property to load you plugin before specifed plugins as shown below:
def loadBefore = ['rabbitmq']
The user can select the environments in which the plugin should be loaded and also stages of the build. The user can achieve this by declaring one or both of these properties in the plugin descriptor as shown in below syntax:
def environments = ['development', 'test']
def scopes = [excludes:'war']
From the above syntax, it is clear that the plugin will be loaded in development and test environments, and it will be excluded from the war phase.
Below is the list of available scopes:
-
test
It is used in/when running tests.
-
functional-test
It is used when running functional tests.
-
run
It is used for run-app and run-war.
-
war
It is used when packaging the application as a WAR file.
-
all
It is used for plugin applied to all scopes (default).
The value of environments and scopes properties can be a string, a list or a map.
