- DC.js - Home
- DC.js - Introduction
- DC.js - Installation
- DC.js - Concepts
- Introduction to Crossfilter
- Introduction to D3.js
- DC.js - Mixins
- DC.js - baseMixin
- DC.js - capMixin
- DC.js - colorMixin
- DC.js - marginMixin
- DC.js - coordinateGridMixin
- DC.js - Pie Chart
- DC.js - Line Chart
- DC.js - Bar Chart
- DC.js - Composite Chart
- DC.js - Series Chart
- DC.js - Scatter Plot
- DC.js - Bubble Chart
- DC.js - Heat Map
- DC.js - Data Count
- DC.js - Data Table
- DC.js - Data Grid
- DC.js - Legend
- DC.js - Dashboard Working Example
DC.js - Data Grid
Data grid is used to filter and display the records. This chapter explains about data grid in detail.
Data Grid Methods
Before moving on to draw a data grid, we should understand the dc.dataGrid class and its methods. This class uses a mixin to get the basic functionality of drawing a data grid chart, which is defined below −
- dc.baseMixin
The dc.dataGrid gets all the methods of this mixin as well as has its own methods to draw the data grid, which is explained below −
beginSlice( [slice])
This method is used to get or set the index of the beginning slice. This method is useful when implementing pagination.
Similarly, you can perform endSlice().
group(function)
This method is used to perform the group function for the data grid.
html( [html])
This method is used to get or set the function to generate a dynamic html.
order( [order])
It is used to sort the order function.
size( [size])
It is used to display the number of items in the grid.
sortBy( [sortByFunction])
This method is used to get or set the sort-by function. We can sort a particular field using this function. For example: we can sort by age, which is defined below −
chart.sortBy(function(d) {
   return d.age;
});
Data Grid Example
Let us perform a data grid in DC. To do this, we need to follow the steps given below −
Step 1: Add styles
Let us add styles in CSS using the coding below −
.dc-chart { font-size: 12px; }
.dc-grid-top { padding-left: 10px; font-size: 14px; font-weight: bold; }
.dc-grid-item { padding-left: 10px; font-size: 12px; font-weight: normal; }
Here, we have assigned the styles for the chart, grid-top and grid-item.
Step 2: Create a variable
Let us create a variable in DC as explained below −
var barChart = dc.barChart('#line');
var countChart = dc.dataCount("#mystats");
var gridChart = dc.dataGrid("#mygrid");
Here, we have assigned a barChart variable id in line, countChart id is mystats and gridChart id is mygrid.
Step 3: Read the data
Read the data from the people.csv file as shown below −
d3.csv("data/people.csv", function(errors, people) {
   var mycrossfilter = crossfilter(people);
}
If data is not present, then it returns an error. Now, assign the data to a crossfilter.
Here, we used the same people.csv file, which was used in our previous charting examples. It looks like as shown below −
id,name,gender,DOB,MaritalStatus,CreditCardType
1,Damaris,Female,1973-02-18,false,visa-electron
2,Barbe,Female,1969-04-10,true,americanexpress
3,Belia,Female,1960-04-16,false,maestro
4,Leoline,Female,1995-01-19,true,bankcard
5,Valentine,Female,1992-04-16,false,
6,Rosanne,Female,1985-01-05,true,bankcard
7,Shalna,Female,1956-11-01,false,jcb
8,Mordy,Male,1990-03-27,true,china-unionpay

..........................................
.........................................
Step 4: Set the dimension
You can set the dimension using the coding given below −
var ageDimension = mycrossfilter.dimension(function(data) {
   return ~~((Date.now() - new Date(data.DOB)) / (31557600000))
});
After the dimension has been assigned, group the age using the coding given below −
var ageGroup = ageDimension.group().reduceCount();
Step 5: Generate a chart
Now, generate a bar chart using the coding given below −
barChart
   .width(400)
   .height(200)
   .x(d3.scale.linear().domain([15,70]))
   .yAxisLabel("Count")
   .xAxisLabel("Age")
   .elasticY(true)
   .elasticX(true)
   .dimension(ageDimension)
   .group(ageGroup);
Here,
- We have assigned the chart width as 400 and height as 200.
- Next, we have specified the domain range as [15,70].
- We have set the x-axis label as age and y-axis label as count.
- We have specified the elasticY and X function as true.
Step 6: Create the grid chart
Now, create the grid chart using the coding given below −
gridChart
   .dimension(ageDimension)
   .group(function (data) {
      return ~~((Date.now() - new Date(data.DOB)) / (31557600000));
   })
Step 7: Render the grid
Now, render the grid using the coding given below −
.size(100)
   .htmlGroup (function(d) {
      return 'Age: ' + d.key +
      '; Count: ' + d.values.length +
      ' people'
   })
   .html (function(d) { return d.name; })
   .sortBy(function (d) {
      return d.name;
   })
   .order(d3.ascending);

barChart.render();
countChart.render();
gridChart.render();
Here, we have sorted the name using the html() function and have finally rendered the chart.
Step 8: Working example
The complete code is as follows. Create a webpage datagrid.html and add the following changes to it.
<html>
   <head>
      <title>DC datagrid sample</title>
      <link rel = "stylesheet" type = "text/css" href = "css/bootstrap.css">
      <link rel = "stylesheet" type = "text/css" href = "css/dc.css"/>

      <style>
         .dc-chart { font-size: 12px; }
         .dc-grid-top { padding-left: 10px; font-size: 14px; font-weight: bold; }
         .dc-grid-item { padding-left: 10px; font-size: 12px; font-weight: normal; }
      </style>

      <script src = "js/d3.js"></script>
      <script src = "js/crossfilter.js"></script>
      <script src = "js/dc.js"></script>
   </head>

   <body>
      <div>
         <div style = "width: 600px;">
            <div id = "mystats" class = "dc-data-count" style = "float: right">
               <span class = "filter-count"></span> selected out of <span
                  class = "total-count"></span> | <a href = "javascript:dc.filterAll();
                  dc.renderAll();">Reset All</a>
            </div>
         </div>

         <div style = "clear: both; padding-top: 20px;">
            <div>
               <div id = "line"></div>
            </div>
         </div>

         <div style = "clear: both">
            <div class = "dc-data-grid" id = "mygrid"></div>
         </div>
      </div>

      <script language = "javascript">
         var barChart = dc.barChart('#line');
         var countChart = dc.dataCount("#mystats");
         var gridChart = dc.dataGrid("#mygrid");

         d3.csv("data/people.csv", function(errors, people) {
            var mycrossfilter = crossfilter(people);

            // age dimension
            var ageDimension = mycrossfilter.dimension(function(data) {
               return ~~((Date.now() - new Date(data.DOB)) / (31557600000))
            });
            var ageGroup = ageDimension.group().reduceCount();

            barChart
               .width(400)
               .height(200)
               .x(d3.scale.linear().domain([15,70]))
               .yAxisLabel("Count")
               .xAxisLabel("Age")
               .elasticY(true)
               .elasticX(true)
               .dimension(ageDimension)
               .group(ageGroup);

            countChart
               .dimension(mycrossfilter)
               .group(mycrossfilter.groupAll());

            gridChart
               .dimension(ageDimension)
               .group(function (data) {
                  return ~~((Date.now() - new Date(data.DOB)) / (31557600000));
               })
               .size(100)
               .htmlGroup (function(d) {
                  return 'Age: ' + d.key +
                  '; Count: ' + d.values.length +
                  ' people'
               })
               .html (function(d) { return d.name; })
               .sortBy(function (d) {
                  return d.name;
               })
               .order(d3.ascending);

            barChart.render();
            countChart.render();
            gridChart.render();
         });
      </script>
   </body>
</html>
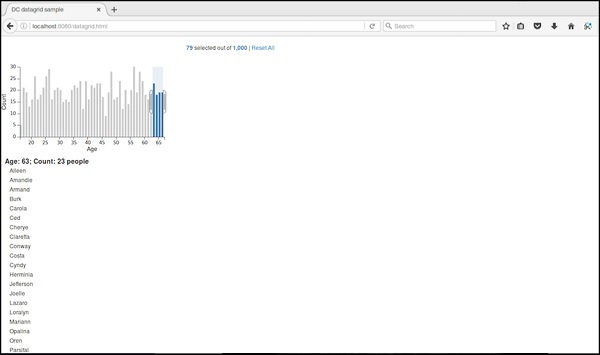
Now, request the browser and we will see the following response.
Initially, the grid chart looks like the following screenshot.
If you select a particular age between 63 and 66, it filters out the following records.