- Cucumber - Home
- Cucumber - Overview
- Cucumber - Environment
- Cucumber - Gherkins
- Cucumber - Features
- Cucumber - Scenarios
- Cucumber - Annotations
- Cucumber - Scenario Outline
- Cucumber - Tags
- Cucumber - Data Tables
- Cucumber - Comments
- Cucumber - Hooks
- Cucumber - Command Line Options
- Cucumber - JUnit Runner
- Cucumber - Reports
- Cucumber - Debugging
- Cucumber - Java Testing
- Cucumber - Ruby Testing
Cucumber - JUnit Runner
It is important to understand what Junit is, before we begin our discussion for Cucumber JUnit Runner. JUnit is an open source unit testing framework for the Java programming language. JUnit has been important in the development of test-driven development, and is one of a family of unit testing frameworks, which is collectively known as xUnit that originated with SUnit.
Benefits of Using JUnit
Unit has a Graphical User Interface (GUI), making it possible to write and test source code quickly and easily.
JUnit allows the developer to incrementally build test suites to measure progress and detect unintended side effects.
Test can be run continuously.
JUnit shows test progress in a bar that is normally green but turns red when a test fails.
By now, we have seen the benefits of using JUnit, but the reason we are discussing it right now is Cucumber framework. On one hand, Cucumber is providing a way for non-technical person to define test cases for a product, and on the other hand, our expectation is for smooth and timely execution of such test cases.
JUnit acts as a bridge between these two. So, the flow of execution will look like the following −
Stakeholders write down the feature file.
Step definition file will be created accordingly.
Specify the JUnit runner class to run the series of test cases.
Once we run the JUnit runner class −
It will parse the Gherkin feature file.
It will execute the functions written in the step definition file according to feature file statements.
JUnit will combine the test case result.
It will build the test report in the specified format (which can be html/JSON).
The important point here is how to configure JUnit to do all these things? Following are the steps −
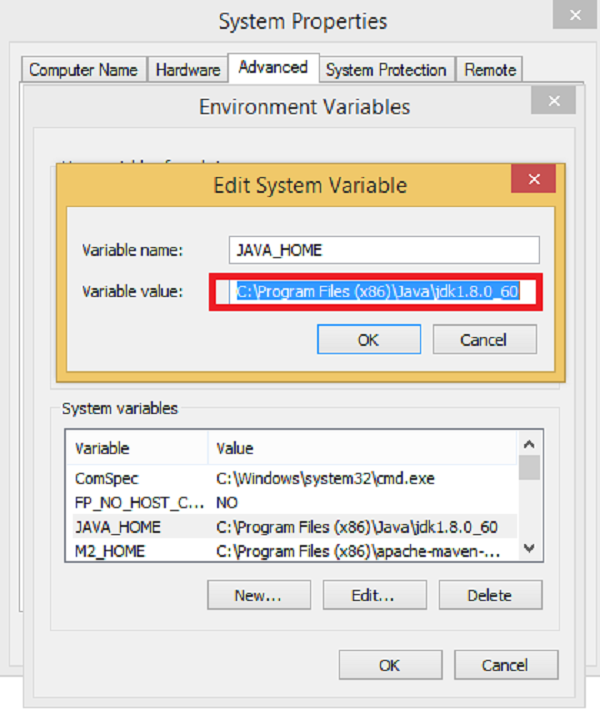
Step 1 − Install Java.
Download jdk and jre from the link http://www.oracle.com/technetwork/java/javase/downloads/index.html
Accept license agreement.
Install JDK and JRE.
Set environment variable as shown in the following screenshot.
Step 2 − Install Eclipse.
Why we need − Eclipse is an Integrated Development Environment (IDE). It contains a base workspace and an extensible plug-in system for customizing the environment.
How to install −
Make sure JAVA is installed on your machine.
Download Eclipse from http://www.eclipse.org/downloads
Unzip and Eclipse is installed.
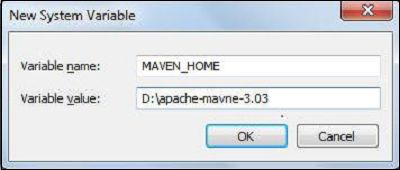
Step 3 − Install Maven.
Why we need − Maven is a build automation tool used primarily for Java projects. It provides a common platform to perform activities like generating source code, compiling code, packaging code to a jar, etc. Also later if any of the software versions gets changed, Maven provides an easy way to modify the test project accordingly.
How to install −
Download Maven − https://maven.apache.org/download.cgi
Unzip the file and remember the location.
Create environment variable MAVEN_HOME as shown in the following screenshot.
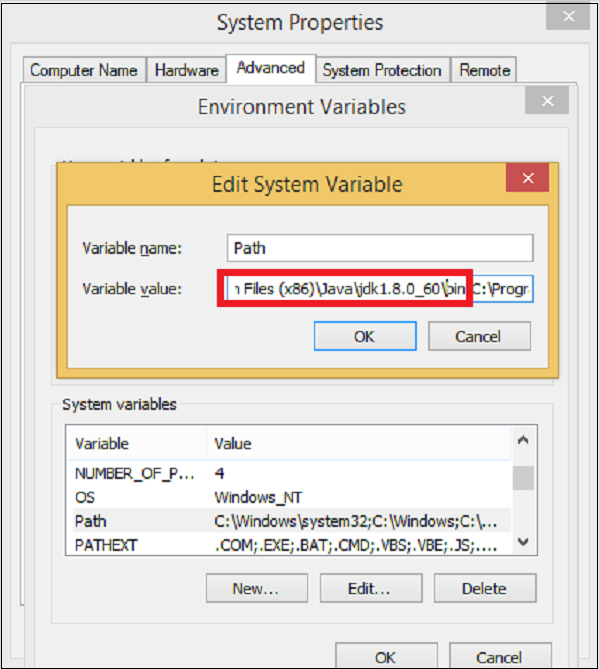
Edit Path variable and include Maven as shown in the following screenshot.
Download MAVEN plugin from Eclipse.
Open Eclipse.
Got to Help → Eclipse Marketplace → Search maven → Maven Integration for Eclipse → INSTALL.
Step 4 − How to configure Cucumber with Maven
Create a Maven project in Eclipse.
Go to File → New → Others → Maven → Maven Project → Next.
Provide group Id (group Id will identify your project uniquely across all projects).
Provide artifact Id (artifact Id is the name of the jar without version. You can choose any name which is in lowercase).
Click on Finish.
Open pom.xml
Go to package explorer on the left hand side of Eclipse.
Expand the project CucumberTest.
Locate pom.xml file.
Right-click and select the option, Open with Text Editor.
Add dependency for Selenium − This will indicate Maven, which Selenium jar files are to be downloaded from the central repository to the local repository.
Open pom.xml is in edit mode, create dependencies tag (<dependencies></dependencies>), inside the project tag.
Inside the dependencies tag, create dependency tag. (<dependency></dependency>).
Provide the following information within the dependency tag.
<dependency>
   <groupId>org.seleniumhq.selenium</groupId>
   <artifactId>selenium-java</artifactId>
   <version>2.47.1</version>
</dependency>
Add dependency for Cucumber-Java − This will indicate Maven, which Cucumber files to be downloaded from the central repository to the local repository.
Create one more dependency tag.
Provide the following information within the dependency tag.
<dependency>
   <groupId>info.cukes</groupId>
   <artifactId>cucumber-java</artifactId>
   <version>1.0.2</version>
   <scope>test</scope>
</dependency>
Add dependency for Cucumber-JUnit: This will indicate Maven, which Cucumber JUnit files are to be downloaded from the central repository to the local repository.
Create one more dependency tag.
Provide the following information within the dependency tag.
<dependency>
   <groupId>info.cukes</groupId>
   <artifactId>cucumber-junit</artifactId>
   <version>1.0.2</version>
   <scope>test</scope>
</dependency>
Add dependency for JUnit − This will indicate Maven, which JUnit files are to be downloaded from the central repository to the local repository.
Create one more dependency tag.
Provide the following information within the dependency tag.
<dependency>
   <groupId>junit</groupId>
   <artifactId>junit</artifactId>
   <version>4.10</version>
   <scope>test</scope>
</dependency>
Verify binaries
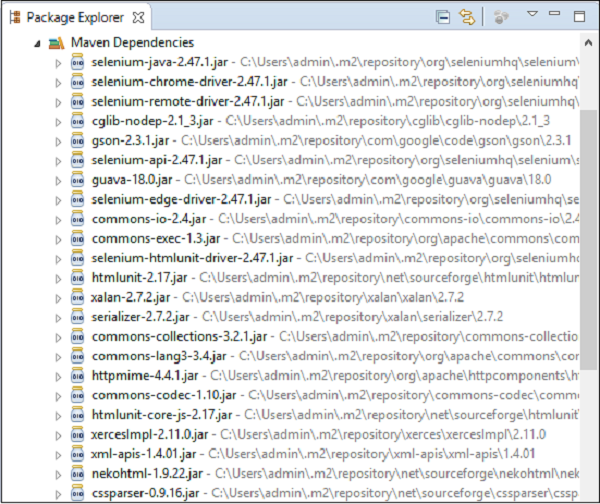
Once pom.xml is edited successfully, save it.
Go to Project → Clean − It will take a few minutes.
After that you will be able to see a Maven repository like the following screenshot.
Step 5 − Create feature file (to be covered later).
Step 6 − Create step definition file (to be covered later).
Step 7 − Create Junit runner to run the test (to be covered later).
