- Cucumber - Home
- Cucumber - Overview
- Cucumber - Environment
- Cucumber - Gherkins
- Cucumber - Features
- Cucumber - Scenarios
- Cucumber - Annotations
- Cucumber - Scenario Outline
- Cucumber - Tags
- Cucumber - Data Tables
- Cucumber - Comments
- Cucumber - Hooks
- Cucumber - Command Line Options
- Cucumber - JUnit Runner
- Cucumber - Reports
- Cucumber - Debugging
- Cucumber - Java Testing
- Cucumber - Ruby Testing
Cucumber - Java Testing
To run Cucumber test with Java, following are the steps.
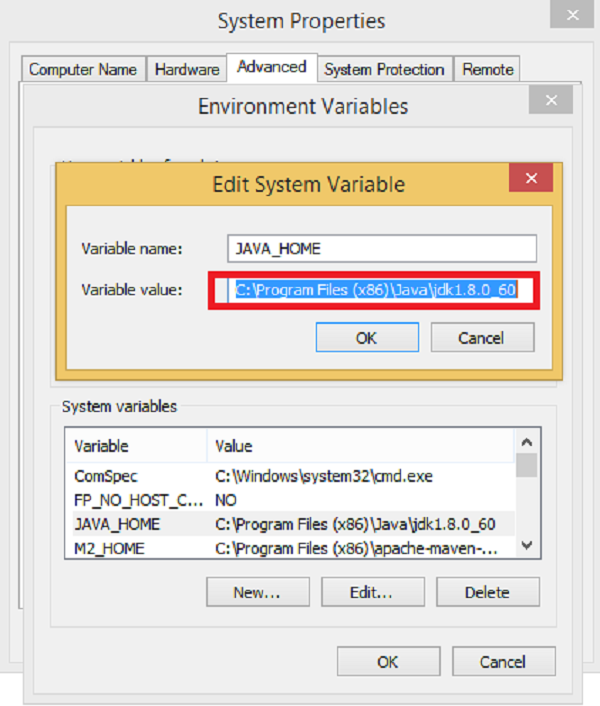
Step 1 − Install Java −
Download jdk and jre from
http://www.oracle.com/technetwork/java/javase/downloads/index.html
Accept license agreement.
Install JDK and JRE.
Set environment variable as shown in the following picture.
Step 2 − Install Eclipse IDE −
Make sure JAVA is installed on your machine.
Download Eclipse from https://eclipse.org/downloads/
Unzip and Eclipse installed.
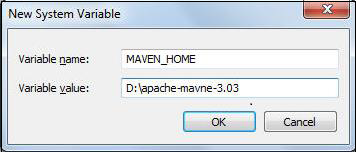
Step 3 − Install Maven −
Download Maven −https://maven.apache.org/download.cgi
Unzip the file and remember the location.
Create environment variable MAVEN_HOME as shown in the following image.
Edit Path variable and include Maven.
Download MAVEN plugin from Eclipse
Open Eclipse.
Got to Help → Eclipse Marketplace → Search maven → Maven Integration for Eclipse →INSTALL
Step 4 − Configure Cucumber with Maven.
Create a Maven project.
Go to File → New → Others → Maven → Maven Project → Next.
Provide group Id (group Id will identify your project uniquely across all projects).
Provide artifact Id (artifact Id is the name of the jar without version. You can choose any name which is in lowercase).
Click on Finish.

Step 5 − Open pom.xml −
Go to the package explorer on the left hand side of Eclipse.
Expand the project CucumberTest.
Locate pom.xml file.
Right-click and select the option, Open with Text Editor.
Step 6 − Add dependency for Selenium − This will indicate Maven, which Selenium jar files are to be downloaded from the central repository to the local repository.
Open pom.xml is in edit mode, create dependencies tag (<dependencies></dependencies>), inside the project tag.
Inside the dependencies tag, create dependency tag. (<dependency></dependency>)
Provide the following information within the dependency tag.
<dependency>
   <groupId>org.seleniumhq.selenium</groupId>
   <artifactId>selenium-java</artifactId>
   <version>2.47.1</version>
</dependency>
Step 7 − Add dependency for Cucumber-Java − This will indicate Maven, which Cucumber files are to be downloaded from the central repository to the local repository.
Create one more dependency tag.
Provide following information within the dependency tag.
<dependency>
   <groupId>info.cukes</groupId>
   <artifactId>cucumber-java</artifactId>
   <version>1.0.2</version>
   <scope>test</scope>
</dependency>
Step 8 − Add dependency for Cucumber-JUnit − This will indicate Maven, which Cucumber JUnit files are to be downloaded from the central repository to the local repository.
Create one more dependency tag.
Provide the following information within the dependency tag.
<dependency>
   <groupId>info.cukes</groupId>
   <artifactId>cucumber-junit</artifactId>
   <version>1.0.2</version>
   <scope>test</scope>
</dependency>
Step 9− Add dependency for JUnit − This will indicate Maven, which JUnit files are to be downloaded from the central repository to the local repository.
Create one more dependency tag.
Provide the following information within the dependency tag.
<dependency>
   <groupId>junit</groupId>
   <artifactId>junit</artifactId>
   <version>4.10</version>
   <scope>test</scope>
</dependency>
Step 10 − Verify binaries.
Once pom.xml is edited successfully, save it.
Go to Project → Clean − It will take a few minutes.
You will be able to see a Maven repository.
Step 11 − Create a package under src/test/java named as cucumberJava.
Step 12 − Create feature file
Select and right-click on the package outline.
Click on New file.
Give the file a name such as cucumberJava.feature.
Write the following text within the file and save it.
Feature: CucumberJava
Scenario: Login functionality exists
Given I have open the browser
When I open Facebook website
Then Login button should exits
Step 13 − Create step definition file −
Select and right-click on the package outline.
Click on New file.
Give the file name a name such as annotation.java.
Write the following text within the file and save it.
package CucumberJava;

import org.openqa.selenium.By;
import org.openqa.selenium.WebDriver;
import org.openqa.selenium.firefox.FirefoxDriver;

import cucumber.annotation.en.Given;
import cucumber.annotation.en.Then;
import cucumber.annotation.en.When;

public class cucumberJava {
   WebDriver driver = null;

   @Given("^I have open the browser$")
   public void openBrowser() {
      driver = new FirefoxDriver();
   }

   @When("^I open Facebook website$")
   public void goToFacebook() {
      driver.navigate().to("https://www.facebook.com/");
   }

   @Then("^Login button should exits$")
   public void loginButton() {
      if(driver.findElement(By.id("u_0_v")).isEnabled()) {
         System.out.println("Test 1 Pass");
      } else {
         System.out.println("Test 1 Fail");
      }
      driver.close();
   }
}
Step 14 − Create a runner class file.
Select and right-click on the package outline.
Click on New file.
Give the file name as runTest.java.
Write the following text within the file and save it.
package cucumberJava;

import org.junit.runner.RunWith;
import cucumber.junit.Cucumber;

@RunWith(Cucumber.class)
@Cucumber.Options(format = {"pretty", "html:target/cucumber"})

public class runTest { }
Step 15 − Run the test using option −
Select runTest.java file from the package explorer.
Right-click and select the option, Run as.
Select JUnit test.
You will observe the following things upon execution −
An instance of Firefox web browser will open.
It will open the Facebook login page on the browser.
It will detect the login button.
The browser will close.
In the JUnit window, you will see a scenario with green tick mark, which indicates success of the test execution.
