- PyQt - Home
- PyQt - Introduction
- PyQt - Environment
- PyQt - Hello World
- PyQt - Major Classes
- PyQt - Using Qt Designer
- PyQt - Meta Objects
- PyQt Signals & Slots
- PyQt - Signals and Slots
- PyQt - Support and Signals
- PyQt - Unbound and Bound Signals
- PyQt - New Signals with PyQtSignal
- PyQt - Connecting, Disconnecting, & Emitting Signals
- PyQt - Slot decorator
- PyQt - Slot Connection
- PyQt Layouts
- PyQt - Layout Management
- PyQt - QBoxLayout
- PyQt - QGridLayout
- PyQt - QFormLayout
- PyQt - QHBoxLayout
- PyQt - QVBoxLayout
- PyQt - QStackedLayout
- PyQt - QGraphicsGridLayout
- PyQt - QGraphicsAnchorLayout
- PyQt - QGraphicsLayout
- PyQt - QGraphicsLinearLayout
- PyQt Basic Widgets
- PyQt - Basic Widgets
- PyQt - Qlabel Widget
- PyQt - QLineEdit Widget
- PyQt - QPushButton Widget
- PyQt - QRadioButton Widget
- PyQt - QCheckBox Widget
- PyQt - QComboBox Widget
- PyQt - QSpinBox Widget
- PyQt - QMessageBox
- PyQt - QDialogButtonBox Widget
- PyQt - QFontComboBox Widget
- PyQt - QDoubleSpinBox Widget
- PyQt - QToolBox Widget
- PyQt - QMenuBar, QMenu & Qaction Widgets
- PyQt - QToolTip
- PyQt - QInputDialog Widget
- PyQt - QFontDialog Widget
- PyQt - QDialog Widget
- PyQt - QFileDialog Widget
- PyQt - QTab Widget
- PyQt - QSplitter Widget
- PyQt - QDock Widget
- PyQt - QStatusBar Widget
- PyQt - QTabBar
- PyQt - QList Widget
- PyQt - QScrollBar Widget
- PyQt - QProgressBar
- PyQt - QCalendar Widget
- PyQt - QMessageBox Widget
- PyQt - QPlainTextEdit
- PyQt - QDateEdit
- PyQt - QDateTimeEdit
- PyQt - QTimeEdit
- PyQt - QTextEdit
- PyQt - QTextBrowser
- PyQt - QScrollArea
- PyQt - Drag and Drop
- PyQt - Multiple Document Interface
- PyQt - QDialog Class
- PyQt Views
- PyQt - QColumnView
- PyQt - QTableView
- PyQt Drawing API
- PyQt - Drawing API
- PyQt - Drawing a Line
- PyQt - Drawing a Rectangle
- PyQt - Drawing a Triangle
- PyQt - Drawing a Circle
- PyQt - Drawing a Ellipse
- PyQt - Drawing a Polygon
- PyQt - Geometric Transformation
- PyQt - Drawing Effect
- PyQt Groups
- PyQt - QButtonGroup
- PyQt - QGroupBox
- PyQt Effects
- PyQt - Effects
- PyQt - Opacity Effect
- PyQt - QGraphicsBlur Effect
- PyQt - QGraphicsColorize Effect
- PyQt - QGraphicsDropShadow Effect
- PyQt Events
- PyQt - Event Handling
- PyQt - File Open Event
- PyQt - Action Event
- PyQt - Hide Event
- PyQt - Resize Event
- PyQt Database
- PyQt - Database Handling
- PyQt Essentials
- PyQt - BrushStyle Constants
- PyQt - QClipboard
- PyQt - QPixmap Class
- PyQt Useful Resources
- PyQt - Quick Guide
- PyQt - Useful Resources
- PyQt - Discussion
PyQt - QTab Widget
In GUI applications, a tab is a part of the user interface element which allows computer users to quickly switch between one or more sets of tabs(tasks).
If a form has too many fields to be displayed simultaneously, they can be arranged on different pages and placed under each tab of a Tabbed Widget.
The QTabWidget provides a tab bar and a page area. The page under the first tab is displayed and others are hidden. The user can view any page by clicking on the desired tab.
Following are some of the frequently methods uses for QTabWidget class −
| Sr.No. | Methods & Description |
|---|---|
| 1 |
addTab() Adds a tab associated with a widget page |
| 2 |
insertTab() Inserts a tab with the page at the desired position |
| 3 |
removeTab() Removes tab at given index |
| 4 |
setCurrentIndex() Sets the index of the currently visible page as current |
| 5 |
setCurrentWidget() Makes the visible page as current |
| 6 |
setTabBar() Sets the tab bar of the widget |
| 7 |
setTabPosition() Position of the tabs are controlled by the values QTabWidget.North - above the pages QTabWidget.South - below the pages QTabWidget.West - to the left of the pages QTabWidget.East - to the right of the pages |
| 8 |
setTabText() Defines the label associated with the tab index |
The following signals are associated with QTabWidget object −
| Sr.No. | Methods & Description |
|---|---|
| 1 |
currentChanged() Whenever the current page index changes |
| 2 |
tabClosedRequested() When the close button on the tab is clicked |
Example
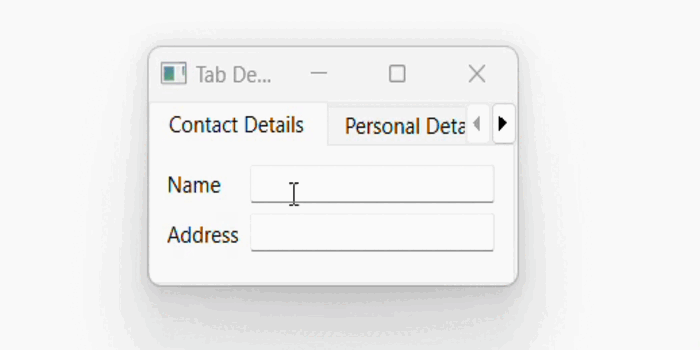
In the following example, the contents of a form are grouped in three categories. Each group of widgets is displayed under a different tab.
Top level window itself is a QTabWidget. Here, we have added three tabs as a parameter to the method addTab().
self.addTab(self.tab1,"Tab 1")
self.addTab(self.tab2,"Tab 2")
self.addTab(self.tab3,"Tab 3")
Each tab displays a sub form designed using a layout. Tab text is altered by the statement.
self.setTabText(0, "Contact Details")
self.setTabText(1, "Personal Details")
self.setTabText(2, "Education Details")
Below is the complete code of QTabwidget that displays the tab more than once.
import sys
from PyQt6.QtWidgets import QApplication, QWidget, QTabWidget, QFormLayout, QLineEdit, QHBoxLayout, QRadioButton, QLabel, QCheckBox

class TabDemo(QTabWidget):
   def __init__(self, parent=None):
      super().__init__(parent)
      self.tab1 = QWidget()
      self.tab2 = QWidget()
      self.tab3 = QWidget()

      self.addTab(self.tab1, "Tab 1")
      self.addTab(self.tab2, "Tab 2")
      self.addTab(self.tab3, "Tab 3")
      self.tab1UI()
      self.tab2UI()
      self.tab3UI()
      self.setWindowTitle("Tab Demo")
   def tab1UI(self):
      layout = QFormLayout()
      layout.addRow("Name", QLineEdit())
      layout.addRow("Address", QLineEdit())
      self.setTabText(0, "Contact Details")
      self.tab1.setLayout(layout)
   def tab2UI(self):
      layout = QFormLayout()
      sex = QHBoxLayout()
      sex.addWidget(QRadioButton("Male"))
      sex.addWidget(QRadioButton("Female"))
      layout.addRow(QLabel("Sex"), sex)
      layout.addRow("Date of Birth", QLineEdit())
      self.setTabText(1, "Personal Details")
      self.tab2.setLayout(layout)
   def tab3UI(self):
      layout = QHBoxLayout()
      layout.addWidget(QLabel("Subjects"))
      layout.addWidget(QCheckBox("Physics"))
      layout.addWidget(QCheckBox("Maths"))
      self.setTabText(2, "Education Details")
      self.tab3.setLayout(layout)
def main():
   app = QApplication(sys.argv)
   ex = TabDemo()
   ex.show()
   sys.exit(app.exec())

if __name__ == '__main__':
   main()
Output
The above code produces the following output −