
 Data Structure
 Networking
 RDBMS
RDBMS Operating System
 Java
Java MS Excel
 iOS
iOS HTML
HTML CSS
CSS Android
 Python
 C Programming
 C++
C++ C#
C# MongoDB
 MySQL
MySQL Javascript
 PHP
PHP
- Selected Reading
- UPSC IAS Exams Notes
- Developer's Best Practices
- Questions and Answers
- Effective Resume Writing
- HR Interview Questions
- Computer Glossary
- Who is Who
Creating a Melody Program
A simple buzzer can be connected to the ESP32 controller for producing sound. It can also be used to produce melodies. In this article, using two different examples, the C code is used on Arduino to make the buzzer play the melody. In the first example, "Twinkle Twinkle Little Star", the poem's notes are played and in the second example, another famous poem "Jingle Bell" is used for playing the note while making two colored LEDs on and off to create a light show with music.
Example 1: Playing the poem notes using buzzer and ESP32
The circuit is made and the program is written using Arduino software. The C language program given here defines the music key notes frequencies for the different piano keys. The function playNotes() is used to make the buzzer pin go HIGH or LOW depending on the duration and time of playing the notes.
Circuit Design Steps and Coding
Step 1 ? Connect the ESP32 microcontroller to the breadboard.
Step 2 ? A buzzer is also placed on the breadboard.
Step 3 ? The buzzer's plus point is to be connected to the D26 pin of ESP32. Connect the buzzer's negative point to the GND pin of ESP32.
Step 4 ? Write the C program using Arduino for playing the melody.
Step 5 ? Attach the ESP32 to the computer using a USB data cable.
Step 6 ? Compile and transfer the code into ESP32 and check the result.
The Code
// set piano notes (frequencies)
#define c 3830
#define d 3400
#define e 3038
#define f 2864
#define g 2550
#define a 2272
#define b 2028
#define C 1912
#define R 0

// buzzer pin is D26 on ESP32

int buzzOut  = 26;
int startFlag = 1;
int flagPlay=1;
// this rhythm_measure is the tempo of the song
long rhythm_measure = 10000;

int pauseTime = 500;
int do_nothing = 2;

int audioTone = 0;
int beat1 = 0;
long timedur  = 0;

void setup() {
   // set the buzzer as output component for melody
   pinMode(buzzOut, OUTPUT);
   if (startFlag) {
      // specify the baud rate
      Serial.begin(9600);
   }
}

// these are the music notes for Twinkle twinkle little star poem
double songNotes[] = {
   c,c,g,g,a,a,g,
   f,f,e,e,d,d,c,
   g,g,f,f,e,e,d,
   g,g,f,f,e,e,d,
   c,c,g,g,a,a,g,
   f,f,e,e,d,d,c
};

int MAX_COUNT = sizeof(songNotes) / 2;

// this is the function which makes the buzzer high and low while playing the poem notes
void playNotes() {
   long passed_time = 0;
   if (audioTone > 0) {

      while (passed_time < timedur) {
      digitalWrite(buzzOut,HIGH);
      delayMicroseconds(audioTone / 2);
      digitalWrite(buzzOut, LOW);
      delayMicroseconds(audioTone / 2);
      passed_time += (audioTone);
      }
   }
   else {
      for (int n = 0; n < do_nothing; n++) {
         delayMicroseconds(timedur);
      }
   }

}
void loop() {
   for (int m=0; m<MAX_COUNT; m++) {
      audioTone = songNotes[m];
       beat1 = 50;


       timedur = beat1 * rhythm_measure;
       if( flagPlay != 0)        {
         playNotes();
      }

      delayMicroseconds(pauseTime);
   }
   delay(5000);
}
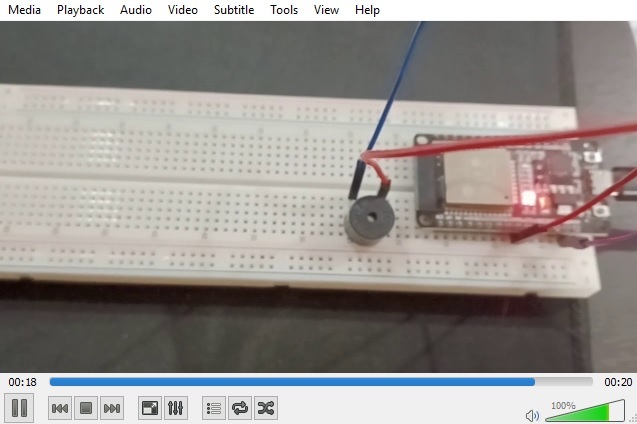
Viewing The Result
The result can be seen as soon the code is compiled and transferred/uploaded to the ESP32.
Example 2: Playing the poem notes and making dancing lights using LEDs, buzzer and ESP32
The C language program is given. The function playNotes() is used to make the buzzer pin go HIGH or LOW depending on the duration and time of playing the notes. The code in the function loop() also makes the red and green LEDs go HIGH and LOW along with the playing music.
Circuit Design Steps and Coding
Step 1 ? Put ESP32 on the breadboard. Connect the GND to the negative rail.
Step 2 ? Attach the buzzer. Connect its plus point to the D26 pin of ESP32 and its negative point to the negative rail of the breadboard.
Step 3 ? Attach a Red LED on the breadboard. Connect its smaller pin to the negative rail and positive pin (the bigger leg) through a resistor to the D12 pin of ESP32.
Step 4 ? Attach a Green LED to the breadboard. Connect its smaller pin to the negative rail and the positive pin (the bigger leg) through a resistor to the D13 pin of ESP32.
Step 5 ? Write the C program using Arduino for playing the melody and making the two LEDs on and off alternately.
Step 6 ? Attach the ESP32 to the computer using USB data cable.
Step 7 ? Compile and transfer the code into ESP32 and check the result.
The Code:
// set piano notes (frequencies)
#define R 0
#define cnote 3830
#define d 3400
#define e 3038
#define f 2864
#define g 2550
#define b 2028
#define C 1912

// buzzer pin is D26 on ESP32
int buzzOut = 26;

// Green color LED pin is D13 on ESP32
int LED_green = 13;

// Red color LED pin is D12 on ESP32
int LED_red = 12;
int LED_flag = 0;
int flag1 = 0;

// this rhythm_measure is the tempo of the song
long rhythm_measure = 15000;
int pauseDur = 2000;
int doNothing = 200;
int audioTone = 0;
int beat1 = 0;
long timedur = 0;

//These are the music notes for the Jingle bells poem
int songNotes[] = { e, e, e,
   e, e, e,
   e, g, cnote, d, e,
   f, f, f,
   f, f, e, e,
   e, e, e,
   d, d, e, d, g, R
};
int MaxNo = sizeof(songNotes) / 2;
int songBeats[] = { 16, 16, 32,
   16, 16, 32,
   16, 16, 16, 8, 48,
   16, 16, 16,
   16, 16, 8, 8,
   16, 16, 16,
   16, 16, 16, 16, 8, 48
};
void changeFlag() {
   if (LED_flag == 0){
      LED_flag = 1;
   } else {
      LED_flag = 0;
   }
}
void playNote() {
   long passed_time = 0;
   if (audioTone > 0) {
      while (passed_time < timedur) {
         digitalWrite(buzzOut,HIGH);
         delayMicroseconds(audioTone / 2);
         digitalWrite(buzzOut, LOW);
         delayMicroseconds(audioTone / 2);
         passed_time += (audioTone);
      }
   }
   else {
      for (int m = 0; m < doNothing; m++) {
         delayMicroseconds(timedur);
      }
   }
}
void setup() {

   // set the buzzer as output component for melody
   pinMode(buzzOut, OUTPUT);

   // set the LEDs as output component for dancing lights
   pinMode(LED_green, OUTPUT);
   pinMode(LED_red, OUTPUT);
   if (flag1) {
      Serial.begin(9600); // Set serial out if we want flag1ging
   }
}
void loop() {
   for (int n=0; n<MaxNo; n++) {
      audioTone = songNotes[n];
      beat1 = songBeats[n];
      changeFlag();
      if (LED_flag == 1){

         // make the green and red lights on and off one after the other
         digitalWrite(LED_green,HIGH);
         digitalWrite(LED_red,LOW);
      } else {
         digitalWrite(LED_green,LOW);
         digitalWrite(LED_red,HIGH);
      }
      timedur = beat1 * rhythm_measure;
      playNote();
      delayMicroseconds(1000);
      if (LED_flag == 1){
         digitalWrite(LED_green,LOW);
         digitalWrite(LED_red,LOW);
      } else {
         digitalWrite(LED_green,LOW);
         digitalWrite(LED_red,LOW);
      }
      if (flag1) {
         Serial.print(n);
         Serial.print(":");
         Serial.print(beat1);
         Serial.print(" ");
         Serial.print(audioTone);
         Serial.print(" ");
         Serial.println(timedur);
      }
   }
}
Viewing The Result - Example 2
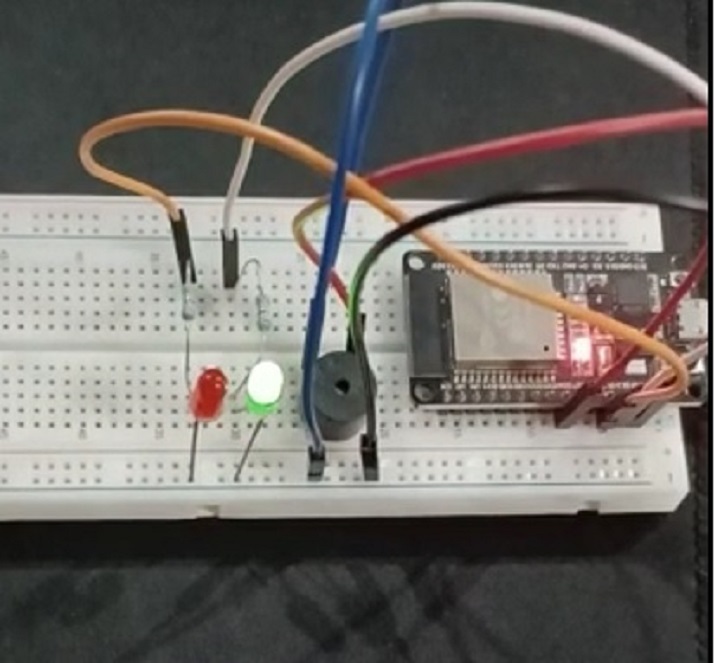
Fig: Showing the Circuit for playing melody and making LEDs on and off.
In this article, using two different examples, the ways to play melody using ESP32 and a buzzer is given. First the method is given for playing a melody of a poem and in the second example another melody is produced while turning LEDs on and off to make a light show.

664 Views
