- Docker - Home
- Docker - Overview
- Docker - Installing on Linux
- Docker - Installation
- Docker - Hub
- Docker - Images
- Docker - Containers
- Docker - Registries
- Docker - Compose
- Docker - Working With Containers
- Docker - Architecture
- Docker - Layers
- Docker - Container & Hosts
- Docker - Configuration
- Docker - Containers & Shells
- Docker - Dockerfile
- Docker - Building Files
- Docker - Public Repositories
- Docker - Managing Ports
- Docker - Web Server
- Docker - Commands
- Docker - Container Linking
- Docker - Data Storage
- Docker - Volumes
- Docker - Networking
- Docker - Security
- Docker - Toolbox
- Docker - Cloud
- Docker - Build Cloud
- Docker - Logging
- Docker - Continuous Integration
- Docker - Kubernetes Architecture
- Docker - Working of Kubernetes
- Docker - Generative AI
- Docker - Hosting
- Docker - Best Practices
- Docker - Setting Node.js
- Docker - Setting MongoDB
- Docker - Setting NGINX
- Docker - Setting ASP.Net
- Docker - Setting MySQL
- Docker - Setting Go
- Docker - Setting Rust
- Docker - Setting Apache
- Docker - Setting MariaDB
- Docker - Setting Jupyter
- Docker - Setting Portainer
- Docker - Setting Rstudio
- Docker - Setting Plex
- Docker Setting - Flame
- Docker Setting - PostgreSql
- Docker Setting - Mosquitto
- Docker Setting - Grafana
- Docker Setting - Nextcloud
- Docker Setting - Pawns
- Docker Setting - Ubuntu
- Docker Setting - RabbitMQ
- Docker - Setting Python
- Docker - Setting Java
- Docker - Setting Redis
- Docker - Setting Alpine
- Docker - Setting BusyBox
- Docker Setting - Traefik
- Docker Setting - WordPress
- Docker Useful Resources
- Docker - Quick Guide
- Docker - Useful Resources
- Docker - Discussion
Docker Setting MySQL
MySQL is an open-source relational DBMS used for storing, managing, and retrieving data efficiently. It has wide adoption due to its reliability, performance, and flexibility.
On the other hand, Docker is a containerization platform that allows building, shipping, and running applications in containers. It offers a uniform and consistent environment to host apps without hassle, for easier development, testing, and implementation.
By taking advantage of both MySQL and Docker, we can achieve isolated, reusable database environments. This allows for −
- Portability − Move your database with ease across various environments like development, testing, and production.
- Efficiency − Be able to spin up and tear down database instances quickly when required.
- Isolation − Conflicts due to dependencies can be prevented between different database versions or applications due to separated containers running them.
- Scalability − Scale your database by running multiple containers easily.
Prerequisites for Dockerizing a MySQL Database
Before we learn how to dockerize MySQL, make sure to have the following −
- Docker setup − You should have Docker installed and running on your system. To verify, you would want to run docker --version in your terminal.
- Basic understanding of Docker − Knowledge of Docker concepts like images, containers, and commands will help.
- MySQL knowledge − Knowing the syntax of MySQL and the administration of databases helps.
In the next section, we are going to see how to pull the official MySQL Docker image from Docker Hub.
Pulling the MySql Docker Image from DockerHub
To run a MySQL container, we need to fetch the MySQL Docker base image. Docker Hub is a public registry of container images. We can pull the official MySQL image from DockerHub.
To do so, you can open your terminal and run the following command −
$ docker pull mysql
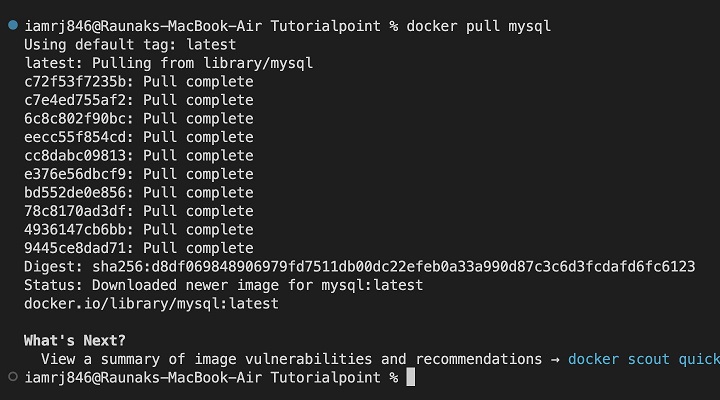
This will download the latest version of the official MySQL Docker image to your local machine. You can list all the images to verify the pull using the below command.
$ docker images
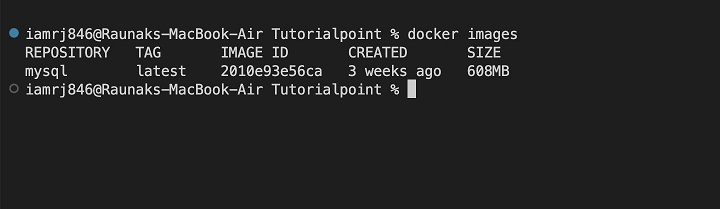
You can see the mysql image has been listed in the above output.
Now that you have the MySQL image available, lets create and run a MySQL container in the next step.
Run Mysql Docker Container with MySQL Image
Docker containers are instances of Docker images. Lets create and start a MySQL container.
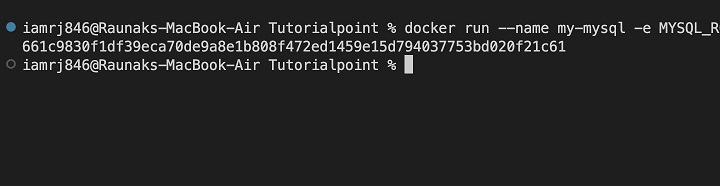
To run a MySQL container, you can use the following command −
$ docker run --name my-mysql -e MYSQL_ROOT_PASSWORD=your_strong_password -d mysql
Let's break down the command −
- docker run − This section of the command will prompt Docker to create a new container.
- --name my-mysql − This option will assign a name to the container.
- -e MYSQL_ROOT_PASSWORD=your_strong_password − This flag will set the root password for the MySQL instance. You can replace your_strong_password with a strong password of your choice.
- -d − This option will run the container in detached mode so that it runs in the background.
- mysql − This is the MySQL image to be used to create the container.
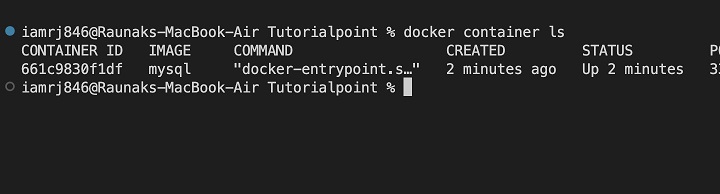
When you execute the command successfully, you'll see a container ID printed to the terminal. This shows that the MySQL container is up and running. You can verify by listing all the containers using the below command.
$ docker container ls
Run MySql Server inside the Container
The MySQL server starts automatically when the Docker container is launched by default. The -d flag that we used in the previous command ensured that the container ran in detached mode.
Your MySQL server is now running inside the Docker container and is completely isolated from your host system.
If you want to verify if the MySQL server is running, you can check the container logs −
docker logs my-mysql
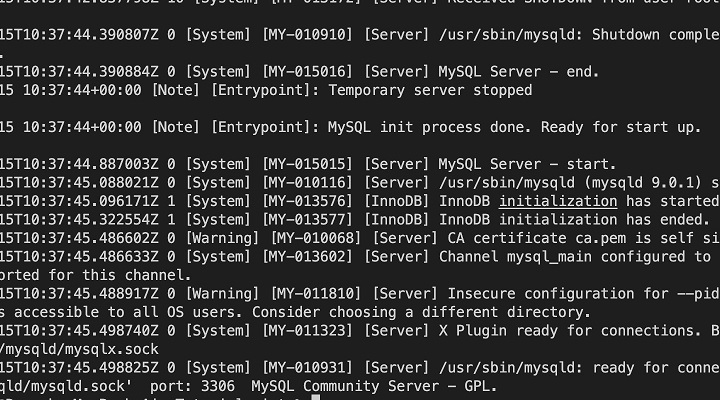
You can see the MySQL startup messages in the output.
You can also access the bash of the container to run MySQL commands.
$ docker exec -it my-mysql /bin/bash
$ mysql -uroot -p -A
It will prompt you to enter the password.
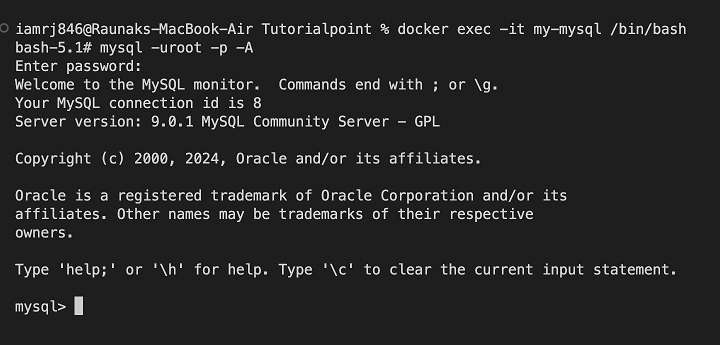
You can see that now you have access to the MySQL terminal inside the container. In the next step, lets try to create a database and table within this MySQL instance.
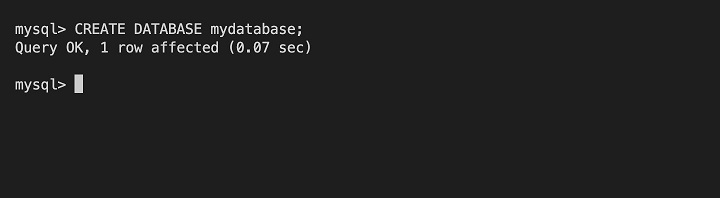
Creating a Database and Table
Lets use the same MySQL command-line client to create a database inside the MySQL container.
CREATE DATABASE mydatabase;
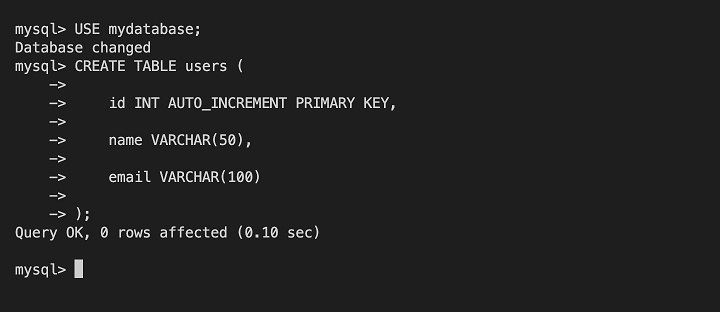
Next, let's create a table called users in the mydatabase database −
USE mydatabase;

CREATE TABLE users (
   id INT AUTO_INCREMENT PRIMARY KEY,
   name VARCHAR(50),
   email VARCHAR(100)
);
This will create a table inside the database with the below three columns −
- id − An auto-incrementing integer primary key.
- name − A varchar column to store names.
- email − A varchar column to store email addresses.
Lets use the INSERT INTO statement to insert a row into the users table.
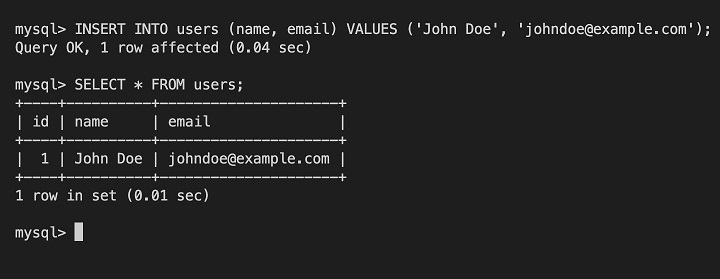
INSERT INTO users (name, email) VALUES ('John Doe', 'johndoe@example.com');
We can use the SELECT statement, to view all the rows in the users table,
SELECT * FROM users;
This will display all columns and rows from the users table.
Now you've successfully created a database and a table inside your Dockerized MySQL instance. In the next section, lets see how to access this MySQL instance from outside the container.
Accessing MySQL Instance outside Container
We will have to expose the MySQL port (3306) to the host machine if we want to access the MySQL instance from outside the container. We can do this using the -p flag when running the Docker container.
Modify the docker run command as follows −
$ docker run --name my-mysql -e MYSQL_ROOT_PASSWORD=your_strong_password -p 3306:3306 -d mysql
This will map the port 3306 of the container to port 3306 on the host. You can then use a MySQL client like the command-line client or a GUI-based tool to connect to the MySQL instance from your host machine.
Using the MySQL command-line client
$ mysql -u root -p -h localhost -P 3306 mydatabase
If you're connecting from a remote machine, you should replace localhost with the actual IP address of your host machine.
Conclusion
In this chapter, you have learned how to dockerize a MySQL database thus, making it portable, efficient, and isolated. Now you can administer your database using the same tools and methods while gaining the advantages of containerization.
Always make it a point to follow security practices such as strong passwords, limited access, and backups regularly. With this in place, you're well on your way to using Docker for your MySQL deployments.
FAQs on How to Dockerize MySQL
1. How do I connect a Node.js application to a Dockerized MySQL database?
You can connect a Node.js application to a Dockerized MySQL database using a MySQL driver for Node.js. Configure the connection string with the right hostname - usually mysql - and the correct port. Ensure that the Node.js Application and the MySQL Container are on the same network.
2. How do I handle data persistence for MySQL in a Docker container?
You can persist the MySQL data by creating a volume for that data. This creates a mapping between one of your host's directories and a directory inside the container. Anything written to the MySQL database will then be persisted on the host's volume.
3. How do I secure a Dockerized MySQL database?
Use strong passwords for the root user of MySQL and other users. Implement as few network exposures against the container running MySQL as possible.
Keep updating the image of MySQL regularly and apply security patches in your setup. Consider using SSL/TLS to encrypt the communication. Establish access control and user management within MySQL itself.
