- Apache Flume - Home
- Apache Flume - Introduction
- Data Transfer in Hadoop
- Apache Flume - Architecture
- Apache Flume - Data Flow
- Apache Flume - Environment
- Apache Flume - configuration
- Apache Flume - Fetching Twitter Data
- Sequence Generator Source
- Apache Flume - NetCat Source
Apache Flume - Fetching Twitter Data
Using Flume, we can fetch data from various services and transport it to centralized stores (HDFS and HBase). This chapter explains how to fetch data from Twitter service and store it in HDFS using Apache Flume.
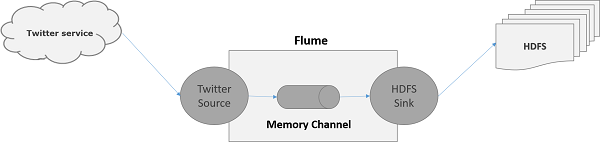
As discussed in Flume Architecture, a webserver generates log data and this data is collected by an agent in Flume. The channel buffers this data to a sink, which finally pushes it to centralized stores.
In the example provided in this chapter, we will create an application and get the tweets from it using the experimental twitter source provided by Apache Flume. We will use the memory channel to buffer these tweets and HDFS sink to push these tweets into the HDFS.
To fetch Twitter data, we will have to follow the steps given below −
- Create a twitter Application
- Install / Start HDFS
- Configure Flume
Creating a Twitter Application
In order to get the tweets from Twitter, it is needed to create a Twitter application. Follow the steps given below to create a Twitter application.
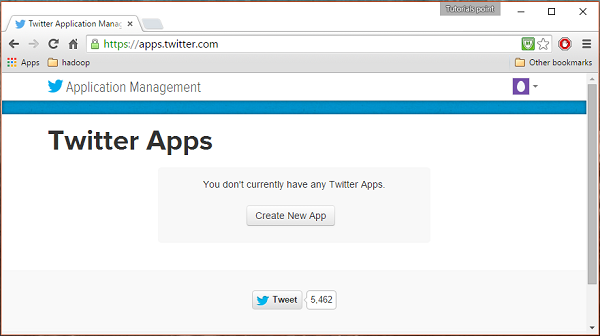
Step 1
To create a Twitter application, click on the following link https://apps.twitter.com/. Sign in to your Twitter account. You will have a Twitter Application Management window where you can create, delete, and manage Twitter Apps.
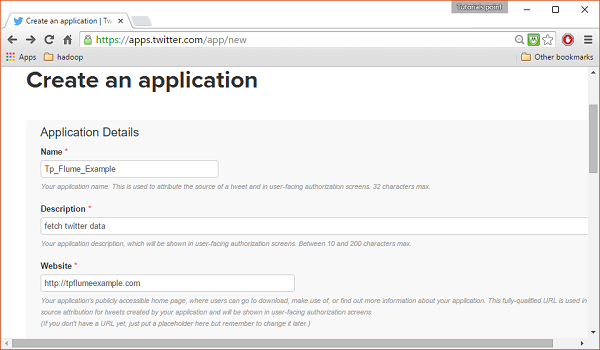
Step 2
Click on the Create New App button. You will be redirected to a window where you will get an application form in which you have to fill in your details in order to create the App. While filling the website address, give the complete URL pattern, for example, http://example.com.
Step 3
Fill in the details, accept the Developer Agreement when finished, click on the Create your Twitter application button which is at the bottom of the page. If everything goes fine, an App will be created with the given details as shown below.
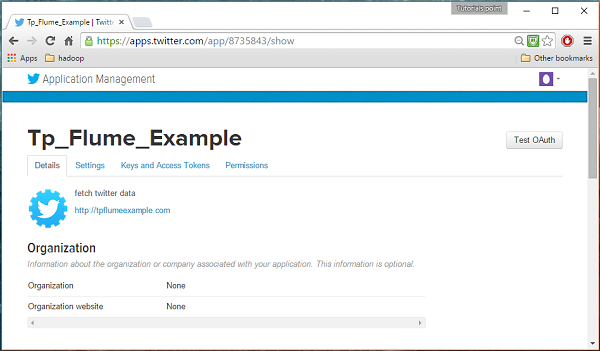
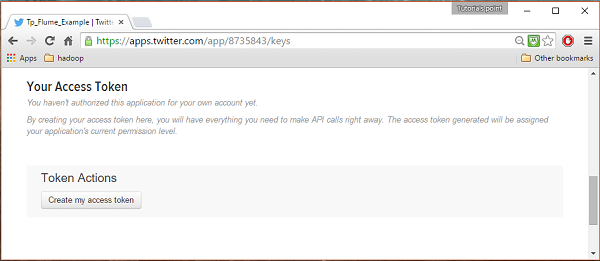
Step 4
Under keys and Access Tokens tab at the bottom of the page, you can observe a button named Create my access token. Click on it to generate the access token.
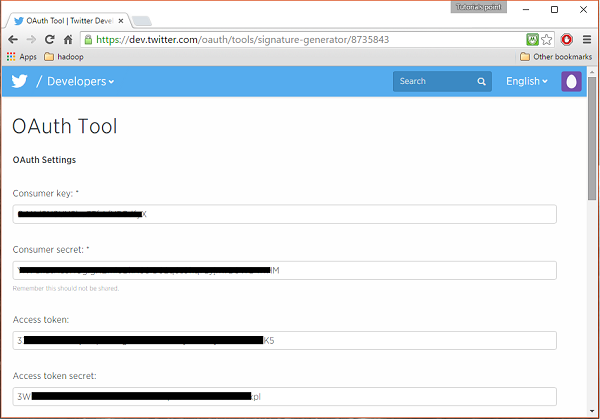
Step 5
Finally, click on the Test OAuth button which is on the right side top of the page. This will lead to a page which displays your Consumer key, Consumer secret, Access token, and Access token secret. Copy these details. These are useful to configure the agent in Flume.
Starting HDFS
Since we are storing the data in HDFS, we need to install / verify Hadoop. Start Hadoop and create a folder in it to store Flume data. Follow the steps given below before configuring Flume.
Step 1: Install / Verify Hadoop
Install Hadoop. If Hadoop is already installed in your system, verify the installation using Hadoop version command, as shown below.
$ hadoop version
If your system contains Hadoop, and if you have set the path variable, then you will get the following output −
Hadoop 2.6.0
Subversion https://git-wip-us.apache.org/repos/asf/hadoop.git -r
e3496499ecb8d220fba99dc5ed4c99c8f9e33bb1
Compiled by jenkins on 2014-11-13T21:10Z
Compiled with protoc 2.5.0
From source with checksum 18e43357c8f927c0695f1e9522859d6a
This command was run using /home/Hadoop/hadoop/share/hadoop/common/hadoop-common-2.6.0.jar
Step 2: Starting Hadoop
Browse through the sbin directory of Hadoop and start yarn and Hadoop dfs (distributed file system) as shown below.
cd /$Hadoop_Home/sbin/
$ start-dfs.sh
localhost: starting namenode, logging to
   /home/Hadoop/hadoop/logs/hadoop-Hadoop-namenode-localhost.localdomain.out
localhost: starting datanode, logging to
   /home/Hadoop/hadoop/logs/hadoop-Hadoop-datanode-localhost.localdomain.out
Starting secondary namenodes [0.0.0.0]
starting secondarynamenode, logging to
   /home/Hadoop/hadoop/logs/hadoop-Hadoop-secondarynamenode-localhost.localdomain.out

$ start-yarn.sh
starting yarn daemons
starting resourcemanager, logging to
   /home/Hadoop/hadoop/logs/yarn-Hadoop-resourcemanager-localhost.localdomain.out
localhost: starting nodemanager, logging to
   /home/Hadoop/hadoop/logs/yarn-Hadoop-nodemanager-localhost.localdomain.out
Step 3: Create a Directory in HDFS
In Hadoop DFS, you can create directories using the command mkdir. Browse through it and create a directory with the name twitter_data in the required path as shown below.
$cd /$Hadoop_Home/bin/
$ hdfs dfs -mkdir hdfs://localhost:9000/user/Hadoop/twitter_data
Configuring Flume
We have to configure the source, the channel, and the sink using the configuration file in the conf folder. The example given in this chapter uses an experimental source provided by Apache Flume named Twitter 1% Firehose Memory channel and HDFS sink.
Twitter 1% Firehose Source
This source is highly experimental. It connects to the 1% sample Twitter Firehose using streaming API and continuously downloads tweets, converts them to Avro format, and sends Avro events to a downstream Flume sink.
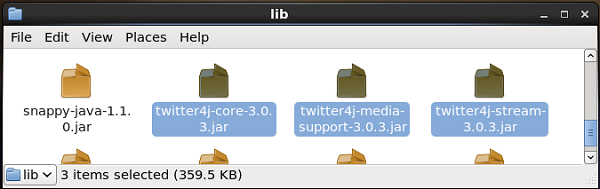
We will get this source by default along with the installation of Flume. The jar files corresponding to this source can be located in the lib folder as shown below.
Setting the classpath
Set the classpath variable to the lib folder of Flume in Flume-env.sh file as shown below.
export CLASSPATH=$CLASSPATH:/FLUME_HOME/lib/*
This source needs the details such as Consumer key, Consumer secret, Access token, and Access token secret of a Twitter application. While configuring this source, you have to provide values to the following properties −
Channels
Source type : org.apache.flume.source.twitter.TwitterSource
consumerKey − The OAuth consumer key
consumerSecret − OAuth consumer secret
accessToken − OAuth access token
accessTokenSecret − OAuth token secret
maxBatchSize − Maximum number of twitter messages that should be in a twitter batch. The default value is 1000 (optional).
maxBatchDurationMillis − Maximum number of milliseconds to wait before closing a batch. The default value is 1000 (optional).
Channel
We are using the memory channel. To configure the memory channel, you must provide value to the type of the channel.
type − It holds the type of the channel. In our example, the type is MemChannel.
Capacity − It is the maximum number of events stored in the channel. Its default value is 100 (optional).
TransactionCapacity − It is the maximum number of events the channel accepts or sends. Its default value is 100 (optional).
HDFS Sink
This sink writes data into the HDFS. To configure this sink, you must provide the following details.
Channel
type − hdfs
hdfs.path − the path of the directory in HDFS where data is to be stored.
And we can provide some optional values based on the scenario. Given below are the optional properties of the HDFS sink that we are configuring in our application.
fileType − This is the required file format of our HDFS file. SequenceFile, DataStream and CompressedStream are the three types available with this stream. In our example, we are using the DataStream.
writeFormat − Could be either text or writable.
batchSize − It is the number of events written to a file before it is flushed into the HDFS. Its default value is 100.
rollsize − It is the file size to trigger a roll. It default value is 100.
rollCount − It is the number of events written into the file before it is rolled. Its default value is 10.
Example Configuration File
Given below is an example of the configuration file. Copy this content and save as twitter.conf in the conf folder of Flume.
# Naming the components on the current agent.
TwitterAgent.sources = Twitter
TwitterAgent.channels = MemChannel
TwitterAgent.sinks = HDFS

# Describing/Configuring the source
TwitterAgent.sources.Twitter.type = org.apache.flume.source.twitter.TwitterSource
TwitterAgent.sources.Twitter.consumerKey = Your OAuth consumer key
TwitterAgent.sources.Twitter.consumerSecret = Your OAuth consumer secret
TwitterAgent.sources.Twitter.accessToken = Your OAuth consumer key access token
TwitterAgent.sources.Twitter.accessTokenSecret = Your OAuth consumer key access token secret
TwitterAgent.sources.Twitter.keywords = tutorials point,java, bigdata, mapreduce, mahout, hbase, nosql

# Describing/Configuring the sink

TwitterAgent.sinks.HDFS.type = hdfs
TwitterAgent.sinks.HDFS.hdfs.path = hdfs://localhost:9000/user/Hadoop/twitter_data/
TwitterAgent.sinks.HDFS.hdfs.fileType = DataStream
TwitterAgent.sinks.HDFS.hdfs.writeFormat = Text
TwitterAgent.sinks.HDFS.hdfs.batchSize = 1000
TwitterAgent.sinks.HDFS.hdfs.rollSize = 0
TwitterAgent.sinks.HDFS.hdfs.rollCount = 10000

# Describing/Configuring the channel
TwitterAgent.channels.MemChannel.type = memory
TwitterAgent.channels.MemChannel.capacity = 10000
TwitterAgent.channels.MemChannel.transactionCapacity = 100

# Binding the source and sink to the channel
TwitterAgent.sources.Twitter.channels = MemChannel
TwitterAgent.sinks.HDFS.channel = MemChannel
Execution
Browse through the Flume home directory and execute the application as shown below.
$ cd $FLUME_HOME
$ bin/flume-ng agent --conf ./conf/ -f conf/twitter.conf
Dflume.root.logger=DEBUG,console -n TwitterAgent
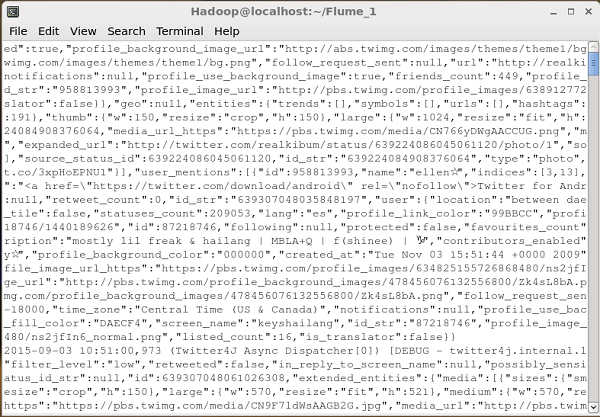
If everything goes fine, the streaming of tweets into HDFS will start. Given below is the snapshot of the command prompt window while fetching tweets.
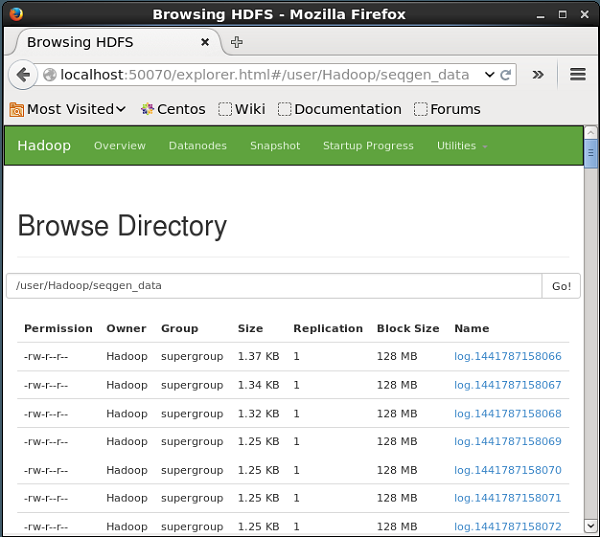
Verifying HDFS
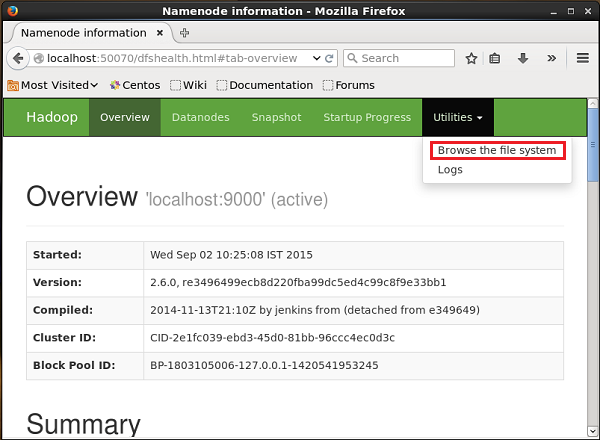
You can access the Hadoop Administration Web UI using the URL given below.
http://localhost:50070/
Click on the dropdown named Utilities on the right-hand side of the page. You can see two options as shown in the snapshot given below.
Click on Browse the file system and enter the path of the HDFS directory where you have stored the tweets. In our example, the path will be /user/Hadoop/twitter_data/. Then, you can see the list of twitter log files stored in HDFS as given below.