- WebRTC - Home
- WebRTC - Overview
- WebRTC - Architecture
- WebRTC - Environment
- WebRTC - MediaStream APIs
- WebRTC - RTCPeerConnection APIs
- WebRTC - RTCDataChannel APIs
- WebRTC - Sending Messages
- WebRTC - Signaling
- WebRTC - Browser Support
- WebRTC - Mobile Support
- WebRTC - Video Demo
- WebRTC - Voice Demo
- WebRTC - Text Demo
- WebRTC - Security
WebRTC - Video Demo
In this chapter, we are going to build a client application that allows two users on separate devices to communicate using WebRTC. Our application will have two pages. One for login and the other for calling another user.
The two pages will be the div tags. Most input is done through simple event handlers.
Signaling Server
To create a WebRTC connection clients have to be able to transfer messages without using a WebRTC peer connection. This is where we will use HTML5 WebSockets − a bidirectional socket connection between two endpoints − a web server and a web browser. Now let's start using the WebSocket library. Create the server.js file and insert the following code −
//require our websocket library
var WebSocketServer = require('ws').Server;

//creating a websocket server at port 9090
var wss = new WebSocketServer({port: 9090});

//when a user connects to our sever
wss.on('connection', function(connection) {
   console.log("user connected");

   //when server gets a message from a connected user
   connection.on('message', function(message) {
      console.log("Got message from a user:", message);
   });

   connection.send("Hello from server");
});
The first line requires the WebSocket library which we have already installed. Then we create a socket server on the port 9090. Next, we listen to the connection event. This code will be executed when a user makes a WebSocket connection to the server. We then listen to any messages sent by the user. Finally, we send a response to the connected user saying Hello from server.
In our signaling server, we will use a string-based username for each connection so we know where to send messages. Let's change our connection handler a bit −
connection.on('message', function(message) {
   var data;

   //accepting only JSON messages
   try {
      data = JSON.parse(message);
   } catch (e) {
      console.log("Invalid JSON");
      data = {};
   }
});
This way we accept only JSON messages. Next, we need to store all connected users somewhere. We will use a simple Javascript object for it. Change the top of our file −
//require our websocket library
var WebSocketServer = require('ws').Server;

//creating a websocket server at port 9090
var wss = new WebSocketServer({port: 9090});

//all connected to the server users
var users = {};
We are going to add a type field for every message coming from the client. For example if a user wants to login, he sends the login type message. Let's define it −
connection.on('message', function(message) {
   var data;

   //accepting only JSON messages
   try {
      data = JSON.parse(message);
   } catch (e) {
      console.log("Invalid JSON");
      data = {};
   }

   //switching type of the user message
   switch (data.type) {
      //when a user tries to login
      case "login":
         console.log("User logged:", data.name);

         //if anyone is logged in with this username then refuse
         if(users[data.name]) {
            sendTo(connection, {
               type: "login",
               success: false
            });
         } else {
            //save user connection on the server
            users[data.name] = connection;
            connection.name = data.name;

            sendTo(connection, {
               type: "login",
               success: true
            });
         }

         break;

      default:
         sendTo(connection, {
            type: "error",
            message: "Command no found: " + data.type
         });

         break;
   }
});
If the user sends a message with the login type, we −
Check if anyone has already logged in with this username
If so, then tell the user that he hasn't successfully logged in
If no one is using this username, we add username as a key to the connection object.
If a command is not recognized we send an error.
The following code is a helper function for sending messages to a connection. Add it to the server.js file −
function sendTo(connection, message) {
   connection.send(JSON.stringify(message));
}
When the user disconnects we should clean up its connection. We can delete the user when the close event is fired. Add the following code to the connection handler −
connection.on("close", function() {
   if(connection.name) {
      delete users[connection.name];
   }
});
After successful login the user wants to call another. He should make an offer to another user to achieve it. Add the offer handler −
case "offer":
   //for ex. UserA wants to call UserB
   console.log("Sending offer to: ", data.name);

   //if UserB exists then send him offer details
   var conn = users[data.name];

   if(conn != null) {
      //setting that UserA connected with UserB
      connection.otherName = data.name;

      sendTo(conn, {
         type: "offer",
         offer: data.offer,
         name: connection.name
      });

   }

   break;
Firstly, we get the connection of the user we are trying to call. If it exists we send him offer details. We also add otherName to the connection object. This is made for the simplicity of finding it later.
Answering to the response has a similar pattern that we used in the offer handler. Our server just passes through all messages as answer to another user. Add the following code after the offer handler −
case "answer":
   console.log("Sending answer to: ", data.name);

   //for ex. UserB answers UserA
   var conn = users[data.name];

   if(conn != null) {
      connection.otherName = data.name;

      sendTo(conn, {
         type: "answer",
         answer: data.answer
      });
   }

   break;
The final part is handling ICE candidate between users. We use the same technique just passing messages between users. The main difference is that candidate messages might happen multiple times per user in any order. Add the candidate handler −
case "candidate":
   console.log("Sending candidate to:",data.name);
   var conn = users[data.name];

   if(conn != null) {
      sendTo(conn, {
         type: "candidate",
         candidate: data.candidate
      });
   }

   break;
To allow our users to disconnect from another user we should implement the hanging up function. It will also tell the server to delete all user references. Add the leave handler −
case "leave":
   console.log("Disconnecting from", data.name);
   var conn = users[data.name];
   conn.otherName = null;

   //notify the other user so he can disconnect his peer connection
   if(conn != null) {
      sendTo(conn, {
         type: "leave"
      });
   }

   break;
This will also send the other user the leave event so he can disconnect his peer connection accordingly. We should also handle the case when a user drops his connection from the signaling server. Let's modify our close handler −
connection.on("close", function() {

   if(connection.name) {
      delete users[connection.name];

      if(connection.otherName) {
         console.log("Disconnecting from ", connection.otherName);
         var conn = users[connection.otherName];
         conn.otherName = null;

         if(conn != null) {
            sendTo(conn, {
               type: "leave"
            });
         }

      }
   }
});
The following is the entire code of our signaling server −
//require our websocket library
var WebSocketServer = require('ws').Server;

//creating a websocket server at port 9090
var wss = new WebSocketServer({port: 9090});

//all connected to the server users
var users = {};

//when a user connects to our sever
wss.on('connection', function(connection) {

   console.log("User connected");

   //when server gets a message from a connected user
   connection.on('message', function(message) {

      var data;

      //accepting only JSON messages
      try {
         data = JSON.parse(message);
      } catch (e) {
         console.log("Invalid JSON");
         data = {};
      }

      //switching type of the user message
      switch (data.type) {
         //when a user tries to login
         case "login":
            console.log("User logged", data.name);

            //if anyone is logged in with this username then refuse
            if(users[data.name]) {
               sendTo(connection, {
                  type: "login",
                  success: false
               });
            } else {
               //save user connection on the server
               users[data.name] = connection;
               connection.name = data.name;

               sendTo(connection, {
                  type: "login",
                  success: true
               });
            }

            break;

         case "offer":
            //for ex. UserA wants to call UserB
            console.log("Sending offer to: ", data.name);

            //if UserB exists then send him offer details
            var conn = users[data.name];

            if(conn != null) {
               //setting that UserA connected with UserB
               connection.otherName = data.name;

               sendTo(conn, {
                  type: "offer",
                  offer: data.offer,
                  name: connection.name
               });
            }

            break;

         case "answer":
            console.log("Sending answer to: ", data.name);
            //for ex. UserB answers UserA
            var conn = users[data.name];

            if(conn != null) {
               connection.otherName = data.name;
               sendTo(conn, {
                  type: "answer",
                  answer: data.answer
               });
            }

            break;

         case "candidate":
            console.log("Sending candidate to:",data.name);
            var conn = users[data.name];

            if(conn != null) {
               sendTo(conn, {
                  type: "candidate",
                  candidate: data.candidate
               });
            }

            break;

         case "leave":
            console.log("Disconnecting from", data.name);
            var conn = users[data.name];
            conn.otherName = null;

            //notify the other user so he can disconnect his peer connection
            if(conn != null) {
               sendTo(conn, {
                  type: "leave"
              });
            }

            break;

         default:
            sendTo(connection, {
               type: "error",
               message: "Command not found: " + data.type
            });

            break;
      }

   });

   //when user exits, for example closes a browser window
   //this may help if we are still in "offer","answer" or "candidate" state
   connection.on("close", function() {

      if(connection.name) {
         delete users[connection.name];

         if(connection.otherName) {
            console.log("Disconnecting from ", connection.otherName);
            var conn = users[connection.otherName];
            conn.otherName = null;

            if(conn != null) {
               sendTo(conn, {
                  type: "leave"
               });
            }
         }
      }

   });

   connection.send("Hello world");
});

function sendTo(connection, message) {
   connection.send(JSON.stringify(message));
}
Client Application
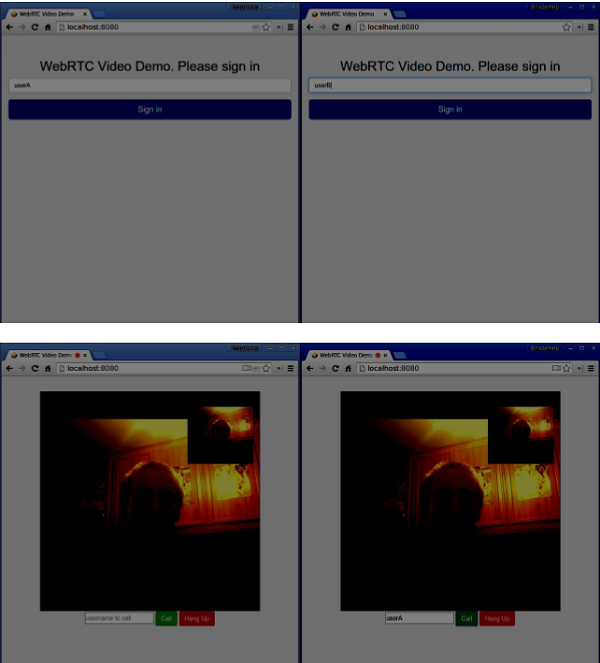
One way to test this application is opening two browser tabs and trying to call each other.
First of all, we need to install the bootstrap library. Bootstrap is a frontend framework for developing web applications. You can learn more at http://getbootstrap.com/. Create a folder called, for example, videochat. This will be our root application folder. Inside this folder create a file package.json (it is necessary for managing npm dependencies) and add the following −
{
   "name": "webrtc-videochat",
   "version": "0.1.0",
   "description": "webrtc-videochat",
   "author": "Author",
   "license": "BSD-2-Clause"
}
Then run npm install bootstrap. This will install the bootstrap library in the videochat/node_modules folder.
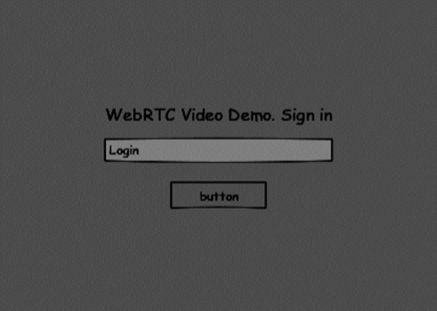
Now we need to create a basic HTML page. Create an index.html file in the root folder with the following code −
<html>
<head>
<title>WebRTC Video Demo</title>
<link rel = "stylesheet" href = "node_modules/bootstrap/dist/css/bootstrap.min.css"/>
</head>
<style>
body {
background: #eee;
padding: 5% 0;
}
video {
background: black;
border: 1px solid gray;
}
.call-page {
position: relative;
display: block;
margin: 0 auto;
width: 500px;
height: 500px;
}
#localVideo {
width: 150px;
height: 150px;
position: absolute;
top: 15px;
right: 15px;
}
#remoteVideo {
width: 500px;
height: 500px;
}
</style>
<body>
<div id = "loginPage" class = "container text-center">
<div class = "row">
<div class = "col-md-4 col-md-offset-4">
<h2>WebRTC Video Demo. Please sign in</h2>
<label for = "usernameInput" class = "sr-only">Login</label>
<input type = "email" id = "usernameInput" c
lass = "form-control formgroup" placeholder = "Login"
required = "" autofocus = "">
<button id = "loginBtn" class = "btn btn-lg btn-primary btnblock">
Sign in</button>
</div>
</div>
</div>
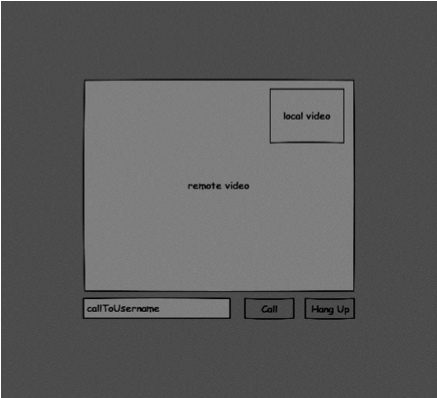
<div id = "callPage" class = "call-page">
<video id = "localVideo" autoplay></video>
<video id = "remoteVideo" autoplay></video>
<div class = "row text-center">
<div class = "col-md-12">
<input id = "callToUsernameInput" type = "text"
placeholder = "username to call" />
<button id = "callBtn" class = "btn-success btn">Call</button>
<button id = "hangUpBtn" class = "btn-danger btn">Hang Up</button>
</div>
</div>
</div>
<script src = "client.js"></script>
</body>
</html>
This page should be familiar to you. We have added the bootstrap css file. We have also defined two pages. Finally, we have created several text fields and buttons for getting information from the user. You should see the two video elements for local and remote video streams. Notice that we have added a link to a client.js file.
Now we need to establish a connection with our signaling server. Create the client.js file in the root folder with the following code −
//our username
var name;
var connectedUser;
//connecting to our signaling server
var conn = new WebSocket('ws://localhost:9090');
conn.onopen = function () {
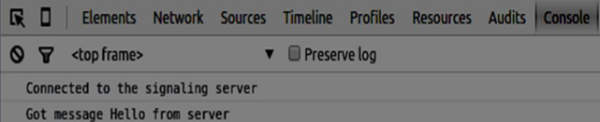
console.log("Connected to the signaling server");
};
//when we got a message from a signaling server
conn.onmessage = function (msg) {
console.log("Got message", msg.data);
var data = JSON.parse(msg.data);
switch(data.type) {
case "login":
handleLogin(data.success);
break;
//when somebody wants to call us
case "offer":
handleOffer(data.offer, data.name);
break;
case "answer":
handleAnswer(data.answer);
break;
//when a remote peer sends an ice candidate to us
case "candidate":
handleCandidate(data.candidate);
break;
case "leave":
handleLeave();
break;
default:
break;
}
};
conn.onerror = function (err) {
console.log("Got error", err);
};
//alias for sending JSON encoded messages
function send(message) {
//attach the other peer username to our messages
if (connectedUser) {
message.name = connectedUser;
}
conn.send(JSON.stringify(message));
};
Now run our signaling server via node server. Then, inside the root folder run the static command and open the page inside the browser. You should see the following console output −
The next step is implementing a user log in with a unique username. We simply send a username to the server, which then tell us whether it is taken or not. Add the following code to your client.js file −
//******
//UI selectors block
//******

var loginPage = document.querySelector('#loginPage');
var usernameInput = document.querySelector('#usernameInput');
var loginBtn = document.querySelector('#loginBtn');

var callPage = document.querySelector('#callPage');
var callToUsernameInput = document.querySelector('#callToUsernameInput');
var callBtn = document.querySelector('#callBtn');

var hangUpBtn = document.querySelector('#hangUpBtn');

//hide call page
callPage.style.display = "none";

// Login when the user clicks the button
loginBtn.addEventListener("click", function (event) {
   name = usernameInput.value;

   if (name.length > 0) {
      send({
         type: "login",
         name: name
      });
   }

});

function handleLogin(success) {

   if (success === false) {
      alert("Ooops...try a different username");
   } else {
      //display the call page if login is successful
      loginPage.style.display = "none";
      callPage.style.display = "block";
      //start peer connection
   }
};
Firstly, we select some references to the elements on the page. The we hide the call page. Then, we add an event listener on the login button. When the user clicks it, we send his username to the server. Finally, we implement the handleLogin callback. If the login was successful, we show the call page and starting to set up a peer connection.
To start a peer connection we need −
- Obtain a stream from the web camera.
- Create the RTCPeerConnection object.
Add the following code to the UI selectors block −
var localVideo = document.querySelector('#localVideo');
var remoteVideo = document.querySelector('#remoteVideo');

var yourConn;
var stream;
Modify the handleLogin function −
function handleLogin(success) {

   if (success === false) {
      alert("Ooops...try a different username");
   } else {
      loginPage.style.display = "none";
      callPage.style.display = "block";

      //**********************
      //Starting a peer connection
      //**********************

      //getting local video stream
      navigator.webkitGetUserMedia({ video: true, audio: true }, function (myStream) {
         stream = myStream;

         //displaying local video stream on the page
         localVideo.src = window.URL.createObjectURL(stream);

         //using Google public stun server
         var configuration = {
            "iceServers": [{ "url": "stun:stun2.1.google.com:19302" }]
         };

         yourConn = new webkitRTCPeerConnection(configuration);

         // setup stream listening
         yourConn.addStream(stream);

         //when a remote user adds stream to the peer connection, we display it
         yourConn.onaddstream = function (e) {
            remoteVideo.src = window.URL.createObjectURL(e.stream);
         };

         // Setup ice handling
         yourConn.onicecandidate = function (event) {

            if (event.candidate) {
               send({
                  type: "candidate",
                  candidate: event.candidate
               });
            }

         };

      }, function (error) {
         console.log(error);
      });
   }
};
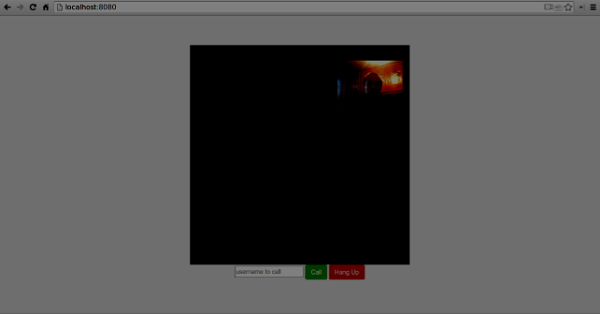
Now if you run the code, the page should allow you to log in and display your local video stream on the page.
Now we are ready to initiate a call. Firstly, we send an offer to another user. Once a user gets the offer, he creates an answer and start trading ICE candidates. Add the following code to the client.js file −
//initiating a call
callBtn.addEventListener("click", function () {
   var callToUsername = callToUsernameInput.value;

   if (callToUsername.length > 0) {

      connectedUser = callToUsername;

      // create an offer
      yourConn.createOffer(function (offer) {
         send({
            type: "offer",
            offer: offer
         });

         yourConn.setLocalDescription(offer);

      }, function (error) {
         alert("Error when creating an offer");
      });
   }
});

//when somebody sends us an offer
function handleOffer(offer, name) {
   connectedUser = name;
   yourConn.setRemoteDescription(new RTCSessionDescription(offer));

   //create an answer to an offer
   yourConn.createAnswer(function (answer) {
      yourConn.setLocalDescription(answer);

      send({
         type: "answer",
         answer: answer
      });

   }, function (error) {
      alert("Error when creating an answer");
   });
};

//when we got an answer from a remote user
function handleAnswer(answer) {
   yourConn.setRemoteDescription(new RTCSessionDescription(answer));
};

//when we got an ice candidate from a remote user
function handleCandidate(candidate) {
   yourConn.addIceCandidate(new RTCIceCandidate(candidate));
};
We add a click handler to the Call button, which initiates an offer. Then we implement several handlers expected by the onmessage handler. They will be processed asynchronously until both the users have made a connection.
The last step is implementing the hang-up feature. This will stop transmitting data and tell the other user to close the call. Add the following code −
//hang up
hangUpBtn.addEventListener("click", function () {

   send({
      type: "leave"
   });

   handleLeave();
});

function handleLeave() {
   connectedUser = null;
   remoteVideo.src = null;

   yourConn.close();
   yourConn.onicecandidate = null;
   yourConn.onaddstream = null;
};
When the user clicks on the Hang Up button −
- It will send a leave message to the other user
- It will close the RTCPeerConnection and destroy the connection locally
Now run the code. You should be able to log in to the server using two browser tabs. You can then call the tab and hang up the call.
The following is the entire client.js file −
//our username
var name;
var connectedUser;

//connecting to our signaling server
var conn = new WebSocket('ws://localhost:9090');

conn.onopen = function () {
   console.log("Connected to the signaling server");
};

//when we got a message from a signaling server
conn.onmessage = function (msg) {
   console.log("Got message", msg.data);

   var data = JSON.parse(msg.data);

   switch(data.type) {
      case "login":
         handleLogin(data.success);
         break;
      //when somebody wants to call us
      case "offer":
         handleOffer(data.offer, data.name);
         break;
      case "answer":
         handleAnswer(data.answer);
         break;
      //when a remote peer sends an ice candidate to us
      case "candidate":
         handleCandidate(data.candidate);
         break;
      case "leave":
         handleLeave();
         break;
      default:
         break;
   }
};

conn.onerror = function (err) {
   console.log("Got error", err);
};

//alias for sending JSON encoded messages
function send(message) {
   //attach the other peer username to our messages
   if (connectedUser) {
      message.name = connectedUser;
   }

   conn.send(JSON.stringify(message));
};

//******
//UI selectors block
//******

var loginPage = document.querySelector('#loginPage');
var usernameInput = document.querySelector('#usernameInput');
var loginBtn = document.querySelector('#loginBtn');

var callPage = document.querySelector('#callPage');
var callToUsernameInput = document.querySelector('#callToUsernameInput');
var callBtn = document.querySelector('#callBtn');

var hangUpBtn = document.querySelector('#hangUpBtn');

var localVideo = document.querySelector('#localVideo');
var remoteVideo = document.querySelector('#remoteVideo');

var yourConn;
var stream;

callPage.style.display = "none";

// Login when the user clicks the button
loginBtn.addEventListener("click", function (event) {
   name = usernameInput.value;

   if (name.length > 0) {
      send({
         type: "login",
         name: name
      });
   }

});

function handleLogin(success) {
   if (success === false) {
      alert("Ooops...try a different username");
   } else {
      loginPage.style.display = "none";
      callPage.style.display = "block";

      //**********************
      //Starting a peer connection
      //**********************

      //getting local video stream
      navigator.webkitGetUserMedia({ video: true, audio: true }, function (myStream) {
         stream = myStream;

         //displaying local video stream on the page
         localVideo.src = window.URL.createObjectURL(stream);

         //using Google public stun server
         var configuration = {
            "iceServers": [{ "url": "stun:stun2.1.google.com:19302" }]
         };

         yourConn = new webkitRTCPeerConnection(configuration);

         // setup stream listening
         yourConn.addStream(stream);

         //when a remote user adds stream to the peer connection, we display it
         yourConn.onaddstream = function (e) {
            remoteVideo.src = window.URL.createObjectURL(e.stream);
         };

         // Setup ice handling
         yourConn.onicecandidate = function (event) {
            if (event.candidate) {
               send({
                  type: "candidate",
                  candidate: event.candidate
               });
            }
         };

      }, function (error) {
         console.log(error);
      });

   }
};

//initiating a call
callBtn.addEventListener("click", function () {
   var callToUsername = callToUsernameInput.value;

   if (callToUsername.length > 0) {

      connectedUser = callToUsername;

      // create an offer
      yourConn.createOffer(function (offer) {
         send({
            type: "offer",
            offer: offer
         });

         yourConn.setLocalDescription(offer);
      }, function (error) {
         alert("Error when creating an offer");
      });

   }
});

//when somebody sends us an offer
function handleOffer(offer, name) {
   connectedUser = name;
   yourConn.setRemoteDescription(new RTCSessionDescription(offer));

   //create an answer to an offer
   yourConn.createAnswer(function (answer) {
      yourConn.setLocalDescription(answer);

      send({
         type: "answer",
         answer: answer
      });

   }, function (error) {
      alert("Error when creating an answer");
   });
};

//when we got an answer from a remote user
function handleAnswer(answer) {
   yourConn.setRemoteDescription(new RTCSessionDescription(answer));
};

//when we got an ice candidate from a remote user
function handleCandidate(candidate) {
   yourConn.addIceCandidate(new RTCIceCandidate(candidate));
};

//hang up
hangUpBtn.addEventListener("click", function () {

   send({
      type: "leave"
   });

   handleLeave();
});

function handleLeave() {
   connectedUser = null;
   remoteVideo.src = null;

   yourConn.close();
   yourConn.onicecandidate = null;
   yourConn.onaddstream = null;
};
Summary
This demo provides a baseline of features that every WebRTC application needs. To improve this demo you can add user identification through platforms like Facebook or Google, handle user input for invalid data. Also, the WebRTC connection can fail because of several reasons like not supporting the technology or not being able to traverse firewalls. A worth of work has gone into making any WebRTC application stable.
