- WebRTC - Home
- WebRTC - Overview
- WebRTC - Architecture
- WebRTC - Environment
- WebRTC - MediaStream APIs
- WebRTC - RTCPeerConnection APIs
- WebRTC - RTCDataChannel APIs
- WebRTC - Sending Messages
- WebRTC - Signaling
- WebRTC - Browser Support
- WebRTC - Mobile Support
- WebRTC - Video Demo
- WebRTC - Voice Demo
- WebRTC - Text Demo
- WebRTC - Security
WebRTC - Signaling
Most WebRTC applications are not just being able to communicate through video and audio. They need many other features. In this chapter, we are going to build a basic signaling server.
Signaling and Negotiation
To connect to another user you should know where he is located on the Web. The IP address of your device allows Internet-enabled devices to send data directly between each other. The RTCPeerConnection object is responsible for this. As soon as devices know how to find each other over the Internet, they start exchanging data about which protocols and codecs each device supports.
To communicate with another user you simply need to exchange contact information and the rest will be done by WebRTC. The process of connecting to the other user is also known as signaling and negotiation. It consists of a few steps −
Create a list of potential candidates for a peer connection.
The user or an application selects a user to make a connection with.
The signaling layer notifies another user that someone want to connect to him. He can accept or decline.
The first user is notified of the acceptance of the offer.
The first user initiates RTCPeerConnection with another user.
Both users exchange software and hardware information through the signaling server.
Both users exchange location information.
The connection succeeds or fails.
The WebRTC specification does not contain any standards about exchanging information. So keep in mind that the above is just an example of how signaling may happen. You can use any protocol or technology you like.
Building the Server
The server we are going to build will be able to connect two users together who are not located on the same computer. We will create our own signaling mechanism. Our signaling server will allow one user to call another. Once a user has called another, the server passes the offer, answer, ICE candidates between them and setup a WebRTC connection.
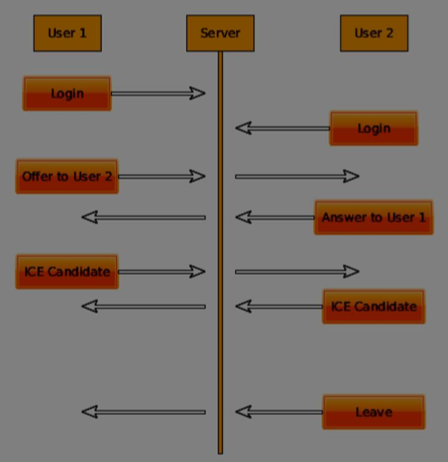
The above diagram is the messaging flow between users when using the signaling server. First of all, each user registers with the server. In our case, this will be a simple string username. Once users have registered, they are able to call each other. User 1 makes an offer with the user identifier he wishes to call. The other user should answers. Finally, ICE candidates are sent between users until they can make a connection.
To create a WebRTC connection clients have to be able to transfer messages without using a WebRTC peer connection. This is where we will use HTML5 WebSockets a bidirectional socket connection between two endpoints a web server and a web browser. Now let's start using the WebSocket library. Create the server.js file and insert the following code −
//require our websocket library
var WebSocketServer = require('ws').Server;

//creating a websocket server at port 9090
var wss = new WebSocketServer({port: 9090});

//when a user connects to our sever
wss.on('connection', function(connection) {
   console.log("user connected");

   //when server gets a message from a connected user
   connection.on('message', function(message){
      console.log("Got message from a user:", message);
   });

   connection.send("Hello from server");
});
The first line requires the WebSocket library which we have already installed. Then we create a socket server on the port 9090. Next, we listen to the connection event. This code will be executed when a user makes a WebSocket connection to the server. We then listen to any messages sent by the user. Finally, we send a response to the connected user saying Hello from server.
Now run node server and the server should start listening for socket connections.
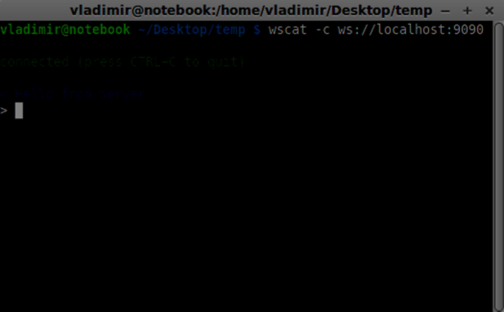
To test our server, we'll use the wscat utility which we also have already installed. This tool helps in connecting directly to the WebSocket server and test out commands. Run our server in one terminal window, then open another and run the wscat -c ws://localhost:9090 command. You should see the following on the client side −
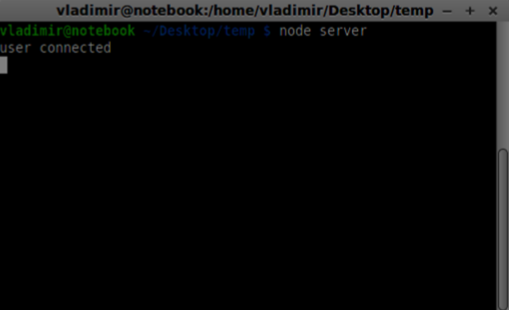
The server should also log the connected user −
User Registration
In our signaling server, we will use a string-based username for each connection so we know where to send messages. Let's change our connection handler a bit −
connection.on('message', function(message) {
   var data;

   //accepting only JSON messages
   try {
      data = JSON.parse(message);
   } catch (e) {
      console.log("Invalid JSON");
      data = {};
   }

});
This way we accept only JSON messages. Next, we need to store all connected users somewhere. We will use a simple Javascript object for it. Change the top of our file −
//require our websocket library
var WebSocketServer = require('ws').Server;

//creating a websocket server at port 9090
var wss = new WebSocketServer({port: 9090});

//all connected to the server users
var users = {};
We are going to add a type field for every message coming from the client. For example if a user wants to login, he sends the login type message. Let's define it −
connection.on('message', function(message){
   var data;

   //accepting only JSON messages
   try {
      data = JSON.parse(message);
   } catch (e) {
      console.log("Invalid JSON");
      data = {};
   }

   //switching type of the user message
   switch (data.type) {
      //when a user tries to login
      case "login":
         console.log("User logged:", data.name);

         //if anyone is logged in with this username then refuse
         if(users[data.name]) {
            sendTo(connection, {
               type: "login",
               success: false
            });
         } else {
            //save user connection on the server
            users[data.name] = connection;
            connection.name = data.name;

            sendTo(connection, {
               type: "login",
               success: true
            });

         }

         break;

      default:
         sendTo(connection, {
            type: "error",
            message: "Command no found: " + data.type
         });

         break;
   }

});
If the user sends a message with the login type, we −
Check if anyone has already logged in with this username
If so, then tell the user that he hasn't successfully logged in
If no one is using this username, we add username as a key to the connection object.
If a command is not recognized we send an error.
The following code is a helper function for sending messages to a connection. Add it to the server.js file −
function sendTo(connection, message) {
   connection.send(JSON.stringify(message));
}
The above function ensures that all our messages are sent in the JSON format.
When the user disconnects we should clean up its connection. We can delete the user when the close event is fired. Add the following code to the connection handler −
connection.on("close", function() {
   if(connection.name) {
      delete users[connection.name];
   }
});
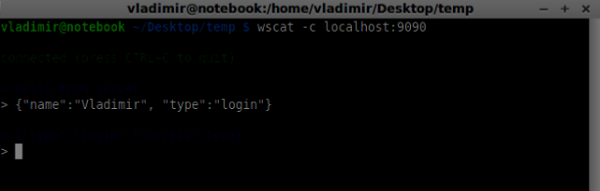
Now let's test our server with the login command. Keep in mind that all messages must be encoded in the JSON format. Run our server and try to login. You should see something like this −
Making a Call
After successful login the user wants to call another. He should make an offer to another user to achieve it. Add the offer handler −
case "offer":
   //for ex. UserA wants to call UserB
   console.log("Sending offer to: ", data.name);

   //if UserB exists then send him offer details
   var conn = users[data.name];

   if(conn != null){
      //setting that UserA connected with UserB
      connection.otherName = data.name;

      sendTo(conn, {
         type: "offer",
         offer: data.offer,
         name: connection.name
      });
   }

   break;
Firstly, we get the connection of the user we are trying to call. If it exists we send him offer details. We also add otherName to the connection object. This is made for the simplicity of finding it later.
Answering
Answering to the response has a similar pattern that we used in the offer handler. Our server just passes through all messages as answer to another user. Add the following code after the offer hander −
case "answer":
   console.log("Sending answer to: ", data.name);

   //for ex. UserB answers UserA
   var conn = users[data.name];

   if(conn != null) {
      connection.otherName = data.name;
      sendTo(conn, {
         type: "answer",
         answer: data.answer
      });
   }

   break;
You can see how this is similar to the offer handler. Notice this code follows the createOffer and createAnswer functions on the RTCPeerConnection object.
Now we can test our offer/answer mechanism. Connect two clients at the same time and try to make offer and answer. You should see the following −
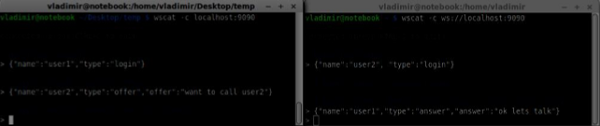
In this example, offer and answer are simple strings, but in a real application they will be filled in with the SDP data.
ICE Candidates
The final part is handling ICE candidate between users. We use the same technique just passing messages between users. The main difference is that candidate messages might happen multiple times per user in any order. Add the candidate handler −
case "candidate":
   console.log("Sending candidate to:",data.name);
   var conn = users[data.name];

   if(conn != null) {
      sendTo(conn, {
         type: "candidate",
         candidate: data.candidate
      });
   }

   break;
It should work similarly to the offer and answer handlers.
Leaving the Connection
To allow our users to disconnect from another user we should implement the hanging up function. It will also tell the server to delete all user references. Add the leave handler −
case "leave":
   console.log("Disconnecting from", data.name);
   var conn = users[data.name];
   conn.otherName = null;

   //notify the other user so he can disconnect his peer connection
   if(conn != null) {
      sendTo(conn, {
         type: "leave"
      });
   }

   break;
This will also send the other user the leave event so he can disconnect his peer connection accordingly. We should also handle the case when a user drops his connection from the signaling server. Let's modify our close handler −
connection.on("close", function() {

   if(connection.name) {
      delete users[connection.name];

      if(connection.otherName) {
         console.log("Disconnecting from ", connection.otherName);
         var conn = users[connection.otherName];
         conn.otherName = null;

         if(conn != null) {
            sendTo(conn, {
               type: "leave"
            });
         }
      }
   }
});
Now if the connection terminates our users will be disconnected. The close event will be fired when a user closes his browser window while we are still in offer, answer or candidate state.
Complete Signaling Server
Here is the entire code of our signaling server −
//require our websocket library
var WebSocketServer = require('ws').Server;

//creating a websocket server at port 9090
var wss = new WebSocketServer({port: 9090});

//all connected to the server users
var users = {};

//when a user connects to our sever
wss.on('connection', function(connection) {

   console.log("User connected");

   //when server gets a message from a connected user
   connection.on('message', function(message) {

      var data;
      //accepting only JSON messages
      try {
         data = JSON.parse(message);
      } catch (e) {
         console.log("Invalid JSON");
         data = {};
      }

      //switching type of the user message
      switch (data.type) {
         //when a user tries to login

         case "login":
            console.log("User logged", data.name);

            //if anyone is logged in with this username then refuse
            if(users[data.name]) {
               sendTo(connection, {
                  type: "login",
                  success: false
               });
            } else {
               //save user connection on the server
               users[data.name] = connection;
               connection.name = data.name;

               sendTo(connection, {
                  type: "login",
                  success: true
               });
            }

            break;

         case "offer":
            //for ex. UserA wants to call UserB
            console.log("Sending offer to: ", data.name);

            //if UserB exists then send him offer details
            var conn = users[data.name];

            if(conn != null) {
               //setting that UserA connected with UserB
               connection.otherName = data.name;

               sendTo(conn, {
                  type: "offer",
                  offer: data.offer,
                  name: connection.name
               });
            }

            break;

         case "answer":
            console.log("Sending answer to: ", data.name);
            //for ex. UserB answers UserA
            var conn = users[data.name];

            if(conn != null) {
               connection.otherName = data.name;
               sendTo(conn, {
                  type: "answer",
                  answer: data.answer
               });
            }

            break;

         case "candidate":
            console.log("Sending candidate to:",data.name);
            var conn = users[data.name];

            if(conn != null) {
               sendTo(conn, {
                  type: "candidate",
                  candidate: data.candidate
               });
            }

            break;

         case "leave":
            console.log("Disconnecting from", data.name);
            var conn = users[data.name];
            conn.otherName = null;

            //notify the other user so he can disconnect his peer connection
            if(conn != null) {
               sendTo(conn, {
                  type: "leave"
               });
            }

            break;

         default:
            sendTo(connection, {
               type: "error",
               message: "Command not found: " + data.type
            });

            break;
      }
   });

   //when user exits, for example closes a browser window
   //this may help if we are still in "offer","answer" or "candidate" state
   connection.on("close", function() {

      if(connection.name) {
      delete users[connection.name];

         if(connection.otherName) {
            console.log("Disconnecting from ", connection.otherName);
            var conn = users[connection.otherName];
            conn.otherName = null;

            if(conn != null) {
               sendTo(conn, {
                  type: "leave"
               });
            }
         }
      }
   });

   connection.send("Hello world");

});

function sendTo(connection, message) {
   connection.send(JSON.stringify(message));
}
So the work is done and our signaling server is ready. Remember that doing things out of order when making a WebRTC connection can cause issues.
Summary
In this chapter, we built simple and straightforward signaling server. We walked through the signaling process, user registration and offer/answer mechanism. We also implemented sending candidates between users.
