- WebRTC - Home
- WebRTC - Overview
- WebRTC - Architecture
- WebRTC - Environment
- WebRTC - MediaStream APIs
- WebRTC - RTCPeerConnection APIs
- WebRTC - RTCDataChannel APIs
- WebRTC - Sending Messages
- WebRTC - Signaling
- WebRTC - Browser Support
- WebRTC - Mobile Support
- WebRTC - Video Demo
- WebRTC - Voice Demo
- WebRTC - Text Demo
- WebRTC - Security
WebRTC - Quick Guide
WebRTC - Overview
The Web is no more a stranger to real-time communication as WebRTC (Web Real-Time Communication) comes into play. Although it was released in May 2011, it is still developing and its standards are changing. A set of protocols is standardized by Real-Time Communication in WEB-browsers Working group at http://tools.ietf.org/wg/rtcweb/ of the IETF (Internet Engineering Task Force) while new sets of APIs are standardized by the Web Real-Time Communications Working Groupe at http://www.w3.org/2011/04/webrtc/ of the W3C (World Wide Web Consortium). With the appearance of WebRTC, modern web applications can easily stream audio and video content to millions of people.
Basic Scheme
WebRTC allows you to set up peer-to-peer connections to other web browsers quickly and easily. To build such an application from scratch, you would need a wealth of frameworks and libraries dealing with typical issues like data loss, connection dropping, and NAT traversal. With WebRTC, all of this comes built-in into the browser out-of-the-box. This technology doesn't need any plugins or third-party software. It is open-sourced and its source code is freely available at http://www.webrtc.org/.
The WebRTC API includes media capture, encoding and decoding audio and video, transportation layer, and session management.
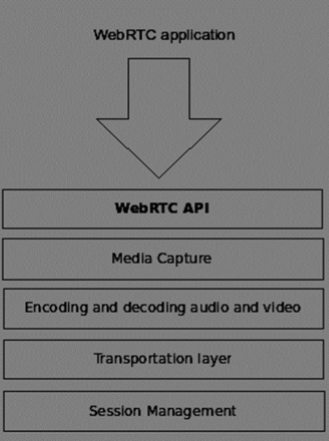
Media Capture
The first step is to get access to the camera and microphone of the user's device. We detect the type of devices available, get user permission to access these devices and manage the stream.
Encoding and Decoding Audio and Video
It is not an easy task to send a stream of audio and video data over the Internet. This is where encoding and decoding are used. This is the process of splitting up video frames and audio waves into smaller chunks and compressing them. This algorithm is called codec. There is an enormous amount of different codecs, which are maintained by different companies with different business goals. There are also many codecs inside WebRTC like H.264, iSAC, Opus and VP8. When two browsers connect together, they choose the most optimal supported codec between two users. Fortunately, WebRTC does most of the encoding behind the scenes.
Transportation Layer
The transportation layer manages the order of packets, deal with packet loss and connecting to other users. Again the WebRTC API gives us an easy access to events that tell us when there are issues with the connection.
Session Management
The session management deals with managing, opening and organizing connections. This is commonly called signaling. If you transfer audio and video streams to the user it also makes sense to transfer collateral data. This is done by the RTCDataChannel API.
Engineers from companies like Google, Mozilla, Opera and others have done a great job to bring this real-time experience to the Web.
Browser Compatibility
The WebRTC standards are one of the fastest evolving on the web, so it doesn't mean that every browser supports all the same features at the same time. To check whether your browser supports WebRTC or not, you may visit http://caniuse.com/#feat=rtcpeerconnection. Throughout all the tutorials, I recommend you to use Chrome for all the examples.
Trying out WebRTC
Let's get started using WebRTC right now.
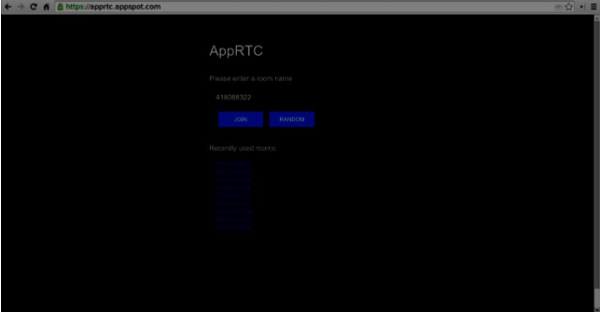
Click the JOIN button. You should see a drop-down notification.

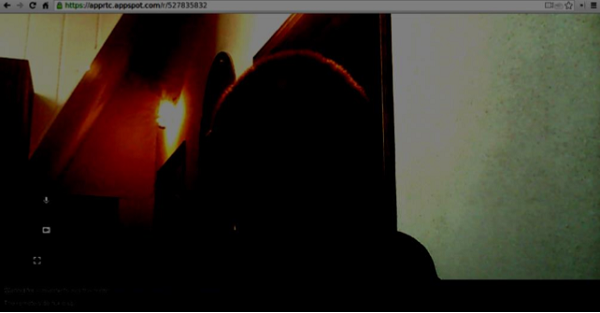
Click the Allow button to start streaming your video and audio to the web page. You should see a video stream of yourself.
Now open the URL you are currently on in a new browser tab and click on JOIN. You should see two video streams − one from your first client and another from the second one.
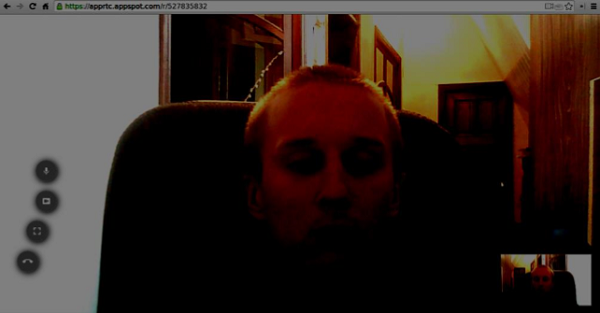
Now you should understand why WebRTC is a powerful tool.
Use Cases
The real-time web opens the door to a whole new range of applications, including text-based chat, screen and file sharing, gaming, video chat, and more. Besides communication you can use WebRTC for other purposes like −
- real-time marketing
- real-time advertising
- back office communications (CRM, ERP, SCM, FFM)
- HR management
- social networking
- dating services
- online medical consultations
- financial services
- surveillance
- multiplayer games
- live broadcasting
- e-learning
Summary
Now you should have a clear understanding of the term WebRTC. You should also have an idea of what types of applications can be built with WebRTC, as you have already tried it in your browser. To sum up, WebRTC is quite a useful technology.
WebRTC - Architecture
The overall WebRTC architecture has a great level of complexity.
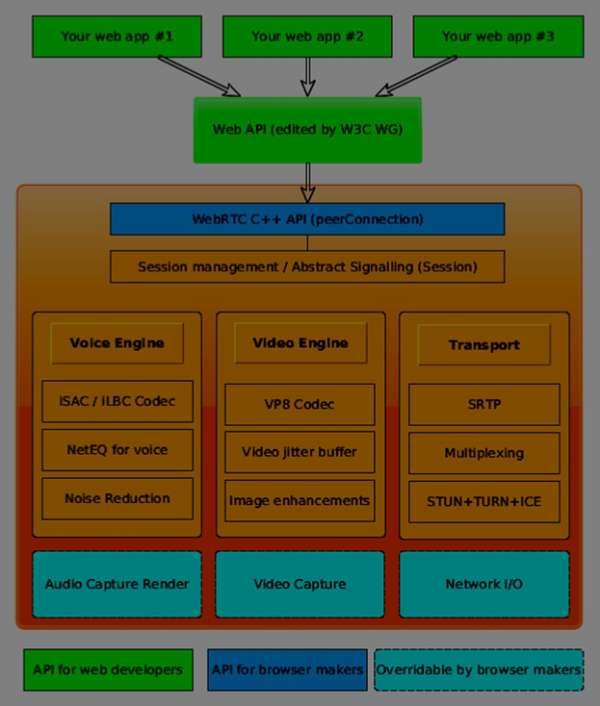
Here you can find three different layers −
API for web developers − this layer contains all the APIs web developer needed, including RTCPeerConnection, RTCDataChannel, and MediaStrean objects.
API for browser makers
Overridable API, which browser makers can hook.
Transport components allow establishing connections across various types of networks while voice and video engines are frameworks responsible for transferring audio and video streams from a sound card and camera to the network. For Web developers, the most important part is WebRTC API.
If we look at the WebRTC architecture from the client-server side we can see that one of the most commonly used models is inspired by the SIP(Session Initiation Protocol) Trapezoid.
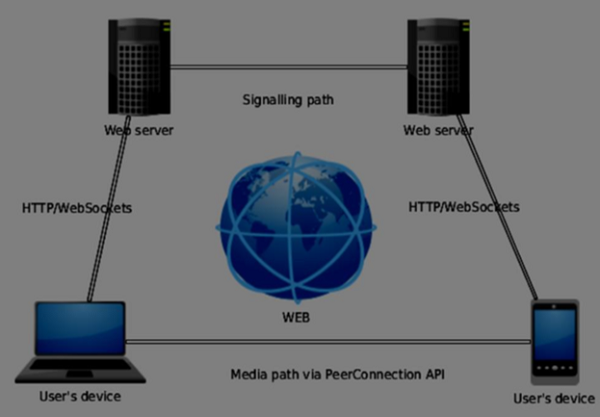
In this model, both devices are running a web application from different servers. The RTCPeerConnection object configures streams so they could connect to each other, peer-to-peer. This signaling is done via HTTP or WebSockets.
But the most commonly used model is Triangle −
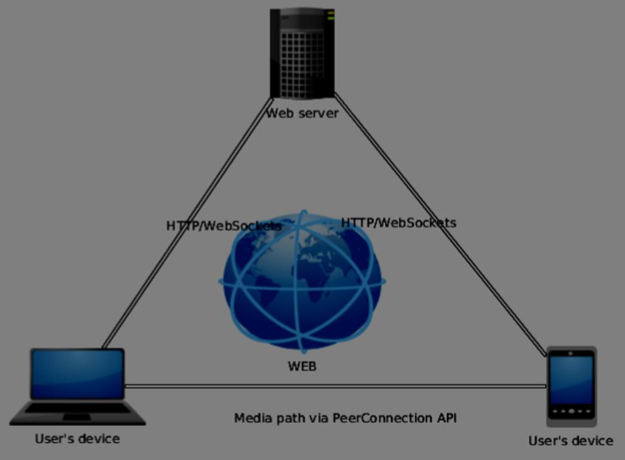
In this model both devices use the same web application. It gives web developer more flexibility when managing user connections.
The WebRTC API
It consists of a few main javascript objects −
- RTCPeerConnection
- MediaStream
- RTCDataChannel
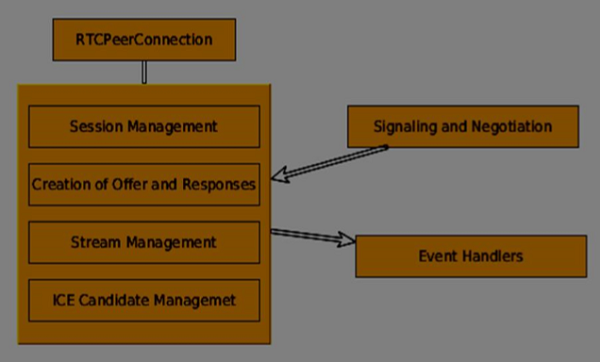
The RTCPeerConnection object
This object is the main entry point to the WebRTC API. It helps us connect to peers, initialize connections and attach media streams. It also manages a UDP connection with another user.
The main task of the RTCPeerConnection object is to setup and create a peer connection. We can easily hook keys points of the connection because this object fires a set of events when they appear. These events give you access to the configuration of our connection −
The RTCPeerConnection is a simple javascript object, which you can simply create this way −
[code]
var conn = new RTCPeerConnection(conf);

conn.onaddstream = function(stream) {
   // use stream here
};

[/code]
The RTCPeerConnection object accepts a conf parameter, which we will cover later in these tutorials. The onaddstream event is fired when the remote user adds a video or audio stream to their peer connection.
MediaStream API
Modern browsers give a developer access to the getUserMedia API, also known as the MediaStream API. There are three key points of functionality −
It gives a developer access to a stream object that represent video and audio streams
It manages the selection of input user devices in case a user has multiple cameras or microphones on his device
It provides a security level asking user all the time he wants to fetch s stream
To test this API let's create a simple HTML page. It will show a single <video> element, ask the user's permission to use the camera and show a live stream from the camera on the page. Create an index.html file and add −
[code]
<html>

   <head>
      <meta charset = "utf-8">
   </head>

   <body>
      <video autoplay></video>
      <script src = "client.js"></script>
   </body>

</html>
[/code]
Then add a client.js file −
[code]
//checks if the browser supports WebRTC

function hasUserMedia() {
   navigator.getUserMedia = navigator.getUserMedia || navigator.webkitGetUserMedia
      || navigator.mozGetUserMedia || navigator.msGetUserMedia;
   return !!navigator.getUserMedia;
}

if (hasUserMedia()) {
   navigator.getUserMedia = navigator.getUserMedia || navigator.webkitGetUserMedia
      || navigator.mozGetUserMedia || navigator.msGetUserMedia;

   //get both video and audio streams from user's camera
   navigator.getUserMedia({ video: true, audio: true }, function (stream) {
      var video = document.querySelector('video');

      //insert stream into the video tag
      video.src = window.URL.createObjectURL(stream);
   }, function (err) {});

}else {
   alert("Error. WebRTC is not supported!");
}
[/code]
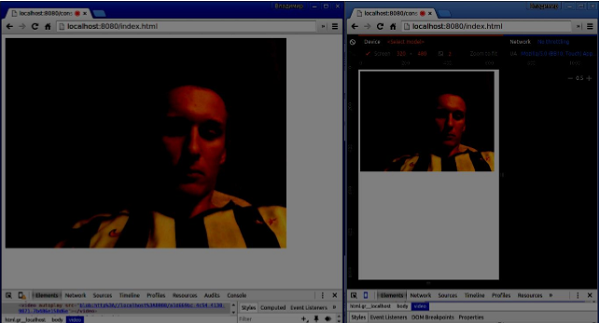
Now open the index.html and you should see the video stream displaying your face.
But be careful, because WebRTC works only on the server side. If you simply open this page with the browser it won't work. You need to host these files on the Apache or Node servers, or which one you prefer.
The RTCDataChannel object
As well as sending media streams between peers, you may also send additional data using DataChannel API. This API is as simple as MediaStream API. The main job is to create a channel coming from an existing RTCPeerConnection object −
[code]
var peerConn = new RTCPeerConnection();

//establishing peer connection
//...
//end of establishing peer connection
var dataChannel = peerConnection.createDataChannel("myChannel", dataChannelOptions);

// here we can start sending direct messages to another peer
[/code]
This is all you needed, just two lines of code. Everything else is done on the browser's internal layer. You can create a channel at any peer connection until the RTCPeerConnectionobject is closed.
Summary
You should now have a firm grasp of the WebRTC architecture. We also covered MediaStream, RTCPeerConnection, and RTCDataChannel APIs. The WebRTC API is a moving target, so always keep up with the latest specifications.
WebRTC - Environment
Before we start building our WebRTC applications, we should set our coding environment. First of all, you should have a text editor or IDE where you can edit HTML and Javascript. There are chances that you have already chosen the preferred one as you are reading this tutorial. As for me, I'm using WebStorm IDE. You can download its trial version at https://www.jetbrains.com/webstorm/. I'm also using Linux Mint as my OS of choice.
The other requirement for common WebRTC applications is having a server to host the HTML and Javascript files. The code will not work just by double-clicking on the files because the browser is not allowed to connect to cameras and microphones unless the files are being served by an actual server. This is done obviously due to the security issues.
There are tons of different web servers, but in this tutorial, we are going to use Node.js with node-static −
Visit https://nodejs.org/en/ and download the latest Node.js version.
Unpack it to the /usr/local/nodejs directory.
Open the /home/YOUR_USERNAME/.profile file and add the following line to the end − export PATH=$PATH:/usr/local/nodejs/bin
The you can restart your computer or run source /home/YOUR_USERNAME/.profile
Now the node command should be available from the command line. The npm command is also available. NMP is the package manager for Node.js. You can learn more at https://www.npmjs.com/.
Open up a terminal and run sudo npm install -g node-static. This will install the static web server for Node.js.
Now navigate to any directory containing the HTML files and run the static command inside the directory to start your web server.
You can navigate to http://localhost:8080 to see your files.
There is another way to install nodejs. Just run sudo apt-get install nodejs in the terminal window.
To test your Node.js installation open up your terminal and run the node command. Type a few commands to check how it works −
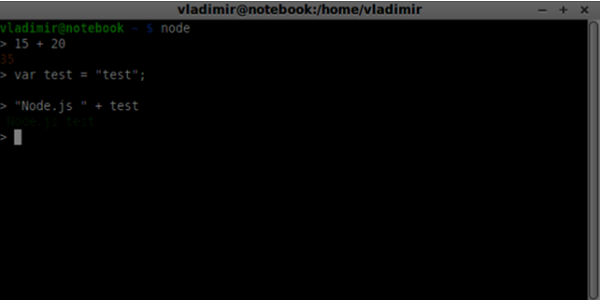
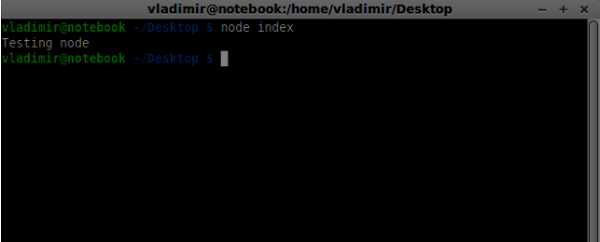
Node.js runs Javascript files as well as commands typed in the terminal. Create an index.js file with the following content −
console.log(Testing Node.js);
Then run the node index command. You will see the following −
When building our signaling server we will use a WebSockets library for Node.js. To install in run npm install ws in the terminal.
For testing our signaling server, we will use the wscat utility. To install it run npm install -g wscat in your terminal window.
| S.No | Protocols & Description |
|---|---|
| 1 | WebRTC Protocols
WebRTC applications use UDP (User Datagram Protocol) as the transport protocol. Most web applications today are built with the using of the TCP (Transmission Control Protocol) |
| 2 | Session Description Protocol
The SDP is an important part of the WebRTC. It is a protocol that is intended to describe media communication sessions. |
| 3 | Finding a Route
In order to connect to another user, you should find a clear path around your own network and the other user's network. But there are chances that the network you are using has several levels of access control to avoid security issues. |
| 4 | Stream Control Transmission Protocol
With the peer connection, we have the ability to send quickly video and audio data. The SCTP protocol is used today to send blob data on top of our currently setup peer connection when using the RTCDataChannel object. |
Summary
In this chapter, we covered several of the technologies that enable peer connections, such as UDP, TCP, STUN, TURN, ICE, and SCTP. You should now have a surface-level understanding of how SDP works and its use cases.
WebRTC - MediaStream APIs
The MediaStream API was designed to easy access the media streams from local cameras and microphones. The getUserMedia() method is the primary way to access local input devices.
The API has a few key points −
A real-time media stream is represented by a stream object in the form of video or audio
It provides a security level through user permissions asking the user before a web application can start fetching a stream
The selection of input devices is handled by the MediaStream API (for example, when there are two cameras or microphones connected to the device)
Each MediaStream object includes several MediaStreamTrack objects. They represent video and audio from different input devices.
Each MediaStreamTrack object may include several channels (right and left audio channels). These are the smallest parts defined by the MediaStream API.
There are two ways to output MediaStream objects. First, we can render output into a video or audio element. Secondly, we can send output to the RTCPeerConnection object, which then send it to a remote peer.
Using the MediaStream API
Let's create a simple WebRTC application. It will show a video element on the screen, ask the user permission to use the camera, and show a live video stream in the browser. Create an index.html file −
<!DOCTYPE html>
<html lang = "en">

   <head>
      <meta charset = "utf-8" />
   </head>

   <body>
      <video autoplay></video>
      <script src = "client.js"></script>
   </body>

</html>
Then create the client.js file and add the following;
function hasUserMedia() {
   //check if the browser supports the WebRTC
   return !!(navigator.getUserMedia || navigator.webkitGetUserMedia ||
      navigator.mozGetUserMedia);
}

if (hasUserMedia()) {
   navigator.getUserMedia = navigator.getUserMedia || navigator.webkitGetUserMedia
      || navigator.mozGetUserMedia;

   //enabling video and audio channels
   navigator.getUserMedia({ video: true, audio: true }, function (stream) {
      var video = document.querySelector('video');

      //inserting our stream to the video tag
      video.src = window.URL.createObjectURL(stream);
   }, function (err) {});
} else {
   alert("WebRTC is not supported");
}
Here we create the hasUserMedia() function which checks whether WebRTC is supported or not. Then we access the getUserMedia function where the second parameter is a callback that accept the stream coming from the user's device. Then we load our stream into the video element using window.URL.createObjectURL which creates a URL representing the object given in parameter.
Now refresh your page, click Allow, and you should see your face on the screen.

Remember to run all your scripts using the web server. We have already installed one in the WebRTC Environment Tutorial.
MediaStream API
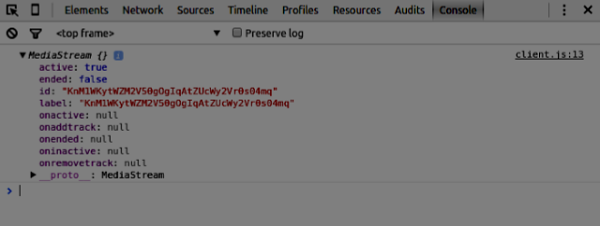
Properties
MediaStream.active (read only) − Returns true if the MediaStream is active, or false otherwise.
MediaStream.ended (read only, deprecated) − Return true if the ended event has been fired on the object, meaning that the stream has been completely read, or false if the end of the stream has not been reached.
MediaStream.id (read only) − A unique identifier for the object.
MediaStream.label (read only, deprecated) − A unique identifier assigned by the user agent.
You can see how the above properties look in my browser −
Event Handlers
MediaStream.onactive − A handler for an active event that is fired when a MediaStream object becomes active.
MediaStream.onaddtrack − A handler for an addtrack event that is fired when a new MediaStreamTrack object is added.
MediaStream.onended (deprecated) − A handler for an ended event that is fired when the streaming is terminating.
MediaStream.oninactive − A handler for an inactive event that is fired when a MediaStream object becomes inactive.
MediaStream.onremovetrack − A handler for a removetrack event that is fired when a MediaStreamTrack object is removed from it.
Methods
MediaStream.addTrack() − Adds the MediaStreamTrack object given as argument to the MediaStream. If the track has already been added, nothing happens.
MediaStream.clone() − Returns a clone of the MediaStream object with a new ID.
MediaStream.getAudioTracks() − Returns a list of the audio MediaStreamTrack objects from the MediaStream object.
MediaStream.getTrackById() − Returns the track by ID. If the argument is empty or the ID is not found, it returns null. If several tracks have the same ID, it returns the first one.
MediaStream.getTracks() − Returns a list of all MediaStreamTrack objects from the MediaStream object.
MediaStream.getVideoTracks() − Returns a list of the video MediaStreamTrack objects from the MediaStream object.
MediaStream.removeTrack() − Removes the MediaStreamTrack object given as argument from the MediaStream. If the track has already been removed, nothing happens.
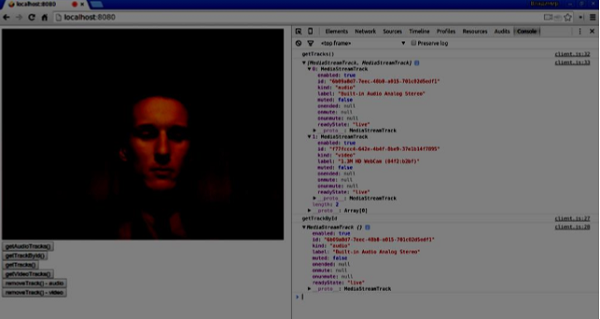
To test the above APIs change change the index.html in the following way −
<!DOCTYPE html>
<html lang = "en">

   <head>
      <meta charset = "utf-8" />
   </head>

   <body>
      <video autoplay></video>
      <div><button id = "btnGetAudioTracks">getAudioTracks()
         </button></div>
      <div><button id = "btnGetTrackById">getTrackById()
         </button></div>
      <div><button id = "btnGetTracks">getTracks()</button></div>
      <div><button id = "btnGetVideoTracks">getVideoTracks()
         </button></div>
      <div><button id = "btnRemoveAudioTrack">removeTrack() - audio
         </button></div>
      <div><button id = "btnRemoveVideoTrack">removeTrack() - video
         </button></div>
      <script src = "client.js"></script>
   </body>

</html>
We added a few buttons to try out several MediaStream APIs. Then we should add event handlers for our newly created button. Modify the client.js file this way −
var stream;

function hasUserMedia() {
   //check if the browser supports the WebRTC
   return !!(navigator.getUserMedia || navigator.webkitGetUserMedia ||
      navigator.mozGetUserMedia);
}

if (hasUserMedia()) {
   navigator.getUserMedia = navigator.getUserMedia || navigator.webkitGetUserMedia
      || navigator.mozGetUserMedia;

   //enabling video and audio channels
   navigator.getUserMedia({ video: true, audio: true }, function (s) {
      stream = s;
      var video = document.querySelector('video');

      //inserting our stream to the video tag
      video.src = window.URL.createObjectURL(stream);
   }, function (err) {});
} else {
   alert("WebRTC is not supported");
}

btnGetAudioTracks.addEventListener("click", function(){
   console.log("getAudioTracks");
   console.log(stream.getAudioTracks());
});

btnGetTrackById.addEventListener("click", function(){
   console.log("getTrackById");
   console.log(stream.getTrackById(stream.getAudioTracks()[0].id));
});

btnGetTracks.addEventListener("click", function(){
   console.log("getTracks()");
   console.log(stream.getTracks());
});

btnGetVideoTracks.addEventListener("click", function(){
   console.log("getVideoTracks()");
   console.log(stream.getVideoTracks());
});

btnRemoveAudioTrack.addEventListener("click", function(){
   console.log("removeAudioTrack()");
   stream.removeTrack(stream.getAudioTracks()[0]);
});

btnRemoveVideoTrack.addEventListener("click", function(){
   console.log("removeVideoTrack()");
   stream.removeTrack(stream.getVideoTracks()[0]);
});
Now refresh your page. Click on the getAudioTracks() button, then click on the removeTrack() - audio button. The audio track should now be removed. Then do the same for the video track.
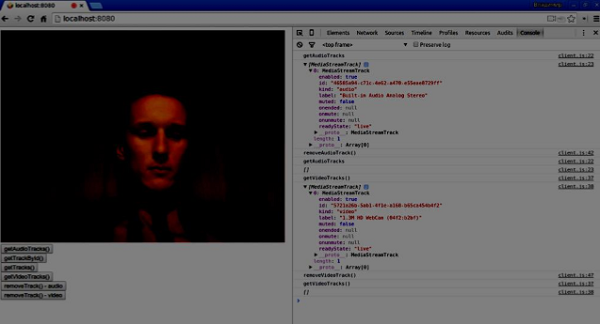
If you click the getTracks() button you should see all MediaStreamTracks (all connected video and audio inputs). Then click on the getTrackById() to get audio MediaStreamTrack.
Summary
In this chapter, we created a simple WebRTC application using the MediaStream API. Now you should have a clear overview of the various MediaStream APIs that make WebRTC work.
WebRTC - RTCPeerConnection APIs
The RTCPeerConnection API is the core of the peer-to-peer connection between each of the browsers. To create the RTCPeerConnection objects simply write
var pc = RTCPeerConnection(config);
where the config argument contains at least on key, iceServers. It is an array of URL objects containing information about STUN and TURN servers, used during the finding of the ICE candidates. You can find a list of available public STUN servers at code.google.com
Depending upon whether you are the caller or the callee the RTCPeerConnection object is used in a slightly different way on each side of the connection.
Here is an example of the user's flow −
Register the onicecandidate handler. It sends any ICE candidates to the other peer, as they are received.
Register the onaddstream handler. It handles the displaying of the video stream once it is received from the remote peer.
Register the message handler. Your signaling server should also have a handler for messages received from the other peer. If the message contains the RTCSessionDescription object, it should be added to the RTCPeerConnection object using the setRemoteDescription() method. If the message contains the RTCIceCandidate object, it should be added to the RTCPeerConnection object using the addIceCandidate() method.
Utilize getUserMedia() to set up your local media stream and add it to the RTCPeerConnection object using the addStream() method.
Start offer/answer negotiation process. This is the only step where the caller's flow is different from the callee's one. The caller starts negotiation using the createOffer() method and registers a callback that receives the RTCSessionDescription object. Then this callback should add this RTCSessionDescription object to your RTCPeerConnection object using setLocalDescription(). And finally, the caller should send this RTCSessionDescription to the remote peer using the signaling server. The callee, on the other, registers the same callback, but in the createAnswer() method. Notice that the callee flow is initiated only after the offer is received from the caller.
RTCPeerConnection API
Properties
RTCPeerConnection.iceConnectionState (read only) − Returns an RTCIceConnectionState enum that describes the state of the connection. An iceconnectionstatechange event is fired when this value changes. The possible values −
new − the ICE agent is waiting for remote candidates or gathering addresses
checking − the ICE agent has remote candidates, but it has not found a connection yet
connected − the ICE agent has found a usable connection, but is still checking more remote candidate for better connection.
completed − the ICE agent has found a usable connection and stopped testing remote candidates.
failed − the ICE agent has checked all the remote candidates but didn't find a match for at least one component.
disconnected − at least one component is no longer alive.
closed − the ICE agent is closed.
RTCPeerConnection.iceGatheringState (read only) − Returns a RTCIceGatheringState enum that describes the ICE gathering state for the connection −
new − the object was just created.
gathering − the ICE agent is in the process of gathering candidates
complete the ICE agent has completed gathering.
RTCPeerConnection.localDescription (read only) − Returns an RTCSessionDescription describing the local session. It can be null if it has not yet been set.
RTCPeerConnection.peerIdentity (read only) − Returns an RTCIdentityAssertion. It consists of an idp(domain name) and a name representing the identity of the remote peer.
RTCPeerConnection.remoteDescription (read only) − Return an RTCSessionDescription describing the remote session. It can be null if it has not yet been set.
RTCPeerConnection.signalingState (read only) − Returns an RTCSignalingState enum that describes the signaling state of the local connection. This state describes the SDP offer. A signalingstatechange event is fired when this value changes. The possible values −
stable − The initial state. There is no SDP offer/answer exchange in progress.
have-local-offer − the local side of the connection has locally applied a SDP offer.
have-remote-offer − the remote side of the connection has locally applied a SDP offer.
have-local-pranswer − a remote SDP offer has been applied, and a SDP pranswer applied locally.
have-remote-pranswer − a local SDP has been applied, and a SDP pranswer applied remotely.
closed − the connection is closed.
Event Handlers
| S.No. | Event Handlers & Description |
|---|---|
| 1 | RTCPeerConnection.onaddstream This handler is called when the addstream event is fired. This event is sent when a MediaStream is added to this connection by the remote peer. |
| 2 | RTCPeerConnection.ondatachannel This handler is called when the datachannel event is fired. This event is sent when a RTCDataChannel is added to this connection. |
| 3 | RTCPeerConnection.onicecandidate This handler is called when the icecandidate event is fired. This event is sent when a RTCIceCandidate object is added to the script. |
| 4 | RTCPeerConnection.oniceconnectionstatechange This handler is called when the iceconnectionstatechange event is fired. This event is sent when the value of iceConnectionState changes. |
| 5 | RTCPeerConnection.onidentityresult This handler is called when the identityresult event is fired. This event is sent when an identity assertion is generated during the creating of an offer or an answer of via getIdentityAssertion(). |
| 6 | RTCPeerConnection.onidpassertionerror This handler is called when the idpassertionerror event is fired. This event is sent when the IdP (Identitry Provider) finds an error while generating an identity assertion. |
| 7 | RTCPeerConnection.onidpvalidation This handler is called when the idpvalidationerror event is fired. This event is sent when the IdP (Identitry Provider) finds an error while validating an identity assertion. |
| 8 | RTCPeerConnection.onnegotiationneeded This handler is called when the negotiationneeded event is fired. This event is sent by the browser to inform the negotiation will be required at some point in the future. |
| 9 | RTCPeerConnection.onpeeridentity This handler is called when the peeridentity event is fired. This event is sent when a peer identity has been set and verified on this connection. |
| 10 | RTCPeerConnection.onremovestream This handler is called when the signalingstatechange event is fired. This event is sent when the value of signalingState changes. |
| 11 | RTCPeerConnection.onsignalingstatechange This handler is called when the removestream event is fired. This event is sent when a MediaStream is removed from this connection. |
Methods
| S.No. | Methods & Description |
|---|---|
| 1 | RTCPeerConnection() Returns a new RTCPeerConnection object. |
| 2 | RTCPeerConnection.createOffer() Creates an offer(request) to find a remote peer. The two first parameters of this method are success and error callbacks. The optional third parameter are options, like enabling audio or video streams. |
| 3 | RTCPeerConnection.createAnswer() Creates an answer to the offer received by the remote peer during the offer/answer negotiation process. The two first parameters of this method are success and error callbacks. The optional third parameter are options for the answer to be created. |
| 4 | RTCPeerConnection.setLocalDescription() Changes the local connection description. The description defines the properties of the connection. The connection must be able to support both old and new descriptions. The method takes three parameters, RTCSessionDescription object, callback if the change of description succeeds, callback if the change of description fails. |
| 5 | RTCPeerConnection.setRemoteDescription() Changes the remote connection description. The description defines the properties of the connection. The connection must be able to support both old and new descriptions. The method takes three parameters, RTCSessionDescription object, callback if the change of description succeeds, callback if the change of description fails. |
| 6 | RTCPeerConnection.updateIce() Updates the ICE agent process of pinging remote candidates and gathering local candidates. |
| 7 | RTCPeerConnection.addIceCandidate() Provides a remote candidate to the ICE agent. |
| 8 | RTCPeerConnection.getConfiguration() Returns a RTCConfiguration object. It represents the configuration of the RTCPeerConnection object. |
| 9 | RTCPeerConnection.getLocalStreams() Returns an array of local MediaStream connection. |
| 10 | RTCPeerConnection.getRemoteStreams() Returns an array of remote MediaStream connection. |
| 11 | RTCPeerConnection.getStreamById() Returns local or remote MediaStream by the given ID. |
| 12 | RTCPeerConnection.addStream() Adds a MediaStream as a local source of video or audio. |
| 13 | RTCPeerConnection.removeStream() Removes a MediaStream as a local source of video or audio. |
| 14 | RTCPeerConnection.close() Closes a connection. |
| 15 | RTCPeerConnection.createDataChannel() Creates a new RTCDataChannel. |
| 16 | RTCPeerConnection.createDTMFSender() Creates a new RTCDTMFSender, associated to a specific MediaStreamTrack. Allows to send DTMF (Dual-tone multifrequency) phone signaling over the connection. |
| 17 | RTCPeerConnection.getStats() Creates a new RTCStatsReport that contains statistics concerning the connection. |
| 18 | RTCPeerConnection.setIdentityProvider() Sets the IdP. Takes three parameters the name, the protocol used to communicate and an optional username. |
| 19 | RTCPeerConnection.getIdentityAssertion() Gathers an identity assertion. It is not expected to deal with this method in the application. So you may call it explicitly only to anticipate the need. |
Establishing a Connection
Now let's create an example application. Firstly, run the signaling server we created in the signaling server tutorial via node server.
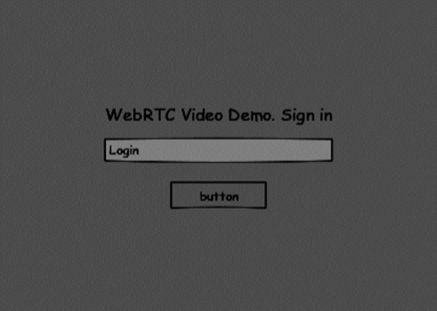
There will be two text inputs on the page, one for a login and one for a username we want to connect to. Create an index.html file and add the following code −
<html lang = "en">
   <head>
      <meta charset = "utf-8" />
   </head>

   <body>

      <div>
         <input type = "text" id = "loginInput" />
         <button id = "loginBtn">Login</button>
      </div>

      <div>
         <input type = "text" id = "otherUsernameInput" />
         <button id = "connectToOtherUsernameBtn">Establish connection</button>
      </div>

      <script src = "client2.js"></script>

   </body>

</html>
You can see that we've added the text input for a login, the login button, the text input for the other peer username, and the connect-to-him button. Now create a client.js file and add the following code −
var connection = new WebSocket('ws://localhost:9090');
var name = "";
var loginInput = document.querySelector('#loginInput');
var loginBtn = document.querySelector('#loginBtn');
var otherUsernameInput = document.querySelector('#otherUsernameInput');
var connectToOtherUsernameBtn = document.querySelector('#connectToOtherUsernameBtn');
var connectedUser, myConnection;
//when a user clicks the login button
loginBtn.addEventListener("click", function(event){
name = loginInput.value;
if(name.length > 0){
send({
type: "login",
name: name
});
}
});
//handle messages from the server
connection.onmessage = function (message) {
console.log("Got message", message.data);
var data = JSON.parse(message.data);
switch(data.type) {
case "login":
onLogin(data.success);
break;
case "offer":
onOffer(data.offer, data.name);
break;
case "answer":
onAnswer(data.answer);
break;
case "candidate":
onCandidate(data.candidate);
break;
default:
break;
}
};
//when a user logs in
function onLogin(success) {
if (success === false) {
alert("oops...try a different username");
} else {
//creating our RTCPeerConnection object
var configuration = {
"iceServers": [{ "url": "stun:stun.1.google.com:19302" }]
};
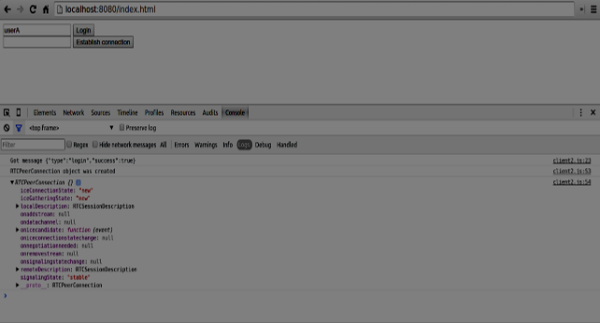
myConnection = new webkitRTCPeerConnection(configuration);
console.log("RTCPeerConnection object was created");
console.log(myConnection);
//setup ice handling
//when the browser finds an ice candidate we send it to another peer
myConnection.onicecandidate = function (event) {
if (event.candidate) {
send({
type: "candidate",
candidate: event.candidate
});
}
};
}
};
connection.onopen = function () {
console.log("Connected");
};
connection.onerror = function (err) {
console.log("Got error", err);
};
// Alias for sending messages in JSON format
function send(message) {
if (connectedUser) {
message.name = connectedUser;
}
connection.send(JSON.stringify(message));
};
You can see that we establish a socket connection to our signaling server. When a user clicks on the login button the application sends his username to the server. If login is successful the application creates the RTCPeerConnection object and setup onicecandidate handler which sends all found icecandidates to the other peer. Now open the page and try to login. You should see the following console output −
The next step is to create an offer to the other peer. Add the following code to your client.js file −
//setup a peer connection with another user
connectToOtherUsernameBtn.addEventListener("click", function () {

   var otherUsername = otherUsernameInput.value;
   connectedUser = otherUsername;

   if (otherUsername.length > 0) {
      //make an offer
      myConnection.createOffer(function (offer) {
         console.log();
         send({
            type: "offer",
            offer: offer
         });

         myConnection.setLocalDescription(offer);
      }, function (error) {
         alert("An error has occurred.");
      });
   }
});

//when somebody wants to call us
function onOffer(offer, name) {
   connectedUser = name;
   myConnection.setRemoteDescription(new RTCSessionDescription(offer));

   myConnection.createAnswer(function (answer) {
      myConnection.setLocalDescription(answer);
      send({
         type: "answer",
         answer: answer
      });

   }, function (error) {
      alert("oops...error");
   });
}

//when another user answers to our offer
function onAnswer(answer) {
   myConnection.setRemoteDescription(new RTCSessionDescription(answer));
}

//when we got ice candidate from another user
function onCandidate(candidate) {
   myConnection.addIceCandidate(new RTCIceCandidate(candidate));
}
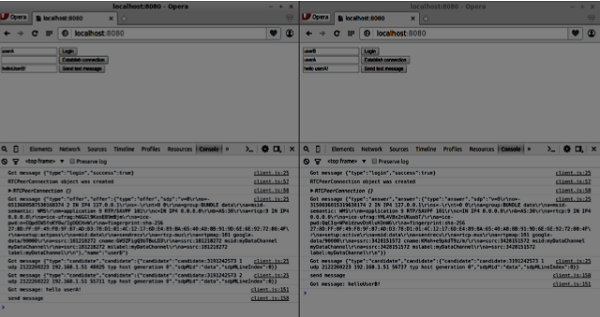
You can see that when a user clicks the Establish connection button the application makes an SDP offer to the other peer. We also set onAnswer and onCandidate handlers. Reload your page, open it in two tabs, login with two users and try to establish a connection between them. You should see the following console output −

Now the peer-to-peer connection is established. In the next tutorials, we will add video and audio streams as well as text chat support.
WebRTC - RTCDataChannel APIs
WebRTC is not only good at transferring audio and video streams, but any arbitrary data we might have. This is where the RTCDataChannel object comes into play.
RTCDataChannel API
Properties
RTCDataChannel.label (read only) − Returns a string containing the data channel name.
RTCDataChannel.ordered (read only) − Returns true if the order of delivery of the messages is guaranteed or false if it is not guaranteed.
RTCDataChannel.protocol (read only) − Returns a string containing subprotocol name used for this channel.
RTCDataChannel.id (read only) − Returns a unique id for the channel which is set at the creation of the RTCDataChannel object.
RTCDataChannel.readyState (read only) − Returns the RTCDataChannelState enum representing the state of the connection. The possible values −
connecting − Indicates that the connection is not yet active. This is the initial state.
open − Indicates that the connection is running.
closing − Indicates that the connection is in the process of shutting down. The cached messages are in the process of being sent or received, but no newly created task is accepting.
closed − Indicates that the connection could not be established or has been shut down.
RTCDataChannel.bufferedAmount (read only) − Returns the amount of bytes that have been queued for sending. This is the amount of data that has not been sent yet via RTCDataChannel.send().
RTCDataChannel.bufferedAmountLowThreshold − Returns the number of bytes at which the RTCDataChannel.bufferedAmount is taken up as low. When the RTCDataChannel.bufferedAmount decreases below this threshold, the bufferedamountlow event is fired.
RTCDataChannel.binaryType − Returns the type of the binary data transmitted by the connection. Can be blob or arraybuffer.
RTCDataChannel.maxPacketLifeType (read only) − Returns an unsigned short that indicates the length in milliseconds of the window in when messaging is going in unreliable mode.
RTCDataChannel.maxRetransmits (read only) − Returns an unsigned short that indicates the maximum number of times a channel will retransmit data if it is not delivered.
RTCDataChannel.negotiated (read only) − Returns a boolean that indicates if the channel has been negotiated by the user-agent, or by the application.
RTCDataChannel.reliable (read only) − Returns a boolean that indicates of the connection can send messages in unreliable mode.
RTCDataChannel.stream (read only) − Synonym for RTCDataChannel.id
Event Handlers
RTCDataChannel.onopen − This event handler is called when the open event is fired. This event is sent when the data connection has been established.
RTCDataChannel.onmessage − This event handler is called when the message event is fired. The event is sent when a message is available on the data channel.
RTCDataChannel.onbufferedamountlow − This event handler is called when the bufferedamoutlow event is fired. This event is sent when RTCDataChannel.bufferedAmount decreases below the RTCDataChannel.bufferedAmountLowThreshold property.
RTCDataChannel.onclose − This event handler is called when the close event is fired. This event is sent when the data connection has been closed.
RTCDataChannel.onerror − This event handler is called when the error event is fired. This event is sent when an error has been encountered.
Methods
RTCDataChannel.close() − Closes the data channel.
RTCDataChannel.send() − Sends the data in the parameter over the channel. The data can be a blob, a string, an ArrayBuffer or an ArrayBufferView.
WebRTC - Sending Messages
Now let's create a simple example. Firstly, run the signaling server we created in the signaling server tutorial via node server.
There will be three text inputs on the page, one for a login, one for a username, and one for the message we want to send to the other peer. Create an index.html file and add the following code −
<html lang = "en">
   <head>
      <meta charset = "utf-8" />
   </head>

   <body>
      <div>
         <input type = "text" id = "loginInput" />
         <button id = "loginBtn">Login</button>
      </div>

      <div>
         <input type = "text" id = "otherUsernameInput" />
         <button id = "connectToOtherUsernameBtn">Establish connection</button>
      </div>

      <div>
         <input type = "text" id = "msgInput" />
         <button id = "sendMsgBtn">Send text message</button>
      </div>

      <script src = "client.js"></script>
   </body>

</html>
We've also added three buttons for login, establishing a connection and sending a message. Now create a client.js file and add the following code −
var connection = new WebSocket('ws://localhost:9090');
var name = "";

var loginInput = document.querySelector('#loginInput');
var loginBtn = document.querySelector('#loginBtn');

var otherUsernameInput = document.querySelector('#otherUsernameInput');
var connectToOtherUsernameBtn = document.querySelector('#connectToOtherUsernameBtn');
var msgInput = document.querySelector('#msgInput');
var sendMsgBtn = document.querySelector('#sendMsgBtn');
var connectedUser, myConnection, dataChannel;

//when a user clicks the login button
loginBtn.addEventListener("click", function(event) {
   name = loginInput.value;

   if(name.length > 0) {
      send({
         type: "login",
         name: name
      });
   }
});

//handle messages from the server
connection.onmessage = function (message) {
   console.log("Got message", message.data);
   var data = JSON.parse(message.data);

   switch(data.type) {
      case "login":
         onLogin(data.success);
         break;
      case "offer":
         onOffer(data.offer, data.name);
         break;
      case "answer":
         onAnswer(data.answer);
         break;
      case "candidate":
         onCandidate(data.candidate);
         break;
      default:
         break;
   }
};

//when a user logs in
function onLogin(success) {

   if (success === false) {
      alert("oops...try a different username");
   } else {
      //creating our RTCPeerConnection object
      var configuration = {
         "iceServers": [{ "url": "stun:stun.1.google.com:19302" }]
      };

      myConnection = new webkitRTCPeerConnection(configuration, {
         optional: [{RtpDataChannels: true}]
      });

      console.log("RTCPeerConnection object was created");
      console.log(myConnection);

      //setup ice handling
      //when the browser finds an ice candidate we send it to another peer
      myConnection.onicecandidate = function (event) {

         if (event.candidate) {
            send({
               type: "candidate",
               candidate: event.candidate
            });
         }
      };

      openDataChannel();

   }
};

connection.onopen = function () {
   console.log("Connected");
};

connection.onerror = function (err) {
   console.log("Got error", err);
};

// Alias for sending messages in JSON format
function send(message) {
   if (connectedUser) {
      message.name = connectedUser;
   }

   connection.send(JSON.stringify(message));
};
You can see that we establish a socket connection to our signaling server. When a user clicks on the login button the application sends his username to the server. If login is successful the application creates the RTCPeerConnection object and setup onicecandidate handler which sends all found icecandidates to the other peer. It also runs the openDataChannel() function which creates a dataChannel. Notice that when creating the RTCPeerConnection object the second argument in the constructor optional: [{RtpDataChannels: true}] is mandatory if you are using Chrome or Opera. The next step is to create an offer to the other peer. Add the following code to your client.js file−
//setup a peer connection with another user
connectToOtherUsernameBtn.addEventListener("click", function () {

   var otherUsername = otherUsernameInput.value;
   connectedUser = otherUsername;

   if (otherUsername.length > 0) {
      //make an offer
      myConnection.createOffer(function (offer) {
         console.log();
         send({
            type: "offer",
            offer: offer
         });

         myConnection.setLocalDescription(offer);
      }, function (error) {
         alert("An error has occurred.");
      });
   }
});

//when somebody wants to call us
function onOffer(offer, name) {
   connectedUser = name;
   myConnection.setRemoteDescription(new RTCSessionDescription(offer));

   myConnection.createAnswer(function (answer) {
      myConnection.setLocalDescription(answer);

      send({
         type: "answer",
         answer: answer
      });

   }, function (error) {
      alert("oops...error");
   });
}

//when another user answers to our offer
function onAnswer(answer) {
   myConnection.setRemoteDescription(new RTCSessionDescription(answer));
}

//when we got ice candidate from another user
function onCandidate(candidate) {
   myConnection.addIceCandidate(new RTCIceCandidate(candidate));
}
You can see that when a user clicks the Establish connection button the application makes an SDP offer to the other peer. We also set onAnswer and onCandidate handlers. Finally, let's implement the openDataChannel() function which creates our dataChannel. Add the following code to your client.js file −
//creating data channel
function openDataChannel() {

   var dataChannelOptions = {
      reliable:true
   };

   dataChannel = myConnection.createDataChannel("myDataChannel", dataChannelOptions);

   dataChannel.onerror = function (error) {
      console.log("Error:", error);
   };

   dataChannel.onmessage = function (event) {
      console.log("Got message:", event.data);
   };
}

//when a user clicks the send message button
sendMsgBtn.addEventListener("click", function (event) {
   console.log("send message");
   var val = msgInput.value;
   dataChannel.send(val);
});
Here we create the dataChannel for our connection and add the event handler for the send message button. Now open this page in two tabs, login with two users, establish a connection, and try to send messages. You should see them in the console output. Notice that the above example is tested in Opera.
Now you may see that RTCDataChannel is extremely powerful part of the WebRTC API. There are a lot of other use cases for this object, like peer-to-peer gaming or torrent-based file sharing.
WebRTC - Signaling
Most WebRTC applications are not just being able to communicate through video and audio. They need many other features. In this chapter, we are going to build a basic signaling server.
Signaling and Negotiation
To connect to another user you should know where he is located on the Web. The IP address of your device allows Internet-enabled devices to send data directly between each other. The RTCPeerConnection object is responsible for this. As soon as devices know how to find each other over the Internet, they start exchanging data about which protocols and codecs each device supports.
To communicate with another user you simply need to exchange contact information and the rest will be done by WebRTC. The process of connecting to the other user is also known as signaling and negotiation. It consists of a few steps −
Create a list of potential candidates for a peer connection.
The user or an application selects a user to make a connection with.
The signaling layer notifies another user that someone want to connect to him. He can accept or decline.
The first user is notified of the acceptance of the offer.
The first user initiates RTCPeerConnection with another user.
Both users exchange software and hardware information through the signaling server.
Both users exchange location information.
The connection succeeds or fails.
The WebRTC specification does not contain any standards about exchanging information. So keep in mind that the above is just an example of how signaling may happen. You can use any protocol or technology you like.
Building the Server
The server we are going to build will be able to connect two users together who are not located on the same computer. We will create our own signaling mechanism. Our signaling server will allow one user to call another. Once a user has called another, the server passes the offer, answer, ICE candidates between them and setup a WebRTC connection.
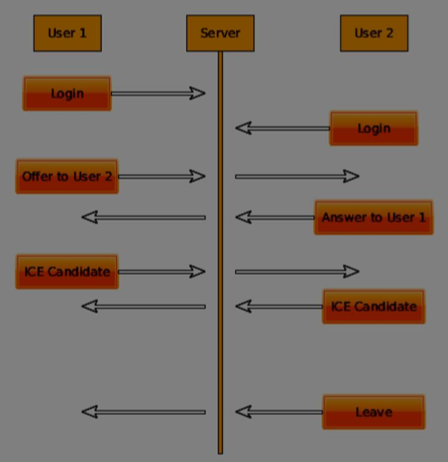
The above diagram is the messaging flow between users when using the signaling server. First of all, each user registers with the server. In our case, this will be a simple string username. Once users have registered, they are able to call each other. User 1 makes an offer with the user identifier he wishes to call. The other user should answers. Finally, ICE candidates are sent between users until they can make a connection.
To create a WebRTC connection clients have to be able to transfer messages without using a WebRTC peer connection. This is where we will use HTML5 WebSockets a bidirectional socket connection between two endpoints a web server and a web browser. Now let's start using the WebSocket library. Create the server.js file and insert the following code −
//require our websocket library
var WebSocketServer = require('ws').Server;

//creating a websocket server at port 9090
var wss = new WebSocketServer({port: 9090});

//when a user connects to our sever
wss.on('connection', function(connection) {
   console.log("user connected");

   //when server gets a message from a connected user
   connection.on('message', function(message){
      console.log("Got message from a user:", message);
   });

   connection.send("Hello from server");
});
The first line requires the WebSocket library which we have already installed. Then we create a socket server on the port 9090. Next, we listen to the connection event. This code will be executed when a user makes a WebSocket connection to the server. We then listen to any messages sent by the user. Finally, we send a response to the connected user saying Hello from server.
Now run node server and the server should start listening for socket connections.
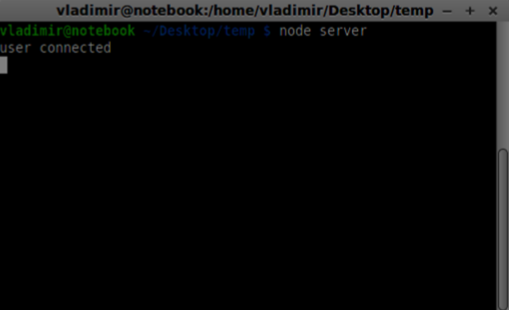
To test our server, we'll use the wscat utility which we also have already installed. This tool helps in connecting directly to the WebSocket server and test out commands. Run our server in one terminal window, then open another and run the wscat -c ws://localhost:9090 command. You should see the following on the client side −
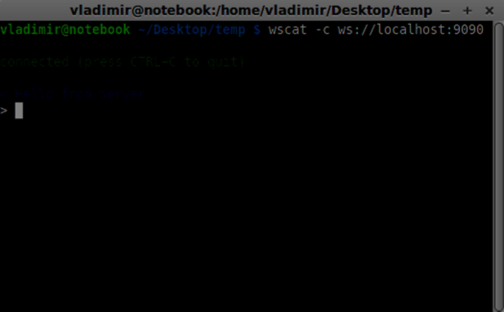
The server should also log the connected user −
User Registration
In our signaling server, we will use a string-based username for each connection so we know where to send messages. Let's change our connection handler a bit −
connection.on('message', function(message) {
   var data;

   //accepting only JSON messages
   try {
      data = JSON.parse(message);
   } catch (e) {
      console.log("Invalid JSON");
      data = {};
   }

});
This way we accept only JSON messages. Next, we need to store all connected users somewhere. We will use a simple Javascript object for it. Change the top of our file −
//require our websocket library
var WebSocketServer = require('ws').Server;

//creating a websocket server at port 9090
var wss = new WebSocketServer({port: 9090});

//all connected to the server users
var users = {};
We are going to add a type field for every message coming from the client. For example if a user wants to login, he sends the login type message. Let's define it −
connection.on('message', function(message){
   var data;

   //accepting only JSON messages
   try {
      data = JSON.parse(message);
   } catch (e) {
      console.log("Invalid JSON");
      data = {};
   }

   //switching type of the user message
   switch (data.type) {
      //when a user tries to login
      case "login":
         console.log("User logged:", data.name);

         //if anyone is logged in with this username then refuse
         if(users[data.name]) {
            sendTo(connection, {
               type: "login",
               success: false
            });
         } else {
            //save user connection on the server
            users[data.name] = connection;
            connection.name = data.name;

            sendTo(connection, {
               type: "login",
               success: true
            });

         }

         break;

      default:
         sendTo(connection, {
            type: "error",
            message: "Command no found: " + data.type
         });

         break;
   }

});
If the user sends a message with the login type, we −
Check if anyone has already logged in with this username
If so, then tell the user that he hasn't successfully logged in
If no one is using this username, we add username as a key to the connection object.
If a command is not recognized we send an error.
The following code is a helper function for sending messages to a connection. Add it to the server.js file −
function sendTo(connection, message) {
   connection.send(JSON.stringify(message));
}
The above function ensures that all our messages are sent in the JSON format.
When the user disconnects we should clean up its connection. We can delete the user when the close event is fired. Add the following code to the connection handler −
connection.on("close", function() {
   if(connection.name) {
      delete users[connection.name];
    }
});
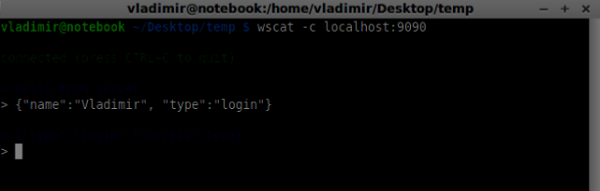
Now let's test our server with the login command. Keep in mind that all messages must be encoded in the JSON format. Run our server and try to login. You should see something like this −
Making a Call
After successful login the user wants to call another. He should make an offer to another user to achieve it. Add the offer handler −
case "offer":
   //for ex. UserA wants to call UserB
   console.log("Sending offer to: ", data.name);

   //if UserB exists then send him offer details
   var conn = users[data.name];

   if(conn != null){
      //setting that UserA connected with UserB
      connection.otherName = data.name;

      sendTo(conn, {
         type: "offer",
         offer: data.offer,
         name: connection.name
      });
   }

   break;
Firstly, we get the connection of the user we are trying to call. If it exists we send him offer details. We also add otherName to the connection object. This is made for the simplicity of finding it later.
Answering
Answering to the response has a similar pattern that we used in the offer handler. Our server just passes through all messages as answer to another user. Add the following code after the offer hander −
case "answer":
   console.log("Sending answer to: ", data.name);

   //for ex. UserB answers UserA
   var conn = users[data.name];

   if(conn != null) {
      connection.otherName = data.name;
      sendTo(conn, {
         type: "answer",
         answer: data.answer
      });
   }

   break;
You can see how this is similar to the offer handler. Notice this code follows the createOffer and createAnswer functions on the RTCPeerConnection object.
Now we can test our offer/answer mechanism. Connect two clients at the same time and try to make offer and answer. You should see the following −
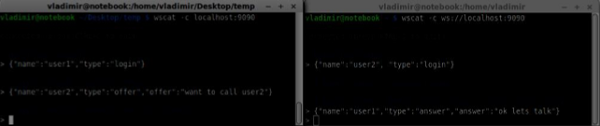
In this example, offer and answer are simple strings, but in a real application they will be filled in with the SDP data.
ICE Candidates
The final part is handling ICE candidate between users. We use the same technique just passing messages between users. The main difference is that candidate messages might happen multiple times per user in any order. Add the candidate handler −
case "candidate":
   console.log("Sending candidate to:",data.name);
   var conn = users[data.name];

   if(conn != null) {
      sendTo(conn, {
         type: "candidate",
         candidate: data.candidate
      });
   }

   break;
It should work similarly to the offer and answer handlers.
Leaving the Connection
To allow our users to disconnect from another user we should implement the hanging up function. It will also tell the server to delete all user references. Add the leave handler −
case "leave":
   console.log("Disconnecting from", data.name);
   var conn = users[data.name];
   conn.otherName = null;

   //notify the other user so he can disconnect his peer connection
   if(conn != null) {
      sendTo(conn, {
         type: "leave"
      });
   }

   break;
This will also send the other user the leave event so he can disconnect his peer connection accordingly. We should also handle the case when a user drops his connection from the signaling server. Let's modify our close handler −
connection.on("close", function() {

   if(connection.name) {
      delete users[connection.name];

      if(connection.otherName) {
         console.log("Disconnecting from ", connection.otherName);
         var conn = users[connection.otherName];
         conn.otherName = null;

         if(conn != null) {
            sendTo(conn, {
               type: "leave"
            });
         }
      }
   }
});
Now if the connection terminates our users will be disconnected. The close event will be fired when a user closes his browser window while we are still in offer, answer or candidate state.
Complete Signaling Server
Here is the entire code of our signaling server −
//require our websocket library
var WebSocketServer = require('ws').Server;

//creating a websocket server at port 9090
var wss = new WebSocketServer({port: 9090});

//all connected to the server users
var users = {};

//when a user connects to our sever
wss.on('connection', function(connection) {

   console.log("User connected");

   //when server gets a message from a connected user
   connection.on('message', function(message) {

      var data;
      //accepting only JSON messages
      try {
         data = JSON.parse(message);
      } catch (e) {
         console.log("Invalid JSON");
         data = {};
      }

      //switching type of the user message
      switch (data.type) {
         //when a user tries to login

         case "login":
            console.log("User logged", data.name);

            //if anyone is logged in with this username then refuse
            if(users[data.name]) {
               sendTo(connection, {
                  type: "login",
                  success: false
               });
            } else {
               //save user connection on the server
               users[data.name] = connection;
               connection.name = data.name;
               sendTo(connection, {
                  type: "login",
                  success: true
               });
            }

            break;

         case "offer":
            //for ex. UserA wants to call UserB
            console.log("Sending offer to: ", data.name);

            //if UserB exists then send him offer details
            var conn = users[data.name];

            if(conn != null) {
               //setting that UserA connected with UserB
               connection.otherName = data.name;

               sendTo(conn, {
                  type: "offer",
                  offer: data.offer,
                  name: connection.name
               });
            }

            break;

         case "answer":
            console.log("Sending answer to: ", data.name);
            //for ex. UserB answers UserA
            var conn = users[data.name];

            if(conn != null) {
               connection.otherName = data.name;
               sendTo(conn, {
                  type: "answer",
                  answer: data.answer
               });
            }

            break;

         case "candidate":
            console.log("Sending candidate to:",data.name);
            var conn = users[data.name];

            if(conn != null) {
               sendTo(conn, {
                  type: "candidate",
                  candidate: data.candidate
               });
            }

            break;

         case "leave":
            console.log("Disconnecting from", data.name);
            var conn = users[data.name];
            conn.otherName = null;

            //notify the other user so he can disconnect his peer connection
            if(conn != null) {
               sendTo(conn, {
                  type: "leave"
               });
            }

            break;

         default:
            sendTo(connection, {
               type: "error",
               message: "Command not found: " + data.type
            });

            break;
      }
   });

   //when user exits, for example closes a browser window
   //this may help if we are still in "offer","answer" or "candidate" state
   connection.on("close", function() {

      if(connection.name) {
      delete users[connection.name];

         if(connection.otherName) {
            console.log("Disconnecting from ", connection.otherName);
            var conn = users[connection.otherName];
            conn.otherName = null;

            if(conn != null) {
               sendTo(conn, {
                  type: "leave"
               });
            }
         }
      }
   });

   connection.send("Hello world");

});

function sendTo(connection, message) {
   connection.send(JSON.stringify(message));
}
So the work is done and our signaling server is ready. Remember that doing things out of order when making a WebRTC connection can cause issues.
Summary
In this chapter, we built simple and straightforward signaling server. We walked through the signaling process, user registration and offer/answer mechanism. We also implemented sending candidates between users.
WebRTC - Browser Support
The Web is moving so fast and it is always improving. New standards are created every day. Browsers allow updates to be installed without the user ever knowing, so you should keep up with what is going on in the world of the Web and WebRTC. Here is an overview of what this is up to today.
Browser Support
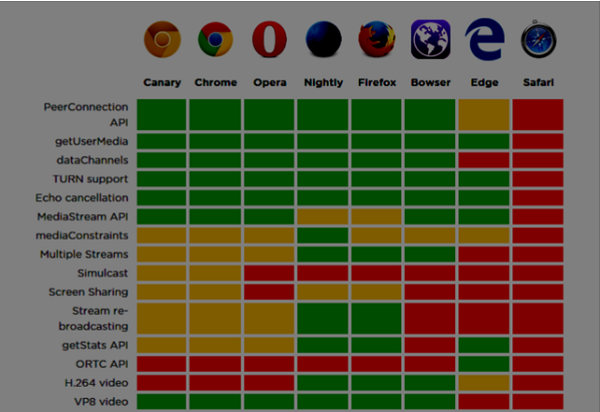
Every browser doesn't have all the same WebRTC features at the same time. Different browsers may be ahead of the curve, which makes some WebRTC features work in one browser and not another. The current support for WebRTC in the browser is shown in the following picture.
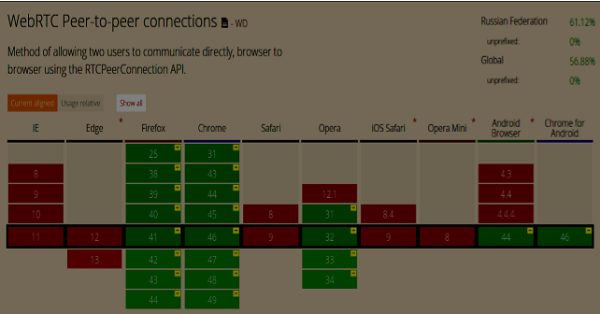
You can check an up-to-date WebRTC support status at http://caniuse.com/#feat=rtcpeerconnection.
Chrome, Firefox, and Opera
The latest versions of Chrome, Firefox, and Opera on mainstream PC operating systems such as Mac OS X, Windows, and Linux, all support WebRTC out-of-the-box. And most importantly, the engineers from Chrome and Firefox developer teams have been working together to fix issues so these two browsers could communicate with each other easily.
Android OS
On Android operating systems, WebRTC applications for Chrome and Firefox should work outof-the-box. They are able to work with other browsers after Android Ice Cream Sandwich version (4.0). This is due to the code sharing between desktop and mobile versions.
Apple
Apple has not yet made any announcement about their plans to support WebRTC in Safari on OS X. One of the possible workarounds for hybrid native iOS applications os to embed the WebRTC code directly into the application and load this app into a WebView.
Internet Explorer
Microsoft doesn't support WebRTC on desktops. But they have officially confirmed that they are going to implement ORTC (Object Realtime Communications) in future versions of IE(Edge). They are not planning to support WebRTC 1.0. They labeled their ORTC as WebRTC 1.1, although it is just a community enhancement and not the official standard. Recently they've added the ORTC support to the latest Microsoft Edge version. You may learn more at https://blogs.windows.com/msedgedev/2015/09/18/ortc-api-is-now-available-in-microsoftedge/.
Summary
Notice that WebRTC is a collection of APIs and protocols, not a single API. The support for each of these is developing on different browsers and operating systems at a different level. A great way to check the latest level of support is through http://canisue.com. It tracks adoption of modern APIs across multiple browsers. You can also find the latest information on browser supports as well as WebRTC demos at http://www.webrtc.org, which is supported by Mozilla, Google, and Opera.
WebRTC - Mobile Support
In the mobile world, the WebRTC support is not on the same level as it is on desktops. Mobile devices have their own way, so WebRTC is also something different on the mobile platforms.
When developing a WebRTC application for desktop, we consider using Chrome, Firefox or Opera. All of them support WebRTC out of the box. In general, you just need a browser and not bother about the desktop's hardware.
In the mobile world there are three possible modes for WebRTC today −
- The native application
- The browser application
- The native browser
Android
In 2013, the Firefox web browser for Android was presented with WebRTC support out of the box. Now you can make video calls on Android devices using the Firefox mobile browser.
It has three main WebRTC components −
PeerConnection − enables calls between browsers
getUserMedia − provides access to the camera and microphone
DataChannels − provides peer-to-peer data transfer
Google Chrome for Android provides WebRTC support as well. As you've already noticed, the most interesting features usually first appear in Chrome.
In the past year, the Opera mobile browser appeared with WebRTC support. So for Android you have Chrome, Firefox, and Opera. Other browsers don't support WebRTC.
iOS
Unfortunately, WebRTC is not supported on iOS now. Although WebRTC works well on Mac when using Firefox, Opera, or Chrome, it is not supported on iOS.
Nowadays, your WebRTC application won't work on Apple mobile devices out of the box. But there is a browser − Bowser. It is a web browser developed by Ericsson and it supports WebRTC out of the box. You can check its homepage at http://www.openwebrtc.org/bowser/.
Today, it is the only friendly way to support your WebRTC application on iOS. Another way is to develop a native application yourself.
Windows Phones
Microsoft doesn't support WebRTC on mobile platforms. But they have officially confirmed that they are going to implement ORTC (Object Realtime Communications) in future versions of IE. They are not planning to support WebRTC 1.0. They labeled their ORTC as WebRTC 1.1, although it is just a community enhancement and not the official standard.
So today Window Phone users can't use WebRTC applications and there is no way to beat this situation.
Blackberry
WebRTC applications are not supported on Blackberry either, in any way.
Using a WebRTC Native Browser
The most convenient and comfortable case for users to utilize WebRTC is using the native browser of the device. In this case, the device is ready to work any additional configurations.
Today only Android devices that are version 4 or higher provide this feature. Apple still doesn't show any activity with WebRTC support. So Safari users can't use WebRTC applications. Microsoft also did not introduce it in Windows Phone 8.
Using WebRTC via Browser Applications
This means using a third-party applications (non-native web browsers) in order to provide the WebRTC features. For now, there are two such third-party applications. Bowser, which is the only way to bring WebRTC features to the iOS device and Opera, which is a nice alternative for Android platform. The rest of the available mobile browsers don't support WebRTC.
Native Mobile Applications
As you can see, WebRTC does not have a large support in the mobile world yet. So, one of the possible solutions is to develop a native applications that utilize the WebRTC API. But it is not the better choice because the main WebRTC feature is a cross-platform solution. Anyway, in some cases this is the only way because a native application can utilize device-specific functions or features that are not supported by HTML5 browsers.
Constraining Video Stream for Mobile and Desktop Devices
The first parameter of the getUserMedia API expects an object of keys and values telling the browser how to process streams. You can check the full set of constraints at https://tools.ietf.org/html/draft-alvestrand-constraints-resolution-03. You can setup video aspect ration, frameRate, and other optional parameters.
Supporting mobile devices is one of the biggest pains because mobile devices have limited screen space along with limited resources. You might want the mobile device to only capture a 480x320 resolution or smaller video stream to save power and bandwidth. Using the user agent string in the browser is a good way to test whether the user is on a mobile device or not. Let's see an example. Create the index.html file −
<!DOCTYPE html>
<html lang = "en">

   <head>
      <meta charset = "utf-8" />
   </head>

   <body>
      <video autoplay></video>
      <script src = "client.js"></script>
   </body>

</html>
Then create the following client.js file −
//constraints for desktop browser
var desktopConstraints = {

   video: {
      mandatory: {
         maxWidth:800,
         maxHeight:600
      }
   },

   audio: true
};

//constraints for mobile browser
var mobileConstraints = {

   video: {
      mandatory: {
         maxWidth: 480,
         maxHeight: 320,
      }
   },

   audio: true
}

//if a user is using a mobile browser
if(/Android|iPhone|iPad/i.test(navigator.userAgent)) {
   var constraints = mobileConstraints;
} else {
   var constraints = desktopConstraints;
}

function hasUserMedia() {
   //check if the browser supports the WebRTC
   return !!(navigator.getUserMedia || navigator.webkitGetUserMedia ||
      navigator.mozGetUserMedia);
}

if (hasUserMedia()) {

   navigator.getUserMedia = navigator.getUserMedia || navigator.webkitGetUserMedia ||
      navigator.mozGetUserMedia;

   //enabling video and audio channels
   navigator.getUserMedia(constraints, function (stream) {
      var video = document.querySelector('video');

      //inserting our stream to the video tag
      video.src = window.URL.createObjectURL(stream);

   }, function (err) {});
} else {
   alert("WebRTC is not supported");
}
Run the web server using the static command and open the page. You should see it is 800x600. Then open this page in a mobile viewport using chrome tools and check the resolution. It should be 480x320.
Constraints are the easiest way to increase the performance of your WebRTC application.
Summary
In this chapter, we learned about the issues that can occur when developing WebRTC applications for mobile devices. We discovered different limitations of supporting the WebRTC API on mobile platforms. We also launched a demo application where we set different constraints for desktop and mobile browsers.
WebRTC - Video Demo
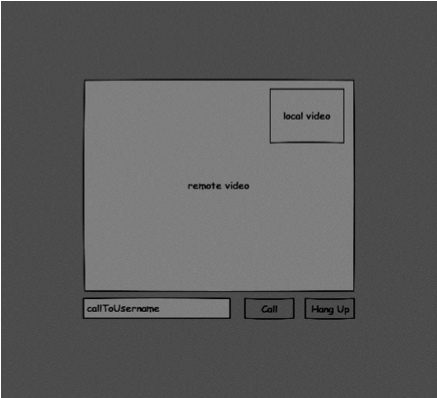
In this chapter, we are going to build a client application that allows two users on separate devices to communicate using WebRTC. Our application will have two pages. One for login and the other for calling another user.
The two pages will be the div tags. Most input is done through simple event handlers.
Signaling Server
To create a WebRTC connection clients have to be able to transfer messages without using a WebRTC peer connection. This is where we will use HTML5 WebSockets − a bidirectional socket connection between two endpoints − a web server and a web browser. Now let's start using the WebSocket library. Create the server.js file and insert the following code −
//require our websocket library
var WebSocketServer = require('ws').Server;

//creating a websocket server at port 9090
var wss = new WebSocketServer({port: 9090});

//when a user connects to our sever
wss.on('connection', function(connection) {
   console.log("user connected");

   //when server gets a message from a connected user
   connection.on('message', function(message) {
      console.log("Got message from a user:", message);
   });

   connection.send("Hello from server");
});
The first line requires the WebSocket library which we have already installed. Then we create a socket server on the port 9090. Next, we listen to the connection event. This code will be executed when a user makes a WebSocket connection to the server. We then listen to any messages sent by the user. Finally, we send a response to the connected user saying Hello from server.
In our signaling server, we will use a string-based username for each connection so we know where to send messages. Let's change our connection handler a bit −
connection.on('message', function(message) {
   var data;

   //accepting only JSON messages
   try {
      data = JSON.parse(message);
   } catch (e) {
      console.log("Invalid JSON");
      data = {};
   }
});
This way we accept only JSON messages. Next, we need to store all connected users somewhere. We will use a simple Javascript object for it. Change the top of our file −
//require our websocket library
var WebSocketServer = require('ws').Server;

//creating a websocket server at port 9090
var wss = new WebSocketServer({port: 9090});

//all connected to the server users
var users = {};
We are going to add a type field for every message coming from the client. For example if a user wants to login, he sends the login type message. Let's define it −
connection.on('message', function(message) {
   var data;

   //accepting only JSON messages
   try {
      data = JSON.parse(message);
   } catch (e) {
      console.log("Invalid JSON");
      data = {};
   }

   //switching type of the user message
   switch (data.type) {
      //when a user tries to login
      case "login":
         console.log("User logged:", data.name);

         //if anyone is logged in with this username then refuse
         if(users[data.name]) {
            sendTo(connection, {
               type: "login",
               success: false
            });
         } else {
            //save user connection on the server
            users[data.name] = connection;
            connection.name = data.name;

            sendTo(connection, {
               type: "login",
               success: true
            });
         }

         break;

      default:
         sendTo(connection, {
            type: "error",
            message: "Command no found: " + data.type
         });

         break;
   }
});
If the user sends a message with the login type, we −
Check if anyone has already logged in with this username
If so, then tell the user that he hasn't successfully logged in
If no one is using this username, we add username as a key to the connection object.
If a command is not recognized we send an error.
The following code is a helper function for sending messages to a connection. Add it to the server.js file −
function sendTo(connection, message) {
   connection.send(JSON.stringify(message));
}
When the user disconnects we should clean up its connection. We can delete the user when the close event is fired. Add the following code to the connection handler −
connection.on("close", function() {
   if(connection.name) {
      delete users[connection.name];
   }
});
After successful login the user wants to call another. He should make an offer to another user to achieve it. Add the offer handler −
case "offer":
   //for ex. UserA wants to call UserB
   console.log("Sending offer to: ", data.name);

   //if UserB exists then send him offer details
   var conn = users[data.name];

   if(conn != null) {
      //setting that UserA connected with UserB
      connection.otherName = data.name;

      sendTo(conn, {
         type: "offer",
         offer: data.offer,
         name: connection.name
      });

   }

   break;
Firstly, we get the connection of the user we are trying to call. If it exists we send him offer details. We also add otherName to the connection object. This is made for the simplicity of finding it later.
Answering to the response has a similar pattern that we used in the offer handler. Our server just passes through all messages as answer to another user. Add the following code after the offer handler −
case "answer":
   console.log("Sending answer to: ", data.name);

   //for ex. UserB answers UserA
   var conn = users[data.name];

   if(conn != null) {
      connection.otherName = data.name;

      sendTo(conn, {
         type: "answer",
         answer: data.answer
      });
   }

   break;
The final part is handling ICE candidate between users. We use the same technique just passing messages between users. The main difference is that candidate messages might happen multiple times per user in any order. Add the candidate handler −
case "candidate":
   console.log("Sending candidate to:",data.name);
   var conn = users[data.name];

   if(conn != null) {
      sendTo(conn, {
         type: "candidate",
         candidate: data.candidate
      });
   }

   break;
To allow our users to disconnect from another user we should implement the hanging up function. It will also tell the server to delete all user references. Add the leave handler −
case "leave":
   console.log("Disconnecting from", data.name);
   var conn = users[data.name];
   conn.otherName = null;

   //notify the other user so he can disconnect his peer connection
   if(conn != null) {
      sendTo(conn, {
         type: "leave"
      });
   }

   break;
This will also send the other user the leave event so he can disconnect his peer connection accordingly. We should also handle the case when a user drops his connection from the signaling server. Let's modify our close handler −
connection.on("close", function() {

   if(connection.name) {
      delete users[connection.name];

      if(connection.otherName) {
         console.log("Disconnecting from ", connection.otherName);
         var conn = users[connection.otherName];
         conn.otherName = null;

         if(conn != null) {
            sendTo(conn, {
               type: "leave"
            });
         }

      }
   }
});
The following is the entire code of our signaling server −
//require our websocket library
var WebSocketServer = require('ws').Server;

//creating a websocket server at port 9090
var wss = new WebSocketServer({port: 9090});

//all connected to the server users
var users = {};

//when a user connects to our sever
wss.on('connection', function(connection) {

   console.log("User connected");

   //when server gets a message from a connected user
   connection.on('message', function(message) {

      var data;

      //accepting only JSON messages
      try {
         data = JSON.parse(message);
      } catch (e) {
         console.log("Invalid JSON");
         data = {};
      }

      //switching type of the user message
      switch (data.type) {
         //when a user tries to login
         case "login":
            console.log("User logged", data.name);

            //if anyone is logged in with this username then refuse
            if(users[data.name]) {
               sendTo(connection, {
                  type: "login",
                  success: false
               });
            } else {
               //save user connection on the server
               users[data.name] = connection;
               connection.name = data.name;

               sendTo(connection, {
                  type: "login",
                  success: true
               });
            }

            break;

         case "offer":
            //for ex. UserA wants to call UserB
            console.log("Sending offer to: ", data.name);

            //if UserB exists then send him offer details
            var conn = users[data.name];

            if(conn != null) {
               //setting that UserA connected with UserB
               connection.otherName = data.name;

               sendTo(conn, {
                  type: "offer",
                  offer: data.offer,
                  name: connection.name
               });
            }

            break;

         case "answer":
            console.log("Sending answer to: ", data.name);
            //for ex. UserB answers UserA
            var conn = users[data.name];

            if(conn != null) {
               connection.otherName = data.name;
               sendTo(conn, {
                  type: "answer",
                  answer: data.answer
               });
            }

            break;

         case "candidate":
            console.log("Sending candidate to:",data.name);
            var conn = users[data.name];

            if(conn != null) {
               sendTo(conn, {
                  type: "candidate",
                  candidate: data.candidate
               });
            }

            break;

         case "leave":
            console.log("Disconnecting from", data.name);
            var conn = users[data.name];
            conn.otherName = null;

            //notify the other user so he can disconnect his peer connection
            if(conn != null) {
               sendTo(conn, {
                  type: "leave"
              });
            }

            break;

         default:
            sendTo(connection, {
               type: "error",
               message: "Command not found: " + data.type
            });

            break;
      }

   });

   //when user exits, for example closes a browser window
   //this may help if we are still in "offer","answer" or "candidate" state
   connection.on("close", function() {

      if(connection.name) {
         delete users[connection.name];

         if(connection.otherName) {
            console.log("Disconnecting from ", connection.otherName);
            var conn = users[connection.otherName];
            conn.otherName = null;

            if(conn != null) {
               sendTo(conn, {
                  type: "leave"
               });
            }
         }
      }

   });

   connection.send("Hello world");
});

function sendTo(connection, message) {
   connection.send(JSON.stringify(message));
}
Client Application
One way to test this application is opening two browser tabs and trying to call each other.
First of all, we need to install the bootstrap library. Bootstrap is a frontend framework for developing web applications. You can learn more at http://getbootstrap.com/. Create a folder called, for example, videochat. This will be our root application folder. Inside this folder create a file package.json (it is necessary for managing npm dependencies) and add the following −
{
   "name": "webrtc-videochat",
   "version": "0.1.0",
   "description": "webrtc-videochat",
   "author": "Author",
   "license": "BSD-2-Clause"
}
Then run npm install bootstrap. This will install the bootstrap library in the videochat/node_modules folder.
Now we need to create a basic HTML page. Create an index.html file in the root folder with the following code −
<html>

   <head>
      <title>WebRTC Video Demo</title>
      <link rel = "stylesheet" href = "node_modules/bootstrap/dist/css/bootstrap.min.css"/>
   </head>

   <style>

      body {
         background: #eee;
         padding: 5% 0;
      }

      video {
         background: black;
         border: 1px solid gray;
      }

      .call-page {
         position: relative;
         display: block;
         margin: 0 auto;
         width: 500px;
         height: 500px;
      }

      #localVideo {
         width: 150px;
         height: 150px;
         position: absolute;
         top: 15px;
         right: 15px;
      }

      #remoteVideo {
         width: 500px;
         height: 500px;
      }

   </style>

   <body>

   <div id = "loginPage" class = "container text-center">

      <div class = "row">
         <div class = "col-md-4 col-md-offset-4">

            <h2>WebRTC Video Demo. Please sign in</h2>
            <label for = "usernameInput" class = "sr-only">Login</label>
            <input type = "email" id = "usernameInput" c
               lass = "form-control formgroup" placeholder = "Login"
               required = "" autofocus = "">
            <button id = "loginBtn" class = "btn btn-lg btn-primary btnblock">
               Sign in</button>

         </div>
      </div>

   </div>

   <div id = "callPage" class = "call-page">
      <video id = "localVideo" autoplay></video>
      <video id = "remoteVideo" autoplay></video>

      <div class = "row text-center">
         <div class = "col-md-12">
            <input id = "callToUsernameInput" type = "text"
               placeholder = "username to call" />
            <button id = "callBtn" class = "btn-success btn">Call</button>
            <button id = "hangUpBtn" class = "btn-danger btn">Hang Up</button>
         </div>
      </div>

   </div>

   <script src = "client.js"></script>

   </body>

</html>
This page should be familiar to you. We have added the bootstrap css file. We have also defined two pages. Finally, we have created several text fields and buttons for getting information from the user. You should see the two video elements for local and remote video streams. Notice that we have added a link to a client.js file.
Now we need to establish a connection with our signaling server. Create the client.js file in the root folder with the following code −
//our username
var name;
var connectedUser;

//connecting to our signaling server
var conn = new WebSocket('ws://localhost:9090');

conn.onopen = function () {
   console.log("Connected to the signaling server");
};

//when we got a message from a signaling server
conn.onmessage = function (msg) {
   console.log("Got message", msg.data);

   var data = JSON.parse(msg.data);

   switch(data.type) {
      case "login":
         handleLogin(data.success);
         break;
      //when somebody wants to call us
      case "offer":
         handleOffer(data.offer, data.name);
         break;
      case "answer":
         handleAnswer(data.answer);
         break;
      //when a remote peer sends an ice candidate to us
      case "candidate":
         handleCandidate(data.candidate);
         break;
      case "leave":
         handleLeave();
         break;
      default:
         break;
   }
};

conn.onerror = function (err) {
   console.log("Got error", err);
};

//alias for sending JSON encoded messages
function send(message) {
   //attach the other peer username to our messages
   if (connectedUser) {
      message.name = connectedUser;
   }

   conn.send(JSON.stringify(message));
};
Now run our signaling server via node server. Then, inside the root folder run the static command and open the page inside the browser. You should see the following console output −
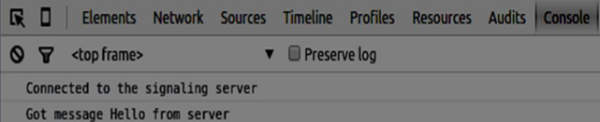
The next step is implementing a user log in with a unique username. We simply send a username to the server, which then tell us whether it is taken or not. Add the following code to your client.js file −
//******
//UI selectors block
//******

var loginPage = document.querySelector('#loginPage');
var usernameInput = document.querySelector('#usernameInput');
var loginBtn = document.querySelector('#loginBtn');

var callPage = document.querySelector('#callPage');
var callToUsernameInput = document.querySelector('#callToUsernameInput');
var callBtn = document.querySelector('#callBtn');

var hangUpBtn = document.querySelector('#hangUpBtn');

//hide call page
callPage.style.display = "none";

// Login when the user clicks the button
loginBtn.addEventListener("click", function (event) {
   name = usernameInput.value;

   if (name.length > 0) {
      send({
         type: "login",
         name: name
      });
   }

});

function handleLogin(success) {

   if (success === false) {
      alert("Ooops...try a different username");
   } else {
      //display the call page if login is successful
      loginPage.style.display = "none";
      callPage.style.display = "block";
      //start peer connection
   }
};
Firstly, we select some references to the elements on the page. The we hide the call page. Then, we add an event listener on the login button. When the user clicks it, we send his username to the server. Finally, we implement the handleLogin callback. If the login was successful, we show the call page and starting to set up a peer connection.
To start a peer connection we need −
- Obtain a stream from the web camera.
- Create the RTCPeerConnection object.
Add the following code to the UI selectors block −
var localVideo = document.querySelector('#localVideo');
var remoteVideo = document.querySelector('#remoteVideo');

var yourConn;
var stream;
Modify the handleLogin function −
function handleLogin(success) {

   if (success === false) {
      alert("Ooops...try a different username");
   } else {
      loginPage.style.display = "none";
      callPage.style.display = "block";

      //**********************
      //Starting a peer connection
      //**********************

      //getting local video stream
      navigator.webkitGetUserMedia({ video: true, audio: true }, function (myStream) {
         stream = myStream;

         //displaying local video stream on the page
         localVideo.src = window.URL.createObjectURL(stream);

         //using Google public stun server
         var configuration = {
            "iceServers": [{ "url": "stun:stun2.1.google.com:19302" }]
         };

         yourConn = new webkitRTCPeerConnection(configuration);

         // setup stream listening
         yourConn.addStream(stream);

         //when a remote user adds stream to the peer connection, we display it
         yourConn.onaddstream = function (e) {
            remoteVideo.src = window.URL.createObjectURL(e.stream);
         };

         // Setup ice handling
         yourConn.onicecandidate = function (event) {

            if (event.candidate) {
               send({
                  type: "candidate",
                  candidate: event.candidate
               });
            }

         };

      }, function (error) {
         console.log(error);
      });
   }
};
Now if you run the code, the page should allow you to log in and display your local video stream on the page.
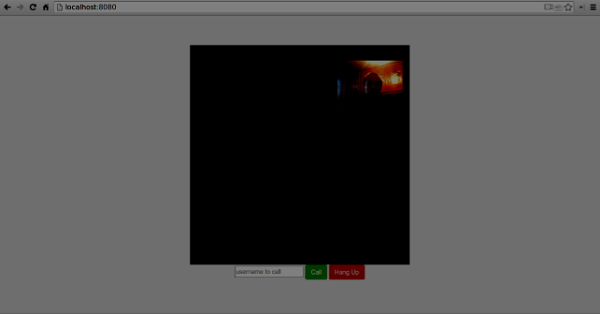
Now we are ready to initiate a call. Firstly, we send an offer to another user. Once a user gets the offer, he creates an answer and start trading ICE candidates. Add the following code to the client.js file −
//initiating a call
callBtn.addEventListener("click", function () {
   var callToUsername = callToUsernameInput.value;

   if (callToUsername.length > 0) {

      connectedUser = callToUsername;

      // create an offer
      yourConn.createOffer(function (offer) {
         send({
            type: "offer",
            offer: offer
         });

         yourConn.setLocalDescription(offer);

      }, function (error) {
         alert("Error when creating an offer");
      });
   }
});

//when somebody sends us an offer
function handleOffer(offer, name) {
   connectedUser = name;
   yourConn.setRemoteDescription(new RTCSessionDescription(offer));

   //create an answer to an offer
   yourConn.createAnswer(function (answer) {
      yourConn.setLocalDescription(answer);

      send({
         type: "answer",
         answer: answer
      });

   }, function (error) {
      alert("Error when creating an answer");
   });
};

//when we got an answer from a remote user
function handleAnswer(answer) {
   yourConn.setRemoteDescription(new RTCSessionDescription(answer));
};

//when we got an ice candidate from a remote user
function handleCandidate(candidate) {
   yourConn.addIceCandidate(new RTCIceCandidate(candidate));
};
We add a click handler to the Call button, which initiates an offer. Then we implement several handlers expected by the onmessage handler. They will be processed asynchronously until both the users have made a connection.
The last step is implementing the hang-up feature. This will stop transmitting data and tell the other user to close the call. Add the following code −
//hang up
hangUpBtn.addEventListener("click", function () {

   send({
      type: "leave"
   });

   handleLeave();
});

function handleLeave() {
   connectedUser = null;
   remoteVideo.src = null;

   yourConn.close();
   yourConn.onicecandidate = null;
   yourConn.onaddstream = null;
};
When the user clicks on the Hang Up button −
- It will send a leave message to the other user
- It will close the RTCPeerConnection and destroy the connection locally
Now run the code. You should be able to log in to the server using two browser tabs. You can then call the tab and hang up the call.
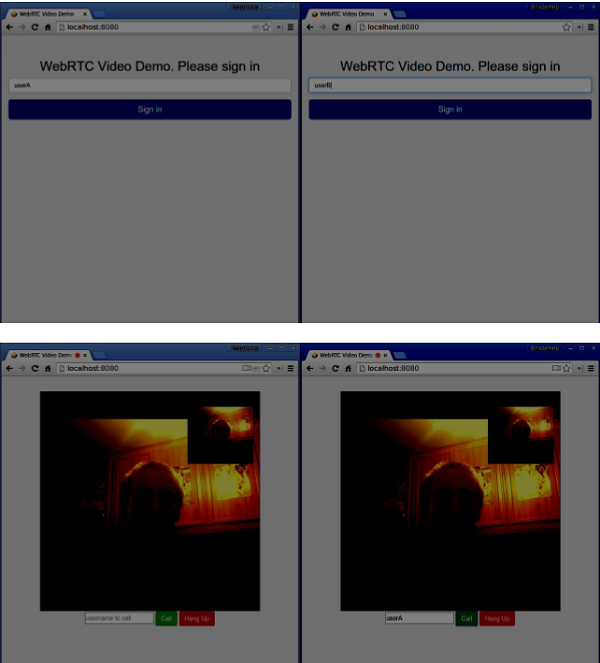
The following is the entire client.js file −
//our username
var name;
var connectedUser;

//connecting to our signaling server
var conn = new WebSocket('ws://localhost:9090');

conn.onopen = function () {
   console.log("Connected to the signaling server");
};

//when we got a message from a signaling server
conn.onmessage = function (msg) {
   console.log("Got message", msg.data);

   var data = JSON.parse(msg.data);

   switch(data.type) {
      case "login":
         handleLogin(data.success);
         break;
      //when somebody wants to call us
      case "offer":
         handleOffer(data.offer, data.name);
         break;
      case "answer":
         handleAnswer(data.answer);
         break;
      //when a remote peer sends an ice candidate to us
      case "candidate":
         handleCandidate(data.candidate);
         break;
      case "leave":
         handleLeave();
         break;
      default:
         break;
   }
};

conn.onerror = function (err) {
   console.log("Got error", err);
};

//alias for sending JSON encoded messages
function send(message) {
   //attach the other peer username to our messages
   if (connectedUser) {
      message.name = connectedUser;
   }

   conn.send(JSON.stringify(message));
};

//******
//UI selectors block
//******

var loginPage = document.querySelector('#loginPage');
var usernameInput = document.querySelector('#usernameInput');
var loginBtn = document.querySelector('#loginBtn');

var callPage = document.querySelector('#callPage');
var callToUsernameInput = document.querySelector('#callToUsernameInput');
var callBtn = document.querySelector('#callBtn');

var hangUpBtn = document.querySelector('#hangUpBtn');

var localVideo = document.querySelector('#localVideo');
var remoteVideo = document.querySelector('#remoteVideo');

var yourConn;
var stream;

callPage.style.display = "none";

// Login when the user clicks the button
loginBtn.addEventListener("click", function (event) {
   name = usernameInput.value;

   if (name.length > 0) {
      send({
         type: "login",
         name: name
      });
   }

});

function handleLogin(success) {
   if (success === false) {
      alert("Ooops...try a different username");
   } else {
      loginPage.style.display = "none";
      callPage.style.display = "block";

      //**********************
      //Starting a peer connection
      //**********************

      //getting local video stream
      navigator.webkitGetUserMedia({ video: true, audio: true }, function (myStream) {
         stream = myStream;

         //displaying local video stream on the page
         localVideo.src = window.URL.createObjectURL(stream);

         //using Google public stun server
         var configuration = {
            "iceServers": [{ "url": "stun:stun2.1.google.com:19302" }]
         };

         yourConn = new webkitRTCPeerConnection(configuration);

         // setup stream listening
         yourConn.addStream(stream);

         //when a remote user adds stream to the peer connection, we display it
         yourConn.onaddstream = function (e) {
            remoteVideo.src = window.URL.createObjectURL(e.stream);
         };

         // Setup ice handling
         yourConn.onicecandidate = function (event) {
            if (event.candidate) {
               send({
                  type: "candidate",
                  candidate: event.candidate
               });
            }
         };

      }, function (error) {
         console.log(error);
      });

   }
};

//initiating a call
callBtn.addEventListener("click", function () {
   var callToUsername = callToUsernameInput.value;

   if (callToUsername.length > 0) {

      connectedUser = callToUsername;

      // create an offer
      yourConn.createOffer(function (offer) {
         send({
            type: "offer",
            offer: offer
         });

         yourConn.setLocalDescription(offer);
      }, function (error) {
         alert("Error when creating an offer");
      });

   }
});

//when somebody sends us an offer
function handleOffer(offer, name) {
   connectedUser = name;
   yourConn.setRemoteDescription(new RTCSessionDescription(offer));

   //create an answer to an offer
   yourConn.createAnswer(function (answer) {
      yourConn.setLocalDescription(answer);

      send({
         type: "answer",
         answer: answer
      });

   }, function (error) {
      alert("Error when creating an answer");
   });
};

//when we got an answer from a remote user
function handleAnswer(answer) {
   yourConn.setRemoteDescription(new RTCSessionDescription(answer));
};

//when we got an ice candidate from a remote user
function handleCandidate(candidate) {
   yourConn.addIceCandidate(new RTCIceCandidate(candidate));
};

//hang up
hangUpBtn.addEventListener("click", function () {

   send({
      type: "leave"
   });

   handleLeave();
});

function handleLeave() {
   connectedUser = null;
   remoteVideo.src = null;

   yourConn.close();
   yourConn.onicecandidate = null;
   yourConn.onaddstream = null;
};
Summary
This demo provides a baseline of features that every WebRTC application needs. To improve this demo you can add user identification through platforms like Facebook or Google, handle user input for invalid data. Also, the WebRTC connection can fail because of several reasons like not supporting the technology or not being able to traverse firewalls. A worth of work has gone into making any WebRTC application stable.
WebRTC - Voice Demo
In this chapter, we are going to build a client application that allows two users on separate devices to communicate using WebRTC audio streams. Our application will have two pages. One for login and the other for making an audio call to another user.
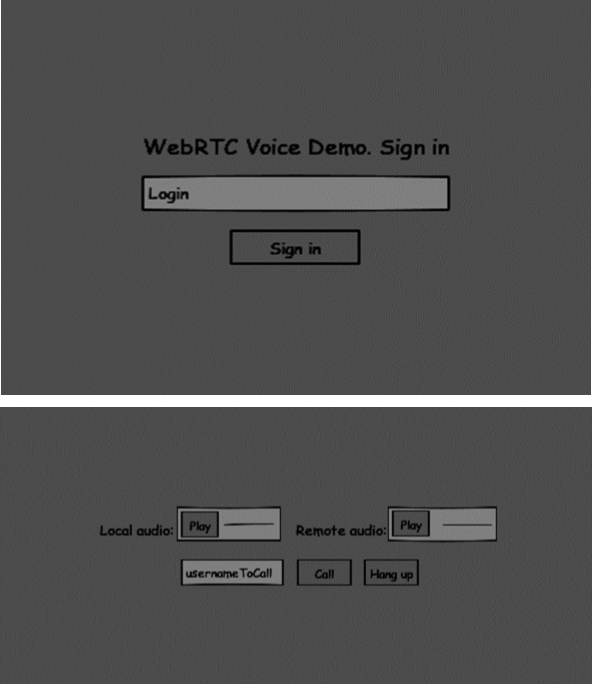
The two pages will be the div tags. Most input is done through simple event handlers.
Signaling Server
To create a WebRTC connection clients have to be able to transfer messages without using a WebRTC peer connection. This is where we will use HTML5 WebSockets − a bidirectional socket connection between two endpoints − a web server and a web browser. Now let's start using the WebSocket library. Create the server.js file and insert the following code −
//require our websocket library
var WebSocketServer = require('ws').Server;

//creating a websocket server at port 9090
var wss = new WebSocketServer({port: 9090});

//when a user connects to our sever
wss.on('connection', function(connection) {
   console.log("user connected");

   //when server gets a message from a connected user
   connection.on('message', function(message) {
      console.log("Got message from a user:", message);
   });

   connection.send("Hello from server");
});
The first line requires the WebSocket library which we have already installed. Then we create a socket server on the port 9090. Next, we listen to the connection event. This code will be executed when a user makes a WebSocket connection to the server. We then listen to any messages sent by the user. Finally, we send a response to the connected user saying Hello from server.
In our signaling server, we will use a string-based username for each connection so we know where to send messages. Let's change our connection handler a bit −
connection.on('message', function(message) {
   var data;

   //accepting only JSON messages
   try {
      data = JSON.parse(message);
   } catch (e) {
      console.log("Invalid JSON");
      data = {};
   }
});
This way we accept only JSON messages. Next, we need to store all connected users somewhere. We will use a simple Javascript object for it. Change the top of our file −
//require our websocket library
var WebSocketServer = require('ws').Server;

//creating a websocket server at port 9090
var wss = new WebSocketServer({port: 9090});

//all connected to the server users
var users = {};
We are going to add a type field for every message coming from the client. For example if a user wants to login, he sends the login type message. Let's define it −
connection.on('message', function(message) {

   var data;
   //accepting only JSON messages
   try {
      data = JSON.parse(message);
   } catch (e) {
      console.log("Invalid JSON");
      data = {};
   }

   //switching type of the user message
   switch (data.type) {
      //when a user tries to login
      case "login":
         console.log("User logged:", data.name);

         //if anyone is logged in with this username then refuse
         if(users[data.name]) {
            sendTo(connection, {
               type: "login",
               success: false
            });
         } else {
            //save user connection on the server
            users[data.name] = connection;
            connection.name = data.name;

            sendTo(connection, {
               type: "login",
               success: true
            });
         }

         break;

      default:
         sendTo(connection, {
            type: "error",
            message: "Command no found: " + data.type
         });

         break;
   }
});
If the user sends a message with the login type, we −
- Check if anyone has already logged in with this username.
- If so, then tell the user that he hasn't successfully logged in.
- If no one is using this username, we add username as a key to the connection object.
- If a command is not recognized we send an error.
The following code is a helper function for sending messages to a connection. Add it to the server.js file −
function sendTo(connection, message) {
   connection.send(JSON.stringify(message));
}
When the user disconnects we should clean up its connection. We can delete the user when the close event is fired. Add the following code to the connection handler−
connection.on("close", function() {
   if(connection.name) {
      delete users[connection.name];
   }
});
After successful login the user wants to call another. He should make an offer to another user to achieve it. Add the offer handler −
case "offer":
   //for ex. UserA wants to call UserB
   console.log("Sending offer to: ", data.name);

   //if UserB exists then send him offer details
   var conn = users[data.name];

   if(conn != null) {
      //setting that UserA connected with UserB
      connection.otherName = data.name;
      sendTo(conn, {
         type: "offer",
         offer: data.offer,
         name: connection.name
      });
   }

   break;
Firstly, we get the connection of the user we are trying to call. If it exists we send him offer details. We also add otherName to the connection object. This is made for the simplicity of finding it later.
Answering to the response has a similar pattern that we used in the offer handler. Our server just passes through all messages as answer to another user. Add the following code after the offer handler −
case "answer":
   console.log("Sending answer to: ", data.name);
   //for ex. UserB answers UserA
   var conn = users[data.name];

   if(conn != null) {
      connection.otherName = data.name;

      sendTo(conn, {
         type: "answer",
         answer: data.answer
      });
   }

   break;
The final part is handling ICE candidate between users. We use the same technique just passing messages between users. The main difference is that candidate messages might happen multiple times per user in any order. Add the candidate handler −
case "candidate":
   console.log("Sending candidate to:",data.name);
   var conn = users[data.name];

   if(conn != null) {
      sendTo(conn, {
         type: "candidate",
         candidate: data.candidate
      });
   }

   break;
To allow our users to disconnect from another user we should implement the hanging up function. It will also tell the server to delete all user references. Add the leave handler −
case "leave":
   console.log("Disconnecting from", data.name);
   var conn = users[data.name];
   conn.otherName = null;

   //notify the other user so he can disconnect his peer connection
   if(conn != null) {
      sendTo(conn, {
         type: "leave"
      });
   }

   break;
This will also send the other user the leave event so he can disconnect his peer connection accordingly. We should also handle the case when a user drops his connection from the signaling server. Let's modify our close handler −
connection.on("close", function() {

   if(connection.name) {
      delete users[connection.name];

      if(connection.otherName) {
         console.log("Disconnecting from ", connection.otherName);
         var conn = users[connection.otherName];
         conn.otherName = null;

         if(conn != null) {
            sendTo(conn, {
               type: "leave"
            });
         }

      }
   }
});
The following is the entire code of our signaling server −
//require our websocket library
var WebSocketServer = require('ws').Server;

//creating a websocket server at port 9090
var wss = new WebSocketServer({port: 9090});

//all connected to the server users
var users = {};

//when a user connects to our sever
wss.on('connection', function(connection) {

   console.log("User connected");

   //when server gets a message from a connected user
   connection.on('message', function(message) {

      var data;

      //accepting only JSON messages
      try {
         data = JSON.parse(message);
      } catch (e) {
         console.log("Invalid JSON");
         data = {};
      }

      //switching type of the user message
      switch (data.type) {
         //when a user tries to login
         case "login":
            console.log("User logged", data.name);

            //if anyone is logged in with this username then refuse
            if(users[data.name]) {
               sendTo(connection, {
                  type: "login",
                  success: false
               });
            } else {
               //save user connection on the server
               users[data.name] = connection;
               connection.name = data.name;
               sendTo(connection, {
                  type: "login",
                  success: true
               });
            }

            break;

         case "offer":
            //for ex. UserA wants to call UserB
            console.log("Sending offer to: ", data.name);

            //if UserB exists then send him offer details
            var conn = users[data.name];

            if(conn != null) {
               //setting that UserA connected with UserB
               connection.otherName = data.name;
               sendTo(conn, {
                  type: "offer",
                  offer: data.offer,
                  name: connection.name
               });
            }

            break;

         case "answer":
            console.log("Sending answer to: ", data.name);
            //for ex. UserB answers UserA
            var conn = users[data.name];

            if(conn != null) {
               connection.otherName = data.name;
               sendTo(conn, {
                  type: "answer",
                  answer: data.answer
               });
            }

            break;

         case "candidate":
            console.log("Sending candidate to:",data.name);
            var conn = users[data.name];

            if(conn != null) {
               sendTo(conn, {
                  type: "candidate",
                  candidate: data.candidate
               });
            }

            break;

         case "leave":
            console.log("Disconnecting from", data.name);
            var conn = users[data.name];
            conn.otherName = null;

            //notify the other user so he can disconnect his peer connection
            if(conn != null) {
               sendTo(conn, {
                  type: "leave"
               });
            }

            break;

         default:
            sendTo(connection, {
               type: "error",
               message: "Command not found: " + data.type
            });

            break;
      }
   });

   //when user exits, for example closes a browser window
   //this may help if we are still in "offer","answer" or "candidate" state
   connection.on("close", function() {

      if(connection.name) {
         delete users[connection.name];

         if(connection.otherName) {
            console.log("Disconnecting from ", connection.otherName);
            var conn = users[connection.otherName];
            conn.otherName = null;

            if(conn != null) {
               sendTo(conn, {
                  type: "leave"
              });
            }
         }
      }
   });

   connection.send("Hello world");
});

function sendTo(connection, message) {
   connection.send(JSON.stringify(message));
}
Client Application
One way to test this application is opening two browser tabs and trying to make an audio call to each other.
First of all, we need to install the bootstrap library. Bootstrap is a frontend framework for developing web applications. You can learn more at http://getbootstrap.com/. Create a folder called, for example, audiochat. This will be our root application folder. Inside this folder create a file package.json (it is necessary for managing npm dependencies) and add the following −
{
   "name": "webrtc-audiochat",
   "version": "0.1.0",
   "description": "webrtc-audiochat",
   "author": "Author",
   "license": "BSD-2-Clause"
}
Then run npm install bootstrap. This will install the bootstrap library in the audiochat/node_modules folder.
Now we need to create a basic HTML page. Create an index.html file in the root folder with the following code −
<html>

   <head>
      <title>WebRTC Voice Demo</title>
      <link rel = "stylesheet" href = "node_modules/bootstrap/dist/css/bootstrap.min.css"/>
   </head>

   <style>
      body {
         background: #eee;
         padding: 5% 0;
      }
   </style>

   <body>
      <div id = "loginPage" class = "container text-center">

         <div class = "row">
            <div class = "col-md-4 col-md-offset-4">

               <h2>WebRTC Voice Demo. Please sign in</h2>

               <label for = "usernameInput" class = "sr-only">Login</label>
               <input type = "email" id = "usernameInput"
                  class = "form-control formgroup"
                  placeholder = "Login" required = "" autofocus = "">
               <button id = "loginBtn" class = "btn btn-lg btn-primary btnblock">
                  Sign in</button>
            </div>
         </div>

      </div>

      <div id = "callPage" class = "call-page">

         <div class = "row">

            <div class = "col-md-6 text-right">
               Local audio: <audio id = "localAudio"
               controls autoplay></audio>
            </div>

            <div class = "col-md-6 text-left">
               Remote audio: <audio id = "remoteAudio"
                  controls autoplay></audio>
            </div>

         </div>

         <div class = "row text-center">
            <div class = "col-md-12">
               <input id = "callToUsernameInput"
                  type = "text" placeholder = "username to call" />
               <button id = "callBtn" class = "btn-success btn">Call</button>
               <button id = "hangUpBtn" class = "btn-danger btn">Hang Up</button>
            </div>
         </div>

      </div>

      <script src = "client.js"></script>

   </body>

</html>
This page should be familiar to you. We have added the bootstrap css file. We have also defined two pages. Finally, we have created several text fields and buttons for getting information from the user. You should see the two audio elements for local and remote audio streams. Notice that we have added a link to a client.js file.
Now we need to establish a connection with our signaling server. Create the client.js file in the root folder with the following code −
//our username
var name;
var connectedUser;

//connecting to our signaling server
var conn = new WebSocket('ws://localhost:9090');

conn.onopen = function () {
   console.log("Connected to the signaling server");
};

//when we got a message from a signaling server
conn.onmessage = function (msg) {
   console.log("Got message", msg.data);
   var data = JSON.parse(msg.data);

   switch(data.type) {
      case "login":
         handleLogin(data.success);
         break;
      //when somebody wants to call us
      case "offer":
         handleOffer(data.offer, data.name);
         break;
      case "answer":
         handleAnswer(data.answer);
         break;
      //when a remote peer sends an ice candidate to us
      case "candidate":
         handleCandidate(data.candidate);
         break;
      case "leave":
         handleLeave();
         break;
      default:
         break;
   }
};

conn.onerror = function (err) {
   console.log("Got error", err);
};

//alias for sending JSON encoded messages
function send(message) {
   //attach the other peer username to our messages
   if (connectedUser) {
      message.name = connectedUser;
   }

   conn.send(JSON.stringify(message));
};
Now run our signaling server via node server. Then, inside the root folder run the static command and open the page inside the browser. You should see the following console output −
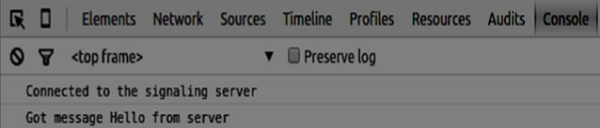
The next step is implementing a user log in with a unique username. We simply send a username to the server, which then tell us whether it is taken or not. Add the following code to your client.js file −
//******
//UI selectors block
//******

var loginPage = document.querySelector('#loginPage');
var usernameInput = document.querySelector('#usernameInput');
var loginBtn = document.querySelector('#loginBtn');

var callPage = document.querySelector('#callPage');
var callToUsernameInput = document.querySelector('#callToUsernameInput');
var callBtn = document.querySelector('#callBtn');

var hangUpBtn = document.querySelector('#hangUpBtn');

callPage.style.display = "none";

// Login when the user clicks the button
loginBtn.addEventListener("click", function (event) {
   name = usernameInput.value;

   if (name.length > 0) {
      send({
         type: "login",
         name: name
      });
   }

});

function handleLogin(success) {
   if (success === false) {
      alert("Ooops...try a different username");
   } else {
      loginPage.style.display = "none";
      callPage.style.display = "block";

      //**********************
      //Starting a peer connection
      //**********************

   }

};
Firstly, we select some references to the elements on the page. The we hide the call page. Then, we add an event listener on the login button. When the user clicks it, we send his username to the server. Finally, we implement the handleLogin callback. If the login was successful, we show the call page and starting to set up a peer connection.
To start a peer connection we need −
- Obtain an audio stream from a microphone
- Create the RTCPeerConnection object
Add the following code to the UI selectors block −
var localAudio = document.querySelector('#localAudio');
var remoteAudio = document.querySelector('#remoteAudio');

var yourConn;
var stream;
Modify the handleLogin function −
function handleLogin(success) {
   if (success === false) {
      alert("Ooops...try a different username");
   } else {
      loginPage.style.display = "none";
      callPage.style.display = "block";

      //**********************
      //Starting a peer connection
      //**********************

      //getting local audio stream
      navigator.webkitGetUserMedia({ video: false, audio: true }, function (myStream) {
         stream = myStream;

         //displaying local audio stream on the page
         localAudio.src = window.URL.createObjectURL(stream);

         //using Google public stun server
         var configuration = {
            "iceServers": [{ "url": "stun:stun2.1.google.com:19302" }]
         };

         yourConn = new webkitRTCPeerConnection(configuration);

         // setup stream listening
         yourConn.addStream(stream);

         //when a remote user adds stream to the peer connection, we display it
         yourConn.onaddstream = function (e) {
            remoteAudio.src = window.URL.createObjectURL(e.stream);
         };

         // Setup ice handling
         yourConn.onicecandidate = function (event) {
            if (event.candidate) {
               send({
                  type: "candidate",
               });
            }
         };

      }, function (error) {
         console.log(error);
      });

   }
};
Now if you run the code, the page should allow you to log in and display your local audio stream on the page.

Now we are ready to initiate a call. Firstly, we send an offer to another user. Once a user gets the offer, he creates an answer and start trading ICE candidates. Add the following code to the client.js file −
//initiating a call
callBtn.addEventListener("click", function () {
   var callToUsername = callToUsernameInput.value;

   if (callToUsername.length > 0) {
      connectedUser = callToUsername;

      // create an offer
      yourConn.createOffer(function (offer) {
         send({
            type: "offer",
            offer: offer
         });

         yourConn.setLocalDescription(offer);

      }, function (error) {
         alert("Error when creating an offer");
      });
   }

});

//when somebody sends us an offer
function handleOffer(offer, name) {
   connectedUser = name;
   yourConn.setRemoteDescription(new RTCSessionDescription(offer));

   //create an answer to an offer
   yourConn.createAnswer(function (answer) {
      yourConn.setLocalDescription(answer);

      send({
         type: "answer",
         answer: answer
      });

   }, function (error) {
      alert("Error when creating an answer");
   });

};

//when we got an answer from a remote user
function handleAnswer(answer) {
   yourConn.setRemoteDescription(new RTCSessionDescription(answer));
};

//when we got an ice candidate from a remote user
function handleCandidate(candidate) {
   yourConn.addIceCandidate(new RTCIceCandidate(candidate));
};
We add a click handler to the Call button, which initiates an offer. Then we implement several handlers expected by the onmessage handler. They will be processed asynchronously until both the users have made a connection.
The last step is implementing the hang-up feature. This will stop transmitting data and tell the other user to close the call. Add the following code −
//hang up
hangUpBtn.addEventListener("click", function () {
   send({
      type: "leave"
   });

   handleLeave();
});

function handleLeave() {
   connectedUser = null;
   remoteAudio.src = null;

   yourConn.close();
   yourConn.onicecandidate = null;
   yourConn.onaddstream = null;
};
When the user clicks on the Hang Up button −
- It will send a leave message to the other user
- It will close the RTCPeerConnection and destroy the connection locally
Now run the code. You should be able to log in to the server using two browser tabs. You can then make an audio call to the tab and hang up the call.
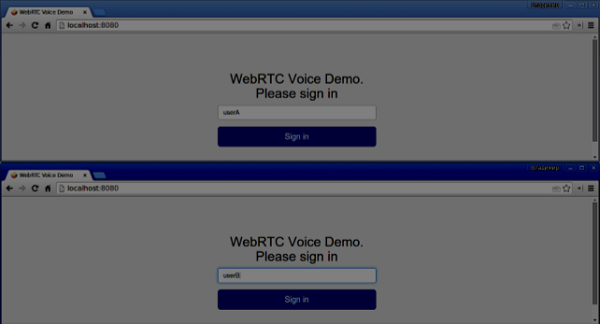
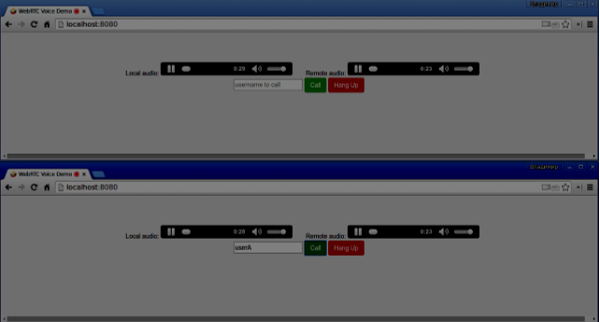
The following is the entire client.js file −
//our username
var name;
var connectedUser;

//connecting to our signaling server
var conn = new WebSocket('ws://localhost:9090');

conn.onopen = function () {
   console.log("Connected to the signaling server");
};

//when we got a message from a signaling server
conn.onmessage = function (msg) {
   console.log("Got message", msg.data);
   var data = JSON.parse(msg.data);

   switch(data.type) {
      case "login":
         handleLogin(data.success);
         break;
      //when somebody wants to call us
      case "offer":
         handleOffer(data.offer, data.name);
         break;
      case "answer":
         handleAnswer(data.answer);
         break;
      //when a remote peer sends an ice candidate to us
      case "candidate":
         handleCandidate(data.candidate);
         break;
      case "leave":
         handleLeave();
         break;
      default:
         break;
   }
};

conn.onerror = function (err) {
   console.log("Got error", err);
};

//alias for sending JSON encoded messages
function send(message) {
   //attach the other peer username to our messages
   if (connectedUser) {
      message.name = connectedUser;
   }

   conn.send(JSON.stringify(message));
};

//******
//UI selectors block
//******

var loginPage = document.querySelector('#loginPage');
var usernameInput = document.querySelector('#usernameInput');
var loginBtn = document.querySelector('#loginBtn');

var callPage = document.querySelector('#callPage');
var callToUsernameInput = document.querySelector('#callToUsernameInput');
var callBtn = document.querySelector('#callBtn');

var hangUpBtn = document.querySelector('#hangUpBtn');
var localAudio = document.querySelector('#localAudio');
var remoteAudio = document.querySelector('#remoteAudio');

var yourConn;
var stream;

callPage.style.display = "none";

// Login when the user clicks the button
loginBtn.addEventListener("click", function (event) {
   name = usernameInput.value;

   if (name.length > 0) {
      send({
         type: "login",
         name: name
      });
   }

});

function handleLogin(success) {
   if (success === false) {
      alert("Ooops...try a different username");
   } else {
      loginPage.style.display = "none";
      callPage.style.display = "block";

      //**********************
      //Starting a peer connection
      //**********************

      //getting local audio stream
      navigator.webkitGetUserMedia({ video: false, audio: true }, function (myStream) {
         stream = myStream;

         //displaying local audio stream on the page
         localAudio.src = window.URL.createObjectURL(stream);

         //using Google public stun server
         var configuration = {
            "iceServers": [{ "url": "stun:stun2.1.google.com:19302" }]
         };

         yourConn = new webkitRTCPeerConnection(configuration);

         // setup stream listening
         yourConn.addStream(stream);

         //when a remote user adds stream to the peer connection, we display it
         yourConn.onaddstream = function (e) {
            remoteAudio.src = window.URL.createObjectURL(e.stream);
         };

         // Setup ice handling
         yourConn.onicecandidate = function (event) {
            if (event.candidate) {
               send({
                  type: "candidate",
                  candidate: event.candidate
               });
            }
         };

      }, function (error) {
         console.log(error);
      });

   }
};

//initiating a call
callBtn.addEventListener("click", function () {
   var callToUsername = callToUsernameInput.value;

   if (callToUsername.length > 0) {
      connectedUser = callToUsername;

      // create an offer
      yourConn.createOffer(function (offer) {
         send({
            type: "offer",
            offer: offer
         });

         yourConn.setLocalDescription(offer);
      }, function (error) {
         alert("Error when creating an offer");
      });
   }
});

//when somebody sends us an offer
function handleOffer(offer, name) {
   connectedUser = name;
   yourConn.setRemoteDescription(new RTCSessionDescription(offer));

   //create an answer to an offer
   yourConn.createAnswer(function (answer) {
      yourConn.setLocalDescription(answer);

      send({
         type: "answer",
         answer: answer
      });

   }, function (error) {
      alert("Error when creating an answer");
   });

};

//when we got an answer from a remote user
function handleAnswer(answer) {
   yourConn.setRemoteDescription(new RTCSessionDescription(answer));
};

//when we got an ice candidate from a remote user
function handleCandidate(candidate) {
   yourConn.addIceCandidate(new RTCIceCandidate(candidate));
};

//hang up
hangUpBtn.addEventListener("click", function () {
   send({
      type: "leave"
   });

   handleLeave();
});

function handleLeave() {
   connectedUser = null;
   remoteAudio.src = null;

   yourConn.close();
   yourConn.onicecandidate = null;
   yourConn.onaddstream = null;
};
WebRTC - Text Demo
In this chapter, we are going to build a client application that allows two users on separate devices to send messages each other using WebRTC. Our application will have two pages. One for login and the other for sending messages to another user.
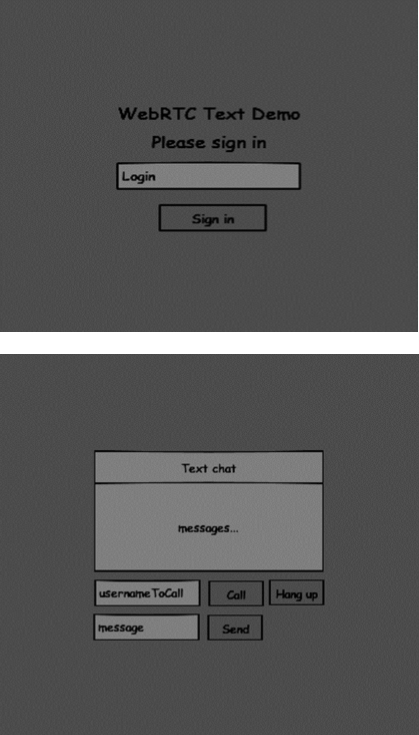
The two pages will be the div tags. Most input is done through simple event handlers.
Signaling Server
To create a WebRTC connection clients have to be able to transfer messages without using a WebRTC peer connection. This is where we will use HTML5 WebSockets − a bidirectional socket connection between two endpoints − a web server and a web browser. Now let's start using the WebSocket library. Create the server.js file and insert the following code −
//require our websocket library
var WebSocketServer = require('ws').Server;

//creating a websocket server at port 9090
var wss = new WebSocketServer({port: 9090});

//when a user connects to our sever
wss.on('connection', function(connection) {
   console.log("user connected");

   //when server gets a message from a connected user
   connection.on('message', function(message) {
      console.log("Got message from a user:", message);
   });

   connection.send("Hello from server");
});
The first line requires the WebSocket library which we have already installed. Then we create a socket server on the port 9090. Next, we listen to the connection event. This code will be executed when a user makes a WebSocket connection to the server. We then listen to any messages sent by the user. Finally, we send a response to the connected user saying Hello from server.
In our signaling server, we will use a string-based username for each connection so we know where to send messages. Let's change our connection handler a bit −
connection.on('message', function(message) {
   var data;

   //accepting only JSON messages
   try {
      data = JSON.parse(message);
   } catch (e) {
      console.log("Invalid JSON");
      data = {};
   }
});
This way we accept only JSON messages. Next, we need to store all connected users somewhere. We will use a simple Javascript object for it. Change the top of our file −
//require our websocket library
var WebSocketServer = require('ws').Server;

//creating a websocket server at port 9090
var wss = new WebSocketServer({port: 9090});

//all connected to the server users
var users = {};
We are going to add a type field for every message coming from the client. For example if a user wants to login, he sends the login type message. Let's define it −
connection.on('message', function(message) {
   var data;

   //accepting only JSON messages
   try {
      data = JSON.parse(message);
   } catch (e) {
      console.log("Invalid JSON");
      data = {};
   }

   //switching type of the user message
   switch (data.type) {
      //when a user tries to login
      case "login":
         console.log("User logged:", data.name);

         //if anyone is logged in with this username then refuse
         if(users[data.name]) {
            sendTo(connection, {
               type: "login",
               success: false
            });
         } else {
            //save user connection on the server
            users[data.name] = connection;
            connection.name = data.name;

            sendTo(connection, {
               type: "login",
               success: true
            });
         }

         break;

      default:
         sendTo(connection, {
            type: "error",
            message: "Command no found: " + data.type
         });

         break;
   }
});
If the user sends a message with the login type, we −
- Check if anyone has already logged in with this username.
- If so, then tell the user that he hasn't successfully logged in.
- If no one is using this username, we add username as a key to the connection object.
- If a command is not recognized we send an error.
The following code is a helper function for sending messages to a connection. Add it to the server.js file −
function sendTo(connection, message) {
   connection.send(JSON.stringify(message));
}
When the user disconnects we should clean up its connection. We can delete the user when the close event is fired. Add the following code to the connection handler −
connection.on("close", function() {
   if(connection.name) {
      delete users[connection.name];
   }
});
After successful login the user wants to call another. He should make an offer to another user to achieve it. Add the offer handler −
case "offer":
   //for ex. UserA wants to call UserB
   console.log("Sending offer to: ", data.name);

   //if UserB exists then send him offer details
   var conn = users[data.name];

   if(conn != null){
   //setting that UserA connected with UserB
   connection.otherName = data.name;

      sendTo(conn, {
         type: "offer",
         offer: data.offer,
         name: connection.name
      });

   break;
Firstly, we get the connection of the user we are trying to call. If it exists we send him offer details. We also add otherName to the connection object. This is made for the simplicity of finding it later.
Answering to the response has a similar pattern that we used in the offer handler. Our server just passes through all messages as answer to another user. Add the following code after the offer handler −
case "answer":
   console.log("Sending answer to: ", data.name);

   //for ex. UserB answers UserA
   var conn = users[data.name];

   if(conn != null) {
      connection.otherName = data.name;
      sendTo(conn, {
         type: "answer",
         answer: data.answer
      });
   }

   break;
The final part is handling ICE candidate between users. We use the same technique just passing messages between users. The main difference is that candidate messages might happen multiple times per user in any order. Add the candidate handler −
case "candidate":
   console.log("Sending candidate to:",data.name);
   var conn = users[data.name];

   if(conn != null) {
      sendTo(conn, {
         type: "candidate",
         candidate: data.candidate
      });
   }

   break;
To allow our users to disconnect from another user we should implement the hanging up function. It will also tell the server to delete all user references. Add the leave handler −
case "leave":
   console.log("Disconnecting from", data.name);
   var conn = users[data.name];
   conn.otherName = null;

   //notify the other user so he can disconnect his peer connection
   if(conn != null) {
      sendTo(conn, {
         type: "leave"
      });
   }

   break;
This will also send the other user the leave event so he can disconnect his peer connection accordingly. We should also handle the case when a user drops his connection from the signaling server. Let's modify our close handler −
connection.on("close", function() {

   if(connection.name) {
      delete users[connection.name];

      if(connection.otherName) {
         console.log("Disconnecting from ", connection.otherName);
         var conn = users[connection.otherName];
         conn.otherName = null;

         if(conn != null) {
            sendTo(conn, {
               type: "leave"
            });
         }
      }
   }
});
The following is the entire code of our signaling server −
//require our websocket library
var WebSocketServer = require('ws').Server;

//creating a websocket server at port 9090
var wss = new WebSocketServer({port: 9090});

//all connected to the server users
var users = {};

//when a user connects to our sever
wss.on('connection', function(connection) {

   console.log("User connected");

   //when server gets a message from a connected user
   connection.on('message', function(message) {

      var data;
      //accepting only JSON messages
      try {
         data = JSON.parse(message);
      } catch (e) {
         console.log("Invalid JSON");
         data = {};
      }

      //switching type of the user message
      switch (data.type) {
         //when a user tries to login
         case "login":
            console.log("User logged", data.name);
            //if anyone is logged in with this username then refuse
            if(users[data.name]) {
               sendTo(connection, {
                  type: "login",
                  success: false
               });
            } else {
               //save user connection on the server
               users[data.name] = connection;
               connection.name = data.name;

                  sendTo(connection, {
                     type: "login",
                     success: true
                  });
            }

            break;

         case "offer":
            //for ex. UserA wants to call UserB
            console.log("Sending offer to: ", data.name);

            //if UserB exists then send him offer details
            var conn = users[data.name];

            if(conn != null) {
               //setting that UserA connected with UserB
               connection.otherName = data.name;

               sendTo(conn, {
                  type: "offer",
                  offer: data.offer,
                  name: connection.name
               });
            }

            break;

         case "answer":
            console.log("Sending answer to: ", data.name);
            //for ex. UserB answers UserA
            var conn = users[data.name];

            if(conn != null) {
               connection.otherName = data.name;
               sendTo(conn, {
                  type: "answer",
                  answer: data.answer
               });
            }

            break;

         case "candidate":
            console.log("Sending candidate to:",data.name);
            var conn = users[data.name];

            if(conn != null) {
               sendTo(conn, {
                  type: "candidate",
                  candidate: data.candidate
               });
            }

            break;

         case "leave":
            console.log("Disconnecting from", data.name);
            var conn = users[data.name];
            conn.otherName = null;

            //notify the other user so he can disconnect his peer connection
            if(conn != null) {
               sendTo(conn, {
                  type: "leave"
               });
            }

            break;

         default:
            sendTo(connection, {
               type: "error",
               message: "Command not found: " + data.type
            });

            break;

      }
   });

   //when user exits, for example closes a browser window
   //this may help if we are still in "offer","answer" or "candidate" state
   connection.on("close", function() {

      if(connection.name) {
         delete users[connection.name];

         if(connection.otherName) {
            console.log("Disconnecting from ", connection.otherName);
            var conn = users[connection.otherName];
            conn.otherName = null;

            if(conn != null) {
               sendTo(conn, {
                  type: "leave"
               });
            }
         }
      }
   });

   connection.send("Hello world");

});

function sendTo(connection, message) {
   connection.send(JSON.stringify(message));
}
Client Application
One way to test this application is opening two browser tabs and trying to send a message each other.
First of all, we need to install the bootstrap library. Bootstrap is a frontend framework for developing web applications. You can learn more at http://getbootstrap.com/.Create a folder called, for example, textchat. This will be our root application folder. Inside this folder create a file package.json (it is necessary for managing npm dependencies) and add the following −
{
   "name": "webrtc-textochat",
   "version": "0.1.0",
   "description": "webrtc-textchat",
   "author": "Author",
   "license": "BSD-2-Clause"
}
Then run npm install bootstrap. This will install the bootstrap library in the textchat/node_modules folder.
Now we need to create a basic HTML page. Create an index.html file in the root folder with the following code −
<html>

   <head>
      <title>WebRTC Text Demo</title>
      <link rel = "stylesheet" href = "node_modules/bootstrap/dist/css/bootstrap.min.css"/>
   </head>

   <style>
      body {
         background: #eee;
         padding: 5% 0;
      }
   </style>

   <body>
      <div id = "loginPage" class = "container text-center">

         <div class = "row">
            <div class = "col-md-4 col-md-offset-4">
               <h2>WebRTC Text Demo. Please sign in</h2>
               <label for = "usernameInput" class = "sr-only">Login</label>
               <input type = "email" id = "usernameInput"
                  class = "form-control formgroup" placeholder = "Login"
                  required = "" autofocus = "">
               <button id = "loginBtn" class = "btn btn-lg btn-primary btnblock">
                  Sign in</button>
            </div>
         </div>

      </div>

      <div id = "callPage" class = "call-page container">

         <div class = "row">
            <div class = "col-md-4 col-md-offset-4 text-center">
               <div class = "panel panel-primary">
                  <div class = "panel-heading">Text chat</div>
                  <div id = "chatarea" class = "panel-body text-left"></div>
               </div>
            </div>
         </div>

         <div class = "row text-center form-group">
            <div class = "col-md-12">
               <input id = "callToUsernameInput" type = "text"
                  placeholder = "username to call" />
               <button id = "callBtn" class = "btn-success btn">Call</button>
               <button id = "hangUpBtn" class = "btn-danger btn">Hang Up</button>
            </div>
         </div>

         <div class = "row text-center">
            <div class = "col-md-12">
               <input id = "msgInput" type = "text" placeholder = "message" />
               <button id = "sendMsgBtn" class = "btn-success btn">Send</button>
            </div>
         </div>

      </div>

      <script src = "client.js"></script>

   </body>

</html>
This page should be familiar to you. We have added the bootstrap css file. We have also defined two pages. Finally, we have created several text fields and buttons for getting information from the user. On the chat page you should see the div tag with the chatarea ID where all our messages will be displayed. Notice that we have added a link to a client.js file.
Now we need to establish a connection with our signaling server. Create the client.js file in the root folder with the following code −
//our username
var name;
var connectedUser;

//connecting to our signaling server
var conn = new WebSocket('ws://localhost:9090');

conn.onopen = function () {
   console.log("Connected to the signaling server");
};

//when we got a message from a signaling server
conn.onmessage = function (msg) {
   console.log("Got message", msg.data);

   var data = JSON.parse(msg.data);

   switch(data.type) {
      case "login":
         handleLogin(data.success);
         break;
      //when somebody wants to call us
      case "offer":
         handleOffer(data.offer, data.name);
         break;
      case "answer":
         handleAnswer(data.answer);
         break;
      //when a remote peer sends an ice candidate to us
      case "candidate":
         handleCandidate(data.candidate);
         break;
      case "leave":
         handleLeave();
         break;
      default:
         break;
   }
};

conn.onerror = function (err) {
   console.log("Got error", err);
};

//alias for sending JSON encoded messages
function send(message) {
   //attach the other peer username to our messages
   if (connectedUser) {
      message.name = connectedUser;
   }

   conn.send(JSON.stringify(message));
};
Now run our signaling server via node server. Then, inside the root folder run the static command and open the page inside the browser. You should see the following console output −

The next step is implementing a user log in with a unique username. We simply send a username to the server, which then tell us whether it is taken or not. Add the following code to your client.js file −
//******
//UI selectors block
//******

var loginPage = document.querySelector('#loginPage');
var usernameInput = document.querySelector('#usernameInput');
var loginBtn = document.querySelector('#loginBtn');

var callPage = document.querySelector('#callPage');
var callToUsernameInput = document.querySelector('#callToUsernameInput');
var callBtn = document.querySelector('#callBtn');

var hangUpBtn = document.querySelector('#hangUpBtn');
callPage.style.display = "none";

// Login when the user clicks the button
loginBtn.addEventListener("click", function (event) {
   name = usernameInput.value;

   if (name.length > 0) {
      send({
         type: "login",
         name: name
      });
   }

});

function handleLogin(success) {

   if (success === false) {
      alert("Ooops...try a different username");
   } else {
      loginPage.style.display = "none";
      callPage.style.display = "block";

      //**********************
      //Starting a peer connection
      //**********************
   }

};
Firstly, we select some references to the elements on the page. The we hide the call page. Then, we add an event listener on the login button. When the user clicks it, we send his username to the server. Finally, we implement the handleLogin callback. If the login was successful, we show the call page, set up a peer connection, and create a data channel.
To start a peer connection with a data channel we need −
- Create the RTCPeerConnection object
- Create a data channel inside our RTCPeerConnection object
Add the following code to the UI selectors block −
var msgInput = document.querySelector('#msgInput');
var sendMsgBtn = document.querySelector('#sendMsgBtn');
var chatArea = document.querySelector('#chatarea');

var yourConn;
var dataChannel;
Modify the handleLogin function −
function handleLogin(success) {
   if (success === false) {
      alert("Ooops...try a different username");
   } else {
      loginPage.style.display = "none";
      callPage.style.display = "block";

      //**********************
      //Starting a peer connection
      //**********************

      //using Google public stun server
      var configuration = {
         "iceServers": [{ "url": "stun:stun2.1.google.com:19302" }]
      };

      yourConn = new webkitRTCPeerConnection(configuration, {optional: [{RtpDataChannels: true}]});

      // Setup ice handling
      yourConn.onicecandidate = function (event) {
         if (event.candidate) {
            send({
               type: "candidate",
               candidate: event.candidate
            });
         }
      };

      //creating data channel
      dataChannel = yourConn.createDataChannel("channel1", {reliable:true});

      dataChannel.onerror = function (error) {
         console.log("Ooops...error:", error);
      };

      //when we receive a message from the other peer, display it on the screen
      dataChannel.onmessage = function (event) {
         chatArea.innerHTML += connectedUser + ": " + event.data + "<br />";
      };

      dataChannel.onclose = function () {
         console.log("data channel is closed");
      };
   }
};
If login was successful the application creates the RTCPeerConnection object and setup onicecandidate handler which sends all found icecandidates to the other peer. It also creates a dataChannel. Notice, that when creating the RTCPeerConnection object the second argument in the constructor optional: [{RtpDataChannels: true}] is mandatory if you are using Chrome or Opera. The next step is to create an offer to the other peer. Once a user gets the offer, he creates an answer and start trading ICE candidates. Add the following code to the client.js file −
//initiating a call
callBtn.addEventListener("click", function () {
   var callToUsername = callToUsernameInput.value;

   if (callToUsername.length > 0) {

      connectedUser = callToUsername;

      // create an offer
      yourConn.createOffer(function (offer) {

         send({
            type: "offer",
            offer: offer
         });

         yourConn.setLocalDescription(offer);

      }, function (error) {
         alert("Error when creating an offer");
      });
   }
});

//when somebody sends us an offer
function handleOffer(offer, name) {
   connectedUser = name;
   yourConn.setRemoteDescription(new RTCSessionDescription(offer));

   //create an answer to an offer
   yourConn.createAnswer(function (answer) {
      yourConn.setLocalDescription(answer);

      send({
         type: "answer",
         answer: answer
      });

   }, function (error) {
      alert("Error when creating an answer");
   });
};

//when we got an answer from a remote user
function handleAnswer(answer) {
   yourConn.setRemoteDescription(new RTCSessionDescription(answer));
};

//when we got an ice candidate from a remote user
function handleCandidate(candidate) {
   yourConn.addIceCandidate(new RTCIceCandidate(candidate));
};
We add a click handler to the Call button, which initiates an offer. Then we implement several handlers expected by the onmessage handler. They will be processed asynchronously until both the users have made a connection.
The next step is implementing the hang-up feature. This will stop transmitting data and tell the other user to close the data channel. Add the following code −
//hang up
hangUpBtn.addEventListener("click", function () {
   send({
      type: "leave"
   });

   handleLeave();
});

function handleLeave() {
   connectedUser = null;
   yourConn.close();
   yourConn.onicecandidate = null;
};
When the user clicks on the Hang Up button −
- It will send a leave message to the other user.
- It will close the RTCPeerConnection and as well as data channel.
The last step is sending a message to another peer. Add the click handler to the send message button −
//when user clicks the "send message" button
sendMsgBtn.addEventListener("click", function (event) {
   var val = msgInput.value;
   chatArea.innerHTML += name + ": " + val + "<br />";

   //sending a message to a connected peer
   dataChannel.send(val);
   msgInput.value = "";
});
Now run the code. You should be able to log in to the server using two browser tabs. You can then set up a peer connection to the other user and send him a message as well as close the data channel by clicking the Hang Up button.
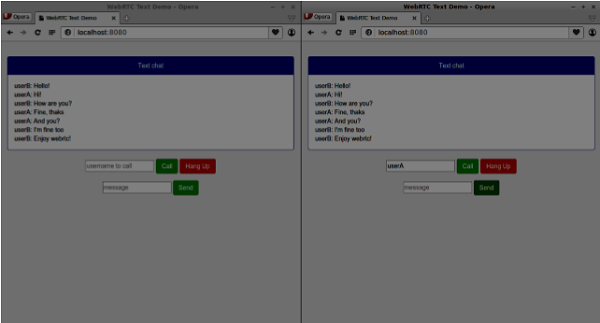
The following is the entire client.js file −
//our username
var name;
var connectedUser;

//connecting to our signaling server
var conn = new WebSocket('ws://localhost:9090');

conn.onopen = function () {
   console.log("Connected to the signaling server");
};

//when we got a message from a signaling server
conn.onmessage = function (msg) {
   console.log("Got message", msg.data);
   var data = JSON.parse(msg.data);

   switch(data.type) {
      case "login":
         handleLogin(data.success);
         break;
      //when somebody wants to call us
      case "offer":
         handleOffer(data.offer, data.name);
         break;
      case "answer":
         handleAnswer(data.answer);
         break;
      //when a remote peer sends an ice candidate to us
      case "candidate":
         handleCandidate(data.candidate);
         break;
      case "leave":
         handleLeave();
         break;
      default:
         break;
   }
};

conn.onerror = function (err) {
   console.log("Got error", err);
};

//alias for sending JSON encoded messages
function send(message) {

   //attach the other peer username to our messages
   if (connectedUser) {
      message.name = connectedUser;
   }

   conn.send(JSON.stringify(message));
};

//******
//UI selectors block
//******

var loginPage = document.querySelector('#loginPage');
var usernameInput = document.querySelector('#usernameInput');
var loginBtn = document.querySelector('#loginBtn');

var callPage = document.querySelector('#callPage');
var callToUsernameInput = document.querySelector('#callToUsernameInput');
var callBtn = document.querySelector('#callBtn');

var hangUpBtn = document.querySelector('#hangUpBtn');
var msgInput = document.querySelector('#msgInput');
var sendMsgBtn = document.querySelector('#sendMsgBtn');

var chatArea = document.querySelector('#chatarea');
var yourConn;
var dataChannel;
callPage.style.display = "none";

// Login when the user clicks the button
loginBtn.addEventListener("click", function (event) {
   name = usernameInput.value;

   if (name.length > 0) {
      send({
         type: "login",
         name: name
      });
   }

});

function handleLogin(success) {

   if (success === false) {
      alert("Ooops...try a different username");
   } else {
      loginPage.style.display = "none";
      callPage.style.display = "block";

      //**********************
      //Starting a peer connection
      //**********************

      //using Google public stun server
      var configuration = {
         "iceServers": [{ "url": "stun:stun2.1.google.com:19302" }]
      };

      yourConn = new webkitRTCPeerConnection(configuration, {optional: [{RtpDataChannels: true}]});

      // Setup ice handling
      yourConn.onicecandidate = function (event) {
         if (event.candidate) {
            send({
               type: "candidate",
               candidate: event.candidate
            });
         }
      };

      //creating data channel
      dataChannel = yourConn.createDataChannel("channel1", {reliable:true});

      dataChannel.onerror = function (error) {
         console.log("Ooops...error:", error);
      };

      //when we receive a message from the other peer, display it on the screen
      dataChannel.onmessage = function (event) {
         chatArea.innerHTML += connectedUser + ": " + event.data + "<br />";
      };

      dataChannel.onclose = function () {
         console.log("data channel is closed");
      };

   }
};

//initiating a call
callBtn.addEventListener("click", function () {
   var callToUsername = callToUsernameInput.value;

   if (callToUsername.length > 0) {
      connectedUser = callToUsername;
      // create an offer
      yourConn.createOffer(function (offer) {
         send({
            type: "offer",
            offer: offer
         });
         yourConn.setLocalDescription(offer);
      }, function (error) {
         alert("Error when creating an offer");
      });
   }

});

//when somebody sends us an offer
function handleOffer(offer, name) {
   connectedUser = name;
   yourConn.setRemoteDescription(new RTCSessionDescription(offer));

   //create an answer to an offer
   yourConn.createAnswer(function (answer) {
      yourConn.setLocalDescription(answer);
      send({
         type: "answer",
         answer: answer
      });
   }, function (error) {
      alert("Error when creating an answer");
   });

};

//when we got an answer from a remote user
function handleAnswer(answer) {
   yourConn.setRemoteDescription(new RTCSessionDescription(answer));
};

//when we got an ice candidate from a remote user
function handleCandidate(candidate) {
   yourConn.addIceCandidate(new RTCIceCandidate(candidate));
};

//hang up
hangUpBtn.addEventListener("click", function () {
   send({
      type: "leave"
   });

   handleLeave();
});

function handleLeave() {
   connectedUser = null;
   yourConn.close();
   yourConn.onicecandidate = null;
};

//when user clicks the "send message" button
sendMsgBtn.addEventListener("click", function (event) {
   var val = msgInput.value;
   chatArea.innerHTML += name + ": " + val + "<br />";

   //sending a message to a connected peer
   dataChannel.send(val);
   msgInput.value = "";
});
WebRTC - Security
In this chapter, we are going to add security features to the signaling server we created in the WebRTC Signaling chapter. There will be two enhancements −
- User authentication using Redis database
- Enabling secure socket connection
Firstly, you should install Redis.
Download the latest stable release at http://redis.io/download(3.05 in my case)
Unpack it
Inside the downloaded folder run sudo make install
After the installation is finished, run make test to check whether everything is working correctly.
Redis has two executable commands −
redis-cli − command line interface for Redis (client part)
redis-server − Redis data store
To run the Redis server type redis-server in the terminal console. You should see the following −

Now open a new terminal window and run redis-cli to open a client application.

Basically, Redis is a key-value database. To create a key with a string value, you should use the SET command. To read the key value you should use the GET command. Let's add two users and passwords for them. Keys will be the usernames and values of these keys will be the corresponding passwords.
Now we should modify our signaling server to add a user authentication. Add the following code to the top of the server.js file −
//require the redis library in Node.js
var redis = require("redis");

//creating the redis client object
var redisClient = redis.createClient();
In the above code, we require the Redis library for Node.js and creating a redis client for our server.
To add the authentication modify the message handler on the connection object −
//when a user connects to our sever
wss.on('connection', function(connection) {
   console.log("user connected");

   //when server gets a message from a connected user
   connection.on('message', function(message) {

      var data;
      //accepting only JSON messages
      try {
         data = JSON.parse(message);
      } catch (e) {
         console.log("Invalid JSON");
         data = {};
      }

      //check whether a user is authenticated
      if(data.type != "login") {

         //if user is not authenticated
         if(!connection.isAuth) {
            sendTo(connection, {
               type: "error",
               message: "You are not authenticated"
            });
            return;
         }
      }

      //switching type of the user message
      switch (data.type) {
         //when a user tries to login
         case "login":
            console.log("User logged:", data.name);
            //get password for this username from redis database

            redisClient.get(data.name, function(err, reply) {
               //check if password matches with the one stored in redis
               var loginSuccess = reply === data.password;

               //if anyone is logged in with this username or incorrect password
                  then refuse
               if(users[data.name] || !loginSuccess) {
                  sendTo(connection, {
                     type: "login",
                     success: false
                  });
               } else {
                  //save user connection on the server
                  users[data.name] = connection;
                  connection.name = data.name;
                  connection.isAuth = true;

                  sendTo(connection, {
                     type: "login",
                     success: true
                  });
               }
            });

            break;
      }
   });

}

//...
//*****other handlers*******
In the above code if a user tries to login we get from Redis his password, check if it matches with the stored one, and if it successful we store his username on the server. We also add the isAuth flag to the connection to check whether the user is authenticated. Notice this code −
//check whether a user is authenticated
if(data.type != "login") {

   //if user is not authenticated
   if(!connection.isAuth) {
      sendTo(connection, {
         type: "error",
         message: "You are not authenticated"
      });

      return;
   }
}
If an unauthenticated user tries to send offer or leave the connection we simply send an error back.
The next step is enabling a secure socket connection. It is highly recommended for WebRTC applications. PKI (Public Key Infrastructure) is a digital signature from a CA (Certificate Authority). Users then check that the private key used to sign a certificate matches the public key of the CA's certificate. For the development purposes. we will use a self-signed security certificate.
We will use the openssl. It is an open source tool that implements SSL (Secure Sockets Layer) and TLS (Transport Layer Security) protocols. It is often installed by default on Unix systems. Run openssl version -a to check whether it is installed.
To generate public and private security certificate keys, you should follow the steps given below −
Generate a temporary server password key
openssl genrsa -des3 -passout pass:x -out server.pass.key 2048
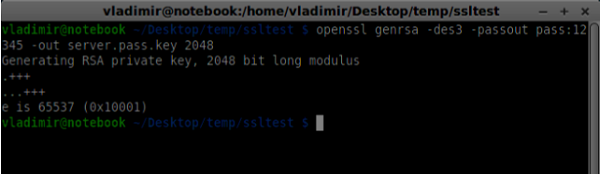
Generate a server private key
openssl rsa -passin pass:12345 -in server.pass.key -out server.key

Generate a signing request. You will be asked additional questions about your company. Just hit the Enter button all the time.
openssl req -new -key server.key -out server.csr
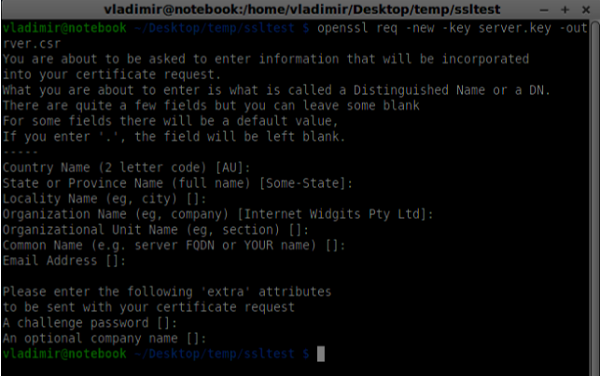
Generate the certificate
openssl x509 -req -days 1095 -in server.csr -signkey server.key -out server.crt
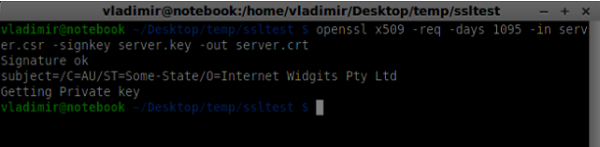
Now you have two files, the certificate (server.crt) and the private key (server.key). Copy them into the signaling server root folder.
To enable the secure socket connection modify our signaling server.
//require file system module
var fs = require('fs');
var httpServ = require('https');

//https://github.com/visionmedia/superagent/issues/205
process.env.NODE_TLS_REJECT_UNAUTHORIZED = "0";

//out secure server will bind to the port 9090
var cfg = {
   port: 9090,
   ssl_key: 'server.key',
   ssl_cert: 'server.crt'
};

//in case of http request just send back "OK"
var processRequest = function(req, res) {
   res.writeHead(200);
   res.end("OK");
};

//create our server with SSL enabled
var app = httpServ.createServer({
   key: fs.readFileSync(cfg.ssl_key),
   cert: fs.readFileSync(cfg.ssl_cert)
}, processRequest).listen(cfg.port);

//require our websocket library
var WebSocketServer = require('ws').Server;

//creating a websocket server at port 9090
var wss = new WebSocketServer({server: app});

//all connected to the server users
var users = {};

//require the redis library in Node.js
var redis = require("redis");

//creating the redis client object
var redisClient = redis.createClient();

//when a user connects to our sever
wss.on('connection', function(connection){
//...other code
In the above code, we require the fs library to read private key and certificate, create the cfg object with the binding port and paths for private key and certificate. Then, we create an HTTPS server with our keys along with WebSocket server on the port 9090.
Now open https://localhost:9090 in Opera. You should see the following −
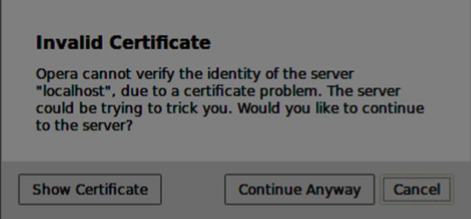
Click the continue anyway button. You should see the OK message.
To test our secure signaling server, we will modify the chat application we created in the WebRTC Text Demo tutorial. We just need to add a password field. The following is the entire index.html file −
<html>

   <head>
      <title>WebRTC Text Demo</title>
      <link rel = "stylesheet" href = "node_modules/bootstrap/dist/css/bootstrap.min.css"/>
   </head>

   <style>
      body {
         background: #eee;
         padding: 5% 0;
      }
   </style>

   <body>
      <div id = "loginPage" class = "container text-center">

         <div class = "row">
            <div class = "col-md-4 col-md-offset-4">
               <h2>WebRTC Text Demo. Please sign in</h2>
               <label for = "usernameInput" class = "sr-only">Login</label>
               <input type = "email" id = "usernameInput"
                  class = "form-control formgroup" placeholder = "Login"
                  required = "" autofocus = "">
               <input type = "text" id = "passwordInput"
                  class = "form-control form-group" placeholder = "Password"
                  required = "" autofocus = "">
               <button id = "loginBtn" class = "btn btn-lg btn-primary btnblock"
                  >Sign in</button>
            </div>
         </div>

      </div>

      <div id = "callPage" class = "call-page container">

         <div class = "row">
            <div class = "col-md-4 col-md-offset-4 text-center">
               <div class = "panel panel-primary">
                  <div class = "panel-heading">Text chat</div>
                  <div id = "chatarea" class = "panel-body text-left"></div>
               </div>
            </div>
         </div>

         <div class = "row text-center form-group">
            <div class = "col-md-12">
               <input id = "callToUsernameInput" type = "text"
                  placeholder = "username to call" />
               <button id = "callBtn" class = "btn-success btn">Call</button>
               <button id = "hangUpBtn" class = "btn-danger btn">Hang Up</button>
            </div>
         </div>

         <div class = "row text-center">
            <div class = "col-md-12">
               <input id = "msgInput" type = "text" placeholder = "message" />
               <button id = "sendMsgBtn" class = "btn-success btn">Send</button>
            </div>
         </div>

      </div>

      <script src = "client.js"></script>

   </body>

</html>
We also need to enable a secure socket connection in the client.js file through this line var conn = new WebSocket('wss://localhost:9090');. Notice the wss protocol. Then, the login button hander must modified to send password along with username −
loginBtn.addEventListener("click", function (event) {
   name = usernameInput.value;
   var pwd = passwordInput.value;

   if (name.length > 0) {
      send({
         type: "login",
         name: name,
         password: pwd
      });
   }

});
The following is the entire client.js file −
//our username
var name;
var connectedUser;

//connecting to our signaling server
var conn = new WebSocket('wss://localhost:9090');

conn.onopen = function () {
   console.log("Connected to the signaling server");
};

//when we got a message from a signaling server
conn.onmessage = function (msg) {
   console.log("Got message", msg.data);

   var data = JSON.parse(msg.data);

   switch(data.type) {
      case "login":
         handleLogin(data.success);
         break;
      //when somebody wants to call us
      case "offer":
         handleOffer(data.offer, data.name);
         break;
      case "answer":
         handleAnswer(data.answer);
         break;
      //when a remote peer sends an ice candidate to us
      case "candidate":
         handleCandidate(data.candidate);
         break;
      case "leave":
         handleLeave();
         break;
      default:
         break;
   }
};

conn.onerror = function (err) {
   console.log("Got error", err);
};

//alias for sending JSON encoded messages
function send(message) {
   //attach the other peer username to our messages
   if (connectedUser) {
      message.name = connectedUser;
   }

   conn.send(JSON.stringify(message));
};

//******
//UI selectors block
//******

var loginPage = document.querySelector('#loginPage');
var usernameInput = document.querySelector('#usernameInput');
var passwordInput = document.querySelector('#passwordInput');
var loginBtn = document.querySelector('#loginBtn');

var callPage = document.querySelector('#callPage');
var callToUsernameInput = document.querySelector('#callToUsernameInput');
var callBtn = document.querySelector('#callBtn');
var hangUpBtn = document.querySelector('#hangUpBtn');

var msgInput = document.querySelector('#msgInput');
var sendMsgBtn = document.querySelector('#sendMsgBtn');
var chatArea = document.querySelector('#chatarea');

var yourConn;
var dataChannel;

callPage.style.display = "none";

// Login when the user clicks the button
loginBtn.addEventListener("click", function (event) {
   name = usernameInput.value;
   var pwd = passwordInput.value;

   if (name.length > 0) {
      send({
         type: "login",
         name: name,
         password: pwd
      });
   }

});

function handleLogin(success) {
   if (success === false) {
      alert("Ooops...incorrect username or password");
   } else {
      loginPage.style.display = "none";
      callPage.style.display = "block";

      //**********************
      //Starting a peer connection
      //**********************

      //using Google public stun server
      var configuration = {
         "iceServers": [{ "url": "stun:stun2.1.google.com:19302" }]
      };

      yourConn = new webkitRTCPeerConnection(configuration, {optional: [{RtpDataChannels: true}]});

      // Setup ice handling
      yourConn.onicecandidate = function (event) {
         if (event.candidate) {
            send({
               type: "candidate",
               candidate: event.candidate
            });
         }
      };

      //creating data channel
      dataChannel = yourConn.createDataChannel("channel1", {reliable:true});

      dataChannel.onerror = function (error) {
         console.log("Ooops...error:", error);
      };

      //when we receive a message from the other peer, display it on the screen
      dataChannel.onmessage = function (event) {
         chatArea.innerHTML += connectedUser + ": " + event.data + "<br />";
      };
      dataChannel.onclose = function () {
         console.log("data channel is closed");
      };
   }

};

//initiating a call
callBtn.addEventListener("click", function () {
   var callToUsername = callToUsernameInput.value;

   if (callToUsername.length > 0) {

      connectedUser = callToUsername;

      // create an offer
      yourConn.createOffer(function (offer) {
         send({
            type: "offer",
            offer: offer
         });

         yourConn.setLocalDescription(offer);

      }, function (error) {
         alert("Error when creating an offer");
      });
   }
});

//when somebody sends us an offer
function handleOffer(offer, name) {
   connectedUser = name;
   yourConn.setRemoteDescription(new RTCSessionDescription(offer));

   //create an answer to an offer
   yourConn.createAnswer(function (answer) {
      yourConn.setLocalDescription(answer);

      send({
         type: "answer",
         answer: answer
      });

   }, function (error) {
      alert("Error when creating an answer");
   });

};

//when we got an answer from a remote user
function handleAnswer(answer) {
   yourConn.setRemoteDescription(new RTCSessionDescription(answer));
};

//when we got an ice candidate from a remote user
function handleCandidate(candidate) {
   yourConn.addIceCandidate(new RTCIceCandidate(candidate));
};

//hang up
hangUpBtn.addEventListener("click", function () {

   send({
      type: "leave"
   });

   handleLeave();
});

function handleLeave() {
   connectedUser = null;
   yourConn.close();
   yourConn.onicecandidate = null;
};

//when user clicks the "send message" button
sendMsgBtn.addEventListener("click", function (event) {
   var val = msgInput.value;
   chatArea.innerHTML += name + ": " + val + "<br />";

   //sending a message to a connected peer
   dataChannel.send(val);
   msgInput.value = "";
});
Now run our secure signaling server via node server. Run node static inside the modified chat demo folder. Open localhost:8080 in two browser tabs. Try to log in. Remember only user1 with password1 and user2 with password2 are allowed to login. Then establish the RTCPeerConnection(call another user) and try to send a message.
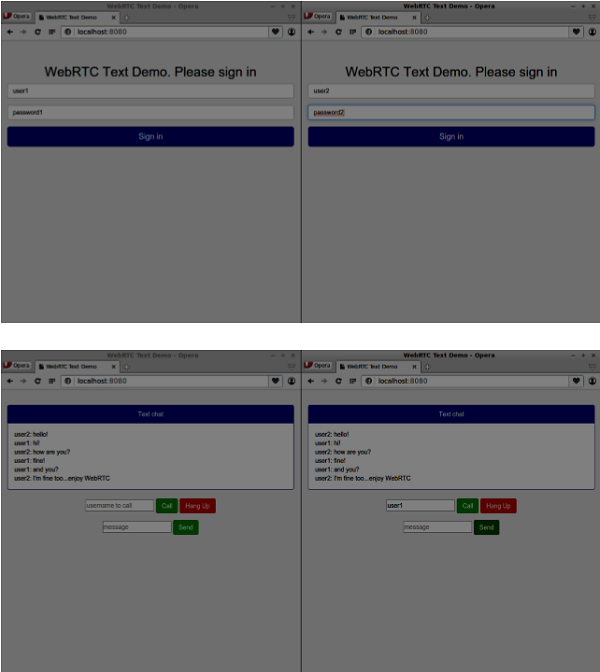
The following is the entire code of our secure signaling server −
//require file system module
var fs = require('fs');
var httpServ = require('https');

//https://github.com/visionmedia/superagent/issues/205
process.env.NODE_TLS_REJECT_UNAUTHORIZED = "0";

//out secure server will bind to the port 9090
var cfg = {
   port: 9090,
   ssl_key: 'server.key',
   ssl_cert: 'server.crt'
};

//in case of http request just send back "OK"
var processRequest = function(req, res){
   res.writeHead(200);
   res.end("OK");
};

//create our server with SSL enabled
var app = httpServ.createServer({
   key: fs.readFileSync(cfg.ssl_key),
   cert: fs.readFileSync(cfg.ssl_cert)
}, processRequest).listen(cfg.port);

//require our websocket library
var WebSocketServer = require('ws').Server;

//creating a websocket server at port 9090
var wss = new WebSocketServer({server: app});

//all connected to the server users
var users = {};

//require the redis library in Node.js
var redis = require("redis");

//creating the redis client object
var redisClient = redis.createClient();

//when a user connects to our sever
wss.on('connection', function(connection) {
   console.log("user connected");

   //when server gets a message from a connected user
   connection.on('message', function(message) {

      var data;
      //accepting only JSON messages
      try {
         data = JSON.parse(message);
      } catch (e) {
         console.log("Invalid JSON");
         data = {};
      }

      //check whether a user is authenticated
      if(data.type != "login") {
         //if user is not authenticated
         if(!connection.isAuth) {
            sendTo(connection, {
               type: "error",
               message: "You are not authenticated"
            });

            return;
         }
      }

      //switching type of the user message
      switch (data.type) {
         //when a user tries to login
         case "login":
            console.log("User logged:", data.name);
            //get password for this username from redis database
            redisClient.get(data.name, function(err, reply) {

               //check if password matches with the one stored in redis
               var loginSuccess = reply === data.password;

               //if anyone is logged in with this username or incorrect password
                  then refuse
               if(users[data.name] || !loginSuccess) {
                  sendTo(connection, {
                     type: "login",
                     success: false
                  });
               } else {
                  //save user connection on the server
                  users[data.name] = connection;
                  connection.name = data.name;
                  connection.isAuth = true;

                  sendTo(connection, {
                     type: "login",
                     success: true
                  });
               }
            });

            break;

         case "offer":
            //for ex. UserA wants to call UserB
            console.log("Sending offer to: ", data.name);

            //if UserB exists then send him offer details
            var conn = users[data.name];

            if(conn != null) {
               //setting that UserA connected with UserB
               connection.otherName = data.name;

               sendTo(conn, {
                  type: "offer",
                  offer: data.offer,
                  name: connection.name
               });
            }

            break;

         case "answer":
            console.log("Sending answer to: ", data.name);
            //for ex. UserB answers UserA
            var conn = users[data.name];

            if(conn != null) {
               connection.otherName = data.name;

               sendTo(conn, {
                  type: "answer",
                  answer: data.answer
               });
            }

            break;

         case "candidate":
            console.log("Sending candidate to:",data.name);
            var conn = users[data.name];

            if(conn != null) {
               sendTo(conn, {
                  type: "candidate",
                  candidate: data.candidate
               });
            }

            break;

         case "leave":
            console.log("Disconnecting from", data.name);
            var conn = users[data.name];
            conn.otherName = null;

            //notify the other user so he can disconnect his peer connection
            if(conn != null) {
               sendTo(conn, {
                  type: "leave"
               });
            }

            break;

         connection.on("close", function() {

            if(connection.name) {
               delete users[connection.name];

               if(connection.otherName) {
                  console.log("Disconnecting from ", connection.otherName);
                  var conn = users[connection.otherName];
                  conn.otherName = null;

                  if(conn != null) {
                     sendTo(conn, {
                        type: "leave"
                    });
                  }

               }
            }
         });

         default:
            sendTo(connection, {
               type: "error",
               message: "Command no found: " + data.type
            });

            break;
      }
   });

   //when user exits, for example closes a browser window
   //this may help if we are still in "offer","answer" or "candidate" state
   connection.on("close", function() {
      if(connection.name) {
         delete users[connection.name];
      }
   });

   connection.send("Hello from server");
});

function sendTo(connection, message) {
   connection.send(JSON.stringify(message));
}
Summary
In this chapter, we added user authentication to our signaling server. We also learned how to create self-signed SSL certificates and use them in the scope of WebRTC applications.
