- WebGL - Home
- WebGL - Introduction
- WebGL - Html5 Canvas Overview
- WebGL - Basics
- WebGL - Graphics Pipeline
- WebGL - Sample Application
- WebGL - Context
- WebGL - Geometry
- WebGL - Shaders
- Associating Attributes & Buffer Objects
- WebGL - Drawing a Model
- WebGL Examples
- WebGL - Drawing Points
- WebGL - Drawing a Triangle
- WebGL - Modes of Drawing
- WebGL - Drawing a Quad
- WebGL - Colors
- WebGL - Translation
- WebGL - Scaling
- WebGL - Rotation
- WebGL - Cube Rotation
- WebGL - Interactive Cube
- WebGL Useful Resources
- WebGL - Quick Guide
- WebGL - Useful Resources
- WebGL - Discussion
WebGL - Sample Application
We have discussed the basics of WebGL and the WebGL pipeline (a procedure followed to render Graphics applications). In this chapter, we are going to take a sample application to create a triangle using WebGL and observe the steps followed in the application.
Structure of WebGL Application
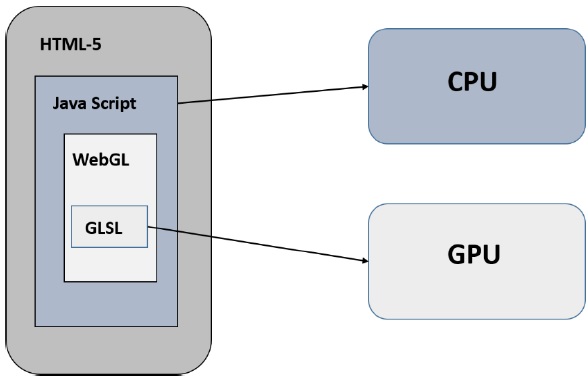
WebGL application code is a combination of JavaScript and OpenGL Shader Language.
- JavaScript is required to communicate with the CPU
- OpenGL Shader Language is required to communicate with the GPU.
Sample Application
Let us now take a simple example to learn how to use WebGL to draw a simple triangle with 2D coordinates.
<!doctype html>
<html>
   <body>
      <canvas width = "300" height = "300" id = "my_Canvas"></canvas>

      <script>
         /* Step1: Prepare the canvas and get WebGL context */

         var canvas = document.getElementById('my_Canvas');
         var gl = canvas.getContext('experimental-webgl');

         /* Step2: Define the geometry and store it in buffer objects */

         var vertices = [-0.5, 0.5, -0.5, -0.5, 0.0, -0.5,];

         // Create a new buffer object
         var vertex_buffer = gl.createBuffer();

         // Bind an empty array buffer to it
         gl.bindBuffer(gl.ARRAY_BUFFER, vertex_buffer);

         // Pass the vertices data to the buffer
         gl.bufferData(gl.ARRAY_BUFFER, new Float32Array(vertices), gl.STATIC_DRAW);

         // Unbind the buffer
         gl.bindBuffer(gl.ARRAY_BUFFER, null);

         /* Step3: Create and compile Shader programs */

         // Vertex shader source code
         var vertCode =
            'attribute vec2 coordinates;' +
            'void main(void) {' + ' gl_Position = vec4(coordinates,0.0, 1.0);' + '}';

         //Create a vertex shader object
         var vertShader = gl.createShader(gl.VERTEX_SHADER);

         //Attach vertex shader source code
         gl.shaderSource(vertShader, vertCode);

         //Compile the vertex shader
         gl.compileShader(vertShader);

         //Fragment shader source code
         var fragCode = 'void main(void) {' + 'gl_FragColor = vec4(0.0, 0.0, 0.0, 0.1);' + '}';

         // Create fragment shader object
         var fragShader = gl.createShader(gl.FRAGMENT_SHADER);

         // Attach fragment shader source code
         gl.shaderSource(fragShader, fragCode);

         // Compile the fragment shader
         gl.compileShader(fragShader);

         // Create a shader program object to store combined shader program
         var shaderProgram = gl.createProgram();

         // Attach a vertex shader
         gl.attachShader(shaderProgram, vertShader);

         // Attach a fragment shader
         gl.attachShader(shaderProgram, fragShader);

         // Link both programs
         gl.linkProgram(shaderProgram);

         // Use the combined shader program object
         gl.useProgram(shaderProgram);

         /* Step 4: Associate the shader programs to buffer objects */

         //Bind vertex buffer object
         gl.bindBuffer(gl.ARRAY_BUFFER, vertex_buffer);

         //Get the attribute location
         var coord = gl.getAttribLocation(shaderProgram, "coordinates");

         //point an attribute to the currently bound VBO
         gl.vertexAttribPointer(coord, 2, gl.FLOAT, false, 0, 0);

         //Enable the attribute
         gl.enableVertexAttribArray(coord);

         /* Step5: Drawing the required object (triangle) */

         // Clear the canvas
         gl.clearColor(0.5, 0.5, 0.5, 0.9);

         // Enable the depth test
         gl.enable(gl.DEPTH_TEST);

         // Clear the color buffer bit
         gl.clear(gl.COLOR_BUFFER_BIT);

         // Set the view port
         gl.viewport(0,0,canvas.width,canvas.height);

         // Draw the triangle
         gl.drawArrays(gl.TRIANGLES, 0, 3);
      </script>
   </body>
</html>
It will produce the following result −
If you observe the above program carefully, we have followed five sequential steps to draw a simple triangle using WebGL. The steps are as follows −
Step 1 − Prepare the canvas and get WebGL rendering context
We get the current HTML canvas object and obtain its WebGL rendering context.
Step 2 − Define the geometry and store it in buffer objects
We define the attributes of the geometry such as vertices, indices, color, etc., and store them in the JavaScript arrays. Then, we create one or more buffer objects and pass the arrays containing the data to the respective buffer object. In the example, we store the vertices of the triangle in a JavaScript array and pass this array to a vertex buffer object.
Step 3 − Create and compile Shader programs
We write vertex shader and fragment shader programs, compile them, and create a combined program by linking these two programs.
Step 4 − Associate the shader programs with buffer objects
We associate the buffer objects and the combined shader program.
Step 5 − Drawing the required object (triangle)
This step includes operations such as clearing the color, clearing the buffer bit, enabling the depth test, setting the view port, etc. Finally, you need to draw the required primitives using one of the methods − drawArrays() or drawElements().
All these steps are explained further in this tutorial.
