- WebGL - Home
- WebGL - Introduction
- WebGL - Html5 Canvas Overview
- WebGL - Basics
- WebGL - Graphics Pipeline
- WebGL - Sample Application
- WebGL - Context
- WebGL - Geometry
- WebGL - Shaders
- Associating Attributes & Buffer Objects
- WebGL - Drawing a Model
- WebGL Examples
- WebGL - Drawing Points
- WebGL - Drawing a Triangle
- WebGL - Modes of Drawing
- WebGL - Drawing a Quad
- WebGL - Colors
- WebGL - Translation
- WebGL - Scaling
- WebGL - Rotation
- WebGL - Cube Rotation
- WebGL - Interactive Cube
- WebGL Useful Resources
- WebGL - Quick Guide
- WebGL - Useful Resources
- WebGL - Discussion
WebGL - Quick Guide
WebGL - Introduction
A few years back, Java applications as a combination of applets and JOGL were used to process 3D graphics on the Web by addressing the GPU (Graphical Processing Unit). As applets require a JVM to run, it became difficult to rely on Java applets. A few years later, people stopped using Java applets.
The Stage3D APIs provided by Adobe (Flash, AIR) offered GPU hardware accelerated architecture. Using these technologies, programmers could develop applications with 2D and 3D capabilities on web browsers as well as on IOS and Android platforms. Since Flash was a proprietary software, it was not used as web standard.
In March 2011, WebGL was released. It is an openware that can run without a JVM. It is completely controlled by the web browser.
The new release of HTML 5 has several features to support 3D graphics such as 2D Canvas, WebGL, SVG, 3D CSS transforms, and SMIL. In this tutorial, we will be covering the basics of WebGL.
What is OpenGL?
OpenGL (Open Graphics Library) is a cross-language, cross-platform API for 2D and 3D graphics. It is a collection of commands. OpenGL4.5 is the latest version of OpenGL. The following table lists a set of technologies related to OpenGL.
| API | Technology Used |
|---|---|
| OpenGL ES | It is the library for 2D and 3D graphics on embedded systems - including consoles, phones, appliances, and vehicles. OpenGL ES 3.1 is its latest version. It is maintained by the Khronos Group www.khronos.org |
| JOGL | It is the Java binding for OpenGL. JOGL 4.5 is its latest version and it is maintained by jogamp.org. |
| WebGL | It is the JavaScript binding for OpenGL. WebGL 1.0 is its latest version and it is maintained by the khronos group. |
| OpenGLSL | OpenGL Shading Language. It is a programming language which is a companion to OpenGL 2.0 and higher. It is a part of the core OpenGL 4.4 specification. It is an API specifically tailored for embedded systems such as those present on mobile phones and tablets. |
Note − In WebGL, we use GLSL to write shaders.
What is WebGL?
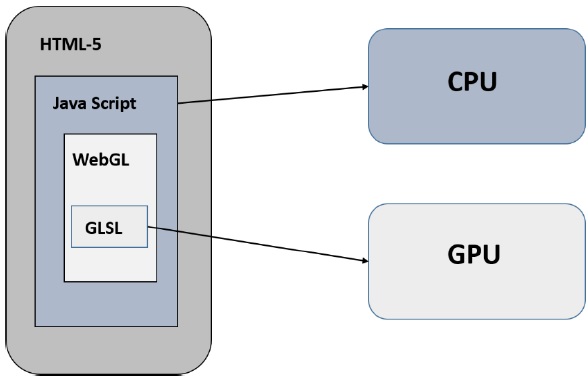
WebGL (Web Graphics Library) is the new standard for 3D graphics on the Web, It is designed for the purpose of rendering 2D graphics and interactive 3D graphics. It is derived from OpenGL's ES 2.0 library which is a low-level 3D API for phones and other mobile devices. WebGL provides similar functionality of ES 2.0 (Embedded Systems) and performs well on modern 3D graphics hardware.
It is a JavaScript API that can be used with HTML5. WebGL code is written within the <canvas> tag of HTML5. It is a specification that allows Internet browsers access to Graphic Processing Units (GPUs) on those computers where they were used.
Who Developed WebGL
An American-Serbian software engineer named Vladimir Vukicevic did the foundation work and led the creation of WebGL
In 2007, Vladimir started working on an OpenGL prototype for Canvas element of the HTML document.
In March 2011, Kronos Group created WebGL.
Rendering
Rendering is the process of generating an image from a model using computer programs. In graphics, a virtual scene is described using information like geometry, viewpoint, texture, lighting, and shading, which is passed through a render program. The output of this render program will be a digital image.
There are two types of rendering −
Software Rendering − All the rendering calculations are done with the help of CPU.
Hardware Rendering − All the graphics computations are done by the GPU (Graphical processing unit).
Rendering can be done locally or remotely. If the image to be rendered is way too complex, then rendering is done remotely on a dedicated server having enough of hardware resources required to render complex scenes. It is also called as server-based rendering. Rendering can also be done locally by the CPU. It is called as client-based rendering.
WebGL follows a client-based rendering approach to render 3D scenes. All the processing required to obtain an image is performed locally using the client's graphics hardware.
GPU
According to NVIDIA, a GPU is "a single chip processor with integrated transform, lighting, triangle setup/clipping, and rendering engines capable of processing a minimum of 10 million polygons per second." Unlike multi-core processors with a few cores optimized for sequential processing, a GPU consists of thousands of smaller cores that process parallel workloads efficiently. Therefore, the GPU accelerates the creation of images in a frame buffer (a portion of ram which contains a complete frame data) intended for output to a display.

GPU Accelerated Computing
In GPU accelerated computing, the application is loaded into the CPU. Whenever it encounters a compute-intensive portion of the code, then that portion of code will be loaded and run on the GPU. It gives the system the ability to process graphics in an efficient way.
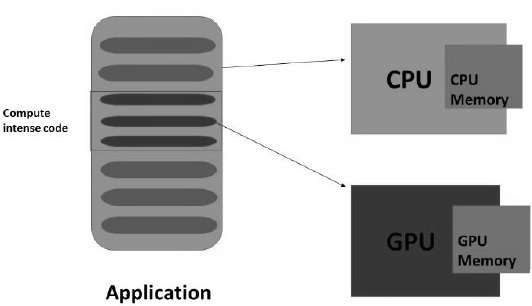
GPU will have a separate memory and it runs multiple copies of a small portion of the code at a time. The GPU processes all the data which is in its local memory, not the central memory. Therefore, the data that is needed to be processed by the GPU should be loaded/copied to the GPU memory and then be processed.
In the systems having the above architecture, the communication overhead between the CPU and GPU should be reduced to achieve faster processing of 3D programs. For this, we have to copy all the data and keep it on the GPU, instead of communicating with the GPU repeatedly.
Browsers Supported
The following tables show a list of browsers that support WebGL −
Web Browsers
| Browser Name | Version | Support |
|---|---|---|
| Internet Explorer | 11 and above | Complete support |
| Google Chrome | 39 and above | Complete support |
| Safari | 8 | Complete support |
| Firefox | 36 and above | Partial support |
| Opera | 27 and above | Partial support |
Mobile Browsers
| Browser Name | Version | Support |
|---|---|---|
| Chrome for Android | 42 | Partial support |
| Android browser | 40 | Partial support |
| IOS Safari | 8.3 | Complete support |
| Opera Mini | 8 | Does not support |
| Blackberry Browser | 10 | Complete support |
| IE mobile | 10 | Partial support |
Advantages of WebGL
Here are the advantages of using WebGL −
JavaScript programming − WebGL applications are written in JavaScript. Using these applications, you can directly interact with other elements of the HTML Document. You can also use other JavaScript libraries (e.g. JQuery) and HTML technologies to enrich the WebGL application.
Increasing support with mobile browsers − WebGL also supports Mobile browsers such as iOS safari, Android Browser, and Chrome for Android.
Open source − WebGL is an open source. You can access the source code of the library and understand how it works and how it was developed.
No need for compilation − JavaScript is a half-programming and half-HTML component. To execute this script, there is no need to compile the file. Instead, you can directly open the file using any of the browsers and check the result. Since WebGL applications are developed using JavaScript, there is no need to compile WebGL applications as well.
Automatic memory management − JavaScript supports automatic memory management. There is no need for manual allocation of memory. WebGL inherits this feature of JavaScript.
Easy to set up − Since WebGL is integrated within HTML 5, there is no need for additional set up. To write a WebGL application, all that you need is a text editor and a web browser.
Environment Setup
There is no need to set a different environment for WebGL. The browsers supporting WebGL have their own in-built setup for WebGL.
WebGL - Html5 Canvas Overview
To create graphical applications on the web, HTML-5 provides a rich set of features such as 2D Canvas, WebGL, SVG, 3D CSS transforms, and SMIL. To write WebGL applications, we use the existing canvas element of HTML-5. This chapter provides an overview of the HTML-5 2D canvas element.
HTML5 Canvas
HTML-5 <canvas> provides an easy and powerful option to draw graphics using JavaScript. It can be used to draw graphs, make photo compositions, or do simple (and not so simple) animations.
Here is a simple <canvas> element having only two specific attributes width and height plus all the core HTML-5 attributes like id, name, and class.
Syntax
The syntax of HTML canvas tag is given below. You have to mention the name of the canvas inside double quotations ( ).
<canvas id = "mycanvas" width = "100" height = "100"></canvas>
Canvas Attributes
The canvas tag has three attributes namely, id, width, and height.
Id − Id represents the identifier of the canvas element in the Document Object Model (DOM).
Width − Width represents the width of the canvas.
Height − Height represents the height of the canvas.
These attributes determine the size of the canvas. If a programmer is not specifying them under the canvas tag, then browsers such as Firefox, Chrome, and Web Kit, by default, provide a canvas element of size 300 × 150.
Example - Create a Canvas
The following code shows how to create a canvas. We have used CSS to give a colored border to the canvas.
<html>
   <head>
      <style>
         #mycanvas{border:1px solid red;}
      </style>
   </head>
   <body>
      <canvas id = "mycanvas" width = "100" height = "100"></canvas>
   </body>
</html>
On executing, the above code will produce the following output −
The Rendering Context
The <canvas> is initially blank. To display something on the canvas element, we have to use a scripting language. This scripting language should access the rendering context and draw on it.
The canvas element has a DOM method called getContext(), which is used to obtain the rendering context and its drawing functions. This method takes one parameter, the type of context 2d.
The following code is to be written to get the required context. You can write this script inside the body tag as shown below.
<!DOCTYPE HTML>
<html>
   <body>
      <canvas id = "mycanvas" width = "600" height = "200"></canvas>

      <script>
         var canvas = document.getElementById('mycanvas');
         var context = canvas.getContext('2d');

         context.font = '20pt Calibri';
         context.fillStyle = 'green';
         context.fillText('Welcome to Tutorialspoint', 70, 70);
      </script>
   </body>
</html>
On executing, the above code will produce the following output −
For more example on HTML-5 2D Canvas, check out the following link HTML-5 Canvas.
WebGL Context
HTML5 Canvas is also used to write WebGL applications. To create a WebGL rendering context on the canvas element, you should pass the string experimental-webgl, instead of 2d to the canvas.getContext() method. Some browsers support only 'webgl'.
<!DOCTYPE html>
<html>
   <canvas id = 'my_canvas'></canvas>

   <script>
      var canvas = document.getElementById('my_canvas');
      var gl = canvas.getContext('experimental-webgl');
      gl.clearColor(0.9,0.9,0.8,1);
      gl.clear(gl.COLOR_BUFFER_BIT);
   </script>
</html>
On executing, the above code will produce the following output −
WebGL - Basics
WebGL is mostly a low-level rasterization API rather than a 3D API. To draw an image using WebGL, you have to pass a vector representing the image. It then converts the given vector into pixel format using OpenGL SL and displays the image on the screen. Writing a WebGL application involves a set of steps which we would be explaining in this chapter.
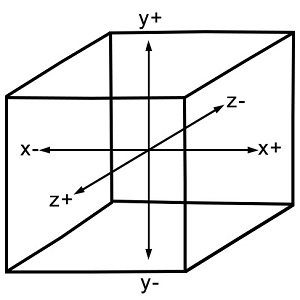
WebGL - Coordinate System
Just like any other 3D system, you will have x, y and z axes in WebGL, where the z axis signifies depth. The coordinates in WebGL are restricted to (1, 1, 1) and (-1, -1, - 1). It means − if you consider the screen projecting WebGL graphics as a cube, then one corner of the cube will be (1, 1, 1) and the opposite corner will be (-1, -1, -1). WebGL wont display anything that is drawn beyond these boundaries.
The following diagram depicts the WebGL coordinate system. The z-axis signifies depth. A positive value of z indicates that the object is near the screen/viewer, whereas a negative value of z indicates that the object is away from the screen. Likewise, a positive value of x indicates that the object is to the right side of the screen and a negative value indicates the object is to the left side. Similarly, positive and negative values of y indicate whether the object is at the top or at the bottom portion of the screen.
WebGL Graphics
After getting the WebGL context of the canvas object, you can start drawing graphical elements using WebGL API in JavaScript.
Here are some fundamental terms you need to know before starting with WebGL.
Vertices
Generally, to draw objects such as a polygon, we mark the points on the plane and join them to form a desired polygon. A vertex is a point which defines the conjunction of the edges of a 3D object. It is represented by three floating point values each representing x, y, z axes respectively.
Example
In the following example, we are drawing a triangle with the following vertices − (0.5, 0.5), (-0.5, 0.5), (-0.5, -0.5).
Note − We have to store these vertices manually using JavaScript arrays and pass them to the WebGL rendering pipeline using vertex buffer.
Indices
In WebGL, numerical values are used to identify the vertices. These numerical values are known as indices. These indices are used to draw meshes in WebGL.
Note − Just like vertices, we store the indices using JavaScript arrays and pass them to WebGL rendering pipeline using index buffer.
Arrays
Unlike OpenGL and JoGL, there are no predefined methods in WebGL to render the vertices directly. We have to store them manually using JavaScript arrays.
Example
var vertices = [ 0.5, 0.5, 0.1,-0.5, 0.5,-0.5]
Buffers
Buffers are the memory areas of WebGL that hold the data. There are various buffers namely, drawing buffer, frame buffer, vetex buffer, and index buffer. The vertex buffer and index buffer are used to describe and process the geometry of the model.
Vertex buffer objects store data about the vertices, while Index buffer objects store data about the indices. After storing the vertices into arrays, we pass them to WegGL graphics pipeline using these Buffer objects.
Frame buffer is a portion of graphics memory that hold the scene data. This buffer contains details such as width and height of the surface (in pixels), color of each pixel, depth and stencil buffers.
Mesh
To draw 2D or 3D objects, the WebGL API provides two methods namely, drawArrays() and drawElements(). These two methods accept a parameter called mode using which you can select the object you want to draw. The options provided by this field are restricted to points, lines, and triangles.
To draw a 3D object using these two methods, we have to construct one or more primitive polygons using points, lines, or triangles. Thereafter, using those primitive polygons, we can form a mesh.
A 3D object drawn using primitive polygons is called a mesh. WebGL offers several ways to draw 3D graphical objects, however users normally prefer to draw a mesh.
Example
In the following example, you can observe that we have drawn a square using two triangles→ {1, 2, 3} and {4, 1, 3}.
Shader Programs
We normally use triangles to construct meshes. Since WebGL uses GPU accelerated computing, the information about these triangles should be transferred from CPU to GPU which takes a lot of communication overhead.
WebGL provides a solution to reduce the communication overhead. Since it uses ES SL (Embedded System Shader Language) that runs on GPU, we write all the required programs to draw graphical elements on the client system using shader programs (the programs which we write using OpenGL ES Shading Language / GLSL).
These shaders are the programs for GPU and the language used to write shader programs is GLSL. In these shaders, we define exactly how vertices, transformations, materials, lights, and camera interact with one another to create a particular image.
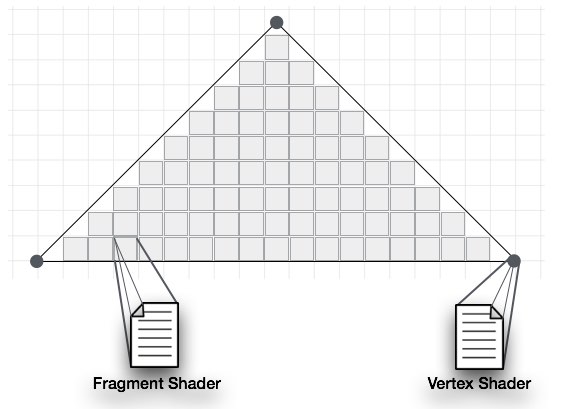
In short, it is a snippet that implements algorithms to get pixels for a mesh. We will discuss more about shaders in later chapters. There are two types of shaders − Vertex Shader and Fragment Shader.
Vertex Shader
Vertext shader is the program code called on every vertex. It is used to transform (move) the geometry (ex: triangle) from one place to another. It handles the data of each vertex (per-vertex data) such as vertex coordinates, normals, colors, and texture coordinates.
In the ES GL code of vertex shader, programmers have to define attributes to handle the data. These attributes point to a Vertex Buffer Object written in JavaScript.
The following tasks can be performed using vertex shaders −
- Vertex transformation
- Normal transformation and normalization
- Texture coordinate generation
- Texture coordinate transformation
- Lighting
- Color material application
Fragment Shader(Pixel Shader)
A mesh is formed by multiple triangles, and the surface of each of the triangles is known as a fragment. Fragment shader is the code that runs on all pixels of every fragment. It is written to calculate and fill the color on individual pixels.
The following tasks can be performed using Fragment shaders −
- Operations on interpolated values
- Texture access
- Texture application
- Fog
- Color sum
OpenGL ES SL Variables
The full form of OpenGL ES SL is OpenGL Embedded System Shading Language. To handle the data in the shader programs, ES SL provides three types of variables. They are as follows −
Attributes − These variables hold the input values of the vertex shader program. Attributes point to the vertex buffer objects that contains per-vertex data. Each time the vertex shader is invoked, the attributes point to VBO of different vertices.
Uniforms − These variables hold the input data that is common for both vertex and fragment shaders, such as light position, texture coordinates, and color.
Varyings − These variables are used to pass the data from the vertex shader to the fragment shader.
With this much basics, we will now move on to discuss the Graphics Pipeline.
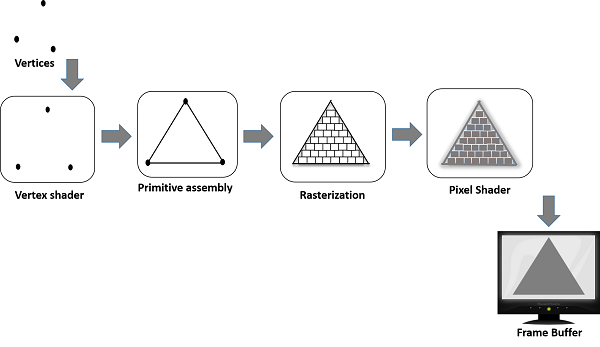
WebGL - Graphics Pipeline
To render 3D graphics, we have to follow a sequence of steps. These steps are known as graphics pipeline or rendering pipeline. The following diagram depicts WebGL graphics pipeline.
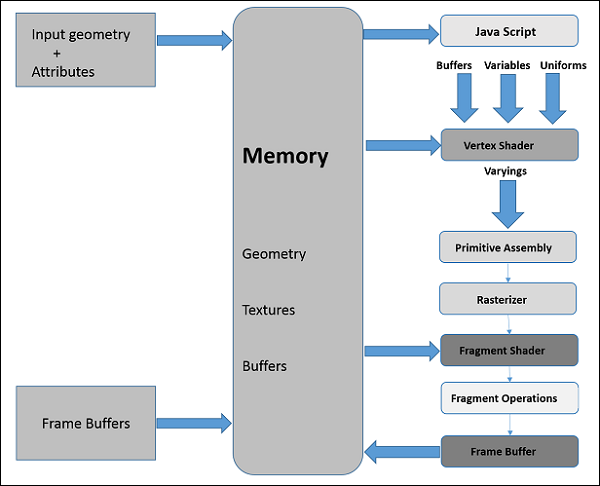
In the following sections, we will discuss one by one the role of each step in the pipeline.
JavaScript
While developing WebGL applications, we write Shader language code to communicate with the GPU. JavaScript is used to write the control code of the program, which includes the following actions −
Initialize WebGL − JavaScript is used to initialize the WebGL context.
Create arrays − We create JavaScript arrays to hold the data of the geometry.
Buffer objects − We create buffer objects (vertex and index) by passing the arrays as parameters.
Shaders − We create, compile, and link the shaders using JavaScript.
Attributes − We can create attributes, enable them, and associate them with buffer objects using JavaScript.
Uniforms − We can also associate the uniforms using JavaScript.
Transformation matrix − Using JavaScript, we can create transformation matrix.
Initially we create the data for the required geometry and pass them to the shaders in the form of buffers. The attribute variable of the shader language points to the buffer objects, which are passed as inputs to the vertex shader.
Vertex Shader
When we start the rendering process by invoking the methods drawElements() and drawArray(), the vertex shader is executed for each vertex provided in the vertex buffer object. It calculates the position of each vertex of a primitive polygon and stores it in the varying gl_position. It also calculates the other attributes such as color, texture coordinates, and vertices that are normally associated with a vertex.
Primitive Assembly
After calculating the position and other details of each vertex, the next phase is the primitive assembly stage. Here the triangles are assembled and passed to the rasterizer.
Rasterization
In the rasterization step, the pixels in the final image of the primitive are determined. It has two steps −
Culling − Initially the orientation (is it front or back facing?) of the polygon is determined. All those triangles with improper orientation that are not visible in view area are discarded. This process is called culling.
Clipping − If a triangle is partly outside the view area, then the part outside the view area is removed. This process is known as clipping.
Fragment Shader
The fragment shader gets
- data from the vertex shader in varying variables,
- primitives from the rasterization stage, and then
- calculates the color values for each pixel between the vertices.
The fragment shader stores the color values of every pixel in each fragment. These color values can be accessed during fragment operations, which we are going to discuss next.
Fragment Operations
Fragment operations are carried out after determining the color of each pixel in the primitive. These fragment operations may include the following −
- Depth
- Color buffer blend
- Dithering
Once all the fragments are processed, a 2D image is formed and displayed on the screen. The frame buffer is the final destination of the rendering pipeline.
Frame Buffer
Frame buffer is a portion of graphics memory that hold the scene data. This buffer contains details such as width and height of the surface (in pixels), color of each pixel, and depth and stencil buffers.
WebGL - Sample Application
We have discussed the basics of WebGL and the WebGL pipeline (a procedure followed to render Graphics applications). In this chapter, we are going to take a sample application to create a triangle using WebGL and observe the steps followed in the application.
Structure of WebGL Application
WebGL application code is a combination of JavaScript and OpenGL Shader Language.
- JavaScript is required to communicate with the CPU
- OpenGL Shader Language is required to communicate with the GPU.
Sample Application
Let us now take a simple example to learn how to use WebGL to draw a simple triangle with 2D coordinates.
<!doctype html>
<html>
   <body>
      <canvas width = "300" height = "300" id = "my_Canvas"></canvas>

      <script>
         /* Step1: Prepare the canvas and get WebGL context */

         var canvas = document.getElementById('my_Canvas');
         var gl = canvas.getContext('experimental-webgl');

         /* Step2: Define the geometry and store it in buffer objects */

         var vertices = [-0.5, 0.5, -0.5, -0.5, 0.0, -0.5,];

         // Create a new buffer object
         var vertex_buffer = gl.createBuffer();

         // Bind an empty array buffer to it
         gl.bindBuffer(gl.ARRAY_BUFFER, vertex_buffer);

         // Pass the vertices data to the buffer
         gl.bufferData(gl.ARRAY_BUFFER, new Float32Array(vertices), gl.STATIC_DRAW);

         // Unbind the buffer
         gl.bindBuffer(gl.ARRAY_BUFFER, null);

         /* Step3: Create and compile Shader programs */

         // Vertex shader source code
         var vertCode =
            'attribute vec2 coordinates;' +
            'void main(void) {' + ' gl_Position = vec4(coordinates,0.0, 1.0);' + '}';

         //Create a vertex shader object
         var vertShader = gl.createShader(gl.VERTEX_SHADER);

         //Attach vertex shader source code
         gl.shaderSource(vertShader, vertCode);

         //Compile the vertex shader
         gl.compileShader(vertShader);

         //Fragment shader source code
         var fragCode = 'void main(void) {' + 'gl_FragColor = vec4(0.0, 0.0, 0.0, 0.1);' + '}';

         // Create fragment shader object
         var fragShader = gl.createShader(gl.FRAGMENT_SHADER);

         // Attach fragment shader source code
         gl.shaderSource(fragShader, fragCode);

         // Compile the fragment shader
         gl.compileShader(fragShader);

         // Create a shader program object to store combined shader program
         var shaderProgram = gl.createProgram();

         // Attach a vertex shader
         gl.attachShader(shaderProgram, vertShader);

         // Attach a fragment shader
         gl.attachShader(shaderProgram, fragShader);

         // Link both programs
         gl.linkProgram(shaderProgram);

         // Use the combined shader program object
         gl.useProgram(shaderProgram);

         /* Step 4: Associate the shader programs to buffer objects */

         //Bind vertex buffer object
         gl.bindBuffer(gl.ARRAY_BUFFER, vertex_buffer);

         //Get the attribute location
         var coord = gl.getAttribLocation(shaderProgram, "coordinates");

         //point an attribute to the currently bound VBO
         gl.vertexAttribPointer(coord, 2, gl.FLOAT, false, 0, 0);

         //Enable the attribute
         gl.enableVertexAttribArray(coord);

         /* Step5: Drawing the required object (triangle) */

         // Clear the canvas
         gl.clearColor(0.5, 0.5, 0.5, 0.9);

         // Enable the depth test
         gl.enable(gl.DEPTH_TEST);

         // Clear the color buffer bit
         gl.clear(gl.COLOR_BUFFER_BIT);

         // Set the view port
         gl.viewport(0,0,canvas.width,canvas.height);

         // Draw the triangle
         gl.drawArrays(gl.TRIANGLES, 0, 3);
      </script>
   </body>
</html>
It will produce the following result −
If you observe the above program carefully, we have followed five sequential steps to draw a simple triangle using WebGL. The steps are as follows −
Step 1 − Prepare the canvas and get WebGL rendering context
We get the current HTML canvas object and obtain its WebGL rendering context.
Step 2 − Define the geometry and store it in buffer objects
We define the attributes of the geometry such as vertices, indices, color, etc., and store them in the JavaScript arrays. Then, we create one or more buffer objects and pass the arrays containing the data to the respective buffer object. In the example, we store the vertices of the triangle in a JavaScript array and pass this array to a vertex buffer object.
Step 3 − Create and compile Shader programs
We write vertex shader and fragment shader programs, compile them, and create a combined program by linking these two programs.
Step 4 − Associate the shader programs with buffer objects
We associate the buffer objects and the combined shader program.
Step 5 − Drawing the required object (triangle)
This step includes operations such as clearing the color, clearing the buffer bit, enabling the depth test, setting the view port, etc. Finally, you need to draw the required primitives using one of the methods − drawArrays() or drawElements().
All these steps are explained further in this tutorial.
WebGL - Context
To write a WebGL application, first step is to get the WebGL rendering context object. This object interacts with the WebGL drawing buffer and can call all the WebGL methods. The following operations are performed to obtain the WebGL context −
- Create an HTML-5 canvas
- Get the canvas ID
- Obtain WebGL
Creating HTML-5 Canvas Element
In Chapter 5, we discussed how to create an HTML-5 canvas element. Within the body of the HTML-5 document, write a canvas, give it a name, and pass it as a parameter to the attribute id. You can define the dimensions of the canvas using the width and height attributes (optional).
Example
The following example shows how to create a canvas element with the dimensions 500 × 500. We have created a border to the canvas using CSS for visibility. Copy and paste the following code in a file with the name my_canvas.html.
<!DOCTYPE HTML>
<html>
   <head>
      <style>
         #mycanvas{border:1px solid blue;}
      </style>
   </head>
   <body>
      <canvas id = "mycanvas" width = "300" height = "300"></canvas>
   </body>
</html>
It will produce the following result −
Get the Canvas ID
After creating the canvas, you have to get the WebGL context. The first thing to do to obtain a WebGL drawing context is to get the id of the current canvas element.
Canvas ID is acquired by calling the DOM (Document Object Model) method getElementById(). This method accepts a string value as parameter, so we pass the name of the current canvas to it.
For example, if the canvas name is my_canvas, then canvas ID is obtained as shown below−
var canvas = document.getElementById('my_Canvas');
Get the WebGL Drawing Context
To get the WebGLRenderingContext object (or WebGL Drawing context object or simply WebGL context), call the getContext() method of the current HTMLCanvasElement. The syntax of getContext() is as follows −
canvas.getContext(contextType, contextAttributes);
Pass the strings webgl or experimental-webgl as the contentType. The contextAttributes parameter is optional. (While proceeding with this step, make sure your browser implements WebGL version 1 (OpenGL ES 2.0)).
The following code snippet shows how to obtain the WebGL rendering context. Here gl is the reference variable to the obtained context object.
var canvas = document.getElementById('my_Canvas');
var gl = canvas.getContext('experimental-webgl');
WebGLContextAttributes
The parameter WebGLContextAttributes is not mandatory. This parameter provides various options that accept Boolean values as listed below −
| Sr.No. | Attributes & Description |
|---|---|
| 1 |
Alpha If its value is true, it provides an alpha buffer to the canvas. By default, its value is true. |
| 2 |
depth If its value is true, you will get a drawing buffer which contains a depth buffer of at least 16 bits. By default, its value is true. |
| 3 |
stencil If its value is true, you will get a drawing buffer which contains a stencil buffer of at least 8 bits. By default, its value is false. |
| 4 |
antialias If its value is true, you will get a drawing buffer which performs anti-aliasing. By default, its value is true. |
| 5 |
premultipliedAlpha If its value is true, you will get a drawing buffer which contains colors with pre-multiplied alpha. By default, its value is true. |
| 6 |
preserveDrawingBuffer If its value is true, the buffers will not be cleared and will preserve their values until cleared or overwritten by the author. By default, its value is false. |
The following code snippet shows how to create a WebGL context with a stencil buffer, which will not perform anti-aliasing.
var canvas = document.getElementById('canvas1');
var context = canvas.getContext('webgl', { antialias: false, stencil: true });
At the time of creating the WebGLRenderingContext, a drawing buffer is created. The Context object manages OpenGL state and renders to the drawing buffer.
WebGLRenderingContext
It is the principal interface in WebGL. It represents the WebGL drawing context. This interface contains all the methods used to perform various tasks on the Drawing buffer. The attributes of this interface are given in the following table.
| Sr.No. | Attributes & Description |
|---|---|
| 1 | Canvas This is a reference to the canvas element that created this context. |
| 2 | drawingBufferWidth This attribute represents the actual width of the drawing buffer. It may differ from the width attribute of the HTMLCanvasElement. |
| 3 | drawingBufferHeight This attribute represents the actual height of the drawing buffer. It may differ from the height attribute of the HTMLCanvasElement. |
WebGL - Geometry
After obtaining the WebGL context, you have to define the geometry for the primitive (object you want to draw) and store it. In WebGL, we define the details of a geometry for example, vertices, indices, color of the primitive using JavaScript arrays. To pass these details to the shader programs, we have to create the buffer objects and store (attach) the JavaScript arrays containing the data in the respective buffers.
Note: Later, these buffer objects will be associated with the attributes of the shader program (vertex shader).
Defining the Required Geometry
A 2D or 3D model drawn using vertices is called a mesh. Each facet in a mesh is called a polygon and a polygon is made of 3 or more vertices.
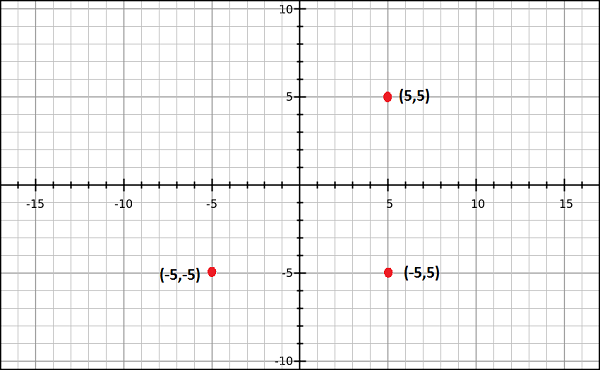
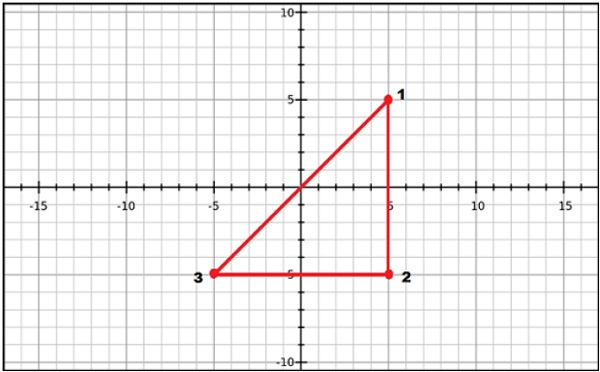
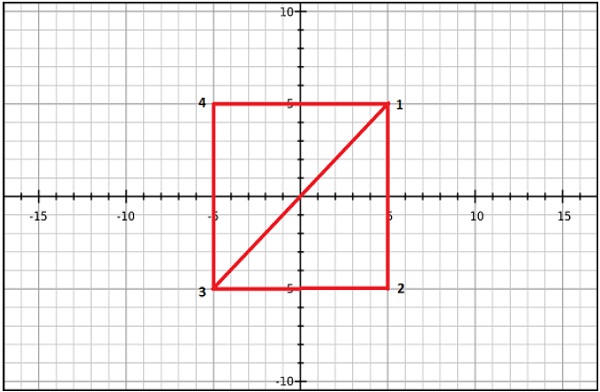
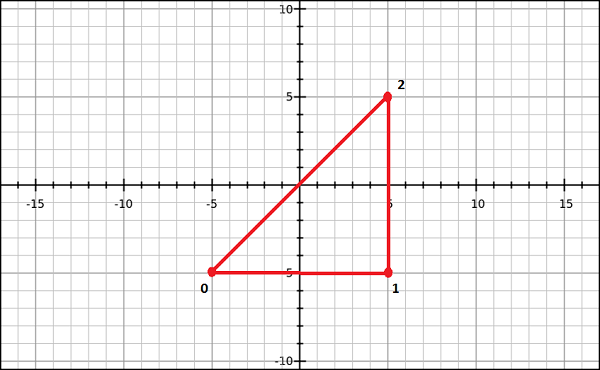
To draw models in the WebGL rendering context, you have to define the vertices and indices using JavaScript arrays. For example, if we want to create a triangle which lies on the coordinates {(5,5), (-5,5), (-5,-5)} as shown in the diagram, then you can create an array for the vertices as −
var vertices = [
   0.5,0.5,    //Vertex 1
   0.5,-0.5,   //Vertex 2
   -0.5,-0.5,  //Vertex 3
];
Similarly, you can create an array for the indices. Indices for the above triangle indices will be [0, 1, 2] and can be defined as −
var indices = [ 0,1,2 ]
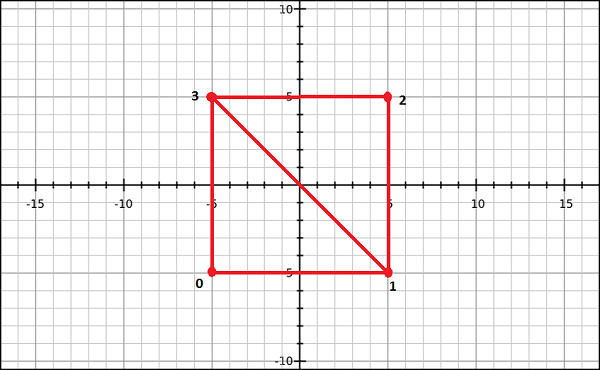
For a better understanding of indices, consider more complex models like square. We can represent a square as a set of two triangles. If (0,3,1) and (3,1,2) are the two triangles using which we intend to draw a square, then the indices will be defined as −
var indices = [0,3,1,3,1,2];
Note −
For drawing primitives, WebGL provides the following two methods −
drawArrays() − While using this method, we pass the vertices of the primitive using JavaScript arrays.
drawElements() − While using this method, we pass both vertices and indices of the primitive using JavaScript array.
Buffer Objects
A buffer object is a mechanism provided by WebGL that indicates a memory area allocated in the system. In these buffer objects, you can store data of the model you want to draw, corresponding to vertices, indices, color, etc.
Using these buffer objects, you can pass multiple data to the shader program (vertex shader) through one of its attribute variables. Since these buffer objects reside in the GPU memory, they can be rendered directly, which in turn improves the performance.
To process geometry, there are two types of buffer objects. They are −
Vertex buffer object (VBO) − It holds the per-vertex data of the graphical model that is going to be rendered. We use vertex buffer objects in WebGL to store and process the data regarding vertices such as vertex coordinates, normals, colors, and texture coordinates.
Index buffer objects (IBO) − It holds the indices (index data) of the graphical model that is going to be rendered.
After defining the required geometry and storing them in JavaScript arrays, you need to pass these arrays to the buffer objects, from where the data will be passed to the shader programs. The following steps are to be followed to store data in the buffers.
Create an empty buffer.
Bind an appropriate array object to the empty buffer.
Pass the data (vertices/indices) to the buffer using one of the typed arrays.
Unbind the buffer (Optional).
Creating a Buffer
To create an empty buffer object, WebGL provides a method called createBuffer(). This method returns a newly created buffer object, if the creation was successful; else it returns a null value in case of failure.
WebGL operates as a state machine. Once a buffer is created, any subsequent buffer operation will be executed on the current buffer until we unbound it. Use the following code to create a buffer −
var vertex_buffer = gl.createBuffer();
Note − gl is the reference variable to the current WebGL context.
Bind the Buffer
After creating an empty buffer object, you need to bind an appropriate array buffer (target) to it. WebGL provides a method called bindBuffer() for this purpose.
Syntax
The syntax of bindBuffer() method is as follows −
void bindBuffer (enum target, Object buffer)
This method accepts two parameters and they are discussed below.
target − The first variable is an enum value representing the type of the buffer we want to bind to the empty buffer. You have two predefined enum values as options for this parameter. They are −
ARRAY_BUFFER which represents vertex data.
ELEMENT_ARRAY_BUFFER which represents index data.
Object buffer − The second one is the reference variable to the buffer object created in the previous step. The reference variable can be of a vertex buffer object or of an index buffer object.
Example
The following code snippet shows how to use the bindBuffer() method.
//vertex buffer
var vertex_buffer = gl.createBuffer();
gl.bindBuffer(gl.ARRAY_BUFFER, vertex_buffer);

//Index buffer
var Index_Buffer = gl.createBuffer();
gl.bindBuffer(gl.ELEMENT_ARRAY_BUFFER, index_buffer);
Passing Data into the Buffer
The next step is to pass the data (vertices/indices) to the buffer. Till now data is in the form of an array and before passing it to the buffer, we need to wrap it in one of the WebGL typed arrays. WebGL provides a method named bufferData() for this purpose.
Syntax
The syntax of bufferData() method is as follows −
void bufferData (enum target, Object data, enum usage)
This method accepts three parameters and they are discussed below −
target − The first parameter is an enum value representing the type of the array buffer we used.The options for this parameter are −
ARRAY_BUFFER which represents vertex data.
ELEMENT_ARRAY_BUFFER which represents index data.
Object data − The second parameter is the object value that contains the data to be written to the buffer object. Here we have to pass the data using typed arrays.
Usage − The third parameter of this method is an enum variable that specifies how to use the buffer object data (stored data) to draw shapes. There are three options for this parameter as listed below.
gl.STATIC_DRAW − Data will be specified once and used many times.
gl.STREAM_DRAW − Data will be specified once and used a few times.
gl.DYNAMIC_DRAW − Data will be specified repeatedly and used many times.
Example
The following code snippet shows how to use the bufferData() method. Assume vertices and indices are the arrays holding the vertex and index data respectively.
//vertex buffer
gl.bufferData(gl.ARRAY_BUFFER, new Float32Array(vertices), gl.STATIC_DRAW);

//Index buffer
gl.bufferData(gl.ELEMENT_ARRAY_BUFFER, new Uint16Array(indices), gl.STATIC_DRAW);
Typed Arrays
WebGL provides a special type of array called typed arrays to transfer the data elements such as index vertex and texture. These typed arrays store large quantities of data and process them in native binary format which results in better performance. The typed arrays used by WebGL are Int8Array, Uint8Array, Int16Array, Uint16Array, Int32Array, UInt32Array, Float32Array, and Float64Array.
Note
Generally, for storing vertex data, we use Float32Array; and to store index data, we use Uint16Array.
You can create typed arrays just like JavaScript arrays using new keyword.
Unbind the Buffers
It is recommended that you unbind the buffers after using them. It can be done by passing a null value in place of the buffer object, as shown below.
gl.bindBuffer(gl.ELEMENT_ARRAY_BUFFER, null);
WebGL provides the following methods to perform buffer operations −
| Sr.No. | Methods and Description |
|---|---|
| 1 | void bindBuffer (enum target, Object buffer) target − ARRAY_BUFFER, ELEMENT_ARRAY_BUFFER |
| 2 | void bufferData(enum target, long size, enum usage) target − ARRAY_BUFFER, ELEMENT_ARRAY_BUFFER usage − STATIC_DRAW, STREAM_DRAW, DYNAMIC_DRAW |
| 3 | void bufferData (enum target, Object data, enum usage) target and usage − Same as for bufferData above |
| 4 | void bufferSubData(enum target, long offset, Object data) target − ARRAY_BUFFER, ELEMENT_ARRAY_BUFFER |
| 5 | Object createBuffer() |
| 6 | void deleteBuffer(Object buffer) |
| 7 | any getBufferParameter(enum target, enum pname) target − ARRAY_BUFFER, ELEMENT_ ARRAY_BUFFER pname − BUFFER_SIZE, BUFFER_USAGE |
| 8 | bool isBuffer(Object buffer) |
WebGL - Shaders
Shaders are the programs that run on GPU. Shaders are written in OpenGL ES Shader Language (known as ES SL). ES SL has variables of its own, data types, qualifiers, built-in inputs and outputs.
Data Types
The following table lists the basic data types provided by OpenGL ES SL.
| Sr.No. | Type & Description |
|---|---|
| 1 | void Represents an empty value. |
| 2 | bool Accepts true or false. |
| 3 | int This is a signed integer data type. |
| 4 | float This is a floating scalar data type. |
| 5 | vec2, vec3, vec4 n-component floating point vector |
| 6 | bvec2, bvec3, bvec4 Boolean vector |
| 7 | ivec2, ivec3, ivec4 signed integer vector |
| 8 | mat2, mat3, mat4 2x2, 3x3, 4x4 float matrix |
| 9 | sampler2D Access a 2D texture |
| 10 | samplerCube Access cube mapped texture |
Qualifiers
There are three main qualifiers in OpenGL ES SL −
| Sr.No. | Qualifier & Description |
|---|---|
| 1 | attribute This qualifier acts as a link between a vertex shader and OpenGL ES for per-vertex data. The value of this attribute changes for every execution of the vertex shader. |
| 2 | uniform This qualifier links shader programs and the WebGL application. Unlike attribute qualifier, the values of uniforms do not change. Uniforms are read-only; you can use them with any basic data types, to declare a variable. Example − uniform vec4 lightPosition; |
| 3 | varying This qualifier forms a link between a vertex shader and fragment shader for interpolated data. It can be used with the following data types − float, vec2, vec3, vec4, mat2, mat3, mat4, or arrays. Example − varying vec3 normal; |
Vertex Shader
Vertex shader is a program code, which is called on every vertex. It transforms (move) the geometry (ex: triangle) from one place to other. It handles the data of each vertex (per-vertex data) such as vertex coordinates, normals, colors, and texture coordinates.
In the ES GL code of vertex shader, programmers have to define attributes to handle data. These attributes point to a Vertex Buffer Object written In JavaScript. The following tasks can be performed using vertex shaders along with vertex transformation −
- Vertex transformation
- Normal transformation and normalization
- Texture coordinate generation
- Texture coordinate transformation
- Lighting
- Color material application
Predefined Variables
OpenGL ES SL provides the following predefined variables for vertex shader −
| Sr.No. | Variables & Description |
|---|---|
| 1 | highp vec4 gl_Position; Holds the position of the vertex. |
| 2 | mediump float gl_PointSize; Holds the transformed point size. The units for this variable are pixels. |
Sample Code
Take a look at the following sample code of a vertex shader. It processes the vertices of a triangle.
attribute vec2 coordinates;

void main(void) {
   gl_Position = vec4(coordinates, 0.0, 1.0);
};
If you observe the above code carefully, we have declared an attribute variable with the name coordinates. (This variable will be associated with the Vertex Buffer Object using the method getAttribLocation(). The attribute coordinates is passed as a parameter to this method along with the shader program object.)
In the second step of the given vertex shader program, the gl_position variable is defined.
gl_Position
gl_Position is the predefined variable which is available only in the vertex shader program. It contains the vertex position. In the above code, the coordinates attribute is passed in the form of a vector. As vertex shader is a per-vertex operation, the gl_position value is calculated for each vertex.
Later, the gl_position value is used by primitive assembly, clipping, culling, and other fixed functionality operations that operate on the primitives after the vertex processing is over.
We can write vertex shader programs for all possible operations of vertex shader, which we will discuss individually in this tutorial.
Fragment Shader
A mesh is formed by multiple triangles, and the surface of the each triangle is known as a fragment. A fragment shader is the code that runs on every pixel on each fragment. This is written to calculate and fill the color on individual pixels. The following tasks can be performed using fragment shaders −
- Operations on interpolated values
- Texture access
- Texture application
- Fog
- Color sum
Predefined Variables
OpenGL ES SL provides the following predefined variables for fragment shader −
| Sr.No. | Variables & Description |
|---|---|
| 1 | mediump vec4 gl_FragCoord; Holds the fragment position within the frame buffer. |
| 2 | bool gl_FrontFacing; Holds the fragment that belongs to a front-facing primitive. |
| 3 | mediump vec2 gl_PointCoord; Holds the fragment position within a point (point rasterization only). |
| 4 | mediump vec4 gl_FragColor; Holds the output fragment color value of the shader |
| 5 | mediump vec4 gl_FragData[n] Holds the fragment color for color attachment n. |
Sample Code
The following sample code of a fragment shader shows how to apply color to every pixel in a triangle.
void main(void) {
   gl_FragColor = vec4(0, 0.8, 0, 1);
}
In the above code, the color value is stored in the variable gl.FragColor. The fragment shader program passes the output to the pipeline using fixed function variables; FragColor is one of them. This variable holds the color value of the pixels of the model.
Storing and Compiling the Shader Programs
Since shaders are independent programs, we can write them as a separate script and use in the application. Or, you can store them directly in string format, as shown below.
var vertCode =
   'attribute vec2 coordinates;' +

   'void main(void) {' +
      ' gl_Position = vec4(coordinates, 0.0, 1.0);' +
   '}';
Compiling the Shader
Compilation involves following three steps −
- Creating the shader object
- Attaching the source code to the created shader object
- Compiling the program
Creating the Vertex Shader
To create an empty shader, WebGL provides a method called createShader(). It creates and returns the shader object. Its syntax is as follows −
Object createShader (enum type)
As observed in the syntax, this method accepts a predefined enum value as parameter. We have two options for this −
gl.VERTEX_SHADER for creating vertex shader
gl.FRAGMENT_SHADER for creating fragment shader.
Attaching the Source to the Shader
You can attach the source code to the created shader object using the method shaderSource(). Its syntax is as follows −
void shaderSource(Object shader, string source)
This method accepts two parameters −
shader − You have to pass the created shader object as one parameter.
Source − You have to pass the shader program code in string format.
Compiling the Program
To compile the program, you have to use the method compileShader(). Its syntax is as follow −
compileShader(Object shader)
This method accepts the shader program object as a parameter. After creating a shader program object, attach the source code to it and pass that object to this method.
The following code snippet shows how to create and compile a vertex shader as well as a fragment shader to create a triangle.
// Vertex Shader
var vertCode =
   'attribute vec3 coordinates;' +

   'void main(void) {' +
      ' gl_Position = vec4(coordinates, 1.0);' +
   '}';

var vertShader = gl.createShader(gl.VERTEX_SHADER);
gl.shaderSource(vertShader, vertCode);
gl.compileShader(vertShader);

// Fragment Shader
var fragCode =
   'void main(void) {' +
      ' gl_FragColor = vec4(0, 0.8, 0, 1);' +
   '}';

var fragShader = gl.createShader(gl.FRAGMENT_SHADER);
gl.shaderSource(fragShader, fragCode);
gl.compileShader(fragShader);
Combined Program
After creating and compiling both the shader programs, you need to create a combined program containing both the shaders (vertex & fragment). The following steps need to be followed −
- Create a program object
- Attach both the shaders
- Link both the shaders
- Use the program
Create a Program Object
Create a program object by using the method createProgram(). It will return an empty program object. Here is its syntax −
createProgram();
Attach the Shaders
Attach the shaders to the created program object using the method attachShader(). Its syntax is as follows −
attachShader(Object program, Object shader);
This method accepts two parameters −
Program − Pass the created empty program object as one parameter.
Shader − Pass one of the compiled shaders programs (vertex shader, fragment shader)
Note − You need to attach both the shaders using this method.
Link the Shaders
Link the shaders using the method linkProgram(), by passing the program object to which you have attached the shaders. Its syntax is as follows −
linkProgram(shaderProgram);
Use the Program
WebGL provides a method called useProgram(). You need to pass the linked program to it. Its syntax is as follows −
useProgram(shaderProgram);
The following code snippet shows how to create, link, and use a combined shader program.
var shaderProgram = gl.createProgram();
gl.attachShader(shaderProgram, vertShader);
gl.attachShader(shaderProgram, fragShader);
gl.linkProgram(shaderProgram);
gl.useProgram(shaderProgram);
Associating Attributes & Buffer Objects
Each attribute in the vertex shader program points to a vertex buffer object. After creating the vertex buffer objects, programmers have to associate them with the attributes of the vertex shader program. Each attribute points to only one vertex buffer object from which they extract the data values, and then these attributes are passed to the shader program.
To associate the Vertex Buffer Objects with the attributes of the vertex shader program, you have to follow the steps given below −
- Get the attribute location
- Point the attribute to a vertex buffer object
- Enable the attribute
Get the Attribute Location
WebGL provides a method called getAttribLocation() which returns the attribute location. Its syntax is as follows −
ulong getAttribLocation(Object program, string name)
This method accepts the vertex shader program object and the attribute values of the vertex shader program.
The following code snippet shows how to use this method.
var coordinatesVar = gl.getAttribLocation(shader_program, "coordinates");
Here, shader_program is the object of the shader program and coordinates is the attribute of the vertex shader program.
Point the Attribute to a VBO
To assign the buffer object to the attribute variable, WebGL provides a method called vertexAttribPointer(). Here is the syntax of this method −
void vertexAttribPointer(location, int size, enum type, bool normalized, long stride, long offset)
This method accepts six parameters and they are discussed below.
Location − It specifies the storage location of an attribute variable. Under this option, you have to pass the value returned by the getAttribLocation() method.
Size − It specifies the number of components per vertex in the buffer object.
Type − It specifies the type of data.
Normalized − This is a Boolean value. If true, non-floating data is normalized to [0, 1]; else, it is normalized to [-1, 1].
Stride − It specifies the number of bytes between different vertex data elements, or zero for default stride.
Offset − It specifies the offset (in bytes) in a buffer object to indicate which byte the vertex data is stored from. If the data is stored from the beginning, offset is 0.
The following snippet shows how to use vertexAttribPointer() in a program −
gl.vertexAttribPointer(coordinatesVar, 3, gl.FLOAT, false, 0, 0);
Enabling the Attribute
Activate the vertex shader attribute to access the buffer object in a vertex shader. For this operation, WebGL provides enableVertexAttribArray() method. This method accepts the location of the attribute as a parameter. Here is how to use this method in a program −
gl.enableVertexAttribArray(coordinatesVar);
WebGL - Drawing a Model
After associating the buffers with the shaders, the final step is to draw the required primitives. WebGL provides two methods namely, drawArrays() and drawElements() to draw models.
drawArrays()
drawArrays() is the method which is used to draw models using vertices. Here is its syntax −
void drawArrays(enum mode, int first, long count)
This method takes the following three parameters −
mode − In WebGL, models are drawn using primitive types. Using mode, programmers have to choose one of the primitive types provided by WebGL. The possible values for this option are − gl.POINTS, gl.LINE_STRIP, gl.LINE_LOOP, gl.LINES, gl.TRIANGLE_STRIP, gl.TRIANGLE_FAN, and gl.TRIANGLES.
first − This option specifies the starting element in the enabled arrays. It cannot be a negative value.
count − This option specifies the number of elements to be rendered.
If you draw a model using drawArrays() method, then WebGL, while rendering the shapes, creates the geometry in the order in which the vertex coordinates are defined.
Example
If you want to draw a single triangle using drawArray() method, then you have to pass three vertices and call the drawArrays() method, as shown below.
var vertices = [-0.5,-0.5, -0.25,0.5, 0.0,-0.5,];
gl.drawArrays(gl.TRIANGLES, 0, 3);
It will produce a triangle as shown below.

Suppose you want to draw contiguous triangles, then you have to pass the next three vertices in order in the vertex buffer and mention the number of elements to be rendered as 6.
var vertices = [-0.5,-0.5, -0.25,0.5, 0.0,-0.5, 0.0,-0.5, 0.25,0.5, 0.5,-0.5,];
gl.drawArrays(gl.TRIANGLES, 0, 6);
It will produce a contiguous triangle as shown below.

drawElements()
drawElements() is the method that is used to draw models using vertices and indices. Its syntax is as follows −
void drawElements(enum mode, long count, enum type, long offset)
This method takes the following four parameters −
mode − WebGL models are drawn using primitive types. Using mode, programmers have to choose one of the primitive types provided by WebGL. The list of possible values for this option are − gl.POINTS, gl.LINE_STRIP, gl.LINE_LOOP, gl.LINES, gl.TRIANGLE_STRIP, gl.TRIANGLE_FAN, and gl.TRIANGLES.
count − This option specifies the number of elements to be rendered.
type − This option specifies the data type of the indices which must be UNSIGNED_BYTE or UNSIGNED_SHORT.
offset − This option specifies the starting point for rendering. It is usually the first element (0).
If you draw a model using drawElements() method, then index buffer object should also be created along with the vertex buffer object. If you use this method, the vertex data will be processed once and used as many times as mentioned in the indices.
Example
If you want to draw a single triangle using indices, you need to pass the indices along with vertices and call the drawElements() method as shown below.
var vertices = [ -0.5,-0.5,0.0, -0.25,0.5,0.0, 0.0,-0.5,0.0 ];
var indices = [0,1,2];

gl.drawElements(gl.TRIANGLES, indices.length, gl.UNSIGNED_SHORT,0);
It will produce the following output −
If you want to draw contagious triangles using drawElements() method, simply add the other vertices and mention the indices for the remaining vertices.
var vertices = [
   -0.5,-0.5,0.0,
   -0.25,0.5,0.0,
   0.0,-0.5,0.0,
   0.25,0.5,0.0,
   0.5,-0.5,0.0
];

var indices = [0,1,2,2,3,4];

gl.drawElements(gl.TRIANGLES, indices.length, gl.UNSIGNED_SHORT,0);
It will produce the following output −
Required Operations
Before drawing a primitive, you need to perform a few operations, which are explained below.
Clear the Canvas
First of all, you should clear the canvas, using clearColor() method. You can pass the RGBA values of a desired color as parameter to this method. Then WebGL clears the canvas and fills it with the specified color. Therefore, you can use this method for setting the background color.
Take a look at the following example. Here we are passing the RGBA value of gray color.
gl.clearColor(0.5, 0.5, .5, 1);
Enable Depth Test
Enable the depth test using the enable() method, as shown below.
gl.enable(gl.DEPTH_TEST);
Clear the Color Buffer Bit
Clear the color as well as the depth buffer by using the clear() method, as shown below.
gl.clear(gl.COLOR_BUFFER_BIT | gl.DEPTH_BUFFER_BIT);
Set the View Port
The view port represents a rectangular viewable area that contains the rendering results of the drawing buffer. You can set the dimensions of the view port using viewport() method. In the following code, the view port dimensions are set to the canvas dimensions.
gl.viewport(0,0,canvas.width,canvas.height);
WebGL - Drawing Points
We discussed earlier (in Chapter 5) how to follow a step-by-step process to draw a primitive. We have explained the process in five steps. You need to repeat these steps every time you draw a new shape. This chapter explains how to draw points with 3D coordinates in WebGL. Before moving further, let us take a relook at the five steps.
Required Steps
The following steps are required to create a WebGL application to draw points.
Step 1 − Prepare the Canvas and Get the WebGL Rendering Context
In this step, we obtain the WebGL Rendering context object using the method getContext().
Step 2 − Define the Geometry and Store it in the Buffer Objects
Since we are drawing three points, we define three vertices with 3D coordinates and store them in buffers.
var vertices = [
   -0.5,0.5,0.0,
   0.0,0.5,0.0,
   -0.25,0.25,0.0,
];
Step 3 − Create and Compile the Shader Programs
In this step, you need to write vertex shader and fragment shader programs, compile them, and create a combined program by linking these two programs.
Vertex Shader − In the vertex shader of the given example, we define a vector attribute to store 3D coordinates, and assign it to the gl_position variable.
gl_pointsize is the variable used to assign a size to the point. We assign the point size as 10.
var vertCode = 'attribute vec3 coordinates;' +

   'void main(void) {' +
      ' gl_Position = vec4(coordinates, 1.0);' +
      'gl_PointSize = 10.0;'+
   '}';
Fragment Shader − In the fragment shader, we simply assign the fragment color to the gl_FragColor variable
var fragCode = 'void main(void) {' +' gl_FragColor = vec4(1, 0.5, 0.0, 1);' +'}';
Step 4 − Associate the Shader Programs to Buffer Objects
In this step, we associate the buffer objects with the shader program.
Step 5 − Drawing the Required Object
We use the method drawArrays() to draw points. Since the number of points we want to draw are is three, the count value is 3.
gl.drawArrays(gl.POINTS, 0, 3)
Example Draw Three Points using WebGL
Here is the complete WebGL program to draw three points −
<!doctype html>
<html>
   <body>
      <canvas width = "570" height = "570" id = "my_Canvas"></canvas>

      <script>
         /*================Creating a canvas=================*/
         var canvas = document.getElementById('my_Canvas');
         gl = canvas.getContext('experimental-webgl');

         /*==========Defining and storing the geometry=======*/

         var vertices = [
            -0.5,0.5,0.0,
            0.0,0.5,0.0,
            -0.25,0.25,0.0,
         ];

         // Create an empty buffer object to store the vertex buffer
         var vertex_buffer = gl.createBuffer();

         //Bind appropriate array buffer to it
         gl.bindBuffer(gl.ARRAY_BUFFER, vertex_buffer);

         // Pass the vertex data to the buffer
         gl.bufferData(gl.ARRAY_BUFFER, new Float32Array(vertices), gl.STATIC_DRAW);

         // Unbind the buffer
         gl.bindBuffer(gl.ARRAY_BUFFER, null);

         /*=========================Shaders========================*/

         // vertex shader source code
         var vertCode =
            'attribute vec3 coordinates;' +

            'void main(void) {' +
               ' gl_Position = vec4(coordinates, 1.0);' +
               'gl_PointSize = 10.0;'+
            '}';

         // Create a vertex shader object
         var vertShader = gl.createShader(gl.VERTEX_SHADER);

         // Attach vertex shader source code
         gl.shaderSource(vertShader, vertCode);

         // Compile the vertex shader
         gl.compileShader(vertShader);

         // fragment shader source code
         var fragCode =
            'void main(void) {' +
               ' gl_FragColor = vec4(0.0, 0.0, 0.0, 0.1);' +
            '}';

         // Create fragment shader object
         var fragShader = gl.createShader(gl.FRAGMENT_SHADER);

         // Attach fragment shader source code
         gl.shaderSource(fragShader, fragCode);

         // Compile the fragmentt shader
         gl.compileShader(fragShader);

         // Create a shader program object to store
         // the combined shader program
         var shaderProgram = gl.createProgram();

         // Attach a vertex shader
         gl.attachShader(shaderProgram, vertShader);

         // Attach a fragment shader
         gl.attachShader(shaderProgram, fragShader);

         // Link both programs
         gl.linkProgram(shaderProgram);

         // Use the combined shader program object
         gl.useProgram(shaderProgram);

         /*======== Associating shaders to buffer objects ========*/

         // Bind vertex buffer object
         gl.bindBuffer(gl.ARRAY_BUFFER, vertex_buffer);

         // Get the attribute location
         var coord = gl.getAttribLocation(shaderProgram, "coordinates");

         // Point an attribute to the currently bound VBO
         gl.vertexAttribPointer(coord, 3, gl.FLOAT, false, 0, 0);

         // Enable the attribute
         gl.enableVertexAttribArray(coord);

         /*============= Drawing the primitive ===============*/

         // Clear the canvas
         gl.clearColor(0.5, 0.5, 0.5, 0.9);

         // Enable the depth test
         gl.enable(gl.DEPTH_TEST);

         // Clear the color buffer bit
         gl.clear(gl.COLOR_BUFFER_BIT);

         // Set the view port
         gl.viewport(0,0,canvas.width,canvas.height);

         // Draw the triangle
         gl.drawArrays(gl.POINTS, 0, 3);
      </script>
   </body>
</html>
It will produce the following result −
WebGL - Drawing a Triangle
In the previous chapter (Chapter 11), we discussed how to draw three points using WebGL. In Chapter 5, we took sample application to demonstrate how to draw a triangle. In both the examples, we have drawn the primitives using only vertices.
To draw more complex shapes/meshes, we pass the indices of a geometry too, along with the vertices, to the shaders. In this chapter, we will see how to draw a triangle using indices.
Steps Required to Draw a Triangle
The following steps are required to create a WebGL application to draw a triangle.
Step 1 − Prepare the Canvas and Get WebGL Rendering Context
In this step, we obtain the WebGL Rendering context object using getContext().
Step 2 − Define the Geometry and Store it in Buffer Objects
Since we are drawing a triangle using indices, we have to pass the three vertices of the triangle, including the indices, and store them in the buffers.
var vertices = [
   -0.5,0.5,0.0,
   -0.5,-0.5,0.0,
   0.5,-0.5,0.0,
];

indices = [0,1,2];
Step 3 − Create and Compile the Shader Programs
In this step, you need to write vertex shader and fragment shader programs, compile them, and create a combined program by linking these two programs.
Vertex Shader − In the vertex shader of the program, we define the vector attribute to store 3D coordinates and assign it to gl_position.
var vertCode =
   'attribute vec3 coordinates;' +

   'void main(void) {' +
      ' gl_Position = vec4(coordinates, 1.0);' +
   '}';
Fragment Shader − In the fragment shader, we simply assign the fragment color to the gl_FragColor variable.
var fragCode = 'void main(void) {' +
   ' gl_FragColor = vec4(1, 0.5, 0.0, 1);' +
'}';
Step 4 − Associate the Shader Programs to the Buffer Objects
In this step, we associate the buffer objects and the shader program.
Step 5 − Drawing the Required Object
Since we are drawing a triangle using indices, we will use drawElements(). To this method, we have to pass the number of indices. The value of the indices.length signifies the number of indices.
gl.drawElements(gl.TRIANGLES, indices.length, gl.UNSIGNED_SHORT,0);
Example Drawing a Triangle
The following program code shows how to draw a triangle in WebGL using indices −
<!doctype html>
<html>
   <body>
      <canvas width = "570" height = "570" id = "my_Canvas"></canvas>

      <script>
         /*============== Creating a canvas ====================*/
         var canvas = document.getElementById('my_Canvas');
         gl = canvas.getContext('experimental-webgl');

         /*======== Defining and storing the geometry ===========*/

         var vertices = [
            -0.5,0.5,0.0,
            -0.5,-0.5,0.0,
            0.5,-0.5,0.0,
         ];

         indices = [0,1,2];

         // Create an empty buffer object to store vertex buffer
         var vertex_buffer = gl.createBuffer();

         // Bind appropriate array buffer to it
         gl.bindBuffer(gl.ARRAY_BUFFER, vertex_buffer);

         // Pass the vertex data to the buffer
         gl.bufferData(gl.ARRAY_BUFFER, new Float32Array(vertices), gl.STATIC_DRAW);

         // Unbind the buffer
         gl.bindBuffer(gl.ARRAY_BUFFER, null);

         // Create an empty buffer object to store Index buffer
         var Index_Buffer = gl.createBuffer();

         // Bind appropriate array buffer to it
         gl.bindBuffer(gl.ELEMENT_ARRAY_BUFFER, Index_Buffer);

         // Pass the vertex data to the buffer
         gl.bufferData(gl.ELEMENT_ARRAY_BUFFER, new Uint16Array(indices), gl.STATIC_DRAW);

         // Unbind the buffer
         gl.bindBuffer(gl.ELEMENT_ARRAY_BUFFER, null);

         /*================ Shaders ====================*/

         // Vertex shader source code
         var vertCode =
            'attribute vec3 coordinates;' +

            'void main(void) {' +
               ' gl_Position = vec4(coordinates, 1.0);' +
            '}';

         // Create a vertex shader object
         var vertShader = gl.createShader(gl.VERTEX_SHADER);

         // Attach vertex shader source code
         gl.shaderSource(vertShader, vertCode);

         // Compile the vertex shader
         gl.compileShader(vertShader);

         //fragment shader source code
         var fragCode =
            'void main(void) {' +
               ' gl_FragColor = vec4(0.0, 0.0, 0.0, 0.1);' +
            '}';

         // Create fragment shader object
         var fragShader = gl.createShader(gl.FRAGMENT_SHADER);

         // Attach fragment shader source code
         gl.shaderSource(fragShader, fragCode);

         // Compile the fragmentt shader
         gl.compileShader(fragShader);

         // Create a shader program object to store
         // the combined shader program
         var shaderProgram = gl.createProgram();

         // Attach a vertex shader
         gl.attachShader(shaderProgram, vertShader);

         // Attach a fragment shader
         gl.attachShader(shaderProgram, fragShader);

         // Link both the programs
         gl.linkProgram(shaderProgram);

         // Use the combined shader program object
         gl.useProgram(shaderProgram);

         /*======= Associating shaders to buffer objects =======*/

         // Bind vertex buffer object
         gl.bindBuffer(gl.ARRAY_BUFFER, vertex_buffer);

         // Bind index buffer object
         gl.bindBuffer(gl.ELEMENT_ARRAY_BUFFER, Index_Buffer);

         // Get the attribute location
         var coord = gl.getAttribLocation(shaderProgram, "coordinates");

         // Point an attribute to the currently bound VBO
         gl.vertexAttribPointer(coord, 3, gl.FLOAT, false, 0, 0);

         // Enable the attribute
         gl.enableVertexAttribArray(coord);

         /*=========Drawing the triangle===========*/

         // Clear the canvas
         gl.clearColor(0.5, 0.5, 0.5, 0.9);

         // Enable the depth test
         gl.enable(gl.DEPTH_TEST);

         // Clear the color buffer bit
         gl.clear(gl.COLOR_BUFFER_BIT);

         // Set the view port
         gl.viewport(0,0,canvas.width,canvas.height);

         // Draw the triangle
         gl.drawElements(gl.TRIANGLES, indices.length, gl.UNSIGNED_SHORT,0);
      </script>
    </body>
</html>
If you run this example, it will produce the following output −
WebGL - Modes of Drawing
In the previous chapter (Chapter 12), we discussed how to draw a triangle using WebGL. In addition to triangles, WebGL supports various other drawing modes. This chapter explains the drawing modes supported by WebGL.
The mode Parameter
Lets take a look at the syntax of the methods − drawElements() and draw Arrays().
void drawElements(enum mode, long count, enum type, long offset);

void drawArrays(enum mode, int first, long count);
If you clearly observe, both the methods accept a parameter mode. Using this parameter, the programmers can select the drawing mode in WebGL.
The drawing modes provided by WebGL are listed in the following table.
| Sr.No. | Mode & Description |
|---|---|
| 1 | gl.POINTS To draw a series of points. |
| 2 | gl.LINES To draw a series of unconnected line segments (individual lines). |
| 3 | gl.LINE_STRIP To draw a series of connected line segments. |
| 4 | gl.LINE_LOOP To draw a series of connected line segments. It also joins the first and last vertices to form a loop. |
| 5 | gl.TRIANGLES To draw a series of separate triangles. |
| 6 | gl.TRIANGLE_STRIP To draw a series of connected triangles in strip fashion. |
| 7 | gl.TRIANGLE_FAN To draw a series of connected triangles sharing the first vertex in a fan-like fashion. |
Example Draw Three Parallel Lines
The following example shows how to draw three parallel lines using gl.LINES.
<!doctype html>
<html>
   <body>
      <canvas width = "300" height = "300" id = "my_Canvas"></canvas>

      <script>
         /*======= Creating a canvas =========*/

         var canvas = document.getElementById('my_Canvas');
         var gl = canvas.getContext('experimental-webgl');

         /*======= Defining and storing the geometry ======*/

         var vertices = [
            -0.7,-0.1,0,
            -0.3,0.6,0,
            -0.3,-0.3,0,
            0.2,0.6,0,
            0.3,-0.3,0,
            0.7,0.6,0
         ]

         // Create an empty buffer object
         var vertex_buffer = gl.createBuffer();

         // Bind appropriate array buffer to it
         gl.bindBuffer(gl.ARRAY_BUFFER, vertex_buffer);

         // Pass the vertex data to the buffer
         gl.bufferData(gl.ARRAY_BUFFER, new Float32Array(vertices), gl.STATIC_DRAW);

         // Unbind the buffer
         gl.bindBuffer(gl.ARRAY_BUFFER, null);

         /*=================== Shaders ====================*/

         // Vertex shader source code
         var vertCode =
            'attribute vec3 coordinates;' +
            'void main(void) {' +
               ' gl_Position = vec4(coordinates, 1.0);' +
            '}';

         // Create a vertex shader object
         var vertShader = gl.createShader(gl.VERTEX_SHADER);

         // Attach vertex shader source code
         gl.shaderSource(vertShader, vertCode);

         // Compile the vertex shader
         gl.compileShader(vertShader);

         // Fragment shader source code
         var fragCode =
            'void main(void) {' +
               'gl_FragColor = vec4(0.0, 0.0, 0.0, 0.1);' +
            '}';

         // Create fragment shader object
         var fragShader = gl.createShader(gl.FRAGMENT_SHADER);

         // Attach fragment shader source code
         gl.shaderSource(fragShader, fragCode);

         // Compile the fragmentt shader
         gl.compileShader(fragShader);

         // Create a shader program object to store
         // the combined shader program
         var shaderProgram = gl.createProgram();

         // Attach a vertex shader
         gl.attachShader(shaderProgram, vertShader);

         // Attach a fragment shader
         gl.attachShader(shaderProgram, fragShader);

         // Link both the programs
         gl.linkProgram(shaderProgram);

         // Use the combined shader program object
         gl.useProgram(shaderProgram);

         /*======= Associating shaders to buffer objects ======*/

         // Bind vertex buffer object
         gl.bindBuffer(gl.ARRAY_BUFFER, vertex_buffer);

         // Get the attribute location
         var coord = gl.getAttribLocation(shaderProgram, "coordinates");

         // Point an attribute to the currently bound VBO
         gl.vertexAttribPointer(coord, 3, gl.FLOAT, false, 0, 0);

         // Enable the attribute
         gl.enableVertexAttribArray(coord);

         /*============ Drawing the triangle =============*/

         // Clear the canvas
         gl.clearColor(0.5, 0.5, 0.5, 0.9);

         // Enable the depth test
         gl.enable(gl.DEPTH_TEST);

         // Clear the color and depth buffer
         gl.clear(gl.COLOR_BUFFER_BIT | gl.DEPTH_BUFFER_BIT);

         // Set the view port
         gl.viewport(0,0,canvas.width,canvas.height);

         // Draw the triangle
         gl.drawArrays(gl.LINES, 0, 6);

         // POINTS, LINE_STRIP, LINE_LOOP, LINES,
         // TRIANGLE_STRIP,TRIANGLE_FAN, TRIANGLES
      </script>
   </body>
</html>
If you run this example, it will produce the following output −
Drawing Modes
In the above program, if you replace the mode of drawArrays() with one of the following drawing modes, it will produce different outputs each time.
| Drawing Modes | Outputs |
|---|---|
| LINE_STRIP |  |
| LINE_LOOP |  |
| TRIANGLE_STRIP |  |
| TRIANGLE_FAN |  |
| TRIANGLES |  |
WebGL - Drawing a Quad
In the previous chapter, we discussed the different drawing modes provided by WebGL. We can also use indices to draw primitives using one of these modes. To draw models in WebGL, we have to choose one of these primitives and draw the required mesh (i.e., a model formed using one or more primitives).
In this chapter, we will take an example to demonstrate how to draw a quadrilateral using WebGL.
Steps to Draw a Quadrilateral
The following steps are required to create a WebGL application to draw a quadrilateral.
Step 1 − Prepare the Canvas and Get the WebGL Rendering Context
In this step, we obtain the WebGL Rendering context object using getContext().
Step 2 − Define the Geometry and Store it in the Buffer Objects
A square can be drawn using two triangles. In this example, we provide the vertices for two triangles (with one common edge) and indices.
var vertices = [
   -0.5,0.5,0.0,
   -0.5,-0.5,0.0,
   0.5,-0.5,0.0,
   0.5,0.5,0.0
];

indices = [3,2,1,3,1,0];
Step 3 − Create and Compile the Shader Programs
In this step, you need to write the vertex shader and fragment shader programs, compile them, and create a combined program by linking these two programs.
Vertex Shader − In the vertex shader of the program, we define the vector attribute to store 3D coordinates and assign it to gl_position.
var vertCode =
   'attribute vec3 coordinates;' +
   'void main(void) {' +
      ' gl_Position = vec4(coordinates, 1.0);' +
   '}';
Fragment Shader − In the fragment shader, we simply assign the fragment color to the gl_FragColor variable.
var fragCode = 'void main(void) {' +' gl_FragColor = vec4(0.5, 0.3, 0.0, 7.5);' +'}';
Step 4 − Associate the Shader Programs to Buffer Objects
In this step, we associate the buffer objects with the shader program.
Step 5 − Drawing the Required Object
Since we are drawing two triangles to form a quad, using indices, we will use the method drawElements(). To this method, we have to pass the number of indices. The value of indices.length gives the number of indices.
gl.drawElements(gl.TRIANGLES, indices.length, gl.UNSIGNED_SHORT,0);
Example Draw a Quadrilateral
The following program shows how to create a WebGL application to draw a quadrilateral.
<!doctype html>
<html>
   <body>
      <canvas width = "570" height = "570" id = "my_Canvas"></canvas>

      <script>
         /*============ Creating a canvas =================*/

         var canvas = document.getElementById('my_Canvas');
         gl = canvas.getContext('experimental-webgl');

         /*========== Defining and storing the geometry =========*/

         var vertices = [
            -0.5,0.5,0.0,
            -0.5,-0.5,0.0,
            0.5,-0.5,0.0,
            0.5,0.5,0.0
         ];

         indices = [3,2,1,3,1,0];

         // Create an empty buffer object to store vertex buffer
         var vertex_buffer = gl.createBuffer();

         // Bind appropriate array buffer to it
         gl.bindBuffer(gl.ARRAY_BUFFER, vertex_buffer);

         // Pass the vertex data to the buffer
         gl.bufferData(gl.ARRAY_BUFFER, new Float32Array(vertices), gl.STATIC_DRAW);

         // Unbind the buffer
         gl.bindBuffer(gl.ARRAY_BUFFER, null);

         // Create an empty buffer object to store Index buffer
         var Index_Buffer = gl.createBuffer();

         // Bind appropriate array buffer to it
         gl.bindBuffer(gl.ELEMENT_ARRAY_BUFFER, Index_Buffer);

         // Pass the vertex data to the buffer
         gl.bufferData(gl.ELEMENT_ARRAY_BUFFER, new Uint16Array(indices), gl.STATIC_DRAW);

         // Unbind the buffer
         gl.bindBuffer(gl.ELEMENT_ARRAY_BUFFER, null);

         /*====================== Shaders =======================*/

         // Vertex shader source code
         var vertCode =
            'attribute vec3 coordinates;' +
            'void main(void) {' +
               ' gl_Position = vec4(coordinates, 1.0);' +
            '}';

         // Create a vertex shader object
         var vertShader = gl.createShader(gl.VERTEX_SHADER);

         // Attach vertex shader source code
         gl.shaderSource(vertShader, vertCode);

         // Compile the vertex shader
         gl.compileShader(vertShader);

         // Fragment shader source code
         var fragCode =
            'void main(void) {' +
               ' gl_FragColor = vec4(0.0, 0.0, 0.0, 0.1);' +
            '}';

         // Create fragment shader object
         var fragShader = gl.createShader(gl.FRAGMENT_SHADER);

         // Attach fragment shader source code
         gl.shaderSource(fragShader, fragCode);

         // Compile the fragmentt shader
         gl.compileShader(fragShader);

         // Create a shader program object to
         // store the combined shader program
         var shaderProgram = gl.createProgram();

         // Attach a vertex shader
         gl.attachShader(shaderProgram, vertShader);

         // Attach a fragment shader
         gl.attachShader(shaderProgram, fragShader);

         // Link both the programs
         gl.linkProgram(shaderProgram);

         // Use the combined shader program object
         gl.useProgram(shaderProgram);

         /* ======= Associating shaders to buffer objects =======*/

         // Bind vertex buffer object
         gl.bindBuffer(gl.ARRAY_BUFFER, vertex_buffer);

         // Bind index buffer object
         gl.bindBuffer(gl.ELEMENT_ARRAY_BUFFER, Index_Buffer);

         // Get the attribute location
         var coord = gl.getAttribLocation(shaderProgram, "coordinates");

         // Point an attribute to the currently bound VBO
         gl.vertexAttribPointer(coord, 3, gl.FLOAT, false, 0, 0);

         // Enable the attribute
         gl.enableVertexAttribArray(coord);

         /*============= Drawing the Quad ================*/

         // Clear the canvas
         gl.clearColor(0.5, 0.5, 0.5, 0.9);

         // Enable the depth test
         gl.enable(gl.DEPTH_TEST);

         // Clear the color buffer bit
         gl.clear(gl.COLOR_BUFFER_BIT);

         // Set the view port
         gl.viewport(0,0,canvas.width,canvas.height);

         // Draw the triangle
         gl.drawElements(gl.TRIANGLES, indices.length, gl.UNSIGNED_SHORT,0);
      </script>
   </body>
</html>
If you run this example, it will produce the following output −
WebGL - Colors
In all our previous examples, we applied color to the object by assigning a desired color value to the gl_FragColor variable. In addition to that, we can define colors for each vertex − just like vertex coordinates and indices. This chapter takes an example to demonstrate how to apply colors to a quadrilateral using WebGL.
Applying Colors
To apply colors, you have to define the colors for each vertex using the RGB values, in JavaScript array. You can assign the same values to all the vertices to have a unique color to the object. After defining the colors, you have to create a color buffer and store these values in it, and associate it to the vertex shader attributes.
In the vertex shader, along with the coordinates attribute (that holds the position of the vertices), we define an attribute and a varying to handle colors.
The color attribute holds the color value per vertex, and varying is the variable that is passed as an input to the fragment shader. Therefore, we have to assign the color value to varying.
In the fragment shader, the varying that holds the color value is assigned to gl_FragColor, which holds the final color of the object.
Steps to Apply Colors
The following steps are required to create a WebGL application to draw a Quad and apply colors to it.
Step 1 − Prepare the Canvas and Get the WebGL Rendering Context
In this step, we obtain the WebGL Rendering context object using getContext().
Step 2 − Define the Geometry and Store it in the Buffer Objects
A square can be drawn using two triangles. Therefore, in this example, we provide the vertices for two triangles (with one common edge) and indices. Since we want to apply colors to it, a variable holding the color values is also defined and the color values for each (Red, Blue, Green, and Pink) are assigned to it.
var vertices = [
   -0.5,0.5,0.0,
   -0.5,-0.5,0.0,
   0.5,-0.5,0.0,
   0.5,0.5,0.0
];

var colors = [ 0,0,1, 1,0,0, 0,1,0, 1,0,1,];
indices = [3,2,1,3,1,0];
Step 3 − Create and Compile the Shader Programs
In this step, you need to write the vertex shader and fragment shader programs, compile them, and create a combined program by linking these two programs.
Vertex Shader − In the vertex shader of the program, we define vector attributes to store 3D coordinates (position), and the color of each vertex. A varing variable is declared to pass the color values from the vertex shader to the fragment shader. And finally, the value stored in the color attribute is assigned to varying.
var vertCode = 'attribute vec3 coordinates;'+
   'attribute vec3 color;'+
   'varying vec3 vColor;'+

   'void main(void) {' +
      ' gl_Position = vec4(coordinates, 1.0);' +
      'vColor = color;'+
   '}';
Fragment Shader − In the fragment shader, we assign the varying to the gl_FragColor variable.
var fragCode = 'precision mediump float;'+
   'varying vec3 vColor;'+
   'void main(void) {'+
      'gl_FragColor = vec4(vColor, 1.);'+
   '}';
Step 4 − Associate the Shader Programs with the Buffer Objects
In this step, we associate the buffer objects and the shader program.
Step 5 − Drawing the Required Object
Since we are drawing two triangles that will form a quad, using indices, we will use the method drawElements(). To this method, we have to pass the number of indices. The value of indices.length indicates the number of indices.
gl.drawElements(gl.TRIANGLES, indices.length, gl.UNSIGNED_SHORT,0);
Example Applying Color
The following program demonstrates how to draw a quad using WebGL application and apply colors to it.
<!doctype html>
<html>
   <body>
    <canvas width = "300" height = "300" id = "my_Canvas"></canvas>

      <script>
         /*============= Creating a canvas ==================*/
         var canvas = document.getElementById('my_Canvas');
         gl = canvas.getContext('experimental-webgl');

         /*========== Defining and storing the geometry ==========*/

         var vertices = [
            -0.5,0.5,0.0,
            -0.5,-0.5,0.0,
            0.5,-0.5,0.0,
            0.5,0.5,0.0
         ];

         var colors = [0,0,1, 1,0,0, 0,1,0, 1,0,1,];

         indices = [3,2,1,3,1,0];

         // Create an empty buffer object and store vertex data
         var vertex_buffer = gl.createBuffer();
         gl.bindBuffer(gl.ARRAY_BUFFER, vertex_buffer);
         gl.bufferData(gl.ARRAY_BUFFER, new Float32Array(vertices), gl.STATIC_DRAW);
         gl.bindBuffer(gl.ARRAY_BUFFER, null);

         // Create an empty buffer object and store Index data
         var Index_Buffer = gl.createBuffer();
         gl.bindBuffer(gl.ELEMENT_ARRAY_BUFFER, Index_Buffer);
         gl.bufferData(gl.ELEMENT_ARRAY_BUFFER, new Uint16Array(indices), gl.STATIC_DRAW);
         gl.bindBuffer(gl.ELEMENT_ARRAY_BUFFER, null);

         // Create an empty buffer object and store color data
         var color_buffer = gl.createBuffer ();
         gl.bindBuffer(gl.ARRAY_BUFFER, color_buffer);
         gl.bufferData(gl.ARRAY_BUFFER, new Float32Array(colors), gl.STATIC_DRAW);

         /*======================= Shaders =======================*/

         // vertex shader source code
         var vertCode = 'attribute vec3 coordinates;'+
            'attribute vec3 color;'+
            'varying vec3 vColor;'+
            'void main(void) {' +
               ' gl_Position = vec4(coordinates, 1.0);' +
               'vColor = color;'+
            '}';

         // Create a vertex shader object
         var vertShader = gl.createShader(gl.VERTEX_SHADER);

         // Attach vertex shader source code
         gl.shaderSource(vertShader, vertCode);

         // Compile the vertex shader
         gl.compileShader(vertShader);


         // fragment shader source code
         var fragCode = 'precision mediump float;'+
            'varying vec3 vColor;'+
            'void main(void) {'+
               'gl_FragColor = vec4(vColor, 1.);'+
            '}';

         // Create fragment shader object
         var fragShader = gl.createShader(gl.FRAGMENT_SHADER);

         // Attach fragment shader source code
         gl.shaderSource(fragShader, fragCode);

         // Compile the fragmentt shader
         gl.compileShader(fragShader);

         // Create a shader program object to
         // store the combined shader program
         var shaderProgram = gl.createProgram();

         // Attach a vertex shader
         gl.attachShader(shaderProgram, vertShader);

         // Attach a fragment shader
         gl.attachShader(shaderProgram, fragShader);

         // Link both the programs
         gl.linkProgram(shaderProgram);

         // Use the combined shader program object
         gl.useProgram(shaderProgram);

         /* ======== Associating shaders to buffer objects =======*/

         // Bind vertex buffer object
         gl.bindBuffer(gl.ARRAY_BUFFER, vertex_buffer);

         // Bind index buffer object
         gl.bindBuffer(gl.ELEMENT_ARRAY_BUFFER, Index_Buffer);

         // Get the attribute location
         var coord = gl.getAttribLocation(shaderProgram, "coordinates");

         // point an attribute to the currently bound VBO
         gl.vertexAttribPointer(coord, 3, gl.FLOAT, false, 0, 0);

         // Enable the attribute
         gl.enableVertexAttribArray(coord);

         // bind the color buffer
         gl.bindBuffer(gl.ARRAY_BUFFER, color_buffer);

         // get the attribute location
         var color = gl.getAttribLocation(shaderProgram, "color");

         // point attribute to the volor buffer object
         gl.vertexAttribPointer(color, 3, gl.FLOAT, false,0,0) ;

         // enable the color attribute
         gl.enableVertexAttribArray(color);

         /*============Drawing the Quad====================*/

         // Clear the canvas
         gl.clearColor(0.5, 0.5, 0.5, 0.9);

         // Enable the depth test
         gl.enable(gl.DEPTH_TEST);

         // Clear the color buffer bit
         gl.clear(gl.COLOR_BUFFER_BIT);

         // Set the view port
         gl.viewport(0,0,canvas.width,canvas.height);

         //Draw the triangle
         gl.drawElements(gl.TRIANGLES, indices.length, gl.UNSIGNED_SHORT,0);
      </script>
   </body>
</html>
If you run this example, it will produce the following output −
WebGL - Translation
So far, we discussed how to draw various shapes and apply colors in them using WebGL. Here, in this chapter, we will take an example to show how to translate a triangle.
Translation
Translation is one of the affine transformations provided by WebGL. Using translation, we can move a triangle (any object) on the xyz plane. Suppose we have a triangle [a, b, c] and we want to move the triangle to a position which is 5 units towards the positive X-axis and 3 units towards the positive Y-axis. Then the new vertices would be [a+5, b+3, c+0]. That means, to translate the triangle, we need to add the translation distances, say, tx, ty, tz to each vertex.
Since it is a per-vertex operation, we can carry it in the vertex shader program.
In the vertex shader, along with the attribute, coordinates (that hold the vertex positions), we define a uniform variable that holds the translation distances (x,y,z). Later, we add this uniform variable to the coordinates variable and assign the result to the gl_Position variable.
Note − Since vertex shader will be run on each vertex, all the vertices of the triangle will be translated.
Steps to Translate a Triangle
The following steps are required to create a WebGL application to draw a triangle and then translate it to a new position.
Step 1 − Prepare the Canvas and Get the WebGL Rendering Context
In this step, we obtain the WebGL Rendering context object using getContext().
Step 2 − Define the Geometry and Store it in the Buffer Objects
Since we are drawing a triangle, we have to pass three vertices of the triangle, and store them in buffers.
var vertices = [ -0.5,0.5,0.0, -0.5,-0.5,0.0, 0.5,-0.5,0.0, ];
Step 3 − Create and Compile the Shader Programs
In this step, you need to write the vertex shader and fragment shader programs, compile them, and create a combined program by linking these two programs.
Vertex Shader − In the vertex shader of the program, we define a vector attribute to store 3D coordinates. Along with it, we define a uniform variable to store the translation distances, and finally, we add these two values and assign it to gl_position which holds the final position of the vertices.
var vertCode =
   'attribute vec4 coordinates;' +
   'uniform vec4 translation;'+
   'void main(void) {' +
      ' gl_Position = coordinates + translation;' +
   '}';
Fragment Shader − In the fragment shader, we simply assign the fragment color to the variable gl_FragColor.
var fragCode = 'void main(void) {' +' gl_FragColor = vec4(1, 0.5, 0.0, 1);' +'}';
Step 4 − Associate the Shader Programs to the Buffer Objects
In this step, we associate the buffer objects with the shader program.
Step 5 − Drawing the Required Object
Since we are drawing the triangle using indices, we will use the method drawArrays(). To this method, we have to pass the number of vertices /elements to be considered. Since we are drawing a triangle, we will pass 3 as a parameter.
gl.drawArrays(gl.TRIANGLES, 0, 3);
Example Translate a Triangle
The following example show how to translate a triangle on xyz plane.
<!doctype html>
<html>
   <body>
      <canvas width = "300" height = "300" id = "my_Canvas"></canvas>

      <script>
         /*=================Creating a canvas=========================*/
         var canvas = document.getElementById('my_Canvas');
         gl = canvas.getContext('experimental-webgl');

         /*===========Defining and storing the geometry==============*/
         var vertices = [
            -0.5,0.5,0.0,
            -0.5,-0.5,0.0,
            0.5,-0.5,0.0,
         ];

         //Create an empty buffer object and store vertex data
         var vertex_buffer = gl.createBuffer();

         //Create a new buffer
         gl.bindBuffer(gl.ARRAY_BUFFER, vertex_buffer);

         //bind it to the current buffer
         gl.bufferData(gl.ARRAY_BUFFER, new Float32Array(vertices), gl.STATIC_DRAW);

         // Pass the buffer data
         gl.bindBuffer(gl.ARRAY_BUFFER, null);

         /*========================Shaders============================*/

         //vertex shader source code
         var vertCode =
            'attribute vec4 coordinates;' +
            'uniform vec4 translation;'+
            'void main(void) {' +
               '  gl_Position = coordinates + translation;' +
            '}';

         //Create a vertex shader program object and compile it
         var vertShader = gl.createShader(gl.VERTEX_SHADER);
         gl.shaderSource(vertShader, vertCode);
         gl.compileShader(vertShader);


         //fragment shader source code
         var fragCode =
            'void main(void) {' +
               '   gl_FragColor = vec4(0.0, 0.0, 0.0, 0.1);' +
            '}';

         //Create a fragment shader program object and compile it
         var fragShader = gl.createShader(gl.FRAGMENT_SHADER);
         gl.shaderSource(fragShader, fragCode);
         gl.compileShader(fragShader);

         //Create and use combiened shader program
         var shaderProgram = gl.createProgram();
         gl.attachShader(shaderProgram, vertShader);
         gl.attachShader(shaderProgram, fragShader);
         gl.linkProgram(shaderProgram);

         gl.useProgram(shaderProgram);

         /* ===========Associating shaders to buffer objects============*/

         gl.bindBuffer(gl.ARRAY_BUFFER, vertex_buffer);
         var coordinatesVar = gl.getAttribLocation(shaderProgram, "coordinates");
         gl.vertexAttribPointer(coordinatesVar, 3, gl.FLOAT, false, 0, 0);
         gl.enableVertexAttribArray(coordinatesVar);

         /* ==========translation======================================*/
         var Tx = 0.5, Ty = 0.5, Tz = 0.0;
         var translation = gl.getUniformLocation(shaderProgram, 'translation');
         gl.uniform4f(translation, Tx, Ty, Tz, 0.0);

         /*=================Drawing the riangle and transforming it========================*/

         gl.clearColor(0.5, 0.5, 0.5, 0.9);
         gl.enable(gl.DEPTH_TEST);

         gl.clear(gl.COLOR_BUFFER_BIT);
         gl.viewport(0,0,canvas.width,canvas.height);
         gl.drawArrays(gl.TRIANGLES, 0, 3);
      </script>
    </body>
 </html>
If you run this example, it will produce the following output −
WebGL - Scaling
In this chapter, we will take an example to demonstrate how to modify the scale of a triangle using WebGL.
Scaling
Scaling is nothing but increasing or decreasing the size of an object. For example, if a triangle has vertices of the size [a,b,c], then the triangle with the vertices [2a, 2b, 2c] will be double its size. Therefore, to scale a triangle, you have to multiply each vertices with the scaling factor. You can also scale a particular vertex.
To scale a triangle, in the vertex shader of the program, we create a uniform matrix and multiply the coordinate values with this matrix. Later, we pass a 44 diagonal matrix having the scaling factors of x,y,z coordinates in the diagonal positions (last diagonal position 1).
Required Steps
The following steps are required to create a WebGL application to scale a triangle.
Step 1 − Prepare the Canvas and Get the WebGL Rendering Context
In this step, we obtain the WebGL Rendering context object using getContext().
Step 2 − Define the Geometry and Store it in the Buffer Objects
Since we are drawing a triangle, we have to pass three vertices of the triangle, and store them in buffers.
var vertices = [ -0.5,0.5,0.0, -0.5,-0.5,0.0, 0.5,-0.5,0.0, ];
Step 3 − Create and Compile the Shader Programs
In this step, you need to write the vertex shader and fragment shader programs, compile them, and create a combined program by linking these two programs.
Vertex Shader − In the vertex shader of the program, we define a vector attribute to store 3D coordinates. Along with it, we define a uniform matrix to store the scaling factors, and finally, we multiply these two values and assign it to gl_position which holds the final position of the vertices.
var vertCode =
   'attribute vec4 coordinates;' +
   'uniform mat4 u_xformMatrix;' +
   'void main(void) {' +
      ' gl_Position = u_xformMatrix * coordinates;' +
   '}';
Fragment Shader − In the fragment shader, we simply assign the fragment color to the gl_FragColor variable.
var fragCode = 'void main(void) {' +' gl_FragColor = vec4(1, 0.5, 0.0, 1);' +'}';
Step 4 − Associate the Shader Programs with the Buffer Objects
In this step, we associate the buffer objects with the shader program.
Step 5 − Drawing the Required Object
Since we are drawing the triangle using indices, we use the drawArrays() method. To this method, we have to pass the number of vertices/elements to be considered. Since we are drawing a triangle, we will pass 3 as a parameter.
gl.drawArrays(gl.TRIANGLES, 0, 3);
Example Scale a Triangle
The following example shows how to scale a triangle −
<!doctype html>
<html>
   <body>
      <canvas width = "300" height = "300" id = "my_Canvas"></canvas>

      <script>
         /*=================Creating a canvas=========================*/
         var canvas = document.getElementById('my_Canvas');
         gl = canvas.getContext('experimental-webgl');

         /*===========Defining and storing the geometry==============*/
         var vertices =  [
            -0.5,0.5,0.0,
            -0.5,-0.5,0.0,
            0.5,-0.5,0.0,
         ];

         //Create an empty buffer object and store vertex data

         var vertex_buffer = gl.createBuffer();
         gl.bindBuffer(gl.ARRAY_BUFFER, vertex_buffer);
         gl.bufferData(gl.ARRAY_BUFFER, new Float32Array(vertices), gl.STATIC_DRAW);
         gl.bindBuffer(gl.ARRAY_BUFFER, null);

         /*========================Shaders============================*/

         //Vertex shader source code
         var vertCode =
            'attribute vec4 coordinates;' +
            'uniform mat4 u_xformMatrix;' +
            'void main(void) {' +
               '  gl_Position = u_xformMatrix * coordinates;' +
            '}';

         //Create a vertex shader program object and compile it
         var vertShader = gl.createShader(gl.VERTEX_SHADER);
         gl.shaderSource(vertShader, vertCode);
         gl.compileShader(vertShader);

         //fragment shader source code
         var fragCode =
            'void main(void) {' +
               '   gl_FragColor = vec4(0.0, 0.0, 0.0, 0.1);' +
            '}';

         //Create a fragment shader program object and compile it
         var fragShader = gl.createShader(gl.FRAGMENT_SHADER);
         gl.shaderSource(fragShader, fragCode);
         gl.compileShader(fragShader);

         //Create and use combiened shader program
         var shaderProgram = gl.createProgram();
         gl.attachShader(shaderProgram, vertShader);
         gl.attachShader(shaderProgram, fragShader);
         gl.linkProgram(shaderProgram);

         gl.useProgram(shaderProgram);

         /*===================scaling==========================*/

         var Sx = 1.0, Sy = 1.5, Sz = 1.0;
         var xformMatrix = new Float32Array([
            Sx,   0.0,  0.0,  0.0,
            0.0,  Sy,   0.0,  0.0,
            0.0,  0.0,  Sz,   0.0,
            0.0,  0.0,  0.0,  1.0
         ]);

         var u_xformMatrix = gl.getUniformLocation(shaderProgram, 'u_xformMatrix');
         gl.uniformMatrix4fv(u_xformMatrix, false, xformMatrix);

         /* ===========Associating shaders to buffer objects============*/
         gl.bindBuffer(gl.ARRAY_BUFFER, vertex_buffer);

         var coordinatesVar = gl.getAttribLocation(shaderProgram, "coordinates");
         gl.vertexAttribPointer(coordinatesVar, 3, gl.FLOAT, false, 0, 0);
         gl.enableVertexAttribArray(coordinatesVar);

         /*=================Drawing the Quad========================*/
         gl.clearColor(0.5, 0.5, 0.5, 0.9);
         gl.enable(gl.DEPTH_TEST);

         gl.clear(gl.COLOR_BUFFER_BIT);
         gl.viewport(0,0,canvas.width,canvas.height);
         gl.drawArrays(gl.TRIANGLES, 0, 3);
      </script>
   </body>
</html>
If you run this example, it will produce the following output −
WebGL - Rotation
In this chapter, we will take an example to demonstrate how to rotate a triangle using WebGL.
Example Rotate a Triangle
The following program shows how to rotate a triangle using WebGL.
<!doctype html>
<html>
   <body>
      <canvas width = "400" height = "400" id = "my_Canvas"></canvas>

      <script>
         /*=================Creating a canvas=========================*/
         var canvas = document.getElementById('my_Canvas');
         gl = canvas.getContext('experimental-webgl');

         /*===========Defining and storing the geometry==============*/

         var vertices = [ -1,-1,-1, 1,-1,-1, 1, 1,-1 ];
         var colors = [ 1,1,1, 1,1,1, 1,1,1 ];
         var indices = [ 0,1,2 ];

         //Create and store data into vertex buffer
         var vertex_buffer = gl.createBuffer ();
         gl.bindBuffer(gl.ARRAY_BUFFER, vertex_buffer);
         gl.bufferData(gl.ARRAY_BUFFER, new Float32Array(vertices), gl.STATIC_DRAW);

         //Create and store data into color buffer
         var color_buffer = gl.createBuffer ();
         gl.bindBuffer(gl.ARRAY_BUFFER, color_buffer);
         gl.bufferData(gl.ARRAY_BUFFER, new Float32Array(colors), gl.STATIC_DRAW);

         //Create and store data into index buffer
         var index_buffer = gl.createBuffer ();
         gl.bindBuffer(gl.ELEMENT_ARRAY_BUFFER, index_buffer);
         gl.bufferData(gl.ELEMENT_ARRAY_BUFFER, new Uint16Array(indices), gl.STATIC_DRAW);

         /*==========================Shaders=========================*/

         var vertCode = 'attribute vec3 position;'+
            'uniform mat4 Pmatrix;'+
            'uniform mat4 Vmatrix;'+
            'uniform mat4 Mmatrix;'+
            'attribute vec3 color;'+//the color of the point
            'varying vec3 vColor;'+

            'void main(void) { '+//pre-built function
               'gl_Position = Pmatrix*Vmatrix*Mmatrix*vec4(position, 1.);'+
               'vColor = color;'+
            '}';

         var fragCode = 'precision mediump float;'+
            'varying vec3 vColor;'+
            'void main(void) {'+
               'gl_FragColor = vec4(vColor, 1.);'+
            '}';

         var vertShader = gl.createShader(gl.VERTEX_SHADER);
         gl.shaderSource(vertShader, vertCode);
         gl.compileShader(vertShader);

         var fragShader = gl.createShader(gl.FRAGMENT_SHADER);
         gl.shaderSource(fragShader, fragCode);
         gl.compileShader(fragShader);

         var shaderProgram = gl.createProgram();
         gl.attachShader(shaderProgram, vertShader);
         gl.attachShader(shaderProgram, fragShader);
         gl.linkProgram(shaderProgram);

         /*===========associating attributes to vertex shader ============*/

         var Pmatrix = gl.getUniformLocation(shaderProgram, "Pmatrix");
         var Vmatrix = gl.getUniformLocation(shaderProgram, "Vmatrix");
         var Mmatrix = gl.getUniformLocation(shaderProgram, "Mmatrix");
         gl.bindBuffer(gl.ARRAY_BUFFER, vertex_buffer);

         var position = gl.getAttribLocation(shaderProgram, "position");
         gl.vertexAttribPointer(position, 3, gl.FLOAT, false,0,0) ; //position
         gl.enableVertexAttribArray(position);
         gl.bindBuffer(gl.ARRAY_BUFFER, color_buffer);

         var color = gl.getAttribLocation(shaderProgram, "color");
         gl.vertexAttribPointer(color, 3, gl.FLOAT, false,0,0) ; //color
         gl.enableVertexAttribArray(color);
         gl.useProgram(shaderProgram);

         /*========================= MATRIX ========================= */

         function get_projection(angle, a, zMin, zMax) {
            var ang = Math.tan((angle*.5)*Math.PI/180);//angle*.5
            return [
               0.5/ang, 0 , 0, 0,
               0, 0.5*a/ang, 0, 0,
               0, 0, -(zMax+zMin)/(zMax-zMin), -1,
               0, 0, (-2*zMax*zMin)/(zMax-zMin), 0
            ];
         }

         var proj_matrix = get_projection(40, canvas.width/canvas.height, 1, 100);
         var mov_matrix = [1,0,0,0, 0,1,0,0, 0,0,1,0, 0,0,0,1];
         var view_matrix = [1,0,0,0, 0,1,0,0, 0,0,1,0, 0,0,0,1];

         //translating z
         view_matrix[14] = view_matrix[14]-6; //zoom

         /*=======================rotation========================*/
         function rotateZ(m, angle) {
            var c = Math.cos(angle);
            var s = Math.sin(angle);
            var mv0 = m[0], mv4 = m[4], mv8 = m[8];

            m[0] = c*m[0]-s*m[1];
            m[4] = c*m[4]-s*m[5];
            m[8] = c*m[8]-s*m[9];
            m[1] = c*m[1]+s*mv0;
            m[5] = c*m[5]+s*mv4;
            m[9] = c*m[9]+s*mv8;
         }

         /*=================Drawing===========================*/

         var time_old = 0;
         var animate = function(time) {
            var dt = time-time_old;
            rotateZ(mov_matrix, dt*0.002);
            time_old = time;

            gl.enable(gl.DEPTH_TEST);
            gl.depthFunc(gl.LEQUAL);
            gl.clearColor(0.5, 0.5, 0.5, 0.9);
            gl.clearDepth(1.0);
            gl.viewport(0.0, 0.0, canvas.width, canvas.height);
            gl.clear(gl.COLOR_BUFFER_BIT | gl.DEPTH_BUFFER_BIT);

            gl.uniformMatrix4fv(Pmatrix, false, proj_matrix);
            gl.uniformMatrix4fv(Vmatrix, false, view_matrix);
            gl.uniformMatrix4fv(Mmatrix, false, mov_matrix);

            gl.bindBuffer(gl.ELEMENT_ARRAY_BUFFER, index_buffer);
            gl.drawElements(gl.TRIANGLES, indices.length, gl.UNSIGNED_SHORT, 0);
            window.requestAnimationFrame(animate);
         }
         animate(0);
      </script>
   </body>
</html>
If you run this example, it will produce the following output −
WebGL - Cube Rotation
In this chapter, we will take an example to demonstrate how to draw a rotating 3D cube using WebGL.
Example Draw a Rotating 3D Cube
The following program shows how to draw a rotating 3D cube −
<!doctype html>
<html>
   <body>
      <canvas width = "570" height = "570" id = "my_Canvas"></canvas>

      <script>
         /*============= Creating a canvas =================*/
         var canvas = document.getElementById('my_Canvas');
         gl = canvas.getContext('experimental-webgl');

         /*============ Defining and storing the geometry =========*/

         var vertices = [
            -1,-1,-1, 1,-1,-1, 1, 1,-1, -1, 1,-1,
            -1,-1, 1, 1,-1, 1, 1, 1, 1, -1, 1, 1,
            -1,-1,-1, -1, 1,-1, -1, 1, 1, -1,-1, 1,
            1,-1,-1, 1, 1,-1, 1, 1, 1, 1,-1, 1,
            -1,-1,-1, -1,-1, 1, 1,-1, 1, 1,-1,-1,
            -1, 1,-1, -1, 1, 1, 1, 1, 1, 1, 1,-1,
         ];

         var colors = [
            5,3,7, 5,3,7, 5,3,7, 5,3,7,
            1,1,3, 1,1,3, 1,1,3, 1,1,3,
            0,0,1, 0,0,1, 0,0,1, 0,0,1,
            1,0,0, 1,0,0, 1,0,0, 1,0,0,
            1,1,0, 1,1,0, 1,1,0, 1,1,0,
            0,1,0, 0,1,0, 0,1,0, 0,1,0
         ];

         var indices = [
            0,1,2, 0,2,3, 4,5,6, 4,6,7,
            8,9,10, 8,10,11, 12,13,14, 12,14,15,
            16,17,18, 16,18,19, 20,21,22, 20,22,23
         ];

         // Create and store data into vertex buffer
         var vertex_buffer = gl.createBuffer ();
         gl.bindBuffer(gl.ARRAY_BUFFER, vertex_buffer);
         gl.bufferData(gl.ARRAY_BUFFER, new Float32Array(vertices), gl.STATIC_DRAW);

         // Create and store data into color buffer
         var color_buffer = gl.createBuffer ();
         gl.bindBuffer(gl.ARRAY_BUFFER, color_buffer);
         gl.bufferData(gl.ARRAY_BUFFER, new Float32Array(colors), gl.STATIC_DRAW);

         // Create and store data into index buffer
         var index_buffer = gl.createBuffer ();
         gl.bindBuffer(gl.ELEMENT_ARRAY_BUFFER, index_buffer);
         gl.bufferData(gl.ELEMENT_ARRAY_BUFFER, new Uint16Array(indices), gl.STATIC_DRAW);

         /*=================== Shaders =========================*/

         var vertCode = 'attribute vec3 position;'+
            'uniform mat4 Pmatrix;'+
            'uniform mat4 Vmatrix;'+
            'uniform mat4 Mmatrix;'+
            'attribute vec3 color;'+//the color of the point
            'varying vec3 vColor;'+

            'void main(void) { '+//pre-built function
               'gl_Position = Pmatrix*Vmatrix*Mmatrix*vec4(position, 1.);'+
               'vColor = color;'+
            '}';

         var fragCode = 'precision mediump float;'+
            'varying vec3 vColor;'+
            'void main(void) {'+
               'gl_FragColor = vec4(vColor, 1.);'+
            '}';

         var vertShader = gl.createShader(gl.VERTEX_SHADER);
         gl.shaderSource(vertShader, vertCode);
         gl.compileShader(vertShader);

         var fragShader = gl.createShader(gl.FRAGMENT_SHADER);
         gl.shaderSource(fragShader, fragCode);
         gl.compileShader(fragShader);

         var shaderProgram = gl.createProgram();
         gl.attachShader(shaderProgram, vertShader);
         gl.attachShader(shaderProgram, fragShader);
         gl.linkProgram(shaderProgram);

         /* ====== Associating attributes to vertex shader =====*/
         var Pmatrix = gl.getUniformLocation(shaderProgram, "Pmatrix");
         var Vmatrix = gl.getUniformLocation(shaderProgram, "Vmatrix");
         var Mmatrix = gl.getUniformLocation(shaderProgram, "Mmatrix");

         gl.bindBuffer(gl.ARRAY_BUFFER, vertex_buffer);
         var position = gl.getAttribLocation(shaderProgram, "position");
         gl.vertexAttribPointer(position, 3, gl.FLOAT, false,0,0) ;

         // Position
         gl.enableVertexAttribArray(position);
         gl.bindBuffer(gl.ARRAY_BUFFER, color_buffer);
         var color = gl.getAttribLocation(shaderProgram, "color");
         gl.vertexAttribPointer(color, 3, gl.FLOAT, false,0,0) ;

         // Color
         gl.enableVertexAttribArray(color);
         gl.useProgram(shaderProgram);

         /*==================== MATRIX =====================*/

         function get_projection(angle, a, zMin, zMax) {
            var ang = Math.tan((angle*.5)*Math.PI/180);//angle*.5
            return [
               0.5/ang, 0 , 0, 0,
               0, 0.5*a/ang, 0, 0,
               0, 0, -(zMax+zMin)/(zMax-zMin), -1,
               0, 0, (-2*zMax*zMin)/(zMax-zMin), 0
            ];
         }

         var proj_matrix = get_projection(40, canvas.width/canvas.height, 1, 100);

         var mov_matrix = [1,0,0,0, 0,1,0,0, 0,0,1,0, 0,0,0,1];
         var view_matrix = [1,0,0,0, 0,1,0,0, 0,0,1,0, 0,0,0,1];

         // translating z
         view_matrix[14] = view_matrix[14]-6;//zoom

         /*==================== Rotation ====================*/

         function rotateZ(m, angle) {
            var c = Math.cos(angle);
            var s = Math.sin(angle);
            var mv0 = m[0], mv4 = m[4], mv8 = m[8];

            m[0] = c*m[0]-s*m[1];
            m[4] = c*m[4]-s*m[5];
            m[8] = c*m[8]-s*m[9];

            m[1]=c*m[1]+s*mv0;
            m[5]=c*m[5]+s*mv4;
            m[9]=c*m[9]+s*mv8;
         }

         function rotateX(m, angle) {
            var c = Math.cos(angle);
            var s = Math.sin(angle);
            var mv1 = m[1], mv5 = m[5], mv9 = m[9];

            m[1] = m[1]*c-m[2]*s;
            m[5] = m[5]*c-m[6]*s;
            m[9] = m[9]*c-m[10]*s;

            m[2] = m[2]*c+mv1*s;
            m[6] = m[6]*c+mv5*s;
            m[10] = m[10]*c+mv9*s;
         }

         function rotateY(m, angle) {
            var c = Math.cos(angle);
            var s = Math.sin(angle);
            var mv0 = m[0], mv4 = m[4], mv8 = m[8];

            m[0] = c*m[0]+s*m[2];
            m[4] = c*m[4]+s*m[6];
            m[8] = c*m[8]+s*m[10];

            m[2] = c*m[2]-s*mv0;
            m[6] = c*m[6]-s*mv4;
            m[10] = c*m[10]-s*mv8;
         }

         /*================= Drawing ===========================*/
         var time_old = 0;

         var animate = function(time) {

            var dt = time-time_old;
            rotateZ(mov_matrix, dt*0.005);//time
            rotateY(mov_matrix, dt*0.002);
            rotateX(mov_matrix, dt*0.003);
            time_old = time;

            gl.enable(gl.DEPTH_TEST);
            gl.depthFunc(gl.LEQUAL);
            gl.clearColor(0.5, 0.5, 0.5, 0.9);
            gl.clearDepth(1.0);

            gl.viewport(0.0, 0.0, canvas.width, canvas.height);
            gl.clear(gl.COLOR_BUFFER_BIT | gl.DEPTH_BUFFER_BIT);
            gl.uniformMatrix4fv(Pmatrix, false, proj_matrix);
            gl.uniformMatrix4fv(Vmatrix, false, view_matrix);
            gl.uniformMatrix4fv(Mmatrix, false, mov_matrix);
            gl.bindBuffer(gl.ELEMENT_ARRAY_BUFFER, index_buffer);
            gl.drawElements(gl.TRIANGLES, indices.length, gl.UNSIGNED_SHORT, 0);

            window.requestAnimationFrame(animate);
         }
         animate(0);
      </script>
   </body>
</html>
If you run this example, it will produce the following output −
WebGL - Interactive Cube
In this chapter, we will take an example to demonstrate how to draw a 3D cube that can be rotated using mouse controls.
Example Draw an Interactive Cube
The following program shows how to rotate a cube using mouse controls −
<!doctype html>
<html>
   <body>
      <canvas width = "570" height = "570" id = "my_Canvas"></canvas>

      <script>
         /*============= Creating a canvas ======================*/
         var canvas = document.getElementById('my_Canvas');
         gl = canvas.getContext('experimental-webgl');

         /*========== Defining and storing the geometry ==========*/

         var vertices = [
            -1,-1,-1, 1,-1,-1, 1, 1,-1, -1, 1,-1,
            -1,-1, 1, 1,-1, 1, 1, 1, 1, -1, 1, 1,
            -1,-1,-1, -1, 1,-1, -1, 1, 1, -1,-1, 1,
            1,-1,-1, 1, 1,-1, 1, 1, 1, 1,-1, 1,
            -1,-1,-1, -1,-1, 1, 1,-1, 1, 1,-1,-1,
            -1, 1,-1, -1, 1, 1, 1, 1, 1, 1, 1,-1,
         ];

         var colors = [
            5,3,7, 5,3,7, 5,3,7, 5,3,7,
            1,1,3, 1,1,3, 1,1,3, 1,1,3,
            0,0,1, 0,0,1, 0,0,1, 0,0,1,
            1,0,0, 1,0,0, 1,0,0, 1,0,0,
            1,1,0, 1,1,0, 1,1,0, 1,1,0,
            0,1,0, 0,1,0, 0,1,0, 0,1,0
         ];

         var indices = [
            0,1,2, 0,2,3, 4,5,6, 4,6,7,
            8,9,10, 8,10,11, 12,13,14, 12,14,15,
            16,17,18, 16,18,19, 20,21,22, 20,22,23
         ];

         // Create and store data into vertex buffer
         var vertex_buffer = gl.createBuffer ();
         gl.bindBuffer(gl.ARRAY_BUFFER, vertex_buffer);
         gl.bufferData(gl.ARRAY_BUFFER, new Float32Array(vertices), gl.STATIC_DRAW);

         // Create and store data into color buffer
         var color_buffer = gl.createBuffer ();
         gl.bindBuffer(gl.ARRAY_BUFFER, color_buffer);
         gl.bufferData(gl.ARRAY_BUFFER, new Float32Array(colors), gl.STATIC_DRAW);

         // Create and store data into index buffer
         var index_buffer = gl.createBuffer ();
         gl.bindBuffer(gl.ELEMENT_ARRAY_BUFFER, index_buffer);
         gl.bufferData(gl.ELEMENT_ARRAY_BUFFER, new Uint16Array(indices), gl.STATIC_DRAW);

         /*=================== SHADERS =================== */

         var vertCode = 'attribute vec3 position;'+
            'uniform mat4 Pmatrix;'+
            'uniform mat4 Vmatrix;'+
            'uniform mat4 Mmatrix;'+
            'attribute vec3 color;'+//the color of the point
            'varying vec3 vColor;'+
            'void main(void) { '+//pre-built function
               'gl_Position = Pmatrix*Vmatrix*Mmatrix*vec4(position, 1.);'+
               'vColor = color;'+
            '}';

         var fragCode = 'precision mediump float;'+
            'varying vec3 vColor;'+
            'void main(void) {'+
               'gl_FragColor = vec4(vColor, 1.);'+
            '}';

         var vertShader = gl.createShader(gl.VERTEX_SHADER);
         gl.shaderSource(vertShader, vertCode);
         gl.compileShader(vertShader);

         var fragShader = gl.createShader(gl.FRAGMENT_SHADER);
         gl.shaderSource(fragShader, fragCode);
         gl.compileShader(fragShader);

         var shaderprogram = gl.createProgram();
         gl.attachShader(shaderprogram, vertShader);
         gl.attachShader(shaderprogram, fragShader);
         gl.linkProgram(shaderprogram);

         /*======== Associating attributes to vertex shader =====*/
         var _Pmatrix = gl.getUniformLocation(shaderprogram, "Pmatrix");
         var _Vmatrix = gl.getUniformLocation(shaderprogram, "Vmatrix");
         var _Mmatrix = gl.getUniformLocation(shaderprogram, "Mmatrix");

         gl.bindBuffer(gl.ARRAY_BUFFER, vertex_buffer);
         var _position = gl.getAttribLocation(shaderprogram, "position");
         gl.vertexAttribPointer(_position, 3, gl.FLOAT, false,0,0);
         gl.enableVertexAttribArray(_position);

         gl.bindBuffer(gl.ARRAY_BUFFER, color_buffer);
         var _color = gl.getAttribLocation(shaderprogram, "color");
         gl.vertexAttribPointer(_color, 3, gl.FLOAT, false,0,0) ;
         gl.enableVertexAttribArray(_color);
         gl.useProgram(shaderprogram);

         /*==================== MATRIX ====================== */

         function get_projection(angle, a, zMin, zMax) {
            var ang = Math.tan((angle*.5)*Math.PI/180);//angle*.5
            return [
               0.5/ang, 0 , 0, 0,
               0, 0.5*a/ang, 0, 0,
               0, 0, -(zMax+zMin)/(zMax-zMin), -1,
               0, 0, (-2*zMax*zMin)/(zMax-zMin), 0
			   ];
         }

         var proj_matrix = get_projection(40, canvas.width/canvas.height, 1, 100);
         var mo_matrix = [ 1,0,0,0, 0,1,0,0, 0,0,1,0, 0,0,0,1 ];
         var view_matrix = [ 1,0,0,0, 0,1,0,0, 0,0,1,0, 0,0,0,1 ];

         view_matrix[14] = view_matrix[14]-6;

         /*================= Mouse events ======================*/

         var AMORTIZATION = 0.95;
         var drag = false;
         var old_x, old_y;
         var dX = 0, dY = 0;

         var mouseDown = function(e) {
            drag = true;
            old_x = e.pageX, old_y = e.pageY;
            e.preventDefault();
            return false;
         };

         var mouseUp = function(e){
            drag = false;
         };

         var mouseMove = function(e) {
            if (!drag) return false;
            dX = (e.pageX-old_x)*2*Math.PI/canvas.width,
            dY = (e.pageY-old_y)*2*Math.PI/canvas.height;
            THETA+= dX;
            PHI+=dY;
            old_x = e.pageX, old_y = e.pageY;
            e.preventDefault();
         };

         canvas.addEventListener("mousedown", mouseDown, false);
         canvas.addEventListener("mouseup", mouseUp, false);
         canvas.addEventListener("mouseout", mouseUp, false);
         canvas.addEventListener("mousemove", mouseMove, false);

         /*=========================rotation================*/

         function rotateX(m, angle) {
            var c = Math.cos(angle);
            var s = Math.sin(angle);
            var mv1 = m[1], mv5 = m[5], mv9 = m[9];

            m[1] = m[1]*c-m[2]*s;
            m[5] = m[5]*c-m[6]*s;
            m[9] = m[9]*c-m[10]*s;

            m[2] = m[2]*c+mv1*s;
            m[6] = m[6]*c+mv5*s;
            m[10] = m[10]*c+mv9*s;
         }

         function rotateY(m, angle) {
            var c = Math.cos(angle);
            var s = Math.sin(angle);
            var mv0 = m[0], mv4 = m[4], mv8 = m[8];

            m[0] = c*m[0]+s*m[2];
            m[4] = c*m[4]+s*m[6];
            m[8] = c*m[8]+s*m[10];

            m[2] = c*m[2]-s*mv0;
            m[6] = c*m[6]-s*mv4;
            m[10] = c*m[10]-s*mv8;
         }

         /*=================== Drawing =================== */

         var THETA = 0,
         PHI = 0;
         var time_old = 0;

         var animate = function(time) {
            var dt = time-time_old;

            if (!drag) {
               dX *= AMORTIZATION, dY*=AMORTIZATION;
               THETA+=dX, PHI+=dY;
            }

            //set model matrix to I4

            mo_matrix[0] = 1, mo_matrix[1] = 0, mo_matrix[2] = 0,
            mo_matrix[3] = 0,

            mo_matrix[4] = 0, mo_matrix[5] = 1, mo_matrix[6] = 0,
            mo_matrix[7] = 0,

            mo_matrix[8] = 0, mo_matrix[9] = 0, mo_matrix[10] = 1,
            mo_matrix[11] = 0,

            mo_matrix[12] = 0, mo_matrix[13] = 0, mo_matrix[14] = 0,
            mo_matrix[15] = 1;

            rotateY(mo_matrix, THETA);
            rotateX(mo_matrix, PHI);

            time_old = time;
            gl.enable(gl.DEPTH_TEST);

            // gl.depthFunc(gl.LEQUAL);

            gl.clearColor(0.5, 0.5, 0.5, 0.9);
            gl.clearDepth(1.0);
            gl.viewport(0.0, 0.0, canvas.width, canvas.height);
            gl.clear(gl.COLOR_BUFFER_BIT | gl.DEPTH_BUFFER_BIT);

            gl.uniformMatrix4fv(_Pmatrix, false, proj_matrix);
            gl.uniformMatrix4fv(_Vmatrix, false, view_matrix);
            gl.uniformMatrix4fv(_Mmatrix, false, mo_matrix);

            gl.bindBuffer(gl.ELEMENT_ARRAY_BUFFER, index_buffer);
            gl.drawElements(gl.TRIANGLES, indices.length, gl.UNSIGNED_SHORT, 0);

            window.requestAnimationFrame(animate);
         }
         animate(0);
      </script>
   </body>
</html>
If you run this example, it will produce the following output −
