- Web2py - Home
- Web2py - Introduction
- Web2py - Python Language
- Web2py - Framework Overview
- Web2py - Core
- Web2py - Views
- Web2py - Database Abstraction Layer
- Web2py - Forms & Validators
- Web2py - Email & SMS
- Web2py - Access Control
- Web2py - Services
- Web2py - Adding Ajax Effects
- Web2py - Components
- Web2py - Deployment
- Web2py - Security
Web2py - Views
web2py framework uses Models, Controllers and Views in its applications. It includes a slightly modified Python syntax in the Views for more readable code without any restriction as imposed on proper Python usage.
The main purpose of a web2py View is to embed the python code in an HTML document. However, it faces some issues, which are as follows −
- Escaping of embedded python code in an HTML document.
- Following indentation based on Python, which may affect HTML rules.
To escape with the problems, web2py uses delimiters {{..}} in the view section. The delimiters help in escaping the embedded python code. It also helps in following the HTML rules of indentation.
The code included within {{..}} delimiters include unintended Python code. Since Python normally uses indentation to delimit blocks of code, the unintended code within the delimiters should be maintained in proper way. To overcome this problem, web2py uses the pass keyword.
The code block beginning with a line terminates with a colon and ends with a line beginning with pass.
Note − pass is a Python keyword, it is not a web2py keyword.
The following code shows the implementation of pass keyword −
{{
   if num > 0:
      response.write('positive number')
   else:
      response.write('negative number')
      pass
}}
HTML Helpers
web2py includes helper class which can be used to build HTML programmatically. It corresponds to the HTML tags, termed as HTML helpers.
For example −
[(A('Home', _href = URL('default', 'home')), False, None, []), ...]
Here, A is the helper corresponding to the anchor <a> tag of HTML. It builds the HTML anchor <a> tag programmatically.
HTML helpers consists of two types, namely positional and named arguments.
Positional arguments are interpreted as objects contained between the HTML open and close tags.
Named arguments begins with an underscore are interpreted as HTML tag.
Helpers are also useful in serialization of strings, with the _str_ and xml methods. For example −
>>> print str(DIV(hello world))
Output
<div> hello world </div>
Note − HTML helpers provide a server-side representation of the Document Object Model (DOM).
XML Helpers
XML is termed as an object, which encapsulates text that should not be escaped. The text may or may not contain valid XML.
For example, for the below mentioned code, it could contain JavaScript.
>>> print XML('<script>alert("unsafe!")</script>')
Output
<script> alert(unsafe!)</script>
Built-in Helpers
There are many built-in helpers used in web2py. Some of the HTML built-in helpers are listed as below.
| Name | Usage | Example |
|---|---|---|
| A | This helper is used to build links. It corresponds to the anchor tag |
[
(A('Home', _href = URL('default', 'home')), False, None, []),
...]
|
| B | This helper helps in making the contents of the text, bold. |
B('<hello>', XML('<i>world</i>'), _class = 'test', _id = 0)
|
| BODY | This helper makes the body of a page. It also includes a multiplication operator to increase the number of breaks. |
BR() |
| CODE | It performs syntax highlighting for Python, C, C++ and web2py code. This helper also has the ability to link an API documentation. |
CODE('print "hello"', language = 'python').xml()
|
| FIELDSET | It creates an input field together with its label. |
FIELDSET('Height:', INPUT(_name = 'height'), _class = 'test')
|
| HEAD | It helps in tagging <head> tag of an HTML page. |
HEAD(TITLE('<hello>'))
|
| IMG | It helps in embedding images for the given HTML page. |
IMG(_src = 'http://example.com/image.png',_alt = 'test') |
Custom Helpers
These helpers are used to customize the tags as per the requirements. web2py uses following custom helpers −
TAG
web2py uses TAG as the universal tag generator. It helps in generating customized XML tags. The general syntax is as follows −
{{ = TAG.name('a', 'b', _c = 'd')}}
It generates the XML code as : <name c = "d">ab</name>
TAG is an object and TAG.name or TAG['name'] is a function that returns a temporary helper class.
MENU
This helper makes a list of the list items or the values of the menu items, generating a tree-like structure representing the menu. The list of menu items is in the form of response.menu. For example −
print MENU([['One', False, 'link1'], ['Two', False, 'link2']])
The output will be displayed as follows −
<ul class = "web2py-menu web2py-menu-vertical">
   <li><a href = "link1">One</a></li>
   <li><a href = "link2">Two</a></li>
</ul>
BEAUTIFY
It helps in building representations of compound objects, including lists and dictionaries. For example,
{{ = BEAUTIFY({"a": ["hello", XML("world")], "b": (1, 2)})}}
It returns an XML object serializable to XML, with a representation of its constructor argument. In this case, the representation would be −
{"a": ["hello", XML("world")], "b": (1, 2)}
The output will be rendered as −
<table>
   <tr>
      <td>a</td>
      <td>:</td>
      <td>hello<br />world</td>
   </tr>

   <tr>
      <td>b</td>
      <td>:</td>
      <td>1<br />2</td>
   </tr>
</table>
Server-side DOM Rendering
Server-side rendering allows a user to pre-render the initial state of web2py components. All the derived helpers provide search element and elements to render DOM on server side.
The element returns the first child element matching a specified condition. On the other hand, elements return a list of all the matching children. Both use same syntax.
This can be demonstrated with the following example −
a = DIV(DIV(DIV('a', _id = 'target',_class = 'abc')))
d = a.elements('div#target')
d[0][0] = 'changed'
print a
The output is given as −
<div><div><div id = "target" class = "abc">changed</div></div></div>
Page Layout
Views are used to display the output to the end users. It can extend as well as include other views as well. This will implement a tree-like structure.
Example − index.html extends to layout.html which can include menu.html which in turn includes header.html.
{{extend 'layout.html'}}
<h1>Hello World</h1>
{{include 'page.html'}}
Example
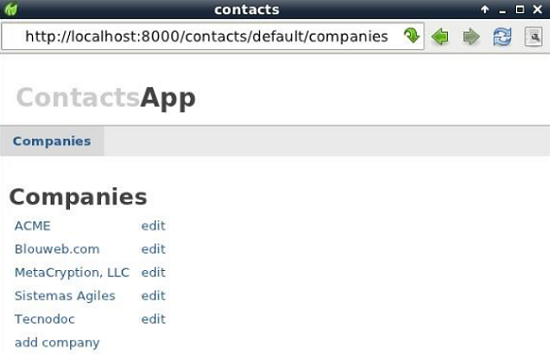
In the previous chapters, we created models and controllers for the company module. Now, we will focus on the creation of view, which helps in rendering the display of data.
By default, the views in web2py include layout.html and index.html, which defines the overall section of displaying data.
{{extend 'layout.html'}}
<h2>Companies</h2>

<table>
   {{for company in companies:}}
   <tr>
      <td>{{ = A(company.name, _href = URL('contacts', args = company.id))}}</td>
      <td>{{ = A('edit', _href = URL('company_edit', args = company.id))}}</td>
   </tr>

   {{pass}}
   <tr>
      <td>{{ = A('add company', _href = URL('company_create'))}}</td>
   </tr>

</table>
The output will be as follows −