- Web2py - Home
- Web2py - Introduction
- Web2py - Python Language
- Web2py - Framework Overview
- Web2py - Core
- Web2py - Views
- Web2py - Database Abstraction Layer
- Web2py - Forms & Validators
- Web2py - Email & SMS
- Web2py - Access Control
- Web2py - Services
- Web2py - Adding Ajax Effects
- Web2py - Components
- Web2py - Deployment
- Web2py - Security
Web2py - Quick Guide
Web2py - Introduction
web2py is defined as a free, open-source web framework for agile development which involves database-driven web applications; it is written in Python and programmable in Python. It is a full-stack framework; it consists of all the necessary components, a developer needs to build a fully functional web application.
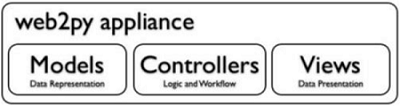
web2py framework follows the Model-View-Controller pattern of running web applications unlike traditional patterns.
Model is a part of the application that includes logic for the data. The objects in model are used for retrieving and storing the data from the database.
View is a part of the application, which helps in rendering the display of data to end users. The display of data is fetched from Model.
Controller is a part of the application, which handles user interaction. Controllers can read data from a view, control user input, and send input data to the specific model.
web2py has an in-built feature to manage cookies and sessions. After committing a transaction (in terms of SQL), the session is also stored simultaneously.
web2py has the capacity of running the tasks in scheduled intervals after the completion of certain actions. This can be achieved with CRON.
web2py Workflow
Take a look at the workflow diagram given below.
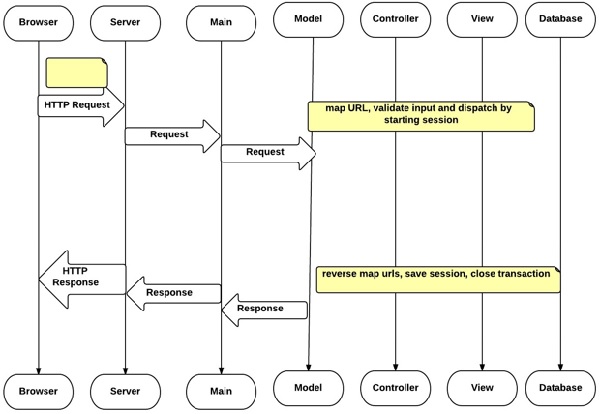
The workflow diagram is described below.
The Models, Views and Controller components make up the user web2py application.
Multiple applications can be hosted in the same instance of web2py.
The browser sends the HTTP request to the server and the server interacts with Model, Controller and View to fetch the necessary output.
The arrows represent communication with the database engine(s). The database queries can be written in raw SQL or by using the web2py Database Abstraction Layer (which will be discussed in further chapters), so that web2py application code is independent of any database engine.
Model establishes the database connection with the database and interacts with the Controller. The Controller on the other hand interacts with the View to render the display of data.
The Dispatcher maps the requested URL as given in HTTP response to a function call in the controller. The output of the function can be a string or a hash table.
The data is rendered by the View. If the user requests an HTML page (the default), the data is rendered into an HTML page. If the user requests the same page in XML, web2py tries to find a view that can render the dictionary in XML.
The supported protocols of web2py include HTML, XML, JSON, RSS, CSV, and RTF.
Model-View-Controller
The model-view-controller representation of web2py is as follows −
Model
"db.py" is the model:
db = DAL('sqlite://storage.sqlite')
db.define_table(employee, Field('name'), Field(phone))
The Model includes the logic of application data. It connects to the database as mentioned in the figure above. Consider SQLite is being used and is stored in storage.sqlite file with a table defined as employee. If the table does not exist, web2py helps by creating the respective table.
Controller
The program "default.py" is the Controller.
def employees():
   grid = SQLFORM.grid(db.contact, user_signature = False)
   return locals()
In web2py, URL mapping helps in accessing the functions and modules. For the above example, the Controller contains a single function (or "action") called employees.
The action taken by the Controller returns a string or a Python dictionary, which is a combination of key and value including a local set of variables.
View
"default/contacts.html" is the View.
{{extend 'layout.html'}}
<h1>Manage My Employees</h1>
{{=grid}}
For the given example, View displays the output after the associated controller function is executed.
The purpose of this View is to render the variables in the dictionary, which is in the form of HTML. The View file is written in HTML, but it embeds Python code with the help of {{ and }} delimiters.
The code embedded into HTML consists of Python code in the dictionary.
Start with web2py
web2py comes in binary packages for all the major operating systems like Windows, UNIX and Mac OS X.
It is easy to install web2py because −
It comprises of the Python interpreter, so you do not need to have it pre-installed. There is also a source code version that runs on all the operating systems.
The following link comprises of the binary packages of web2py for download as per the users need − www.web2py.com
The web2py framework requires no pre-installation unlike other frameworks. The user needs to download the zip file and unzip as per the operating system requirement.
The web2py framework is written in Python, which is a complete dynamic language that does not require any compilation or complicated installation to run.
It uses a virtual machine like other programming languages such as Java or .net and it can transparently byte-compile the source code written by the developers.
| Operating System | Command |
|---|---|
| Unix and Linux (source distribution) | python web2py.py |
| OS X (binary distribution) | open web2py.app |
| Windows (binary web2py distribution) | web2py.exe |
| Windows (source web2py distribution) | c:/Python27/python.exe web2py.py |
Web2py - Python Language
Python can be defined as a combination of object-oriented and interactive language. It is an open source software. Guido van Rossum conceived python in the late 1980s.
Python is a language similar to PERL (Practical Extraction and Reporting Language), which has gained popularity because of its clear syntax and readability.
The main notable features of Python are as follows −
Python is said to be relatively easy to learn and portable. Its statements can be easily interpreted in a number of operating systems, including UNIX-based systems, Mac OS, MS-DOS, OS/2, and various versions of Windows.
Python is portable with all the major operating systems. It uses an easy to understand syntax, making the programs, which are user friendly.
It comes with a large standard library that supports many tasks.
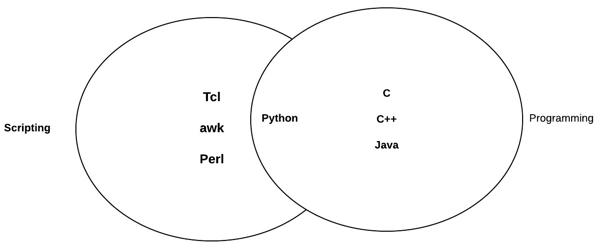
From the above diagram, it is clearly visible that Python is a combination of scripting as well as programming language. They are interpreted within another program like scripting languages.
Versions of Python
Python has three production-quality implementations, which are called as CPython, Jython, and IronPython. These are also termed as versions of Python.
Classic Python a.k.a CPython is a compiler, interpreter and consists of built-in and optional extension modules which is implemented in standard C language.
Jython is a Python implementation for Java Virtual Machine (JVM).
IronPython is designed by Microsoft, which includes Common Language Runtime (CLR). It is commonly known as .NET
Starting Up
A basic Python program in any operating system starts with a header. The programs are stored with .py extension and Python command is used for running the programs.
For example, python_rstprogram.py will give you the required output. It will also generate errors, if present.
Python uses indentation to delimit blocks of code. A block starts with a line ending with colon, and continues for all lines in the similar fashion that have a similar or higher indentation as the next line.
# Basic program in Python
print "Welcome to Python!\n"
The output of the program will be −
Welcome to Python!
Indentation
Indentations of the programs are quite important in Python. There are some prejudices and myths about Python's indentation rules for the developers who are beginners to Python.
The thumb rule for all the programmers is −
Whitespace is significant in Python source code.
Leading whitespace, which includes spaces and tabs at the beginning of a logical line of Python computes the indentation level of line.
Note
The indentation level also determines the grouping of the statements.
It is common to use four spaces i.e. tab for each level of indentation.
It is a good policy not to mix tabs with spaces, which can result in confusion, which is invisible.
Python also generates a compile time error if there is lack of indentation.
IndentationError: expected an indented block
Control Flow Statements
The control flow of a Python program is regulated by conditional statements, loops and function calls.
The If statement, executes a block of code under specified condition, along with else and elif(a combination of else-if).
The For statement, iterates over an object, capturing each element to a local variable for use by the attached block.
The While statement, executes a block of code under the condition, which is True.
The With statement, encloses a code block within the context manager. It has been added as a more readable alternative to the try/finally statement.
# If statement in Python
   x = int(raw_input("Please enter an integer: ")) #Taking input from the user
if x<0:
   print "1 - Got a negative expression value"
   print x
else:
   print "1 - Got a positive expression value"
   print x
print "Good bye!"
Output
sh-4.3$ python main.py
Please enter an integer: 4
1 - Got a positive expression value
4
Good bye!
Functions
The statements in a typical Python program are organized and grouped in a particular format called, Functions". A function is a group of statements that perform an action based on the request. Python provides many built-in functions and allows programmers to define their own functions.
In Python, functions are values that are handled like other objects in programming languages.
The def statement is the most common way to define a function. def is a single-clause compound statement with the following syntax −
def function-name (parameters):statement(s)
The following example demonstrates a generator function. It can be used as an iterable object, which creates its objects in a similar way.
def demo ():
   for i in range(5):
      yield (i*i)

for j in demo():
   print j
Output
sh-4.3$ python main.py
0
1
4
9
16
Special Attributes, Methods, and Operators
The attributes, methods, and operators starting with double underscore of a class are usually private in behavior. Some of them are reserved keywords, which include a special meaning.
Three of them are listed below −
__len__
__getitem__
__setitem__
The other special operators include __getattr__ and __setattr__, which defines the get and set attributes for the class.
File I/O Functions
Python includes a functionality to open and close particular files. This can be achieved with the help of open(), write() and close() functions.
The commands which help in file input and output are as follows −
| Sr.No | Command & Functionality |
|---|---|
| 1 |
open() It helps in opening a file or document |
| 2 |
write() It helps to write a string in file or document |
| 3 |
read() It helps in reading the content in existing file |
| 4 |
close() This method closes the file object. |
Example
Consider a file named demo.txt, which already exists with a text This is a demo file.
#!/usr/bin/python
# Open a file
fo = open("demo.txt", "wb")
fo.write( "Insering new line \n");
# Close opend file
fo.close()
The string available after opening the file will be −
This is a demo file
Inserting a new line
Web2py - Framework Overview
web2py is a full-stack web framework that can be used by a developer to completely develop a web application. It includes SQL database integration and multi-threaded web server for designing a program.
Web Interface for Designing a Users Program
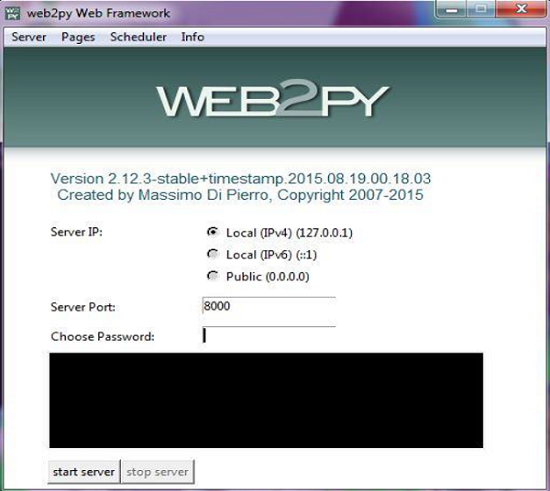
Once the command is executed as per the operating system, web2py displays a startup window and then displays a GUI widget that asks the user to choose −
- a one-time administrator password,
- the IP address of the network interface to be used for the web server,
- and a port number from which to serve requests.
The administrator includes all the authority for addition and editing any new web application.
By default, web2py runs its web server on 127.0.0.1:8000 (port 8000 on localhost) but a user can run it on any available IP address and port as per the requirement.
The web2py GUI widget will be displayed as shown below.
The password is used in the administrative interface for any changes in the new module.
After the user has set the administration password, web2py starts up the web browser at the page with the following URL − http://127.0.0.1:8000/
The welcome page of the framework will be displayed as shown below.
Designing a Basic Program in web2py
After starting the web2py application, with the above-mentioned URL, we can use the administrative interface for creating a new module, for example, helloWorld.
The administrative interface will ask for the password for authentication purpose as the administrator holds all the authority for addition and editing any new web application.
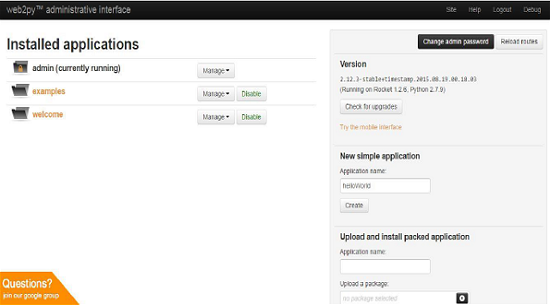
The snapshot given above includes the page details, which lists all the installed web2py applications and allows the administrator to manage them. By default, the web2py framework comes with three applications. They are −
An admin application, which the user is implementing currently.
An examples application, with the online interactive documentation and an instance of the web2py official website.
A welcome application. It includes the basic template for any other web2py application. It is also known as the scaffolding application. The application also welcomes a user at the startup.
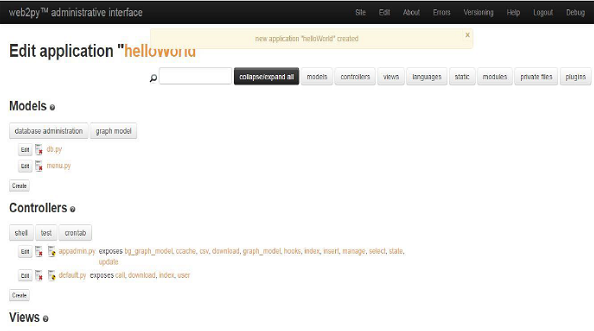
Let the name of the new application be helloWorld.
Once, a new application is created, the user is redirected to a page comprising of view, model and controllers of the respective application.
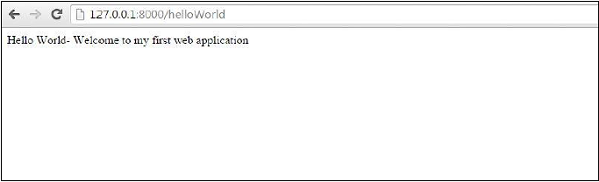
The user can look at the newly created application by mentioning the following URL − http://127.0.0.1:8000/helloWorld
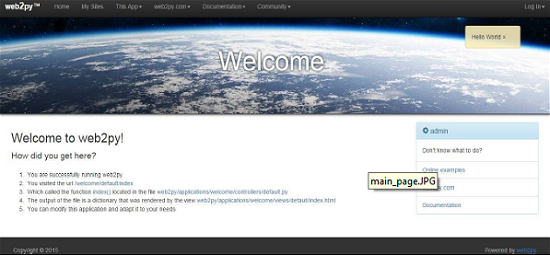
By default, a user can view the following screen on hitting the above-mentioned URL.
For printing the message of the given web application helloWorld, the change is made in the default.py controller.
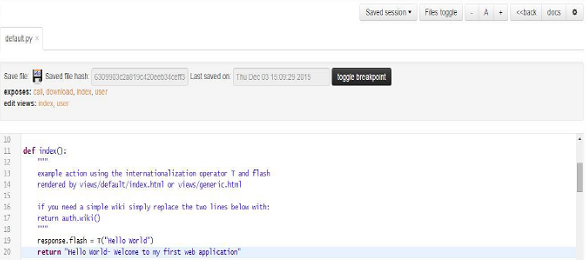
The function named index is the default function for returning the value and displaying the necessary output. As mentioned above, the string Hello World- Welcome to my first web application is used as the return value, which displays the output in the screen.
The output is displayed as follows −
Postbacks
The mechanism of validating the input of form is very common and is not considered as such a good programming practice. The input is validated each time, which is a burden for validation.
A better pattern in web2py is to submit forms to the same action, which generates them. This mechanism is called as postback which is the main feature of web2py. In short, self-submission is achieved in postback.
def first():
   if request.vars.visitor_name: #if visitor name exists
      session.visitor_name = request.vars.visitor_name
      redirect(URL('second'))#postback is implemented
   return dict()
CRUD Application
web2py includes applications, which perform the functions of Create, retrieve, update and delete. The CRUD cycle describes the elemental functions of a database, which is persistent.
All the application logic is written in the models, which are retrieved by the controllers and displayed to the users with the help of view.
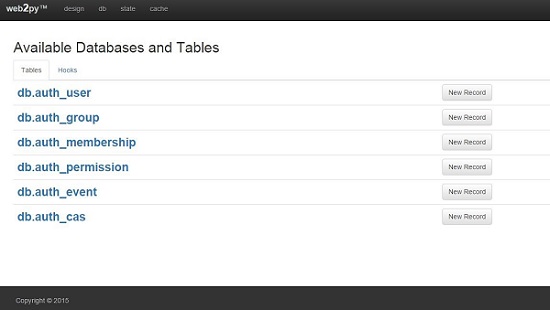
appadmin
For PHP, the application server includes listing of all the databases under phpmyadmin. In a similar way, web2py provides an interface for managing, creating and deleting tables or databases, which is termed as appadmin.
Before implementing the logic behind the tables, it is necessary to create database and its associated tables.
The URL to access appadmin −
http://127.0.0.1:8000/applicationname/appadmin
On hitting the URL, the user will get the list of tables associated for the given application.
This interface is not intended to be public. It is designed to get an easy access to the database. It consists of two files namely − a controller appadmin.py and a view appadmin.html.
It can paginate up to 100 records at a time. The usage of appadmin is discussed in subsequent chapters.
Web2py - Core
Command Line Options
We have learnt how to start the web2py server using GUI widget in the previous chapter.
This widget can be skipped by starting the server from command line prompt.
python web2py.py -a 'your password' -i 127.0.0.1 -p 8000
Whenever web2py server starts, it creates a file "parameters_8000.py" where all the passwords are stored in a hashed form.
For additional security purpose, the following command line can be used −
python web2py.py -a '<recycle>' -i 127.0.0.1 -p 8000
For the above scenario, web2py reuses the hashed passwords stored in "parameters_8000.py".
In case, if the file "parameters_8000.py" is deleted accidently or due to some other reasons, the web-based administrative interface is disabled in web2py.
URL Mapping / Dispatching
The functioning of web2py is based on model-view-controller, which maps the URL in a specific form − http://127.0.0.1:8000/a/d/f.html
It routes till the function f() mentioned in the controller d.py is under the application named a. If the controller is not present in the application then web2py uses a default controller named default.py.
If the function, as given in the URL is not present, then the default function called init() is used. The working of the URL is shown schematically in the image below.
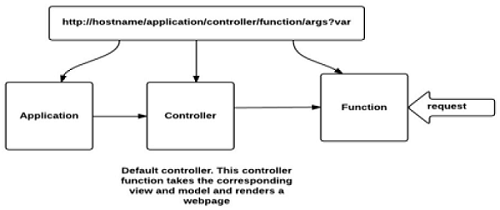
The extension .html is optional for the URL. The extension determines the extension of View that renders the output of the function defined in the controller. The same content is served in multiple formats namely html, xml, json, rss etc.
The request is passed, based on the functions, which accept the arguments and gives the appropriate output to the user. It is the controller, which interacts with model and view of the application for giving the output as per the users need.
web2py Workflow
The workflow of web2py is discussed below −
The web server manages each and every HTTP requests simultaneously in its own thread.
The HTTP request header is parsed and passed to the dispatcher.
The Dispatcher manages the application requests and maps the PATH_INFO in the URL of the function call. Every function call is represented in the URL.
All the requests for files included in the static folder are managed directly, and large file are streamed to the client.
Requests for anything but a static file are mapped into an action.
If the request header contains a session cookie for the app, the session object is retrieved; or else, a session id is created.
If the action returns a value as string, this is returned to the client.
If the action returns an iterable, it is used to loop and stream the data to the client.
Conditional Models
In the previous chapter, we saw the functionality of the Controllers. web2py uses models, views and controllers in each of its application. Therefore, it is also necessary to understand the functionality of the Model.
Unlike any other MVC application, Models in web2py are treated as conditional. Models in subfolders are executed, based on its controllers usage. This can be demonstrated with following example −
Consider the URL − http://127.0.0.1:8000/a/d/f.html
In this case, a is the name of the application, d is the controllers name and f() is the function associated with the controller. The list of models, which will be executed are as follows −
applications/a/models/*.py
applications/a/models/d/*.py
applications/a/models/d/f/*.py
Libraries
web2py includes libraries, which are exposed to the all the applications as the objects. These objects are defined inside the core files under the directory named gluon.
Many of the modules like DAL template have no dependencies and can be implemented outside the framework of web2py. It also maintains the unit tests which is considered as good practice.
Applications
web2py applications are shown below in a diagrammatic form.
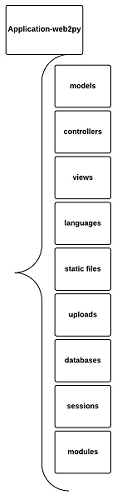
The Applications developed in web2py are composed of the following parts −
Models − Represents data and database tables.
Controllers − Describes the application logic and workflow.
Views − Helps rendering the display of the data.
Languages − describe how to translate strings in the application into various supported languages.
Static files − Do not require processing (e.g. images, CSS style sheets etc).
ABOUT and README − Details of the project.
Errors − Stores error reports generated by the application.
Sessions − Stores information related to each particular user.
Databases − store SQLite databases and additional table information.
Cache − Store cached application items.
Modules − Modules are other optional Python modules.
Private − Included files are accessed by the controllers but not directly by the developer.
Uploads − Files are accessed by the models but not directly by the developer.
API
In web2py, models, controllers and views are executed in an environment where certain objects are imported for the developers.
Global Objects − request, response, session, cache.
Helpers − web2py includes helper class, which can be used to build HTML programmatically. It corresponds to HTML tags, termed as HTML helpers.
For example, A, B, FIELDSET, FORM, etc.
Session
A session can be defined as a server-side storage of information, which is persisted throughout the user's interaction throughout the web application.
Session in web2py is the instance of storage class.
For example, a variable can be stored in session as
session.myvariable = "hello"
This value can be retrieved as
a = session.myvariable
The value of the variable can be retrieved as long as the code is executed in the same session by the same user.
One of the important methods in web2py for session is forget −
session.forget(response);
It instructs web2py not to save the session.
Running Tasks in Background
An HTTP request arrives to the web server, which handles each request in its own thread, in parallel. The task, which is active, takes place in the foreground while the others are kept in background. Managing the background tasks is also one of the main features of web2py.
Time-consuming tasks are preferably kept in the background. Some of the mechanisms are listed as follows, which manage the background tasks −
CRON
Queues
Scheduler
CRON
In web2py, CRON gives the ability to run the task within the specified intervals of the time. Each application includes a CRON file, which defines its functionalities.
Scheduler
The built-in scheduler helps in running the tasks in background by setting the priority. It provides a mechanism for creating, scheduling and modifying the tasks.
The scheduled events are listed in models with the file name scheduler.py.
Building an Application
We had an overview of creating models and controllers in web2py. Here, we will focus on the creation of the application named Contacts. The application needs to maintain a list of companies, and a list of people who work at those companies.
Creation of Model
Here, identification of the tables for the data dictionary is the model. The model for the contacts application will be created under the models folders. The file is stored in models/db_contacts.py.
# in file: models/db_custom.py
db.define_table('company', Field('name', notnull = True, unique = True), format = '%(name)s')
db.define_table(
   'contact',
   Field('name', notnull = True),
   Field('company', 'reference company'),
   Field('picture', 'upload'),
   Field('email', requires = IS_EMAIL()),
   Field('phone_number', requires = IS_MATCH('[\d\-\(\) ]+')),
   Field('address'),
   format = '%(name)s'
)

db.define_table(
   'log',
   Field('body', 'text', notnull = True),
   Field('posted_on', 'datetime'),
   Field('contact', 'reference contact')
)
Once the above file is created, the tables can be accessed with the help of URL http://127.0.0.1:8000/contacts/appadmin
Creation of Controller
The Controller will include some functions for listing, editing and deleting the contacts.
# in file: controllers/default.py
def index():return locals()
def companies():companies = db(db.company).select(orderby = db.company.name)
return locals()

def contacts():company = db.company(request.args(0)) or redirect(URL('companies'))
contacts = db(db.contact.company == company.id).select(orderby = db.contact.name)
return locals()

@auth.requires_login()
def company_create():form = crud.create(db.company, next = 'companies')
return locals()

@auth.requires_login()
def company_edit():company = db.company(request.args(0)) or redirect(URL('companies'))
form = crud.update(db.company, company, next='companies')
return locals()

@auth.requires_login()
def contact_create():db.contact.company.default = request.args(0)
form = crud.create(db.contact, next = 'companies')
return locals()

@auth.requires_login()
def contact_edit():contact = db.contact(request.args(0)) or redirect(URL('companies'))
form = crud.update(db.contact, contact, next = 'companies')
return locals()

def user():return dict(form = auth())
The creation of the view along with its output will be discussed in the next chapter.
Web2py - Views
web2py framework uses Models, Controllers and Views in its applications. It includes a slightly modified Python syntax in the Views for more readable code without any restriction as imposed on proper Python usage.
The main purpose of a web2py View is to embed the python code in an HTML document. However, it faces some issues, which are as follows −
- Escaping of embedded python code in an HTML document.
- Following indentation based on Python, which may affect HTML rules.
To escape with the problems, web2py uses delimiters {{..}} in the view section. The delimiters help in escaping the embedded python code. It also helps in following the HTML rules of indentation.
The code included within {{..}} delimiters include unintended Python code. Since Python normally uses indentation to delimit blocks of code, the unintended code within the delimiters should be maintained in proper way. To overcome this problem, web2py uses the pass keyword.
The code block beginning with a line terminates with a colon and ends with a line beginning with pass.
Note − pass is a Python keyword, it is not a web2py keyword.
The following code shows the implementation of pass keyword −
{{
   if num > 0:
      response.write('positive number')
   else:
      response.write('negative number')
      pass
}}
HTML Helpers
web2py includes helper class which can be used to build HTML programmatically. It corresponds to the HTML tags, termed as HTML helpers.
For example −
[(A('Home', _href = URL('default', 'home')), False, None, []), ...]
Here, A is the helper corresponding to the anchor <a> tag of HTML. It builds the HTML anchor <a> tag programmatically.
HTML helpers consists of two types, namely positional and named arguments.
Positional arguments are interpreted as objects contained between the HTML open and close tags.
Named arguments begins with an underscore are interpreted as HTML tag.
Helpers are also useful in serialization of strings, with the _str_ and xml methods. For example −
>>> print str(DIV(hello world))
Output
<div> hello world </div>
Note − HTML helpers provide a server-side representation of the Document Object Model (DOM).
XML Helpers
XML is termed as an object, which encapsulates text that should not be escaped. The text may or may not contain valid XML.
For example, for the below mentioned code, it could contain JavaScript.
>>> print XML('<script>alert("unsafe!")</script>')
Output
<script> alert(unsafe!)</script>
Built-in Helpers
There are many built-in helpers used in web2py. Some of the HTML built-in helpers are listed as below.
| Name | Usage | Example |
|---|---|---|
| A | This helper is used to build links. It corresponds to the anchor tag |
[
(A('Home', _href = URL('default', 'home')), False, None, []),
...]
|
| B | This helper helps in making the contents of the text, bold. |
B('<hello>', XML('<i>world</i>'), _class = 'test', _id = 0)
|
| BODY | This helper makes the body of a page. It also includes a multiplication operator to increase the number of breaks. |
BR() |
| CODE | It performs syntax highlighting for Python, C, C++ and web2py code. This helper also has the ability to link an API documentation. |
CODE('print "hello"', language = 'python').xml()
|
| FIELDSET | It creates an input field together with its label. |
FIELDSET('Height:', INPUT(_name = 'height'), _class = 'test')
|
| HEAD | It helps in tagging <head> tag of an HTML page. |
HEAD(TITLE('<hello>'))
|
| IMG | It helps in embedding images for the given HTML page. |
IMG(_src = 'http://example.com/image.png',_alt = 'test') |
Custom Helpers
These helpers are used to customize the tags as per the requirements. web2py uses following custom helpers −
TAG
web2py uses TAG as the universal tag generator. It helps in generating customized XML tags. The general syntax is as follows −
{{ = TAG.name('a', 'b', _c = 'd')}}
It generates the XML code as : <name c = "d">ab</name>
TAG is an object and TAG.name or TAG['name'] is a function that returns a temporary helper class.
MENU
This helper makes a list of the list items or the values of the menu items, generating a tree-like structure representing the menu. The list of menu items is in the form of response.menu. For example −
print MENU([['One', False, 'link1'], ['Two', False, 'link2']])
The output will be displayed as follows −
<ul class = "web2py-menu web2py-menu-vertical">
   <li><a href = "link1">One</a></li>
   <li><a href = "link2">Two</a></li>
</ul>
BEAUTIFY
It helps in building representations of compound objects, including lists and dictionaries. For example,
{{ = BEAUTIFY({"a": ["hello", XML("world")], "b": (1, 2)})}}
It returns an XML object serializable to XML, with a representation of its constructor argument. In this case, the representation would be −
{"a": ["hello", XML("world")], "b": (1, 2)}
The output will be rendered as −
<table>
   <tr>
      <td>a</td>
      <td>:</td>
      <td>hello<br />world</td>
   </tr>

   <tr>
      <td>b</td>
      <td>:</td>
      <td>1<br />2</td>
   </tr>
</table>
Server-side DOM Rendering
Server-side rendering allows a user to pre-render the initial state of web2py components. All the derived helpers provide search element and elements to render DOM on server side.
The element returns the first child element matching a specified condition. On the other hand, elements return a list of all the matching children. Both use same syntax.
This can be demonstrated with the following example −
a = DIV(DIV(DIV('a', _id = 'target',_class = 'abc')))
d = a.elements('div#target')
d[0][0] = 'changed'
print a
The output is given as −
<div><div><div id = "target" class = "abc">changed</div></div></div>
Page Layout
Views are used to display the output to the end users. It can extend as well as include other views as well. This will implement a tree-like structure.
Example − index.html extends to layout.html which can include menu.html which in turn includes header.html.
{{extend 'layout.html'}}
<h1>Hello World</h1>
{{include 'page.html'}}
Example
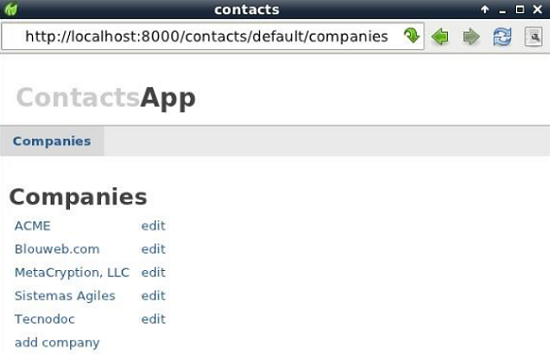
In the previous chapters, we created models and controllers for the company module. Now, we will focus on the creation of view, which helps in rendering the display of data.
By default, the views in web2py include layout.html and index.html, which defines the overall section of displaying data.
{{extend 'layout.html'}}
<h2>Companies</h2>

<table>
   {{for company in companies:}}
   <tr>
      <td>{{ = A(company.name, _href = URL('contacts', args = company.id))}}</td>
      <td>{{ = A('edit', _href = URL('company_edit', args = company.id))}}</td>
   </tr>

   {{pass}}
   <tr>
      <td>{{ = A('add company', _href = URL('company_create'))}}</td>
   </tr>

</table>
The output will be as follows −
Web2py - Database Abstraction Layer
The Database Abstraction Layer (DAL) is considered as the major strength of web2py. The DAL exposes a simple Applications Programming Interface (API) to the underlying SQL syntax.
In this chapter, we will get to know the non-trivial applications of DAL, such as building queries to search by tags efficiently and building a hierarchical category tree.
Some important features of DAL are −
web2py includes a Database Abstraction Layer (DAL), an API which maps Python objects into database objects. The database objects can be queries, tables and records.
The DAL dynamically generates the SQL in real time using the specified dialect for the database back end, so that it is not mandatory for a developer to write complete SQL query.
The major advantage of using DAL is that the applications will be portable with different kinds of databases.
Getting Started with DAL
Most applications in web2py require a database connection. Therefore, building the database model is the first step in the design of an application.
Consider the newly created application named helloWorld. The database is implemented under the Models of the application. All the models for the respective application are comprised under file named − models/db_custom.py.
The following steps are used for implementing DAL −
Step 1 - DAL Constructor
Establish a database connection. This is created using DAL object which is also called the DAL constructor.
db = DAL ('sqlite://storage.sqlite')
The notable feature of DAL is that it allows multiple connections with the same database or with different databases, even with different types of database. It is observed that this line is already in the file models/db.py. Therefore, you may not need it, unless you deleted it or need to connect to a different database. By default, web2py connects to a SQLite database stored in file storage.sqlite.
This file is located in the application's databases folder. If the file is absent, it is created by web2py when the application is first executed.
SQLite is fast, and stores all the data in one single file. This means that your data can be easily transferred from one application to another. In fact, the SQLite database(s) are packaged by web2py together with the applications. It provides full SQL support, including translations, joins, and aggregates.
There are two disadvantages of SQLite.
One is that it does not enforce column types, and there is no ALTER TABLE except for adding and dropping columns.
The other disadvantage is that the entire database is locked by any transaction that requires write access.
Step 2 - Table Constructor
Once the connection with database is established, we can use the define_table method to define new tables.
For example −
db.define_table('invoice',Field('name'))
The above method is also used among Table constructor. The syntax for the table constructor is the same. The first argument is the table name, and it is followed by a list of Field(s). The field constructor takes the following arguments −
| Sr.No | Arguments & Usage |
|---|---|
| 1 |
The field name Name of the field in table. |
| 2 |
The field type takes values having any of the datatypes such as string (default), text, boolean, integer and so on. |
| 3 |
Length Defines the maximum length. |
| 4 |
default = None This is the default value when a new record is inserted. |
| 5 |
update = None This works the same as default, but the value is used only on update, not on insert. |
| 6 |
Notnull This specifies whether the field value can be NULL or not. |
| 7 |
readable = True This specifies whether the field is readable in forms or not. |
| 8 |
writable = True This specifies whether the field is writable in forms or not. |
| 9 |
label = "Field Name" This is the label to be used for this field in forms. |
The define_table method also takes three named arguments −
Syntax
db.define_table('....',migrate=True, fake_migrate=False, format = '%(id)s')
migrate = True − This instructs web2py to create the table if it does not exist, or alter it if it does not match the model definition.
fake_migrate = False − If the model matches the database table content, then set fake_migrate = True which helps web2py to rebuild a data.
format = '%(id)s' − This is a format string that determines how records on the given table should be represented.
Generating Raw SQL
Using DAL, we can establish a connection to database and create new tables and their fields using the table constructor and field constructor.
Sometimes, it is necessary to generate SQL statements to conform to the necessary output. web2py includes various functions, which help in generating raw SQL, which are given as follows −
_insert
It helps in fetching insert statements for the given table. For example,
print db.person._insert(name ='ABC')
It will retrieve the insert statement for table named person.
SQL statement output −
INSERT INTO person(name) VALUES ('ABC');
_count
It helps in fetching SQL statement, which gives the count of records. For example, consider a table named person and we need to find the count of persons with name ABC.
print db(db.person.name ==' ABC ')._count()
SQL statement output −
SELECT count(*) FROM person WHERE person.name = ' ABC ';
_select
It helps in fetching select SQL statements. For example, consider a table named person and we need to find the list of persons with name ABC.
print db(db.person.name == ' ABC ')._select()
SQL statement output −
SELECT person.name FROM person WHERE person.name = ' ABC ';
_delete
It helps in fetching the delete SQL statements. For example, consider for table named person and we need to delete the statements with name ABC
print db(db.person.name == ' ABC ')._delete()
SQL statement output −
DELETE FROM person WHERE person.name = ' ABC ';4
_update
It helps in fetching updated SQL statements. For example, consider for table named person and we need to update a column name with some other value
print db(db.person.name == ' ABC ')._update()
SQL statement output −
UPDATE person SET WHERE person.name = Alex;
Issues with DAL (Gotchas)
SQLite
SQLite lacks the support of dropping or altering the columns. Deleting a field from the table keeps it active in the database, due to which web2py will not be aware of any changes made.
In this case, it is necessary to set the fake_migrate = True which will help to redefine the metadata such that any changes such as alter or delete will be kept under the knowledge of web2py.
SQLite does not support Boolean types. For this, web2py internally maps the Booleans to 1 character string, with 'T' and 'F' representing true and False respectively.
MySQL
MySQL does not support ALTER TABLE feature. Thus, migration of database involves multiple commits. This situation can be avoided by setting the parameter fake_migrate = True while defining the database, which will persist all the metadata.
Oracle
Oracle does not support the feature of pagination of records. It also lacks the support for the keywords OFFSET or limit. For this, web2py achieves pagination with the help of a complex three-way nested select of DAL. DAL needs to handle pagination on its own, if Oracle database has been used.
Web2py - Forms & Validators
web2py comes with powerful functions for form generation. Four distinct ways to build forms in web2py are as follows −
FORM − In terms of HTML helpers, it is considered as a low-level implementation. A FORM object is aware of its field contents.
SQLFORM − It provides the functionalities of Create, Update and Delete to the existing database.
SQLFORM.factory − It is considered as abstraction layer on the top of SQLFORM, which generates a form similar to SQLFORM. Here, there is no need to create a new database.
CRUD Methods − As the name suggests, it provides Create, Retrieve, Update and Delete features with the similar functionalities based on SQLFORM.
FORM
Consider an application, which accepts an input from the user and has a submit button to submit the response.
Controller
default.py controller will include the following associated function
def display_form():
   return dict()
View
The associated view "default/display_form.html" will render the display of form in HTML as −
{{extend 'layout.html'}}
<h2>Basic Form</h2>

<form enctype = "multipart/form-data" action = "{{= URL()}}" method = "post">
   Your name:
   <input name = "name" />
   <input type = "submit" />
</form>

<h2>Submitted variables</h2>
{{= BEAUTIFY(request.vars)}}
The above example is the normal HTML form, which asks for the user input. The same form can be generated with the helpers like FORM object.
Controller
def display_form():
   form = FORM('Value:', INPUT(_value = 'name'), INPUT(_type = 'submit'))
   return dict(form = form)
The above function in default.py controller includes FORM object (HTML helper) which helps in creation of form.
View
{{extend 'layout.html'}}
<h2>Basic form</h2>

{{= form}}
<h2>Submitted variables</h2>

{{= BEAUTIFY(request.vars)}}
He form which is generated by the statement {{= form}} serializes the FORM object. When a user fills the form and clicks on the submit button, the form self-submits, and the variable request.vars.value along with its input value is displayed at the bottom.
SQLFORM
It helps in creation of a form to the existing database. The steps for its implementation are discussed below.
Establishing connection with database using DAL, this is created using DAL object which is also called DAL constructor. After establishing the connection, user can create the respective table.
db = DAL('sqlite://storage.sqlite')
db.define_table('employee', Field('name', requires = IS_NOT_EMPTY()))
Thus, we have created a table named employee. The controller builds the form and button with the following statements −
form = SQLFORM(
   db.mytable,
   record = mytable_index,
   deletable = True,
   submit_button = T('Update')
)
Therefore, for the employee table created, the modification in the controller would be −
def display_form():
   form = SQLFORM(db.person)
There is no modification in View. In the new controller, it is necessary build a FORM, since the SQLFORM constructor built one from the table db.employee is defined in the model. The new form, when serialized, appears as follows −
<form enctype = "multipart/form-data" action = "" method = "post">

   <table>
      <tr id = "employee_name__row">
         <td>
            <label id = "person_name__label" for = "person_name">Your name: </label>
         </td>

         <td>
            <input type = "text" class = "string" name = "name" value = "" id = "employee_name" />
         </td>

         <td></td>
      </tr>

      <tr id = "submit_record__row">
         <td></td>
         <td><input value = "Submit" type = "submit" /></td>
         <td></td>
      </tr>

   </table>

   <input value = "9038845529" type = "hidden" name = "_formkey" />
   <input value = "employee" type = "hidden" name = "_formname" />

</form>
All tags in the form have names derived from the table and field name.
An SQLFORM object also deals with "upload" fields by saving uploaded files in the "uploads" folder. This is done automatically. SQLFORM displays Boolean values in the form of checkboxes and text values with the help of textareas.
SQLFORM also uses the process method.This is necessary if the user wants to keep values with an associated SQLFORM.
If form.process(keepvalues = True) then it is accepted.
Example
def display_form():
   form = SQLFORM(db.employee)
if form.process().accepted:
   response.flash = 'form accepted'

elif form.errors:
   response.flash = 'form has errors'
else:
   response.flash = 'please fill out the form'

return dict(form = form)
SQLFORM.factory
Sometimes, the user needs to generate a form in a way that there is an existing database table without the implementation of the database. The user simply wants to take an advantage of the SQLFORM capability.
This is done via form.factory and it is maintained in a session.
def form_from_factory():
   form = SQLFORM.factory(
      Field('your_name', requires = IS_NOT_EMPTY()),
      Field('your_image', 'upload'))

   if form.process().accepted:
      response.flash = 'form accepted'
      session.your_name = form.vars.your_name
      session.your_image = form.vars.your_image
   elif form.errors:
      response.flash = 'form has errors'

   return dict(form = form)
The form will appear like SQLFORM with name and image as its fields, but there is no such existing table in database.
The "default/form_from_factory.html" view will represent as −
{{extend 'layout.html'}}
{{= form}}
CRUD Methods
CRUD is an API used on top of SQLFORM. As the name suggests, it is used for creation, retrieval, updating and deletion of appropriate form.
CRUD, in comparison to other APIs in web2py, is not exposed; therefore, it is necessary that it should be imported.
from gluon.tools import Crud
crud = Crud(db)
The CRUD object defined above provides the following API −
| Sr.No | API & Functionality |
|---|---|
| 1 |
crud.tables() Returns a list of tables defined in the database. |
| 2 |
crud.create(db.tablename) Returns a create form for the table tablename. |
| 3 |
crud.read(db.tablename, id) Returns a read-only form for tablename and record id. |
| 4 |
crud.delete(db.tablename, id) deletes the record |
| 5 |
crud.select(db.tablename, query) Returns a list of records selected from the table. |
| 6 |
crud.search(db.tablename) Returns a tuple (form, records) where form is a search form. |
| 7 |
crud() Returns one of the above based on the request.args(). |
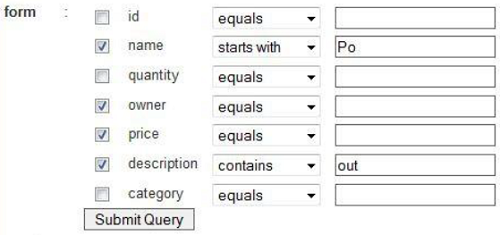
Creation of Form
Let us create a form. Follow the codes given below.
Model
A new model is created under the models folder of the application. The name of the file would be dynamic_search.py.
def build_query(field, op, value):
if op == 'equals':
return field == value
elif op == 'not equal':
return field != value
elif op == 'greater than':
return field > value
elif op == 'less than':
return field < value
elif op == 'starts with':
return field.startswith(value)
elif op == 'ends with':
return field.endswith(value)
elif op == 'contains':
return field.contains(value)
def dynamic_search(table):
tbl = TABLE()
selected = []
ops = ['equals',
'not equal',
'greater than',
'less than',
'starts with',
'ends with',
'contains']
query = table.id > 0
for field in table.fields:
chkval = request.vars.get('chk'+field,None)
txtval = request.vars.get('txt'+field,None)
opval = request.vars.get('op'+field,None)
row = TR(TD(INPUT(_type = "checkbox",_name = "chk"+field,value = chkval == 'on')),
TD(field),TD(SELECT(ops,_name = "op"+field,value = opval)),
TD(INPUT(_type = "text",_name = "txt"+field,_value = txtval)))
tbl.append(row)
if chkval:
if txtval:
query &= build_query(table[field], opval,txtval)
selected.append(table[field])
form = FORM(tbl,INPUT(_type="submit"))
results = db(query).select(*selected)
return form, results
Controller
The associated file namely dynamic_search.py under controllers section will include the following code −
def index():
   form,results = dynamic_search(db.things)
   return dict(form = form,results = results)
View
We can render this with the following view.
{{extend 'layout.html'}}
{{= form}}
{{= results}}
Here is what it looks like −
Web2py - Email & SMS
web2py includes functionalities of sending e-mail and SMS to the user. It uses libraries to send emails and sms.
Setting Up Email
The in-built class namely gluon.tools.Mail class is used to send email in web2py framework. The mailer can be defined with this class.
from gluon.tools import Mail
mail = Mail()
mail.settings.server = 'smtp.example.com:25'
mail.settings.sender = 'abc@example.com'
mail.settings.login = 'username:password'
The sender email as mentioned in the above example along with the password will be authenticated each time when an email is sent.
If the user needs to experiment or use for some debugging purpose, this can be achieved using the following code.
mail.settings.server = 'logging'
Now, all the emails will not be sent but it will be logged in the console.
Sending an Email
Once we have set the configuration settings for an email using mail object, an email can be sent to many users.
The complete syntax of mail.send() is as follows −
send(
   to, subject = 'Abc',
   message = 'None', attachments = [],
   cc = [], bcc = [], reply_to = [],
   sender = None, encoding = 'utf-8',
   raw = True, headers = {}
)
The implementation of mail.send() is given below.
mail.send(
   to = ['sender@example.com'], subject = 'hello',
   reply_to = 'abc@example.com',
   message = 'Hello ! How are you?'
)
Mail returns a Boolean expression based on the response of the mailing server, that the mail is received by the end user. It returns True if it succeeds in sending an email to the user.
The attributes to, cc and bcc includes the list of valid email addresses for which the mail is intended to be sent.
Sending SMS
The implementation for sending SMS messages differs from sending emails in web2py framework as it will require third party service that can relay the messages to the receiver. The third party service is not a free service and will obviously differ based on geographical region (from country to country).
web2py uses a module to help sending SMS with the following process −
from gluon.contrib.sms_utils
import SMSCODES, sms_email
email = sms_email('1 (111) 111-1111','T-Mobile USA (abc)')
mail.send(to = email, subject = 'test', message = 'test')
In the above example, SMSCODES is the dictionary maintained by web2py that maps the names of the major phone companies to the email address postfix.
Telephone companies usually treat emails originating from third party services as spam. A better method is that the phone companies themselves relay the SMS. Every phone company includes a unique email address for every mobile number in its storage and the SMS can be sent directly to the email.
In the above example,
The sms_email function takes a phone number (as a string), which returns the email address of the phone.
The scaffolding app includes several files. One of them is models/db.py, which imports four.
Classes from gluon.tools include mail libraries as well and defines the various global objects.
The scaffolding application also defines tables required by the auth object, such as db.auth_user. The default scaffolding application is designed to minimize the number of files, not to be modular. In particular, the model file, db.py, contains the configuration, which in a production environment, is best kept in separate files.
Here, we suggest creating a configuration file −
from gluon.storage import Storage
   settings = Storage()
   settings.production = False

   if
      settings.production:
      settings.db_uri = 'sqlite://production.sqlite'
      settings.migrate = False
   else:
      settings.db_uri = 'sqlite://development.sqlite'
      settings.migrate = True
      settings.title = request.
      settings.subtitle = 'write something here'

      settings.author = 'you'
      settings.author_email = 'you@example.come'

      settings.keywords = ''
      settings.description = ''
      settings.layout_theme = 'Default'
      settings.security_key = 'a098c897-724b-4e05-b2d8-8ee993385ae6'

      settings.email_server = 'localhost'
      settings.email_sender = 'you@example.com'
      settings.email_login = ''

      settings.login_method = 'local'
      settings.login_config = ''
Web2py - Access Control
Authentication
Almost every application needs to be able to authenticate users and set permissions. web2py comes with an extensive and customizable role-based access control mechanism.web2py. It also supports the protocols, such as CAS, OpenID, OAuth 1.0, LDAP, PAM, X509, and many more.
web2py includes a mechanism known as Role Based Access Control mechanism (RBAC) which is an approach to restricting system access to authorized users. The web2py class that implements RBAC is called Auth.
Look at the schema given below.
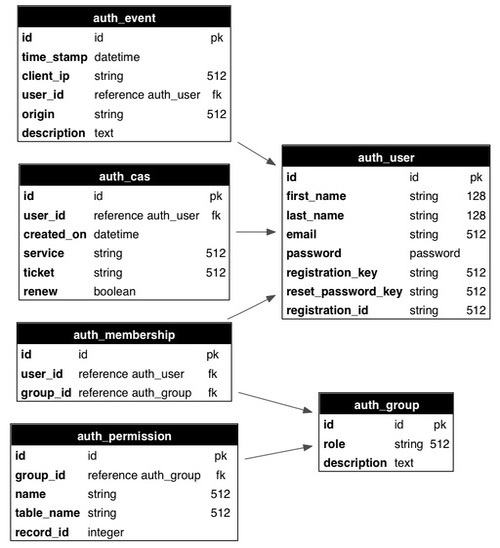
Auth defines the following tables −
| Sr.No | Table Name & Description |
|---|---|
| 1 | auth_user stores users' name, email address, password, and status. |
| 2 | auth_group stores groups or roles for users in a many-to-many structure |
| 3 | auth_membership Stores the information of links users and groups in a many-to-many structure |
| 4 | auth_permission The table links groups and permissions. |
| 5 | auth_event logs changes in the other tables and successful access |
| 6 | auth_cas It is used for Central Authentication Service |
Customizing Auth
There are two ways to customize Auth.
To define a custom db.auth_user table from scratch.
Let web2py define the auth table.
Let us look at the last method of defining the auth table. In the db.py model, replace the following line −
auth.define_tables()
Replace it with the following code −
auth.settings.extra_fields['auth_user'] = [
   Field('phone_number',requires = IS_MATCH('\d{3}\-\d{3}\-\d{4}')),
   Field('address','text')
]

auth.define_tables(username = True)
The assumption is that each user consists of phone number, username and address.
auth.settings.extra_fields is a dictionary of extra fields. The key is the name of the auth table to which to add the extra fields. The value is a list of extra fields. Here, we have added two extra fields, phone_number and address.
username has to be treated in a special way, because it is involved in the authentication process, which is normally based on the email field. By passing the username argument to the following line, it is informed to web2py that we want the username field, and we want to use it for login instead of the email field. It acts like a primary key.
auth.define_tables(username = True)
The username is treated as a unique value. There may be cases when registration happens outside the normal registration form. It also happens so, that the new user is forced to login, to complete their registration.
This can be done using a dummy field, complete_registration that is set to False by default, and is set to True when they update their profile.
auth.settings.extra_fields['auth_user'] = [
   Field('phone_number',requires = IS_MATCH('\d{3}\-\d{3}\-\d{4}'),
   comment = "i.e. 123-123-1234"),
   Field('address','text'),
   Field('complete_registration',default = False,update = True,
   writable = False, readable = False)
]

auth.define_tables(username = True)
This scenario may intend the new users, upon login, to complete their registration.
In db.py, in the models folder, we can append the following code −
if auth.user and not auth.user.complete_registration:
if not (request.controller,request.function) == ('default','user'):
   redirect(URL('default','user/profile'))
This will force the new users to edit their profile as per the requirements.
Authorization
It is the process of granting some access or giving permission of something to the users.
In web2py once the new user is created or registered, a new group is created to contain the user. The role of the new user is conventionally termed as user_[id] where id is the unique identification of the user.
The default value for the creation of the new group is −
auth.settings.create_user_groups = "user_%(id)s"
The creation of the groups among the users can be disabled by −
auth.settings.create_user_groups = None
Creation, granting access to particular members and permissions can be achieved programmatically with the help of appadmin also.
Some of the implementations are listed as follows −
| Sr.No | Command & Usage |
|---|---|
| 1 | auth.add_group('role', 'description') returns the id of the newly created group. |
| 2 | auth.del_group(group_id) Deletes the group with the specified id |
| 3 | auth.del_group(auth.id_group('user_7')) Deletes the user group with the given identification. |
| 4 | auth.user_group(user_id) Returns the value of id of group uniquely associated for the given user. |
| 5 | auth.add_membership(group_id, user_id) Returns the value of user_id for the given group_id |
| 6 | auth.del_membership(group_id, user_id) Revokes access of the given member_id i.e. user_id from the given group. |
| 7 | auth.has_membership(group_id, user_id, role) Checks whether user_id belongs to the given group. |
Central Authentication Service (CAS)
web2py provides an industry standard namely, Client Authentication Service CAS for both client and server built-in web2py. It is a third party authentication tool.
It is an open protocol for distributed authentication. The working of CAS is as follows −
If the user visits the website, the protocol checks whether the user is authenticated.
If the user is not authenticated to the application, the protocol redirects to the page where the user can register or log in to the application.
If the registration is completed, user receives an email. The registration is not complete until and unless user verifies the email.
After successful registration, the user is authenticated with the key, which is used by CAS appliance.
The key is used to get the credentials of user via HTTP request, which is set in the background.
Web2py - Services
web2py provides support for various protocols like XML, JSON, RSS, CSV, XMLRPC, JSONRPC, AMFRPC, and SOAP. Each of those protocols is supported in multiple ways, and we make a distinction between −
- Rendering the output of a function in a given format.
- Remote Procedure Calls.
Rendering a Dictionary
Consider the following code which maintains the count of the sessions.
def count():
   session.counter = (session.counter or 0) + 1
   return dict(counter = session.counter, now = request.now)
The above function increases the number of counts as and when the user visits the page. Suppose the given function is defined in default.py controller of web2py application. The page can be requested with the following URL − http://127.0.0.1:8000/app/default/count
web2py can render the above page in different protocols and by adding extension to the URL, like −
http://127.0.0.1:8000/app/default/count.html
http://127.0.0.1:8000/app/default/count.xml
http://127.0.0.1:8000/app/default/count.json
The dictionary returned by the above action will be rendered in HTML, XML and JSON.
Remote Procedure Calls
web2py framework provides a mechanism which converts a function into a web service. The mechanism described here differs from the mechanism described before because −
- Inclusion of arguments in function.
- The function must be defined in a model.
- It enforces a more strict URL naming convention.
- It works for a fixed set of protocols and it is easily extensible.
- To use this feature it is necessary to import and initiate a service object.
To implement this mechanism, at first, you must import and instantiate a service object.
from gluon.tools import Service
service = Service()
This is implemented in the "db.py" model file in the scaffolding application. Db.py model is the default model in web2py framework, which interacts with the database and the controller to achieve the desired output to the users.
After implementing, the service in model can be accessed from the controllers as and when required.
The following example shows various implementations of remote procedure calls using web services and many more.
Web Services
Web Services can be defined as a standardized way of integrating Web-based applications using the protocols like XML, SOAP, WSDL and UDDI.
web2py supports most of them, but the integration will be quite tricky.
Consuming a web2py JSON service with jQuery
There are many ways to return JSON form web2py, but here we consider the case of a JSON service. For example −
def consumer():return dict()@service.json
def get_days():return ["Sun", "Mon", "Tues", "Wed", "Thurs", "Fri", "Sat"]
def call():return service()
Here, we observe that −
the function just returns an empty dictionary to render the view, which will consume the service.
get_days defines the service, and the function call exposes all registered services.
get_days does not need to be in the controller, and can be in a model.
call is always in the default.py scaffolding controller.
View with the consumer actions are as follows −
{{extend 'layout.html'}}
<div id = "target"></div>
<script>
jQuery.getJSON("{{= URL('call',args = ['json','get_days'])}}",
function(msg){
jQuery.each(msg, function(){ jQuery("#target").
append(this + "<br />"); } )
}
);
</script>
The first argument of jQuery.getJSON is the URL of the following service − http://127.0.0.1:8000/app/default/call/json/get_days
This always follows the pattern −
http://<domain>/<app>/<controller>/call/<type>/<service>
The URL is in between {{...}}, because it is resolved at the server-side, while everything else is executed at the client-side. The second argument of jQuery.getJSON is a callback, which will be passed the JSON response.
In this case, the callback loops over each item in the response (a list of week days as strings), and appends each string, followed by a <br/> to the <div id = "target">.
In this way, web2py manages implementation of web services using jQuery.getJSON.
Web2py - Adding Ajax Effects
In this chapter, we will discuss examples of integration of jQuery plugins with web2py. These plugins help in making forms and tables more interactive and friendly to the user, thus improving the usability of your application.
In particular, we will learn
how to improve the multi-select drop-down with an interactive add option button,
how to replace an input field with a slider, and
how to display tabular data using jqGrid and WebGrid.
Although web2py is a server-side development component, the welcome scaffolding app includes the base jQuery library. This scaffolding web2py application "welcome" includes a file called views/web2py_ajax.html.
The contents of the view are as follows −
<script type = "text/javascript"><!--

   // These variables are used by the web2py_ajax_init function in web2py_ajax.js
      (which is loaded below).

   var w2p_ajax_confirm_message = "{{= T('Are you sure you want to delete this object?')}}";
   var w2p_ajax_disable_with_message = "{{= T('Working...')}}";
   var w2p_ajax_date_format = "{{= T('%Y-%m-%d')}}";
   var w2p_ajax_datetime_format = "{{= T('%Y-%m-%d %H:%M:%S')}}";

   var ajax_error_500 = '{{=T.M('An error occured, please [[reload %s]] the page') %

      URL(args = request.args, vars = request.get_vars) }}'

//--></script>

{{
   response.files.insert(0,URL('static','js/jquery.js'))
   response.files.insert(1,URL('static','css/calendar.css'))
   response.files.insert(2,URL('static','js/calendar.js'))
   response.files.insert(3,URL('static','js/web2py.js'))
   response.include_meta()
   response.include_files()
}}
The file consists of implementation of JavaScript and AJAX implementation. web2py will prevent the user from using other AJAX libraries such as Prototype, ExtJS, because it is always observed that it is easier to implement such libraries.
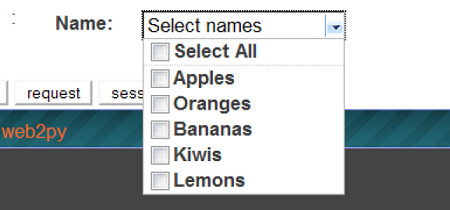
JQuery Effects
The default rendering of <select multiple = "true">..</select> is considered not so intuitive to use, in particular, when it is necessary to select non-contiguous options. This can not be called as an HTML shortcoming, but a poor design of most of the browsers. The presentation of the multiple select can be overwritten using JavaScript. This can be implemented using jQuery plugin called jquery.multiselect.js.
For this, a user should download the plugin jquery.muliselect.js from http://abeautifulsite.net/2008/04/jquery-multiselect, and place the corresponding files into static/js/jquery.multiselect.js and static/css/jquery.multiselect.css.
Example
The following code should be added in the corresponding view before {{extend layout.html}}
{{
   response.files.append('https://ajax.googleapis.com/ajax\
      /libs/jqueryui/1.8.9/jquery-ui.js')

   response.files.append('https://ajax.googleapis.com/ajax\
      /libs/jqueryui/1.8.9/themes/ui-darkness/jquery-ui.css')

   response.files.append(URL('static','js/jquery.multiSelect.js'))
   response.files.append(URL('static','css/jquery.\multiSelect.css'))
}}
Place the following after {{extend 'layout.html'}} −
<script>
   jQuery(document).ready(function(){jQuery('[multiple]').multiSelect();});
</script>
This will help to style multiselect for the given form
Controller
def index():
   is_fruits = IS_IN_SET(['Apples','Oranges','Bananas','Kiwis','Lemons'], multiple = True)
   form = SQLFORM.factory(Field('fruits','list:string', requires = is_fruits))

   if form.accepts(request,session):response.flash = 'Yummy!'
return dict(form = form)
This action can be tried with the following view −
{{
   response.files.append('https://ajax.googleapis.com/ajax\
      /libs/jqueryui/1.8.9/jquery-ui.js')

   response.files.append('https://ajax.googleapis.com/ajax\
      /libs/jqueryui/1.8.9/themes/ui-darkness/jquery-ui.css')

   response.files.append(URL('static','js/jquery.multiSelect.js'))
   response.files.append(URL('static','css/jquery.\multiSelect.css'))
}}

{{extend 'layout.html}}
<script>
   jQuery(document).ready(function(){jQuery('[multiple]'). multiSelect();});
</script>
{{= form}}
The screenshot of the output is as follows −
Some of the useful Jquery events are listed in the following table −
| Sr.No. | Event & Usage |
|---|---|
| 1 | onchange to be run when the element changes |
| 2 | onsubmit to be run when the form is submitted |
| 3 | onselect to be run when the element is selected |
| 4 | onblur to be run when the element loses focus |
| 5 | onfocus to be run when the element gets focus |
JQuery and Ajax-jqGrid
jqGrid is an Ajax-enabled JavaScript control built on jQuery that provides a solution for representing and manipulating tabular data. jqGrid is a client-side solution, and it loads data dynamically through Ajax callbacks, thus providing pagination, search popup, inline editing, and so on.
jqGrid is integrated into PluginWiki, but, here, we discuss it as a standalone for web2py programs that do not use the plugin. jqGrid deserves a book of its own but here we will only discuss its basic features and simplest integration.
The syntax of jqGrid will be as follows −
def JQGRID(
   table, fieldname = None,
   fieldvalue = None, col_widths = [],
   colnames = [], _id = None, fields = [],
   col_width = 80, width = 700,
   height = 300, dbname = 'db'
):
Web2py - Components
A component is defined as the functional part of a web page, which works autonomously. It can be composed of modules, controllers and views, which are embedded in a web page. The component in an application, must be localized tag and the performance is considered to be independent of module.
In web2py, the main focus is on using components that are loaded in page and which communicate with the component controller via AJAX.
web2py includes a function, which is called the LOAD function, which makes implementation of components easy without explicit JavaScript or AJAX programming.
Consider a simple web application namely test that extends the web2py application with custom model in file models/db_comments.py.
db.define_table(
   'comment_post', Field('body','text',
   label = 'Your comment'),auth.signature
)
The above code will create a table comment_post with the proper table definition. The action will be implemented with the help of functions in controllers/comments.py.
def post():
   return dict(
      form = SQLFORM(db.comment_post).process(),
      comments = db(db.comment_post).select()
   )
The corresponding view will be displayed as −
{{extend 'layout.html'}}
{{for post in comments:}}

<div class = "post">
   On {{= post.created_on}} {{= post.created_by.first_name}}
   says <span class = "post_body">{{= post.body}}</span>
</div>

{{pass}}
{{= form}}
The page can be accessed using the given URL − http://127.0.0.1:8000/test/comments/post
The method mentioned above is a traditional way of accessing a view, which can be changed with the implementation of the LOAD function.
This can be achieved by creating a new view with the extension ".load" that does not extend the layout.
The new view created would be "views/comments/post.load" −
<div class = "post">
   On {{= post.created_on}} {{= post.created_by.first_name}}
   says <blockquote class = "post_body">{{= post.body}}</blockquote>
</div>

{{pass}}
{{= form}}
The URL to access the page would be − http://127.0.0.1:8000/test/comments/post.load
The LOAD component can be embedded into any other page of web2py application. This can be done by using the following statement.
{{= LOAD('comments','post.load',ajax = True)}}
For example, the Controllers can be edited as −
def index():
   return dict()
In View, we can add the component −
{{extend 'layout.html'}}
{{= LOAD('comments','post.load',ajax = True)}}
The page can be accessed with the URL − http://127.0.0.1:8000/test/default/index
Component Plugins
Component plugins are the plugins, which uniquely define Components. Components access the database directly with their model definition.
As mentioned in the previous example, comments component into a comments_plugin can be done in the Models section −
"models/plugin_comments.py" −
db.define_table(
   'plugin_comments_comment',
   Field('body','text', label = 'Your comment'),
   auth.signature
)
The Controller will include the following plugin −
def plugin_comments():
   return LOAD('plugin_comments','post',ajax = True)
Web2py - Deployment
Installation of web2py in Ubuntu (Linux)
The following steps are implemented for installation of web2py in the Ubuntu Desktop.
Step 1 − Download web2py
cd /home
mkdir www-dev

cd www-dev
wget http://www.web2py.com/examples/static/web2py_src.zip
Step 2 − After the download is complete, unzip it.
unzip -x web2py_src.zip
Step 3 − Optionally install the tk library for Python, if you need to access the GUI.
sudo apt-get install python-tk
Step 4 − To start web2py, access the web2py directory and run web2py.
cd web2py
python web2py.py
The GUI will appear as follows −

After installation, each time you run it, web2py will ask you to choose a password. This password is your administrative password. If the password is left blank, the administrative interface will be disabled.
Once the server is started, web2py will redirect to the screen with following mentioned URL − http://127.0.0.1:8000/
This will conclude that web2py is perfectly running in Ubuntu desktop.
Production Deployment in Ubuntu
Step 1 − Installation of all the modules needed to run web2py.
Installation of postgreSQL
sudo apt-get install postgresql
Unzip and open ssh-server
sudo apt-get install unzip
sudo apt-get install openssh-server
Installation of Apache 2 and mod-wsgi
sudo apt-get install apache2
sudo apt-get install libapache2-mod-wsgi
Step 2 − Installation of web2py in /home/www-data
This helps for proper deployment in production environment.
sudo apt-get install unzip
sudo apt-get install openssh-server
cd /home
sudo mkdir www-data
cd www-data
Get the web2py source from the web2py site −
sudo wget http://web2py.com/examples/static/web2py_src.zip
sudo unzip web2py_src.zip
sudo chown -R www-data:www-data web2py
Step 3 − Create a self-signed certificate. SSL certificates should be obtained from a trusted Certificate Authority. Maintain an SSL folder with the certificates in it.
Step 4 − Edit the apache configuration as per the requirement of production environment.
Step 5 − Restart the Apache server and verify if the production environment works for the given IP address.
Installing web2py on Windows
Although there is a binary distribution for Windows environments (packaging executables and standard libraries), web2py is open source, and can be used with a normal Python installation.
This method allows working with the latest releases of web2py, and customizing the python modules to be used.
Step 1 − Download the source package from web2py official website − http://www.web2py.com/examples/static/web2py_src.zip and unzip it.
As web2py does not require installation, the user can unzip it in any folder.
Step 2 − To start it, double-click web2py.py. From the console −
cd c:\web2py
c:\python27\python.exe web2py.py
Step 3 − Here command line parameters can be added (−a to set an admin password, −p to specify an alternate port). The startup options are visible through −
C:\web2py>c:\python27\python.exe web2py.py --help
Note
web2py is written in Python, a portable, interpreted and dynamic language that does not require compilation or complicated installation to run.
It uses a virtual machine (such as Java and .Net), and it can transparently byte-compile your source code on the fly when you run your scripts.
Functionalities in web2py for Database and Testing
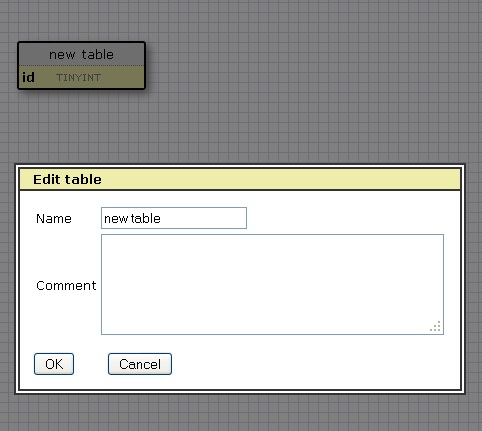
It is a software called SQLDesigner which helps in making web2py models and generates the corresponding code. Given below are some of the screenshots −
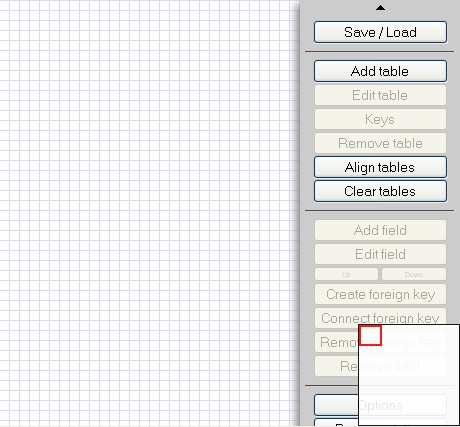
SQLDesigner helps in maintaining the relations of the tables in simple manner and generates the corresponding code in the models of given application.
Functional Testing
Functional testing involves testing of the functions of components or overall system. It can be based on requirement and business process.
web2py comes with a module gluon.contrib.webclient, which performs functional testing in remote and local web2py applications. It is basically designed to understand web2py session and postbacks.
All it requires is to import the package such that the functional testing would be implemented on the given module.
The syntax to import the package is as follows −
from gluon.contrib.webclient import WebClient
Web2py - Security
In the previous chapters, there was complete information on the implementation of web2py with various tools. The major concern for developing web2py applications includes security from a users perspective.
The unique features of web2py are as follows −
Users can learn the implementation easily. It requires no installation and dependencies.
It has been stable since the day of launch.
web2py is lightweight and includes libraries for Data Abstraction Layer and template language.
It works with the help of Web Server Gateway Interface, which acts as a communication between web servers and applications.
Open web application security project (OWASP) is a community, which lists down the security breaches of web application.
Security Breaches
With respect to OWASP, issues related to web applications and how web2py overcomes them is discussed below.
Cross Side Scripting
It is also known as XSS. It occurs whenever an application takes a user supplied data and sends it to the users browser without encoding or validating the content. The attackers execute scripts to inject worms and viruses using cross side scripting.
web2py helps in preventing XSS by preventing all the rendered variables in the View.
Information Leakage
Sometimes, applications leak information about internal workings, privacy and configurations. Attackers use this to breach sensitive data, which could lead to serious attacks.
web2py prevents this by ticketing system. It logs all the errors and the ticket is issued to the user whose error is being registered. These errors are only accessible to the administrator.
Broken Authentication
Account credentials are not often protected. Attackers compromise on passwords, authentication tokens to steal the users identities.
web2py provides a mechanism for administrative interface. It also forces to use secure sessions when the client is not localhost.
Insecure Communications
Sometimes applications fail to encrypt the network traffic. It is necessary to manage traffic to protect sensitive communications.
web2py provides SSL enabled certificates to provide encryption of communications. This also helps to maintain sensitive communication.
Restriction in URL Access
Web applications normally protect the sensitive functionality by preventing display of the links and URLs to some users. Attackers can try to breach some sensitive data by manipulating the URL with some information.
In wb2py, a URL maps to the modules and functions rather than the given file. It also includes a mechanism, which specifies which functions are public and which are maintained as private. This helps in resolving the issue.
