- Virtualization 2.0 - Home
- Virtualization 2.0 - Overview
- Virtualization 2.0 - Pros and Cons
- Virtualization 2.0 - Common Uses
- Virtualization 2.0 - Hardware
- Virtualization 2.0 - Microsoft HyperV
- VMware Workstation Player
- Virtualization 2.0 - VirtualBox
- Virtualization 2.0 - Openstack
- Preparing the Infrastructure
- Virtualization 2.0 - Troubleshooting
- Backing Up, Restoring & Migrating VM
- Virtualization 2.0 - Quick Guide
- Virtualization 2.0 - Useful Resources
- Virtualization 2.0 - Discussion
Virtualization 2.0 - Quick Guide
Virtualization 2.0 - Overview
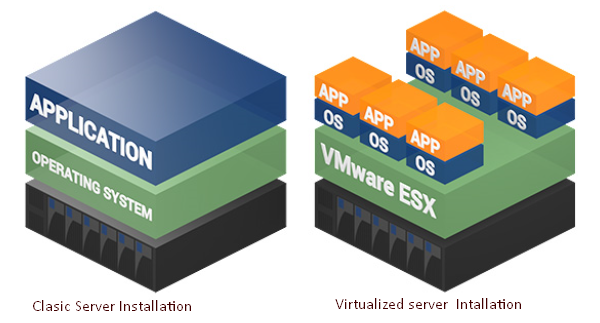
Virtualization is a technology that helps us to install different Operating Systems on a hardware. They are completely separated and independent from each other. In Wikipedia, you can find the definition as In computing, virtualization is a broad term that refers to the abstraction of computer resources.
Virtualization hides the physical characteristics of computing resources from their users, their applications or end users. This includes making a single physical resource (such as a server, an operating system, an application or a storage device) appear to function as multiple virtual resources. It can also include making multiple physical resources (such as storage devices or servers) appear as a single virtual resource...
Virtualization is often −
- The creation of many virtual resources from one physical resource.
- The creation of one virtual resource from one or more physical resource.
Types of Virtualization
Today the term virtualization is widely applied to a number of concepts, some of which are described below −
- Server Virtualization
- Client & Desktop Virtualization
- Services and Applications Virtualization
- Network Virtualization
- Storage Virtualization
Let us now discuss each of these in detail.
Server Virtualization
It is virtualizing your server infrastructure where you do not have to use any more physical servers for different purposes.
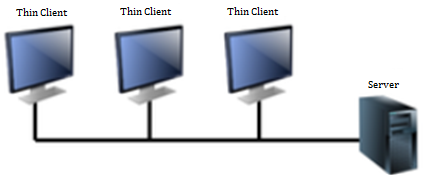
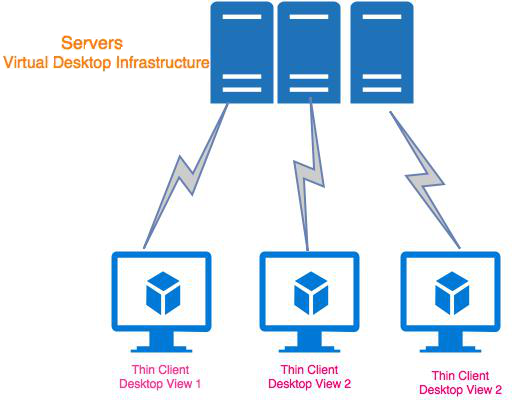
Client & Desktop Virtualization
This is similar to server virtualization, but this time is on the users site where you virtualize their desktops. We change their desktops with thin clients and by utilizing the datacenter resources.
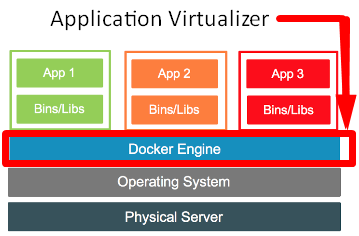
Services and Applications Virtualization
The virtualization technology isolates applications from the underlying operating system and from other applications, in order to increase compatibility and manageability. For example Docker can be used for that purpose.
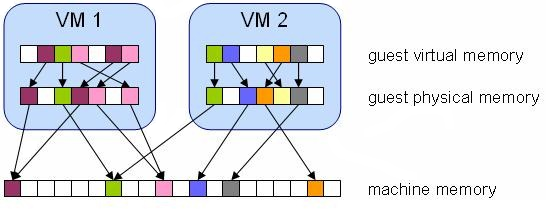
Network Virtualization
It is a part of virtualization infrastructure, which is used especially if you are going to visualize your servers. It helps you in creating multiple switching, Vlans, NAT-ing, etc.
The following illustration shows the VMware schema −
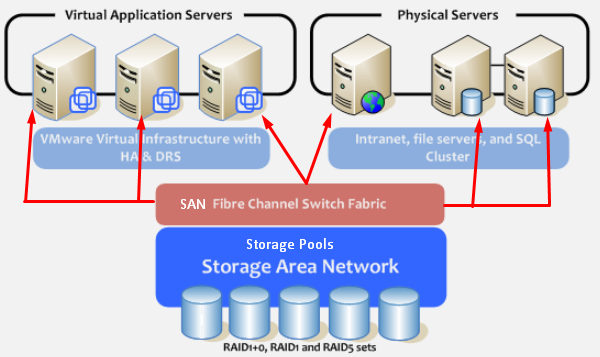
Storage Virtualization
This is widely used in datacenters where you have a big storage and it helps you to create, delete, allocated storage to different hardware. This allocation is done through network connection. The leader on storage is SAN. A schematic illustration is given below −
Understanding Different Types of Hypervisors
A hypervisor is a thin software layer that intercepts operating system calls to the hardware. It is also called as the Virtual Machine Monitor (VMM). It creates a virtual platform on the host computer, on top of which multiple guest operating systems are executed and monitored.
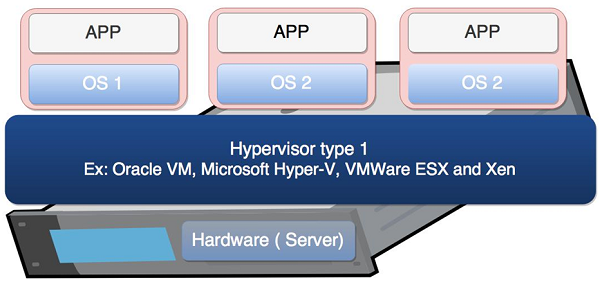
Hypervisors are two types −
- Native of Bare Metal Hypervisor and
- Hosted Hypervisor
Let us now discuss both of these in detail.
Native or Bare Metal Hypervisor
Native hypervisors are software systems that run directly on the host's hardware to control the hardware and to monitor the Guest Operating Systems. The guest operating system runs on a separate level above the hypervisor. All of them have a Virtual Machine Manager.
Examples of this virtual machine architecture are Oracle VM, Microsoft Hyper-V, VMWare ESX and Xen.
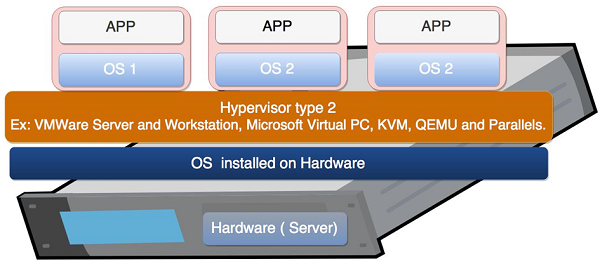
Hosted Hypervisor
Hosted hypervisors are designed to run within a traditional operating system. In other words, a hosted hypervisor adds a distinct software layer on top of the host operating system. While, the guest operating system becomes a third software level above the hardware.
A well-known example of a hosted hypervisor is Oracle VM VirtualBox. Others include VMWare Server and Workstation, Microsoft Virtual PC, KVM, QEMU and Parallels.
Understanding Local Virtualization and Cloud
Virtualization is one of the fundamental technologies that makes cloud-computing work. However, virtualization is not cloud computing. Cloud computing is a service that different providers offer to you based on some costs.
In enterprise networks, virtualization and cloud computing are often used together to build a public or private cloud infrastructure. In small businesses, each technology will be deployed separately to gain measurable benefits. In different ways, virtualization and cloud computing can help you keep your equipment spending to a minimum and get the best possible use from the equipment you already have.
As mentioned before, virtualization software allows one physical server to run several individual computing environments. In practice, it is like getting multiple servers for each physical server you buy. This technology is fundamental to cloud computing. Cloud providers have large data centers full of servers to power their cloud offerings, but they are not able to devote a single server to each customer. Thus, they virtually partition the data on the server, enabling each client to work with a separate virtual instance (which can be a private network, servers farm, etc.) of the same software.
Small businesses are most likely to adopt cloud computing by subscribing to a cloud-based service. The largest providers of cloud computing are Microsoft with Azure and Amazon.
The following illustration is provided by Microsoft where you can understand how utilizing extra infrastructure for your business without the need to spend extra money helps. You can have the on-premises base infrastructure, while on cloud you can have all your services, which are based on Virtualized technology.
Virtualization 2.0 - Pros and Cons
In this chapter, we will discuss some of the most common advantages and disadvantages of Virtualization.
Advantages of Virtualization
Following are some of the most recognized advantages of Virtualization, which are explained in detail.
Using Virtualization for Efficient Hardware Utilization
Virtualization decreases costs by reducing the need for physical hardware systems. Virtual machines use efficient hardware, which lowers the quantities of hardware, associated maintenance costs and reduces the power along with cooling the demand. You can allocate memory, space and CPU in just a second, making you more self-independent from hardware vendors.
Using Virtualization to Increase Availability
Virtualization platforms offer a number of advanced features that are not found on physical servers, which increase uptime and availability. Although the vendor feature names may be different, they usually offer capabilities such as live migration, storage migration, fault tolerance, high availability and distributed resource scheduling. These technologies keep virtual machines chugging along or give them the ability to recover from unplanned outages.
The ability to move a virtual machine from one server to another is perhaps one of the greatest single benefits of virtualization with far reaching uses. As the technology continues to mature to the point where it can do long-distance migrations, such as being able to move a virtual machine from one data center to another no matter the network latency involved.
Disaster Recovery
Disaster recovery is very easy when your servers are virtualized. With up-to-date snapshots of your virtual machines, you can quickly get back up and running. An organization can more easily create an affordable replication site. If a disaster strikes in the data center or server room itself, you can always move those virtual machines elsewhere into a cloud provider. Having that level of flexibility means your disaster recovery plan will be easier to enact and will have a 99% success rate.
Save Energy
Moving physical servers to virtual machines and consolidating them onto far fewer physical servers means lowering monthly power and cooling costs in the data center. It reduces carbon footprint and helps to clean up the air we breathe. Consumers want to see companies reducing their output of pollution and taking responsibility.
Deploying Servers too fast
You can quickly clone an image, master template or existing virtual machine to get a server up and running within minutes. You do not have to fill out purchase orders, wait for shipping and receiving and then rack, stack, and cable a physical machine only to spend additional hours waiting for the operating system and applications to complete their installations. With virtual backup tools like Veeam, redeploying images will be so fast that your end users will hardly notice there was an issue.
Save Space in your Server Room or Datacenter
Imagine a simple example: you have two racks with 30 physical servers and 4 switches. By virtualizing your servers, it will help you to reduce half the space used by the physical servers. The result can be two physical servers in a rack with one switch, where each physical server holds 15 virtualized servers.
Testing and setting up Lab Environment
While you are testing or installing something on your servers and it crashes, do not panic, as there is no data loss. Just revert to a previous snapshot and you can move forward as if the mistake did not even happen. You can also isolate these testing environments from end users while still keeping them online. When you have completely done your work, deploy it in live.
Shifting all your Local Infrastructure to Cloud in a day
If you decide to shift your entire virtualized infrastructure into a cloud provider, you can do it in a day. All the hypervisors offer you tools to export your virtual servers.
Possibility to Divide Services
If you have a single server, holding different applications this can increase the possibility of the services to crash with each other and increasing the fail rate of the server. If you virtualize this server, you can put applications in separated environments from each other as we have discussed previously.
Disadvantages of Virtualization
Although you cannot find many disadvantages for virtualization, we will discuss a few prominent ones as follows −
Extra Costs
Maybe you have to invest in the virtualization software and possibly additional hardware might be required to make the virtualization possible. This depends on your existing network. Many businesses have sufficient capacity to accommodate the virtualization without requiring much cash. If you have an infrastructure that is more than five years old, you have to consider an initial renewal budget.
Software Licensing
This is becoming less of a problem as more software vendors adapt to the increased adoption of virtualization. However, it is important to check with your vendors to understand how they view software use in a virtualized environment.
Learn the new Infrastructure
Implementing and managing a virtualized environment will require IT staff with expertise in virtualization. On the user side, a typical virtual environment will operate similarly to the non-virtual environment. There are some applications that do not adapt well to the virtualized environment.
Virtualization 2.0 - Common Uses
There are several types of uses in virtualization, but the most commonly used are Server Virtualization and Client Desktops Virtualization. We have already discussed their advantages in the previous chapter and why are they used widely.
Virtualizing Desktop Computers
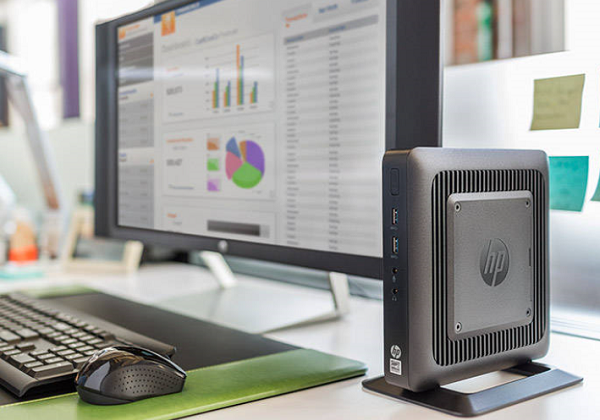
Client virtualization also called as VDI runs the entire desktop environment within a centralized server. All processing is done within the server. Client devices are typically thin clients that serve as an end node to connect I/O peripherals such as keyboard, mouse, a display, audio connectors and even USB ports over the LAN.
As discussed earlier, a thin client hardware is a computer terminal, which provides I/O for a keyboard, mouse, monitor, jacks for sound peripherals, and open ports for USB devices.
For example Printer, Flash Drive, Web Cam, Card Reader, Smartphone, etc. Some thin clients include legacy serial and/or parallel ports to support older devices such as Receipt Printers, Scales, Time Clocks, etc. Thin client software typically consists of a GUI (graphical user interface), Cloud Access Agents (for e.g. RDP, ICA, PCoIP), a local web browser, terminal emulations (in some cases) and a basic set of local utilities.
The largest producers of thin clients are HP, Dell and IBM.
Running a Specific Program Solution
One of the best software known for Desktop Virtualization is XenApp & XenDesktop. Deliver Windows, Linux, Web and SaaS applications or full virtual desktops to workers on any device and anywhere.
More information can be found on https://www.citrix.com/products/xenapp-xendesktop/
Another major provider is VMware with its platform called VMware Horizon 7. To purchase and understand all their features and specifications, click on the following link https://www.vmware.com/products/horizon.html
Microsoft is another provider with a combination of Remote desktop services along with Hyper-V. For any further Information on this, click on the following link https://technet.microsoft.com/en-us/windowsserver/ee236407.aspx
Setting up Test and Development Environments
One of the most powerful features of a virtualized environment is the possibility to create labs for different approaches in a minute, especially in software development and then to import the same infrastructure in production.
Regarding the test environment, it brings cross-platform functionality to your dev-test environment and uses your preferred coding language to build natively. It tests your applications on the devices and platforms you use today: from Linux, Windows to iOS and Android.
All the features mentioned in the above can be done through private cloud or public cloud. It depends on what we would like to use as per the requirement. You should take into consideration the human resources with which you have to manage this cloud and the budget that you want to spend.
Virtualization 2.0 - Hardware
In this chapter, we will discuss various components of hardware such as CPU, Memory, Storage and Networking.
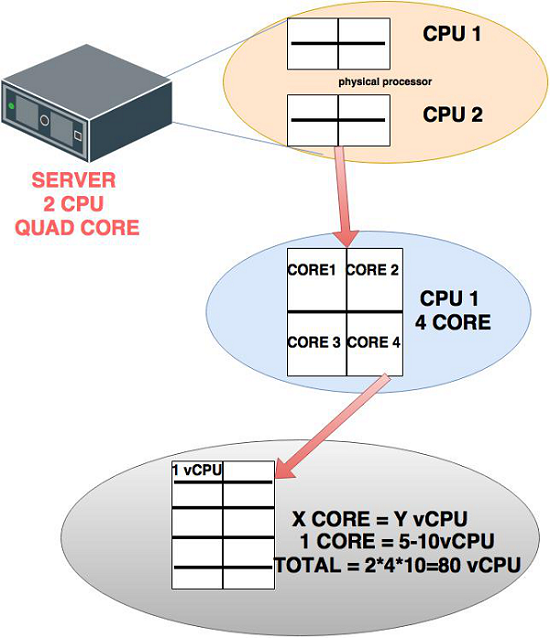
Understanding Virtual CPU
When we install a hypervisor, each physical CPU is abstracted into virtual CPUs. This divides the available CPU cycles for each core and allows multiple VMs to "time share" a given physical processor core. Generally talking, the hypervisor typically assigns one workload per vCPU (per core). If the workloads on a server need more CPU cycles, it is better to deploy fewer VMs on a particular virtual CPU.
Let us consider the following example to understand the logic of virtual CPU.
I have a physical server with two processors (CPU 1 and CPU 2) and each of them has four physical cores. In total, we have 2 * 4 = 8 physical cores.
Based on some calculations our hypervisor provided for each physical core, we can get 5-10 vCPUs.
In total, we will have [8 physical cores * (5 to 10 vCPUs)] 40-80 vCPUs, which means that we can assign a maximum of 80 vCPUs to virtual machines.
Understanding Virtual Memory
Virtual Memory in simple words is the RAM of the machine. The memory resource settings for a virtual machine determines how much of the host's memory is allocated to the virtual machine. The virtual hardware memory size determines how much memory is available to applications that run in the virtual machine.
A virtual machine cannot benefit from more memory resources than its configured virtual hardware memory size. The ESXi hosts limit the memory resource use to the maximum amount useful for the virtual machine, so that you can accept the default of unlimited memory resources.
You can add, change, and configure virtual machine memory resources or options to enhance virtual machine performance. You can set most of the memory parameters while creating the virtual machine or it can also be done after the Guest Operating System is installed. Most of the hypervisors require to power off the virtual machine before changing the settings.
In the following schematic illustration, you can see that the total physical memory is divided between two virtual machines.
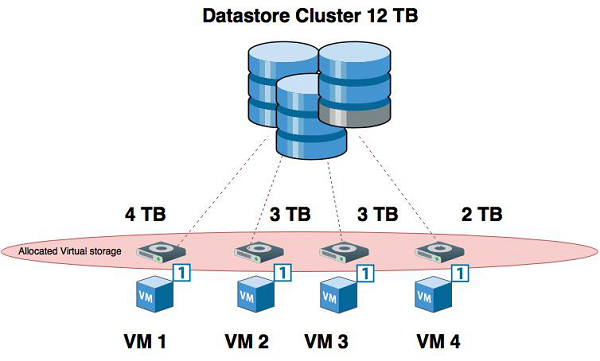
Understanding Virtual Storage
Storage virtualization is the pooling of physical storage (Data cluster) from multiple network storage devices into what appears to be a single storage device that is managed from a central console. We cannot assign more storage to virtual machines that data cluster offers physically.
You will see these extensions on the end of a file. Of all the files used as part of a virtual machine, different hypervisors like to use different file types. Some of the more common are VDI, VHDX, VMDK and HDD.
In the following example, we have a data cluster of 12 TB in total and four virtual machines to which we have allocated storage to each of them. In total, the maximum storage allocated to them is 12 TB.
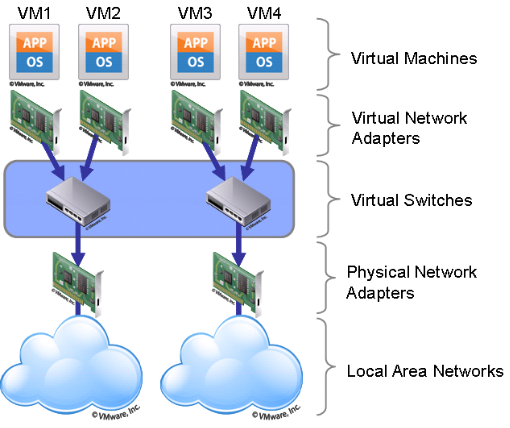
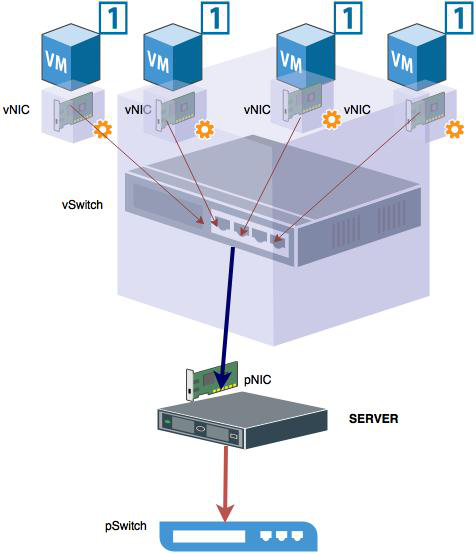
Understanding Virtual Networking
We will discuss this with a simple example as to how virtual networking done.
We have Virtual Machine 1, 2, 3 and 4 running on the same host. They would like to send the network traffic back and forth. This is done by virtual networking cards as shown in the following illustration (vNIC), which connects virtually with a virtual switch (vSwitch) that is created by the hypervisor.
This virtual switch communicates with a physical card of the server (pNIC), which is connected with a physical switch (pSwitch) and then communicates with the rest of the network equipment.
Please see the following schematically done up scenario.
Virtualization 2.0 - Microsoft Hyper-V
In this chapter, we will discuss Microsoft Hyper-V along with its various modules.
Installing Hyper-V in Windows Server 2012
Microsoft Hyper-V, known as Windows Server Virtualization, is a native (bare) hypervisor. It can create virtual machines on x86-64 systems running Windows OS, starting with Windows 8. Hyper-V supersedes Windows Virtual PC as the hardware virtualization component of the client editions of Windows NT. A server computer running Hyper-V can be configured to expose individual virtual machines to one or more networks.
Hyper-V was first released alongside Windows Server 2008 and Windows 7 and has been available without charge for all the Windows Server versions and some client operating systems since that time.
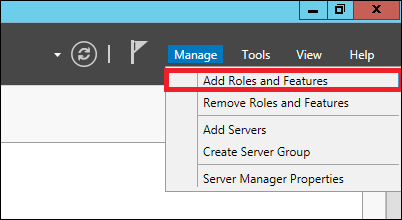
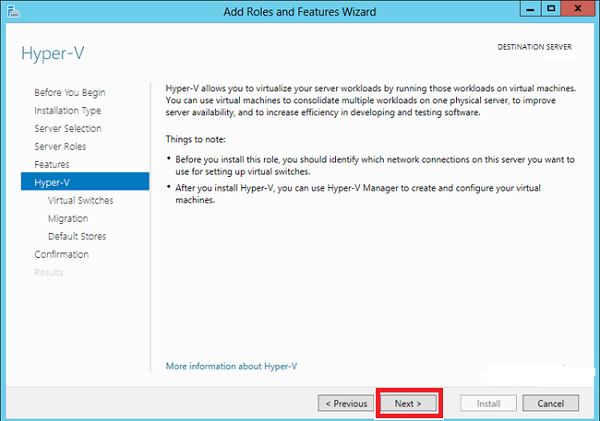
Let us see how to install a Hyper-V role in a Windows Server 2012 by following the steps given below.
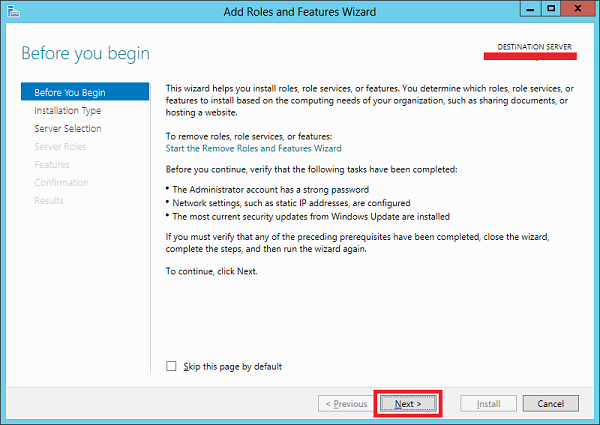
Step 1 − To Install Hyper-V role go to Server Manager → Manage → Add Roles and Features.
Step 2 − Click on Next.
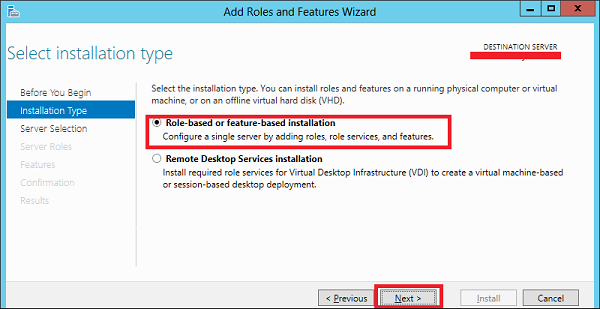
Step 3 − Select Role-based or feature-based installation option → click on Next.
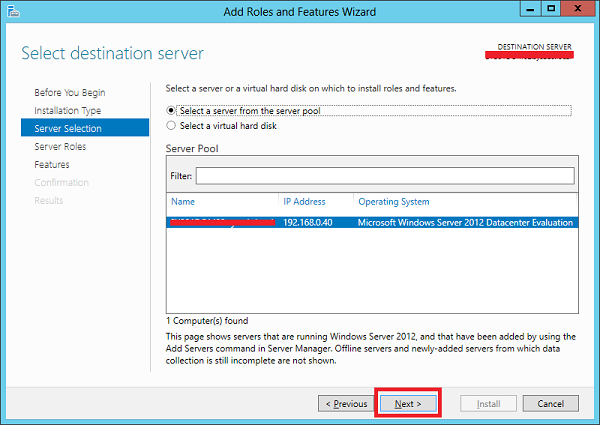
Step 4 − We will locally install the Hyper-V role as such Select a server from the server pool → click Next.
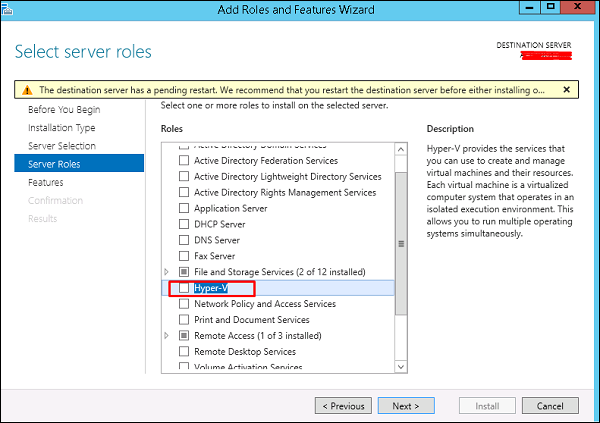
Step 5 − From the Roles lists, check the Hyper-V Server role → click on Add Features on the popup window → click Next.
Step 6 − Click Next.
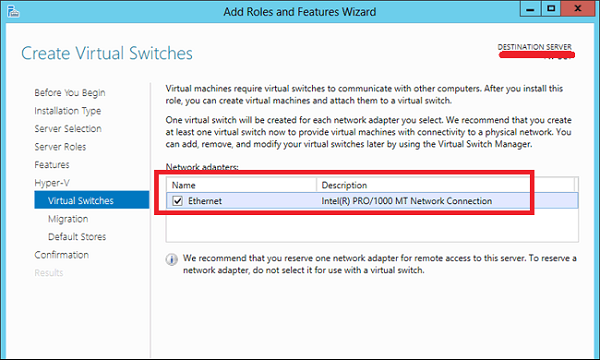
Step 7 − Choose your servers physical network adapters that will take part in the virtualization and responsible for network switching → click on Next.
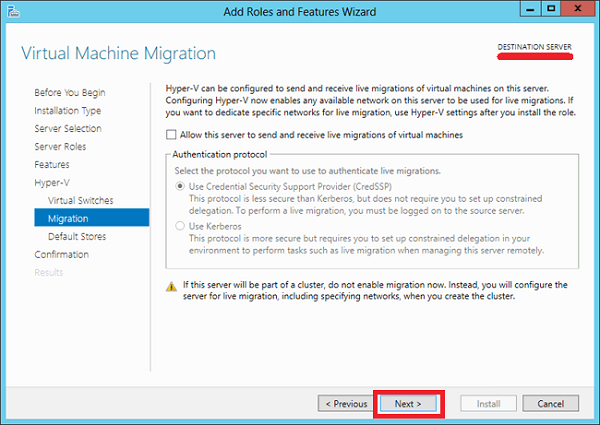
Step 8 − Under Migration, leave the default settings → click on Next.
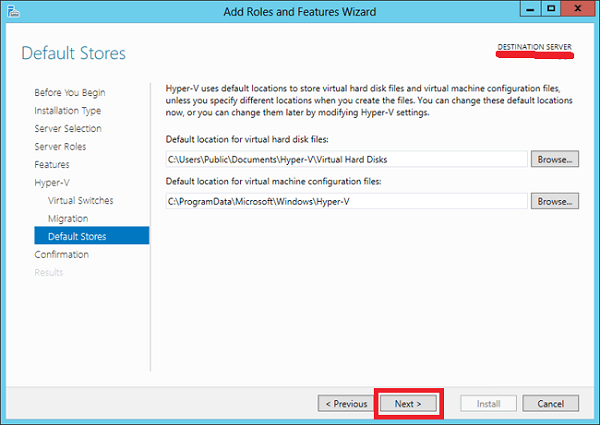
Step 9 − Choose the path where you want to save the file → click on Next.
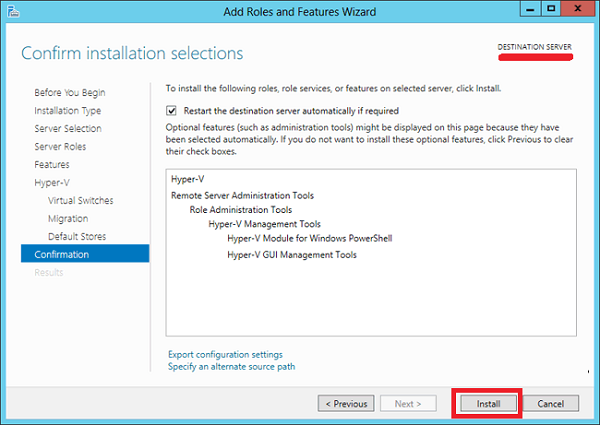
Step 10 − Click Install and wait for the installation bar to finish.
Installing Hyper-V in a windows 10 workstation
To install it in Windows 7, 8, 10 versions, you have to check if your computer supports virtualization. Following are the basic requirements −
- Windows 10 Pro or Enterprise 64-bit Operating System.
- A 64-bit processor with Second Level Address Translation (SLAT).
- 4GB system RAM at minimum.
- BIOS-level Hardware Virtualization support.
In my case, we have a laptop HP Probook 450 G3, which supports it.
Before continuing with the installation, follow the steps given below.
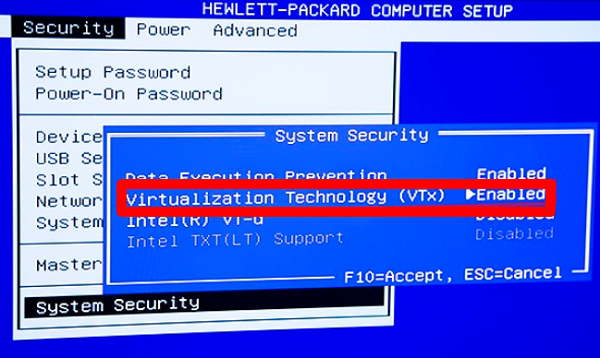
Step 1 − Ensure that hardware virtualization support is turned on in the BIOS settings as shown below −
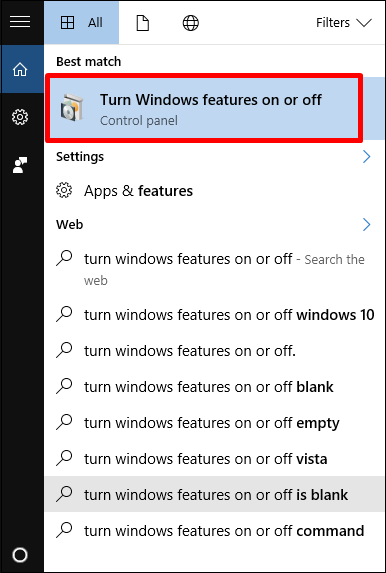
Step 2 − Type in the search bar turn windows features on or off and click on that feature as shown below.
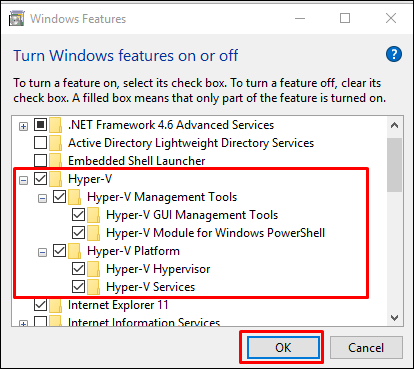
Step 3 − Select and enable Hyper-V.
Creating a Virtual Machine with Hyper-V
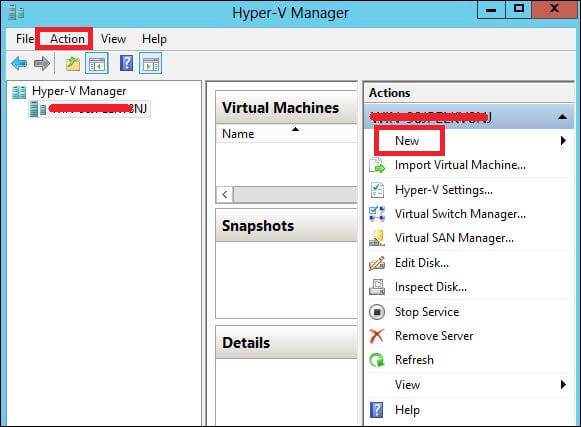
In this section, we will learn how to create a virtual machine. To begin with, we have to open the Hyper-V manager and then follow the steps given below.
Step 1 − Go to Server Manager → Click on Hyper-V Manager.
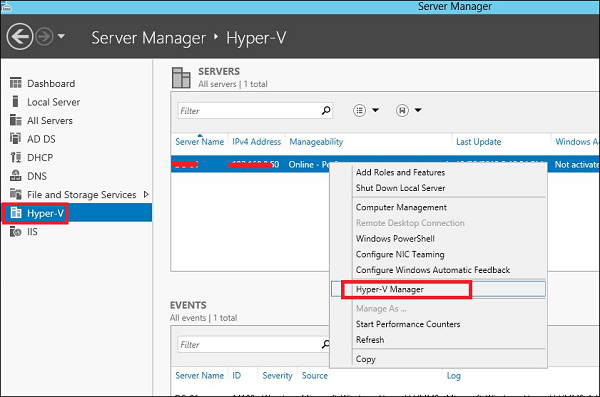
Step 2 − Click New on the left Panel or on the Actions button.
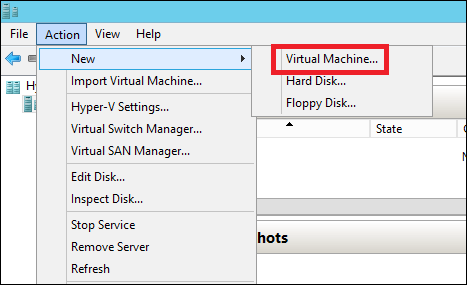
Step 3 − Double-click on Virtual Machine
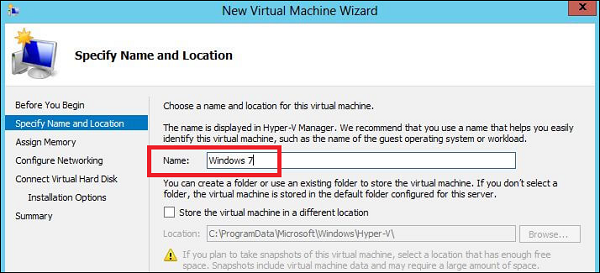
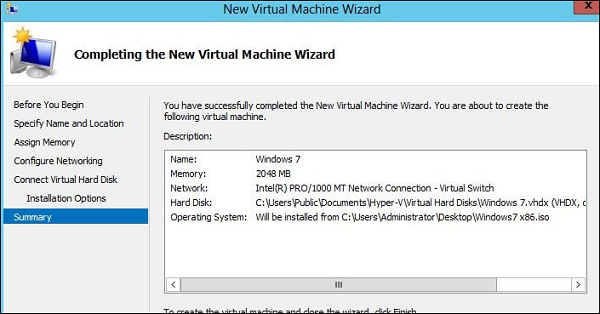
Step 4 − A new table will open → Type Name of your new machine → click Next.
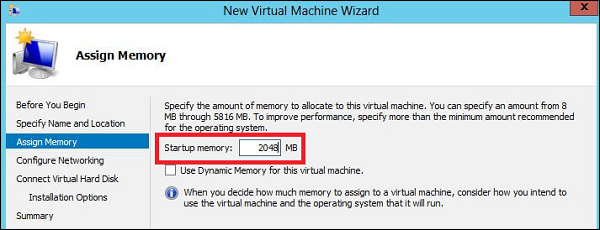
Step 5 − A new table will be opened where you have to allocate the memory. Keep in mind you cannot choose more memory than you have physically.
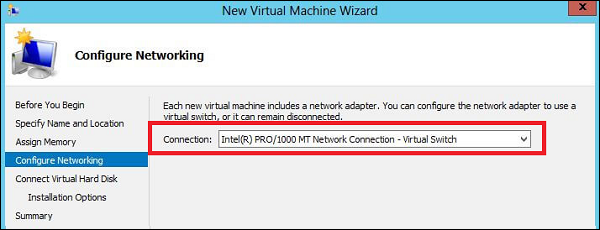
Step 6 − In the Connection drop down box, choose your physical network adaptor → click on Next.
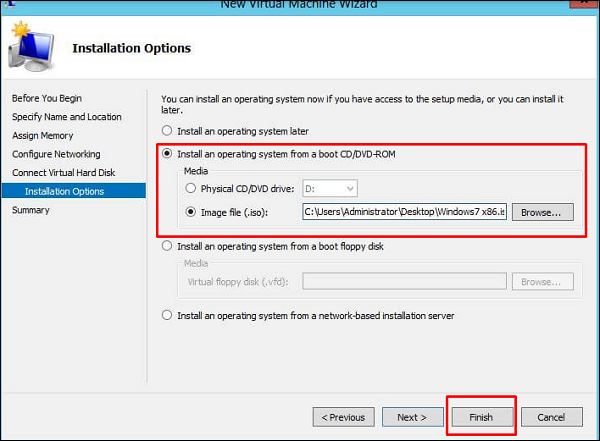
Step 7 − Now it is time to create a Virtual Hard disk, if you already have one, choose the second option.
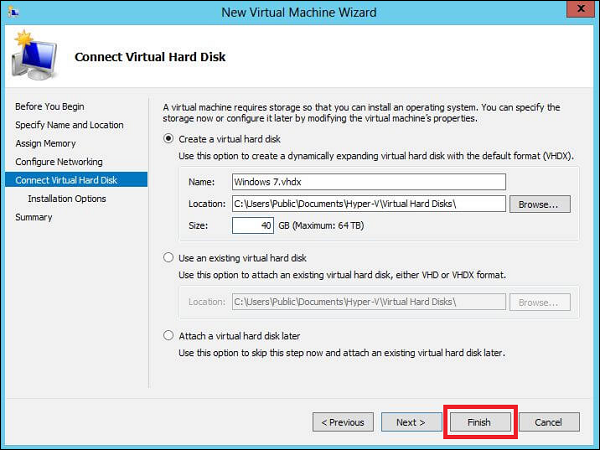
Step 8 − Select the Image of ISO that has to be installed → click on Finish.
Step 9 − After clicking on finish, you would get the following message as shown in the screenshot below.
Step 10 − To connect to the Virtual machine, Right Click on the created machine → click on Connect

Step 11 − After that, installation of your ISO will continue.

Setting up Networking with Hyper-V
The Hyper-V vSwitch is a software, layer-2 Ethernet network-traffic switch. It allows administrators to connect VMs to either physical or virtual networks. It is available by default within the Hyper-V Manager installation and contains extended capabilities for security and resource tracking.
If you attempt to create a VM right after the set-up process, you will not be able to connect it to a network.
To set up a network environment, you will need to select the Virtual Switch Manager in the right hand side panel of Hyper-V Manager as shown in the screenshot below.
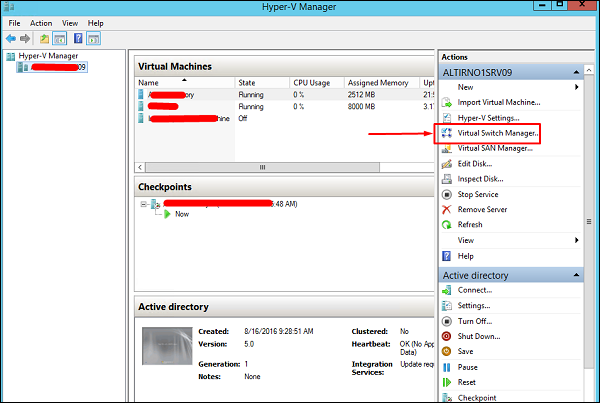
The Virtual Switch Manager helps configure the vSwitch and the Global Network Settings, which simply lets you change the default MAC Address Range, if you see any reason for that.
Creation of the virtual switch is easy and there are three vSwitch types available, which are described below −
External vSwitch will link a physical NIC of the Hyper-V host with a virtual one and then give your VMs access outside of the host. This means that your physical network and internet (if your physical network is connected to internet).
Internal vSwitch should be used for building an independent virtual network, when you need to connect VMs to each other and to a hypervisor as well.
Private vSwitch will create a virtual network where all connected VMs will see each other, but not the Hyper-V host. This will completely isolate the VMs in that sandbox.
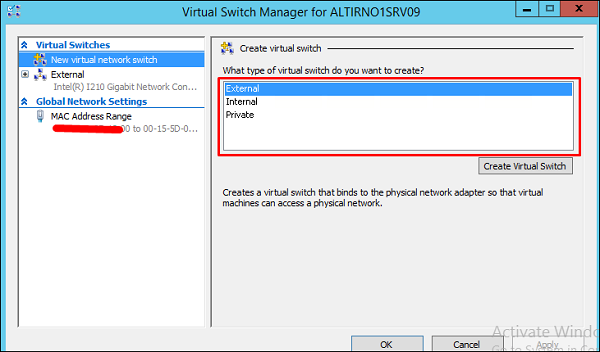
Here, we have selected External and then Create Virtual Switch. The table with the setting of the vSwitch will be open where we will fill the fields as shown below
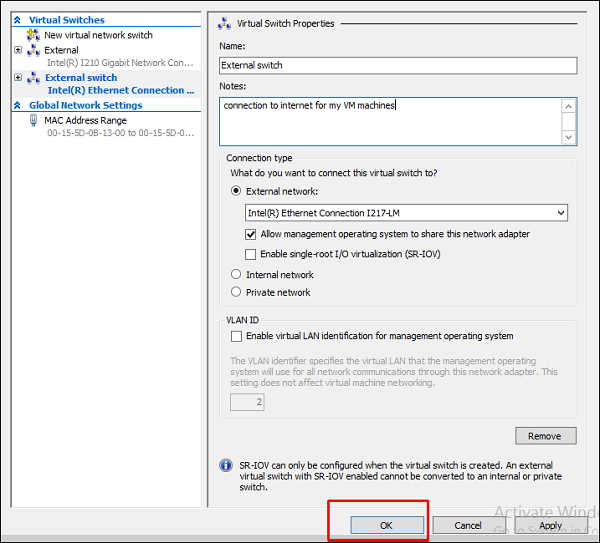
Name − is the name that we will put to identify the vSwitch.
Notes − is the description for us, generally, we put friendly descriptions to be understood.
Connection Type − is external as explained earlier and selects a physical network card on my server.
Once all this is entered, Click on OK.
Allocating Processors & Memory to a VM using Hyper-V
In this section, we will see the task of allocating CPU, Memory and Disk Resources to the virtual machines that are running on a server. The key to allocating CPU or any other type of resource in Hyper-V is to remember that everything is relative.
For example, Microsoft has released some guidelines for Virtualizing Exchange Server. One of the things that was listed was that the overall system requirements for Exchange Server are identical whether Exchange is being run on a virtual machine or on a dedicated server.
To allocate one of the features mentioned above, we need to click on the Settings tab in the right hand side panel.
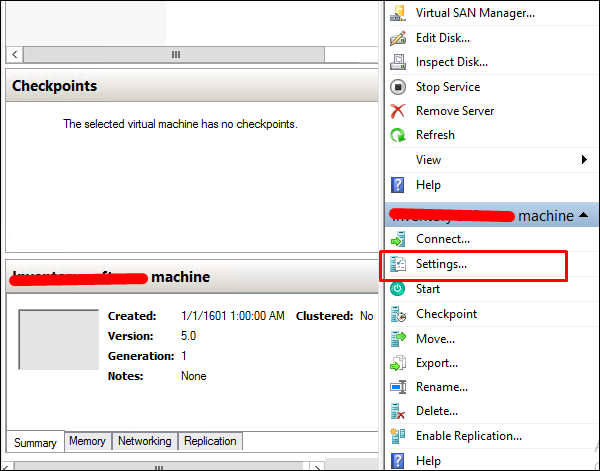
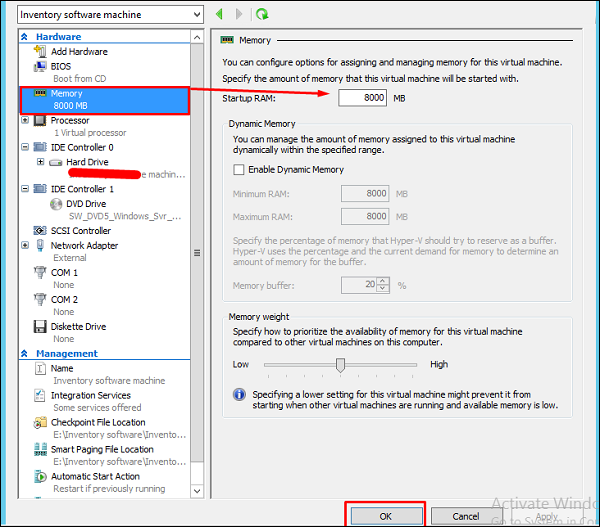
To allocate more memory to the selected virtual machine, click on the Memory tab on the left hand side of the screen. You will also have Startup RAM, where you can allocate as much ram as you have physically to a VM machine → Click on Ok.
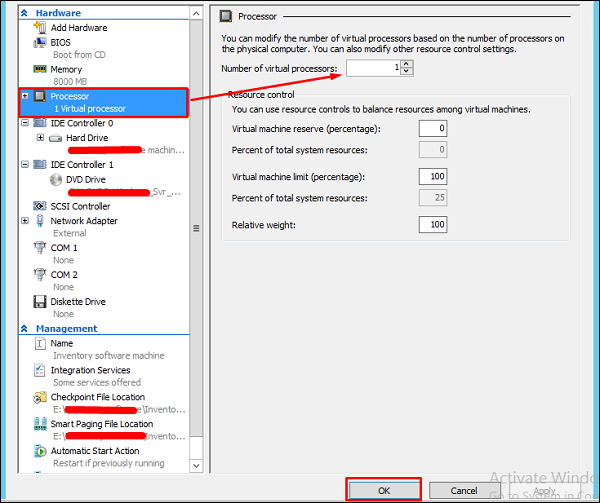
To allocate more processors, click on the Processor tab on the left hand side of the panel. Then you can enter the number of virtual processors for your machine.
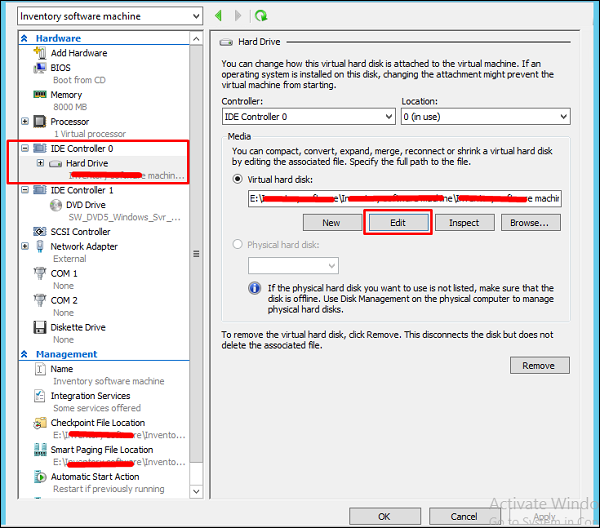
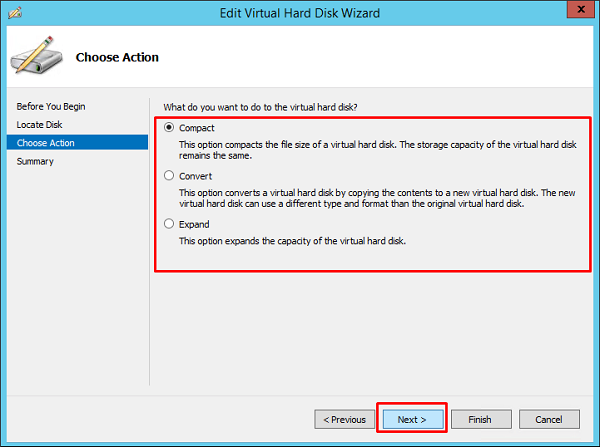
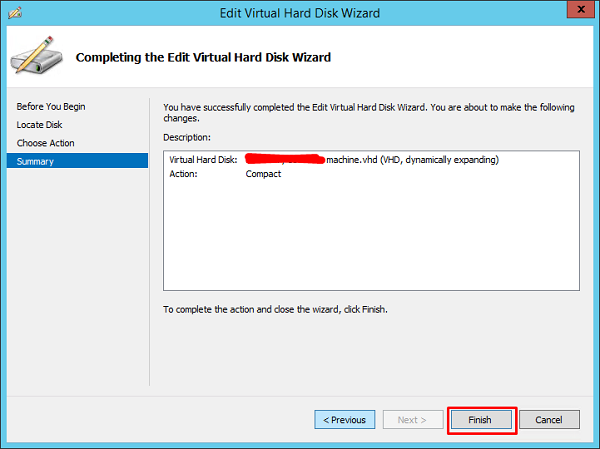
If you need to expand, compress the capacity of the virtual hard disk. Click on the IDE controller 0 on the left hand side panel → click on Edit.
Once all the above changes are done, Click on Next.
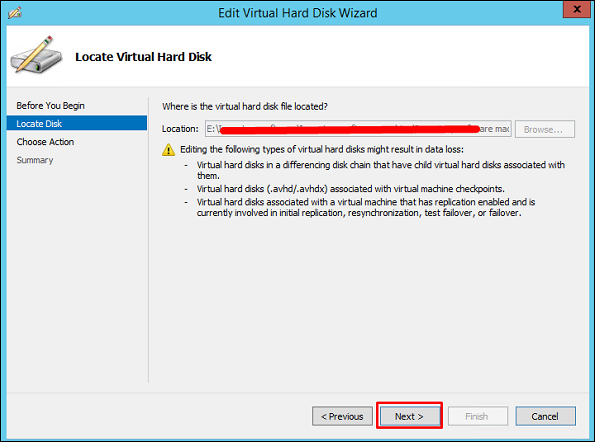
Select one of the options based on your need (all of them have their respective descriptions) and then click on Next.
Click on Finish and wait for the process to finish.
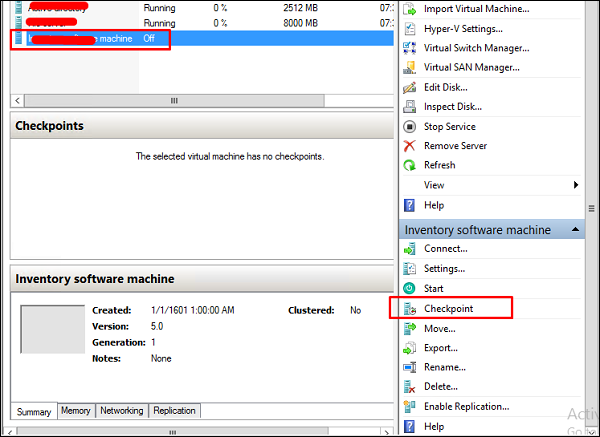
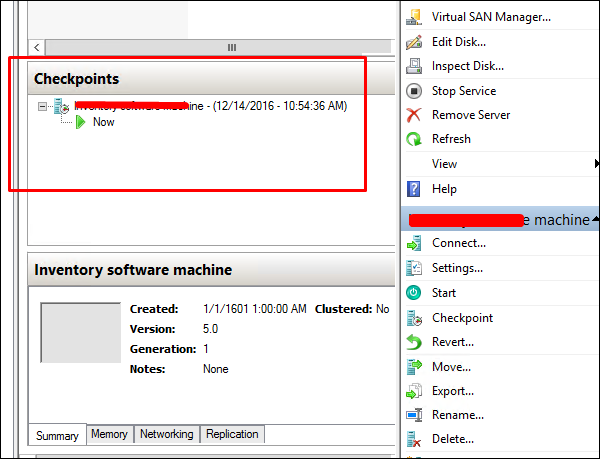
Using Checkpoints in Hyper-V
Checkpoints in Hyper-V are called snapshots and they help us to revert the machine in a desired state that we had in the past.
To create a checkpoint we should follow the steps given below.
Step 1 − Select the VM by clicking on it. On the left hand side panel, click on Checkpoint.
Step 2 − The following checkpoint will be created with the respective date and time in the main Hyper-V manager console.
VMware Workstation Player
In this chapter, we will understand how to install the VMware Workstation Player and its usages.
Installing VMware Workstation Player
VMware workstation player is a hosted hypervisor, so you have to have a pre-installed OS before continuing to install it.
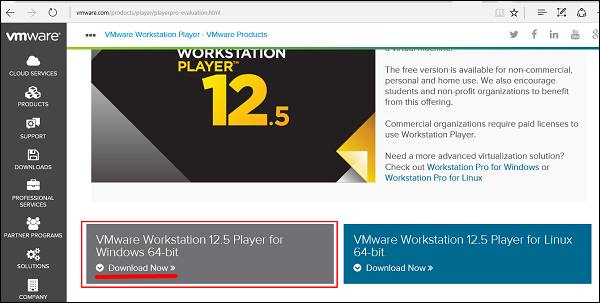
VMware workstation player is free version and available for non-commercial, personal and home use. They also encourage students and non-profit organizations to benefit from this offering. To download the VMware workstation player, you can click on the following link https://www.vmware.com/products/desktop-hypervisor/workstation-and-fusion. To install the VMware workstation player, follow the steps given below.
Step 1 − Click on Download Now as shown in the screenshot below.
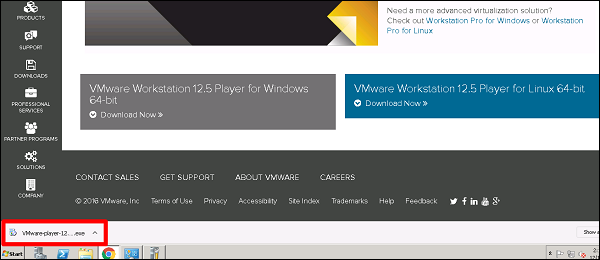
Step 2 − You will see that a file has been downloaded → double click on it.
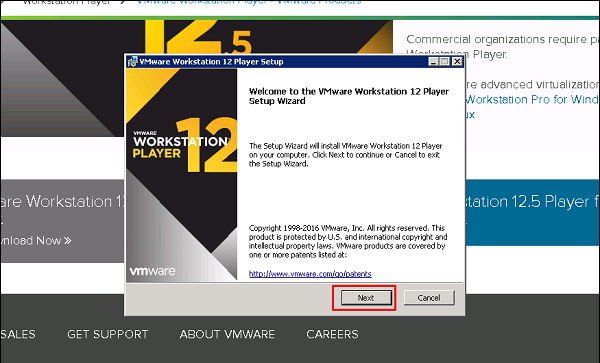
Step 3 − A Table will pop-up initializing the installation of VMware → Click Next.
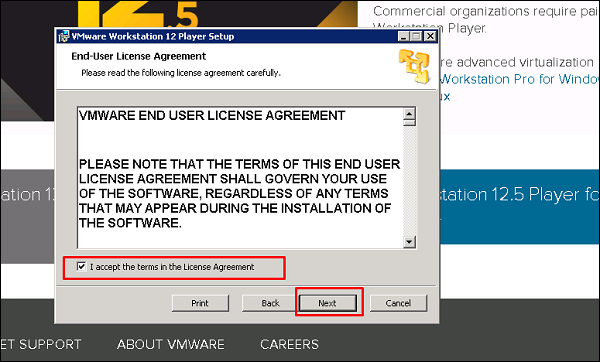
Step 4 − Check the box I accept the terms in the license agreement → Click on Next.
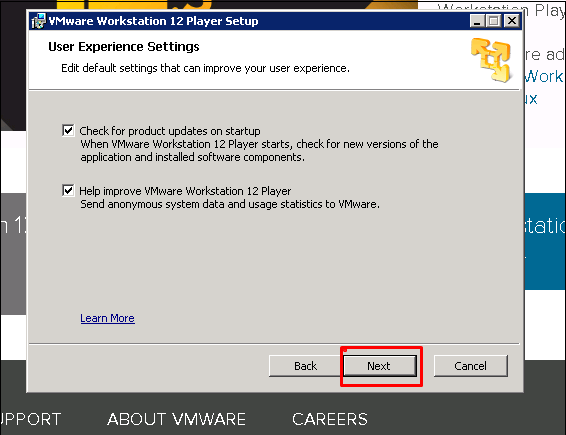
Step 5 − Once again, click on the Next button.

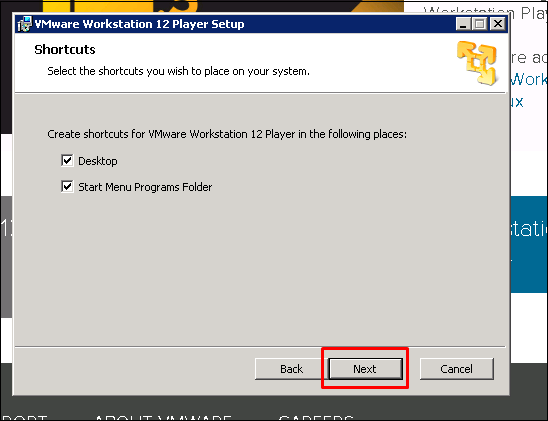
Step 6 − Leave the default values and click on Next.
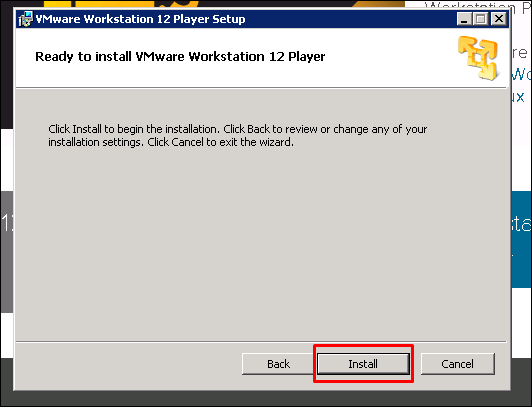
Step 7 − Once again, click on Next.
Step 8 − Click on Install.
Step 9 − An icon will be created on the desktop. Click on it and a table will popup, where you have two possibilities: If you want to use it as a non-commercial version, just enter your email address. If you want to use it as a commercial version, check the second option and enter your serial key.
Creating a VM with VMware Workstation
To create a virtual machine, we have to follow the steps given below.
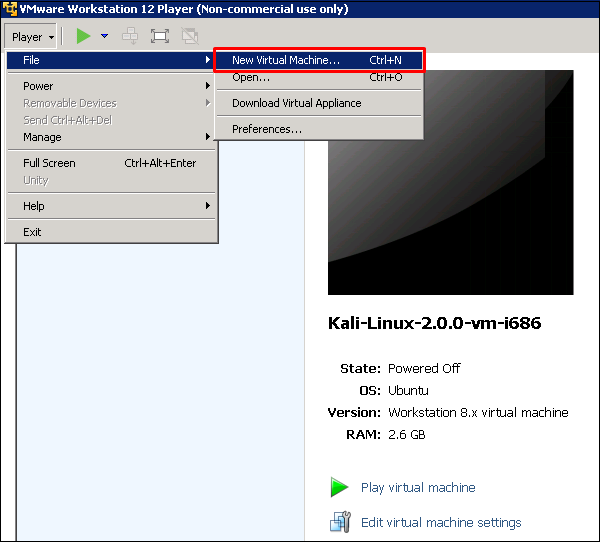
Step 1 − Click on Player → File → New Virtual Machine.
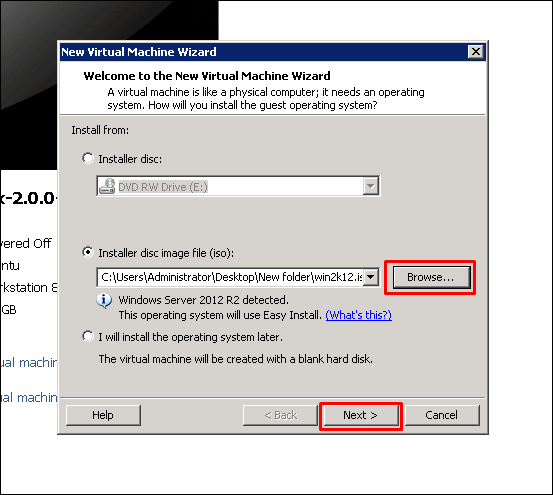
Step 2 − A table will pop-up requesting you to find a Boot disk, Boot Image or to install OS at a later stage.
We will choose the second option and click on Browse. Then we have to click on the ISO image, which we want to install. Once all this is done, click on Next.
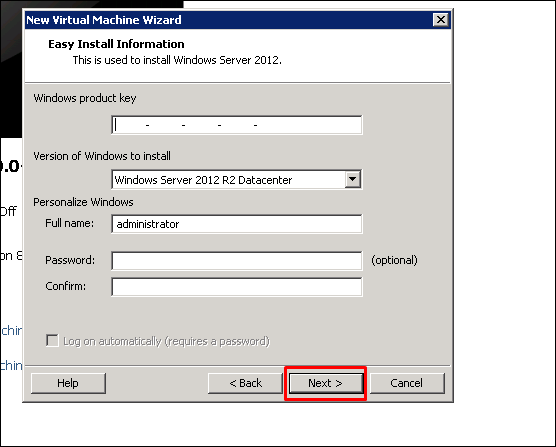
Step 3 − As I am installing windows server 2012, it will pop-up a table requesting to enter the serial key → click directly on Next, if you want to activate the noncommercial version for Windows.
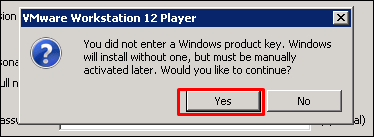
Step 4 − After the above step is complete, a dialogue box opens. Click Yes.
Step 5 − Click Next.
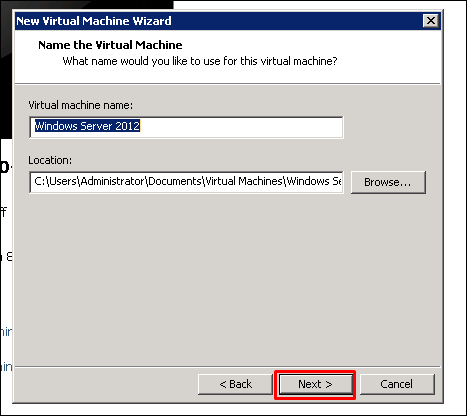
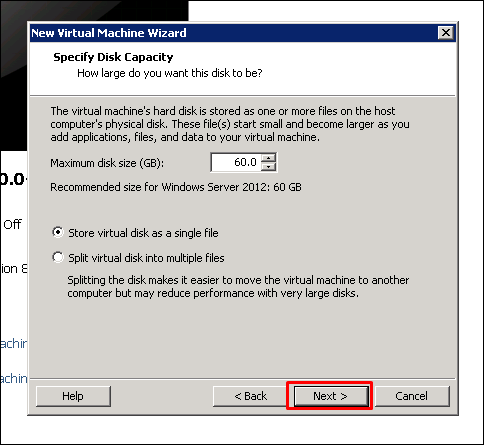
Step 6 − In the Maximum size disk box, enter the value of your virtual Hard disk, which in our case is 60GB. Then click on Next.
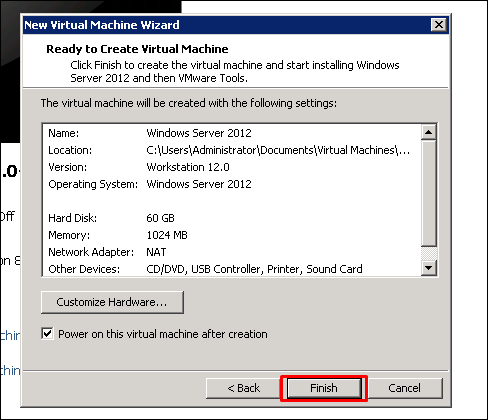
Step 7 − Click on Finish.
Setting up Networking with VMware Workstation
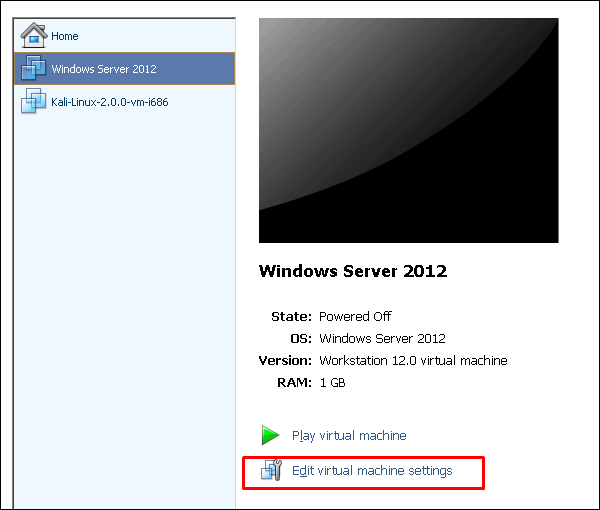
To set up the networking modes of a virtual machine in a VMware Workstation, we have to click on the Edit virtual machine settings.
A table will be opened with the settings of networking and on the left hand side panel of this table click on Network Adaptor.
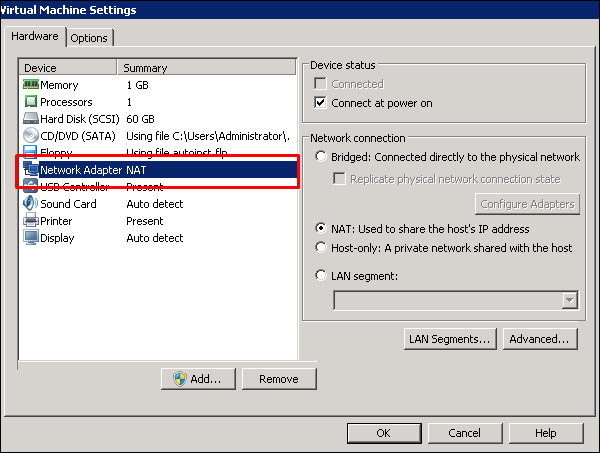
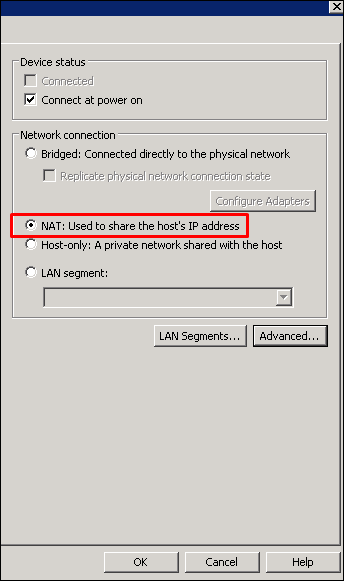
On the left of this table, you can see the networking modes as shown in the following screnshots.
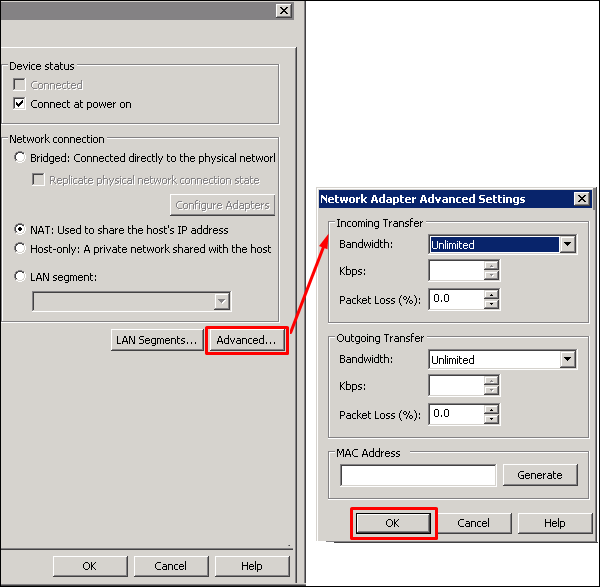
If we want to limit the bandwidth usage of a virtual machine, click on Advance and set the incoming and outgoing bandwidths.
Allocating Processors & Memory to a VM using VMware Workstation
To allocate memory to a virtual machine in a VMware Workstation, we have to click on Edit virtual machine settings. A table will be opened and we will have to click on Memory.
On the left hand side panel, we have to enter the amount of memory manually or by moving the arrow up and down as shown in the following screenshot.

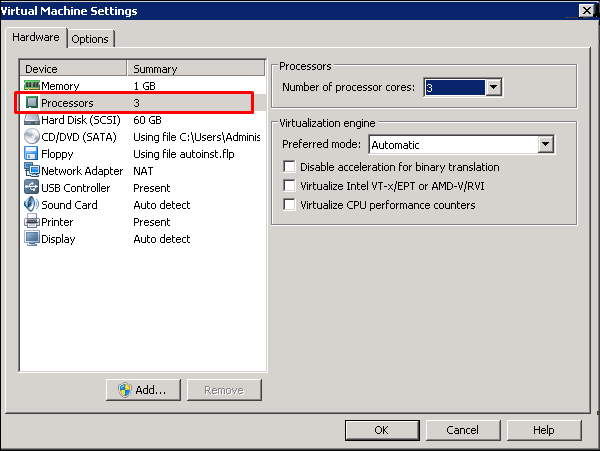
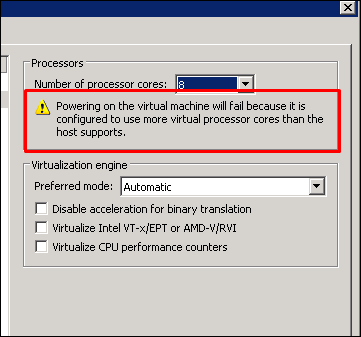
If you click on Processors. On the left hand side panel, we have to enter the amount of vCPU as shown in the screenshot below.
Note − If you put more vCPU-s than what the host supports, it will fail to power on the VM.
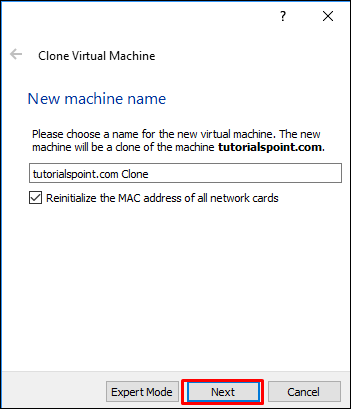
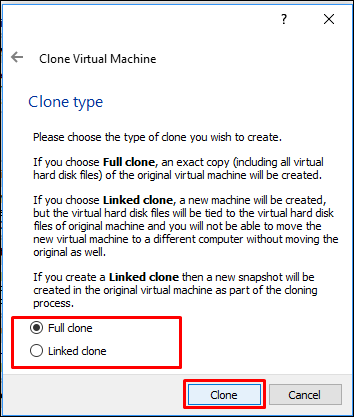
Duplicating a VM Using VMware Workstation
To create duplicates of VM machines, we have to use the VMware Workstation Commercial Version.
Let us see how to do it in practice by following the steps given below.
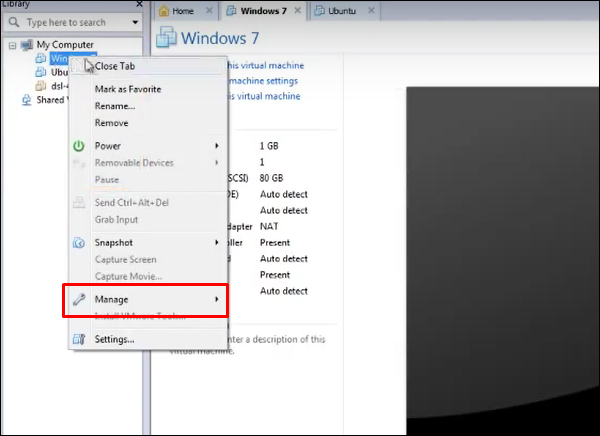
Step 1 − Open the VMware managing console and right click on a VM that you want to duplicate. Click on Manage.
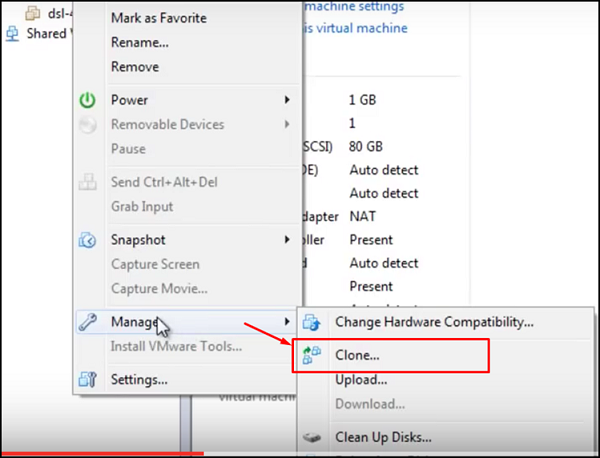
Step 2 − Click on Clone and a wizard will be open.
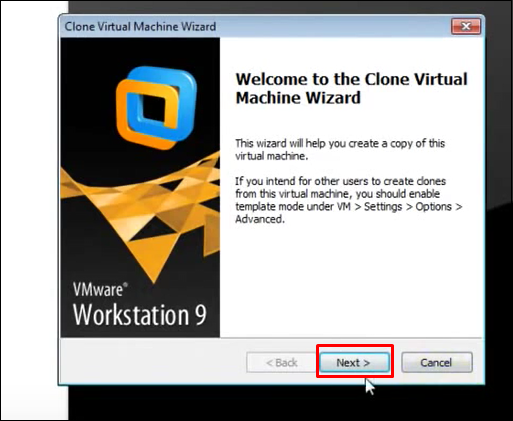
Step 3 − Click on Next.
Step 4 − Click on Create a Full Clone and Next.
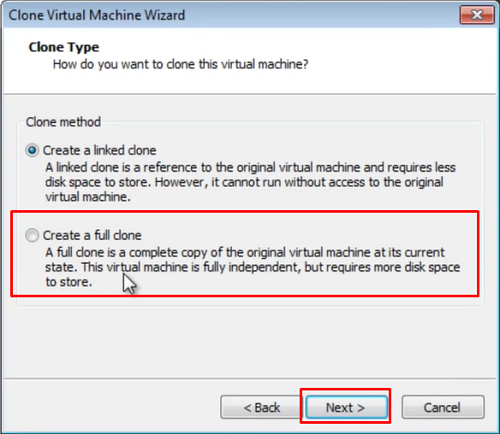
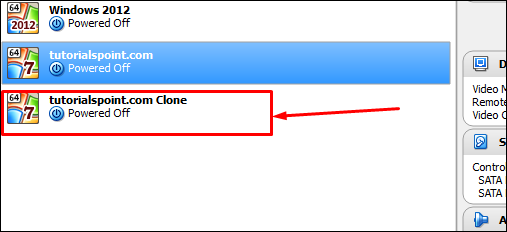
Step 5 − Put a name for the clone that will be created and Finish.
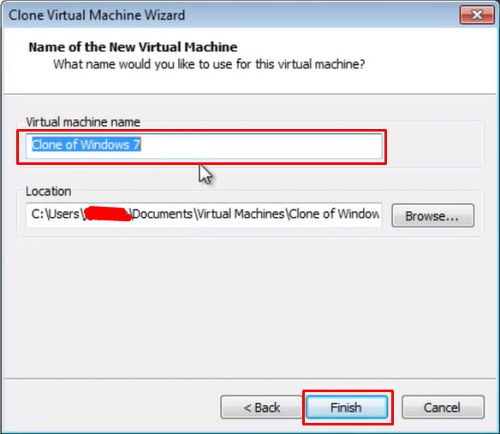
The following screenshots describe the process of cloning.
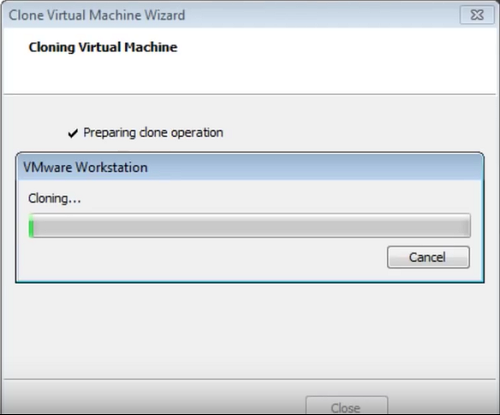
Once the cloning process is complete, the following window will open.

Virtualization 2.0 - VirtualBox
In this chapter, we will understand what a VirtualBox is and discuss in detail the various components it has.
Installing VirtualBox
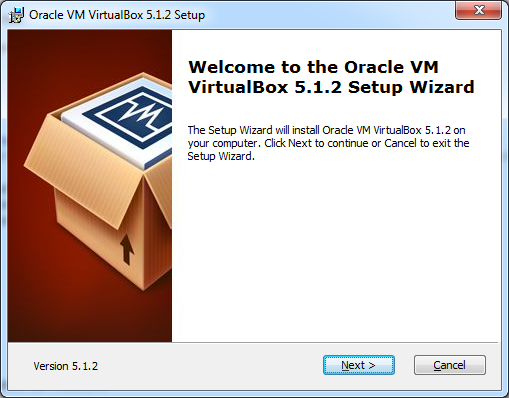
To start with, we will download VirtualBox and install it. We should follow the steps given below for the installation.
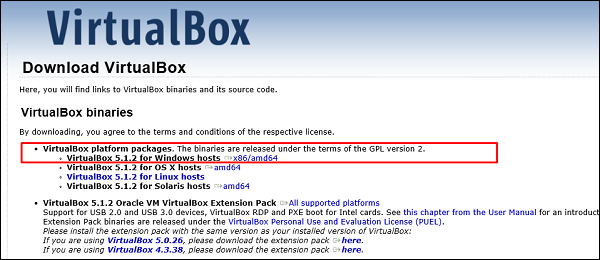
Step 1 − To download VirtualBox, click on the following link https://www.virtualbox.org/wiki/Downloads Now, depending on your OS, select which version to install. In our case, it will be the first one (Windows host).
Step 2 − Once the option is selected, click on Next.
Step 3 − You have the option asking where to install the application. We can leave it as default and click on Next.
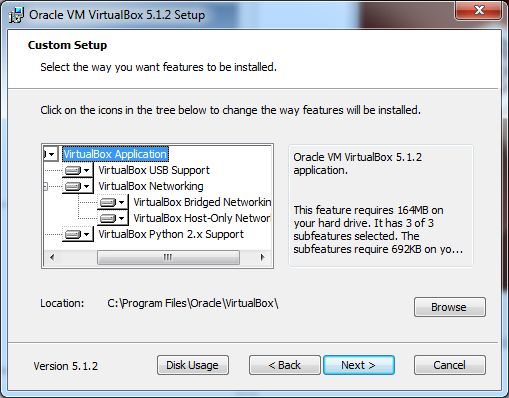
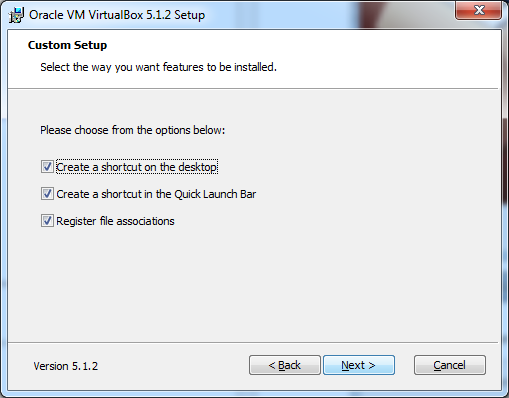
Step 4 − Once the options are selected as shown in the following screenshot, click on Next.
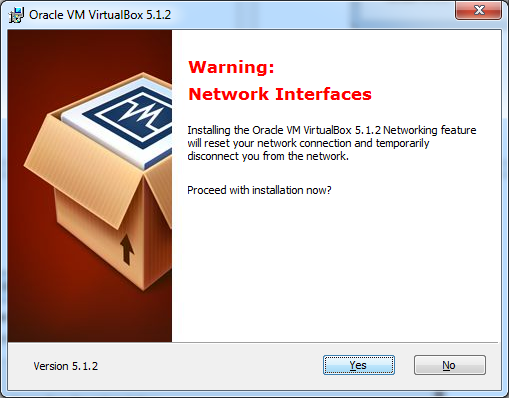
Step 5 − A dialog box will come up asking whether to proceed with the installation. Click Yes.
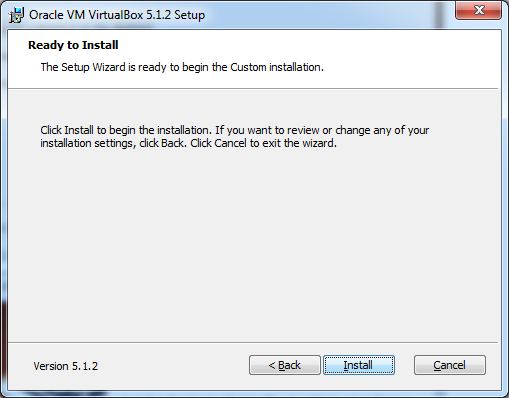
Step 6 − In the next step, click on Install.
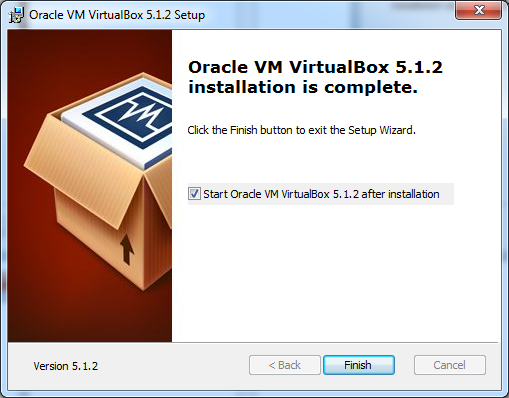
Step 7 − Tick the start VirtualBox check box and click on Finish.
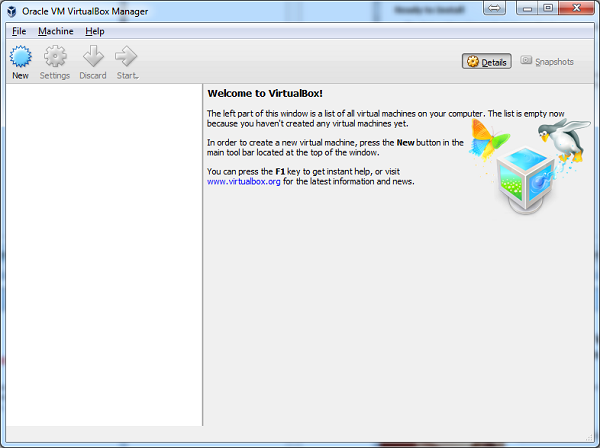
Step 8 − VirtualBox application will now open as shown in the following screenshot. Now, we are ready to install the virtual machines.
Creating a VM with VirtualBox
To create a virtual machine with Oracle VirtualBox, we should follow the steps given below.
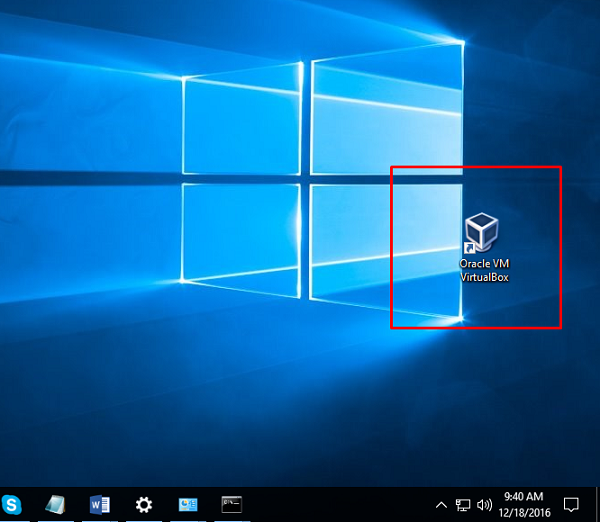
Step 1 − To begin with, click on the Oracle VM VirtualBox icon on the desktop as shown in the screenshot below.
Step 2 − The next step is to click on New button, which is in the top left hand side of the screen.
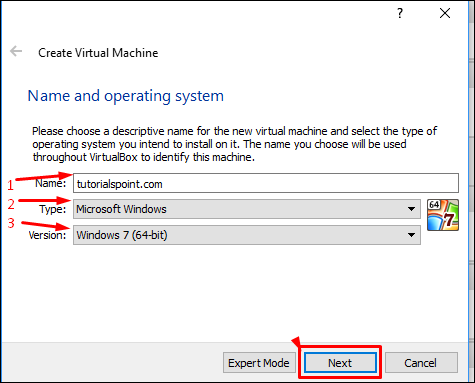
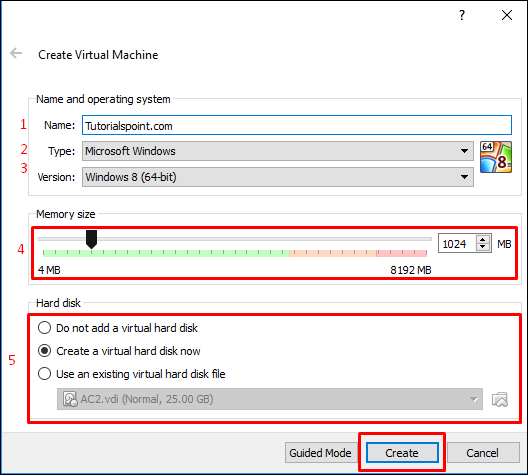
Step 3 − A table will pop-up requesting you the parameters for the virtual machine. These will be −
Name − We have to put a friendly name for this Virtual Machine.
Type − Enter the OS that is going to be installed on it.
Version − Enter the specific version for that OS, which we have selected earlier.
Once all the above parameters are filled, click on Next.
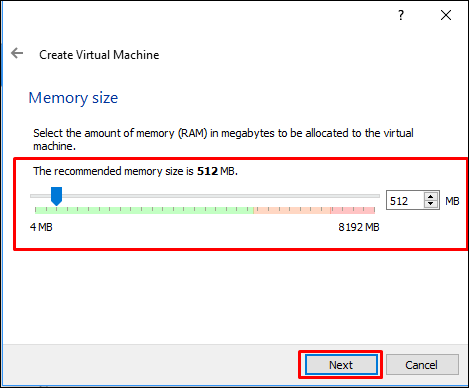
Step 4 − Select the amount of memory that you need to allocate in this VM → Click on Next.
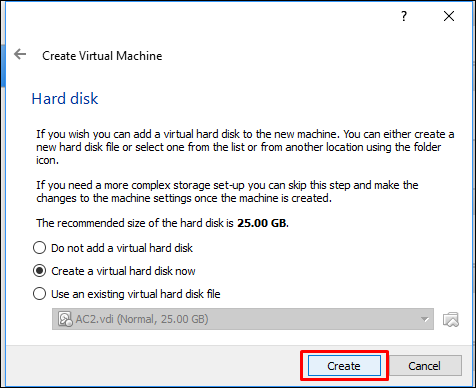
Step 5 − Check one of the three options for the HDD and click on Create.
Step 6 − Select a file extension for your virtual HDD (It is recommended to use a common file extension that most of the hypervisors use like VHD) → click on Next.
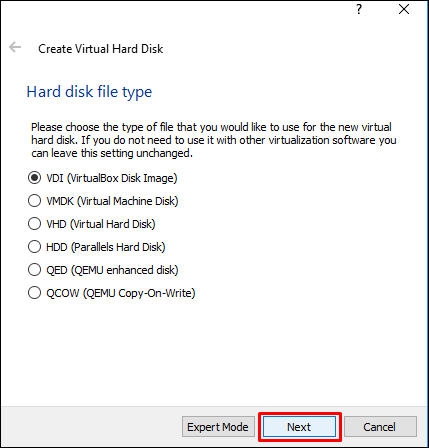
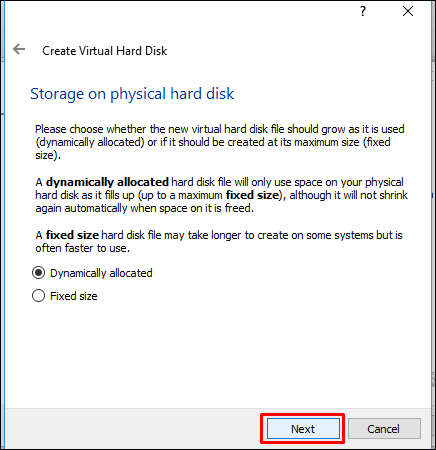
Step 7 − Choose whether you want the Virtual HDD as dynamic or fixed. This is based on your needs → Click on Next.
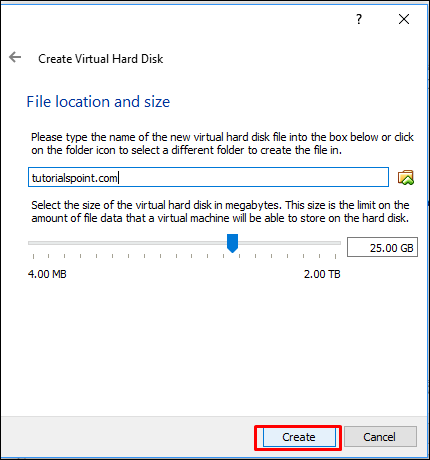
Step 8 − Put a name for your virtual HDD file and select the disk size for your VM → Click on Create.
All the above steps can be done in one shot by selecting the Expert mode.
The virtual machine created will be as shown in the screenshot below.
Setting up Networking with VirtualBox
There are two types of networking modes in VirtualBox, which are −
- Nat Networks and
- Host-only Networks.
Both of these are explained in detail below.
Nat Networks
For setting up Nat Networks, we should follow the steps given below.
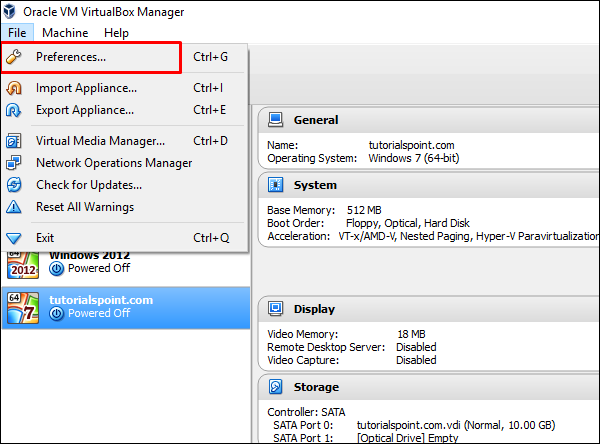
Step 1 − Go to Oracle VM VirtualBox Manager → Click on Preferences
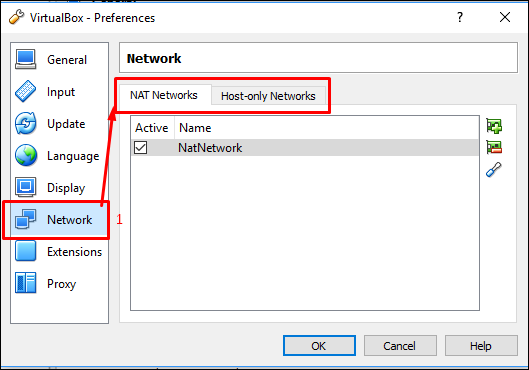
Step 2 − Click on Network and then on the left panel click on the NAT Networks tab.
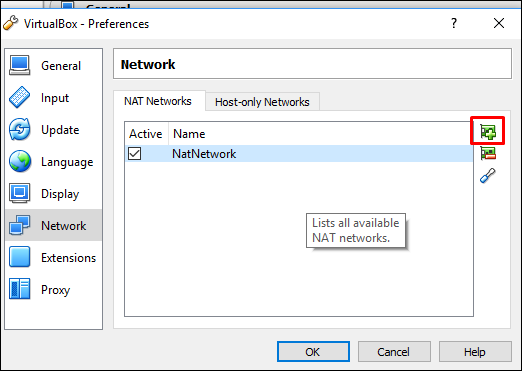
Step 3 − Click on the + button, which is highlighted in the screenshot below.
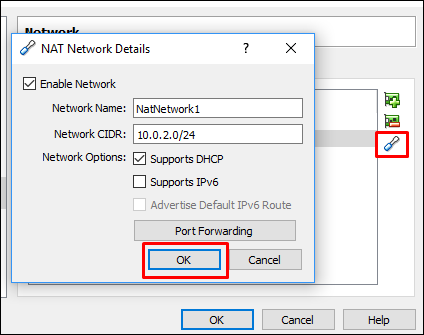
Step 4 − Here, we have to put the Network Name and the IP range for this network that will be NAT-ed, in order to have access to internet and to other networks.
Host-only Networks
For setting up Host-only Networks, we should follow the steps given below.
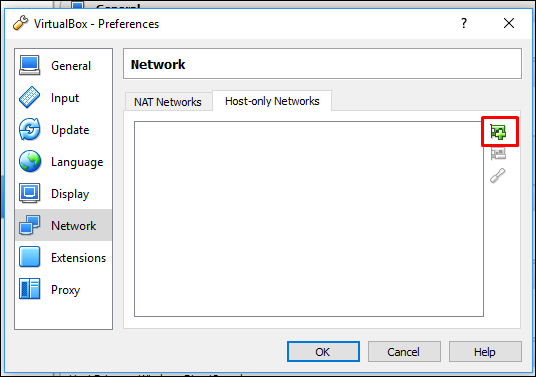
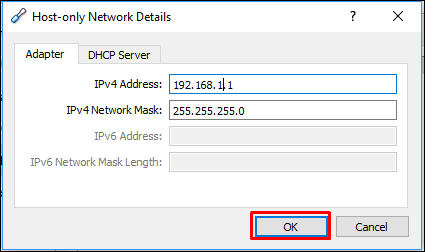
Step 1 − If you click on the Host-only Networks tab, you can create networks that are isolated from the other networks. However, VM hosts communicate with each other and the Hypervisor machine. Click on the + sign.
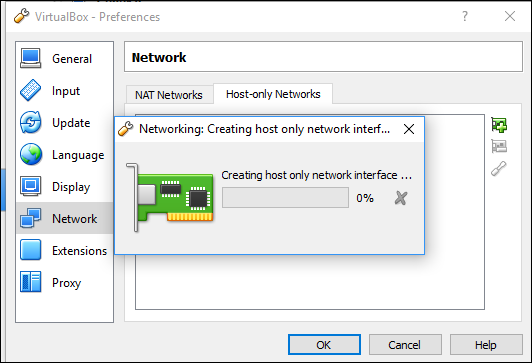
Step 2 − The host interface will continue to be created as shown in the screenshot below.
Step 3 − If you click on  button, you can edit the settings.

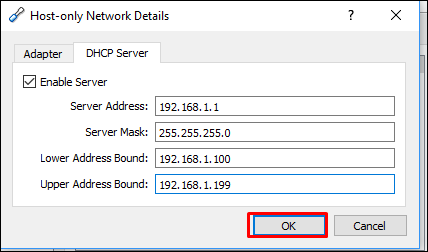
Step 4 − If you want your host machines to take DHCP IP, click on the DHCP Server tab and check the box Enable Server → Click OK.
Step 5 − In the Adapter tab, put the IP of the hypervisor.
After all these preparations for setting up the network modes is complete. It is now time to assign a network to our VMs.
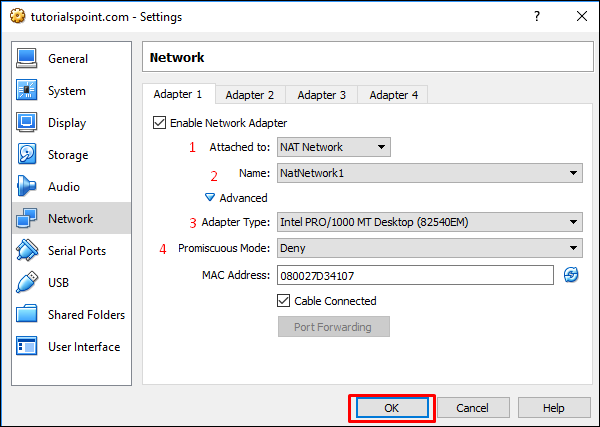
To do this, Click on the VMs on the left side of the panel, then right click on the Network option and a table will be open.
You can have up to four Ethernet adaptors per machine. The following image has four sections highlighted, which are explained below.
Check the box Enable Network Adapter to enable the vNIC on the VM and attach it to one network.
You can have many networks created, so we have to select one of them in the Name dropdown box.
In the adapter type dropdown-box, we have to select a physical NIC that the hypervisor has.
Promiscuous Mode: Here, we can select Deny, if we do not want the VMs to communicate with each other.
Once all the above parameters are completed. Click on OK.
Allocating Processors & Memory to a VM
To allocate processors and memory to a virtual machine using VirtualBox, we should follow the steps given below.
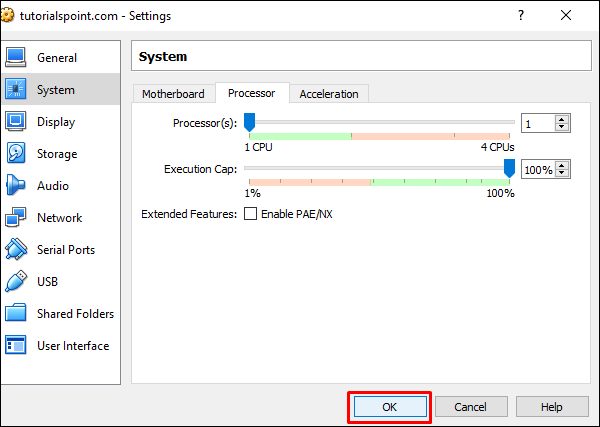
Step 1 − To allocate a processor and memory, you have to click on Settings after you have selected the VM.
Step 2 − Click on System on the left side tab, then click on the Motherboard tab. Move the arrow left or right to allocate the memory as shown in the screenshot below.
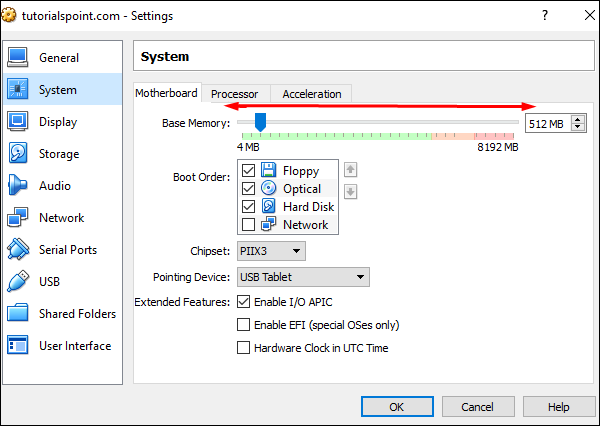
Step 3 − To allocate processors, click on the Processor tab. Move the arrow left or right to allocate the number of processors as shown in the screenshot below.
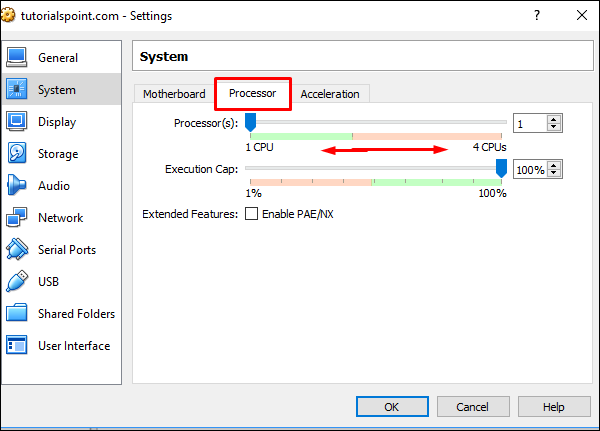
Step 4 − After all those changes are done → click on OK.
Duplicating a VM Using VirtualBox
To duplicate a virtual machine using VirtualBox, we should follow the steps given below.
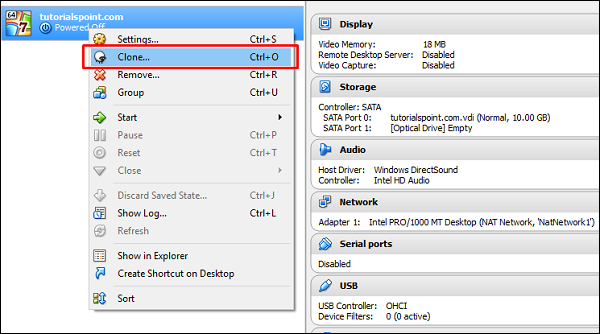
Step 1 − To duplicate a VM that we created before, right click on the VM and select Clone. A wizard will open.
Step 2 − Write the name of the cloning machine and click on Next.
Step 3 − Select one of the options and Click on Clone.
Step 4 − The newly created VM will be as shown in the following screenshot.
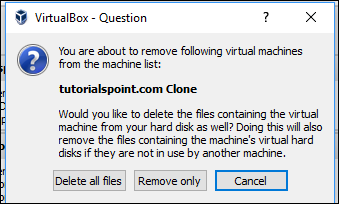
Deleting a VM on VirtualBox
To delete a virtual machine on VirtualBox, we should follow the steps given below.
Step 1 − To start with, we have to right click on the VM that we want to delete and then click on Remove.
Step 2 − To delete a virtual machine completely, select Delete all files.
Virtualization 2.0 - Openstack
In this chapter, we will discuss regarding Openstack and its role in Virtualization.
Understanding Openstack
OpenStack is a software for building and managing cloud-computing platforms for public and private clouds. Openstack has one of the biggest communities. It is managed by the OpenStack Foundation, a non-profit organization that oversees both development and community building. Its official webpage is https://www.openstack.org/.
OpenStack is used to deploy virtual machines and other instances that handle different tasks for managing a cloud environment. OpenStack is considered as Infrastructure as a Service (IaaS). Based on Openstack, please see the following schematic illustration, which describes how it is managed.
Source − https://www.openstack.org/
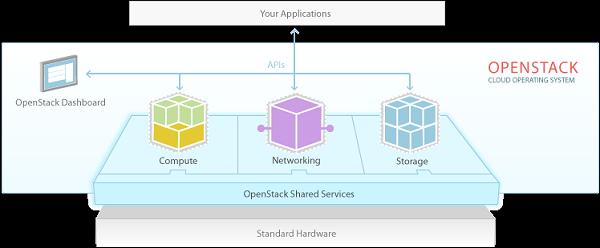
Openstack platform is managed by a web UI dashboard. It comprises of nine Core key components.
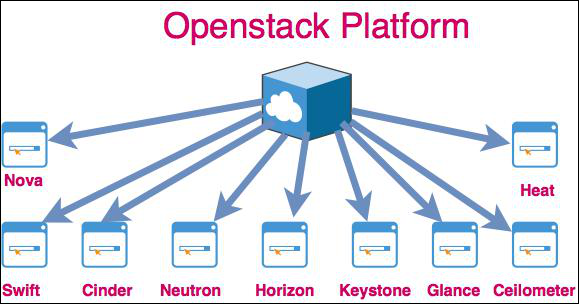
These key concepts are described in detail as follows −
Nova is a computing engine. It is used for deploying and managing large numbers of virtual machines.
Swift is a storage system for objects and files.
Cinder is a block storage component. It accesses specific locations on a disk drive.
Neutron provides the networking capability.
Horizon is the dashboard of Openstack. It is the only graphical interface (WEB UI).
Keystone provides identity services. It is essentially a central list of all the users.
Glance provides image services to OpenStack. In this case, "images" refers to images (or virtual copies) of hard disks.
Ceilometer provides telemetry services, which allow the cloud to provide billing services to individual users of the cloud.
Heat allows developers to store the requirements of a cloud application in a file that defines what resources are necessary for that application.
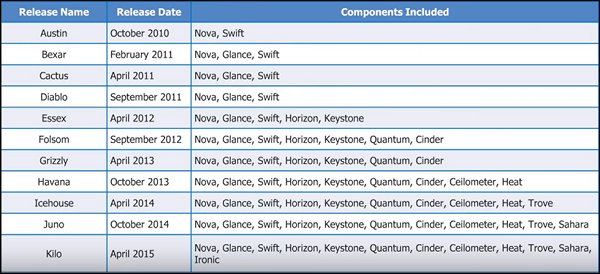
The release versions of Openstack are explained in the following illustration.
Installing Openstack
As Openstack is an open source platform, there are many ways to install and deploy it through different software distributions. Each one of them adds their own value to the cloud operating system.
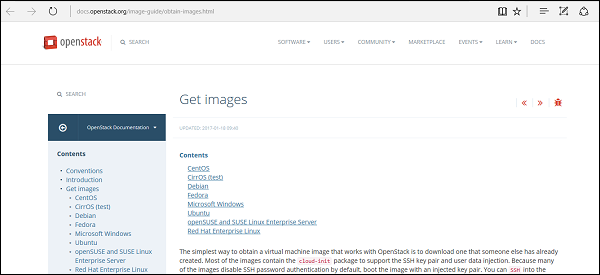
For a new system administrator, who wants to play with Openstack will get pre-installed ISO images of the Openstack platform. They can be downloaded from the following link https://docs.openstack.org/image-guide/obtain-images.html
To install them manually, the main distributors are −
Red Hat − https://www.rdoproject.org/
We must understand that Openstack is for enterprise environment and to install it we should have the following hardware requirements.
Installation Requirements
The installation requirements for Openstack are as follows −
A minimum of 5 machines with the following roles −
1 machine for the MAAS server.
1 machine for the Autopilot.
3 or more machines for the cloud −
At least one must have 2 NICs.
At least 3 must have 2 disks.
A dedicated switch to create a private cloud LAN.
Internet access through a router on that LAN.
For this laboratory, we have a virtual machine and we will install Devstack. It is designed for installation on a single laptop, PC or VM. It includes the raw upstream code for development evaluation. It is supported on −
- Ubuntu 14.04/16.04
- Fedora 23/24
- CentOS/RHEL 7
- Debian and
- OpenSUSE
The link for this version is https://docs.openstack.org/devstack/latest/#install-linux
Installing Openstack on Ubuntu 14.04
For installing Openstack on Ubuntu 14.04, we should follow the steps given below.
Step 1 − Download the installation script from the following link - https://git.openstack.org/cgit/openstack-dev/devstack
Use this command git clone https://git.openstack.org/openstack-dev/devstack


Step 2 − Browse the folder Devstack by keying in the following command $ cddevstack.

Step 3 − Execute the file stack.sh with the following command ./stack.sh and installation process will continue as shown below −
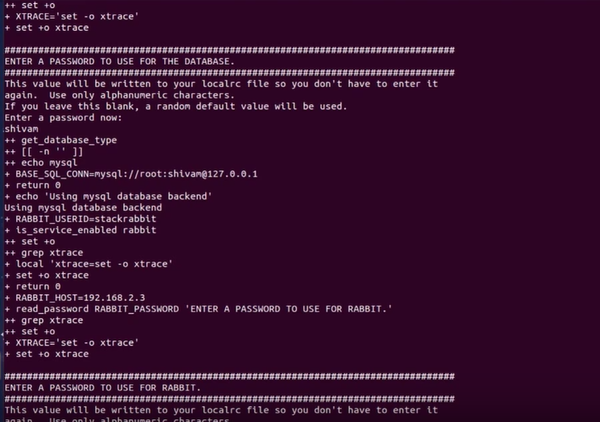
Step 4 − Enter your password.

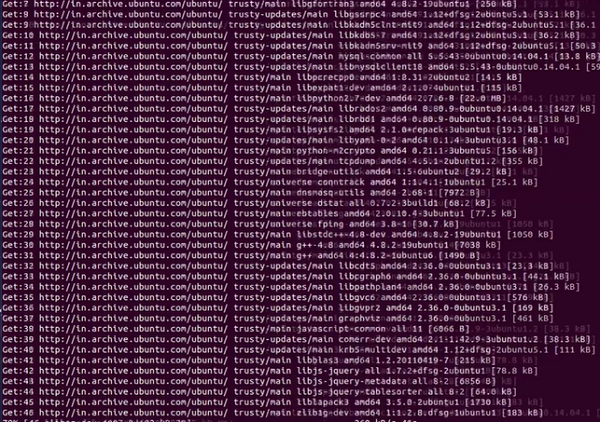
Step 5 − Now it will take about 15-20 minutes to finish the installation process, while it downloads and installs all the libraries.
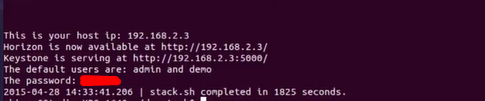
Step 6 − At the end of the installation, we will see the IP of the host, URL for managing it, username and password to administrate it.
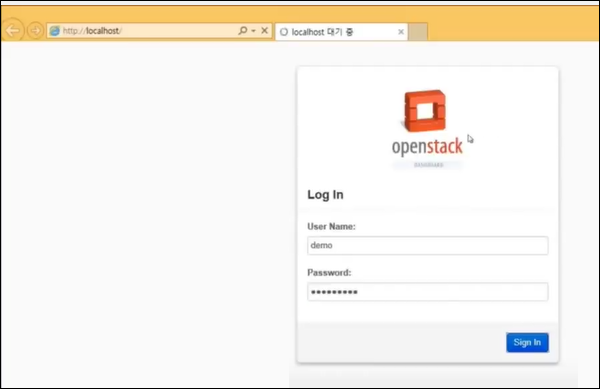
Step 7 − To sign in, you have to type in the browser: Host IP, username and password that we entered during the installation.
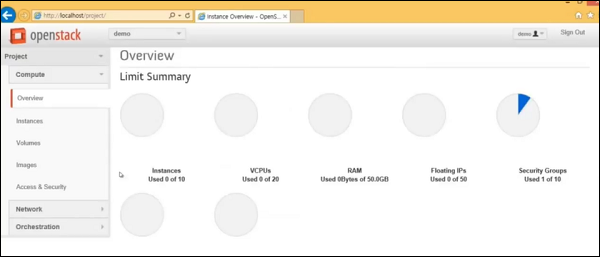
Step 8 − In the main dashboard, you will see Instances overview.
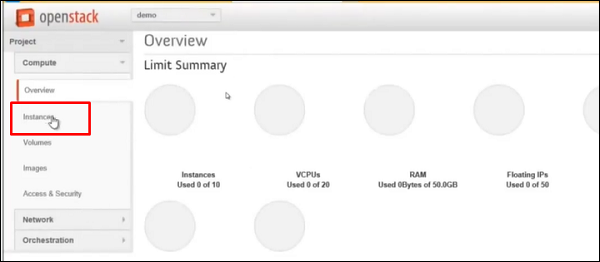
Step 9 − To create new instances or in simple words to create Virtual machines click on Instances.
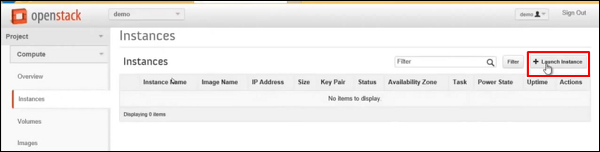
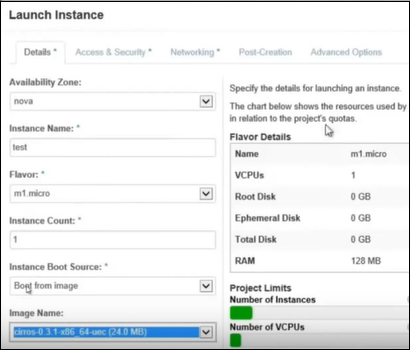
Step 10 − Click on Launch Instances.
Step 11 − Fill in all the fields as shown below.
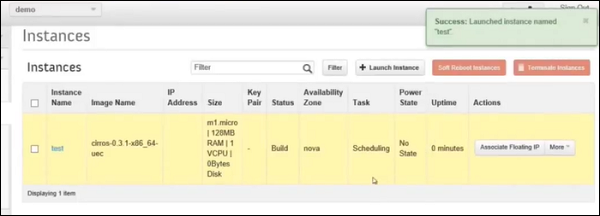
Step 12 − We will see the instance created as shown in the following screenshot.
Preparing the Infrastructure
Virtualization, at least at the server level, has been in use for some time. Since, the concept has expanded to the User, Application, Network, Security, Storage, and of course to Desktop Virtualization (VDI) as well. Therefore, to roll out in all these concepts, we have to prepare an infrastructure before, which is divided in some key components.
The First one is Hypervisor and we have discussed it in the earlier chapters. Some important specifications needed for this job are Processors, Memory and Networking Modes, etc.
Networking - LAN and WAN Optimization
VDI can be very resource intensive this includes traffic over the wire. Having a good core-switching infrastructure will help alleviate this pain by allowing the administrators to create certain rules and policies revolving around traffic flow.
Setting up QoS metrics for VDI-specific traffic can help remove congestion and ensure that the right traffic has the proper amount of priority. As for the traffic that is leaving the data center, knowing where the user is located and optimizing their experience based on certain criteria, becomes very important.
Another significant aspect is storage. Large organizations will have numerous storage controllers. At the same time, some smaller organizations will be using only one. Regardless of the amount of storage controllers available, they need to be sized properly for VDI.
To prevent boot and processing storms, organizations must look at IOPS requirements for their images. To alleviate processing pains, administrators can look at Flash Technologies (NetApp, Fusion-IO, XtremIO) or SSD Technologies (Violin, Nimbus) to help offload that kind of workload. Furthermore, intermediary platforms like Atlantis ILIO run on top of a virtual machine that utilizes massive amounts of RAM as the key storage repository.
Understanding Different File Systems
File systems are varied depending on their functions. Some of the most common ones are listed below −
- Virtual Machine File System- VMFS
- Network File System- NFS
- New Technology File System- NTFS
- Raw Device Mapping- RDM
Let us discuss each of these in detail.
Virtual Machine File System
VMFS is a file system proprietary to VMware. It is a clustered file system and it can be mounted on multiple servers simultaneously. This helps every host to connect to the any file system at the same time, which is expected from a proprietary system preferred by VMware. Most of the VMware hypervisors will work with other file systems, but the default choice and the preferred choice is VMFS.
Network File System
NFS is a system that was originally developed by Sun, but is now an Open Standard system. Used commonly in the UNIX and Linux world. It is a distributed file system. It can be mounted on one server and the network will be used to share information to multiple machines.
New Technology File System
NTFS is the standard file structure for the Windows NT operating system. It is used for retrieving and storing files on the hard disk.
Raw Device Mapping
RDM helps any file in a virtual machine file system to act as a proxy for any raw device. It allows a VM to access as well as use the storage device.
Choosing Between Different Types of Storage
All the storage devices are divided into three categories, which are −
- Direct-Attached Storage
- Network-Attached Storage
- Storage-Area Network
Let us understand each of these in detail.
Direct-Attached Storage
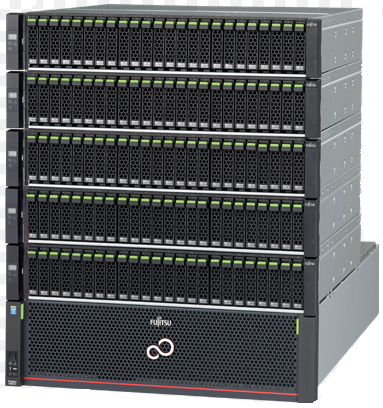
DAS is your local hard drive. We can have one or more local hard drives in every machine. It is mostly used for small-virtualized systems. This solution is appropriate for a small amount of guest machines. It is the cheapest and the easiest method of storage. You can connect an external hard drive too with this method, load any guest machines onto that external hard drive, and that is just a quick and easy way to get rolling.
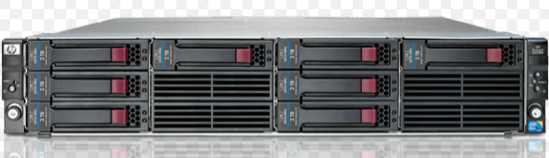
For example A server that has local hard discs on it. That type of hypervisor can hold not more that 10-20 VM machines. A sample device can be a HP Server with eight local hard discs as shown in the following illustration.
Network-attached Storage
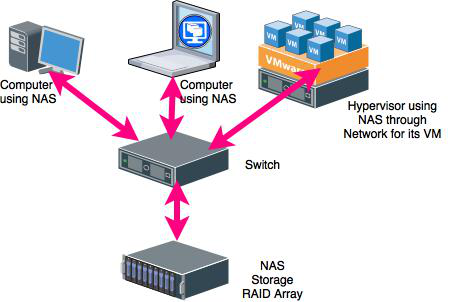
NAS is "Any server that shares its own storage with others on the network and acts as a file server in the simplest form". Network Attached Storage shares files over the network. Some of the most significant protocols used are SMB, NFS, CIFS, and TCP/IP. When you access files on a file server on your windows system, it is NAS
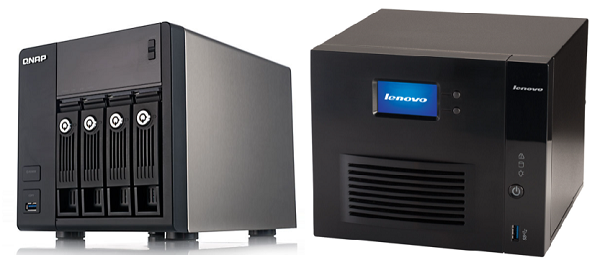
NAS will be using an Ethernet connection for sharing files over the network. The NAS device will have an IP address and then will be accessible over the network through that IP address. Biggest providers of NAS are QNAP and Lenovo.
The following illustration shows how NAS works.
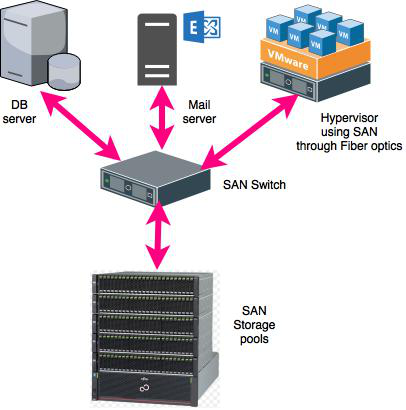
Storage-area Network
SANs allow multiple servers to share a pool of storage; making it appear to the server as if it were local or directly attached storage. A dedicated networking standard, Fibre Channel, has been developed to allow blocks to be moved between servers and storage at high speed. It uses dedicated switches and a fiber-based cabling system, which separates it from the day-to-day traffic traversing the busy enterprise network. While the well-established SCSI protocol enables communication between the servers host bus adaptors and the disk system.
The following illustration shows how a SAN switch operates.
Virtualization 2.0 - Troubleshooting
In this chapter, we will discuss troubleshooting for network communication and for slow performance.
Troubleshooting Network Communication
In a virtual environment, to troubleshoot a network connectivity, we should follow some steps in order to find a resolution.
Network Communication Indications
Some of the symptoms that we have are as follows −
- You cannot connect to the Internet.
- There is no network connectivity to or from a single virtual machine.
- Virtual machines fail to connect to the network.
- Cannot get an IP.
- A TCP/IP connection fails to and from a single virtual machine.
Network Communication Errors
You can get the following errors as well −
- Destination Host Unreachable
- Network error
- Connection Refused
- Network cable is unplugged
- Ping request could not find host
- Please check the name and try again
- Unable to resolve target system name, etc.
Network Communication Resolutions
The resolutions for the above symptoms and errors are as follows −
Make sure that the Port Group Name is associated with the virtual machine's network adapter, which exists in the switch or in the Virtual Distributed Switch. Also, ensure that it is spelt correctly.
Make sure that there are enough storage capacities in your virtual machine sometimes it affects the connectivity.
Verify that the virtual network adapter is present and connected.
Verify that the networking within the virtual machine's guest operating system is correct.
Verify that the TCP/IP stack is functioning correctly.
If this virtual machine was converted from a physical system, verify that there are no hidden network adapters present. Because it can have hidden static routes.
Verify that the vSwitch has enough ports for the virtual machine.
Verify that the virtual machine is configured with two vNICs to eliminate a NIC or a physical configuration issue.
Confirm that your virtual machine's firewall is not blocking the Internet access.
Confirm that your virtual machine's anti-virus program is not blocking the Internet access.
Ensure that the network adapter is enabled.
Shut down the virtual machine and then restart your Host Machine.
Removing and re-adding virtual network card adaptor.
Troubleshooting Slow Performance
Check if your CPU load is high. You can click on CPU. This will show you the amount of CPU the VM is consuming. If it is very high, you may consider adding some more vCPUs. This should be done after ensuring that the physical host has more cores available than what you are going to configure inside the VM. We should also consider whether the applications inside the VM are actually able to utilize multiple vCPUs or not.
Check the Memory
Memory could be a serious limit on VM performance as well. If you do not configure enough memory, the VM will usually respond by starting to swap its memory pages to disk .If your virtual machine is using more than 2/3rd of the memory and then we should allocate more.
See Disk Alignment
For any pre-Windows 7, pre-Windows 2008 Server or older Linux based systems, your disks may be misaligned. Misalignment may cause quite a performance hit, especially when your storage underneath does not have many IOPS to spare.
It is important to format the virtual disks to a specific format or block size according to the application needs. For example The database of a Microsoft SQL 2005 server is generally put on an NTFS that has a block size of 64KB.
If the virtual machine has a performance issue at some point in time, you need to check the virus scanner. Not only on the impacted virtual machine, but also on the other virtual machines as well.
If you do a P2V a virtual machine (meaning you convert a physical machine to a VM) and you do not clean up afterwards, there may be a lot of unused drivers and even applications.
Backing Up, Restoring and Migrating VM
In this chapter, we will discuss how to back up, restore and migrate a virtual machine.
Duplicating a VM
To duplicate or clone a machine means making an exact copy of it. Most of the hypervisors support this feature. By duplicating a machine, we copy down every detail, including the name of the machine and the different network addresses attached to the machine.
Duplicating a machine and putting it in to function is not always the best option because a duplicate name or IP in network can be a problem. We make duplication generally for backup purposes.
Most hypervisors can clone while the machine is turned off. If the hypervisor accepts to clone while it is on, it is recommend to turn it off, because the process can crash the machine. In practice, we have discussed How cloning is done in VMware Workstation, please refer to the previous chapters.
Backing Up and Recovering a VM
There are three methods for backing up virtual machines.
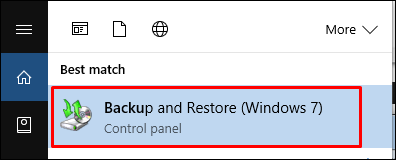
Method 1
The most common one is to install traditional backup software on the guest VM. If Windows OS is used on our VM, we can use Backup and restore to back up the machine, which is found in the Control Panel.
For Linux OS, we can use many open source tools depending on our needs, like Bacula, rsync, etc.
Method 2
Another strategy or method is to copy all of the files that define a VM. Therefore, we will have to go out and find all of the individual files that define our virtual machine and copy them to an alternate location. Some of these files are going to be large.
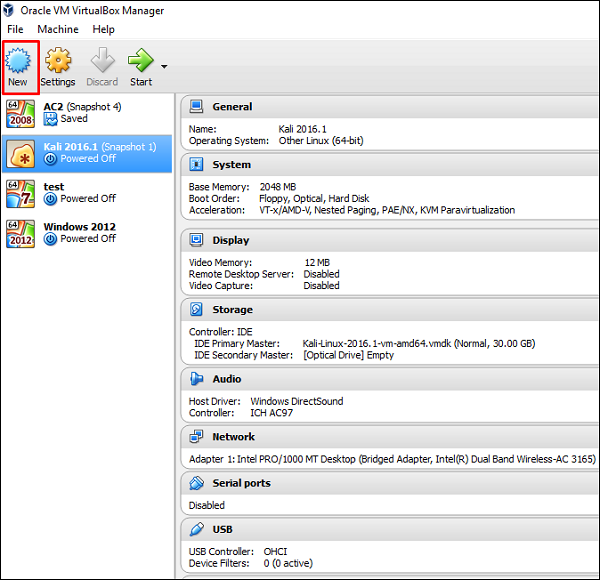
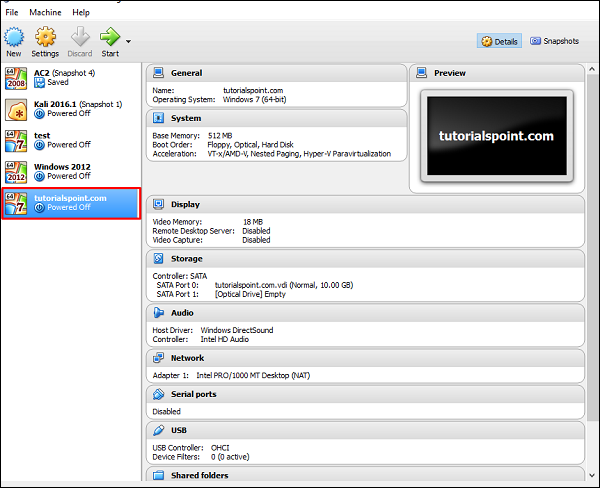
Example: Here, we have created several VM machines with VirtualBox as shown in the following illustration. Their names are AC2, Kali2016.1, test, Windows 2012.

To find the files that we have to copy or to backup, we have to right click on the VM machine. Go to Storage then move your mouse over the virtual HDD and it will show the full path where the VDI files are found.
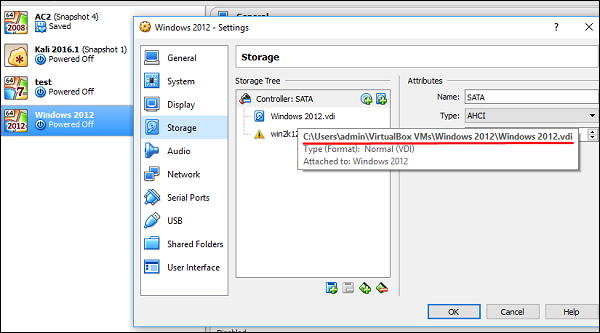
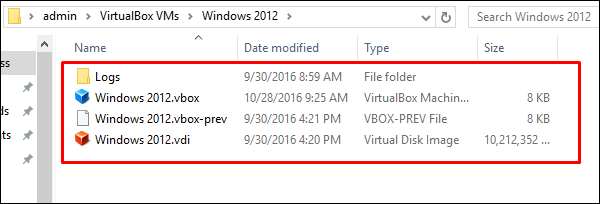
We will save all these files to another location.
Method 3
The third option to backup and restore VM machines is to use third party software. One of the best is VEEAM, which can be found on the following URL - https://www.veeam.com/

Converting a Physical Server into a Virtual Server
In this section, we will see how to convert a physical machine into a virtual machine. This is often called as P2V in many literatures.
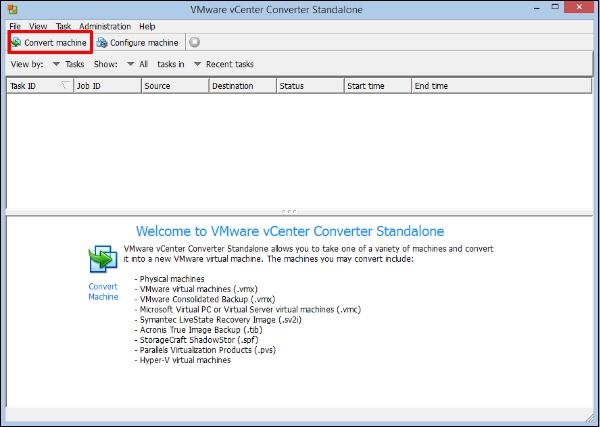
VMware puts out a product that is called vCenter Converter, which will convert from a physical machine specifically into a VMware virtual machine. The software can be downloaded from - https://www.vmware.com/products/converter.html
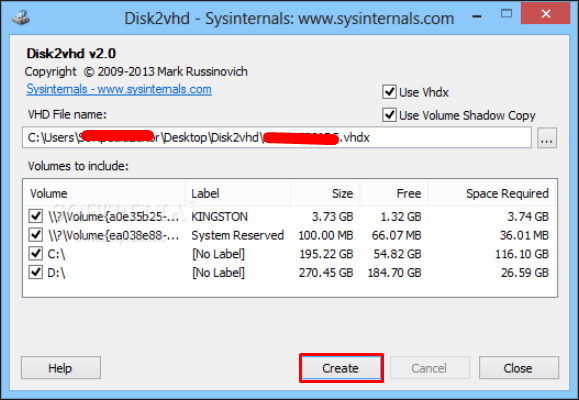
Microsoft has a product called Disk2vhd, which will convert a physical hard drive into a VHD formatted virtual hard drive. It can be downloaded from the following link https://technet.microsoft.com/en-us/sysinternals/ee656415.aspx
We just have to install the software on the physical server and click Create as shown in the screenshot below. A VHDX file will be created which could be imported in a Hypervisor.
Both of these products will convert machines, while the server is running and is free. All the vendors of hypervisors have some P2V tool and they are typically free. From the vendors point of view, they would very much like you to convert your physical machines into virtual machines that are optimized for their hypervisor.
Converting a Virtual Server into a Physical Server
To convert a virtual server to a physical server also commonly called as V2P is certainly less common than a P2V conversion. However sometimes, it is needed in development-based environments. It does happen where a product needs to be tested in the virtual server than to a physical server, or to clone a production machine and move it to test.
Hypervisor vendors do not offer such a tool. However, you have to request the hardware vendor, if they could offer such tools.
