- Sprint Security - Home
- Spring Security - Introduction
- Spring Security - Architecture
- Spring Security - Project Modules
- Spring Security - Environment Setup
- Spring Security - Form Login
- Spring Security - Custom Form Login
- Spring Security - Logout
- Spring Security - Remember Me
- Spring Security - Redirection
- Spring Security - Taglibs
- Spring Security - XML Configuration
- Spring Security - Authentication Provider
- Spring Security - Basic Authentication
- Spring Security - AuthenticationFailureHandler
- Spring Security - JWT
- Spring Security - Retrieve User Information
- Spring Security - Maven
- Spring Security - Default Password Encoder
- Spring Security – Password Encoding
- Spring Security - Methods Level
- Spring Security - Manual Authentication
- Spring Security - Extra Login Fields
- Spring Security - Prevent Brute Force
- Spring Security - Login Page with React
- Spring Security - Security Filter Chain
- Spring Security - Securing Spring Boot API
- Spring Security - Expressions
- Spring Security - Security none, Filters none, access permitAll
- Spring Security - Control the Session
- Spring Security Useful Resources
- Spring Security - Quick Guide
- Spring Security - Useful Resources
- Spring Security - Discussion
Spring Security - JWT
Overview
JSON Web Token or JWT, as it is more commonly called, is an open Internet standard (RFC 7519) for securely transmitting trusted information between parties in a compact way. The tokens contain claims that are encoded as a JSON object and are digitally signed using a private secret or a public key/private key pair. They are self-contained and verifiable as they are digitally signed. JWTs can be signed and/or encrypted. The signed tokens verify the integrity of the claims contained in the token, while the encrypted ones hide the claims from other parties.
JWT's can also be used for the exchange of information though they more commonly used for authorization as they offer a lot of advantages over session management using in-memory random tokens. The biggest of them being the enabling the delegation of authentication logic to a third-party server like AuthO etc.
A JWT token is divided into 3 parts namely header, payload, and signature in the format of
[Header].[Payload].[Signature]
-
Header − The Header of a JWT token contains the list cryptographic operations that are applied to the JWT. This can be the signing technique, metadata information about the content-type and so on. The header is presented as a JSON object which is encoded to a base64URL. An example of a valid JWT header would be
{ "alg": "HS256", "typ": "JWT" }Here, "alg" gives us information about the type of algorithm used and "typ gives us the type of the information.
Payload − The payload part of JWT contains the actual data to be transferred using the token. This part is also known as the "claims" part of the JWT token. The claims can be of three types registered, public and private.
The registered claims are the ones which are recommended but not mandatory claims such as iss(issuer), sub(subject), aud(audience) and others.
Public claims are those that are defined by those using the JWTs.
-
Private claims or custom claims are user-defined claims created for the purpose of sharing the information between the concerned parties.
Example of a payload object could be.
{ "sub": "12345", "name": "Johnny Hill", "admin": false }The payload object, like the header object is base64Url encoded as well and this string forms the second part of the JWT.
-
Signature− The signature part of the JWT is used for the verification that the message wasnt changed along the way. If the tokens are signed with private key, it also verifies that the sender is who it says it is. It is created using the encoded header, encoded payload, a secret and the algorithm specified in the header. An example of a signature would be.
HMACSHA256( base64UrlEncode(header) + "." + base64UrlEncode(payload), secret)
If we put the header, payload and signature we get a token as given below.
eyJhbGciOiJSUzI1NiIsInR5cCI6IkpXVCJ9.eyJzdWIiOiIxMjM0NTY3ODkwIiwibmFtZSI6I
kpvaG4gRG9lIiwiYWRtaW4iOmZhbHNlfQ.gWDlJdpCTIHVYKkJSfAVNUn0ZkAjMxskDDm-5Fhe
WJ7xXgW8k5CllcGk4C9qPrfa1GdqfBrbX_1x1E39JY8BYLobAfAg1fs_Ky8Z7U1oCl6HL63yJq_
wVNBHp49hWzg3-ERxkqiuTv0tIuDOasIdZ5FtBdtIP5LM9Oc1tsuMXQXCGR8GqGf1Hl2qv8MCyn
NZJuVdJKO_L3WGBJouaTpK1u2SEleVFGI2HFvrX_jS2ySzDxoO9KjbydK0LNv_zOI7kWv-gAmA
j-v0mHdJrLbxD7LcZJEGRScCSyITzo6Z59_jG_97oNLFgBKJbh12nvvPibHpUYWmZuHkoGvuy5RLUA
Now, this token can be used in the Authorization header using the Bearer schema as Authorization − Bearer <token>
The use of JWT token for authorization is the most common of its applications. The token is usually generated in the server and sent to the client where it is stored in the session storage or local storage. To access a protected resource the client would send the JWT in the header as given above. We will see the JWT implementation in Spring Security in the section below.
Let us start actual programming with Spring Security. Before you start writing your first example using Spring framework, you have to make sure that you have set up your Spring environment properly as explained in Spring Security - Environment Setup Chapter. We also assume that you have a bit of working knowledge on Spring Tool Suite IDE.
Now let us proceed to write a Spring MVC based Application managed by Maven, which will ask user to login, authenticate user and then provide option to logout using Spring Security Form Login Feature.
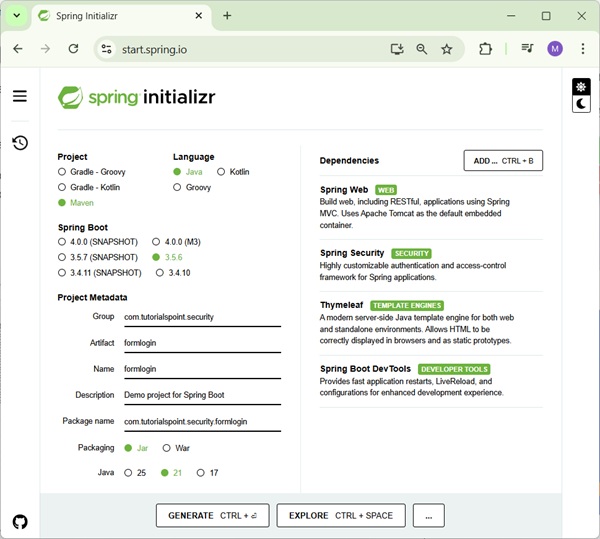
Create Project using Spring Initializr
Spring Initializr is great way to start with Spring Boot project. It provides a easy to use User Interface to create a project, add dependencies, select java runtime etc. It generates a skeleton project structure which once downloaded can be imported in spring tool suite and we can proceed with our readymade project structure.
We're choosing a maven project, naming the project as formlogin, with java version as 21. Following dependencies are added:
Spring Web
Spring Security
Spring Boot DevTools
Thymeleaf is a templating engine for Java. It allows us to quickly develop static or dynamic web pages for rendering in the browser. It is extremely extensible and allows us to define and customize the processing of our templates in fine detail. In addition to this, we can learn more about Thymeleaf by clicking this link.
Let's move on to generate our project and download it. We then extract it to a folder of our choice and use any IDE to open it. I shall be using Spring Tools Suite 4. It is available for free downloading from the https://spring.io/tools website and is optimized for spring applications.
pom.xml with all relevant dependencies
Let's take a look at our pom.xml file. It should look something similar to this −
pom.xml
<?xml version="1.0" encoding="UTF-8"?>
<project xmlns="http://maven.apache.org/POM/4.0.0" xmlns:xsi="http://www.w3.org/2001/XMLSchema-instance"
xsi:schemaLocation="http://maven.apache.org/POM/4.0.0 https://maven.apache.org/xsd/maven-4.0.0.xsd">
   <modelVersion>4.0.0</modelVersion>
   <parent>
      <groupId>org.springframework.boot</groupId>
      <artifactId>spring-boot-starter-parent</artifactId>
      <version>3.5.6</version>
      <relativePath/> <!-- lookup parent from repository -->
   </parent>
   <groupId>com.tutorialspoint.security</groupId>
   <artifactId>formlogin</artifactId>
   <version>0.0.1-SNAPSHOT</version>
   <name>formlogin</name>
   <description>Demo project for Spring Boot</description>
   <url/>
   <licenses>
      <license/>
   </licenses>
   <developers>
      <developer/>
   </developers>
   <scm>
      <connection/>
      <developerConnection/>
      <tag/>
      <url/>
   </scm>
   <properties>
      <java.version>21</java.version>
   </properties>
   <dependencies>
      <dependency>
         <groupId>org.springframework.boot</groupId>
         <artifactId>spring-boot-starter-security</artifactId>
      </dependency>
      <dependency>
         <groupId>org.springframework.boot</groupId>
         <artifactId>spring-boot-starter-thymeleaf</artifactId>
      </dependency>
      <dependency>
         <groupId>org.springframework.boot</groupId>
         <artifactId>spring-boot-starter-web</artifactId>
      </dependency>
      <dependency>
         <groupId>org.thymeleaf.extras</groupId>
         <artifactId>thymeleaf-extras-springsecurity6</artifactId>
      </dependency>
      <dependency>
         <groupId>org.springframework.boot</groupId>
         <artifactId>spring-boot-devtools</artifactId>
         <scope>runtime</scope>
         <optional>true</optional>
      </dependency>
      <dependency>
         <groupId>org.springframework.boot</groupId>
         <artifactId>spring-boot-starter-test</artifactId>
         <scope>test</scope>
      </dependency>
      <dependency>
         <groupId>org.springframework.security</groupId>
         <artifactId>spring-security-test</artifactId>
         <scope>test</scope>
      </dependency>
      <dependency>
         <groupId>io.jsonwebtoken</groupId>
         <artifactId>jjwt-api</artifactId>
         <version>0.11.5</version>
      </dependency>
      <dependency>
         <groupId>io.jsonwebtoken</groupId>
         <artifactId>jjwt-impl</artifactId>
         <version>0.11.5</version>
         <scope>runtime</scope>
      </dependency>
      <dependency>
         <groupId>io.jsonwebtoken</groupId>
         <artifactId>jjwt-jackson</artifactId>
         <version>0.11.5</version>
         <scope>runtime</scope>
      </dependency>
   </dependencies>
   <build>
      <plugins>
         <plugin>
            <groupId>org.springframework.boot</groupId>
            <artifactId>spring-boot-maven-plugin</artifactId>
         </plugin>
      </plugins>
   </build>
</project>
JWT Secret
The JWT includes a secret which we will define in our application.properties file as given below.
application.properties
spring.application.name=formlogin
secret=somerandomsecretsomerandomsecretsomerandomsecretsomerandomsecret
JWT Related Classes
Now lets create a package called jwtutils. This package is going to contain all classes and interface related to JWT operations, which will include.
- Generating token
- Validating token
- Checking the signature
- Verifying claims and permissions
In this package, we create our first class called Token Manager. This class will be responsible for the creation and validation of tokens using io.jsonwebtoken.Jwts.
TokenManager.java
package com.tutorialspoint.security.formlogin.jwtutils;

import java.security.Key;
import java.util.Date;
import java.util.HashMap;
import java.util.Map;

import org.springframework.beans.factory.annotation.Value;
import org.springframework.security.core.userdetails.UserDetails;
import org.springframework.stereotype.Component;

import io.jsonwebtoken.Claims;
import io.jsonwebtoken.Jwts;
import io.jsonwebtoken.SignatureAlgorithm;
import io.jsonwebtoken.io.Decoders;
import io.jsonwebtoken.security.Keys;

@Component
public class TokenManager {

   private static final long serialVersionUID = 7008375124389347049L;
   public static final long TOKEN_VALIDITY = 10 * 60 * 60;

   @Value("${secret}")
   private String jwtSecret;

   // Generates a token on successful authentication by the user
   // using username, issue date of token and the expiration date of the token.
   public String generateJwtToken(UserDetails userDetails) {
      Map<String, Object> claims = new HashMap<>();
      return Jwts
         .builder()
         .setClaims(claims)  // set the claims
         .setSubject(userDetails.getUsername())  // set the username as subject in payload
         .setIssuedAt(new Date(System.currentTimeMillis()))
         .setExpiration(new Date(System.currentTimeMillis() + TOKEN_VALIDITY * 1000))
         .signWith(getKey(), SignatureAlgorithm.HS256)  // signature part
         .compact();
   }

   // Validates the token
   // Checks if user is an authenticatic one and using the token is the one that was generated and sent to the user.
   // Token is parsed for the claims such as username, roles, authorities, validity period etc.
   public Boolean validateJwtToken(String token, UserDetails userDetails) {
      final String username = getUsernameFromToken(token);
      final Claims claims = Jwts
         .parserBuilder()
         .setSigningKey(getKey())
         .build()
         .parseClaimsJws(token).getBody();
      Boolean isTokenExpired = claims.getExpiration().before(new Date());
      return (username.equals(userDetails.getUsername())) && !isTokenExpired;
   }

   // get the username by checking subject of JWT Token
   public String getUsernameFromToken(String token) {
      final Claims claims = Jwts
         .parserBuilder()
         .setSigningKey(getKey())
         .build()
         .parseClaimsJws(token).getBody();
      return claims.getSubject();
   }

   // create a signing key based on secret
   private Key getKey() {
      byte[] keyBytes = Decoders.BASE64.decode(jwtSecret);
      Key key = Keys.hmacShaKeyFor(keyBytes);
      return key;
   }
}
JwtUserDetailsService.java
package com.tutorialspoint.security.formlogin.jwtutils;

import java.util.ArrayList;
import org.springframework.security.core.userdetails.User;
import org.springframework.security.core.userdetails.UserDetails;
import org.springframework.security.core.userdetails.UserDetailsService;
import org.springframework.security.core.userdetails.UsernameNotFoundException;
import org.springframework.stereotype.Service;

@Service
public class JwtUserDetailsService implements UserDetailsService {
   @Override
   public UserDetails loadUserByUsername(String username) throws UsernameNotFoundException {
      // create a user for "randomuser123"/"password".
      if ("randomuser123".equals(username)) {
         return new User("randomuser123", // username
            "$2a$10$slYQmyNdGzTn7ZLBXBChFOC9f6kFjAqPhccnP6DxlWXx2lPk1C3G6", // encoded password
            new ArrayList<>());
      } else {
         throw new UsernameNotFoundException("User not found with username: " + username);
      }
   }
}
Now its time we created our Filter. The filter class will be used to track our requests and detect if they contain the valid token in the header. If the token is valid we let the request proceed otherwise we send a 401 error (Unauthorized).
JwtFilter.java
package com.tutorialspoint.security.formlogin.jwtutils;

import java.io.IOException;
import jakarta.servlet.FilterChain;
import jakarta.servlet.ServletException;
import jakarta.servlet.http.HttpServletRequest;
import jakarta.servlet.http.HttpServletResponse;
import org.springframework.beans.factory.annotation.Autowired;
import org.springframework.security.authentication.UsernamePasswordAuthenticationToken;
import org.springframework.security.core.context.SecurityContextHolder;
import org.springframework.security.core.userdetails.UserDetails;
import org.springframework.security.web.authentication.WebAuthenticationDetailsSource;
import org.springframework.stereotype.Component;
import org.springframework.web.filter.OncePerRequestFilter;
import io.jsonwebtoken.ExpiredJwtException;


// filter to run for every request
@Component
public class JwtFilter extends OncePerRequestFilter {
   @Autowired
   private JwtUserDetailsService userDetailsService;
   @Autowired
   private TokenManager tokenManager;
   @Override
   protected void doFilterInternal(HttpServletRequest request,
      HttpServletResponse response, FilterChain filterChain)
      throws ServletException, IOException {

      String tokenHeader = request.getHeader("Authorization");
      String username = null;
      String token = null;
      // if bearer token is provided, get the username
      if (tokenHeader != null && tokenHeader.startsWith("Bearer ")) {
         token = tokenHeader.substring(7);
         try {
            username = tokenManager.getUsernameFromToken(token);
         } catch (IllegalArgumentException e) {
            System.out.println("Unable to get JWT Token");
         } catch (ExpiredJwtException e) {
            System.out.println("JWT Token has expired");
         }
      } else {
         System.out.println("Bearer String not found in token");
      }
      // validate the JWT Token and create a new authentication token and set in security context
      if (null != username && SecurityContextHolder.getContext().getAuthentication() == null) {
         UserDetails userDetails = userDetailsService.loadUserByUsername(username);
         if (tokenManager.validateJwtToken(token, userDetails)) {
            UsernamePasswordAuthenticationToken
               authenticationToken = new UsernamePasswordAuthenticationToken(
                  userDetails, null, userDetails.getAuthorities());
               authenticationToken.setDetails(new
                  WebAuthenticationDetailsSource().buildDetails(request));
            SecurityContextHolder.getContext().setAuthentication(authenticationToken);
         }
      }
      filterChain.doFilter(request, response);
   }
}
Having created the filter for our requests, we now create the JwtAutheticationEntryPoint class. This class extends Springs AuthenticationEntryPoint class and rejects every unauthenticated request with an error code 401 sent back to the client. We have overridden the commence() method of AuthenticationEntryPoint class to do that.
JwtAuthenticationEntryPoint.java
package com.tutorialspoint.security.formlogin.jwtutils;

import java.io.IOException;
import java.io.Serializable;
import jakarta.servlet.ServletException;
import jakarta.servlet.http.HttpServletRequest;
import jakarta.servlet.http.HttpServletResponse;
import org.springframework.security.core.AuthenticationException;
import org.springframework.security.web.AuthenticationEntryPoint;
import org.springframework.stereotype.Component;

@Component
public class JwtAuthenticationEntryPoint implements AuthenticationEntryPoint, Serializable {

   private static final long serialVersionUID = 1L;

   @Override
   public void commence(HttpServletRequest request, HttpServletResponse response,
      AuthenticationException authException) throws IOException, ServletException {
      response.sendError(HttpServletResponse.SC_UNAUTHORIZED, "Unauthorized");
   }
}
Next, we create classes for our Request and Response models under package models. These models determine how our request and response formats would be for authentication.
JwtRequestModel.java
package com.tutorialspoint.security.formlogin.jwtutils.models;

import java.io.Serializable;
public class JwtRequestModel implements Serializable {
   /**
   *
   */
   private static final long serialVersionUID = 2636936156391265891L;
   private String username;
   private String password;
   public JwtRequestModel() {
   }
   public JwtRequestModel(String username, String password) {
      super();
      this.username = username; this.password = password;
   }
   public String getUsername() {
      return username;
   }
   public void setUsername(String username) {
      this.username = username;
   }
   public String getPassword() {
      return password;
   }
   public void setPassword(String password) {
      this.password = password;
   }
}
JwtResponseModel.java
package com.tutorialspoint.security.formlogin.jwtutils.models;

import java.io.Serializable;
public class JwtResponseModel implements Serializable {
   /**
   *
   */
   private static final long serialVersionUID = 1L;
   private final String token;
   public JwtResponseModel(String token) {
      this.token = token;
   }
   public String getToken() {
      return token;
   }
}
Now, we're creating a controller class to create a JWT Token once user is logged in using POST /login call.
JwtController.java
package com.tutorialspoint.security.formlogin.jwtutils;

import org.springframework.beans.factory.annotation.Autowired;
import org.springframework.http.ResponseEntity;
import org.springframework.security.authentication.AuthenticationManager;
import org.springframework.security.authentication.BadCredentialsException;
import org.springframework.security.authentication.DisabledException;
import org.springframework.security.authentication.UsernamePasswordAuthenticationToken;
import org.springframework.security.core.userdetails.UserDetails;
import org.springframework.web.bind.annotation.CrossOrigin;
import org.springframework.web.bind.annotation.PostMapping;
import org.springframework.web.bind.annotation.RequestBody;
import org.springframework.web.bind.annotation.RestController;

import com.tutorialspoint.security.formlogin.jwtutils.models.JwtRequestModel;
import com.tutorialspoint.security.formlogin.jwtutils.models.JwtResponseModel;

@RestController
@CrossOrigin
public class JwtController {
   @Autowired
   private JwtUserDetailsService userDetailsService;
   @Autowired
   private AuthenticationManager authenticationManager;
   @Autowired
   private TokenManager tokenManager;

   // Get a JWT Token once user is authenticated, otherwise throw BadCredentialsException
   @PostMapping("/login")
   public ResponseEntity<JwtResponseModel> createToken(@RequestBody JwtRequestModel
      request) throws Exception {
      try {
         authenticationManager.authenticate(
            new UsernamePasswordAuthenticationToken(request.getUsername(), request.getPassword()));
      } catch (DisabledException e) {
         throw new Exception("USER_DISABLED", e);
      } catch (BadCredentialsException e) {
         throw new Exception("INVALID_CREDENTIALS", e);
      }
      final UserDetails userDetails = userDetailsService.loadUserByUsername(request.getUsername());
      final String jwtToken = tokenManager.generateJwtToken(userDetails);
      return ResponseEntity.ok(new JwtResponseModel(jwtToken));
   }
}
Spring Security Configuration Class
Inside of our config package, we have created the WebSecurityConfig class. We shall be using this class for our security configurations, so let's annotate it with an @Configuration annotation and @EnableWebSecurity. As a result, Spring Security knows to treat this class a configuration class. As we can see, configuring applications have been made very easy by Spring.
WebSecurityConfig
package com.tutorialspoint.security.formlogin.config;

import org.springframework.beans.factory.annotation.Autowired;
import org.springframework.context.annotation.Bean;
import org.springframework.context.annotation.Configuration;
import org.springframework.security.authentication.AuthenticationManager;
import org.springframework.security.authentication.UsernamePasswordAuthenticationToken;
import org.springframework.security.config.Customizer;
import org.springframework.security.config.annotation.web.builders.HttpSecurity;
import org.springframework.security.config.annotation.web.configuration.EnableWebSecurity;
import org.springframework.security.config.annotation.web.configurers.AbstractHttpConfigurer;
import org.springframework.security.config.http.SessionCreationPolicy;
import org.springframework.security.core.userdetails.UserDetailsService;
import org.springframework.security.crypto.bcrypt.BCryptPasswordEncoder;
import org.springframework.security.crypto.password.PasswordEncoder;
import org.springframework.security.web.SecurityFilterChain;
import org.springframework.security.web.authentication.UsernamePasswordAuthenticationFilter;

import com.tutorialspoint.security.formlogin.jwtutils.JwtAuthenticationEntryPoint;
import com.tutorialspoint.security.formlogin.jwtutils.JwtFilter;

@Configuration
@EnableWebSecurity
public class WebSecurityConfig {

   @Autowired
   private JwtAuthenticationEntryPoint authenticationEntryPoint;
   @Autowired
   private JwtFilter filter;

   @Bean
   protected PasswordEncoder passwordEncoder() {
      return new BCryptPasswordEncoder();
   }

   @Bean
   protected SecurityFilterChain filterChain(HttpSecurity http) throws Exception {
      return http
         .csrf(AbstractHttpConfigurer::disable)
         .authorizeHttpRequests(request -> request.requestMatchers("/login").permitAll()
         .anyRequest().authenticated())
         // Send a 401 error response if user is not authentic.
         .exceptionHandling(exception -> exception.authenticationEntryPoint(authenticationEntryPoint))
         // no session management
         .sessionManagement(session -> session.sessionCreationPolicy(SessionCreationPolicy.STATELESS))
         // filter the request and add authentication token
         .addFilterBefore(filter,  UsernamePasswordAuthenticationFilter.class)
         .build();
   }

   @Bean
   AuthenticationManager customAuthenticationManager() {
      return authentication -> new UsernamePasswordAuthenticationToken("randomuser123","password");
   }
}
Controller Class
In this class, we've created a mapping for single GET "/hello" endpoint.
HelloController
package com.tutorialspoint.security.formlogin.controllers;

import org.springframework.web.bind.annotation.GetMapping;
import org.springframework.web.bind.annotation.RestController;

@RestController
public class HelloController {
   @GetMapping("/hello")
   public String hello() {
      return "hello";
   }
}
Output
As we can see, we have done all of that, and now our application is ready to go. Lets start the application and use postman for making our requests.
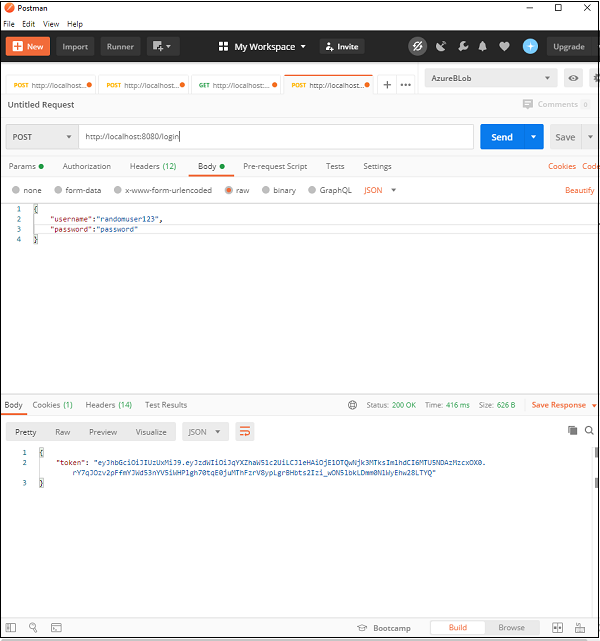
Here we have made our first request to get the token, and as we can see on providing the correct username/password combination we get back our token.
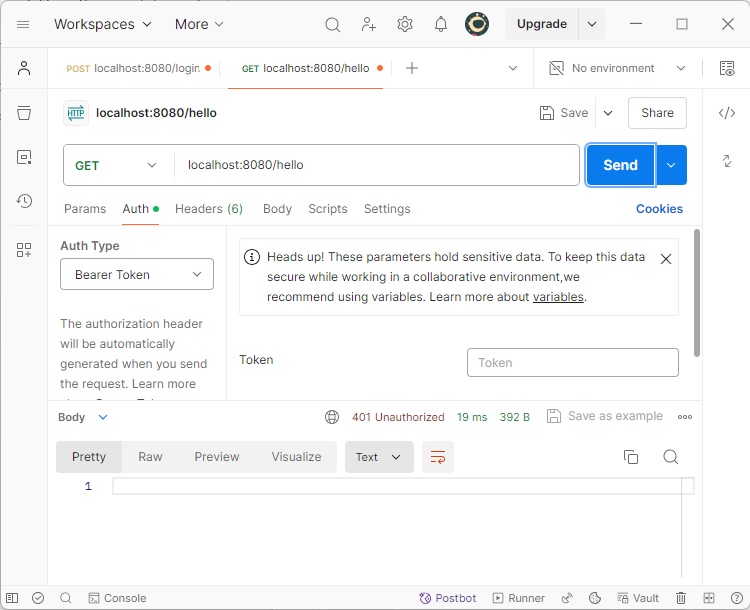
Now using that token in our header, lets call the /hello endpoint.
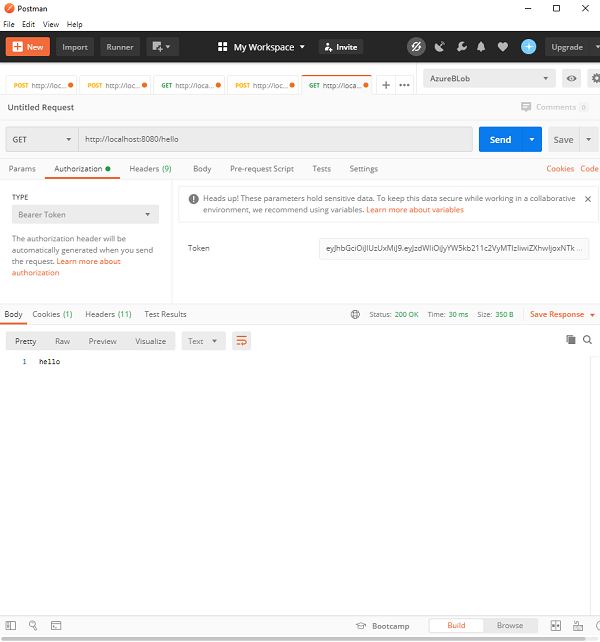
As we can see, since the request is authenticated, we get the desired response back. Now, if we tamper with the token or do not send the Authorization header, we will get a 401 error as configured in our application. This ensures that the protection our request using the JWT.