- Sprint Security - Home
- Spring Security - Introduction
- Spring Security - Architecture
- Spring Security - Project Modules
- Spring Security - Environment Setup
- Spring Security - Form Login
- Spring Security - Custom Form Login
- Spring Security - Logout
- Spring Security - Remember Me
- Spring Security - Redirection
- Spring Security - Taglibs
- Spring Security - XML Configuration
- Spring Security - Authentication Provider
- Spring Security - Basic Authentication
- Spring Security - AuthenticationFailureHandler
- Spring Security - JWT
- Spring Security - Retrieve User Information
- Spring Security - Maven
- Spring Security - Default Password Encoder
- Spring Security – Password Encoding
- Spring Security - Methods Level
- Spring Security - Manual Authentication
- Spring Security - Extra Login Fields
- Spring Security - Prevent Brute Force
- Spring Security - Login Page with React
- Spring Security - Security Filter Chain
- Spring Security - Securing Spring Boot API
- Spring Security - Expressions
- Spring Security - Security none, Filters none, access permitAll
- Spring Security - Control the Session
- Spring Security Useful Resources
- Spring Security - Quick Guide
- Spring Security - Useful Resources
- Spring Security - Discussion
Spring Security - Form Login, Remember Me and Logout
Contents
- Introduction and Overview
- Getting Started (Practical Guide)
Introduction and Overview
Spring Security comes with a ton of built-in features and tools for our convenience. In this example, we are going to discuss three of those interesting and useful features −
- Form-login
- Remember Me
- Logout
Form Login
Form-based login is one form of Username/password authentication that Spring Security provides support for. This is provided through an Html form.
Whenever a user requests a protected resource, Spring Security checks for the authentication of the request. If the request is not authenticated/authorized, the user will be redirected to the login page. The login page must be somehow rendered by the application. Spring Security provides that login form by default.
Moreover, any other configuration, if needed, must be explicitly provided as given below −
protected void configure(HttpSecurity http) throws Exception {
http
   // ...
   .formLogin(
      form -> form       .loginPage("/login")
      .permitAll()
   );
}
This code requires a login.html file to be present in the templates folder which would be returned on hitting the /login. This HTML file should contain a login form. Furthermore, the request should be a post request to /login. The parameter names should be username and password for username and password respectively. In addition to this, a CSRF Token also needs to be included with the form.
The above code snippet will be clearer once we are done with code exercise.
Remember Me
This type of authentication requires a remember-me cookie to be sent to the browser. This cookie stores user information/authentication principal and it is stored in the browser. So, the website can remember the identity of the user next time when the session is started. Spring Security has the necessary implementations in place for this operation. One uses hashing to preserve the security of cookie-based tokens while the other uses a database or other persistent storage mechanism to store the generated tokens.
Logout
The default URL /logout logs the user out by−
- Invalidating the HTTP Session
- Cleaning up any RememberMe authentication that was configured
- Clearing the SecurityContextHolder
- Redirect to /login?logout
WebSecurityConfigurerAdapter automatically applies logout capabilities to the Spring Boot application.
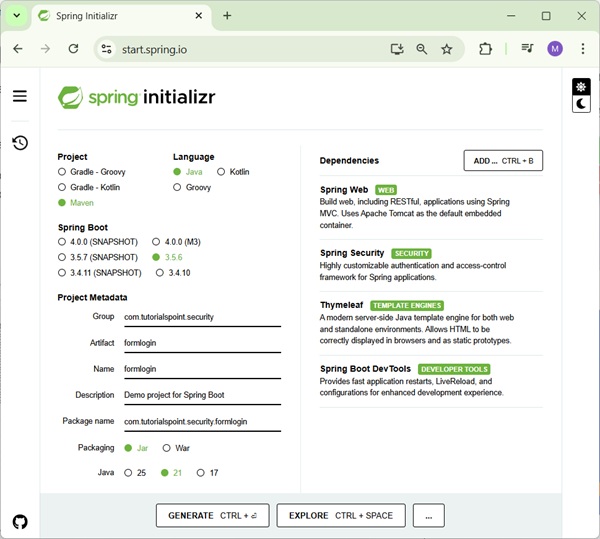
Getting Started (Practical Guide) As usual, we shall start by going to start.spring.io. Here we choose a maven project. We name the project formlogin and choose the desired Java version. I am choosing Java 8 for this example. We also go on to add the following dependencies −
- Spring Web
- Spring Security
- Thymeleaf
- Spring Boot DevTools
Thymeleaf is a templating engine for Java. It allows us to quickly develop static or dynamic web pages for rendering in the browser. It is extremely extensible and allows us to define and customize the processing of our templates in fine detail. In addition to this, we can learn more about Thymeleaf by clicking this link.
Lets move on to generate our project and download it. We then extract it to a folder of our choice and use any IDE to open it. I shall be using Spring Tools Suite 4. It is available for free downloading from the https://spring.io/tools website and is optimized for spring applications.
Lets take a look at our pom.xml file. It should look something similar to this −
<?xml version="1.0" encoding="UTF-8"?>
<project xmlns="http://maven.apache.org/POM/4.0.0"    xmlns:xsi="http://www.w3.org/2001/XMLSchema-instance"
   xsi:schemaLocation="http://maven.apache.org/POM/4.0.0 https://maven.apache.org/xsd/maven-4.0.0.xsd">
   <modelVersion>4.0.0</modelVersion>
   <parent>
      <groupId>org.springframework.boot</groupId>
      <artifactId>spring-boot-starter-parent</artifactId>
      <version>2.3.1.RELEASE</version>
      <relativePath />
      <!-- lookup parent from repository -->
   </parent>
   <groupId>            com.spring.security</groupId>
   <artifactId>formlogin</artifactId>
   <version>0.0.1-SNAPSHOT</version>
   <name>formlogin</name>
   <description>Demo project for Spring Boot</description>

   <properties>
      <java.version>1.8</java.version>
   </properties>

   <dependencies>
      <dependency>
         <groupId>org.springframework.boot</groupId>
         <artifactId>spring-boot-starter-security</artifactId>
      </dependency>
   <dependency>
      <groupId>org.springframework.boot</groupId>
      <artifactId>spring-boot-starter-web</artifactId>
   </dependency>
   <dependency>
      <groupId>org.springframework.boot</groupId>
      <artifactId>spring-boot-starter-thymeleaf</artifactId>
   </dependency>
   <dependency>
      <groupId>org.springframework.boot</groupId>
      <artifactId>spring-boot-devtools</artifactId>
   </dependency>
   <dependency>
   <groupId>org.springframework.boot</groupId>
   <artifactId>spring-boot-starter-test</artifactId>
   <scope>test</scope>
   <exclusions>
      <exclusion>
         <groupId>org.junit.vintage</groupId>
         <artifactId>junit-vintage-engine</artifactId>
      </exclusion>
   </exclusions>
   </dependency>
   <dependency>
      <groupId>org.springframework.security</groupId>
      <artifactId>spring-security-test</artifactId>
      <scope>test</scope>
   </dependency>
   </dependencies>

   <build>
      <plugins>
         <plugin>
            <groupId>org.springframework.boot</groupId>
            <artifactId>spring-boot-maven-plugin</artifactId>
         </plugin>
      </plugins>
   </build>
</project>
Lets create a package in our folder /src/main/java under the default package. We shall be naming it as config as we would place all our configuration classes here. So, the name should look something similar to this com.tutorial.spring.security.formlogin.config.
The Configuration Class
package com.tutorial.spring.security.formlogin.config;

import java.util.List;
import org.springframework.beans.factory.annotation.Autowired;
import org.springframework.context.annotation.Bean;
import org.springframework.context.annotation.Configuration;
import org.springframework.security.config.annotation.web.builders.HttpSecurity;
import org.springframework.security.config.annotation.web.configuration.WebSecurityConfigurerAdapter;
import org.springframework.security.core.userdetails.User;
import org.springframework.security.core.userdetails.UserDetails;
import org.springframework.security.core.userdetails.UserDetailsService;
import org.springframework.security.crypto.bcrypt.BCryptPasswordEncoder;
import org.springframework.security.crypto.password.NoOpPasswordEncoder;
import org.springframework.security.crypto.password.PasswordEncoder;
import org.springframework.security.provisioning.InMemoryUserDetailsManager; import org.springframework.security.provisioning.UserDetailsManager;
import org.springframework.security.web.authentication.UsernamePasswordAuthenticationFilter;
import org.springframework.security.web.util.matcher.AntPathRequestMatcher;

import com.spring.security.formlogin.AuthFilter;

@Configuration
public class WebSecurityConfig extends WebSecurityConfigurerAdapter {

   @Bean
   protected UserDetailsService userDetailsService() {
   UserDetailsManager userDetailsManager = new InMemoryUserDetailsManager();
   UserDetails user = User.withUsername("abby")
   .password(passwordEncoder().encode("12345"))
      .authorities("read") .build();
      userDetailsManager.createUser(user);
      return userDetailsManager;

   }
   @Bean
   public PasswordEncoder passwordEncoder() {
      return new BCryptPasswordEncoder(); };
      @Override
      protected void configure(HttpSecurity http) throws Exception {
      http.csrf().disable() .authorizeRequests().anyRequest()
      .authenticated() .and()
      .formLogin()
      .and()
      .rememberMe()
      .and() .logout() .logoutUrl("/logout")
      .logoutSuccessUrl("/login") .deleteCookies("remember-me");
   }
}
Code Breakdown
Inside of our config package, we have created the WebSecurityConfig class. This class extends the WebSecurityConfigurerAdapter of Spring Security. We shall be using this class for our security configurations, so lets annotate it with an @Configuration annotation. As a result, Spring Security knows to treat this class a configuration class. As we can see, configuring applications have been made very easy by Spring.
Lets take a look at our configuration class.
- First, we shall create a bean of our UserDetailsService class by using the userDetailsService() method. We shall be using this bean for managing our users for this application. Here, to keep things simple, we shall use an InMemoryUserDetailsManager instance to create a user. This user, along with our given username and password, will contain a simple read authority.
- Now, lets look at our PasswordEncoder. We shall be using a BCryptPasswordEncoder instance for this example. Hence, while creating the user, we used the passwordEncoder to encode our plaintext password like this
.password(passwordEncoder().encode("12345"))
- After the above steps, we move on to our next configuration. Here, we override the configure method of WebSecurityConfigurerAdapter class. This method takes HttpSecurity as a parameter. We shall be configuring this to use our form login and logout, as well as a remember-me function.
Http Security Configuration
We can observe that all these functionalities are available in Spring Security. Lets study the below section in detail −
http.csrf().disable()
   .authorizeRequests().anyRequest().authenticated()
   .and()
   .formLogin()
   .and()
   .rememberMe()
   .and()
   .logout()
   .logoutUrl("/logout") .logoutSuccessUrl("/login") .deleteCookies("remember-me");
There are a few points to note here −
- We have disabled csrf or Cross-Site Request Forgery protection As this is a simple application only for demonstration purposes, we can safely disable this for now.
- Then we add configuration which requires all requests to be authenticated. As we shall see later, we will have a single / endpoint for the index page of this application, for simplicity.
- After that, we shall be using the formLogin() functionality of Spring Security as mentioned above. This generates a simple login page.
- Then, we use the rememberMe() functionality of Spring Security. This will perform two things.
- Firstly, it will add a Remember Me checkbox to our default login form that we generated using formLogin().
- And, secondly, ticking the checkbox generates the remember-me cookie. The cookie stores the identity of the user and the browser stores it. Spring Security detects the cookie in future sessions to automate the login.
- And lastly, we have the logout() functionality. For this too, a default functionality has been provided by Spring security. Here it performs two important functions −
- Invalidates the Http session, and unbinds objects bound to the session.
- It clears the remember-me cookie.
- Removes the authentication from Springs Security context.
As a result, the user can access the application again without logging in again.
We also, provided a logoutSuccessUrl(), so that the application comes back to the login page after logout. This completes our application configuration.
The Protected Content (Optional)
We shall now create a dummy index page now for the user to view when he logs in. It will also contain a logout button.
In our /src/main/resources/templates, we add a index.html file.Then add some Html content to it.
<!doctype html>
<html lang="en">
   <head>
      <!-- Required meta tags -->
      <meta charset="utf-8">
      <meta name="viewport" content="width=device-width, initial-scale=1, shrink-to-fit=no">
      <!-- Bootstrap CSS -->
      <link rel="stylesheet" href="https://stackpath.bootstrapcdn.com/bootstrap/4.5.0/css/bootstrap.min.css" integrity="sha384-9aIt2nRpC12Uk9gS9baDl411NQApFmC26EwAOH8WgZl5MYYxFfc+NcPb1dKGj7Sk" crossorigin="anonymous">
      <title>Hello, world!</title>
   </head>
   <body>
      <h1>Hello, world!</h1> <a href="logout">logout</a>
      <!-- Optional JavaScript -->
      <!-- jQuery first, then Popper.js, then Bootstrap JS -->
      <script src="https://code.jquery.com/jquery-3.5.1.slim.min.js" integrity="sha384-DfXdz2htPH0lsSSs5nCTpuj/zy4C+OGpamoFVy38MVBnE+IbbVYUew+OrCXaRkfj" crossorigin="anonymous"></script>
      <script src="https://cdn.jsdelivr.net/npm/popper.js@1.16.0/dist/umd/popper.min.js" integrity="sha384-Q6E9RHvbIyZFJoft+2mJbHaEWldlvI9IOYy5n3zV9zzTtmI3UksdQRVvoxMfooAo" crossorigin="anonymous"></script>
      <script src="https://stackpath.bootstrapcdn.com/bootstrap/4.5.0/js/bootstrap.min.js"
      integrity="sha384-OgVRvuATP1z7JjHLkuOU7Xw704+h835Lr+6QL9UvYjZE3Ipu6Tp75j7Bh/kR0JKI" crossorigin="anonymous"></script>
   </body>
</html>
This content is from Bootstrap 4 getting started template.
We also add
<a href="logout">logout</a>
to our file, so as the user can log out of the application using this link.
The Resource Controller
We have created the protected resource, we now add the controller to serve this resource.
package com.tutorial.spring.security.formlogin.controllers;
import org.springframework.stereotype.Controller;
import org.springframework.web.bind.annotation.GetMapping;
@Controller public class AuthController {
   @GetMapping("/") public String home() { return "index"; }
}
As we can see, it is a very simple controller. It only has a get endpoint which serves our index.html file when the start our application.
Running the application
Lets run the application as a Spring Boot Application. We can go to http://localhost:8080 on our browser when the application starts. It should ask us for username and password. Additionally, we shall also be able to see the remember-me checkbox.
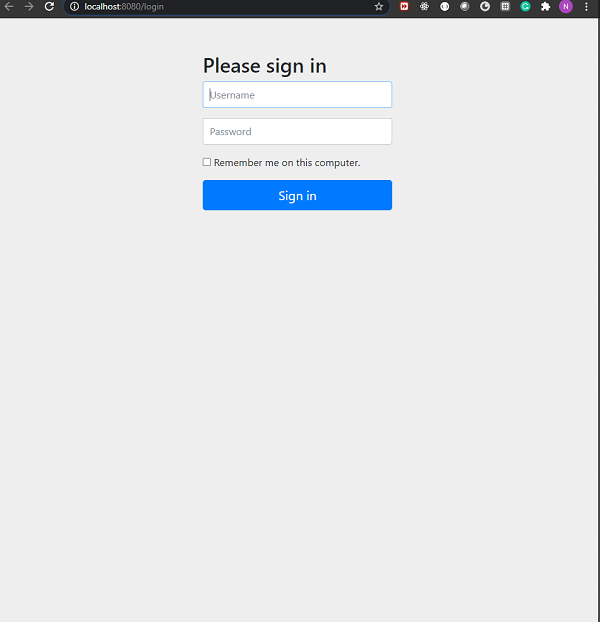
Login Page
Now, if we provide the user information as we had configured in our WebSecurity config file, we shall be able to log in. Also, if we tick the remember-me checkbox, we shall be able to see the remember-me cookie in our browsers developer tools section.
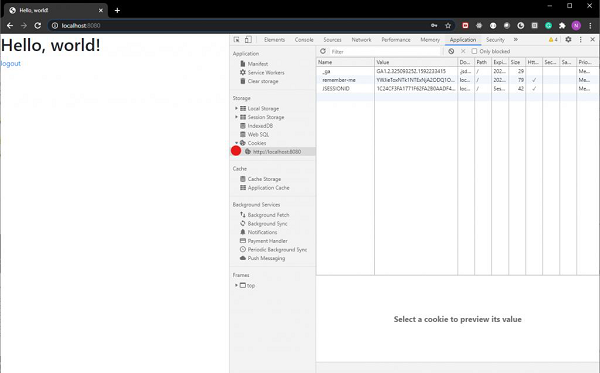
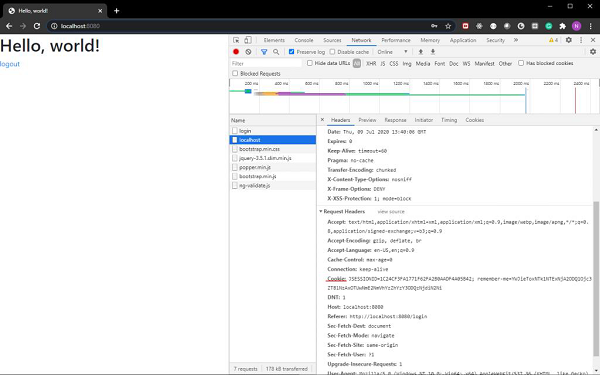
As we can see the cookie is sent along with our login request.
Also, included in the web page is a link for log out. On clicking the link, we shall be logged out of our application and sent back to our login page.
