- Spring Boot & H2 - Home
- Spring Boot & H2 - Overview
- Spring Boot & H2 - Environment Setup
- Spring Boot & H2 - Project Setup
- Spring Boot & H2 - REST APIs
- Spring Boot & H2 - H2 Console
Spring Boot & H2 Examples
- Spring Boot & H2 - Add Record
- Spring Boot & H2 - Get Record
- Spring Boot & H2 - Get All Records
- Spring Boot & H2 - Update Record
- Spring Boot & H2 - Delete Record
- Spring Boot & H2 - Unit Test Controller
- Spring Boot & H2 - Unit Test Service
- Spring Boot & H2 - Unit Test Repository
Spring Boot & H2 Useful Resources
Spring Boot & H2 - Quick Guide
Spring Boot & H2 - Overview
What is H2?
H2 database is an open source, embedded and in memory relational database management system. It is written in Java and provides a client/server application. It stores data in system memory instead of disk. Once program is closed, data is also lost. An in memory database is used when we don't want to persist the data and unit test the overall functionality. Some of the other popular in memory databases are HSQLDB or HyperSQL Database and Apache Derby. H2 is the most popular one among other embedded databases.
Advantages of H2 Database
Following is the list of advantages that H2 provides −
No configuration − Spring Boot intrinsically supports H2 and no extra configuration required to configure H2 database.
Easy to Use − H2 Database is very easy to use.
Lightweight and Fast − H2 database is very lightweight and being in memory, it is very fast.
Switch configurations − Using profiles, you can easily switch between production level database and in-memory database.
Supports Standard SQL and JDBC − H2 database supports almost all the features of Standard SQL and operations of JDBC.
Web Based Console − H2 Database can be managed by its web based console application.
Configuring H2 Database
Add H2 Database as maven dependency and that's it.
<dependency>
   <groupId>com.h2database</groupId>
   <artifactId>h2</artifactId>
   <scope>runtime</scope>
</dependency>
Although, spring boot configures H2 database automatically. We can override the default configurations by specifying them in application.properties as shown below.
spring.datasource.url=jdbc:h2:mem:testdb
spring.datasource.driverClassName=org.h2.Driver
spring.datasource.username=sa
spring.datasource.password=
spring.jpa.database-platform=org.hibernate.dialect.H2Dialect
spring.h2.console.enabled=true
Persisting H2 Data
If persistent storage is needed than add the following configuration in application.properties.
spring.datasource.url=jdbc:h2:file:/data/database
spring.datasource.url=jdbc:h2:C:/data/database
Spring Boot & H2 - Environment Setup
This chapter will guide you on how to prepare a development environment to start your work with Spring Boot Framework and H2. It will also teach you how to set up JDK and STS on your machine before you set up Spring Framework −
Step 1 - Setup Java Development Kit (JDK)
You can download the latest version of SDK from Oracle's Java site − Java SE Downloads. You will find instructions for installing JDK in downloaded files, follow the given instructions to install and configure the setup. Finally set PATH and JAVA_HOME environment variables to refer to the directory that contains java and javac, typically java_install_dir/bin and java_install_dir respectively.
If you are running Windows and have installed the JDK in C:\jdk-24, you would have to put the following line in your C:\autoexec.bat file.
set PATH=C:\jdk-24;%PATH%
set JAVA_HOME=C:\jdk-24
Alternatively, on Windows NT/2000/XP, you will have to right-click on My Computer, select Properties → Advanced → Environment Variables. Then, you will have to update the PATH value and click the OK button.
On Unix (Solaris, Linux, etc.), if the SDK is installed in /usr/local/jdk-24 and you use the C shell, you will have to put the following into your .cshrc file.
setenv PATH /usr/local/jdk-24/bin:$PATH
setenv JAVA_HOME /usr/local/jdk-24
Alternatively, if you use an Integrated Development Environment (IDE) like Borland JBuilder, Eclipse, IntelliJ IDEA, or Sun ONE Studio, you will have to compile and run a simple program to confirm that the IDE knows where you have installed Java. Otherwise, you will have to carry out a proper setup as given in the document of the IDE.
Step 2 - Setup Spring Tool Suite
All the examples in this tutorial have been written using Spring Tool Suite IDE. So we would suggest you should have the latest version of Spring Tool Suite installed on your machine.
To install Spring Tool Suite IDE, download the latest Spring Tool Suite binaries from www.eclipse.org/downloads. Once you download the installation, unpack the binary distribution into a convenient location. For example, in C:\sts\sts-4.30.0.RELEASE on Windows, or /usr/local/sts/sts-4.30.0.RELEASE on Linux/Unix and finally set PATH variable appropriately.
Spring Tool Suite can be started by executing the following commands on Windows machine, or you can simply double-click on SpringToolSuite4.exe
E:\sts\sts-4.30.0.RELEASE\SpringToolSuite4.exe
Eclipse can be started by executing the following commands on Unix (Solaris, Linux, etc.) machine −
$/usr/local/sts/sts-4.30.0.RELEASE/SpringToolSuite4
Step 3 - Setup Spring Boot Project
Now if everything is fine, then you can proceed to set up your Spring Boot. Following are the simple steps to download and install the Spring Boot Project on your machine.
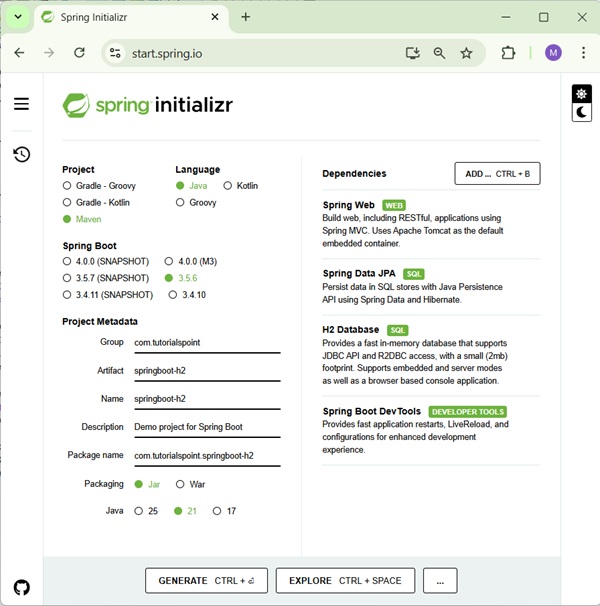
Go to spring Initializr link to create a spring boot project, https://start.spring.io/.
Select project as Maven Project.
Select language as Java.
Select Spring Boot version as 3.5.6.
Set Project Metadata - Group as com.tutorialspoint, Artifact as springboot-h2, name as springboot-h2, Description as Demo project for Spring Boot and package name as com.tutorialspoint.springboot-h2.
Select packaging as Jar.
Select java as 21.
Add dependencies as Spring Web, Spring Data JPA, H2 Database and Spring Boot DevTools.
Now click on GENERATE Button to generate the project structure.
Once the maven based spring boot project is downloaded, then import the maven project into eclipse and rest eclipse will handle. It will download the maven dependencies and build the project to make it ready for further development.
Step 4 - POSTMAN for REST APIs Testing
POSTMAN is a useful tool to test REST Based APIs. To install POSTMAN, download the latest POSTMAN binaries from www.postman.com/downloads/. Once you download the installable, follow the instructions to install and use it.
Spring Boot & H2 - Project Setup
As in previous chapter Environment Setup, we've imported the generated spring boot project in eclipse. Now let's create the following structure in src/main/java folder.
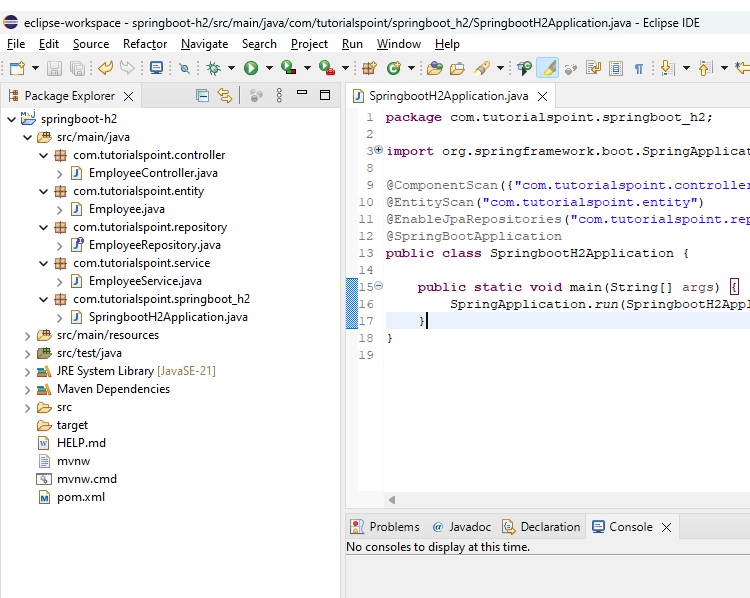
com.tutorialspoint.controller.EmployeeController − A REST Based Controller to implement REST based APIs.
com.tutorialspoint.entity.Employee − An entity class representing the corresponding table in database.
com.tutorialspoint.repository.EmployeeRepository − A Repository Interface to implement the CRUD operations on the database.
com.tutorialspoint.service.EmployeeService − A Service Class to implement the business opearations over repository functions.
com.tutorialspoint.springboot_h2.SprintBootH2Application − A Spring Boot Application class.
SprintBootH2Application class is already present. We need to create the above packages and relevant classes and interface as shown below −
Entity - Entity.java
Following is the default code of Employee. It represents a Employee table with id, name, age and email columns.
package com.tutorialspoint.entity;

import jakarta.persistence.Column;
import jakarta.persistence.Entity;
import jakarta.persistence.Id;
import jakarta.persistence.Table;

@Entity
@Table
public class Employee {

   // database column mappings
   @Id
   @Column
   private int id;

   @Column
   private String name;

   @Column
   private int age;

   @Column
   private String email;

   // setter/getter methods
   public int getId() {
      return id;
   }
   public void setId(int id) {
      this.id = id;
   }

   public String getName() {
      return name;
   }
   public void setName(String name) {
      this.name = name;
   }

   public int getAge() {
      return age;
   }
   public void setAge(int age) {
      this.age = age;
   }

   public String getEmail() {
      return email;
   }
   public void setEmail(String email) {
      this.email = email;
   }
}
Repository - EmployeeRepository.java
Following is the default code of Repository to implement CRUD operations on above entity, Employee.
package com.tutorialspoint.repository;

import org.springframework.data.repository.CrudRepository;
import org.springframework.stereotype.Repository;
import com.tutorialspoint.entity.Employee;

@Repository
public interface EmployeeRepository extends CrudRepository<Employee, Integer>  {
}
Service - EmployeeService.java
Following is the default code of Service to implement operations over repository functions.
package com.tutorialspoint.service;

import java.util.List;
import org.springframework.beans.factory.annotation.Autowired;
import org.springframework.stereotype.Service;
import com.tutorialspoint.entity.Employee;
import com.tutorialspoint.repository.EmployeeRepository;

@Service
public class EmployeeService {

   @Autowired
   EmployeeRepository repository;

   // to be implemented
   public Employee getEmployeeById(int id) {
      return null;
   }

   // to be implemented
   public List<Employee> getAllEmployees(){
      return null;
   }

   // to be implemented
   public void saveOrUpdate(Employee employee) {
   }

   // to be implemented
   public void deleteEmployeeById(int id) {
   }
}
Controller - EmployeeController.java
Following is the default code of Controller to implement REST APIs.
package com.tutorialspoint.controller;

import java.util.List;
import org.springframework.beans.factory.annotation.Autowired;
import org.springframework.web.bind.annotation.DeleteMapping;
import org.springframework.web.bind.annotation.GetMapping;
import org.springframework.web.bind.annotation.PathVariable;
import org.springframework.web.bind.annotation.PostMapping;
import org.springframework.web.bind.annotation.PutMapping;
import org.springframework.web.bind.annotation.RequestBody;
import org.springframework.web.bind.annotation.RequestMapping;
import org.springframework.web.bind.annotation.RestController;
import com.tutorialspoint.entity.Employee;
import com.tutorialspoint.service.EmployeeService;

@RestController
@RequestMapping(path = "/emp")
public class EmployeeController {

   @Autowired
   EmployeeService employeeService;

   // to be implemented
   @GetMapping("/employees")
   public List<Employee> getAllEmployees(){
      return null;
   }

   // to be implemented
   @GetMapping("/employee/{id}")
   public Employee getEmployee(@PathVariable("id") int id) {
      return null;
   }

   // to be implemented
   @DeleteMapping("/employee/{id}")
   public void deleteEmployee(@PathVariable("id") int id) {
   }

   // to be implemented
   @PostMapping("/employee")
   public void addEmployee(@RequestBody Employee employee) {
   }

   // to be implemented
   @PutMapping("/employee")
   public void updateEmployee(@RequestBody Employee employee) {
   }
}
Application - SprintBootH2Application.java
Following is the updated code of Application to use above classes.
package com.tutorialspoint.springboot_h2;

import org.springframework.boot.SpringApplication;
import org.springframework.boot.autoconfigure.SpringBootApplication;
import org.springframework.boot.autoconfigure.domain.EntityScan;
import org.springframework.context.annotation.ComponentScan;
import org.springframework.data.jpa.repository.config.EnableJpaRepositories;

@ComponentScan({"com.tutorialspoint.controller","com.tutorialspoint.service"})
@EntityScan("com.tutorialspoint.entity")
@EnableJpaRepositories("com.tutorialspoint.repository")
@SpringBootApplication
public class SpringbootH2Application {

   public static void main(String[] args) {
      SpringApplication.run(SpringbootH2Application.class, args);
   }
}
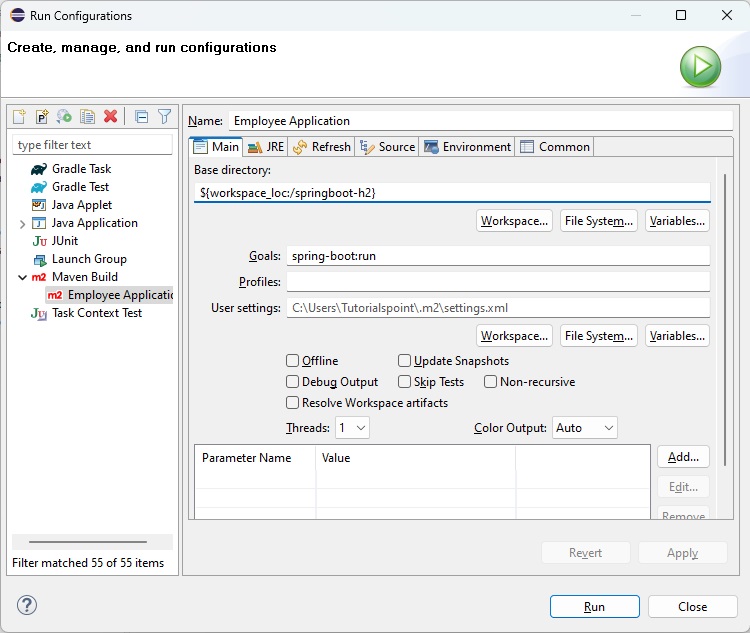
Run/Debug Configuration
Create following maven configuration in eclipse to run the springboot application with goal spring-boot:run. This configuration will help to run the REST APIs and we can test them using POSTMAN.
Spring Boot & H2 - REST APIs
As in previous chapter Application Setup, we've created the required files in spring boot project. Now create the following collection in POSTMAN to test the REST APIs.
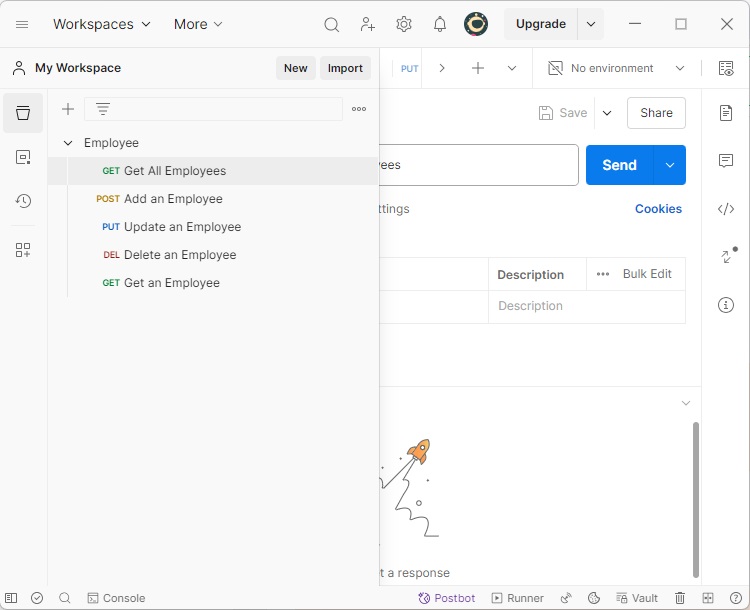
GET Get All Employees − A GET request to return all the employees.
POST Add an Employee − A POST request to create an employee.
PUT Update an Employee − A PUT request to update an existing employee.
GET An Employee − A GET request to get an employee identified by its id.
Delete An Employee − A Delete request to delete an employee identified by its id.
GET All Employees
Set the following parameters in POSTMAN.
HTTP Method − GET
URL − http://localhost:8080/emp/employees
Add an Employee
Set the following parameters in POSTMAN.
HTTP Method − POST
URL − http://localhost:8080/emp/employee
BODY − An employee JSON
{
   "id": "1",
   "age": "35",
   "name": "Julie",
   "email": "julie@gmail.com"
}
Update an Employee
Set the following parameters in POSTMAN.
HTTP Method − PUT
URL − http://localhost:8080/emp/employee
BODY − An employee JSON
{
   "id": "1",
   "age": "35",
   "name": "Julie",
   "email": "julie.roberts@gmail.com"
}
GET An Employees
Set the following parameters in POSTMAN.
HTTP Method − GET
URL - http://localhost:8080/emp/employee/1 − Where 1 is the employee id
Delete An Employees
Set the following parameters in POSTMAN.
HTTP Method − DELETE
URL - http://localhost:8080/emp/employee/1 − Where 1 is the employee id
Spring Boot & H2 - Console
As in previous chapter Application Setup, we've created the required files in spring boot project. Now let's update the application.properties lying in src/main/resources and pom.xml to use a different version of maven-resources-plugin.
application.properties
spring.datasource.url=jdbc:h2:mem:testdb
pom.xml
...
<build>
   <plugins>
      <plugin>
         <groupId>org.springframework.boot</groupId>
         <artifactId>spring-boot-maven-plugin</artifactId>
      </plugin>
      <plugin>
         <groupId>org.apache.maven.plugins</groupId>
         <artifactId>maven-resources-plugin</artifactId>
      </plugin>
   </plugins>
</build>
...
Run the application
In eclipse, run the Employee Application configuration as prepared during Application Setup
Eclipse console will show the similar output.
[INFO] Scanning for projects...
[INFO]
[INFO] [1m------------------< [0;36mcom.tutorialspoint:springboot-h2[0;1m >------------------[m
[INFO] [1mBuilding springboot-h2 0.0.1-SNAPSHOT[m
[INFO]   from pom.xml
[INFO] [1m--------------------------------[ jar ]---------------------------------[m
[INFO]
[INFO] [1m>>> [0;32mspring-boot:3.5.6:run[m [1m(default-cli)[0;1m > [0;1mtest-compile[m @ [36mspringboot-h2[0;1m >>>[m
[INFO]
[INFO] [1m--- [0;32mresources:3.3.1:resources[m [1m(default-resources)[m @ [36mspringboot-h2[0;1m ---[m
[INFO] Copying 1 resource from src\main\resources to target\classes
[INFO] Copying 0 resource from src\main\resources to target\classes
[INFO]
[INFO] [1m--- [0;32mcompiler:3.14.0:compile[m [1m(default-compile)[m @ [36mspringboot-h2[0;1m ---[m
[INFO] Recompiling the module because of [1madded or removed source files[m.
[INFO] Compiling 5 source files with javac [debug parameters release 21] to target\classes
[INFO]
[INFO] [1m--- [0;32mresources:3.3.1:testResources[m [1m(default-testResources)[m @ [36mspringboot-h2[0;1m ---[m
[INFO] skip non existing resourceDirectory D:\Projects\springboot-h2\src\test\resources
[INFO]
[INFO] [1m--- [0;32mcompiler:3.14.0:testCompile[m [1m(default-testCompile)[m @ [36mspringboot-h2[0;1m ---[m
[INFO] Recompiling the module because of [1mchanged dependency[m.
[INFO] Compiling 1 source file with javac [debug parameters release 21] to target\test-classes
[INFO]
[INFO] [1m<<< [0;32mspring-boot:3.5.6:run[m [1m(default-cli)[0;1m < [0;1mtest-compile[m @ [36mspringboot-h2[0;1m <<<[m
[INFO]
[INFO]
[INFO] [1m--- [0;32mspring-boot:3.5.6:run[m [1m(default-cli)[m @ [36mspringboot-h2[0;1m ---[m
[INFO] Attaching agents: []

  .   ____          _            __ _ _
 /\\ / ___'_ __ _ _(_)_ __  __ _ \ \ \ \
( ( )\___ | '_ | '_| | '_ \/ _` | \ \ \ \
 \\/  ___)| |_)| | | | | || (_| |  ) ) ) )
  '  |____| .__|_| |_|_| |_\__, | / / / /
 =========|_|==============|___/=/_/_/_/

 :: Spring Boot ::                (v3.5.6)

2025-10-01T16:10:51.809+05:30  INFO 35360 --- [springboot-h2] [  restartedMain] c.t.s.SpringbootH2Application            : Starting SpringbootH2Application using Java 21.0.6 with PID 35360 (D:\Projects\springboot-h2\target\classes started by mahes in D:\Projects\springboot-h2)
2025-10-01T16:10:51.811+05:30  INFO 35360 --- [springboot-h2] [  restartedMain] c.t.s.SpringbootH2Application            : No active profile set, falling back to 1 default profile: "default"
2025-10-01T16:10:51.891+05:30  INFO 35360 --- [springboot-h2] [  restartedMain] .e.DevToolsPropertyDefaultsPostProcessor : Devtools property defaults active! Set 'spring.devtools.add-properties' to 'false' to disable
2025-10-01T16:10:51.891+05:30  INFO 35360 --- [springboot-h2] [  restartedMain] .e.DevToolsPropertyDefaultsPostProcessor : For additional web related logging consider setting the 'logging.level.web' property to 'DEBUG'
2025-10-01T16:10:52.272+05:30  INFO 35360 --- [springboot-h2] [  restartedMain] .s.d.r.c.RepositoryConfigurationDelegate : Bootstrapping Spring Data JPA repositories in DEFAULT mode.
2025-10-01T16:10:52.305+05:30  INFO 35360 --- [springboot-h2] [  restartedMain] .s.d.r.c.RepositoryConfigurationDelegate : Finished Spring Data repository scanning in 24 ms. Found 1 JPA repository interface.
2025-10-01T16:10:52.818+05:30  INFO 35360 --- [springboot-h2] [  restartedMain] o.s.b.w.embedded.tomcat.TomcatWebServer  : Tomcat initialized with port 8080 (http)
2025-10-01T16:10:52.832+05:30  INFO 35360 --- [springboot-h2] [  restartedMain] o.apache.catalina.core.StandardService   : Starting service [Tomcat]
2025-10-01T16:10:52.832+05:30  INFO 35360 --- [springboot-h2] [  restartedMain] o.apache.catalina.core.StandardEngine    : Starting Servlet engine: [Apache Tomcat/10.1.46]
2025-10-01T16:10:52.876+05:30  INFO 35360 --- [springboot-h2] [  restartedMain] o.a.c.c.C.[Tomcat].[localhost].[/]       : Initializing Spring embedded WebApplicationContext
2025-10-01T16:10:52.877+05:30  INFO 35360 --- [springboot-h2] [  restartedMain] w.s.c.ServletWebServerApplicationContext : Root WebApplicationContext: initialization completed in 984 ms
2025-10-01T16:10:52.991+05:30  INFO 35360 --- [springboot-h2] [  restartedMain] com.zaxxer.hikari.HikariDataSource       : HikariPool-1 - Starting...
2025-10-01T16:10:53.183+05:30  INFO 35360 --- [springboot-h2] [  restartedMain] com.zaxxer.hikari.pool.HikariPool        : HikariPool-1 - Added connection conn0: url=jdbc:h2:mem:testdb user=SA
2025-10-01T16:10:53.185+05:30  INFO 35360 --- [springboot-h2] [  restartedMain] com.zaxxer.hikari.HikariDataSource       : HikariPool-1 - Start completed.
2025-10-01T16:10:53.227+05:30  INFO 35360 --- [springboot-h2] [  restartedMain] o.hibernate.jpa.internal.util.LogHelper  : HHH000204: Processing PersistenceUnitInfo [name: default]
2025-10-01T16:10:53.281+05:30  INFO 35360 --- [springboot-h2] [  restartedMain] org.hibernate.Version                    : HHH000412: Hibernate ORM core version 6.6.29.Final
2025-10-01T16:10:53.319+05:30  INFO 35360 --- [springboot-h2] [  restartedMain] o.h.c.internal.RegionFactoryInitiator    : HHH000026: Second-level cache disabled
2025-10-01T16:10:53.554+05:30  INFO 35360 --- [springboot-h2] [  restartedMain] o.s.o.j.p.SpringPersistenceUnitInfo      : No LoadTimeWeaver setup: ignoring JPA class transformer
2025-10-01T16:10:53.641+05:30  INFO 35360 --- [springboot-h2] [  restartedMain] org.hibernate.orm.connections.pooling    : HHH10001005: Database info:
	Database JDBC URL [Connecting through datasource 'HikariDataSource (HikariPool-1)']
	Database driver: undefined/unknown
	Database version: 2.3.232
	Autocommit mode: undefined/unknown
	Isolation level: undefined/unknown
	Minimum pool size: undefined/unknown
	Maximum pool size: undefined/unknown
2025-10-01T16:10:54.259+05:30  INFO 35360 --- [springboot-h2] [  restartedMain] o.h.e.t.j.p.i.JtaPlatformInitiator       : HHH000489: No JTA platform available (set 'hibernate.transaction.jta.platform' to enable JTA platform integration)
2025-10-01T16:10:54.285+05:30  INFO 35360 --- [springboot-h2] [  restartedMain] j.LocalContainerEntityManagerFactoryBean : Initialized JPA EntityManagerFactory for persistence unit 'default'
2025-10-01T16:10:54.432+05:30  WARN 35360 --- [springboot-h2] [  restartedMain] JpaBaseConfiguration$JpaWebConfiguration : spring.jpa.open-in-view is enabled by default. Therefore, database queries may be performed during view rendering. Explicitly configure spring.jpa.open-in-view to disable this warning
2025-10-01T16:10:54.606+05:30  INFO 35360 --- [springboot-h2] [  restartedMain] o.s.b.a.h2.H2ConsoleAutoConfiguration    : H2 console available at '/h2-console'. Database available at 'jdbc:h2:mem:testdb'
2025-10-01T16:10:54.658+05:30  INFO 35360 --- [springboot-h2] [  restartedMain] o.s.b.d.a.OptionalLiveReloadServer       : LiveReload server is running on port 35729
2025-10-01T16:10:54.692+05:30  INFO 35360 --- [springboot-h2] [  restartedMain] o.s.b.w.embedded.tomcat.TomcatWebServer  : Tomcat started on port 8080 (http) with context path '/'
2025-10-01T16:10:54.700+05:30  INFO 35360 --- [springboot-h2] [  restartedMain] c.t.s.SpringbootH2Application            : Started SpringbootH2Application in 3.193 seconds (process running for 3.488)
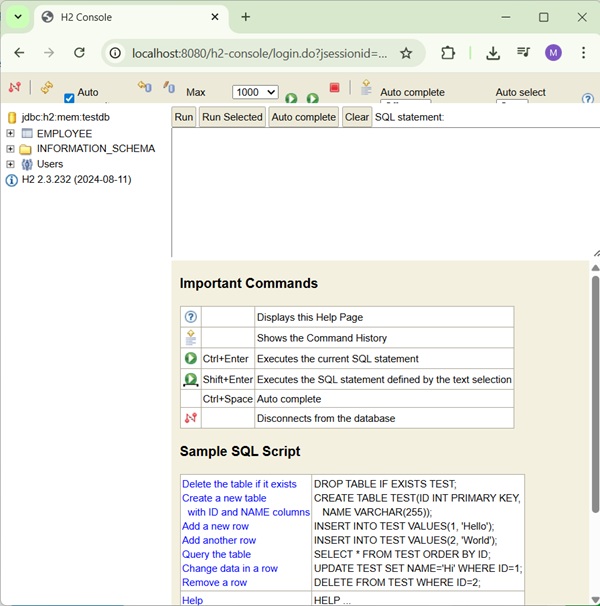
Once server is up and running, open localhost:8080/h2-console in a browser and click on Test Connection to verify the database connection.
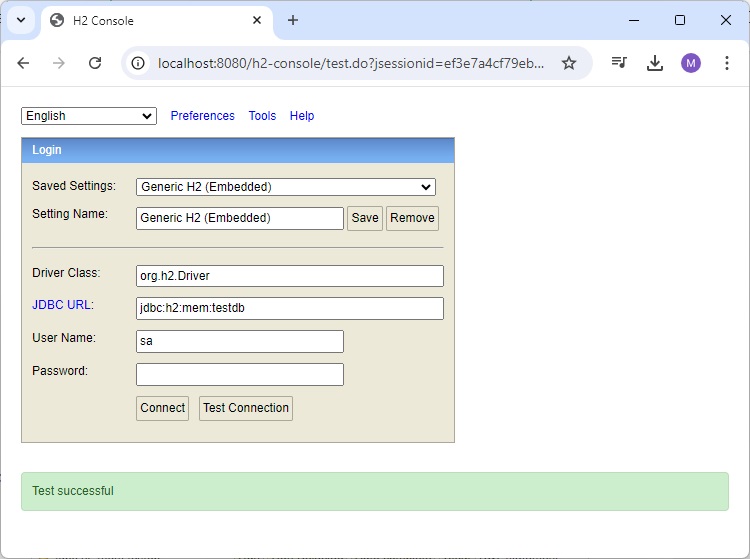
Click on Connect button and H2 database window will appear as shown below −
Spring Boot & H2 - Add Record
Let's now update the project created so far to prepare a complete Add Record API and test it.
Update Service
// Use repository.save() to persist Employee entity in database
public void saveOrUpdate(Employee employee) {
   repository.save(employee);
}
EmployeeService
package com.tutorialspoint.service;

import java.util.List;

import org.springframework.beans.factory.annotation.Autowired;
import org.springframework.stereotype.Service;

import com.tutorialspoint.entity.Employee;
import com.tutorialspoint.repository.EmployeeRepository;

@Service
public class EmployeeService {
   @Autowired
   EmployeeRepository repository;

   // To be implemented
   public Employee getEmployeeById(int id) {
      return null;
   }

   // To be implemented
   public List<Employee> getAllEmployees(){
      return null;
   }

   // Create/Update an Employee
   public void saveOrUpdate(Employee employee) {
      repository.save(employee);
   }

   // To be implemented
   public void deleteEmployeeById(int id) {
   }
}
Update Controller
// Use service.saveOrUpdate() to persist Employee entity in database
@PostMapping("/employee")
public void addEmployee(@RequestBody Employee employee) {
   employeeService.saveOrUpdate(employee);
}
EmployeeController
package com.tutorialspoint.controller;

import java.util.List;

import org.springframework.beans.factory.annotation.Autowired;
import org.springframework.web.bind.annotation.DeleteMapping;
import org.springframework.web.bind.annotation.GetMapping;
import org.springframework.web.bind.annotation.PathVariable;
import org.springframework.web.bind.annotation.PostMapping;
import org.springframework.web.bind.annotation.PutMapping;
import org.springframework.web.bind.annotation.RequestBody;
import org.springframework.web.bind.annotation.RequestMapping;
import org.springframework.web.bind.annotation.RestController;

import com.tutorialspoint.entity.Employee;
import com.tutorialspoint.service.EmployeeService;

@RestController
@RequestMapping(path = "/emp")
public class EmployeeController {
   @Autowired
   EmployeeService employeeService;

   // To be implemented
   @GetMapping("/employees")
   public List<Employee> getAllEmployees(){
      return null;
   }

   // To be implemented
   @GetMapping("/employee/{id}")
   public Employee getEmployee(@PathVariable("id") int id) {
      return null;
   }

   // To be implemented
   @DeleteMapping("/employee/{id}")
   public void deleteEmployee(@PathVariable("id") int id) {
   }

   // Create an employee
   @PostMapping("/employee")
   public void addEmployee(@RequestBody Employee employee) {
      employeeService.saveOrUpdate(employee);
   }

   // To be implemented
   @PutMapping("/employee")
   public void updateEmployee(@RequestBody Employee employee) {
   }
}
Run the application
In eclipse, run the Employee Application configuration as prepared during Application Setup
Eclipse console will show the similar output.
[INFO] Scanning for projects...
...
2025-10-01T16:19:27.696+05:30  INFO 35360 --- [springboot-h2] [  restartedMain] o.s.b.d.a.OptionalLiveReloadServer       : LiveReload server is running on port 35729
2025-10-01T16:19:27.702+05:30  INFO 35360 --- [springboot-h2] [  restartedMain] o.s.b.w.embedded.tomcat.TomcatWebServer  : Tomcat started on port 8080 (http) with context path '/'
2025-10-01T16:19:27.704+05:30  INFO 35360 --- [springboot-h2] [  restartedMain] c.t.s.SpringbootH2Application            : Started SpringbootH2Application in 0.292 seconds (process running for 516.493)
2025-10-01T16:19:27.705+05:30  INFO 35360 --- [springboot-h2] [  restartedMain] .ConditionEvaluationDeltaLoggingListener : Condition evaluation unchanged
Once server is up and running, Use Postman to make a POST request −
Set the following parameters in POSTMAN.
HTTP Method − POST
URL − http://localhost:8080/emp/employee
BODY − An employee JSON
{
   "id": "1",
   "age": "35",
   "name": "Julie",
   "email": "julie@gmail.com"
}
Click on Send Button and check the response status to be OK.

Now open H2-Console and verify the inserted record using following query −
Select * from Employee;
It should display following result −

Spring Boot & H2 - Get Record
Let's now update the project created so far to prepare a complete Get Record API and test it.
Update Service
// Use repository.findById() to get Employee entity by Id
public Employee getEmployeeById(int id) {
   return repository.findById(id).get();
}
EmployeeService
package com.tutorialspoint.service;

import java.util.List;

import org.springframework.beans.factory.annotation.Autowired;
import org.springframework.stereotype.Service;

import com.tutorialspoint.entity.Employee;
import com.tutorialspoint.repository.EmployeeRepository;

@Service
public class EmployeeService {

   @Autowired
   EmployeeRepository repository;

   // get an employee by ud
   public Employee getEmployeeById(int id) {
      return repository.findById(id).get();
   }

   // to be implemented
   public List<Employee> getAllEmployees(){
      return null;
   }

   // create or update an employee
   public void saveOrUpdate(Employee employee) {
      repository.save(employee);
   }

   // to be implemented
   public void deleteEmployeeById(int id) {
   }
}
Update Controller
// Use service.getEmployeeById() to get Employee entity from database
@GetMapping("/employee/{id}")
public Employee getEmployee(@PathVariable("id") int id) {
   return employeeService.getEmployeeById(id);
}
EmployeeController
package com.tutorialspoint.controller;

import java.util.List;

import org.springframework.beans.factory.annotation.Autowired;
import org.springframework.web.bind.annotation.DeleteMapping;
import org.springframework.web.bind.annotation.GetMapping;
import org.springframework.web.bind.annotation.PathVariable;
import org.springframework.web.bind.annotation.PostMapping;
import org.springframework.web.bind.annotation.PutMapping;
import org.springframework.web.bind.annotation.RequestBody;
import org.springframework.web.bind.annotation.RequestMapping;
import org.springframework.web.bind.annotation.RestController;

import com.tutorialspoint.entity.Employee;
import com.tutorialspoint.service.EmployeeService;

@RestController
@RequestMapping(path = "/emp")
public class EmployeeController {

   @Autowired
   EmployeeService employeeService;

   // to be implemented
   @GetMapping("/employees")
   public List<Employee> getAllEmployees(){
      return null;
   }

   // get an employee by id
   @GetMapping("/employee/{id}")
   public Employee getEmployee(@PathVariable("id") int id) {
      return employeeService.getEmployeeById(id);
   }

   // to be implemented
   @DeleteMapping("/employee/{id}")
   public void deleteEmployee(@PathVariable("id") int id) {
   }

   // create an employee
   @PostMapping("/employee")
   public void addEmployee(@RequestBody Employee employee) {
      employeeService.saveOrUpdate(employee);
   }

   // to be implemented
   @PutMapping("/employee")
   public void updateEmployee(@RequestBody Employee employee) {
   }
}
Run the application
In eclipse, run the Employee Application configuration as prepared during Application Setup
Eclipse console will show the similar output.
[INFO] Scanning for projects...
...
2025-10-01T16:26:31.492+05:30  INFO 35360 --- [springboot-h2] [  restartedMain] o.s.b.d.a.OptionalLiveReloadServer       : LiveReload server is running on port 35729
2025-10-01T16:26:31.504+05:30  INFO 35360 --- [springboot-h2] [  restartedMain] o.s.b.w.embedded.tomcat.TomcatWebServer  : Tomcat started on port 8080 (http) with context path '/'
2025-10-01T16:26:31.507+05:30  INFO 35360 --- [springboot-h2] [  restartedMain] c.t.s.SpringbootH2Application            : Started SpringbootH2Application in 0.405 seconds (process running for 940.297)
2025-10-01T16:26:31.510+05:30  INFO 35360 --- [springboot-h2] [  restartedMain] .ConditionEvaluationDeltaLoggingListener : Condition evaluation unchanged
Once server is up and running, Use Postman to make a POST request −
Set the following parameters in POSTMAN.
HTTP Method − POST
URL − http://localhost:8080/emp/employee
BODY − An employee JSON
{
   "id": "1",
   "age": "35",
   "name": "Julie",
   "email": "julie@gmail.com"
}
Click on Send Button and check the response status to be OK.
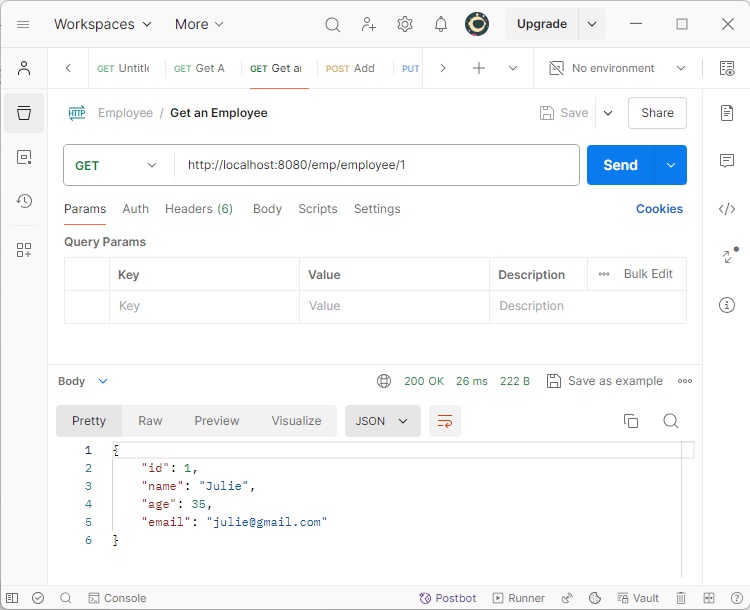
Now make a GET Request to get that record.
Set the following parameters in POSTMAN.
HTTP Method − GET
URL − http://localhost:8080/emp/employee/1
Click the send button and verify the response.
Spring Boot & H2 - Get All Records
Let's now update the project created so far to prepare a complete Get All Records API and test it.
Update Service
// Use repository.findAll() to get all Employee records
public List<Employee> getAllEmployees(){
   List<Employee> employees = new ArrayList<Employee>();
   repository.findAll().forEach(employee -> employees.add(employee));
   return employees;
}
EmployeeService
package com.tutorialspoint.service;

import java.util.ArrayList;
import java.util.List;

import org.springframework.beans.factory.annotation.Autowired;
import org.springframework.stereotype.Service;

import com.tutorialspoint.entity.Employee;
import com.tutorialspoint.repository.EmployeeRepository;

@Service
public class EmployeeService {
   @Autowired
   EmployeeRepository repository;
   public Employee getEmployeeById(int id) {
      return repository.findById(id).get();
   }
   public List<Employee> getAllEmployees(){
      List<Employee> employees = new ArrayList<Employee>();
      repository.findAll().forEach(employee -> employees.add(employee));
      return employees;
   }
   public void saveOrUpdate(Employee employee) {
      repository.save(employee);
   }
   public void deleteEmployeeById(int id) {
   }
}
Update Controller
// Use service.getAllEmployees() to get a list of employees from database
@GetMapping("/employees")
public List<Employee> getAllEmployees(){
   return employeeService.getAllEmployees();
}
EmployeeController
package com.tutorialspoint.controller;

import java.util.List;

import org.springframework.beans.factory.annotation.Autowired;
import org.springframework.web.bind.annotation.DeleteMapping;
import org.springframework.web.bind.annotation.GetMapping;
import org.springframework.web.bind.annotation.PathVariable;
import org.springframework.web.bind.annotation.PostMapping;
import org.springframework.web.bind.annotation.PutMapping;
import org.springframework.web.bind.annotation.RequestBody;
import org.springframework.web.bind.annotation.RequestMapping;
import org.springframework.web.bind.annotation.RestController;

import com.tutorialspoint.entity.Employee;
import com.tutorialspoint.service.EmployeeService;

@RestController
@RequestMapping(path = "/emp")
public class EmployeeController {
   @Autowired
   EmployeeService employeeService;
   @GetMapping("/employees")
   public List<Employee> getAllEmployees(){
      return employeeService.getAllEmployees();
   }
   @GetMapping("/employee/{id}")
   public Employee getEmployee(@PathVariable("id") int id) {
      return employeeService.getEmployeeById(id);
   }
   @DeleteMapping("/employee/{id}")
   public void deleteEmployee(@PathVariable("id") int id) {
   }
   @PostMapping("/employee")
   public void addEmployee(@RequestBody Employee employee) {
      employeeService.saveOrUpdate(employee);
   }
   @PutMapping("/employee")
   public void updateEmployee(@RequestBody Employee employee) {
   }
}
Run the application
In eclipse, run the Employee Application configuration as prepared during Application Setup
Eclipse console will show the similar output.
[INFO] Scanning for projects...
...
2025-10-01T16:31:40.081+05:30  INFO 35360 --- [springboot-h2] [  restartedMain] o.s.b.d.a.OptionalLiveReloadServer       : LiveReload server is running on port 35729
2025-10-01T16:31:40.088+05:30  INFO 35360 --- [springboot-h2] [  restartedMain] o.s.b.w.embedded.tomcat.TomcatWebServer  : Tomcat started on port 8080 (http) with context path '/'
2025-10-01T16:31:40.090+05:30  INFO 35360 --- [springboot-h2] [  restartedMain] c.t.s.SpringbootH2Application            : Started SpringbootH2Application in 0.316 seconds (process running for 1248.879)
2025-10-01T16:31:40.091+05:30  INFO 35360 --- [springboot-h2] [  restartedMain] .ConditionEvaluationDeltaLoggingListener : Condition evaluation unchanged
Once server is up and running, Use Postman to make a POST request −
Set the following parameters in POSTMAN.
HTTP Method − POST
URL − http://localhost:8080/emp/employee
BODY − An employee JSON
{
   "id": "1",
   "age": "35",
   "name": "Julie",
   "email": "julie@gmail.com"
}
Click on Send Button and check the response status to be OK.
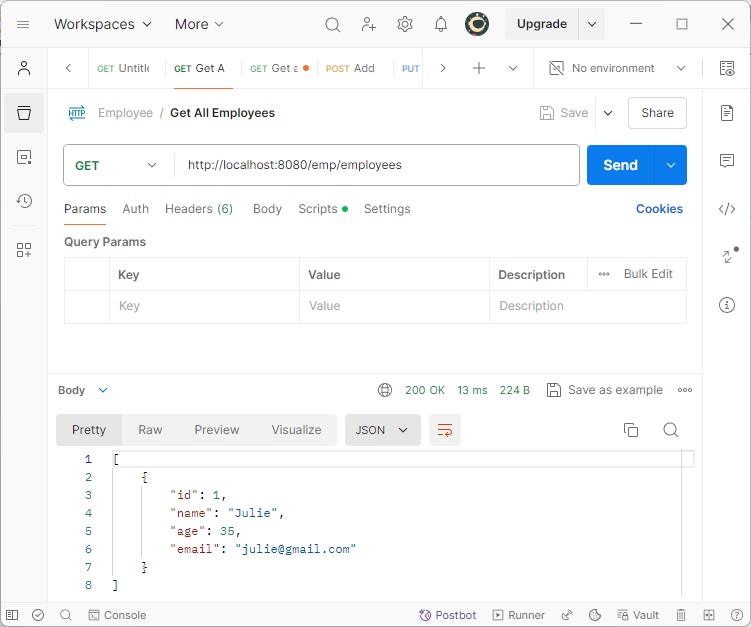
Now make a GET Request to get all records. Set the following parameters in POSTMAN.
HTTP Method − GET
URL − http://localhost:8080/emp/employees
Click the send button and verify the response.
Spring Boot & H2 - Update Record
Let's now update the project created so far to prepare a complete Update Record API and test it.
Update Controller
// Use service.saveOrUpdate() to update an employee record
@PutMapping("/employee")
public void updateEmployee(@RequestBody Employee employee) {
   employeeService.saveOrUpdate(employee);
}
EmployeeController
package com.tutorialspoint.controller;

import java.util.List;

import org.springframework.beans.factory.annotation.Autowired;
import org.springframework.web.bind.annotation.DeleteMapping;
import org.springframework.web.bind.annotation.GetMapping;
import org.springframework.web.bind.annotation.PathVariable;
import org.springframework.web.bind.annotation.PostMapping;
import org.springframework.web.bind.annotation.PutMapping;
import org.springframework.web.bind.annotation.RequestBody;
import org.springframework.web.bind.annotation.RequestMapping;
import org.springframework.web.bind.annotation.RestController;

import com.tutorialspoint.entity.Employee;
import com.tutorialspoint.service.EmployeeService;

@RestController
@RequestMapping(path = "/emp")
public class EmployeeController {
   @Autowired
   EmployeeService employeeService;

   // Get all employees
   @GetMapping("/employees")
   public List<Employee> getAllEmployees(){
      return employeeService.getAllEmployees();
   }

   // get an employee by id
   @GetMapping("/employee/{id}")
   public Employee getEmployee(@PathVariable("id") int id) {
      return employeeService.getEmployeeById(id);
   }

   // delete an employee by id
   @DeleteMapping("/employee/{id}")
   public void deleteEmployee(@PathVariable("id") int id) {
      employeeService.deleteEmployeeById(id);
   }

   // create an employee
   @PostMapping("/employee")
   public void addEmployee(@RequestBody Employee employee) {
      employeeService.saveOrUpdate(employee);
   }

   // update an employee details
   @PutMapping("/employee")
   public void updateEmployee(@RequestBody Employee employee) {
      employeeService.saveOrUpdate(employee);
   }
}
Run the application
In eclipse, run the Employee Application configuration as prepared during Application Setup
Eclipse console will show the similar output.
[INFO] Scanning for projects...
...
2025-10-01T20:47:37.594+05:30  INFO 35360 --- [springboot-h2] [  restartedMain] o.s.b.d.a.OptionalLiveReloadServer       : LiveReload server is running on port 35729
2025-10-01T20:47:37.609+05:30  INFO 35360 --- [springboot-h2] [  restartedMain] o.s.b.w.embedded.tomcat.TomcatWebServer  : Tomcat started on port 8080 (http) with context path '/'
2025-10-01T20:47:37.612+05:30  INFO 35360 --- [springboot-h2] [  restartedMain] c.t.s.SpringbootH2Application            : Started SpringbootH2Application in 0.55 seconds (process running for 16606.4)
2025-10-01T20:47:37.612+05:30  INFO 35360 --- [springboot-h2] [  restartedMain] .ConditionEvaluationDeltaLoggingListener : Condition evaluation unchanged
Once server is up and running, Use Postman to make a POST request −
Set the following parameters in POSTMAN.
HTTP Method − POST
URL − http://localhost:8080/emp/employee
BODY − An employee JSON
{
   "id": "1",
   "age": "35",
   "name": "Julie",
   "email": "julie@gmail.com"
}
Click on Send Button and check the response status to be OK.
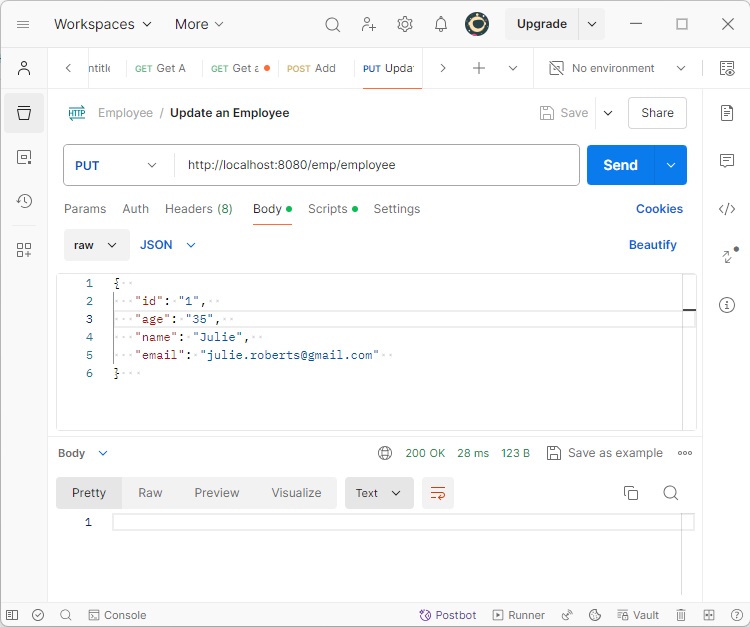
Now make a Put Request to update that records.
Set the following parameters in POSTMAN.
HTTP Method − PUT
URL − http://localhost:8080/emp/employee
BODY − An employee JSON
{
   "id": "1",
   "age": "35",
   "name": "Julie",
   "email": "julie.roberts@gmail.com"
}
Click the send button and verify the response status to be OK.
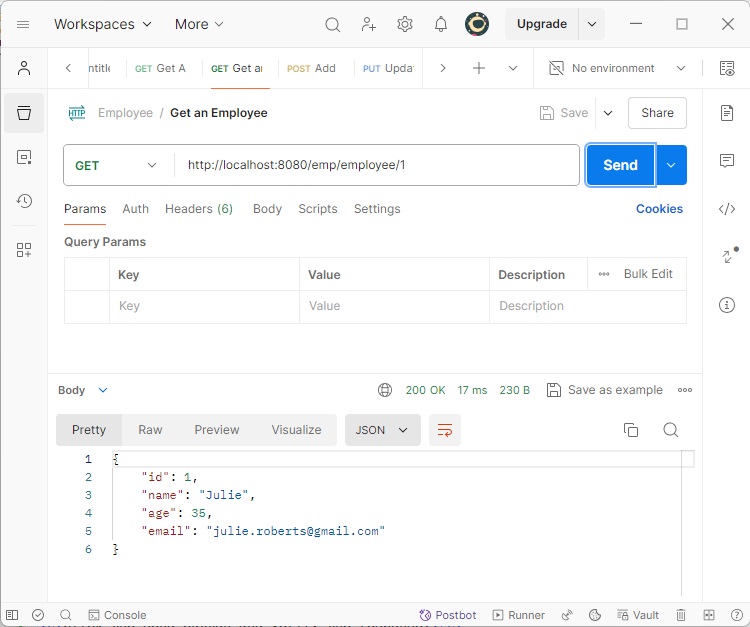
Now make a GET Request to get that record.
Set the following parameters in POSTMAN.
HTTP Method − GET
URL − http://localhost:8080/emp/employee/1
Click the send button and verify the response.
Spring Boot & H2 - Delete Record
Let's now update the project created so far to prepare a complete Delete Record API and test it.
Update Service
// Use repository.deleteById() to delete an Employee record
public void deleteEmployeeById(int id) {
   repository.deleteById(id);
}
EmployeeService
package com.tutorialspoint.service;

import java.util.ArrayList;
import java.util.List;

import org.springframework.beans.factory.annotation.Autowired;
import org.springframework.stereotype.Service;

import com.tutorialspoint.entity.Employee;
import com.tutorialspoint.repository.EmployeeRepository;

@Service
public class EmployeeService {

   @Autowired
   EmployeeRepository repository;

   // get an employee by id
   public Employee getEmployeeById(int id) {
      return repository.findById(id).get();
   }

   // get all employees
   public List<Employee> getAllEmployees(){
      List<Employee> employees = new ArrayList<Employee>();
      repository.findAll().forEach(employee -> employees.add(employee));
      return employees;
   }

   // create or update an employee
   public void saveOrUpdate(Employee employee) {
      repository.save(employee);
   }

   // delete an employee by id
   public void deleteEmployeeById(int id) {
      repository.deleteById(id);
   }
}
Update Controller
// Use service.deleteEmployeeById() to delete an employee by id
@DeleteMapping("/employee/{id}")
public void deleteEmployee(@PathVariable("id") int id) {
   employeeService.deleteEmployeeById(id);
}
EmployeeController
package com.tutorialspoint.controller;

import java.util.List;

import org.springframework.beans.factory.annotation.Autowired;
import org.springframework.web.bind.annotation.DeleteMapping;
import org.springframework.web.bind.annotation.GetMapping;
import org.springframework.web.bind.annotation.PathVariable;
import org.springframework.web.bind.annotation.PostMapping;
import org.springframework.web.bind.annotation.PutMapping;
import org.springframework.web.bind.annotation.RequestBody;
import org.springframework.web.bind.annotation.RequestMapping;
import org.springframework.web.bind.annotation.RestController;

import com.tutorialspoint.entity.Employee;
import com.tutorialspoint.service.EmployeeService;

@RestController
@RequestMapping(path = "/emp")
public class EmployeeController {

   @Autowired
   EmployeeService employeeService;

   // get all employees
   @GetMapping("/employees")
   public List<Employee> getAllEmployees(){
      return employeeService.getAllEmployees();
   }

   // get an employee by id
   @GetMapping("/employee/{id}")
   public Employee getEmployee(@PathVariable("id") int id) {
      return employeeService.getEmployeeById(id);
   }

   // delete an employee by id
   @DeleteMapping("/employee/{id}")
   public void deleteEmployee(@PathVariable("id") int id) {
      employeeService.deleteEmployeeById(id);
   }

   // create an employee
   @PostMapping("/employee")
   public void addEmployee(@RequestBody Employee employee) {
      employeeService.saveOrUpdate(employee);
   }

   // update an employee
   @PutMapping("/employee")
   public void updateEmployee(@RequestBody Employee employee) {
      employeeService.saveOrUpdate(employee);
   }
}
Run the application
In eclipse, run the Employee Application configuration as prepared during Application Setup
Eclipse console will show the similar output.
[INFO] Scanning for projects...
...
2025-10-01T20:55:14.722+05:30  INFO 35360 --- [springboot-h2] [  restartedMain] o.s.b.d.a.OptionalLiveReloadServer       : LiveReload server is running on port 35729
2025-10-01T20:55:14.730+05:30  INFO 35360 --- [springboot-h2] [  restartedMain] o.s.b.w.embedded.tomcat.TomcatWebServer  : Tomcat started on port 8080 (http) with context path '/'
2025-10-01T20:55:14.730+05:30  INFO 35360 --- [springboot-h2] [  restartedMain] c.t.s.SpringbootH2Application            : Started SpringbootH2Application in 0.357 seconds (process running for 17063.522)
2025-10-01T20:55:14.734+05:30  INFO 35360 --- [springboot-h2] [  restartedMain] .ConditionEvaluationDeltaLoggingListener : Condition evaluation unchanged
Once server is up and running, Use Postman to make a POST request −
Set the following parameters in POSTMAN.
HTTP Method − POST
URL − http://localhost:8080/emp/employee
BODY − An employee JSON
{
   "id": "1",
   "age": "35",
   "name": "Julie",
   "email": "julie@gmail.com"
}
Click on Send Button and check the response status to be OK.
Now make a Delete Request to delete that records.
Set the following parameters in POSTMAN.
HTTP Method − DELETE
URL − http://localhost:8080/emp/employee/1
Click the send button and verify the response status to be OK.

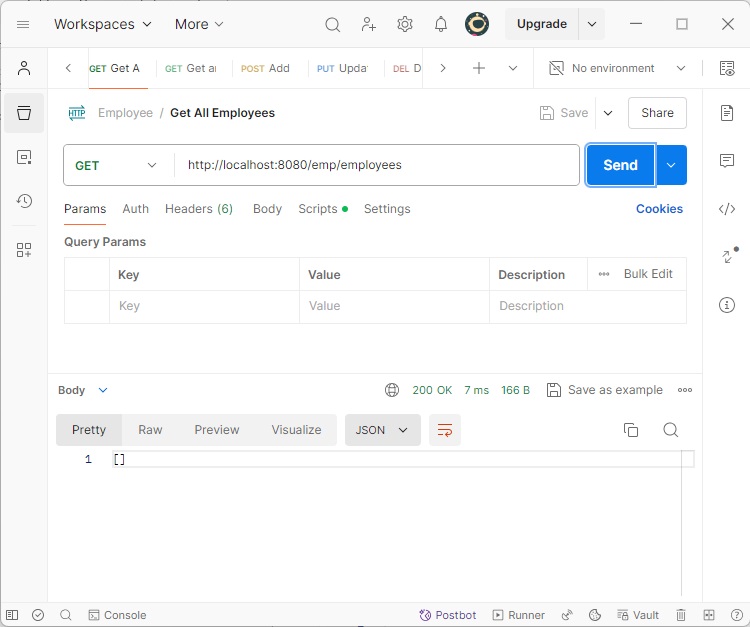
Now make a GET Request to get all records.
Set the following parameters in POSTMAN.
HTTP Method − GET
URL − http://localhost:8080/emp/employees
Click the send button and verify the response.
Spring Boot & H2 - Unit Test Controller
Overview
As in previous chapter we've completed our REST APIs. Now let's create the following structure in src/main/test folder.
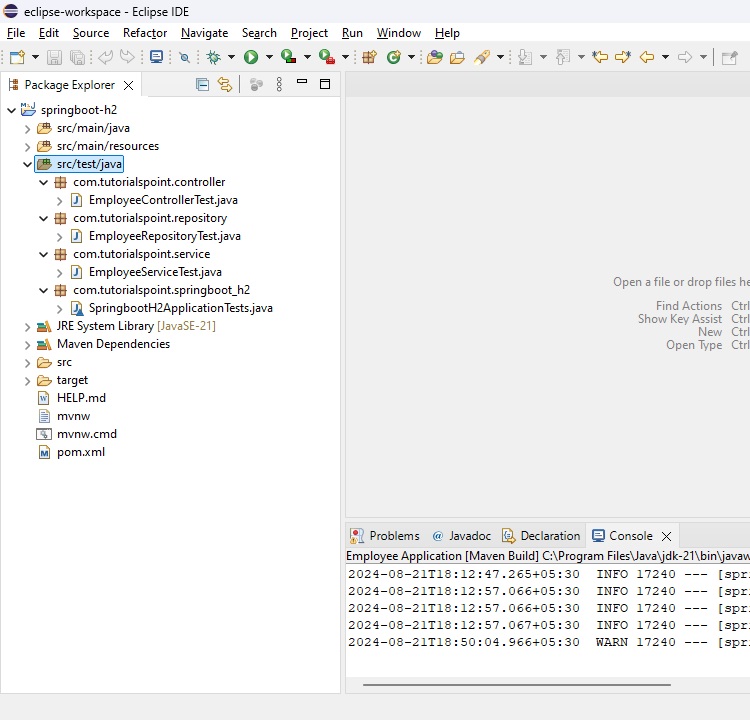
com.tutorialspoint.controller.EmployeeControllerTest − A Unit Tester Class to unit test all methods of EmployeeController.
com.tutorialspoint.repository.EmployeeRepositoryTest − A Unit Tester Class to unit test all methods of EmployeeRepository.
com.tutorialspoint.service.EmployeeServiceTest − A Unit Tester Class to unit test all methods of EmployeeService.
SprintBootH2ApplicationTests class is already present. We need to create the above packages and relevant classes.
EmployeeControllerTest
To test a REST Controller, we need the following annotation and classes −
@ExtendWith(SpringExtension.class) − Mark the class to run as test case using SpringExtension class.
@SpringBootTest(classes = SprintBootH2Application.class) − Configure the Spring Boot application.
@AutoConfigureMockMvc − To automatically configure the MockMVC to mock HTTP Requests and Response.
@Autowired private MockMvc mvc; − MockMvc object to be used in testing.
@MockBean private EmployeeController employeeController − EmployeeController mock object to be tested.
EmployeeControllerTest.java
Following is the complete code of EmployeeControllerTest class.
package com.tutorialspoint.controller;

import static org.hamcrest.core.Is.is;
import static org.mockito.BDDMockito.given;
import static org.mockito.Mockito.doNothing;
import static org.springframework.http.MediaType.APPLICATION_JSON;
import static org.springframework.test.web.servlet.request.MockMvcRequestBuilders.delete;
import static org.springframework.test.web.servlet.request.MockMvcRequestBuilders.get;
import static org.springframework.test.web.servlet.request.MockMvcRequestBuilders.post;
import static org.springframework.test.web.servlet.request.MockMvcRequestBuilders.put;
import static org.springframework.test.web.servlet.result.MockMvcResultMatchers.jsonPath;
import static org.springframework.test.web.servlet.result.MockMvcResultMatchers.status;

import java.util.ArrayList;
import java.util.List;

import org.junit.jupiter.api.Test;
import org.springframework.beans.factory.annotation.Autowired;
import org.springframework.boot.test.autoconfigure.web.servlet.AutoConfigureMockMvc;
import org.springframework.boot.test.context.SpringBootTest;
import org.springframework.boot.test.mock.mockito.MockBean;
import org.springframework.test.web.servlet.MockMvc;

import com.fasterxml.jackson.databind.ObjectMapper;
import com.tutorialspoint.entity.Employee;
import com.tutorialspoint.springboot_h2.SpringbootH2Application;

@SpringBootTest(classes = SpringbootH2Application.class)
@AutoConfigureMockMvc
public class EmployeeControllerTest {

   @Autowired
   private MockMvc mvc;

   @MockBean
   private EmployeeController employeeController;

   @Test
   public void testGetAllEmployees() throws Exception {
      Employee employee = getEmployee();
      List<Employee> employees = new ArrayList<>();
      employees.add(employee);
      given(employeeController.getAllEmployees()).willReturn(employees);
      mvc.perform(get("/emp/employees").contentType(APPLICATION_JSON)).andExpect(status().isOk())
         .andExpect(jsonPath("$[0].name", is(employee.getName())));
   }

   @Test
   public void testGetEmployee() throws Exception {
      Employee employee = getEmployee();
      given(employeeController.getEmployee(1)).willReturn(employee);
      mvc.perform(get("/emp/employee/" + employee.getId()).contentType(APPLICATION_JSON)).andExpect(status().isOk())
         .andExpect(jsonPath("name", is(employee.getName())));
   }

   @Test
   public void testDeleteEmployee() throws Exception {
      Employee employee = getEmployee();
      doNothing().when(employeeController).deleteEmployee(1);
      mvc.perform(delete("/emp/employee/" + employee.getId()).contentType(APPLICATION_JSON))
         .andExpect(status().isOk()).andReturn();
   }

   @Test
   public void testAddEmployee() throws Exception {
      Employee employee = getEmployee();
      doNothing().when(employeeController).addEmployee(employee);
      mvc.perform(post("/emp/employee").content(asJson(employee)).contentType(APPLICATION_JSON))
         .andExpect(status().isOk()).andReturn();
   }

   @Test
   public void testUpdateEmployee() throws Exception {
      Employee employee = getEmployee();
      doNothing().when(employeeController).updateEmployee(employee);
      mvc.perform(put("/emp/employee").content(asJson(employee)).contentType(APPLICATION_JSON))
         .andExpect(status().isOk()).andReturn();
   }

   private Employee getEmployee() {
      Employee employee = new Employee();
      employee.setId(1);
      employee.setName("Mahesh");
      employee.setAge(30);
      employee.setEmail("mahesh@test.com");
      return employee;
   }

   private static String asJson(final Object obj) {
      try {
         return new ObjectMapper().writeValueAsString(obj);
      } catch (Exception e) {
         throw new RuntimeException(e);
      }
   }
}
Run the test cases.
Run the Test cases using Run As > Maven Test.
[INFO] Scanning for projects...
...
[INFO] -------------------------------------------------------
[INFO]  T E S T S
[INFO] -------------------------------------------------------
[INFO] Running com.tutorialspoint.controller.[1mEmployeeControllerTest[m
21:03:09.324 [main] INFO org.springframework.boot.devtools.restart.RestartApplicationListener -- Restart disabled due to context in which it is running

  .   ____          _            __ _ _
 /\\ / ___'_ __ _ _(_)_ __  __ _ \ \ \ \
( ( )\___ | '_ | '_| | '_ \/ _` | \ \ \ \
 \\/  ___)| |_)| | | | | || (_| |  ) ) ) )
  '  |____| .__|_| |_|_| |_\__, | / / / /
 =========|_|==============|___/=/_/_/_/

 :: Spring Boot ::                (v3.5.6)

2025-10-01T21:03:09.662+05:30  INFO 46276 --- [springboot-h2] [           main] c.t.controller.EmployeeControllerTest    : Starting EmployeeControllerTest using Java 21.0.6 with PID 46276 (started by mahes in D:\Projects\springboot-h2)
2025-10-01T21:03:09.663+05:30  INFO 46276 --- [springboot-h2] [           main] c.t.controller.EmployeeControllerTest    : No active profile set, falling back to 1 default profile: "default"
2025-10-01T21:03:10.282+05:30  INFO 46276 --- [springboot-h2] [           main] .s.d.r.c.RepositoryConfigurationDelegate : Bootstrapping Spring Data JPA repositories in DEFAULT mode.
2025-10-01T21:03:10.326+05:30  INFO 46276 --- [springboot-h2] [           main] .s.d.r.c.RepositoryConfigurationDelegate : Finished Spring Data repository scanning in 33 ms. Found 1 JPA repository interface.
...
2025-10-01T21:03:15.338+05:30  INFO 46276 --- [springboot-h2] [           main] c.t.s.SpringbootH2ApplicationTests       : Started SpringbootH2ApplicationTests in 0.48 seconds (process running for 7.078)
[INFO] [1;32mTests run: [0;1;32m1[m, Failures: 0, Errors: 0, Skipped: 0, Time elapsed: 0.511 s -- in com.tutorialspoint.springboot_h2.[1mSpringbootH2ApplicationTests[m
[INFO]
[INFO] Results:
[INFO]
[INFO] [1;32mTests run: 6, Failures: 0, Errors: 0, Skipped: 0[m
[INFO]
[INFO] [1m------------------------------------------------------------------------[m
[INFO] [1;32mBUILD SUCCESS[m
[INFO] [1m------------------------------------------------------------------------[m
[INFO] Total time:  10.893 s
[INFO] Finished at: 2025-10-01T21:03:15+05:30
[INFO] [1m------------------------------------------------------------------------[m
Spring Boot & H2 - Unit Test Service
Overview
To test a Service, we need the following annotation and classes −
@ExtendWith(SpringExtension.class) − Mark the class to run as test case using SpringExtension class.
@SpringBootTest(classes = SprintBootH2Application.class) − Configure the Spring Boot application.
@MockBean private EmployeeService employeeService − EmployeeService mock object to be tested.
EmployeeServiceTest.java
Following is the complete code of EmployeeServiceTest class.
package com.tutorialspoint.service;

import static org.junit.jupiter.api.Assertions.assertEquals;
import static org.junit.jupiter.api.Assertions.assertTrue;
import static org.mockito.BDDMockito.given;
import static org.mockito.Mockito.doNothing;

import java.util.ArrayList;
import java.util.List;

import org.junit.jupiter.api.Test;
import org.springframework.boot.test.context.SpringBootTest;
import org.springframework.boot.test.mock.mockito.MockBean;

import com.tutorialspoint.entity.Employee;
import com.tutorialspoint.springboot_h2.SpringbootH2Application;

@SpringBootTest(classes = SpringbootH2Application.class)
public class EmployeeServiceTest {

   @MockBean
   private EmployeeService employeeService;

   @Test
   public void testGetAllEmployees() throws Exception {
      Employee employee = getEmployee();
      List<Employee> employees = new ArrayList<>();
      employees.add(employee);
      given(employeeService.getAllEmployees()).willReturn(employees);
      List<Employee> result = employeeService.getAllEmployees();
      assertEquals(result.size(), 1);
   }

   @Test
   public void testGetEmployee() throws Exception {
      Employee employee = getEmployee();
      given(employeeService.getEmployeeById(1)).willReturn(employee);
      Employee result = employeeService.getEmployeeById(1);
      assertEquals(result.getId(), 1);
   }

   @Test
   public void testDeleteEmployee() throws Exception {
      doNothing().when(employeeService).deleteEmployeeById(1);
      employeeService.deleteEmployeeById(1);
      assertTrue(true);
   }

   @Test
   public void testSaveOrUpdateEmployee() throws Exception {
      Employee employee = getEmployee();
      doNothing().when(employeeService).saveOrUpdate(employee);
      employeeService.saveOrUpdate(employee);
      assertTrue(true);
   }

   private Employee getEmployee() {
      Employee employee = new Employee();
      employee.setId(1);
      employee.setName("Mahesh");
      employee.setAge(30);
      employee.setEmail("mahesh@test.com");
      return employee;
   }
}
Run the test cases.
Run the Test cases using Run As > Maven Test.
[INFO] Scanning for projects...
...
[INFO] -------------------------------------------------------
[INFO]  T E S T S
[INFO] -------------------------------------------------------
...
[INFO] Running com.tutorialspoint.service.[1mEmployeeServiceTest[m
2025-10-01T21:26:04.330+05:30  INFO 30384 --- [springboot-h2] [           main] o.s.b.d.r.RestartApplicationListener     : Restart disabled due to context in which it is running

  .   ____          _            __ _ _
 /\\ / ___'_ __ _ _(_)_ __  __ _ \ \ \ \
( ( )\___ | '_ | '_| | '_ \/ _` | \ \ \ \
 \\/  ___)| |_)| | | | | || (_| |  ) ) ) )
  '  |____| .__|_| |_|_| |_\__, | / / / /
 =========|_|==============|___/=/_/_/_/

 :: Spring Boot ::                (v3.5.6)

2025-10-01T21:26:04.364+05:30  INFO 30384 --- [springboot-h2] [           main] c.t.service.EmployeeServiceTest          : Starting EmployeeServiceTest using Java 21.0.6 with PID 30384 (started by mahes in D:\Projects\springboot-h2)
2025-10-01T21:26:04.365+05:30  INFO 30384 --- [springboot-h2] [           main] c.t.service.EmployeeServiceTest          : No active profile set, falling back to 1 default profile: "default"
2025-10-01T21:26:04.519+05:30  INFO 30384 --- [springboot-h2] [           main] .s.d.r.c.RepositoryConfigurationDelegate : Bootstrapping Spring Data JPA repositories in DEFAULT mode.
2025-10-01T21:26:04.530+05:30  INFO 30384 --- [springboot-h2] [           main] .s.d.r.c.RepositoryConfigurationDelegate : Finished Spring Data repository scanning in 6 ms. Found 1 JPA repository interface.
...
[INFO] [1;32mTests run: [0;1;32m1[m, Failures: 0, Errors: 0, Skipped: 0, Time elapsed: 1.222 s -- in com.tutorialspoint.springboot_h2.[1mSpringbootH2ApplicationTests[m
[INFO]
[INFO] Results:
[INFO]
[INFO] [1;32mTests run: 10, Failures: 0, Errors: 0, Skipped: 0[m
[INFO]
[INFO] [1m------------------------------------------------------------------------[m
[INFO] [1;32mBUILD SUCCESS[m
[INFO] [1m------------------------------------------------------------------------[m
[INFO] Total time:  12.634 s
[INFO] Finished at: 2025-10-01T21:26:06+05:30
[INFO] [1m------------------------------------------------------------------------[m
Spring Boot & H2 - Unit Test Repository
Overview
To test a Repository, we need the following annotation and classes −
@ExtendWith(SpringExtension.class) − Mark the class to run as test case using SpringExtension class.
@SpringBootTest(classes = SprintBootH2Application.class) − Configure the Spring Boot application.
@Transactional − To mark repository to do CRUD Operation capable.
@Autowired private EmployeeRepository employeeRepository − EmployeeRepository object to be tested.
EmployeeRepositoryTest.java
Following is the complete code of EmployeeRepositoryTest class.
package com.tutorialspoint.repository;

import static org.junit.jupiter.api.Assertions.assertEquals;

import java.util.ArrayList;
import java.util.List;

import org.junit.jupiter.api.Test;
import org.springframework.beans.factory.annotation.Autowired;
import org.springframework.boot.test.context.SpringBootTest;

import com.tutorialspoint.entity.Employee;
import com.tutorialspoint.springboot_h2.SpringbootH2Application;

import jakarta.transaction.Transactional;

@Transactional
@SpringBootTest(classes = SpringbootH2Application.class)
public class EmployeeRepositoryTest {

   @Autowired
   private EmployeeRepository employeeRepository;

   @Test
   public void testFindById() {
      Employee employee = getEmployee();
      employeeRepository.save(employee);
      Employee result = employeeRepository.findById(employee.getId()).get();
      assertEquals(employee.getId(), result.getId());
   }

   @Test
   public void testFindAll() {
      Employee employee = getEmployee();
      employeeRepository.save(employee);
      List<Employee> result = new ArrayList<>();
      employeeRepository.findAll().forEach(e -> result.add(e));
      assertEquals(result.size(), 1);
   }

   @Test
   public void testSave() {
      Employee employee = getEmployee();
      employeeRepository.save(employee);
      Employee found = employeeRepository.findById(employee.getId()).get();
      assertEquals(employee.getId(), found.getId());
   }

   @Test
   public void testDeleteById() {
      Employee employee = getEmployee();
      employeeRepository.save(employee);
      employeeRepository.deleteById(employee.getId());
      List<Employee> result = new ArrayList<>();
      employeeRepository.findAll().forEach(e -> result.add(e));
      assertEquals(result.size(), 0);
   }

   private Employee getEmployee() {
      Employee employee = new Employee();
      employee.setId(1);
      employee.setName("Mahesh");
      employee.setAge(30);
      employee.setEmail("mahesh@test.com");
      return employee;
   }
}
Run the test cases.
Run the Test cases using Run As > Maven Test.
[INFO] Scanning for projects...
...
[INFO] -------------------------------------------------------
[INFO]  T E S T S
[INFO] -------------------------------------------------------
[INFO] Running com.tutorialspoint.controller.[1mEmployeeControllerTest[m
21:31:59.404 [main] INFO org.springframework.boot.devtools.restart.RestartApplicationListener -- Restart disabled due to context in which it is running

  .   ____          _            __ _ _
 /\\ / ___'_ __ _ _(_)_ __  __ _ \ \ \ \
( ( )\___ | '_ | '_| | '_ \/ _` | \ \ \ \
 \\/  ___)| |_)| | | | | || (_| |  ) ) ) )
  '  |____| .__|_| |_|_| |_\__, | / / / /
 =========|_|==============|___/=/_/_/_/

 :: Spring Boot ::                (v3.5.6)

2025-10-01T21:31:59.827+05:30  INFO 36064 --- [springboot-h2] [           main] c.t.controller.EmployeeControllerTest    : Starting EmployeeControllerTest using Java 21.0.6 with PID 36064 (started by mahes in D:\Projects\springboot-h2)
2025-10-01T21:31:59.832+05:30  INFO 36064 --- [springboot-h2] [           main] c.t.controller.EmployeeControllerTest    : No active profile set, falling back to 1 default profile: "default"
2025-10-01T21:32:00.829+05:30  INFO 36064 --- [springboot-h2] [           main] .s.d.r.c.RepositoryConfigurationDelegate : Bootstrapping Spring Data JPA repositories in DEFAULT mode.
2025-10-01T21:32:00.869+05:30  INFO 36064 --- [springboot-h2] [           main] .s.d.r.c.RepositoryConfigurationDelegate : Finished Spring Data repository scanning in 29 ms. Found 1 JPA repository interface.
Mockito is currently self-attaching to enable the inline-mock-maker. This will no longer work in future releases of the JDK. Please add Mockito as an agent to your build as described in Mockito's documentation: https://javadoc.io/doc/org.mockito/mockito-core/latest/org.mockito/org/mockito/Mockito.html#0.3
OpenJDK 64-Bit Server VM warning: Sharing is only supported for boot loader classes because bootstrap classpath has been appended
2025-10-01T21:32:02.988+05:30  INFO 36064 --- [springboot-h2] [           main] com.zaxxer.hikari.HikariDataSource       : HikariPool-1 - Starting...
2025-10-01T21:32:03.441+05:30  INFO 36064 --- [springboot-h2] [           main] com.zaxxer.hikari.pool.HikariPool        : HikariPool-1 - Added connection conn0: url=jdbc:h2:mem:testdb user=SA
2025-10-01T21:32:03.451+05:30  INFO 36064 --- [springboot-h2] [           main] com.zaxxer.hikari.HikariDataSource       : HikariPool-1 - Start completed.
2025-10-01T21:32:03.671+05:30  INFO 36064 --- [springboot-h2] [           main] o.hibernate.jpa.internal.util.LogHelper  : HHH000204: Processing PersistenceUnitInfo [name: default]
2025-10-01T21:32:03.824+05:30  INFO 36064 --- [springboot-h2] [           main] org.hibernate.Version                    : HHH000412: Hibernate ORM core version 6.6.29.Final
2025-10-01T21:32:03.916+05:30  INFO 36064 --- [springboot-h2] [           main] o.h.c.internal.RegionFactoryInitiator    : HHH000026: Second-level cache disabled
2025-10-01T21:32:04.241+05:30  INFO 36064 --- [springboot-h2] [           main] o.s.o.j.p.SpringPersistenceUnitInfo      : No LoadTimeWeaver setup: ignoring JPA class transformer
...
2025-10-01T21:32:08.343+05:30  INFO 36064 --- [springboot-h2] [           main] c.t.repository.EmployeeRepositoryTest    : Started EmployeeRepositoryTest in 0.587 seconds (process running for 10.161)
...
[INFO] Results:
[INFO]
[INFO] [1;32mTests run: 14, Failures: 0, Errors: 0, Skipped: 0[m
[INFO]
[INFO] [1m------------------------------------------------------------------------[m
[INFO] [1;32mBUILD SUCCESS[m
[INFO] [1m------------------------------------------------------------------------[m
[INFO] Total time:  15.223 s
[INFO] Finished at: 2025-10-01T21:32:09+05:30
[INFO] [1m------------------------------------------------------------------------[m
