- Spring Boot & H2 - Home
- Spring Boot & H2 - Overview
- Spring Boot & H2 - Environment Setup
- Spring Boot & H2 - Project Setup
- Spring Boot & H2 - REST APIs
- Spring Boot & H2 - H2 Console
Spring Boot & H2 Examples
- Spring Boot & H2 - Add Record
- Spring Boot & H2 - Get Record
- Spring Boot & H2 - Get All Records
- Spring Boot & H2 - Update Record
- Spring Boot & H2 - Delete Record
- Spring Boot & H2 - Unit Test Controller
- Spring Boot & H2 - Unit Test Service
- Spring Boot & H2 - Unit Test Repository
Spring Boot & H2 Useful Resources
Spring Boot & H2 - Environment Setup
This chapter will guide you on how to prepare a development environment to start your work with Spring Boot Framework and H2. It will also teach you how to set up JDK and STS on your machine before you set up Spring Framework −
Step 1 - Setup Java Development Kit (JDK)
You can download the latest version of SDK from Oracle's Java site − Java SE Downloads. You will find instructions for installing JDK in downloaded files, follow the given instructions to install and configure the setup. Finally set PATH and JAVA_HOME environment variables to refer to the directory that contains java and javac, typically java_install_dir/bin and java_install_dir respectively.
If you are running Windows and have installed the JDK in C:\jdk-24, you would have to put the following line in your C:\autoexec.bat file.
set PATH=C:\jdk-24;%PATH%
set JAVA_HOME=C:\jdk-24
Alternatively, on Windows NT/2000/XP, you will have to right-click on My Computer, select Properties → Advanced → Environment Variables. Then, you will have to update the PATH value and click the OK button.
On Unix (Solaris, Linux, etc.), if the SDK is installed in /usr/local/jdk-24 and you use the C shell, you will have to put the following into your .cshrc file.
setenv PATH /usr/local/jdk-24/bin:$PATH
setenv JAVA_HOME /usr/local/jdk-24
Alternatively, if you use an Integrated Development Environment (IDE) like Borland JBuilder, Eclipse, IntelliJ IDEA, or Sun ONE Studio, you will have to compile and run a simple program to confirm that the IDE knows where you have installed Java. Otherwise, you will have to carry out a proper setup as given in the document of the IDE.
Step 2 - Setup Spring Tool Suite
All the examples in this tutorial have been written using Spring Tool Suite IDE. So we would suggest you should have the latest version of Spring Tool Suite installed on your machine.
To install Spring Tool Suite IDE, download the latest Spring Tool Suite binaries from www.eclipse.org/downloads. Once you download the installation, unpack the binary distribution into a convenient location. For example, in C:\sts\sts-4.30.0.RELEASE on Windows, or /usr/local/sts/sts-4.30.0.RELEASE on Linux/Unix and finally set PATH variable appropriately.
Spring Tool Suite can be started by executing the following commands on Windows machine, or you can simply double-click on SpringToolSuite4.exe
E:\sts\sts-4.30.0.RELEASE\SpringToolSuite4.exe
Eclipse can be started by executing the following commands on Unix (Solaris, Linux, etc.) machine −
$/usr/local/sts/sts-4.30.0.RELEASE/SpringToolSuite4
Step 3 - Setup Spring Boot Project
Now if everything is fine, then you can proceed to set up your Spring Boot. Following are the simple steps to download and install the Spring Boot Project on your machine.
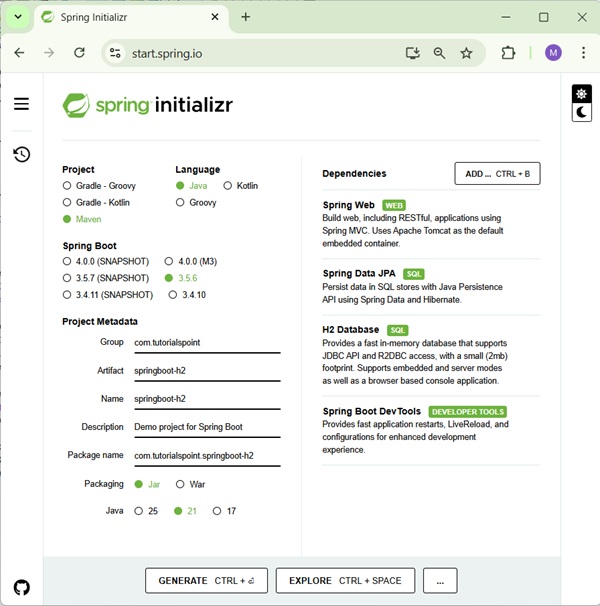
Go to spring Initializr link to create a spring boot project, https://start.spring.io/.
Select project as Maven Project.
Select language as Java.
Select Spring Boot version as 3.5.6.
Set Project Metadata - Group as com.tutorialspoint, Artifact as springboot-h2, name as springboot-h2, Description as Demo project for Spring Boot and package name as com.tutorialspoint.springboot-h2.
Select packaging as Jar.
Select java as 21.
Add dependencies as Spring Web, Spring Data JPA, H2 Database and Spring Boot DevTools.
Now click on GENERATE Button to generate the project structure.
Once the maven based spring boot project is downloaded, then import the maven project into eclipse and rest eclipse will handle. It will download the maven dependencies and build the project to make it ready for further development.
Step 4 - POSTMAN for REST APIs Testing
POSTMAN is a useful tool to test REST Based APIs. To install POSTMAN, download the latest POSTMAN binaries from www.postman.com/downloads/. Once you download the installable, follow the instructions to install and use it.
