- Serverless - Home
- Serverless - Introduction
- Serverless - Installation
- Serverless - Deploying Function
- Serverless - Regions, Memory-Size, Timeouts
- Serverless - Service
- Serverless - Scheduled Lambdas
- Serverless - API Gateway Triggered Lambdas
- Serverless - Include/Exclude
- Serverless - Plugins
- Serverless - Packaging Dependencies
- Serverless - Layer Creation
- Serverless - REST API with DynamoDB
- Serverless - Telegram Echo Bot
- Serverless Useful Resources
- Serverless - Quick Guide
- Serverless - Useful Resources
- Serverless - Discussion
Serverless - Telegram Echo Bot
This is another interesting project available within the official serverless projects list. We basically create a new bot on Telegram, then use the set_webhook method to connect it to our lambda function, and within the lambda function, write the code that will make the bot echo back whatever message it receives.
Prerequisites
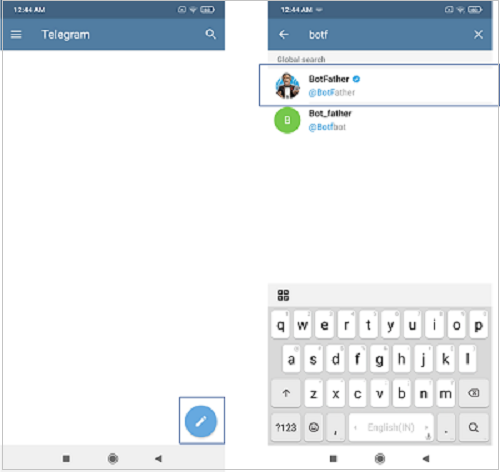
You will need the Telegram App installed on your mobile phone or desktop. The download options can be found here. Telegram is a messaging app,kind of similar to WhatsApp or Messenger. Once the app is installed, you will need to create a new bot within the app. For that, click on the 'New Message' icon (the round pencil icon atthe bottom right), and search for BotFather. Click on the verified account.
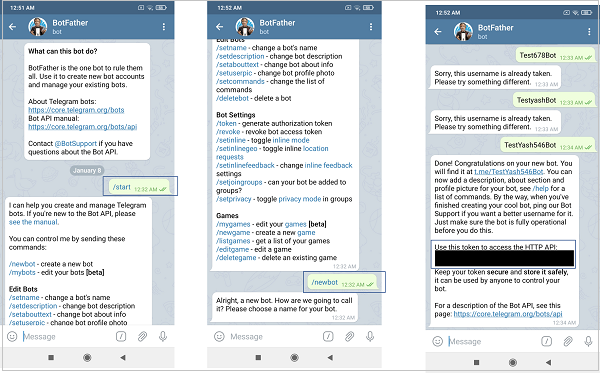
Once you begin your chat with BotFather, creating a new bot is quite self-explanatory. You send the \newbot command, enter a name and username for the bot, and you get an access token, which you need to note down.
Code Walkthrough
The code can be found on GitHub - https://github.com/serverless/examples/tree/master/aws-python-telegram-bot
We will have a look at the project structure and then perform the walkthrough of the serverless.yml file and the handler.py file.
Project Structure
We can see that this project has an external dependency (the python telegram bot library), listed in requirements.py −
python-telegram-bot==8.1.1
The package.json and the serverless.yml both show that the serverless-python-requirements plugin has been used for bundling the python requirements (the telegram bot library in this case).Therefore, the README.md file also suggests that you perform npm install to install the necessary plugins. I would personally recommend that you delete package.json, and install serverless-python-requirements using sls plugin install -n serverless-python-requirements. This will create the package.json file automatically. This willalso ensure that you install the latest version of serverless-python-requirements. By running npm install, you will be installing the version mentioned in the existing package.jsonwhich may be outdated.
If you read the README.md file, you will find that one file which is referenced, is not actually present in the project − serverless.env.yml. You have been asked to create this file and enter your TELEGRAM_TOKEN in this file. This has been done for security reasons. The TELEGRAM_TOKEN is supposed to be confidential, and you don't want to share it publicly. Therefore, the creator of this project has not added the serverless.env.yml file on GitHub. But you will need to create it on your local machine.
serverless.yml Walkthrough
The serverless.yml file begins with the definition of the service.
service: serverless-telegram-bot
Next, the provider is defined. Here again, an environment variable has been set. The value for this variable (TELEGRAM_TOKEN) is fetched from the serverless.env.yml file which you are supposed to create locally. Here again, we've used $ to signify variables.
provider:
   name: aws
   runtime: python3.6
   profile: ckl
   environment:
      TELEGRAM_TOKEN: ${file(./serverless.env.yml):TELEGRAM_TOKEN, ''}
The functions block is quite straightforward. Two functions are defined, both HTTP triggered. The http event parameters, however, are defined in a single line here.
- http:
   path: /set_webhook
   method: post
Instead of the single line execution used is - http − POST /set_webhook
Also, note that both the webhook and set_webhook functions lie within the same handler file.
functions:
   webhook:
      handler: handler.webhook
      events:
         - http: POST /
set_webhook:
   handler: handler.set_webhook
   events:
      - http: POST /set_webhook
Finally, the serverless-python-requirements plugin is defined.
plugins:
   - serverless-python-requirements
Walkthrough of handler.py
We being with a couple of import statements
import json
import telegram
import os
import logging
Next, a logger object is defined, which basically helps us enter log statements. Please note that this is not required for python runtime functions. Simple print statements also get logged.
The only difference is that the output from logger includes log level, timestamp, and request ID. You can read more about the logging library here.
# Logging is cool!
logger = logging.getLogger()
if logger.handlers:
   for handler in logger.handlers:
      logger.removeHandler(handler)
logging.basicConfig(level=logging.INFO)
Next, the JSONs for OK_RESPONSE and ERROR_RESPONSE are defined. These serve as return values of the functions.
OK_RESPONSE = {
   'statusCode': 200,
   'headers': {'Content-Type': 'application/json'},
   'body': json.dumps('ok')
}
ERROR_RESPONSE = {
   'statusCode': 400,
   'body': json.dumps('Oops, something went wrong!')
}
Next, a helper function, that is used by both the API functions is defined. This function returns a bot instance, using the Token provided as an environment variable in serverless.yml.
def configure_telegram():
   """
   Conimages the bot with a Telegram Token.
   Returns a bot instance.
   """
   TELEGRAM_TOKEN = os.environ.get('TELEGRAM_TOKEN')
   if not TELEGRAM_TOKEN:
      logger.error('The TELEGRAM_TOKEN must be set')
      raise NotImplementedError
   return telegram.Bot(TELEGRAM_TOKEN)
Next, the handler functions for the two APIs are defined. Let's look at the set_webhook function first. Over here, the bot instance is obtained from the configure_telegram function that we saw earlier. Next, the host field is extracted from the headers, and the stage field is extracted from the requestContext block of the incoming event. Using these, two fields, the URL of the webhook is constructed. Finally, it is applied to the bot using the bot.set_webhook(url) function. If the webhook is set correctly, the OK_RESPONSE is set, else the ERROR_RESPONSE is set. Please note that this set_webhook API has to be triggered manually once, using a tool like POSTMAN.
def set_webhook(event, context):
   """
   Sets the Telegram bot webhook.
   """
   logger.info('Event: {}'.format(event))
   bot = configure_telegram()
   url = 'https://{}/{}/'.format(
      event.get('headers').get('Host'),
      event.get('requestContext').get('stage'),
   )
   webhook = bot.set_webhook(url)

   if webhook:
      return OK_RESPONSE
   return ERROR_RESPONSE
Let us understand how the set_webhook function is able to get the correct URL for the webhook. Note that the set_webhook and the webhook functions only have a difference of '/set_webhook' in their path. They share the same host and stage. Therefore, we can derive the endpoint of the webhook function using the host and dev received in the set_webhook function's event. If your endpoint is 'https://abcdefghijk.execute-api.us-east-1.amazonaws.com/dev', then the host will be 'https://abcdefghijk.execute-api.us-east-1.amazonaws.com' and the stage will be 'dev'. The set_webhook function is triggered by 'https://abcdefghijk.execute-api.us-east-1.amazonaws.com/dev/set_webhook' and the webhook function is triggered by 'https://abcdefghijk.execute-api.us-east-1.amazonaws.com/dev'. Thus, the parameters in set_webhook's event can help us construct the endpoint URL of the webhook function.
Finally, let's look at the webhook function. It is pretty straightforward. It receives the bot instance from the configure_telegram helper function. It then checks the event. If it is a POST event and contains a body, then it extracts the chat ID and message from the body. If the text is '/start', indicating the start of conversation, it replies back with a standard greeting using the bot.sendMessage(chat_id=chat_id, text=text) command. Else, it replies back with the same text that it received.
def webhook(event, context):
"""
Runs the Telegram webhook.
"""
bot = configure_telegram()
logger.info('Event: {}'.format(event))
if event.get('httpMethod') == 'POST' and event.get('body'):
logger.info('Message received')
update = telegram.Update.de_json(json.loads(event.get('body')), bot)
chat_id = update.message.chat.id
text = update.message.text
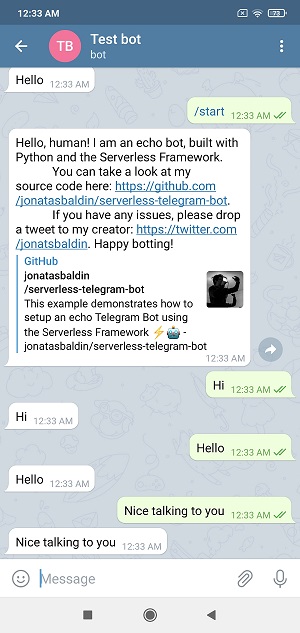
if text == '/start':
text = """Hello, human! I am an echo bot, built with Python and the Serverless Framework.
You can take a look at my source code here: https://github.com/jonatasbaldin/serverless-telegram-bot.
If you have any issues, please drop a tweet to my creator: https://twitter.com/jonatsbaldin. Happy botting!"""
bot.sendMessage(chat_id=chat_id, text=text)
logger.info('Message sent')
return OK_RESPONSE
return ERROR_RESPONSE
Once you've triggered the set_webhook function through a tool like POSTMAN, you can open your bot on Telegram and have a chat with it. It will echo back messages as expected.
Congratulations on your first Telegram bot!
