- Serverless - Home
- Serverless - Introduction
- Serverless - Installation
- Serverless - Deploying Function
- Serverless - Regions, Memory-Size, Timeouts
- Serverless - Service
- Serverless - Scheduled Lambdas
- Serverless - API Gateway Triggered Lambdas
- Serverless - Include/Exclude
- Serverless - Plugins
- Serverless - Packaging Dependencies
- Serverless - Layer Creation
- Serverless - REST API with DynamoDB
- Serverless - Telegram Echo Bot
- Serverless Useful Resources
- Serverless - Quick Guide
- Serverless - Useful Resources
- Serverless - Discussion
Serverless - Quick Guide
Serverless - Introduction
What is Serverless?
Well, the name gives you quite some hints. Computation without the headache of maintaining a server − that's the crux of serverless computing (or serverless in short). The concept is quite revolutionary and disruptive. It has been widely adopted. Several fresh applications begin by designing a serverless backend, and the legacy applications with dedicated servers are also slowly migrating to the serverless architecture. So what has led to the widespread adoption of serverless? As with everything, the economics have made serverless quite favorable.
You see, with serverless, you only pay for what you use. Imagine you need to perform some routine maintenance on your database every day. This process may take about 10 minutes every day.
Now, in the absence of serverless computing, your maintenance cron may be residing in a server. Unless you have something else to do with your server in the remaining time, you may end up paying for 24 hours, for a task that takes 10 minutes. Quite a waste of money, right? What if you were told that there is a new service that will charge you exactly for those 10 minutes that your maintenance cron takes to execute? Won't you want to simply switch to that new service? That's exactly why serverless adoption has been so swift and widespread. It has brought down the backend bills for several organizations, and also reduced their server maintenance headache.
The cloud service provider (AWS, Azure, etc.) takes the headache of making sure that the serverless application is available exactly when required, and in the quantity required. Thus, during high loads, you may invoke multiple serverless applications, while you may invoke a single application during normal load. And of course,you will pay for the extra invocations only for the duration of the high load.
What is Serverless, again?
The concept explained above seems great, but how do you implement it? You need a framework for that. It is called, uh, serverless.
The serverless framework helps us develop and deploy functions/ applications designed to run in a serverless fashion. The framework goes a step ahead and takes care of the deployment of the entire stack required for our serverless functions to run. What is a stack? Well, the stack comprises of all the resources that you will require for deploying, storing, and monitoring your serverless applications.
It includes the actual function/ application, storage containers, monitoring solutions, and a lot more.For example, in the context of AWS, your stack will consist of your actual Lambda function, S3 bucket for your function files, Cloudwatch resources linked to your function, and so on.The serverless framework creates this entire stack for us. This allows us to focus completely on our function. Serverless takes away the headache of maintaining a server and serverless (framework) takes away the headache of creating and deploying the stack necessary to run our function.
The serverless framework also takes care of assigning the necessary permissions to our functions/ applications.Some applications (examples of which we will see in this tutorial) even require databases to be linked to them. Serverless framework again takes care of creating and linking the DBs. How does serverless know what to include in the stack and which permissions to provide? All of it is mentioned in the serverless.yml file, which will be our main focus in this tutorial. More on it in the upcoming chapters.
Serverless in AWS
There are many services of AWS that fall under the umbrella of 'serverless computing'. You can find the entire organized list here. There are Compute services, Integration services, even Data Storage services (yes, AWS even has Serverless DBs). We will be focusing on the AWS Lambda functions throughout the tutorial. So what is AWS Lambda? The AWS Lambda website defines it as follows −
AWS Lambda is a serverless compute service that lets you run code without provisioning or managing servers, creating workload-aware cluster scaling logic, maintaining event integrations, or managing runtimes.
In layperson terms, AWS Lambda is your window to serverless computing on AWS. It is AWS Lambda that has made the serverless concept so popular. All you need to do is define your function and the trigger to your function, and the function will be invoked exactly when you want it to be invoked, and you will be charged only for the time the function takes to execute. What's more,you can link AWS Lambda with almost every other service that AWS provides − EC2, S3, dynamoDB, and so on.
Therefore, if you have already been a part of the AWS ecosystem, then Lambda integration is quite seamless. If you are new to the AWS ecosystem like I was when I first learned about AWS Lambda, it will act as a good gateway to the AWS universe.
In this tutorial, we will be learning all about the deployment of AWS Lambda functions using the serverless framework. Are you excited? Then move on to the next chapter to get started.
Serverless - Installing
Serverless installation has already been covered in another tutorialspoint tutorial. Reproducing it here, with some modifications and additions.
Step 1 − Install nodejs
To begin with, you need to first install nodejs. You can check whether nodejs is installed in your machine or not by opening the Command Prompt and typing node -v. If it is installed, you will get the version number of node. Otherwise, you can download and install node from here.

Step 2 − Install serverless using the npm command
You can install serverless using the following command (npm stands for node package manager) −
npm install -g serverless
You can check whether it got successfully installed by running serverless create --help. If serverless is successfully installed, you should see the help screen for the create plugin.
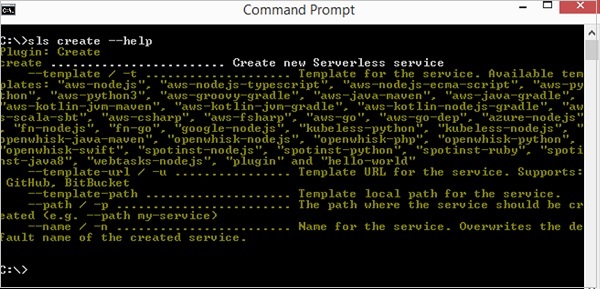
Please note that you can use the shorthand sls instead of serverless in all your commands.
Step 3 − Configure Credentials
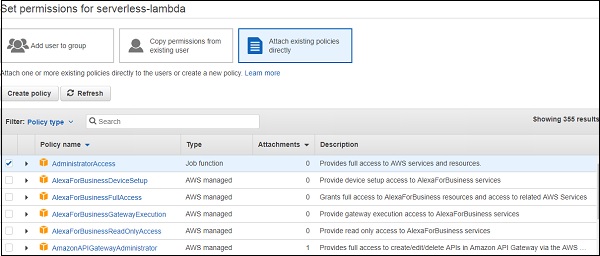
You need to obtain credentials from AWS for configuring serverless. For that, either create a user (through IAM -> Users -> Add user) in the AWS Console or click on an existing User in IAM -> Users. If you are creating a new user, you will need to attach some required policies (like Lambda Access, S3 Access, etc.) or provide Administrator access to the user.
After you create the user, you will be able to see the access key and secret key. Please keep this very secure and confidential.

If you are an existing user, you can generate a new Access Key and Secret by following the steps mentioned here.
Once you have the access and secret keys handy, you can configure credentials in serverless using the following command −
serverless config credentials --provider aws --key 1234 --secret 5678 --profile custom-profile
The profile field is optional. If you leave it blank, the default profile is 'aws'.Remember what profile name you set because you will have to mention it in the serverless.yml file that we will see in the next tutorial.
If you've completed the above steps, the serverless configuration is complete. Move on to the next chapter to create your first serverless project.
Serverless - Deploying Function
Creating a New Project
Navigate to a new folder wherein you want to create your first project to be deployed to serverless. Within that folder, run the following command −
sls create --template aws-python3
This command will create the boilerplate code for deploying lambda functions using serverless and python runtime.
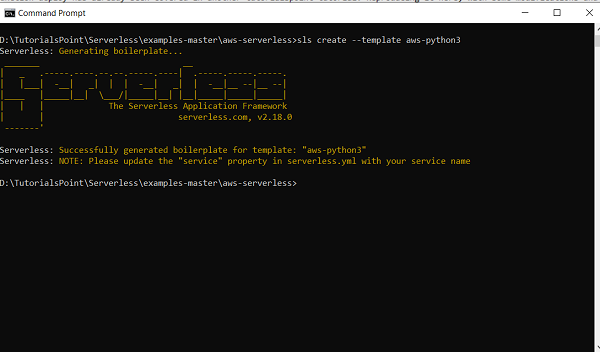
Note that you can use other runtimes as well. Run sls create --help to get a list of all templates.
Once the boilerplate code is created, you will see two files in your folder: handler.py and serverless.yml. handler.py is the file containing the lambda function code. serverless.yml is the file that tells AWS how to create your lambda functions. It is the configuration file or the settings file that is going to be the focus of several chapters of this tutorial. Let us go through the handler.py file first.
import json
def hello(event, context):
   body = {
      "message": "Go Serverless v1.0! Your function executed successfully!", "input": event
   }
   response = {
      "statusCode": 200, "body": json.dumps(body)
   }
   return response
   # Use this code if you don't use the http event with the LAMBDA-PROXY
   # integration
   """
   return {
      "message": "Go Serverless v1.0! Your function executed successfully!", "event": event
   }
   """
It contains one function hello. This function takes in two arguments: event and context. Both of these are required arguments for any AWS Lambda function. Whenever the lambda function is invoked, the lambda runtime passes two arguments to the function − event and context.
The event argument contains the data for the lambda function to process. For instance, if you trigger your lambda function through a REST API, whatever data you send in the path parameters or the body of the API, are sent to the lambda function in the event parameter. More on that in later chapters. The important thing to note is that the event is usually of the python dict type, although can also be of str, float, int, list, or NoneType type.
The context object is another argument passed on to your lambda function at runtime. It is not used very often. The official AWS Documentation states that this object provides methods and properties that provide information about the invocation, function, and runtime environment. You can read more about the event and context objects here.
The function is pretty straightforward. It simply returns a message with status code 200. There is a comment at the bottom that should be used if we don't use the HTTP event with the LAMBDA-PROXY setting.More on that in the API-triggered lambda chapter.
Now, let us look at the serverless.yml file. It is a heavily commented file. The comments are extremely useful for someone starting off with serverless. You are encouraged to go through the comments thoroughly. We will be looking at a lot of concepts related to serverless.yml in the upcoming chapters. Let us just skim through the basic concepts here.
If you look at the serverless.yml file after removing the comments, this is how it will look like −
service: aws-serverless
frameworkVersion: '2'

provider:
   name: aws
   runtime: python3.8
   lambdaHashingVersion: 20201221
functions:
   hello:
      handler: handler.hello
The service field determines the name of the CloudFormation stack within which your lambda function and all the required resources will be created. Think of the service as your project. Everything required for the AWS Lambda function to execute will be created within that service. You can set a service name of your choice.
The framework version refers to the version of the serverless framework. It is an optional field, ususally kept to ensure that the same version number is used by people with whom you share your code. If ther frameworkVersion mentioned in serverless.yml is different than the version of serverless installed in your machine, you will receive an error during deployment. You can also specify a range for frameworkVersion like frameworkVersion − >=2.1.0 && <3.0.0. You can read more about frameworkVersions here.
The next section, provider, can be considered as a set of global settings. We will be discussing additional parameters covered under provider in later chapters. Here, we will focus on the parameters available. The name field determines the name of your platform environment, which is aws in this case. The runtime is python3.8 because we used the python3 template. The lambdaHashingVersion refers to the name of the hashing algorithm that should be used by the framework.
Please note that if you've added a custom profile in the config credentials step in the previous chapter, you will need to add the profile parameter in provide. For instance, I set my profile name to yash-sanghvi. Therefore, my provider looks like −
provider:
   name: aws
   runtime: python3.8
   lambdaHashingVersion: 20201221
   profile: yash-sanghvi
Finally, the functions block defines all the lambda functions. We have just one function here, in the handler file. The name of the function is hello. The path of the function is mentioned in the handler field.
Deploying the function
To deploy the function you need to open the Command Prompt, navigate to the folder containing your serverless.yml, and enter the following command −
sls deploy -v
The -v is an optional argument that indicates verbose output. It helps you understand the background processes better. Once your function is deployed, you should be able to see it on the AWS Console in the us-east-1 region (which is the default). You can invoke it from the console, using the 'Test' feature (you can keep the same default event since our lambda function is anyway not using the event input). You can also test it using the Command Prompt using −
sls invoke --function hello
Please note that you cannot always test your function locally if it interfaces with other AWS Services like S3 or dynamoDB.Only the very basic functions can be tested locally.
Deploying function from an existing project
If you want to deploy an existing project to AWS, modify the existing function to take in only the event and context as arguments. Next, add a serverless.yml file in the folder, and define your function within serverless.yml. Then open the command prompt, navigate to the folder, and hit sls deploy -v. That way, your existing function can also be deployed to AWS Lambda.
Serverless - Regions, Memory-size, Timeouts
We saw how to deploy our first function using serverless in the previous chapter. In this chapter, we will look at some configurations that we can perform on the function. We will primarily look at the region, the memory-size, and the timeout.
Region
By default, all lambda functions deployed using serverless are created in the us-east-1 region. If you want your lambda functions to get created in a different region, you can specify that in the provider.
provider:
   name: aws
   runtime: python3.6
   region: us-east-2
   profile: yash-sanghvi
It is not possible to specify different regions for different functions within the same serverless.yml file. You should include only the functions belonging to a single region in a particular serverless.yml file. Function belonging to a separate region can be deployed using a separate serverless.yml file.
MemorySize
AWS Lambda allocates CPU in proportion to the memory chosen. With the recently announced changes, you can choose up to 10GB of RAM for your lambda function (it was ~3 GB earlier).
The higher the RAM chosen, the higher is the CPU allocated, the faster your function executes, the lower is the execution time. AWS Lambda charges you for the GB-s consumed. Therefore, if a function on 1 GB RAM takes 10 seconds to execute and it takes 5 seconds to execute on a 2 GB RAM, you will be charged the same amount for both the invocations. Whether the time halves on doubling the memory depends a lot on the nature of your function, and you may or may not benefit by increasing the memory. The key takeaway is that the amount of memory allotted is an important setting for each lambda function and one you would like to have control of.
With serverless, it is quite easy to set the default value of the memory-size for the functions defined within your serverless.yml file. It is also possible to define different memory-sizes for different functions. Let us see how.
Setting default memory-size for all the functions
The default values are always mentioned in the provider. This value will be inherited by all the functions within that serverless.yml. The memorySize key is used for setting this value.The value is expressed in MB.
provider:
   name: aws
   runtime: python3.6
   region: us-east-2
   profile: yash-sanghvi
   memorySize: 512 #will be inherited by all functions
In case you don't specify the memorySize in the provider, nor in individual functions, the default value of 1024 will be considered.
Setting custom memory-size for some functions
In case you want some functions to have a value different than the default memory, then you can specify it in the functions section of serverless.yml.
functions:
   custom_memory_func: #will override the default memorySize
      handler: handler.custom_memory
      memorySize: 2048
  default_memory_func: #will inherit the default memorySize from provider
      handler: handler.default_memory
Timeout
Just like memorySize, the default value of the timeout (in seconds) can be set in the provider, and custom timeouts for individual functions can be specified in the functions section.
If you don't specify either the global or custom timeouts, the default value is 6 seconds.
provider:
   name: aws
   runtime: python3.6
   region: us-east-2
   profile: yash-sanghvi
   memorySize: 512 #will be inherited by all functions
   timeout: 50 #will be inherited by all functions

functions:
   custom_timeout: #will override the default timeout
      handler: handler.custom_memory
      timeout: 30
  default_timeout_func: #will inherit the default timeout from provider
      handler: handler.default_memory
Make sure to keep the timeout at a conservative value. It should not be so small that your function times out very frequently, nor should it be so large that a bug in your function leaves you with an outrageous bill to pay.
Serverless - Service
You wouldn't want to create a separate serverless.yml file for each function that you deploy. That would be very tedious. Luckily, serverless has provisions to deploy multiple functions within the same serverless.yml file. All these functions belong to a single group called 'service'. The service name is often the first thing defined in a serverless.yml file.
service: my-first-service

provider:
   name: aws
   runtime: python3.6
   stage: prod
   region: us-east-2
   profile: yash-sanghvi

   functions:
      func1:
      handler: handler1.func1

   func2:
      handler: handler2.func2
All the functions within a service, when deployed, take the following name format on the AWS Lambda console − service_name-stage_name-function_name. Thus, the two functions in the example above,when deployed, will take the names − my-first-service-prod-func1 and my-first-service-prod-func2. The stage parameter helps you differentiate within the different stages of code development.
Thus, if your function is in the development stage, you may use the stage dev; if it is in the testing stage, you may use the stage test; if it is in production, you may use the stage prod. This way, you can ensure that changes made to the dev stage don't affect the production codes. The stage names are not set in stone. dev, test, prod are just examples.
You can have any stage name of your choice. Please note that if you have API Gateway triggered lambdas (more on that in a later chapter), then your endpoints will be different for each stage.
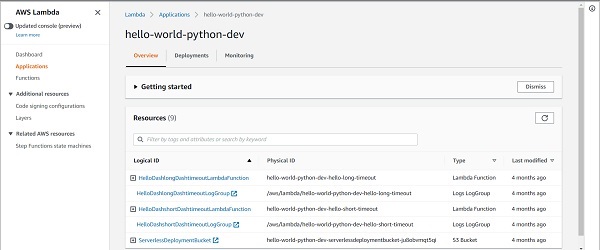
Additionally, if you go to the lesser-used 'Applications' section of the AWS Lambda Console, you will be able to see the entire service with the stage.
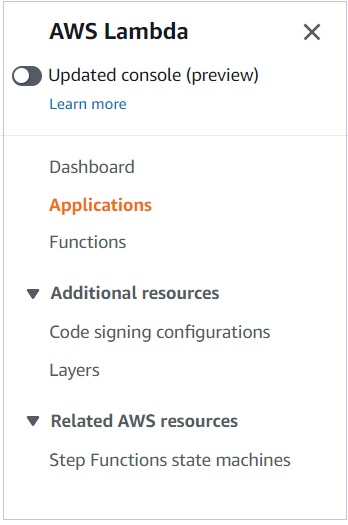
If you click on the service and stage combination of your choice, you will be able to see all the resources used by the service in one place − Lambda functions,API Gateways, Events Rules, Log groups, S3 buckets, everything.
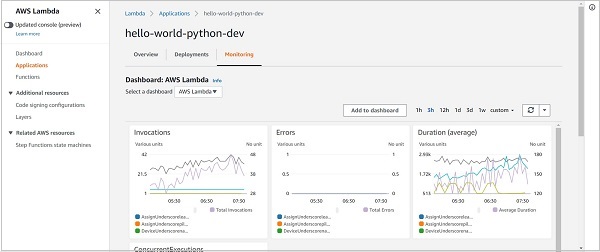
What's even more interesting is that you can go to the Monitoring tab and see the performance of your service as a whole -> Number of invocations, average duration, error count, etc. You can get an idea of which function is contributing the most to your bill. When you have several functions within your service, monitoring the performance of each individual function becomes quite difficult. The service-level Monitoring Tab helps a lot here.
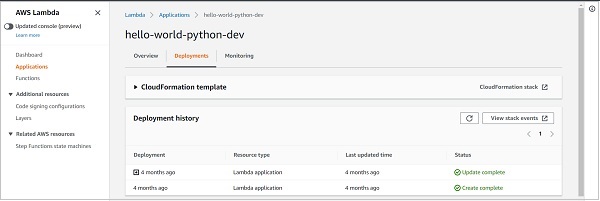
Finally, the Deployments tab helps you see all the past deployments of the service and the status of the deployments.
Serverless - Scheduled Lambdas
Often, you require your function to be invoked at fixed intervals. It can be once a day, twice a week, once a minute during weekdays, and so on.Serverless provides two types of events to invoke functions at fixed frequencies. They are cron events and rate events.
Cron Event
The cron event has much more flexibility than the rate event. The only downside is that it is not as straightforward to understand as the rate event. The syntax of the cron expression is defined in the AWS documentation −
cron(minutes hours day-of-month month day-of-week year)
As can be seen, the cron expression consists of 6 fields. Each field can take in some accepted values, and some, as AWS calls them, wildcards.
Let's have a look at the accepted values first −
minutes − 0-59
hours − 0-23
day-of-month − 1-31
month − 1-12 or JAN-DEC
day-of-week − 1-7 or SUN-SAT
year − 1970-2199
Now that the accepted values are clear, let us have a look at the wildcards. There are a total of 8 wildcards possible in the cron expression (some allowed for all 6 fields and some only for specific fields). Listing them down here −
* (asterisk, allowed for all 6 fields) − This is the most popular wildcard. It simply says that all values of the field are included. A * in the hours field would mean that the cron would run every hour. A * in the day-of-month field would mean that the cron will run every day.
, (comma, allowed for all 6 fields) − This is used to specify more than one value. For example. If you want your cron to run at the 5th, 7th, and 9th minute of every hour, your minute field would look like 5,7,9.Similarly, MON,TUE,WED,THU,FRI in the day-of-week field could mean that the cron should run only on weekdays.
- (dash, allowed for all 6 fields) − This wildcard specifies ranges. In the previous wildcard example, in order to specify weekdays, instead of specifying 5 comma-separated-values, we could have simply written MON-FRI
? (question mark, only allowed for day-of-month and day-of-week) − This is like a don't-care wildcard. If you have specified MON in the day-of-week field, you don't care what date Monday falls on. Therefore, you will enter ? in place of day-of-month. Similarly, if you want the cron to run on the 5th of every month, you will enter 5 in the day-of-month field and ? in the day-of-week field, because you don't care what the day is on the 5th of every month. Note that the AWS documentation clearly states that you cannot use * for both day-of-week and day-of-month fields. If you use * for one, you have to use ? for the other
/ (forward slash, allowed for the 5 fields except for day-of-month) − This field specifies increments. If you enter 0/2 in the hours field, this cron will run every even hour (0, 0+2, 0+2+2, and so on). If you specify 1/2 in the hours field, this cron will run every odd hour (1, 1+2, 1+2+2, and so on). As you would have guessed, the value preceding the / is the starting value and the value succeeding it defines the increment.
L (only allowed for day-of-month and day-of-week) − Specifies the last day of the month or the last day of the week
W (only allowed for day-of-month) − This specifies a weekday (Monday to Friday) nearest to that specific day of the month. So if you specify 8W in the day-of-month field, and it corresponds to a weekday, say Tuesday, then the cron will fire on 8th itself. But if 8 corresponds to a weekend day, say Saturday, then the cron will be triggered on 7th (Friday). If 8th corresponds to Sunday, then the cron will fire on 9th (Monday). This is one of the least used wildcards.
# (only allowed for day-of-week) − This is a very special wildcard, best understood by an example. Say you want a cron to run on Mother's day. Now, Mother's day falls on 2nd Sunday of May every year.Therefore, your month field would contain MAY or 5. But how do you specify 2nd Sunday? Come in the hashtag. The expression is 0#2. The value preceding the wildcard is the day of the week (0 for Sunday,1 for Monday, and so on). The value succeeding the wildcard specifies the occurrence. Therefore, 2 here refers to the 2nd occurrence of Sunday or the second Sunday.
Now, to define a cron trigger for your lambda function, all you need to do is specify the cron expression within the events key in the function in serverless.yml.
functions:
   cron_triggered_lambda:
      handler: handler.hello
      events:
         - schedule: cron(10 03 * * ? *) #run at 03:10 (UTC) every day.
Some Examples
Given below are some examples of cron expressions −
cron(30 15 ? * MON-FRI *) − Triggered at 15:30 (UTC) on every weekday
cron(0 9 ? 6 0#3 *) − Triggered at 09:00 (UTC) on the third Sunday of June (Father's Day)
cron(0/15 * ? * MON *) − Triggered every 15 minutes on Mondays
cron(0/30 9-18 ? * MON-FRI *) − Triggered every 30 minutes from 9 AM to 5:30 PM on weekdays (corresponding to office hours at several places)
Rate Event
This is much more straightforward compared to cron expressions. The syntax is simply rate(value unit). For example, rate(5 minutes).
The value can be any positive integer and the allowed units are minute(s), hour(s), day(s).
Defining a rate trigger for your lambda function is similar to defining a cron trigger.
functions:
   rate_triggered_lambda:
      handler: handler.hello
      events:
         - schedule: rate(10 minutes) #run every 10 minutes
Some Examples
rate(2 hours) − Triggered every 2 hours
rate(1 day) − Triggered every day (at 00:00 UTC)
rate(90 minutes) − Triggered every 90 minutes
As you would have realized, the simplicity of the rate expression comes at the price of reduced flexibility. You can use rate for lambdas running every N minutes/hours/days. To do anything more complex, like triggering your lambda only on the weekdays, you have to use a cron expression.
Please note that if your cron expression somehow results in trigger times of less than a minute, it won't be supported.
References
Serverless - API Gateway Triggered Lambdas
API Gateways are another popular method of triggering lambdas, just like cron/rate events. Basically, you get a URL endpoint for your lambda function. This URL belongs to the API Gateway connected to your lambda. Whenever you invoke the URL,either in the browser or through an application, your lambda function gets invoked. In this chapter, we will see how to connect an API Gateway to your lambda function using the serverless framework, and how to test it.
HTTP Events
To link an API Gateway to a lambda function, we need to create HTTP events in the function definition in serverless.yml. The following example shows how to link your lambda function(s) to a REST API and trigger it using the GET request.
functions:
   user_details_api:
      handler: handler.send_user_details
      events:
         - http:
            path: details/{user_id}
            method: get
            integration: lambda-proxy
            cors: true

   location_api:
      handler: handler.send_location
      events:
         - http:
            path: location/{user_id}
            method: get
            integration: lambda-proxy
            cors: true
Let's unpack the keys one by one. We will only discuss the first function from the above list (user_details_api). The concepts covered below hold for the other function as well.
The value of the path specifies the address after the endpoint for invoking the URL. Both the functions defined in the above example will share the same endpoint, but one will be invoked using endpoint/details/{user_id}, while the other will be invoked by endpoint/location/{user_id} The elements within curly brackets are path parameters. I can send any value in place of user_id and the lambda function can be programmed to return details for that particular user (see the example function below).
The value of the method indicates the request method. The popular methods are get and post. There are several other methods as well. Diving into the details of these methods is outside the scope of this chapter. There is another post on tutorialspoint which you can refer to for the details.
The integration field specifies how the lambda function will be integrated with the API Gateway. The default is lambda-proxy, while the other options which are possible are lambda, http, http-proxy, mock. The most widely used options out of these two are lambda and lambda-proxy. In layperson terms, lambda-proxy gives the entire control to your lambda function, while lambda gives some control to the API Gateway and some to the lambda function.
If you choose lambda-proxy as the integration type, then the entire HTTP request will be passed in the raw form to your lambda function, and the response sent by the lambda function is passed without alteration to the client which made the request. Therefore,you have to define the statusCode and headers in the response of your lambda function.
If you choose lambda as the integration type, your API Gateway can make changes to the received request,before passing it on to the lambda function. Similarly, it can also modify the response sent by the lambda function before forwarding it to the client. The API Gateway adds the status code and the headers to the response, and therefore, the lambda function just has to worry about sending the body. Both options have their advantages and disadvantages.
You can use lambda-proxy if you prefer simplicity. You can choose lambda if you are okay with some complexity (since you will have to worry about the lambda function's code as well as the API Gateway's configuration), but require more control.
You can read more about the difference between these two types here.Out of the other integration types, http and http-proxy are used when integrating the API Gateway with an HTTP backend instead of the lambda function, so irrelevant for us. mockis used when you just want to test the API without invoking the backend.
The cors − true configuration enables CORS (Cross-Origin Resource Sharing). In layperson terms, this means that you allow requests from servers from another domain. Without cors − true, only requests from the same domain will be allowed. Of course, instead of allowing all domains, you can allow only some specific domains. To understand how to do that, see the documentation.
There are a lot more configurations possible within serverless, for API-Gateway triggered lambdas. You are strongly recommended to go through the documentation, or at least bookmark the link so that you can look it up whenever required.
Sample Lambda Function
At this point, you may be wondering that you created the API Gateway triggered function, but how do you access the path parameters in the lambda function? The following sample lambda function in python will answer that. We basically use the 'pathParameters' property, when the integration type is lambda-proxy.
import json

def lambda_handler(event, context):
   # TODO implement
   # print(event)
   #helps you see the entire input request. The printed output can be found in CloudWatch logs
      user = event['pathParameters']['user_id']
      return {
         'statusCode': 200,
         'body': json.dumps('Hello ' + str(user))
      }
Accessing the Endpoint
Now, another question that you may be having is how do you access the endpoint. There are multiple ways of doing that. The first way is through serverless deployment. Whenever you deploy a function, or multiple functions through a service, the endpoint is shown at the end of serverless deploy.
The second method is through the Lambda console. If you navigate to your function on the lambda console, you can see the API Gateway attached to it. Clicking on it should reveal the endpoint.
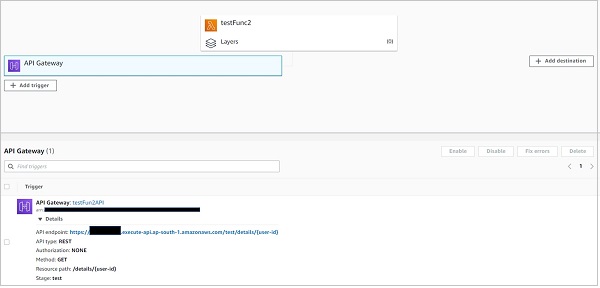
Please note that, as discussed above, all the functions within a service share the same endpoint.The path property differentiates the actual trigger URL of one function from another.
References
Serverless - Include/Exclude
We've already seen in the 'Deploying a function' chapter that to deploy functions from an existing project to AWS lambda, you need to modify the functions to take event and context as arguments and you need to add a serverless.yml file in the project folder, with the functions defined.Then hitting serverless deploy does the job.
Quite frequently, especially if you are asked to migrate some functions from an extensive existing project to AWS Lambda, you are faced with a size challenge.If your project is large enough, you may very well exceed the size limits imposed by AWS on Lambda functions (250 MB, including the application code and its dependencies).
And some dependencies like NumPy occupy a lot of space themselves. For instance, NumPy is ~80 MB large, SciPy is also in the same ballpark, and so on.In such scenarios, you have very limited space left for the application code and require a method of excluding unnecessary files from the lambda deployment package. Luckily, serverless makes this quite easy.
Include and exclude fields
As you would have guessed, you can specify files and folders that you want to exclude from the deployment build using the 'exclude' tag. All the files/ folders not specified in the exclude section are included by default. Then what is the use of the 'include' tag? Well, if you want a folder to be excluded in general, but want to include just a few files or sub-folders within that folder, you can specify those files/sub-folders within the 'include' tag. This way, all other files within that folder will be excluded, and only those specified within the 'include' section will remain. The example below will explain this better.
service: influx-archive-pipeline

provider:
   name: aws
   runtime: python3.6
   stage: prod
   region: us-east-2
   profile: yash-sanghvi
   timeout: 900
   memorySize: 1024

# you can add packaging information here
package:
   include:
      - src/models/config.py
      - src/models/lambda_apis/**
      - src/models/scheduled_lambdas/**

   exclude:
      - docs/**
      - models/**
      - notebooks/**
      - references/**
      - reports/**
      - src/data/**
      - src/visualization/**
      - src/models/**
      - utils/**

functions:
   user_details_api:
      handler: src/models/lambda_apis/user_details_api.sync_user_details
      events:
         - http:
            path: details/{user_id}
            method: get
            integration: lambda
            cors: true

   monitoring_lambda:
      handler: src/models/scheduled_lambdas/monitoring_lambda.periodic_monitoring
      events:
         - schedule: cron(15 16 * * ? *)
As you can from the above severless.yml file, we are excluding most of the folders within the root folder that contains the serverless.yml. We have even excluded the src/models folder. However,we want to include 2 sub-folders and 1 file within src/models. Therefore, those have been specifically added in the 'include' section. Please note that any file/ folder that is not a part of the exclude section will be included by default.
Note the path of the two lambda functions. They both lie in src/models. While src/models is excluded by default, these functions specifically lie in sub-folders that are mentioned in the include section. Therefore they will execute without any issues. If I added a function lying in, say, src/data, that would not be allowed, because all the contents of src/data have been excluded.
Please note that specifying /** indicates that all content (files/sub-folders) within that folder gets covered. Thus if the docs folder contains 10 sub-folders and 12 files, all of which need to be excluded, then -docs/** does the job. We don't need to mention each file/folder separately.
Serverless - Plugins
As serverless grew in popularity, it was but natural that the demand for a lot more features for niche user-cases would rise. These demands are met by plugins. As the name suggests, plugins are optional and you only need to install the ones that you need. In this chapter, we will see how to access the several plugins available for serverless, how to install these plugins,and how to reference them within serverless.yml.
Browsing the list of plugins
All the plugins available for serverless can be found at www.serverless.com/plugins/
You can search for a plugin here. For example, if you search for 'Python', you will see several plugins specifically developed for the python runtime. They are arranged in the order of popularity.
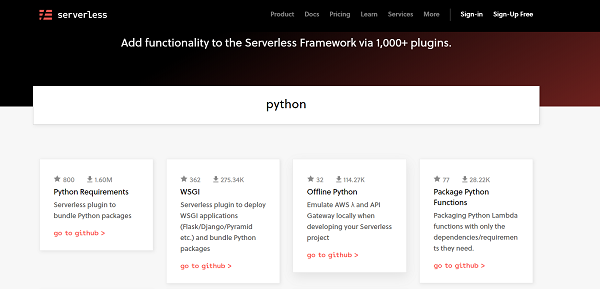
Let's look at the most popular python plugin (at the time of writing this post): Python Requirements. Click on that plugin. This opens up the detailed documentation related to this plugin.
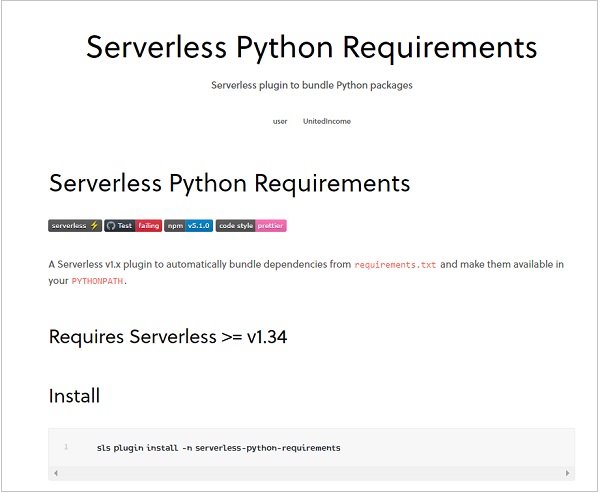
This documentation covers two of the most important aspects − installing the plugin and referencing it within serverless.yml. This is true for any plugin. You only need to open its documentation to know the installation and usage of that plugin. Coming back to the Python Requirements plugin, the documentation states that this plugin automatically bundles dependencies from requirements.txt and makes them available in your PYTHONPATH.
In other words, if your lambda function requires additional dependencies like pandas, numpy, matplotlib, etc., you need to just specify these dependencies in a requirements.txt file, that sits in the same folder as your serverless.yml file. Then this plugin will do the rest. You can even specify the version number of the libraries in requirements.txt.For instance, this is how a sample requirements.txt file looks like −
aws-psycopg2==1.2.1
boto
boto3==1.7.62
botocore==1.10.62
numpy==1.14.5
pandas==0.25.0
scipy==1.5.2
sqlalchemy==1.2.15
As you can see, you can either mention just the dependency name, or add the version number along with it (separated by the == sign). Of course, the dependencies, along with the application code, should not exceed 250 MB in size. Therefore, it is essential that you include only those dependencies that you actually need.
Now, let's come back to our plugin. We have the requirements.txt file ready. The next step would be to install the plugin. Open your Command Prompt and navigate to the project folder containing the serverless.yml file. Then, following the documentation, run the following command to install the plugin −
sls plugin install -n serverless-python-requirements
In fact, if you replace serverless-python-requirements with any other plugin name, the above command should still work for most plugins. However, it is recommended to follow the installation command given in the documentation whenever you install a new plugin. When you run the above command, you should see messages similar to those in the image below −

As you can see, a packages.json file got created in the project folder. If you had a packages.json file existing in your project folder, it would get edited to include the above plugin. Also,the serverless.yml file would automatically get edited to include the installed plugin. If you now open the serverless.yml file, you should see the following lines added −
plugins:
   - serverless-python-requirements
This means that the referencing of the plugin in serverless.yml is automatically done. There are several settings related to this plugin which can be found in the documentation. We will take up the setting related to 'Cross Compiling' in the next chapter. But for now, let us just see the effect of using this plugin. I've added numpy in my requirements.txt. This is how my handler.py file looks like −
import time
import numpy

def hello(event, context):
   print("second update!")
   time.sleep(4)
   print(numpy.random.randint(100))
   return("hello")
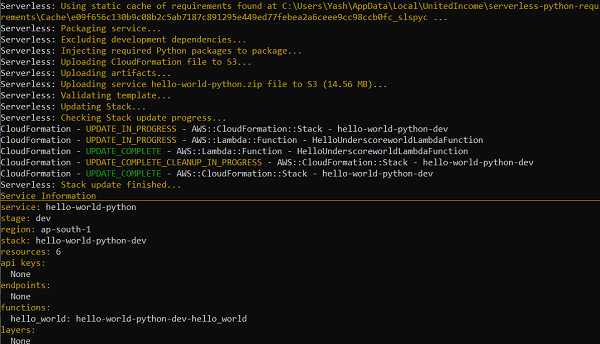
Let me now deploy this to lambda. You should see messages similar to those in the image below. Focus on the size of the package. It is now > 14 MB (this is the size of the zipped package) instead of ~10 kB before the plugin addition, because the numpy dependency is also getting bundled together.
This proves that the dependencies are now getting bundled along with the application code. You can test it locally using sls invoke local -f function_name.If you are a Windows or Mac user, chances are that testing out the deployed lambda function on the AWS Lambda Console will throw up an error, similar to the one given below −
Unable to import module 'handler':

IMPORTANT: PLEASE READ THIS FOR ADVICE ON HOW TO SOLVE THIS ISSUE!

Importing the numpy C-extensions failed. This error can happen for
many reasons, often due to issues with your setup or how NumPy was
installed.

We have compiled some common reasons and troubleshooting tips at:

   https://numpy.org/devdocs/user/troubleshooting-importerror.html

Please note and check the following:

  * The Python version is: Python3.8 from "/var/lang/bin/python3.8"
  * The NumPy version is: "1.19.4"

and make sure that they are the versions you expect.
Please carefully study the documentation linked above for further help.

Original error was: No module named 'numpy.core._multiarray_umath'
Head on to the next chapter to learn more about why this error is occurring and how to deal with it.
Serverless - Packaging Dependencies
In the previous chapter, we saw how to use plugins with serverless. We specifically looked at the Python Requirements plugin and saw how it can be used to bundle dependencies like numpy, scipy, pandas, etc.with your lambda function's application code. We even saw an example of deploying a function requiring the numpy dependency. We saw that it ran well locally but on the AWS Lambda console, you'd have encountered an error if you are on a Windows or Mac machine. Let's understand why the function runs locally but doesn't run after deployment.
If you look at the error message, you get some hints. I'm specifically referring to one line − 'Importing the numpy C-extensions failed.' Now, many important python packages like numpy, pandas, scipy, etc.require the compilation of C-extensions. If we compile them on a Windows or a Mac machine, then Lambda (linux environment) will throw up an error when trying to load them. So the important question is, what can be done to avoid this error. Come in docker!
What is docker?
According to Wikipedia, docker is a set of platform as a service (PaaS) products that use OS-level virtualization to deliver software in packages called containers. If you scan the Wikipedia page of docker a bit more, you will come across some more relevant statements − Docker can package an application and its dependencies in a virtual container that can run on any Linux, Windows, or macOS computer. This enables the application to run in a variety of locations, such as on-premises, in a public cloud, and/or in a private cloud. I think it should be very clear after the above statements. We have an error coming up because C-extensions compiled on Windows/Mac don't work in Linux.
We can simply bypass that error by packaging the application in a container that can run on any OS. What docker does in the background to achieve this OS-level virtualization is beyond the scope of this chapter.
Installing docker
You can head over to https://docs.docker.com/engine/install/ for the installation of Docker Desktop. If you are using Windows 10 Home Edition,the Windows version should be at least 1903 (May 2019 update). Therefore, you may want to upgrade your Windows 10 OS before installing Docker Desktop. No such limitations apply to Windows Pro or Enterprise versions.
Using dockerizePip in serverless
Once Docker Desktop has been installed on your machine, you need to make only the following addition to your serverless.yml file to package your applications and dependencies using docker −
custom:
   pythonRequirements:
      dockerizePip: true
Please note, that if you have been following along with me since the previous chapter, it is likely that you have already deployed code to lambda once.This would have created a static cache in your local storage. By default, serverless would use that cache to bundle dependencies, and therefore, docker container won't be created.Therefore, to force serverless to create use docker, we will add another statement to pythonRequirements −
custom:
   pythonRequirements:
      dockerizePip: true
	useStaticCache: false #not necessary if you will be deploying the code to lambda for the first time.
This last statement is not necessary if you are deploying to lambda for the first time. In general, you should set useStaticCache to true, since that will save you some packaging time when you haven't made any changes to the dependencies or the way they have to be packaged.
With these additions, the serverless.yml file now looks like −
service: hello-world-python
provider:
   name: aws
   runtime: python3.6
   profile: yash-sanghvi
   region: ap-south-1

functions:
   hello_world:
      handler: handler.hello
      timeout: 6
      memorySize: 128

plugins:
   - serverless-python-requirements

custom:
   pythonRequirements:
      dockerizePip: true
	useStaticCache: false #not necessary if you will be deploying the code to lambda for the first time.
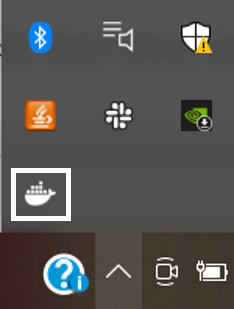
Now, when you run the sls deploy -v command, make sure that docker is running in the background. On Windows, you can just search for Docker Desktop in the Start menu and double click on the app. You will soon get a message that it is running. You can also verify this through the small popup near the battery icon in Windows. If you can see the docker icon there, it is running.
Now when you run your function on the AWS Lambda console, it would work. Congratulations!!
However, in your 'Function Code' section on the AWS Lambda console, you would be seeing a message saying 'The deployment package of your Lambda function "hello-world-python-dev-hello_world" is too large to enable inline code editing. However, you can still invoke your function.'
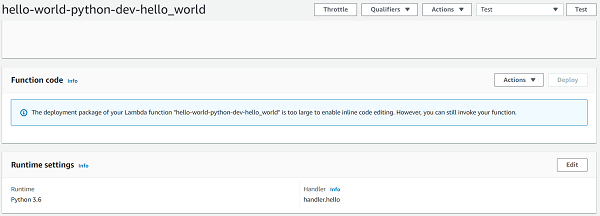
Seems like the addition of the Numpy dependency has made the bundle size too large and as a result, we cannot even edit our application code in the lambda console. How do we solve that problem? Head on to the next chapter to find out.
References
Serverless - Layer Creation
What are layers?
Layers are a way of isolating code blocks. Say you want to import the NumPy library in your application. You trust the library and there's hardly any chance that you will be making changes in the source code of that library. Therefore, you won't like it if the source code of NumPy clutters your application workspace. Speaking very crudely, you would simply want NumPy to sit somewhere else, isolated from your application code. Layers allow you to do exactly that. You can simply bundle all your dependencies (NumPy, Pandas, SciPy, etc.) in a separate layer, and then simply reference that layer in your lambda function within serverless. And boom! All the libraries bundled within that layer can now be imported into your application. At the same time, your application workspace remains completely uncluttered. You simply see the application code to edit.

Photo by Iva Rajovic on Unsplash, indicative of code separation in layers
The really cool thing about layers is that they can be shared across functions. Say you deployed a lambda function with a python-requirements layer that contains NumPy and Pandas. Now, if another lambda function requires NumPy, you need not deploy a separate layer for this function. You can simply use the layer of the previous function and it will work well with the new function as well.
This will save you a lot of precious time during deployment. After all, you will be deploying only the application code. The dependencies are already present in an existing layer. Therefore,several developers keep the dependencies layer in a separate stack. They then use this layer in all other applications. This way, they don't need to deploy the dependencies again and again. After all, the dependencies are quite heavy. NumPy library itself is approx. 80 MB large. Deploying dependencies every time you make changes to your application code (which may measure just a few KBs) will be quite inconvenient.
And adding a dependencies layer is just one example. There are several other use-cases. For example, the example given on serverless.com concerns the creation of GIFs using the FFmpeg tool. In that example, they have stored the FFmpeg tool in a layer. In all, AWS Lambda allows us to add a maximum of 5 layers per function. The only condition is that the total size of the 5 layers and the application should be less than 250 MB.
Creating python-requirements layer
Now let's see how the layer containing all the dependencies can be created and deployed using serverless. To do that, we need the serverless-python-requirements plugin.This plugin only works with Serverless 1.34 and above. So you may want to upgrade your Serverless version if you have a version <1.34. You can install the plugin using −
sls plugin install -n serverless-python-requirements
Next, you add this plugin in the plugins section of your serverless.yml, and mention it's configurations in the custom section −
plugins:
   - serverless-python-requirements
custom:
   pythonRequirements:
      dockerizePip: true
      layer: true
Over here, dockerizePip − true enables the usage of docker and allows you to package all the dependencies in a docker container. We've discussed about packaging using docker in the previous chapter. layer − true tells serverless that the python requirements should be stored in a separate layer. Now, at this point, you may be wondering that how does serverless understand which dependencies to package? The answer, as mentioned in the plugins chapter, lies in the requirements.txt file.
Once the layer plugin and custom configurations have been defined, you can add the layer to your individual functions within serverless as follows −
functions:
   hello:
      handler: handler.hello
      layers:
         - { Ref: PythonRequirementsLambdaLayer }
The keyword PythonRequirementsLambdaLayer comes from the CloudFormation Reference.In general, it is derived from the layer's name. The syntax is 'LayerNameLambdaLayer' (TitleCased, without spaces). In our case, since the layer name is python requirements, the reference becomes PythonRequirementsLambdaLayer. If you aren't sure about the name of your lambda layer, you can get it in the following steps −
Run sls package
Open .serverless/cloudformation-template-update-stack.json
Search for 'LambdaLayer'
Using an existing layer from another function in the same region
Like I mentioned in the beginning, a really cool thing about layers is the ability to use existing layers in your function. This can be done easily by using the ARN of your existing layer.The syntax to add an existing layer to a function using the ARN is quite straightforward −
functions:
   hello:
      handler: handler.hello
      layers:
         - arn:aws:lambda:region:XXXXXX:layer:LayerName:Y
That's it. Now the layer with the specified ARN will work with your function. If the layer contains the NumPy library, you can simply go ahead and call import numpy in your 'hello' function. It will run without any error.
If you are wondering from where you can get the ARN, it is quite simple actually. Simply navigate to the function containing the layer in the AWS Console, and click on 'Layers'.
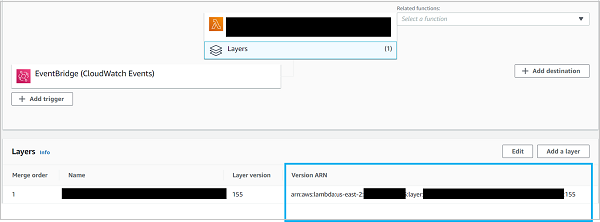
Of course, if the layer doesn't belong to your account, then it either needs to be publicly shared or shared specifically with your account. More on that later.
Also, keep in mind that the layer should be compatible with your application. Don't expect a layer compatible with node.js runtime to run with a function created in python3.6 runtime.
Non-requirements/ generic layers
As mentioned in the beginning, the layers serve the main function of isolating your code blocks. Therefore, they don't need to contain just dependencies. They can contain any piece of code that you specify. Calling layer: true within pythonRequirements within custom is a kind of a shortcut made possible by the serverless-python-requirements plugin. However, to create a generic layer, the syntax within serverless.yml, as explained in the serverless docs, is as follows −
layers:
   hello:
      path: layer-dir # required, path to layer contents on disk
      name: ${opt:stage, self:provider.stage, 'dev'}-layerName # optional, Deployed Lambda layer name
      description: Description of what the lambda layer does # optional, Description to publish to AWS
      compatibleRuntimes: # optional, a list of runtimes this layer is compatible with
         - python3.8
      licenseInfo: GPLv3 # optional, a string specifying license information
      # allowedAccounts: # optional, a list of AWS account IDs allowed to access this layer.
      #   - '*'
      # note: uncommenting this will give all AWS users access to this layer unconditionally.
      retain: false # optional, false by default. If true, layer versions are not deleted as new ones are created
The various configuration parameters are self-explanatory thanks to the comments provided. Except for the 'path', all other properties are optional. The path property is a path to a directory of your choice that you want to be isolated from your application code. It will be zipped up and published as your layer. For instance, in the example project on serverless, where they host the FFmpeg tool in a layer, they download the tool in a separate folder called 'layer' and specify that in the path property.
layers:
   ffmpeg:
      path: layer
As told before, we can add up to 5 layers within the layers − property.
To use these generic layers in your functions, again, you can use either the CloudFormation reference or specify the ARN.
Allowing other accounts to access layers
More accounts can be provided access to your layer by simply mentioning the account numbers in the 'allowedAccounts' property. For example −
layers:
   testLayer:
      path: testLayer
      allowedAccounts:
         - 999999999999 # a specific account ID
         - 000123456789 # a different specific account ID
If you want the layer to be publicly accessible, you can add '*' in allowedAccounts −
layers:
   testLayer:
      path: testLayer
      allowedAccounts:
      - '*'
References
Serverless - REST API with DynamoDB
So far, we have learned several concepts related to serverless lambda deployments. Now it is time to look at some examples. In this chapter, we will look at one of the examples officially provided by Serverless. We will be creating, as the name suggests, a REST API. All our lambda functions, as you would have guessed, will be triggered by an API Gateway. Our lambda functions will interface with a dynamoDB table, which is a to-do list essentially, and the user will be able to perform several operations, like creating a new item, fetching existing items, deleting items, etc. using the endpoints that will be exposed post the deployment.If you are not familiar with REST APIs, then you can read up more about them here.
Code Walkthrough
The code can be found on GitHub − https://github.com/serverless/examples/tree/master/aws-python-rest-api-with-dynamodb
We will have a look at the project structure, discuss some new concepts that we haven't seen so far, and then perform the walkthrough of the serverless.yml file. The walkthrough of all the function handlers will be redundant. Therefore, we will walk through just one function handler. You can take up understanding the other functions as an exercise.
Project Structure
Now, if you look at the project structure, the lambda function handlers are all within separate .py files in the todos folder. The serverless.yml file specifies the todos folder in the path of each function handler. There are no external dependencies, and therefore, no requirements.txt file.
New Concepts
Now, there are a couple of terms that you may be seeing for the first time. Let's scan these quickly −
dynamoDB − This is a NoSQL (Not only SQL) database provided by AWS. While not exactly accurate, broadly speaking, NoSQL is to SQL what Word is to Excel. You can read more about NoSQL here. There are 4 types of NoSQL databases − Document databases, key-value databases, wide-column stores, and graph databases. dynamoDB is a key-value database, meaning that you can keep inserting key-value pairs into the database. This is similar to redis cache. You can retrieve the value by referencing its key.
boto3 − This is the AWS SDK for Python. If you need to configure, manage, call, or create any service of AWS (EC2, dynamoDB, S3, etc.) within the lambda function, you need the boto3 SDK.You can read up more about boto3 here.
Apart from these, there are some concepts that we will encounter during the walkthrough of the serverless.yml and the handler function. We will discuss them there.
serverless.yml Walkthrough
The serverless.yml file begins with the definition of the service.
service: serverless-rest-api-with-dynamodb
That is followed by the declaration of the framework version range through the following line −
frameworkVersion: ">=1.1.0 <=2.1.1"
This acts like a check. If your serverless version doesn't lie in this range, it will throw up an error. This helps when you are sharing code and would want everyone using this serverless.yml file to use the same serverless version range to avoid problems.
Next, within the provider, we see two extra fields that we haven't encountered so far − environment and iamRoleStatements.
provider:
   name: aws
   runtime: python3.8
   environment:
      DYNAMODB_TABLE: ${self:service}-${opt:stage, self:provider.stage}
   iamRoleStatements:
      - Effect: Allow
         Action:
         - dynamodb:Query
         - dynamodb:Scan
         - dynamodb:GetItem
         - dynamodb:PutItem
         - dynamodb:UpdateItem
         - dynamodb:DeleteItem
         Resource: "arn:aws:dynamodb:${opt:region, self:provider.region}:
         *:table/${self:provider.environment.DYNAMODB_TABLE}"
Environment, as you would have guessed, is used to define environment variables. All the functions defined within this serverless.yml file can fetch these environment variables. We will see an example in the function handler walkthrough below. Over here, we are defining the dynamoDB table name as an environment variable.
The $ sign signifies a variable. The self keyword refers to the serverless.yml file itself, while opt refers to an option that we can provide during sls deploy. Thus, the table name will be the service name followed by a hyphen followed by the first stage parameter that the file finds: either one available from options during serverless deploy, or the provider stage, which is dev by default.Thus, in this case, if you don't provide any option during serverless deploy, the dynamoDB table name will be serverless-rest-api-with-dynamodb-dev. You can read more about serverless variables here.
iamRoleStatements define permissions provided to the functions. In this case, we are allowing the functions to perform the following operations on the dynamoDB table − Query, Scan, GetItem, PutItem, UpdateItem, and DeleteItem. The Resource name specifies the exact table on which these operations are allowed.If you had entered "*" in place of the resource name, you would have allowed these operations on all the tables. However, here, we want to allow these operations on just one table, and therefore, the arn (Amazon Resource Name) of this table is provided in the Resource name, using the standard arn format. Here again, the first one of either the option region (specified during serverless deploy) or the region mentioned in provider (us-east-1 by default)is used.
In the functions section, the functions are defined as per the standard format. Notice that get, update, delete all have the same path, with id as the path parameter. However, the method is different for each.
functions:
   create:
      handler: todos/create.create
      events:
         - http:
            path: todos
            method: post
            cors: true
   list:
      handler: todos/list.list
      events:
         - http:
            path: todos
            method: get
            cors: true
   get:
      handler: todos/get.get
      events:
         - http:
            path: todos/{id}
            method: get
            cors: true

   update:
      handler: todos/update.update
      events:
         - http:
            path: todos/{id}
            method: put
            cors: true
   delete:
      handler: todos/delete.delete
      events:
         - http:
            path: todos/{id}
            method: delete
            cors: true
Later on, we come across another block that we haven't seen before, the resources block. This block basically helps you specify the resources that you will need to create, in a CloudFormation template, for the functions to work. In this case, we need to create a dynamoDB table for the functions to work. So far, we have specified the name of the table, and even referenced its ARN. But we haven't created the table. Specifying the characteristics of the table in the resources block will create that table for us.
resources:
   Resources:
      TodosDynamoDbTable:
         Type: 'AWS::DynamoDB::Table'
         DeletionPolicy: Retain
         Properties:
         AttributeDefinitions:
            -
               AttributeName: id
               AttributeType: S
         KeySchema:
            -
               AttributeName: id
               KeyType: HASH
         ProvisionedThroughput:
            ReadCapacityUnits: 1
            WriteCapacityUnits: 1
            TableName: ${self:provider.environment.DYNAMODB_TABLE}
There are a lot of configurations being defined here, most of them specific to dynamoDB. Briefly, we are asking serverless to create a 'TodosDynamoDbTable', or type 'DynamoDB Table', with TableName (mentioned right at the bottom) equal to the one defined in environment variables in provider. We are setting its deletion policy to 'Retain', which means that if the stack is deleted, the resource is retained. See here. We are saying that the table will have an attribute named id, and its type will be String. We are also specifying that the id attribute will be a HASH key or a partition key. You can read up more about KeySchemas in dynamoDB tables here. Finally, we are specifying the read capacity and write capacity of the table.
That's it! Our serverless.yml file is now ready. Now, since all the function handlers are more or less similar, we will walk through just one handler, that of the create function.
Walkthrough of the create function handler
We being with a couple of import statements
import json
import logging
import os
import time
import uuid
Next, we import boto3, which, as described above, is the AWS SDK for python. We need boto3 to interface with dynamoDB from within the lambda function.
import boto3
dynamodb = boto3.resource('dynamodb')
Next, in the actual function handler, we first check the contents of the 'events' payload (create API uses the post method). If its body doesn't contain a 'text' key, we haven't received a valid item to be added to the todo list. Therefore, we raise an exception.
def create(event, context):
   data = json.loads(event['body'])
   if 'text' not in data:
      logging.error("Validation Failed")
      raise Exception("Couldn't create the todo item.")
Considering that we got the 'text' key as expected, we make preparations for adding it to the dynamoDB table. We fetch the current timestamp, and connect to the dynamoDB table. Notice how the environment variable defined in serverless.yml is fetched (using os.environ)
timestamp = str(time.time())
table = dynamodb.Table(os.environ['DYNAMODB_TABLE'])
Next, we create the item to be added to the table, by generating a random uuid using the uuid package, using the received data as text, setting createdAt and updatedAt to the current timestamp,and setting the field 'checked' to False. 'checked' is another field which you can update, apart from text, using the update operation.
item = {
   'id': str(uuid.uuid1()),
   'text': data['text'],
   'checked': False,
   'createdAt': timestamp,
   'updatedAt': timestamp,
}
Finally, we add the item to the dynamoDB table and return the created item to the user.
# write the todo to the database
table.put_item(Item=item)

# create a response
response = {
   "statusCode": 200,
   "body": json.dumps(item)
}
return response
With this walkthrough, I think the other function handlers will be self-explanatory. In some functions, you may see this statement − "body" − json.dumps(result['Item'], cls=decimalencoder.DecimalEncoder). This is a workaround used for a bug in json.dumps. json.dumps can't handle decimal numbers by default and therefore, the decimalencoder.py file has been created to contain the DecimalEncoder class which handles this.
Congratulations on understanding your first comprehensive project created using serverless. The creator of the project has also shared the endpoints of his deployment and the ways to test these functions in the README file. Have a look. Head on to the next chapter to see another example.
Serverless - Telegram Echo Bot
This is another interesting project available within the official serverless projects list. We basically create a new bot on Telegram, then use the set_webhook method to connect it to our lambda function, and within the lambda function, write the code that will make the bot echo back whatever message it receives.
Prerequisites
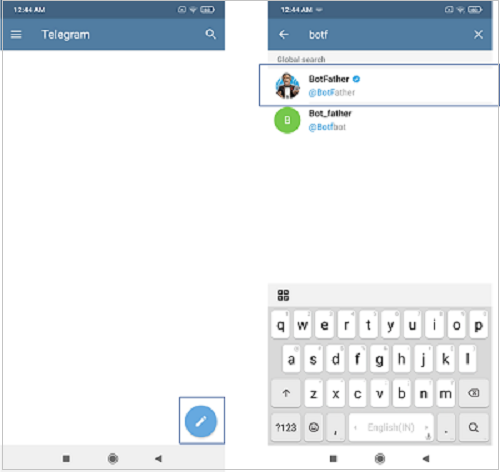
You will need the Telegram App installed on your mobile phone or desktop. The download options can be found here. Telegram is a messaging app,kind of similar to WhatsApp or Messenger. Once the app is installed, you will need to create a new bot within the app. For that, click on the 'New Message' icon (the round pencil icon atthe bottom right), and search for BotFather. Click on the verified account.
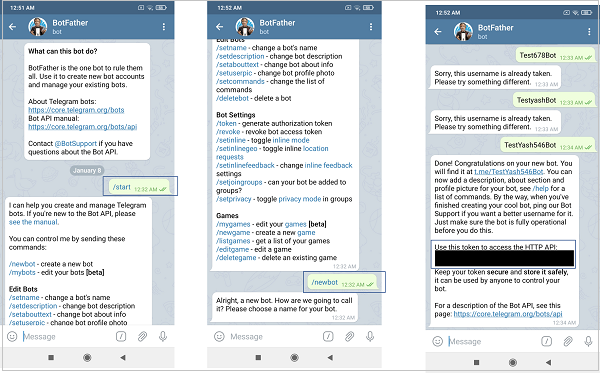
Once you begin your chat with BotFather, creating a new bot is quite self-explanatory. You send the \newbot command, enter a name and username for the bot, and you get an access token, which you need to note down.
Code Walkthrough
The code can be found on GitHub - https://github.com/serverless/examples/tree/master/aws-python-telegram-bot
We will have a look at the project structure and then perform the walkthrough of the serverless.yml file and the handler.py file.
Project Structure
We can see that this project has an external dependency (the python telegram bot library), listed in requirements.py −
python-telegram-bot==8.1.1
The package.json and the serverless.yml both show that the serverless-python-requirements plugin has been used for bundling the python requirements (the telegram bot library in this case).Therefore, the README.md file also suggests that you perform npm install to install the necessary plugins. I would personally recommend that you delete package.json, and install serverless-python-requirements using sls plugin install -n serverless-python-requirements. This will create the package.json file automatically. This willalso ensure that you install the latest version of serverless-python-requirements. By running npm install, you will be installing the version mentioned in the existing package.jsonwhich may be outdated.
If you read the README.md file, you will find that one file which is referenced, is not actually present in the project − serverless.env.yml. You have been asked to create this file and enter your TELEGRAM_TOKEN in this file. This has been done for security reasons. The TELEGRAM_TOKEN is supposed to be confidential, and you don't want to share it publicly. Therefore, the creator of this project has not added the serverless.env.yml file on GitHub. But you will need to create it on your local machine.
serverless.yml Walkthrough
The serverless.yml file begins with the definition of the service.
service: serverless-telegram-bot
Next, the provider is defined. Here again, an environment variable has been set. The value for this variable (TELEGRAM_TOKEN) is fetched from the serverless.env.yml file which you are supposed to create locally. Here again, we've used $ to signify variables.
provider:
   name: aws
   runtime: python3.6
   profile: ckl
   environment:
      TELEGRAM_TOKEN: ${file(./serverless.env.yml):TELEGRAM_TOKEN, ''}
The functions block is quite straightforward. Two functions are defined, both HTTP triggered. The http event parameters, however, are defined in a single line here.
- http:
   path: /set_webhook
   method: post
Instead of the single line execution used is - http − POST /set_webhook
Also, note that both the webhook and set_webhook functions lie within the same handler file.
functions:
   webhook:
      handler: handler.webhook
      events:
         - http: POST /
set_webhook:
   handler: handler.set_webhook
   events:
      - http: POST /set_webhook
Finally, the serverless-python-requirements plugin is defined.
plugins:
   - serverless-python-requirements
Walkthrough of handler.py
We being with a couple of import statements
import json
import telegram
import os
import logging
Next, a logger object is defined, which basically helps us enter log statements. Please note that this is not required for python runtime functions. Simple print statements also get logged.
The only difference is that the output from logger includes log level, timestamp, and request ID. You can read more about the logging library here.
# Logging is cool!
logger = logging.getLogger()
if logger.handlers:
   for handler in logger.handlers:
      logger.removeHandler(handler)
logging.basicConfig(level=logging.INFO)
Next, the JSONs for OK_RESPONSE and ERROR_RESPONSE are defined. These serve as return values of the functions.
OK_RESPONSE = {
   'statusCode': 200,
   'headers': {'Content-Type': 'application/json'},
   'body': json.dumps('ok')
}
ERROR_RESPONSE = {
   'statusCode': 400,
   'body': json.dumps('Oops, something went wrong!')
}
Next, a helper function, that is used by both the API functions is defined. This function returns a bot instance, using the Token provided as an environment variable in serverless.yml.
def configure_telegram():
   """
   Conimages the bot with a Telegram Token.
   Returns a bot instance.
   """
   TELEGRAM_TOKEN = os.environ.get('TELEGRAM_TOKEN')
   if not TELEGRAM_TOKEN:
      logger.error('The TELEGRAM_TOKEN must be set')
      raise NotImplementedError
   return telegram.Bot(TELEGRAM_TOKEN)
Next, the handler functions for the two APIs are defined. Let's look at the set_webhook function first. Over here, the bot instance is obtained from the configure_telegram function that we saw earlier. Next, the host field is extracted from the headers, and the stage field is extracted from the requestContext block of the incoming event. Using these, two fields, the URL of the webhook is constructed. Finally, it is applied to the bot using the bot.set_webhook(url) function. If the webhook is set correctly, the OK_RESPONSE is set, else the ERROR_RESPONSE is set. Please note that this set_webhook API has to be triggered manually once, using a tool like POSTMAN.
def set_webhook(event, context):
   """
   Sets the Telegram bot webhook.
   """
   logger.info('Event: {}'.format(event))
   bot = configure_telegram()
   url = 'https://{}/{}/'.format(
      event.get('headers').get('Host'),
      event.get('requestContext').get('stage'),
   )
   webhook = bot.set_webhook(url)

   if webhook:
      return OK_RESPONSE
   return ERROR_RESPONSE
Let us understand how the set_webhook function is able to get the correct URL for the webhook. Note that the set_webhook and the webhook functions only have a difference of '/set_webhook' in their path. They share the same host and stage. Therefore, we can derive the endpoint of the webhook function using the host and dev received in the set_webhook function's event. If your endpoint is 'https://abcdefghijk.execute-api.us-east-1.amazonaws.com/dev', then the host will be 'https://abcdefghijk.execute-api.us-east-1.amazonaws.com' and the stage will be 'dev'. The set_webhook function is triggered by 'https://abcdefghijk.execute-api.us-east-1.amazonaws.com/dev/set_webhook' and the webhook function is triggered by 'https://abcdefghijk.execute-api.us-east-1.amazonaws.com/dev'. Thus, the parameters in set_webhook's event can help us construct the endpoint URL of the webhook function.
Finally, let's look at the webhook function. It is pretty straightforward. It receives the bot instance from the configure_telegram helper function. It then checks the event. If it is a POST event and contains a body, then it extracts the chat ID and message from the body. If the text is '/start', indicating the start of conversation, it replies back with a standard greeting using the bot.sendMessage(chat_id=chat_id, text=text) command. Else, it replies back with the same text that it received.
def webhook(event, context):
"""
Runs the Telegram webhook.
"""
bot = configure_telegram()
logger.info('Event: {}'.format(event))
if event.get('httpMethod') == 'POST' and event.get('body'):
logger.info('Message received')
update = telegram.Update.de_json(json.loads(event.get('body')), bot)
chat_id = update.message.chat.id
text = update.message.text
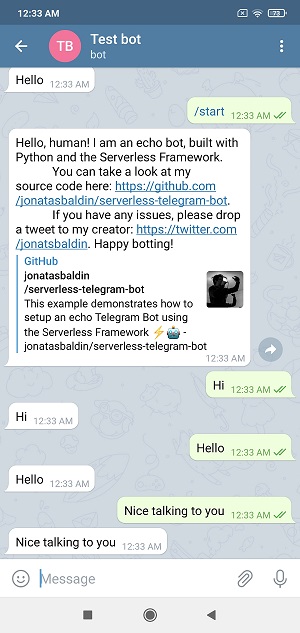
if text == '/start':
text = """Hello, human! I am an echo bot, built with Python and the Serverless Framework.
You can take a look at my source code here: https://github.com/jonatasbaldin/serverless-telegram-bot.
If you have any issues, please drop a tweet to my creator: https://twitter.com/jonatsbaldin. Happy botting!"""
bot.sendMessage(chat_id=chat_id, text=text)
logger.info('Message sent')
return OK_RESPONSE
return ERROR_RESPONSE
Once you've triggered the set_webhook function through a tool like POSTMAN, you can open your bot on Telegram and have a chat with it. It will echo back messages as expected.
Congratulations on your first Telegram bot!
