- Sass - Home
- Sass - Overview
- Sass - Installation
- Sass - Syntax
- Using Sass
- Sass - CSS Extensions
- Sass - Comments
- Sass - Script
- Sass - @-Rules and Directives
- Control Directives & Expressions
- Sass - Mixin Directives
- Sass - Function Directives
- Sass - Output Style
- Extending Sass
- Sass - Interview Questions
- Sass - Quick Guide
- Sass - Cheatsheet
- Sass - Useful Resources
- Sass - Discussion
Sass - Quick Guide
Sass - Overview
What is SASS?
SASS (Syntactically Awesome Stylesheet) is a CSS pre-processor, which helps to reduce repetition with CSS and saves time. It is more stable and powerful CSS extension language that describes the style of a document cleanly and structurally.
It was initially designed by Hampton Catlin and developed by Natalie Weizenbaum in 2006. Later, Weizenbaum and Chris Eppstein used its initial version to extend the Sass with SassScript.
Why to Use SASS?
It is a pre-processing language which provides indented syntax (its own syntax) for CSS.
It provides some features, which are used for creating stylesheets that allows writing code more efficiently and is easy to maintain.
It is a super set of CSS, which means it contains all the features of CSS and is an open source pre-processor, coded in Ruby.
It provides the document style in a good, structured format than flat CSS. It uses re-usable methods, logic statements and some of the built-in functions such as color manipulation, mathematics and parameter lists.
Features of SASS
It is more stable, powerful, and compatible with versions of CSS.
It is a super set of CSS and is based on JavaScript.
It is known as syntactic sugar for CSS, which means it makes easier way for user to read or express the things more clearly.
It uses its own syntax and compiles to readable CSS.
You can easily write CSS in less code within less time.
It is an open source pre-processor, which is interpreted into CSS.
Advantages of SASS
It allows writing clean CSS in a programming construct.
It helps in writing CSS quickly.
It is a superset of CSS, which helps designers and developers work more efficiently and quickly.
As Sass is compatible with all versions of CSS, we can use any available CSS libraries.
It is possible to use nested syntax and useful functions such as color manipulation, mathematics and other values.
Disadvantages of SASS
It takes time for a developer to learn new features present in this pre-processor.
If many people are working on the same site, then should use the same preprocessor. Some people use Sass and some people use CSS to edit the files directly. Therefore, it becomes difficult to work on the site.
There are chances of losing benefits of browser's built-in element inspector.
Sass - Installation
In this chapter, we will learn the step-by-step procedure to install Ruby, which is used for executing the SASS files.
System Requirements for SASS
Operating System − Cross-platform
Browser Support − IE (Internet Explorer 8+), Firefox, Google Chrome, Safari, Opera
Programming Language − Ruby
Installation of Ruby
Step 1 − Open the link https://www.ruby-lang.org/en/downloads/, you will see a screen as shown below −
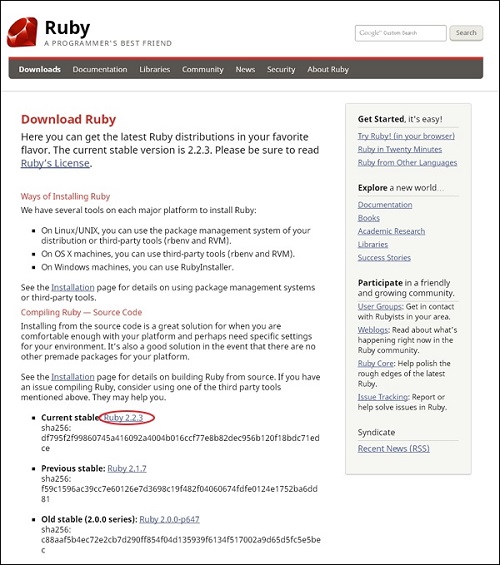
Download the Current stable version of the zip file.
Step 2 − Next, run the setup to install Ruby on the System.
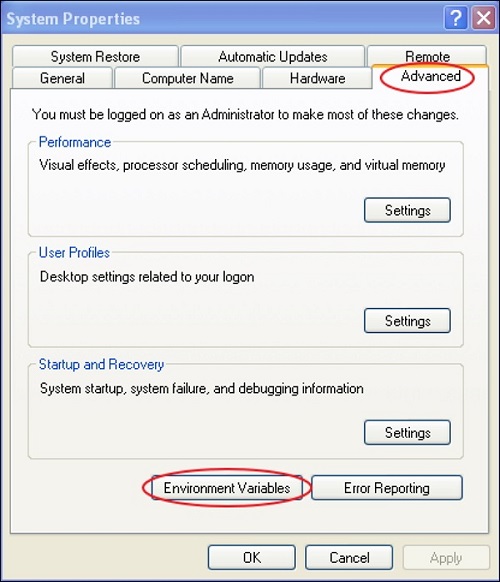
Step 3 − Next, add Ruby bin folder to your PATH User Variable and System Variable to work with gem command.
Path User Variable −
Right Click the My Computer icon.
Select Properties.
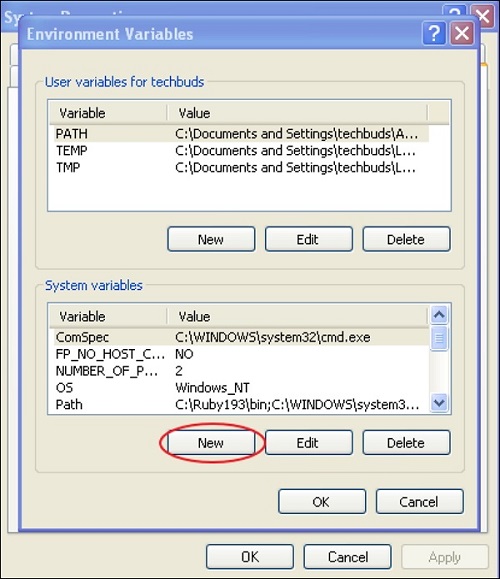
Next, click the Advanced tab and click Environment Variables.
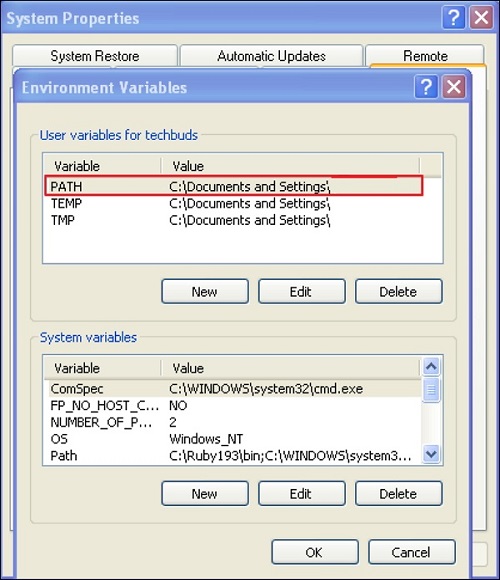
In the Environment Variables window, double click the PATH as shown in the screenshot given below −
You will get an Edit User Variable box as shown. Add ruby bin folder path in the Variable value field as C:\Ruby\bin. If path is already set for other files, then put semicolon after that and add the Ruby folder path as shown below.
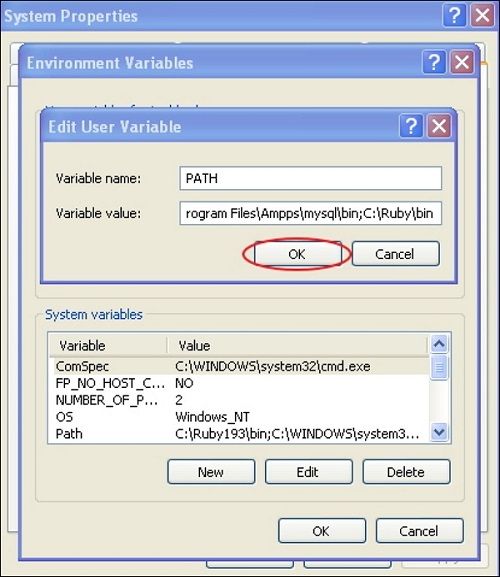
Click the OK button.
System Variable −
Click the New button.
Next, the New System Variable block is displayed as shown below.
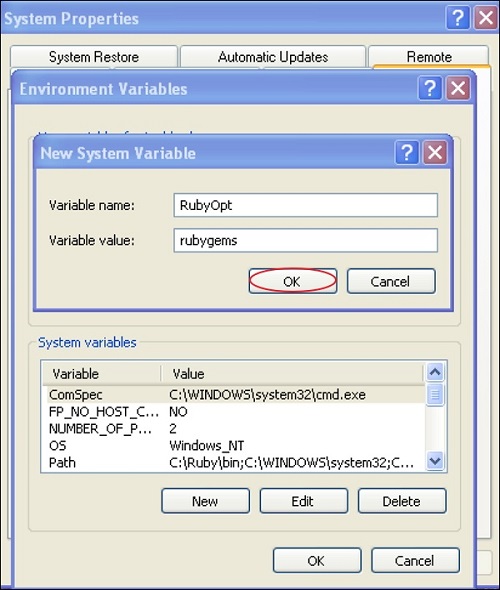
Enter RubyOpt in the Variable name field and rubygems in the Variable value field. After writing the Variable name and value, click the OK button.
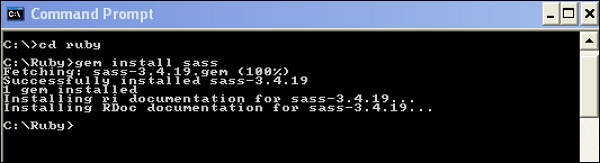
Step 4 − Open the command prompt in your system and enter the following line −
gem install sass
Step 5 − Next, you will see the following screen after installing SASS successfully.
Example
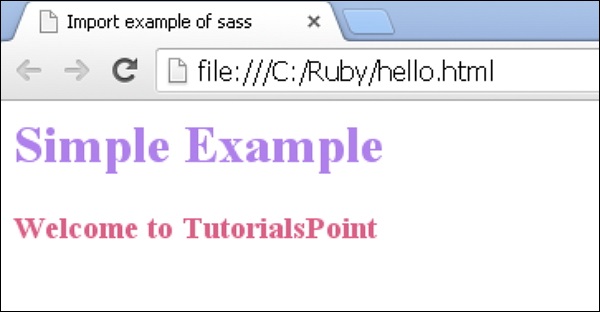
The following is a simple example of SASS.
<html>
   <head>
      <title> Import example of sass</title>
      <link rel = "stylesheet" type = "text/css" href = "style.css"/>
   </head>

   <body>
      <h1>Simple Example</h1>
      <h3>Welcome to TutorialsPoint</h3>
   </body>
</html>
Now, we will create file as style.scss, which is quite similar to CSS and the only one difference is that it will be saved with .scss extension. Both, .htm and .scss files should be created inside the folder ruby. You can save your .scss file in the folder ruby\lib\sass\ (before this process, create a folder as sass in lib directory).
h1{
   color: #AF80ED;
}

h3{
   color: #DE5E85;
}
You can tell SASS to watch the file and update the CSS whenever SASS file changes, by using the following command −
sass --watch C:\ruby\lib\sass\style.scss:style.css
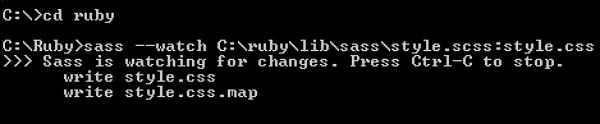
When you run the above command, it will create the style.css file automatically. Whenever you change the SCSS file, the style.css file will be updated automatically.
The style.css file will have the following code when you run the above given command −
style.css
h1 {
   color: #AF80ED;
}
h3 {
   color: #DE5E85;
}
Let us carry out the following steps to see how the above given code works −
Save the above given code in hello.html file.
Open this HTML file in a browser.
Sass - Syntax
In this chapter, we will study about SASS Syntax. SASS supports two syntaxes namely SCSS and Indented syntax.
The SCSS (Sassy CSS) is an extension of CSS syntax. This means every valid CSS is a valid SCSS as well. SCSS makes much easier to maintain large stylesheets and can recognize vendor specific syntax, Many CSS and SCSS files use the extension .scss.
Indented − This is older syntax and sometimes just called as SASS. Using this form of syntax, CSS can be written concisely. SASS files use the extension .sass.
SASS Indented Syntax
SASS Indented syntax or just SASS is an alternative to CSS based SCSS syntax.
It uses indentation rather than { and } to delimit blocks.
To separate statements, it uses newlines instead of semicolons(;).
Property declaration and selectors must be placed on its own line and statements within { and } must be placed on new line and indented.
For instance, consider the following SCSS code −
.myclass {
   color = red;
   font-size = 0.2em;
}
The indented syntax is an older syntax, which is not recommended for use in new Sass files. If you use this file, it will display error in the CSS file as we have used = instead of for setting properties and variables.
Compile the above given code using the following command −
sass --watch C:\ruby\lib\sass\style.scss:style.css
Next, run the above command; it will display an error in style.css file as shown below −
Error: Invalid CSS after "  color = red": expected "{", was ";"
      on line 2 of C:\ruby\lib\sass\style17.scss

1:.myclass {
2:   color = red;
3:   font-size = 0.2em;
4:}
Syntax Differences of SASS
Most CSS and SCSS syntaxes work perfectly in SASS. However, there are some differences, which are explained in the following sections −
Property Syntax
CSS properties can be declared in two ways −
Properties can be declared similar to CSS but without semicolon(;).
colon(:) will be prefixed to every property name.
For instance, you can write as −
.myclass
   :color red
   :font-size 0.2em
Both the above ways (properties declaration without semicolon and colon prefixed to property name) can be used, by default. However, only one property syntax is allowed to specify when you use the :property_syntax option.
Multiline Selectors
In Indented syntax, selectors can be placed on a newline whenever they appear after commas.
Example
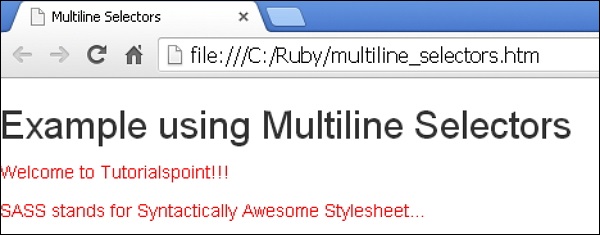
The following example describes the use of multiline selectors in the SCSS file −
<html>
   <head>
      <title>Multiline Selectors</title>
      <link rel = "stylesheet" type = "text/css" href = "style.css" />
      <link rel = "stylesheet" href = "https://maxcdn.bootstrapcdn.com/bootstrap/3.3.5/css/bootstrap.min.css">
      <script src = "https://ajax.googleapis.com/ajax/libs/jquery/2.1.3/jquery.min.js"></script>
      <script src = "https://maxcdn.bootstrapcdn.com/bootstrap/3.3.5/js/bootstrap.min.js"></script>
   </head>

   <body>
      <h2>Example using Multiline Selectors</h2 >
      <p class = "class1">Welcome to Tutorialspoint!!!</p>
      <p class = "class2">SASS stands for Syntactically Awesome Stylesheet...</p>
   </body>
</html>
Next, create file style.scss. Note the .scss extension.
style.scss
.class1,
.class2{
   color:red;
}
You can tell SASS to watch the file and update the CSS whenever SASS file changes, by using the following command −
sass --watch C:\ruby\lib\sass\style.scss:style.css
Next, execute the above given command, it will create the style.css file automatically with the following code −
The generated style.css is as shown below −
style.css
.class1,
.class2 {
   color: red;
}
Output
Let us carry out the following steps to see how the above given code works −
Save the above given html code in multiline_selectors.html file.
Open this HTML file in a browser, an output is displayed as shown below.
Comments
Comments take up an entire line and enclose all the text nested under them. They are line-based in indented syntax. For more information about comments, refer this link.
@import
In SASS the @import directive can be written with/without quotes. Unlike in SCSS, they must be used with quotes.
For instance, in SCSS the @import directive can be used as −
@import "themes/blackforest";
@import "style.sass";
This can be written in SASS as −
@import themes/blackforest
@import fontstyle.sass
Mixin Directives
SASS supports shorthand for directives like @mixin and @include. Instead of @mixin and @include you can use = and + characters, which require less typing and makes your code simpler, and easier to read.
For instance, you can write the mixin directives as −
=myclass
   font-size: 12px;
p
   +myclass
The above given code is the same as −
@mixin myclass
   font-size: 12px;
p
   @include myclass
Deprecated Syntax
SASS supports the use of some old syntax. However, using this syntax in SASS is not recommended. Warning will be displayed if you use this syntax and it is removed in later versions. Some of the old syntaxes are shown in the following table.
| S. No. | Operator & Description |
|---|---|
| 1 | = It was used instead of : when setting variables and properties to values of SassScript. |
| 2 | ||= It was used instead of : whenever you are assigning default value of a variable. |
| 3 | ! Instead of $, ! was used as variable prefix. Functionality will not be changed when it is used instead of $. |
Using Sass
SASS is more powerful and stable that provides power to the basic language by using extension of CSS. You can use SASS in three different ways −
- As a command line tool
- As a Ruby module
- As a plugin for Rack enable framework
If you are using SASS on windows, then you need to install Ruby first. For more information about installing Ruby, refer the SASS Installation chapter.
The following table shows the commands, which are used for executing the SASS code −
| S. No. | Command & Description |
|---|---|
| 1 |
sass input.scss output.css It is used to run the SASS code from the command line. |
| 2 |
sass --watch input.scss:output.css It informs SASS to watch the file and update the CSS whenever SASS file changes. |
| 3 |
sass --watch app/sass:public/stylesheets It is used to watch the entire directory, if SASS contains many files in a directory. |
Rack/Rails/Merb Plugin
Rack is a web server interface, which is used for developing web applications in Ruby. For information about Rack, just visit this link.
You can enable the SASS in the Rails 3 version using the environment.rb file present under the config folder. Enable the SASS for the Rails 3 using the following code −
config.gem "sass"
You can use the following line to the Gemfile for the Rails 3(and above version), as −
gem "sass"
Rails is an open-source web framework that uses web standards such as JSON, HTML, CSS and JavaScript for displaying user interface. To work with Rails, you need to have a basic knowledge of Ruby and object-oriented programming. Learn more about on Rails framework here.
If you want to enable the SASS in Rack application, add the following lines to the config.ru file, which is present in the app's root directory −
require 'sass/plugin/rack'
use Sass::Plugin::Rack
Merb is a web application framework, which provides speed and modularity to Rails. To know more about Merb, just open this link.
You can enable the SASS in Merb by adding the following line to the config/dependencies.rb file −
dependency "merb-haml"
Caching
SASS caches documents such as templates and partials, which can be reused without parsing them unless they have changed. It makes compilation of SASS files faster and works even better when the templates are divided into separate files, which are all imported into one large file. If you delete cached files, they will be generated again when you compile next time.
Options
You can set the options in the environment.rb file of Rails or config.ru file of Rack application by using the following line −
Sass::Plugin.options[:style] = :compact
You can also set options in the init.rb file of Merb by using the following line −
Merb::Plugin.config[:sass][:style] = :compact
There are some options available with SASS and SCSS as described in the table given below −
| S. No. | Option & Description |
|---|---|
| 1 |
:style It displays style of the output. |
| 2 |
:syntax You can use indented syntax for sass and CSS extension syntax for scss. |
| 3 |
:property_syntax It uses indented syntax to make use of properties. If it is not correct, then it will throw an error. For instance, consider "background: #F5F5F5" in which background is a property name and #F5F5F5 is its property value. You must use colon after the property name. |
| 4 |
:cache It speeds up compilation of SASS files. It is set to true by default. |
| 5 |
:read_cache It read only SASS files if cache is not set and read_cache is set. |
| 6 |
:cache_store It can be used to store and access the cached result by setting it to an instance of Sass::CacheStores::Base. |
| 7 |
:never_update It should never update the CSS file if the template files changes. By default it is set to false. |
| 8 |
:always_update It should update the CSS file whenever the template files changes. |
| 9 |
:always_check It should check for the updates whenever the server starts. It will recompile and overwrite the CSS file, if there is an update in the SASS template file. |
| 10 |
:poll It uses polling backend for Sass::Plugin::Compiler#watch (which watches the template and updation of CSS files) by setting it to true. |
| 11 |
:full_exception It displays the error description whenever an exception occurs in SASS code within generated CSS file. It displays a line number where an error occurred along with source in the CSS file. |
| 12 |
:template_location It provides the path for the template directory in the application. |
| 13 |
:css_location It provides the path for the CSS stylesheets in the application. |
| 14 |
:unix_newlines It provides Unix style newlines when writing files by setting it to true. |
| 15 |
:filename It is name of the filename being displayed and used for reporting errors. |
| 16 |
:line It specifies the first line of the SASS template and displays the line numbers for errors. |
| 17 |
:load_paths It is used to load the paths for SASS template which are included using @import directive. |
| 18 |
:filesystem_importer It is used to import files from file system that uses Sass::Importers::Base sub class to handle string load paths. |
| 19 |
:sourcemap It generates source maps which instructs browser to find the SASS styles. It uses three values −
|
| 20 |
:line_numbers It displays the line number for errors reported in the CSS file by setting it to true. |
| 21 |
:trace_selectors It helps to trace the selectors of imports and mixins when it is set to true. |
| 22 |
:debug_info It provides debug information of SASS file using line number and file when it is set to true. |
| 23 |
:custom It makes data available to SASS functions in the separate applications. |
| 24 |
:quiet It disables the warnings by setting it to true. |
Syntax Selection
You can determine which syntax you are using in the SASS template by using the SASS command line tool. By default, SASS uses indented syntax which is an alternative to CSS based SCSS syntax. You can use the SCSS command line program, which is similar to the SASS program, but by the default, it considers the syntax to be SCSS.
Encodings
SASS uses the character encoding of stylesheets by specifying the following CSS specifications −
First, it checks for Unicode byte, next @charset declaration and then Ruby string encoding.
Next, if nothing is set, then it considers charset encoding as UTF-8.
Determine character encoding explicitly by using @charset declaration. Just use "@charset encoding name" at the beginning of the stylesheet and SASS will assume that this is the given character encoding.
If output file of SASS contains non-ASCII characters, then it will use the @charset declaration.
Sass - CSS Extensions
In this chapter, we will study about CSS Extensions. CSS Extensions can be used to enhance the functionality of the web pages. The following table lists down some of the CSS extensions used in SASS −
| S. No. | CSS Extension & Description |
|---|---|
| 1 | Nested Rules
It is a way of combining multiple CSS rules within one another. |
| 2 | Referencing Parent Selectors: &
It is the process of selecting parent selector by using the & character. |
| 3 | Nested Properties
It allows nesting of properties into other properties which leads to grouping of another related code. |
| 4 | Placeholder Selectors
Sass supports placeholder selector using class or id selector by making use of @extend directive. |
Sass - Comments
In this chapter, we will study about Sass Comments. Comments are non-executable statements, which are placed in source code. Comments make source code easier to understand. SASS supports two types of comments.
Multiline comments − These are written using /* and */. Multiline comments are preserved in CSS output.
Single line comments − These are written using // followed by comments. Single line comments are not preserved in CSS output.
Example
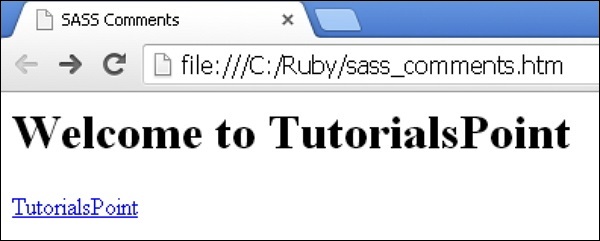
The following example demonstrates the use of comments in the SCSS file −
<html>
   <head>
      <title>SASS comments</title>
      <link rel = "stylesheet" type = "text/css" href = "style.css"/>
   </head>

   <body>
      <h1>Welcome to TutorialsPoint</h1>
      <a href = "http://www.tutorialspoint.com/">TutorialsPoint</a>
   </body>
</html>
Next, create file style.scss.
style.scss
/* This comment is
 * more than one line long
 * since it uses the CSS comment syntax,
 * it will appear in the CSS output. */
body { color: black; }

// These comments are in single line
// They will not appear in the CSS output,
// since they use the single-line comment syntax.
a { color: blue; }
You can tell SASS to watch the file and update the CSS whenever SASS file changes, by using the following command −
sass --watch C:\ruby\lib\sass\style.scss:style.css
Next, execute the above command, it will create the style.css file automatically with the following code −
style.css
/* This comment is
 * more than one line long
 * since it uses the CSS comment syntax,
 * it will appear in the CSS output. */
body {
   color: black; }

a {
   color: blue; }
Output
Let us carry out the following steps to see how the above given code works −
Save the above given html code in sass_comments.html file.
Open this HTML file in a browser, an output is displayed as shown below.
To study about interpolation within multiline comments, click this link.
Sass Interpolation in Multiline Comments
Description
Interpolation within the multiline comments are resolved in the resulting CSS. You can specify variables or property names within the curly braces.
Syntax
$var : "value";
/* multiline comments #{$var} */
Example
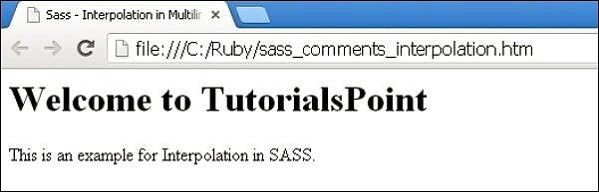
The following example demonstrates the use of interpolation in multiline comments in the SCSS file −
<html>
   <head>
      <title>SASS comments</title>
      <link rel = "stylesheet" type = "text/css" href = "style.css"/>
   </head>

   <body>
      <h1>Welcome to TutorialsPoint</h1>
      <p>This is an example for Interpolation in SASS.</p>
   </body>
</html>
Next, create file style.scss.
style.css
$version: "7.8";
/* Framework version for the generated CSS is #{$version}. */
You can tell SASS to watch the file and update the CSS whenever SASS file changes, by using the following command −
sass --watch C:\ruby\lib\sass\style.scss:style.css
Next, execute the above command; it will create the style.css file automatically with the following code
style.css
/* Framework version for the generated CSS is 7.8. */
Output
Let us carry out the following steps to see how the above given code works −
Save the above given html code in sass_comments_interpolation.htm file.
Open this HTML file in a browser, an output is displayed as shown below.
Sass - Script
SASS uses a small set of extensions known as SassScript which can be included in the SASS documents to compute variables from property values and uses properties of variables, arithmetic, and other functions. SassScript can also be used with selectors and property names while using mixins (Mixins allows to re-use CSS styles throughout the stylesheet).
The following table lists some of the CSS extensions used in SASS −
| S. No. | CSS Extension & Description |
|---|---|
| 1 | Interactive Shell
It evaluates SassScript expression using command line. |
| 2 | Variables
It represents the data such as numeric values, characters or memory addresses. |
| 3 | DataTypes
It declares data type for every data object. |
| 4 | Operations
It provides operations such as number, color, string, boolean and list operations. |
| 5 | Parentheses
It is pair of signs which are usually marked off by round brackets ( ) or square brackets []. |
| 6 | Functions
It supports for the use of functions by providing some keyword arguments. |
| 7 | Interpolation
It provides SassScript variables and property names using #{ } syntax. |
| 8 | & in SassScript
It allows nesting of properties into another properties which leads to group of another related code. |
| 9 | Variable Defaults
It allows nesting of properties into another properties which leads to group of another related code. |
Sass - @-Rules and Directives
The following table lists all the rules and directives which you can use in SASS.
| S. No. | Directives & Description |
|---|---|
| 1 | @import
It imports the SASS or SCSS files, it directly takes the filename to import. |
| 2 | @media
It sets the style rule to different media types. |
| 3 | @extend
@extend directive is used to share rules and relationships between selectors. |
| 4 | @at-root
@at-root directive is a collection of nested rules, which is able to make style block at root of the document. |
| 5 | @debug
@debug directive detects the errors and displays the SassScript expression values to the standard error output stream. |
| 6 | @warn
@warn directive is used to give cautionary advice about the problem; it displays the SassScript expression values to the standard error output stream. |
| 7 | @error
@error directive displays the SassScript expression value as fatal error. |
Sass - Control Directives & Expressions
In this chapter, we will study about Control Directives & Expressions. Styling based on some conditions or applying the same style many times with variations can be accomplished by using control directives and expressions, which are supported by SassScript. These control directives are advanced options used mainly in mixins. They require considerable flexibility, as they are a part of Compass libraries.
The following table lists the control directives and expressions used in SASS −
| S. No. | Control Directive & Expression with Description |
|---|---|
| 1 | if()
Based on the condition, if() function returns only one result from two possible outcomes. |
| 2 | @if
The @if directive accepts SassScript expressions and uses the nested styles whenever the result of the expression is anything other than false or null. |
| 3 | @for
The @for directive allows you to generate styles in a loop. |
| 4 | @each
In @each directive, a variable is defined which contains the value of each item in a list. |
| 5 | @while
It takes SassScript expressions and untill the statement evaluates to false it iteratively outputs nested styles. |
Sass - Mixin Directives
Mixins allow creating a group of styles, which are reusable throughout your stylesheet without any need to recreation of non-semantic classes. In CSS, the mixins can store multiple values or parameters and call function; it helps to avoid writing repetitive codes. Mixin names can use underscores and hyphens interchangeably. Following are the directives present in Mixins −
| S. No. | Directive & Description |
|---|---|
| 1 | Defining a Mixin
@mixin directive is used to define the mixin. |
| 2 | Including a Mixin
@include directive is used to include the mixins in the document. |
| 3 | Arguments
The SassScript values can be taken as arguments in mixins, which is given when mixin is included and available as variable within the mixin. |
| 4 | Passing Content Blocks to a Mixin
Block of styles are passed to the mixin. |
Sass - Function Directives
In this chapter, we will study about Function Directives. In SASS, you can create your own function and use them in your script context or can be used with any value. Functions are called by using the function name and with any parameters.
Example
The following example demonstrates the use of function directive in the SCSS file −
function_directive.htm
<html>
   <head>
      <title>Nested Rules</title>
      <link rel = "stylesheet" type = "text/css" href = "style.css" />
      <link rel = "stylesheet" href = "https://maxcdn.bootstrapcdn.com/bootstrap/3.3.5/css/bootstrap.min.css">
      <script src = "https://ajax.googleapis.com/ajax/libs/jquery/2.1.3/jquery.min.js"></script>
      <script src = "https://maxcdn.bootstrapcdn.com/bootstrap/3.3.5/js/bootstrap.min.js"></script>
   </head>

   <body>
      <div class = "container" id = "set_width">
         <h2>Example for Function directives</h2>
         <p>SASS stands for Syntactically Awesome Stylesheet. </p>
      </div>
   </body>
</html>
Next, create file style.scss.
style.scss
$first-width: 5px;
$second-width: 5px;

@function adjust_width($n) {
   @return $n * $first-width + ($n - 1) * $second-width;
}

#set_width { padding-left: adjust_width(10); }
You can tell SASS to watch the file and update the CSS whenever SASS file changes, by using the following command −
sass --watch C:\ruby\lib\sass\style.scss:style.css
Next, execute the above command; it will create the style.css file automatically with the following code −
style.css
#set_width {
   padding-left: 95px;
}
Output
Let us carry out the following steps to see how the above given code works −
Save the above given html code in function_directive.html file.
Open this HTML file in a browser, an output is displayed as shown below.
In the output, you can see that the left-padding is being applied.
Just like mixin, function can also access globally defined variables and can also accept parameters. You should call the return value for the function by using @return. We can call the SASS-defined functions by using keyword parameters.
Call the above function as shown below.
#set_width { padding-left: adjust_width($n: 10); }
Naming Conventions
To avoid naming conflicts function names can be prefixed so that they can be easily differentiated. Like mixins, variable arguments are also supported by user-defined functions. Functions and other SASS identifiers can use underscores(_) and hyphens(-) interchangeably.
For example, if a function is defined as adjust_width, it can be used as adjust-width, and vice versa.
Sass - Output Style
In this chapter, we will study about SASS Output Style. The CSS file that the SASS generates consists of default CSS style, which reflects the structure of document. The default CSS styling is good but might not be suitable for all situations; on other hand, SASS supports many other styles.
It supports the following different output styles −
:nested
Nested style is default styling of SASS. This way of styling is very useful when you are dealing with large CSS files. It makes the structure of the file more readable and can be easily understood. Every property takes its own line and indentation of each rule is based on how deeply it is nested.
For instance, we can nest the code in SASS file as shown below −
#first {
   background-color: #00FFFF;
   color: #C0C0C0;
}

#first p {
   width: 10em;
}

.highlight {
   text-decoration: underline;
   font-size: 5em;
   background-color: #FFFF00;
}
:expanded
In expanded type of CSS styling each property and rule has its own line. It takes more space compared to the Nested CSS style. The Rules section consists of properties, which are all intended within the rules, whereas rules does not follow any indentation.
For instance, we can expand the code in the SASS file as shown below −
#first {
   background-color: #00FFFF;
   color: #C0C0C0;
}

#first p {
   width: 10em;
}

.highlight {
   text-decoration: underline;
   font-size: 5em;
   background-color: #FFFF00;
}
:compact
Compact CSS style competitively takes less space than Expanded and Nested. It focuses mainly on selectors rather than its properties. Each selector takes up one line and its properties are also placed in the same line. Nested rules are positioned next to each other without a newline and the separate groups of rules will have new lines between them.
For instance, we can compact the code in the SASS file as shown below −
#first {
   background-color: #00FFFF; color: #C0C0C0;
}

#first p {
   width: 10em;
}

.highlight {
   text-decoration: underline; font-size: 5em; background-color: #FFFF00;
}
:compressed
Compressed CSS style takes the least amount of space compared to all other styles discussed above. It provides whitespaces only to separate selectors and newline at the end of the file. This way of styling is confusing and is not easily readable.
For instance, we can compress the code in SASS file as shown below −
#first {
   background-color:#00FFFF;color:#C0C0C0
}

#first p {
   width:10em
}

.highlight {
   text-decoration:underline;font-size:5em;background-color:#FFFF00
}
Extending Sass
You can extend the functionality of SASS to provide different types of features and customizations for users. To make use of these features, user should have knowledge of Ruby.
Defining Custom SASS Functions
You can define your own SASS functions while using Ruby API. You can add your custom functions by adding them to Ruby methods as shown in the following code −
module Sass::Script::Functions
   def reverse(string)
      assert_type string, :String
      Sass::Script::Value::String.new(string.value.reverse)
   end
   declare :reverse, [:string]
end
In the code you could see, the Function, declare, specifies the argument names for the function. If it fails then it will not accept any arguments even if the function is working and it also takes arbitrary keyword arguments. You can get Ruby values by using value accessor and access the color objects by using rgb, red, green, or blue.
Cache Stores
SASS stores cache of parsed documents, which can be reused without parsing again. SASS uses :cache_location to write cache files on the file system. It makes compilation of SASS files faster and if you delete cached files, they will be generated again when you compile next time. You can define your own cache store by setting the :cache_store option. This will write cache files on the file system or share cache files to ruby processes or machines. SASS uses instance of subclass of Sass::CacheStores::Base to store and retrieve cache results.
Custom Importers
SASS uses @import to import SCSS and SASS files and passes paths to @import rule to find an appropriate path code for specified paths. SASS importers use file system for loading the code and added to the load using database or different file naming scheme.
Single importer can take single file loading and can be placed in :load_paths array along with the paths of file system. While using @import, SASS looks for loaded paths, which import the path for the importer. When the path is found, the imported file is used. A user can inherit the importers from Sass::Importers::Base.
