- SAP SRM - Home
- SAP SRM - Overview
- SAP SRM - Navigation
- SAP SRM - Functions
- SAP SRM - Software Components
- SAP SRM - Deployment Options
- SAP SRM - Contract Management
- SAP SRM - Creating Central Contract
- SAP SRM - Bid Invitation
- Quotation & Live Auction Cockpit
- SAP SRM - Procurement
- Invoicing And Purchase Order
- SAP SRM - Shopping Cart
- SAP SRM - Supplier Self-Service
- SAP SRM - Post Installation For LAC
- Configuring Single Sign-on
- SAP SRM - Supplier Evaluation
- SAP SRM - MDM Catalog Upgrade
- SAP SRM - Security
- SAP SRM - System Landscape
- Network & Communication Security
- SAP SRM - Auditing & Logging
SAP SRM - Quick Guide
SAP SRM - Overview
SAP SRM (Supplier Relationship Management) is a SAP product that facilitates the procurement of goods via a web-based platform. Organizations can procure all type of products like direct and indirect material, services and this can be integrated with SAP ERP modules and other non-SAP backend systems for accounting and planning.
SAP SRM allows you to optimize your procurement process to work effectively with suppliers to get long term benefits and also to perform forecasting, procurement cycle and to work with partners. You can reduce the time span and costing of procurement cycle using innovative methods to manage business processes with key suppliers.
SAP SRM supports the full procurement cycle, i.e., starting from source and purchase to pay through complete procurement process with suppliers and effectively managing supplier to build long-term relationship.
SAP SRM helps you to emphasize supplier performance management and helps you to streamline the procurement operations, put compliance with contracts and purchasing policies, and improve overall cost management and expenditure.
Key Benefits and Functionalities
There are various benefits and key functionalities that you can achieve by using SAP SRM product and by integrating with other SAP ERP modules and non-SAP systems for planning and optimization.
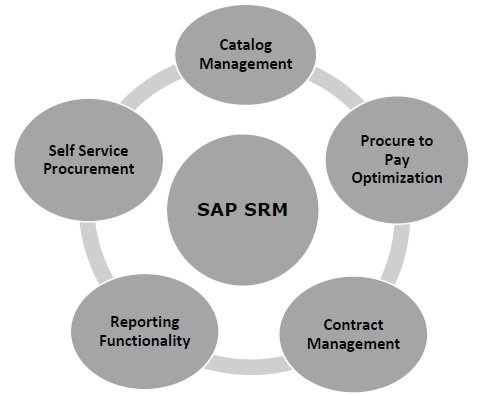
Following are the key benefits of SAP SRM −
Catalog Management
Suppliers can easily manage catalog data and this data can easily be integrated with business processes like accounting, finance and planning.
Procure to Pay Optimization
Using SAP SRP product, you can streamline procure to pay lifecycle and improve communication with supplier and cost management.
Self Service Procurement
End-users can search products using multiple product catalog and helps them to find and purchase product that are compliant with purchase and procurement policy of the company.
Reporting Functionality
Using SAP Supplier Relationship management, you can create reports related to procurement activities, compliance and contract management, and managing costing in procurement process.
Contract Management
You can manage contracts using secure central repository. This helps to reduce compliance violations and allows end-users to follow business processes during self-service procurement.
Technical Benefits of SAP SRM
Following are the technical benefits of SAP SRM −
Live Auction Cockpit to perform real time monitoring and bidding process in procurement process.
SAP NetWeaver Business Intelligence to perform data warehousing, analytics and web-based reporting.
Easy transactions between SAP SRM and online transaction processing system OLTP.
SAP bidding engine to create quotations and to process them.
SAP SRM - Navigation
To check SAP SRM software navigation, you can login to SRM system using SAP GUI client. Select SRM system and enter the user name and password. It will display the SAP Easy Access Supplier Relationship Management screen.
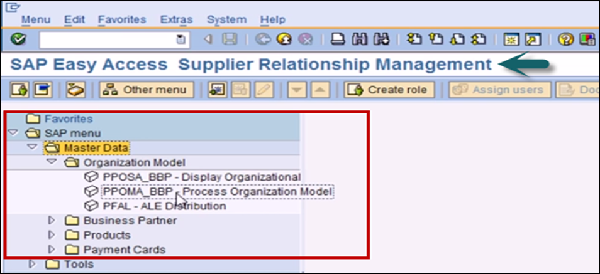
In SAP menu, you have various folders like −
- Master Data
- Business Partner
- Products
- Payment Cards
To open Organization model, you can run T-code or go from Master data → Process Organization Model.
When you build an organization structure, it is created downward. At the top, you have root organization structure and then you have other organization units like subsidiary, business units, etc.

You can also access SAP SRM Portal Desktop using web URL. The portal area is divided into the following parts −
- At the top, you have SRM Work Centers.
- To the left, you have Navigation area.
- At the bottom, you have Content area.
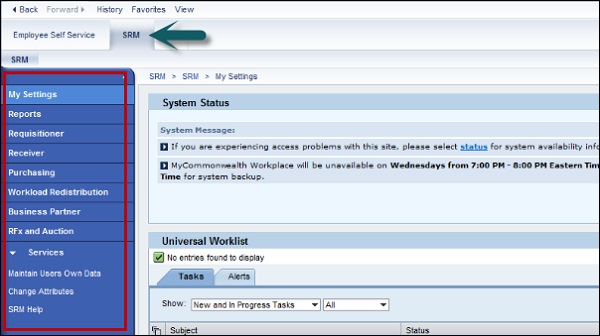
As per the SRM user role, the left side navigation area is displayed. If you have access, you can see additional fields in SRM portal. On the left side, you can select work set and Person Object Work list will be displayed on the right side.
The results of selected query are displayed in a table form.
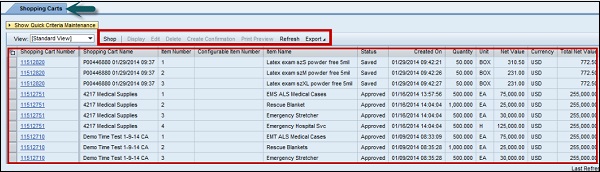
You can select any of the rows in table and can use the top buttons like display, edit, delete, preview, refresh and export, etc.
In the following screenshot, you can see a table with a three-step approach to add goods to a shopping cart and complete and order.
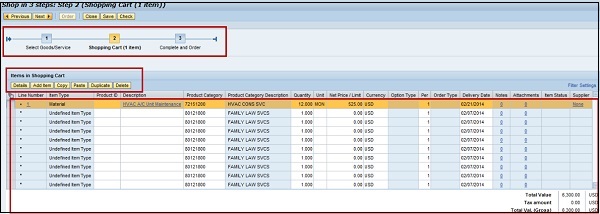
In the shopping cart, you can add, delete, copy, paste or duplicate an item in shopping cart. Note that you need to create a separate shopping cart for each supplier.
Performing search is easy and user-friendly. It eases the process of creating a Purchase Order for a few materials and some suppliers.
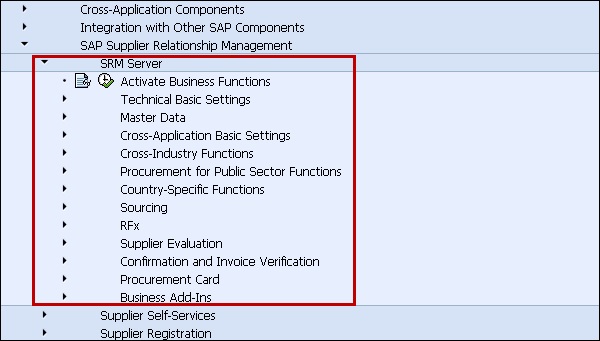
In SAP GUI, you can see the following configuration options under SAP SRM −

You can expand SAP SRM to see various settings under SRM system −
SAP SRM - Functions
You can perform various functions in SAP SRM. Using the SAP SRM portal, a user can use self-service option for different options.
The key functions in SAP SRM include the following −
Navigation
In SAP SRM, screens are easy to navigate. SRM portal has a user-friendly and easy to manage look.
Searching
In SAP SRM portal, you can easily perform search for different products and suppliers. Search criteria is easy to use.
You can also restrict the number of entries in Search.
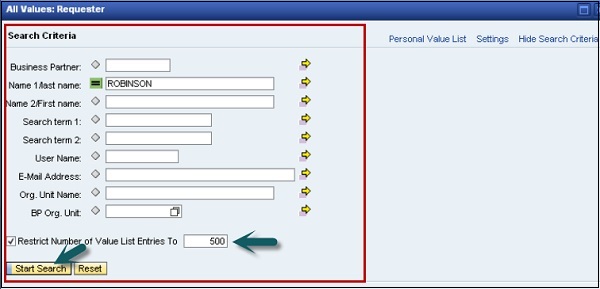
To see the details, select the object and click the OK button.
Purchase Orders
You can create purchase orders for a few of the material type. POs are also automatically created for some materials and suppliers.
Account Assignment
A user can also define default account preferences. Cost assignments can be defined as per quantity, percentage or value of the material. You can also search G/L codes online using search option.
Workflow
In SAP SRM, the approval process for Purchase Orders is very easy. This allows organization to perform goods requisition in an easy and simple manner.
Copying and Deleting
A user can use copying option to copy the items in the shopping cart. Edit option can be easily used to edit the address, cost distribution, etc.
Deletion is also easy in shopping cart as you can easily select a good in cart and delete it.

SAP SRM - Software Components
There are various application and technology components that are a part of SAP Supplier Relationship Management product. Application components include components that are required to create RFx and submit bids, for financial management, BI needs, Enterprise portal for application interaction and other various components to perform different functions.
Technology component consists of NetWeaver Process Integration to integrate with SAP and non-SAP external systems, SAP GUI for configuration, and R/3 plugin for Master Data.
Lets see each of the components under application and technology in detail −
SAP Supplier Relationship Management Server
SAP SRM server includes SAP SRM server and SAP Bidding engine. SAP SRM is based on SAP NetWeaver application server and is available for different platforms and database. You can check all the releases of SAP SRM on SAP Market place under Product Availability Matrix (PAM).
SAP SRM Bidding Engine
SAP SRM Bidding Engine can be used to create and process requests for bids; bidders can submit bids and other functions in RFx.
Bidding engine defines the rules for bidding and bidders can use it to submit bids in the system.
SAP NetWeaver BI
In SAP SRM spend analysis, BI is primarily used and requires Application server ABAP on the same system. It may also require Java Application server and SAP Enterprise portal.
SAP NetWeaver Enterprise Portal
This is used as an entry point for users to manage applications and information related to SRM. It provides role-based and secure access to applications and services.
Online Transaction Processing System
Various systems can be used for backend transaction processing to manage material and financial queries. SAP ERP system can be used and data exchange occurs between SAP SRM and SAP ERP system.
You can also install SAP SRM as standalone without a backend system.
Live Auction Cockpit Server
LAC web presentation server is a J2ee based software application. This provides the user with an option of real time bidding, real time monitoring and reverse auction options.
Apart from these, technology component also includes SAP Process Integrator for integrating processes from different systems, SAP GUI for configuration and R/e plug in for data exchange between one or more R/3 systems and other components.
SAP SRM - Deployment Options
SAP SRM can be integrated with SAP ERP for backend processing for procurement, inventory and financial management. It can integrate with SAP ERP applications and non-ERP systems.
There are four different deployment scenarios that you can use with SAP SRM −
Standalone Deployment
In a Standalone Deployment model, all the procurement processing is performed in SAP SRM system and backend accounting system is used for invoice financial processing.
In a Standalone Deployment scenario, purchase order management, shopping cart and goods receipt and invoices are processed in SRM system.
This scenario is suggested for the following customers −
When there is no operational backend system for material management and there exists only financial accounting systems in landscape.
When you want to move all procurement activities in SAP SRM system and hence allow companies to decrease the work load on the backend procurement system by transferring buyers which are interested to procure from selected options.
It is recommended for customers who want to maintain only minimal product data and only rely on supplier catalogs.
Classic Scenario
In a classing deployment model, you process the shopping cart in SAP SRM and supporting documents are processed in backend ERP system.
You can perform goods receipt or invoices in any of the systems.
This deployment model is suggested for those customers who have a strong backend procurement system and where buyers do not want to use multiple systems for their operations.
Extended Classic Deployment
In this deployment model, procurement process takes place in SAP SRM system and PO is generated in SRM system and a read only copy is created in backend ERP system.
You can perform goods receipt or invoices in any of the system as in the case of classic scenario.
This model is recommended where you want few of procurement functionalities in SAP SRM like PO response, etc.
You can implement direct material in extended classic deployment scenario.
Decoupled Deployment
When you use all the three scenarios parallel, this is called decoupled scenario. When customers want to utilize all the functionalities of each component, SAP SRM allows to use all the above scenarios in parallel.
Example
Consider a customer who wants to use the standalone deployment model for certain indirect materials and routine services, the classic scenario for stock materials to utilize inventory and planning capabilities of backend materials management system, the extended classic deployment scenario to perform effective supplier management to provide response for POs.
SAP SRM - Contract Management
In SAP SRM, a contract is defined as a negotiation between a supplier and an organization for supply of goods and material or delivery of services within defined terms and conditions in a specific time period. These contracts are placed at central secure location to resolve the lack of visibility into contract across the different groups.
This allows you to manage different local contracts with different terms and conditions for similar type of goods.
CCM allows buyers form different departments of company from different locations to take advantage of negotiated terms and conditions. The terms and conditions are transitioned into a central contract and to be distributed to local purchasing group to perform procurement process for the company.
SAP SRM provides the following CCM features −
SAP SRM helps you to improve and fasten procurement process by automating and streamlining the contract management process.
SAP SRM helps you to automate transfer of global negotiated conditions into multiple ERP systems and into non-SAP solutions using Enterprise Services.
SAP SRM allows you to ensure contract compliance by providing a repository of standard contracts that can be used for creating new contracts.
You can easily create or change a central contract by directly negotiating with suppliers or by creating RFx.
Using CCM, you can control access to central contract using the assignment of authorization on central repository.
You can also configure system to generate alerts for the expiring contracts, etc.
You can customize central contract distribution as per your needs and it can be an individual contract or multiple contracts for the same category.
Integration with SAP ERP to Upload Contracts
To upload the central contracts and to schedule agreements from SAP ERP system to SAP SRM system, you can use program BBP_CONTRACT_INITIAL_UPLOAD. As per your configuration, these contracts are loaded and scheduled from ERP to SAP SRM system.
The initial upload is supposed to be a one-time activity and is performed at the time of installation in the backend system.
To perform contract search, you can use TREX search engine. This search engine is provided with SAP SRM but you have to install it and run a program to create indexing for all the available contracts. You should run program BBP_TREX_INDEX_ADMIN that creates a new index for existing documents and helps you to perform indexing for all new or changed documents when a contract is saved.
You can also evaluate your contracts by creating BI reports when you integrate with SAP NetWeaver Business Intelligence.
To generate BI reports, go to SAP NetWeaver → BI Content → Supplier Relationship Management → Contract Management.
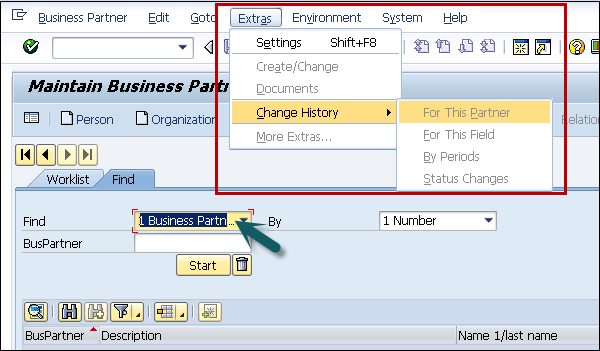
Change History in Central Contract Management
You can also view change documents available for all the fields in Central Contract Management (CCM) and they are used for audit trial. You can compare the versions of a contract by comparing changes at item and header level between these versions.
Let us follow these steps to compare the versions −
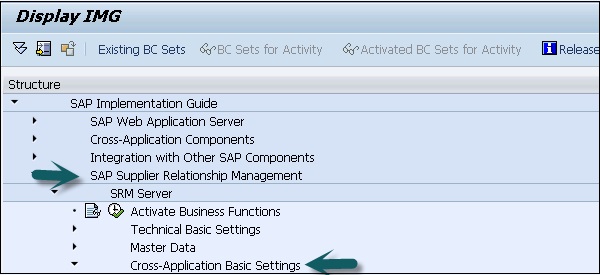
Step 1 − To perform this, go to SRM Server → Cross Application Basic Settings → Switch on version control for purchasing documents.
Step 2 − Login to SRM system as in the following screenshot using SAP GUI.

Step 3 − Type SPRO → IMG → Navigate to SRM Server → Cross Application Basic Settings.
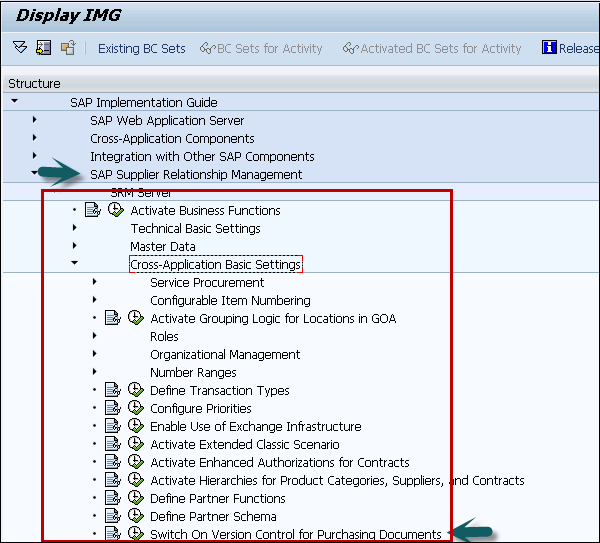
Step 4 − You can view all business transaction categories for which version control is on/off.
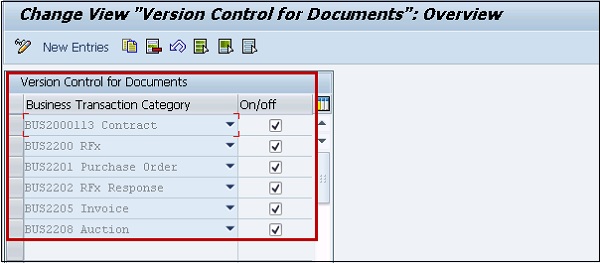
Step 5 − To display change documents and to compare versions of a central contract, click on Tracking when you display the central contract.
Uploading and Managing Central Contracts in ERP
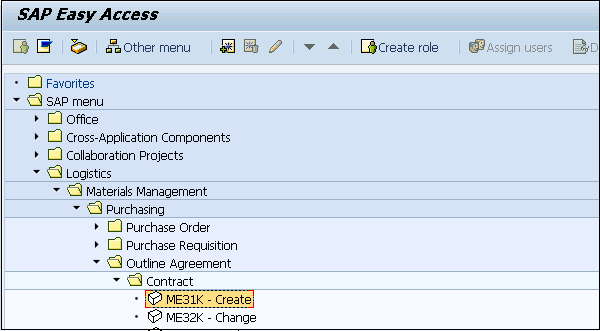
Let us now understand how to upload and manage central contracts in ERP. You can upload contracts in SAP ERP system by going to SAP ERP Central Component → Logistics → Materials Management → Purchasing → Outline Purchase agreements with vendors → Contract → Central Contract → SRM Central Contract
Managing Authorization in Central Contract
In SAP ERP, it is possible to authorize users to assign a role to create, change or display a central contract in repository. Companys law department analyzes the agreement before it is released for users. You can assign a role display/change to the legal team to view notes with no access to confidential fields like terms and conditions.
Let us follow these steps to assign a role display/change −
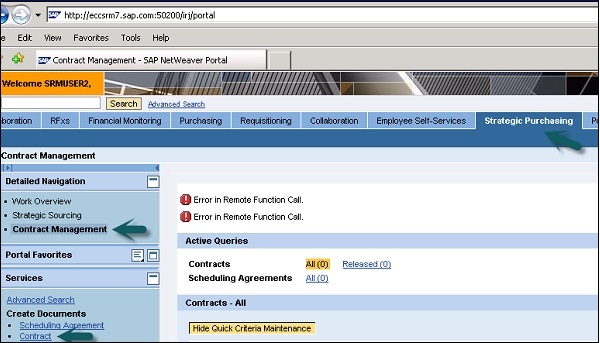
Step 1 − To assign the authorization for Central Contract, go to SAP SRM → Strategic Purchasing → Contract Management → Contract.
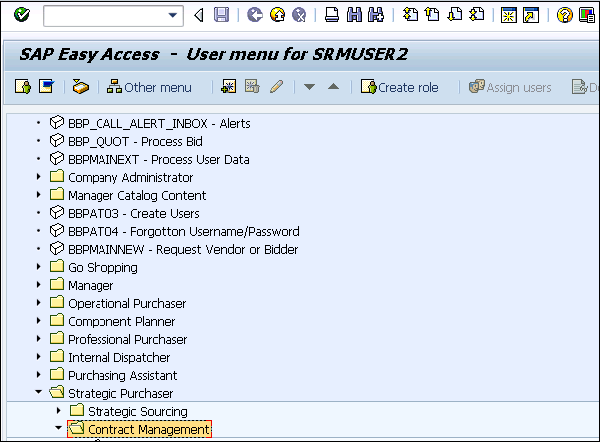
Step 2 − If you are not able to call this transaction from SAP Easy access, you can go SRP portal and go to Strategic Purchasing tab.
Step 3 − You have to go to Authorization tab → To edit an existing user, select a user and edit.
You can create a new user and assign the authorization as per the requirement of the user.

Performing Changes in Central Contract
You can perform same changes to one or more central contracts or to a central contract hierarchy. This is used to perform mass changes to multiple contracts as per business needs.
Example
Consider a case where you have multiple contracts with a Supplier ABC. Now with increase in order volume, you will get an additional discount of x%. Now to maintain multiple contracts with this supplier ABC, you have to change all contracts at one time.
Note
You cant make changes to central contracts which are marked as completed.
To make mass changes for central contract, you have to search and select contracts in central repository.
To perform mass change, go to mass change option and it will open the wizard.
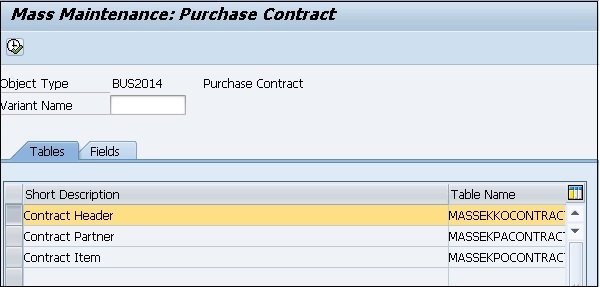
You can see all the contracts that you have selected. To perform a mass change, select mass change parameter and specify the change and same way select other mass change parameters and specify the change.
You can see a flag next to all those fields for which parameter has been changed and this indicates that you have changed this parameter. All the contracts in Wizard remain locked when you are performing mass changes so that no other user makes changes to these projects.
It is also possible to perform the changes in background as the time required to perform changes depends on the number of central contracts and you can close the Mass Change window. Once changes are completed, you will get an email with the link of mass changes completed. You can view if changes are applied successfully or not.
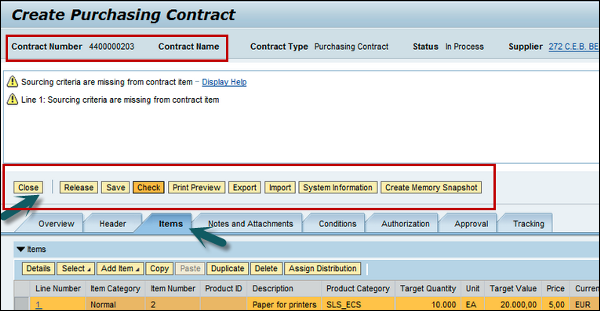
SAP SRM - Creating a Central Contract
You can create a central contract manually in SAP SRM. If you have to create multiple contracts that are similar to each other, you can create a template and then copy an existing contract based on the template.
To create a Central Contract, go to SAP SRM → Strategic Purchasing → Contract Management → Create Central Contract
You can see different tabs Header tab, Overview tab and Distribution tab. In Overview tab, go to fill the item details and general header data. You can fill the following details in a contract −
Target Quantity and Value
In this field, you need to enter the target quantity and target value. This defines the quantity which shows the number of units to be purchased from a supplier in a time period.
Release Value
It is defined as accumulated value of all POs against the central contract.
Basic Contract
Now if you define a contract as basic contract, it only contains header data and conditions and you cant put line items and cannot be distributed to a catalog.
Item Category
When you define item category as normal, it must contain a product category. Under product category, you need to define a target value and a product category item always refers to all connected catalogs.
Central Contract Status
Following are the status available for a central contract in SAP SRM system −
Awaiting Approval
As per system configuration, an approval workflow is started when you select Release for a contract. In this case, contract status is set to Awaiting Approval.
Completed
When a contract is in expired or released status and you select Close Contract, the status of the contract is set to Complete and this is an irreversible status.
You can search the completed contracts and use them as template for creating new contracts.
Deleted
When a contract is not released, you can set the status to delete and this contract is achieved.
Incorrect Distribution
When the distribution of a central contract to backend system fails, then the system sets the status as distribution incorrect.
Expired
When the validity period of a contract expires, status is set to expire. A system administrator can schedule a report when a contract is expired.
In Distribution
When your contract is in distribution process in the backend system, the status of contract is set to in distribution.
In Negotiation
When a contract is selected for renew and is in saved state, the status of contract is set as in negotiation.
In Renewal
This is set when you select a contract for renewal in released state.
Locked
When you want a contract to be temporary unavailable as source of supply, you can set the status to Lock. To unlock a locked central contract, you can select Unlock.
Released Rejected
When the central contract is not approved for release, the system sets the status of project to Release Rejected.
Released
When you select a central contract to release and it has been approved, the status of the contract is set to Release. This contract can be used for sourcing.
Saved
This status is set when you save a central contract. This contract is not available for sourcing till it is approved and released.
SAP SRM - Bid Invitation
A bid invitation is defined as a request from a buyer to a supplier to submit a quotation for goods or services as per the mentioned criteria. Bid invitation is also known as request for quotation RFx.
A request for quotation RFx is an invitation sent to supplier by an organizations purchase department to submit RFx response for the supply of certain goods under specified terms and condition. RFx document contains information like vendors name, vendor's address, quantity of goods and delivery dates for the material. You can create RFx with reference to a purchase requisition and all the information is copied from the purchase requisition. When RFx is created without any reference, you can enter the details manually in RFx document.
Creating Bid Invitations in Bidding Engine
To create bid invitations for services and goods, buyers can use SAP Bidding Engine to create public and restricted bids. You can customize system to perform bid invitation automatically in the background for requirements where no source supply is assigned.
You can check assigned sources by going to SPRO → IMG → SRM Server → Sourcing → Define sourcing for product categories
Login to SRM system → SPRO → IMG
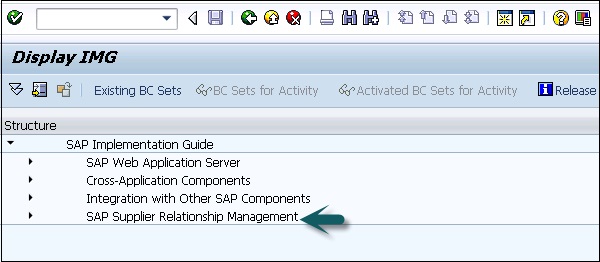
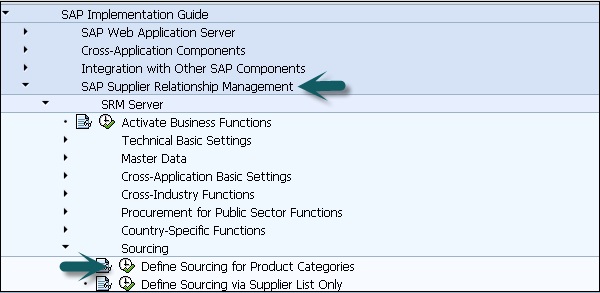
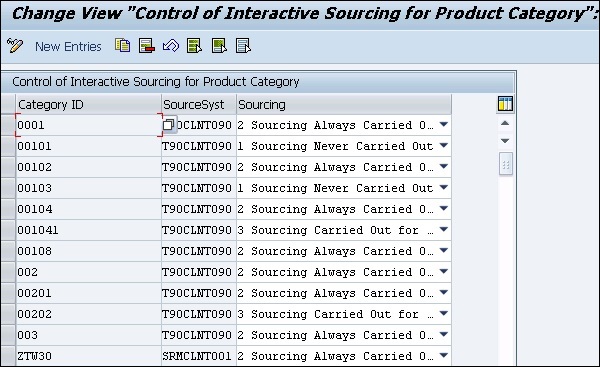
Here you can check sourcing for product categories −
Types of Bid Invitation
In SAP bidding engine, you can create two types of bid invitations −
Public Bid Invitations
These bid invitations are available to all bidders via a web portal. Bidders can access the url available on web portal to login to SAP bidding engine and there they can enter the bids. If you want some specific bidders to send the bid, you can directly email them the bid invitation.
Restricted Bid Invitations
In restricted bid invitations, the hyperlink to login to SAP Bidding Engine is sent to some specific set of bidders via email. Bidders can login to Bidding Engine and enter the bid.
In addition to this, you can create emails using the Smart Forms feature −
Step 1 − To create a bid invitation, you have to login to the SAP Bidding Engine. You can search for existing bid invitations or create a new invitation.
Step 2 − When you create a new bid invitation, you have to mention the name and number range at the top.
Step 3 − Enter the basic data for bid invitation, this includes −
Type of Bid Invitation (public/restricted)
Product Category
Start Date and Time − When a bidder can enter the bid details in the system. When no time is mentioned, bidders can bid when the invitation is published.
End Date and Time − Bidders can submit their bids until this time period.
Opening Date and Time − This time is defined as the time when you can open and reject the bids.
End of Bidding Period − This allows the bidder to mention the end of bidding period till when that bid is valid.
Detailed Price Information − This condition can be used to allow bidder to put price scale.
Bidders/Bid − You can search for suppliers/bidders from the supplier directories and extend the bid invitation to these bidders in case of public invitation.
Step 4 − Similar way, you can define other fields like currencies in which bid is accepted and if the bidder can bid in any currency of their choice. You can also attach any additional documents you want to share with bid invitations.
Step 5 − Under Item data, you can fill item details by transferring items from a catalog or by transferring products from product master. Lot option can be used to group related items together.
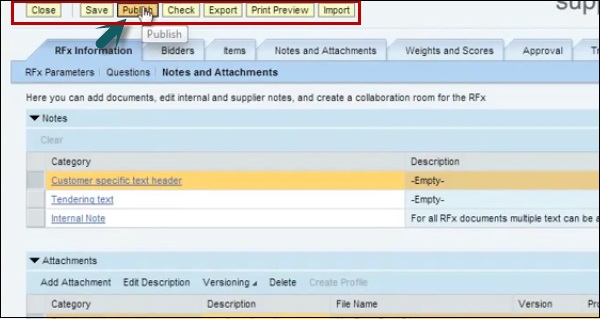
Step 6 − When you enter all the required information in relevant fields, you can perform a check by clicking on Check button at the top of screen.
Step 7 − You can save your bid by clicking on Hold button.
Step 8 − When you click on Complete, it shows that the bid has been checked and it is ready for publishing.
Step 9 − You can select the Publish button to publish the bid invitation.
Step 10 − Go to SRM Portal → Strategic Purchasing → Strategic Sourcing
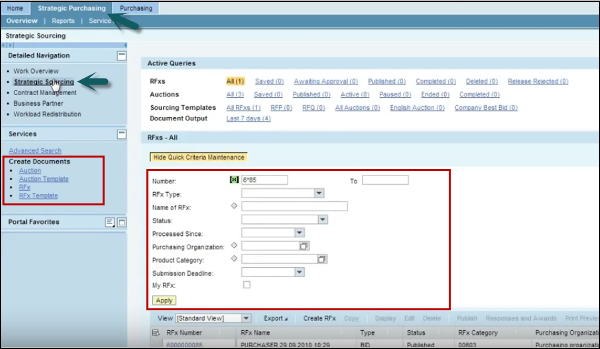
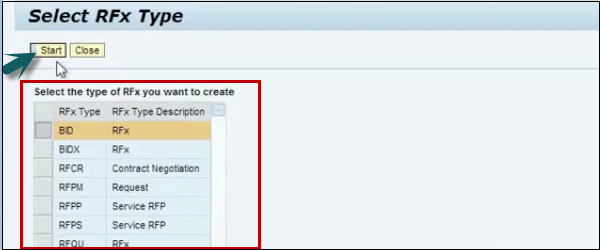
Step 11 − On the left side, you have an option to create RFx. Click on RFX and you will be prompted to select RFx type. Select RFx type and click on Start.
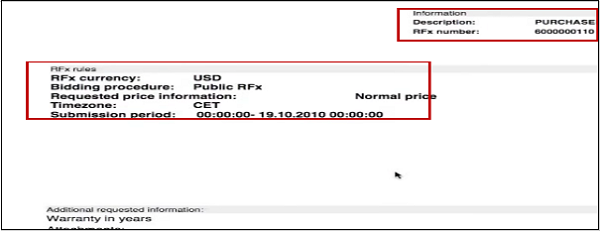
Step 12 − At the top, you can see basic data bout RFx like RFx#, Name, type, status, created by, etc.
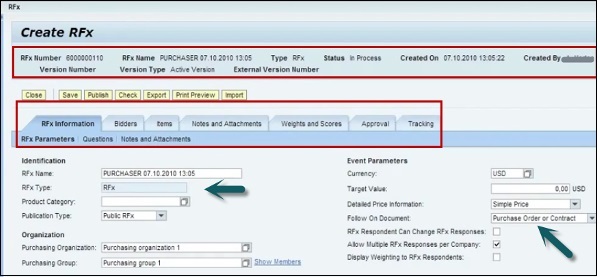
Step 13 − Under Event parameters, you can define the output field if it is a Purchase Order or a Contract.
Step 14 − Go to Bidders tab; here you can search bidders from internal or external directories.
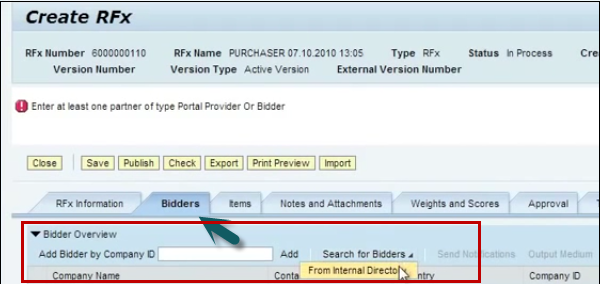
Step 15 − You can also type the bidder company id and click on Add button to add the bidders to the list.
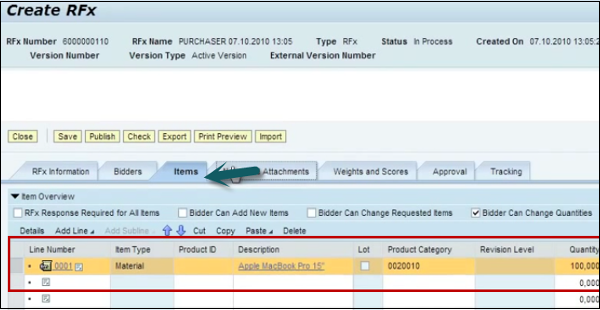
Step 16 − Go to Items tab, enter item details like description, product category, quantity, Delivery date, lot and item type etc.
Step 17 − You can add any other notes and attachments. If you want some specific questions to be raised with the Bidder, go to RFx information tab → Questions → ADD Question.
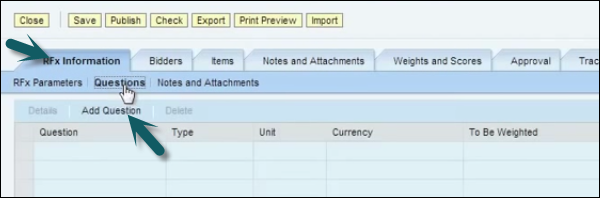
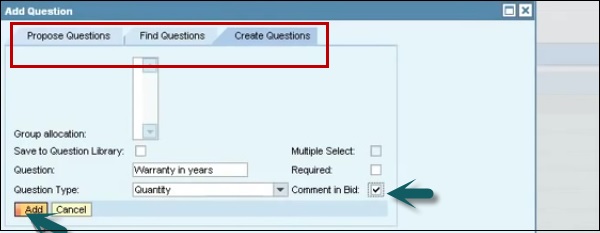
Step 18 − You can find existing questions or can create new questions as per the requirement. To add the comment in bid, select the check box.
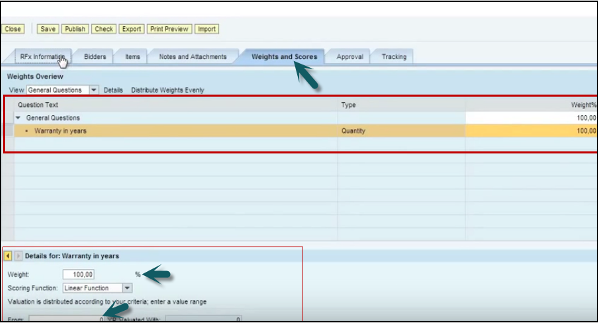
Step 19 − To add weight and score to the question, go to the tab and add weight. You can also assign percentage and value for which 100% score will be provided.
Step 20 − When all the details are entered, you can publish RFx. All the suppliers will get an email message.
Step 21 − All the documents and RFx details will be sent in attachment as per the configuration. You can also attach images of goods in RFx and the same will be received by suppliers in an email message.
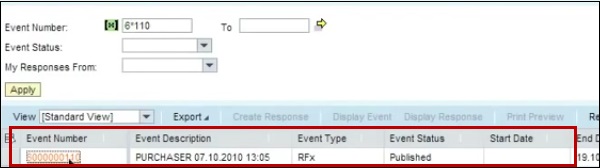
Step 22 − In the email message, a hyperlink is provided where bidders can login and enter the bid details. They can select RFx and submit a response.
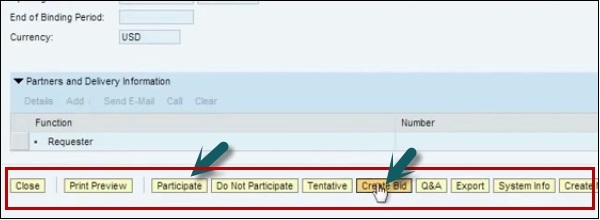
Step 23 − To participate in bidding, click on the Participant button and the purchaser will be notified. To create a bid and enter the details, click on the Create Bid button.
SAP SRM - Quotation & Live Auction Cockpit
A Quotation is defined as a response to RFx, where a bidder confirms the selling of goods and services to buyers/purchasers as per specific criteria. As part of bid invitation process when an email is triggered, the supplier gets the information on the request for quotation. Suppliers start bidding as per the bid invitation and when they submit the bid in SAP Bidding Engine, the final price is shown. Suppliers can bid till the end date is reached and once bids are closed, purchasers can perform a price comparison to get the best supplier and to award the bid, and a purchase order can be raised for the best supplier.
In case, when the number of bidders is less or purchaser feels that there is not a best bid, he can always convert RFx to live auction.
Live Auction Cockpit allows purchasers to get a real-time environment for direct bidding on reverse live auctions. This provides an experience similar to a live auction by utilizing the technology to share the updated information.
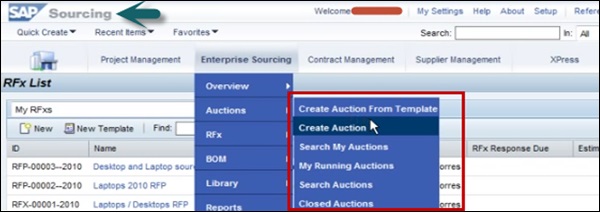
Creating Live Auction
Let us now understand how to create live auction.
To create a live auction, purchasers can use SAP Bidding engine and auction takes place in Live Auction cockpit. Purchasers can create live auction −
- Using an Auction template
- By copying an Auction
- In SRM portal, from the Sourcing application
- Purchaser can also convert RFx to a live Auction
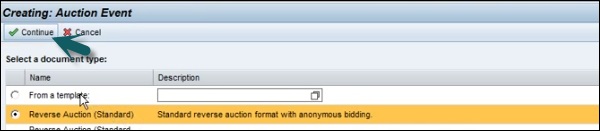
You can create different documents types under Auction, click on continue after selecting the document.
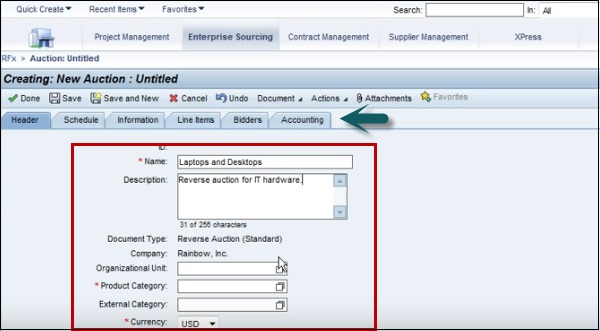
Enter the details under different tabs to create a new Auction.
Scroll down in the Header tab to define various roles for the auction like owner, collaborator, reviewer, etc. To add a user to auction, click on Add User.
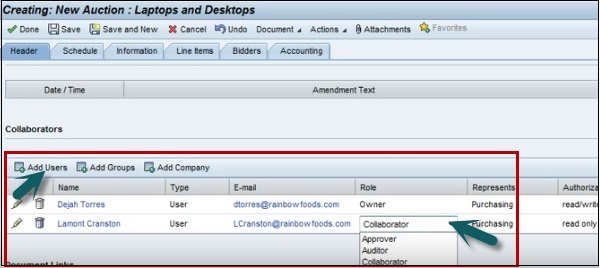
When you enter all the details, click on Save → Done

Converting RFx to Auction
You can create a live Auction from an RFx by choosing Convert to Auction button in RFx → Enter the Auction transaction type and bids to copy to the auction directly.
When you convert RFx to an auction, the RFx is set to the status Completed and you cannot make any changes to it.
SAP SRM - Procurement
Procurement functions are seamlessly integrated between SAP ERP and SRM. There are various business functions that allow a fully integrated, end-to-end procurement management solution to improve both compliance and procurement management process as per business requirements. It helps in closing the gap in ERP sourcing functionality using SRM capabilities and provides a common UI for designing integrated procurement processes.
Follow this data for Procurement in SRM Integration −
| Technical Data | |
|---|---|
| Technical Name of Business Function | LOG_MM_P2PSE_ |
| Type of Business Function | Enterprise Business Function |
| Technical Usage | Central Applications |
| Application Component | MM-PUR, MM-SRV |
When you use this business function for integration of procurement management process in ERP with SRM, following business functions are activated by default −
- Procure to Pay LOG_MM_CI_2
- Operations enterprise services 2 LOG_ESOA_OPS_2
This business function can be used to implement specific functions for buyers that allows you to further optimize service procurement across SAP ERP and SAP SRM.
SAP SRM - Invoicing And Purchase Order
In SAP SRM, you can enter invoices that contain goods with reference from Purchase Orders or without Purchase Order. When invoices are created with reference to Purchase Orders, data from the PO is automatically used in invoice creation from the system.
In SAP SRM, invoices can be created in the following ways −
Using local Purchase Orders
For which confirmations have already been entered or for which no confirmations are expected.
With value limit (provided the value limit has not been exceeded).
For services
When there are no purchase orders or confirmations, you enter the data from a supplier invoice that you have received by means other than the system.
Creating Collective Invoice
You can also create collective invoices by entering additional purchase orders. Purchase order numbers can be searched in system or you can enter them directly and transfer these purchase orders to the invoice.
The following data must be the same in all purchase orders −
Currency
Backend System Details
Supplier
Company Code
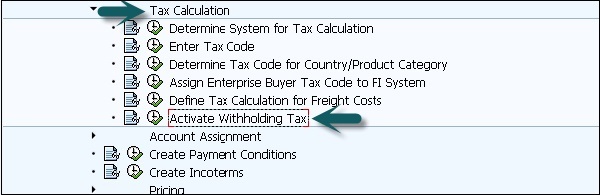
Withholding Tax − You can enter the withholding tax and this is defined for a country or supplier under Customizing. To define withholding tax, go to SRM Server → Cross Application Basic Settings → Tax Calculation → Activate Withholding tax
SAP SRM - Shopping Cart
Shopping cart helps purchasers by making procurement process fast and more responsive. As per SRM deployment model, a shopping cart creates the follow-up model in backend system or in the SRM system itself. When you add items in a shopping cart, it automatically sends for approval. You can also address shopping cart as template and this can be used later as reference from other shopping cart requests.
In SRM, you can handle various order scenarios −
- Catalogue Shopping (External and internal catalogues)
- Purchasing for team
- External goods request
- Buy on others behalf scenario
Shopping cart creation and backend processing depends on the deployment scenario. In a classic model, you create the shopping cart in the SRM system and all other procurement process PO, goods receipt, and follow-up documents are worked upon in the backend system.
In Extended Classic Deployment scenario, shopping cart is created in the SRM system and PO and follow-up documents are also created in SRM and replicated in the backend system.
In a Standalone Deployment scenario, shopping cart and other processing is done in the SRM system and only final invoice is sent to the backend system for financial accounting.
Each Shopping Cart normally contains the following fields −
Every shopping cart item is composed of the following tabs −
- Item Data
- Account Assignment (costing of items)
- Sources of Supply (Assignment of suppliers)
- Availability (Item Availability)
- Notes and Attachments (To add attachments and text notes)
- Delivery Address
- Approval Process Overview
- Related Documents (Follow-on documents for shopping cart)
Types of Shopping Cart
In SRM, you can use different applications to use Shopping Carts −
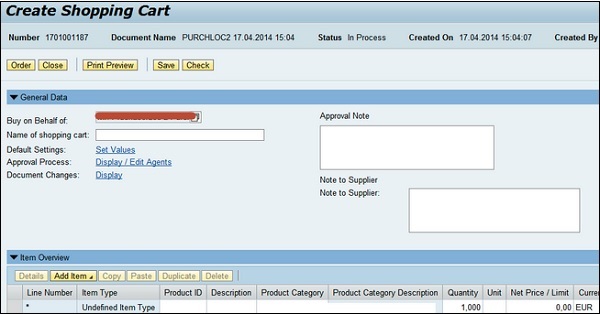
Professional Shopping Cart Form
In this shopping cart, most of the fields are used by professional buyers and employees. In the header section, you have the details of shopping cart cart number, name, status, creation date and created by.

If you want to use the buy on behalf option, this information can be entered in the General tab. You can also check default values and approval process in this tab.
At the bottom, you have details of the item that has been added to cart. To add a new item, you have to click on Add Item button.
Simple Shopping Cart Form
Like the above shopping cart, you can use a simplified shopping cart form with less number of fields. This is suitable for users who haves no experience and limited authorization.
It only depends on the catalogs and no other options are there for purchasing.
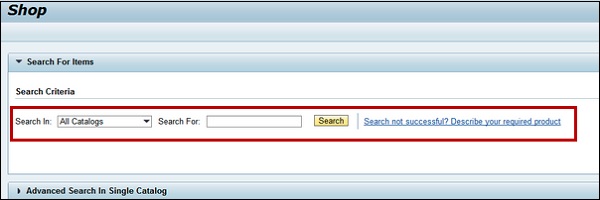
Using the Search option, you can find the items in catalog and add to shopping cart. Advance Search option allows you to search a single catalog too.
Shopping Cart Wizard
Purchasers can also use the Shopping Cart Wizard to provide complete shopping experience. It is a 3 step/4 step approach as per the SRM Version method where the Wizard helps you go through the entire process. This is recommended for purchases with less experience to perform purchasing.
Key Steps in Creating a Shopping Cart
Following are the key steps in creating a shopping cart −
- Selecting Goods/Services
- Shopping Cart
- Complete and Order
- Confirmation
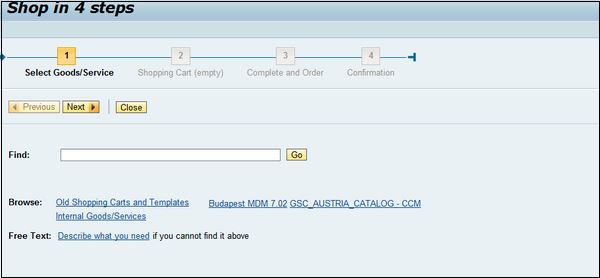
You can use the Next button to move from one step to another. To check existing templates, you can use the Browse button where you can search old shopping carts and templates.
SAP SRM - Supplier Self-Service
Supplier self-service is one of the components in SRM that shortens the procurement life cycle and reduces the costs involved in the procurement process. In SUS, suppliers are provided with access to purchasers procurement system and they are able to provide fast response.
As part of integration, SUS is installed separately and configured to work with SAP ERP or the SAP SRM system. When you connect to SAP ERP, this allows the user to collaborate on POs containing service item hierarchies.
In SUS, you can perform basic functions related to procurement process and documents in processing. The key functions include −
Display
This function displays a document flow list containing all documents connected with a particular procurement document and indicating their statuses.
Download
You can use this function to download any type of document in CSV or XML formats.
This function is used to print the document in CSV, XML or PDF format.
Hold
You can use this function to hold invoices, credit memos, and confirmations locally and edit them later.
Copy
This function can be used to copy an invoice.
Supplier Self-service - Other Functions
There are various other functions like Update, Refresh that can be used to handle procurement process more effectively.
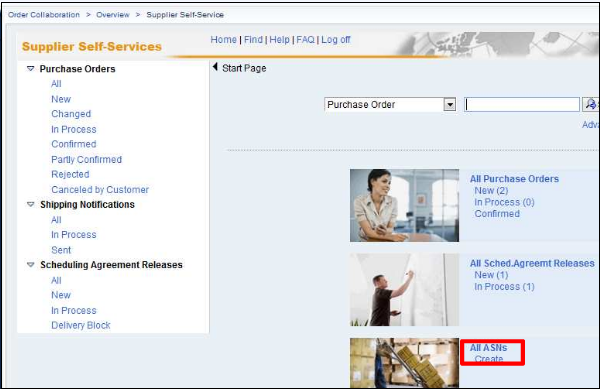
To open SUS portal, go to Order Collaboration → Supplier Services.
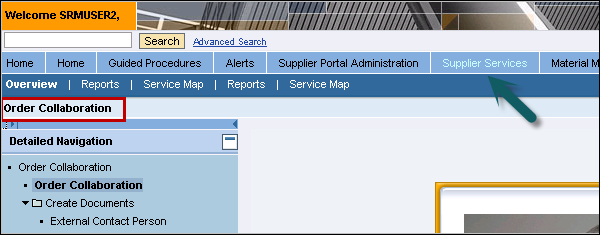
On the left side, you have the navigation menu
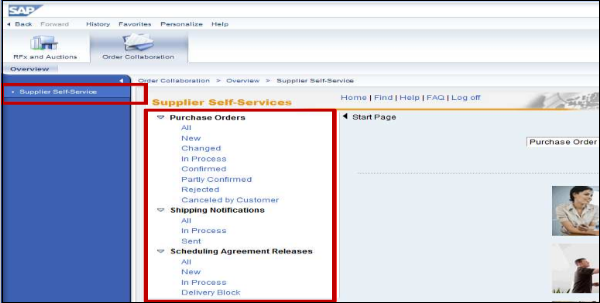
To view new Purchase Orders, a supplier can click on the New button. You will see all new Purchase Orders which are not worked on.
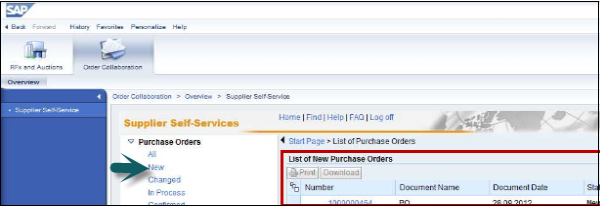
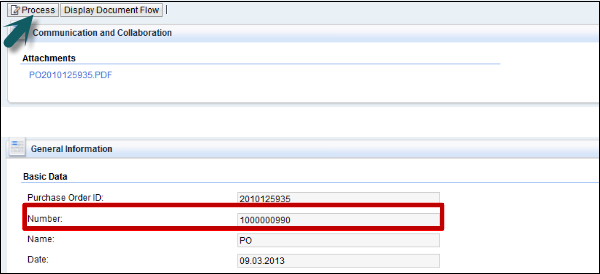
Click on document number to view the details of the Purchase Order. To maintain confirmation, click on the Process button.
A vendor can accept all the items or can reject all items. To accept or reject a single item, you can click on the tick or the cross button.
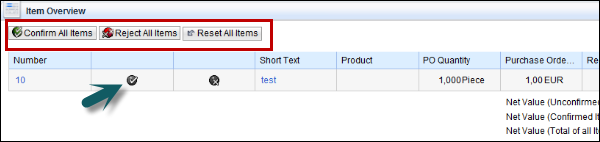
To save the confirmation, click on the Save button and to send the notification, click on the send button. Once confirmation is sent, a purchaser has an option to accept or reject the confirmation if there are any differences. When a purchaser rejects the confirmation, the supplier can submit a new confirmation.
When a purchaser accepts the confirmation, next is to confirm the shipping notification. Go to Create ASN on home page.
Enter the details sold to party, ship to address and click on goods delivered to recipients to transfer them to the Purchase Order.

SAP SRM - Post Installation For LAC
In SAP SRM, Live Auction Cockpit allows you to perform auctions in real time scenario. As discussed in the previous chapters, you can convert RFx to Live Auction or can create a new Auction in SRM Portal. As mentioned, Live Auction Cockpit is available in both Java and ABAP.
LAC is deployed as part of the overall installation of SAP SRM with SAP NetWeaver Java Application Server (J2EE Engine). If you install the SRM ABAP system and J2EE Engine on the same machine, ABAP backend system is the default data source, as desired. However, if you install the J2EE Engine on a separate machine, you must change the default setting and select the SRM ABAP backend as the data source for the J2EE Engine.
The following deployment options are available −
Live Auction Cockpit on Java Web Server
Live Auction Cockpit on ABAP Web Server
Live Auction Cockpit on Java Web Server in supplier self-services
Live Auction Cockpit on ABAP Web Server in supplier self-services
To facilitate customization, the resource files for the Live Auction Cockpit applet are packaged separately from the web application itself. In order for the applet to retrieve its resources, the web server must make the resource files accessible via HTTP. This is achieved by creating a web alias for the directory that contains the resources. Without this alias, the applet cannot load properly.
To define a Web alias, go to SAP NetWeaver.
You should have administrator privilege for NetWeaver Administration.
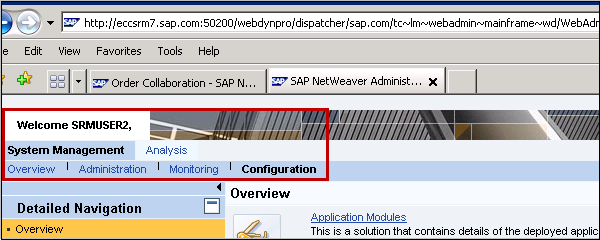
Go to Configuration → Infrastructure → Java HTTP Provider Configuration → Aliases. Click on Add alias → Enter name and path and click on Save button.
SAP SRM - Configuring Single Sign-on
To configure single sign-on, you need to have access to these T-codes −
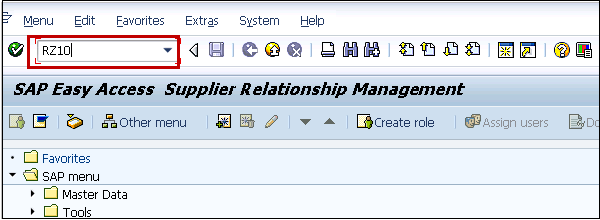
- RZ10
- STRUST
Step 1 − Login to the SAP SRM system using SAP GUI, go to T-code RZ10.
Step 2 − Select the Default profile and Extended Maintenance after that.
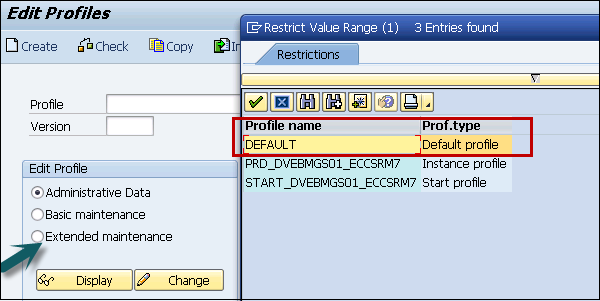
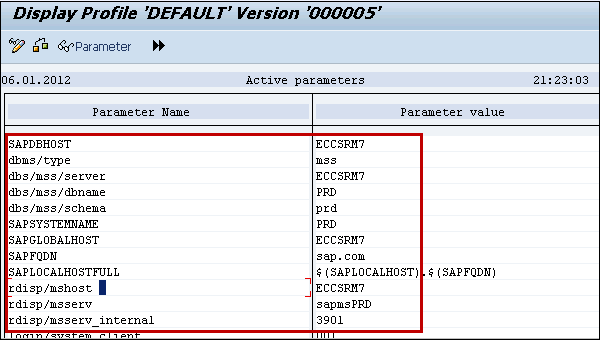
Step 3 − Click on Change and you will see the list of parameters for the profile.
Step 4 − Change the following profile parameters −
- login/create_sso2_ticket = 1
- login/accept_sso2_ticket = 1
Step 5 − Save and Activate the profile. It will generate a new profile.
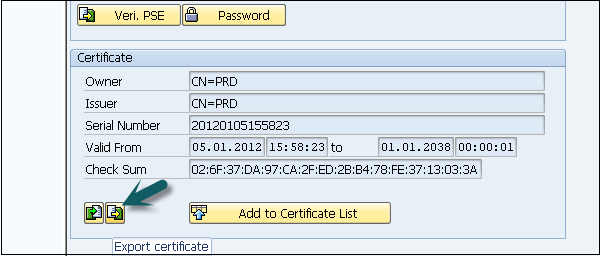
Step 6 − Export the R3SSO certificate from the Trust Manager, go to transaction STRUST.
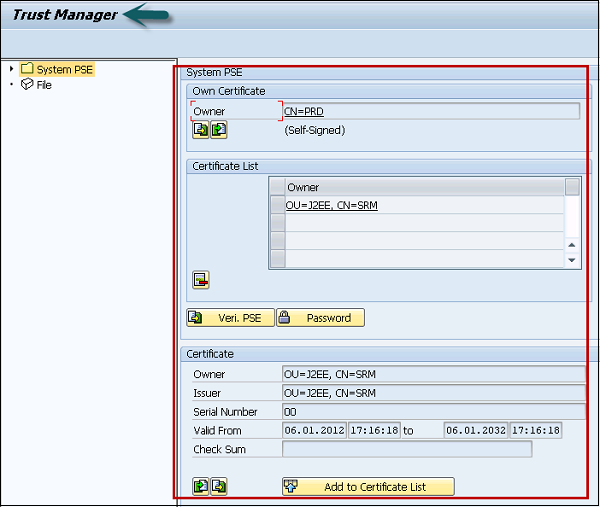
Step 7 − Double-click the text box to the right of Own Certificate. The certificate information is displayed. Note down the values of certificate as you need to enter the values.
Step 8 − Click on icon Export Certificate.
Step 9 − Save the file as <R3_Name>-<Client>.crt.
Example
EBS-300.crt
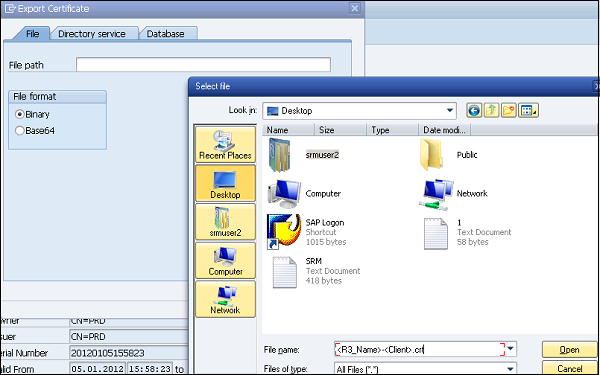
Step 10 − Click on the tick mark to create the file in parent directory.
Step 11 − Import R3 SSO certificate to the Java engine using the administrator tool.
NOTE − Make sure the Java engine is started.
Step 12 − Open the Java Administration tool.
Step 13 − Enter the Java Engine Administrator password and click on Connect.
Step 14 − Choose Server → Services Key → Storage
Step 15 − Click on Ticket Key Store in the View panel.
Step 16 − Click on Load in the Entry group box. Select the .crt file you exported in the previous step.
Step 17 − Configure the Security Provider service in the SAP Java engine using the Administrator tool.
Step 18 − Choose Server Services Security Provider.
Step 19 − Choose ticket in the Component panel and go to the Authentication tab.
Step 20 − Modify the options of Evaluate Ticket Login Module and add the following properties to each backend system on which you want to configure SSO.
SAP SRM - Supplier Evaluation
Supplier evaluation is one of the key processes in maintaining and improving long term relationships with the suppliers.
SAP supports two main methodologies for Supplier Evaluation −
Event-driven evaluation, triggered from confirmation, invoice, and advanced supplier list.
Ad-hoc surveys using the Supplier Survey Cockpit
Creating Supplier Survey Cockpit
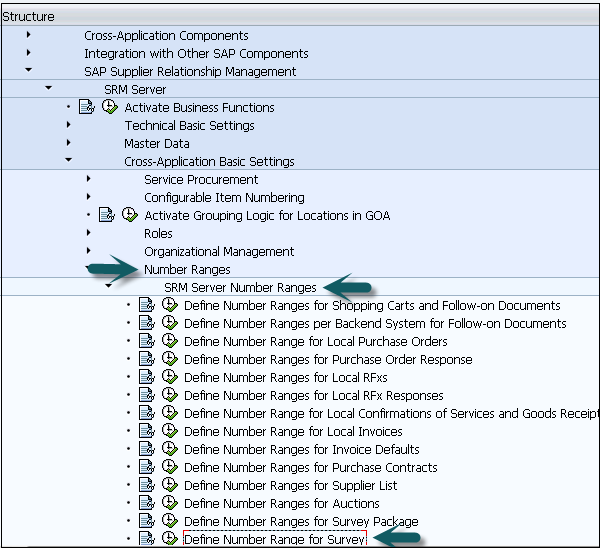
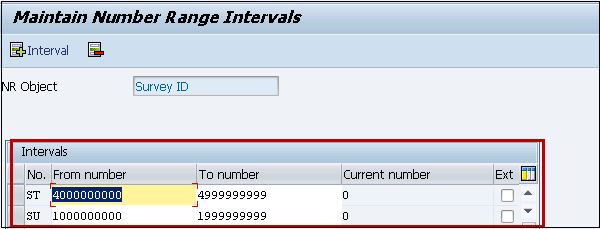
Each supplier survey has a unique id and you need to configure the number range in SAP server. Go to SRM Server → Cross Application Basic Settings → Number Ranges → SRM Server Number ranges → Define number range for survey.
You can enter numeric and alphanumeric ranges in the number range.
Evaluation Area
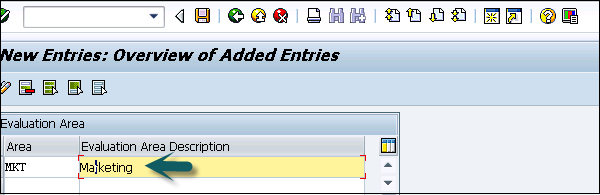
You can also define the evaluation area how a survey can be classified and a part of the organization is evaluated.
Example
Evaluation areas could be Marketing, Production and Finance.
Step 1 − To define Evaluation Area, go to SRM Server → Supplier Evaluation → Evaluation Area
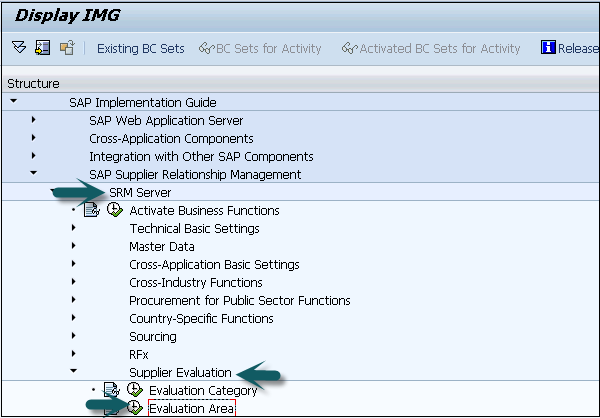
Step 2 − Click on new entries and enter the area and description. To save the area click on the Save icon at the top
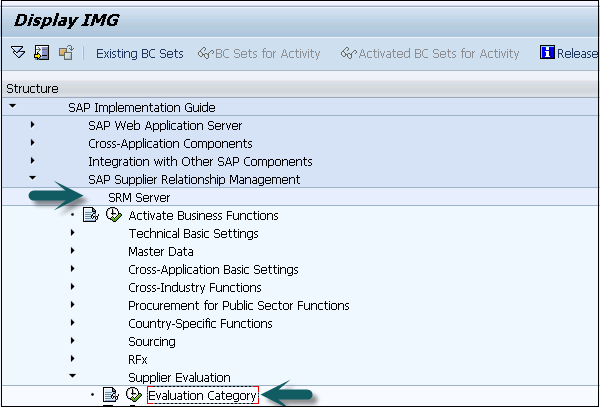
Evaluation Category
In supplier evaluation, you can divide each survey as per the evaluation category. This refers to the questionnaire and the target group.
Example
Delivery, Quality, etc.
Step 1 − To define the Evaluation area, go to SRM Server → Supplier Evaluation → Evaluation category.
Step 2 − To send and receive questionnaires via email, you have to create mail user using transaction SU01.
SAP SRM - MDM Catalog Upgrade
There is a requirement from clients to upgrade from SRM-MDM Catalog 2.0 service pack 04 to SRM MDM Catalog 7.01 or to upgrade from SRM MDM catalog 7.01 to SRM MDM catalog 7.02 and there shouldnt be any data loss.
Let us follow these steps to perform catalog −
Step 1 − Uninstall the old SRM-MDM Catalog 7.01 components.
Step 2 − Install the new SRM-MDM Catalog 7.02 installation packages.
Step 3 − Upgrade the existing repositories.
Step 4 − When repository upgrade is completed, load repositories with index updating.
Step 5 − Perform upgrade SRM-MDM Catalog Search UI.
You may also need to perform these optional steps −
- You can upgrade SRM-MDM Catalog Web UI for Approver.
- You can upgrade MDM Web UI.
- You can upgrade MDM ABAP AP.
- Perform all the component-specific activities.
SAP SRM - Security
In SAP SRM, there are various activities that can be performed under security. Security deals with −
- User authorization
- User authentication
- Single Sign-on
- Data transfer between SRM applications with secure methods
- Managing access control
SAP SRM is based on SAP NetWeaver platform, so you configure the security for SRM similar as in SAP NetWeaver.
Managing User Administration and Authentication
There are various user management tools that you can use in SAP NetWeaver. These tools are inbuilt to SAP system and can be called from transactions.
Using these tools, you can manage the application platform for Java and ABAP.
Managing Users in ABAP Engine
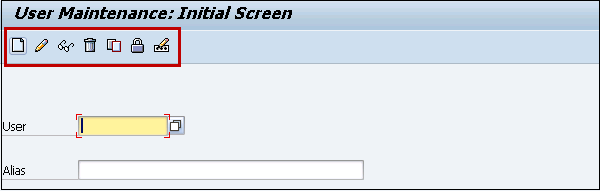
Step 1 − You can manage users in the SAP system using T-Code: SU01, you can use this to manage users in ABAP system.
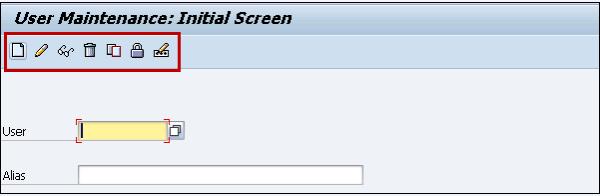
Step 2 − To create a new user, enter the username and click on Create button.
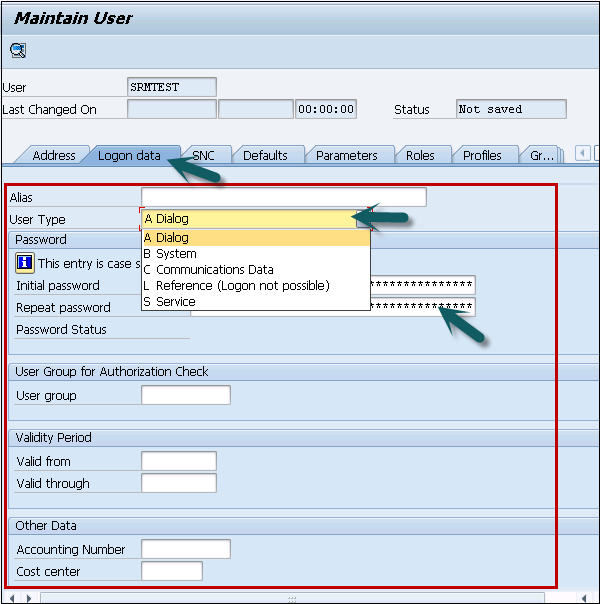
Step 3 − You will be directed to the next window where you can see multiple tabs. In the Address tab, enter the details about the user. Title, first name, last name, academic title, and other details.

Step 4 − In Logon Data tab, enter the details like User type, Password details, etc
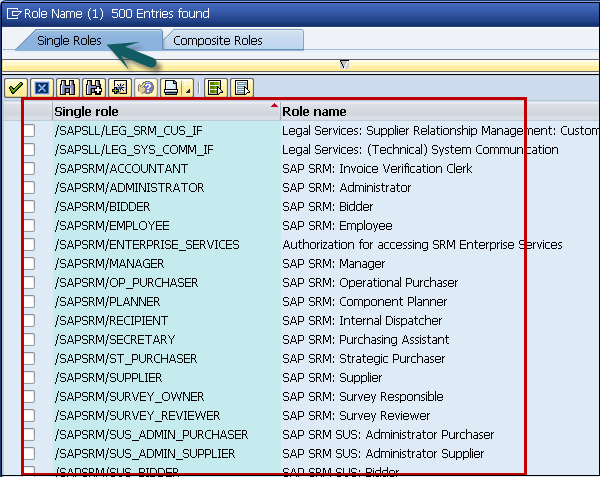
Step 5 − Go to the Roles tab to add the role as per business requirement. There are predefined roles as per different modules.
You have an option to select from single roles or composite roles.
Step 6 − You can scroll to different tabs. In Groups, you can add a user to different groups.
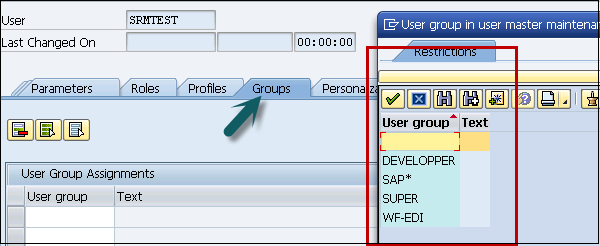
Step 7 − When you enter all the details, you can click on the Save button at the top.
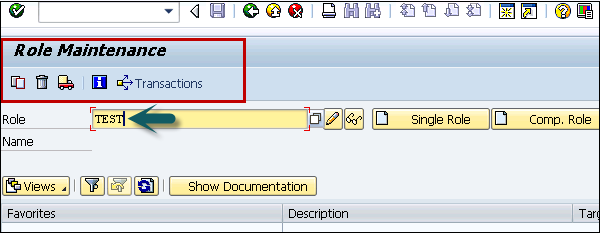
Profile Generator (PFCG)
Transaction PFCG
You can use this transaction to manage roles in ABAP system and to provide user authorization. You can create new roles, copy existing roles, define single and composite roles, etc.
Step 1 − In the following screen, you have to enter the role name and click on Single/Composite role.
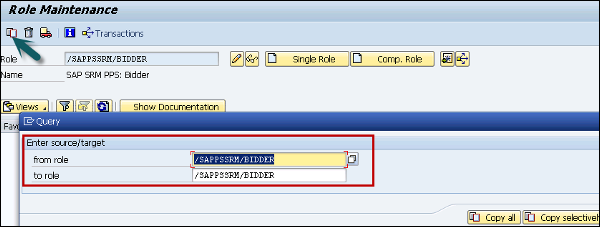
Step 2 − To copy an existing role, you can click on the Copy Role button. Select the role from the list of existing roles, you can select Single/Composite Role.
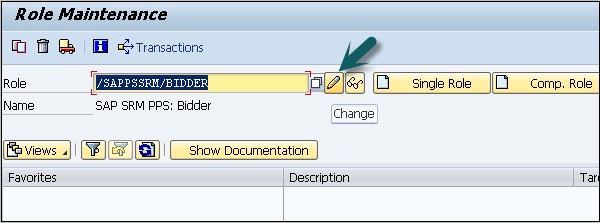
Step 3 − To change a role. Select the role from the list and click on the Change button.
Step 4 − When you go to the User tab, you can see the list of users that has been applied to this role. You can see user id, user name, from and to date.
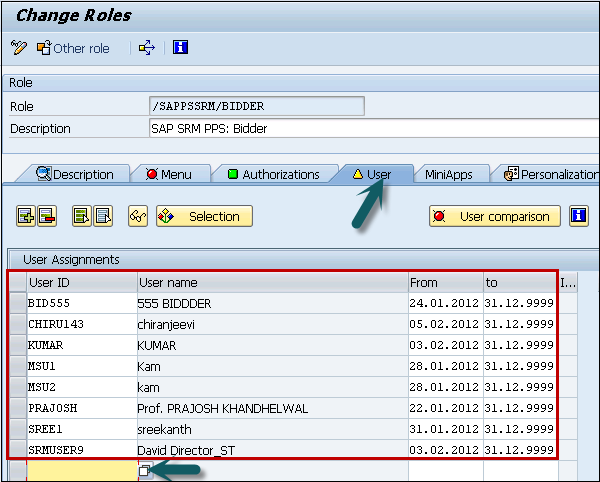
Step 5 − You can also perform a user comparison master record or can add a direct user to this role.
Central User Administration
You can use this method to centrally maintain users for multiple ABAP-based systems. This method also supports synchronization with a directory server.
These system users are required for RFC configuration between two clients. These RFCs are also required to transfer the data here.
You need to create the following in the respective clients with the following defined roles −
Client 1 − 400 User, this is a central system CUA_EC400
Client 2 − 410 User, this is a child system CUA_EC410
The usernames mentioned above have been created in client 400 and 410 respectively with the following roles −
User CUA_EC400 is associated with the following roles (roles in the central system) −
- SAP_BC_USR_CUA_CENTRAL
- SAP_BC_USR_CUA_CENTRAL_BDIST
- SAP_BC_USR_CUA_CENTRAL_EXTERN
UME Engine
You can use Web-based UME administration console to maintain users, roles and authorizations in Java-based systems that use the UME for the user store.
User Types
When you create a new user, you can select the following user types −
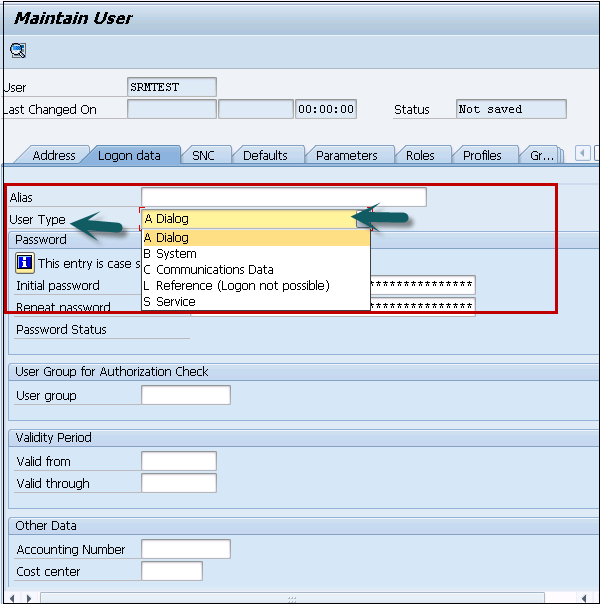
Each user has its own description as per business requirement. A dialog user is required to login to system as an individual user.
The following are the different user types in SAP −
| S.No | User Types In SAP & Description |
|---|---|
| 1 |
Dialog Individual, interactive system access |
| 2 |
System Background processing and communication withing a system (Such as RFC users for ALE, Workflow, TMS, and CUA) |
| 3 |
Communication Dialog-free communication for external RFC calls |
| 4 |
Service Dialog user available to a larger, anonymous group of users. |
| 5 |
Reference General, non-person related users that allow the assignment of additional identical authorizations, such as for Internet users created with Transaction SU01. No logon is possible. |
SAP SRM - System Landscape
As mentioned in previous chapters, in SAP SRM you can go for various deployment scenarios based on the business requirement. Different deployment scenarios support different procurement processes and the processing of goods receipt and invoices.
In SRM, you can use the following two types of data exchange −
- Using external user interfaces
- Using external system interfaces
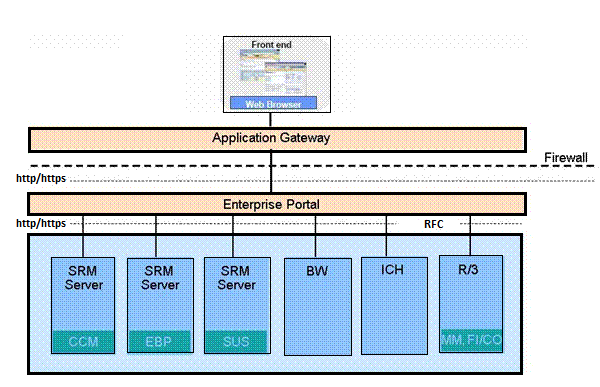
It is recommended that you use SAP Web Dispatcher to access the SRM components that are protected in internal firewall and are not known to outside users. SAP Web Dispatcher is also used to implement SAP security standards in common scenario.
To implement security, it is necessary to find out the software component you need to install as per the business scenario and the SAP SRM package.
Operational Contract Management
Let us now understand Operational Contract Management.
We have the following processes under Operational Contract Management −
Strategic Sourcing: For Strategic Sourcing, you can use −
RFx
Live Auction cockpit
Service procurement
Service procurement
Service procurement external staffing
Catalog management
Self-user Service SUS: For Self-user Service SUS, you can use −
SUS Classic
SUS extended classic
BI Analytics
Spend Analysis
Supplier Evaluation
SAP SRM procurement for Public sector
As per the software components, you have to decide the deployment scenario and security guidelines in SAP SRM system.
Network & Communication Security
In SAP SRM, data exchange occurs with HTTPS connection using SSL encryption that is used to protect data from unauthorized access. SSL stands for Secure Socket Layer. While performing secure network and communication in SAP system, the following points can be considered −
- Network topology of SAP system
- Firewall configuration
- Transport layer security
- Using multiple network zones
In SAP SRM system, all the components that use HTTP protocol support encryption of data using SSL protocol and as per the protocol data are transferred. The components include confidential data like system password, etc. As per data transfer and protocol, you can also apply transport level security.
SSL can be used to increase the security between business systems and adapters, business system and integration server.
| Destination | Delivered | Type |
|---|---|---|
| SAP ERP (Classic Scenario) | No | RFCs and SOA Services |
| SAP ERP (Extended Classic Scenario) | No | RFCs and IDocs |
| SAP Customer Relationship Management (SAP CRM) | No | RFCs and SOA Services |
| Collaboration Projects (cPro) | No | XML communication using SAP NetWeaver Process Integration (SAP NetWeaver PI) (Web services) |
| CFolders | No | RFCs |
This shows the system and components and relevant communication destinations for the SAP SRM system.
To communicate with external systems, you need to activate the following services in SAP SRM system −
- /sap/bc/webdynpro/sapsrm
- /sap/bc/srm
- /sap/bc/bsp/sapsrm
- /sap/sapsrm/
- /default_host/sap/bc/srm
- /default_host/sap/bc/webdynpro/sapsrm
- /default_host/sap/bc/bsp/sapsrm
To use NetWeaver Business client for SRM, you need to activate the following −
- /default_host/sap/bc/nwbc/srm
To use Live Auction cockpit, you need to activate the following −
- /sap/lacmessaging
To activate these services, use T-code SICF
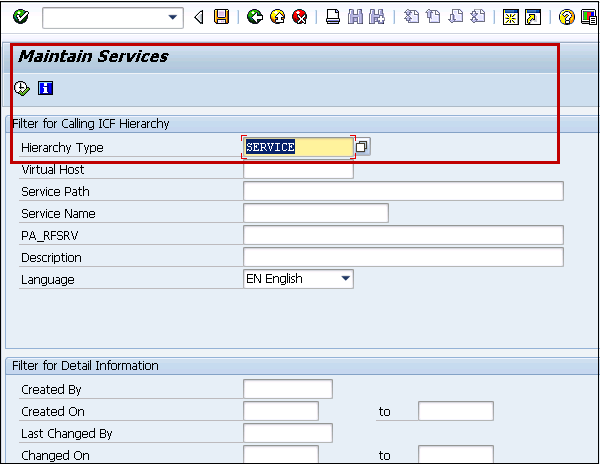
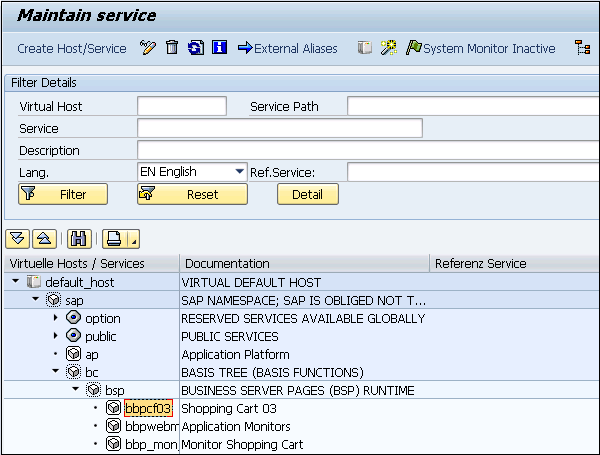
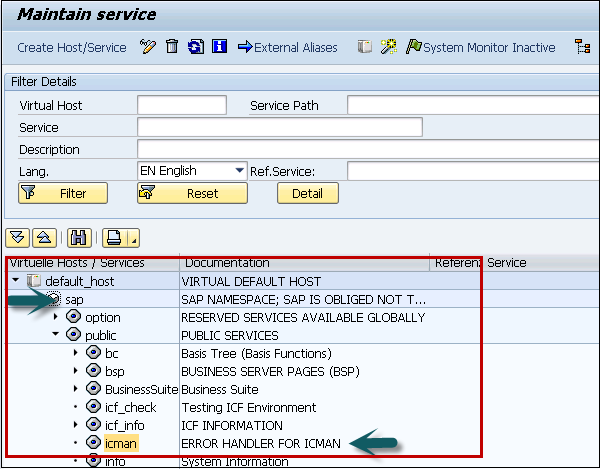
In Hierarchy type, select service and click on Execute button. In the next window, you can maintain service. Select the required ICF service in the ICF tree in transaction SICF.
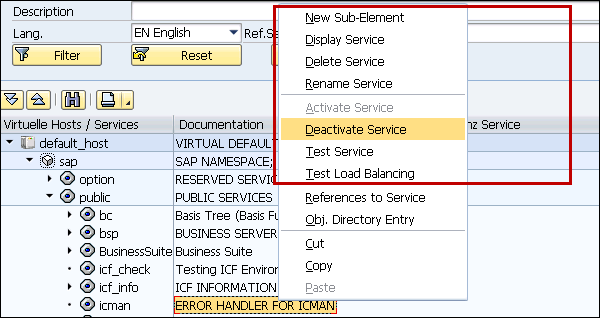
Activate the ICF service in one of the following ways −
- Using menu option Service/Host → Activate
- Using the context menu and choosing Activate Service
Default_host node is inactive in transaction SICF; the HTTP requests could result in ABAP runtime error RAISE_EXCEPTION with the following short text −
Exception condition "HOST_INACTIVE" triggered.
If a service is inactive in transaction SICF, an error text appears when you try to access the service.
To support internet protocols HTTP, HTTPS and SMTP /default_host/sap/public/icman is activated in transaction.
This service is used to decide how HTTP requests are distributed.
Other Internal Services in SAP
Let us now understand the other internal services in SAP −
default_host/sap/bc/echo
This is used to provide information about the logon procedure in use, header and form fields and the SSO cookie generated for the processed request. This service should be activated only for error analysis.
/default_host/sap/bc/error
This service creates some error situations in the system and should only be activated for error analysis. To activate/deactivate service, you have to right-click on service.
SAP SRM - Auditing and Logging
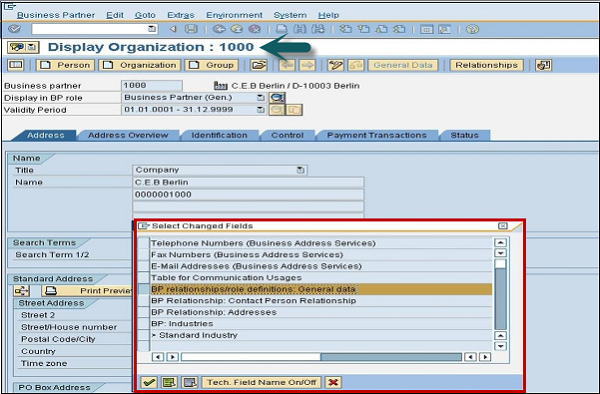
You can also perform auditing and logging information in SAP SRM. The user information system can be used to check the details about user, roles, profiles and authorizations.
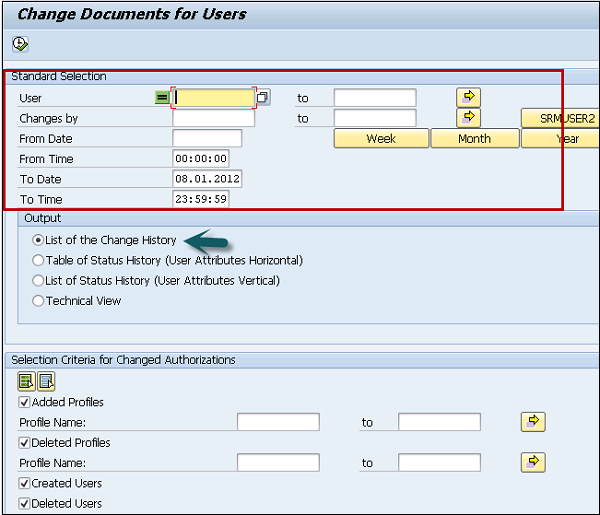
To check change documents for users, use T-code SU01
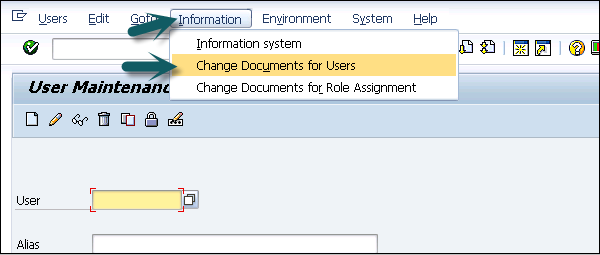
You will be directed to the next window where you can enter the selection criteria.
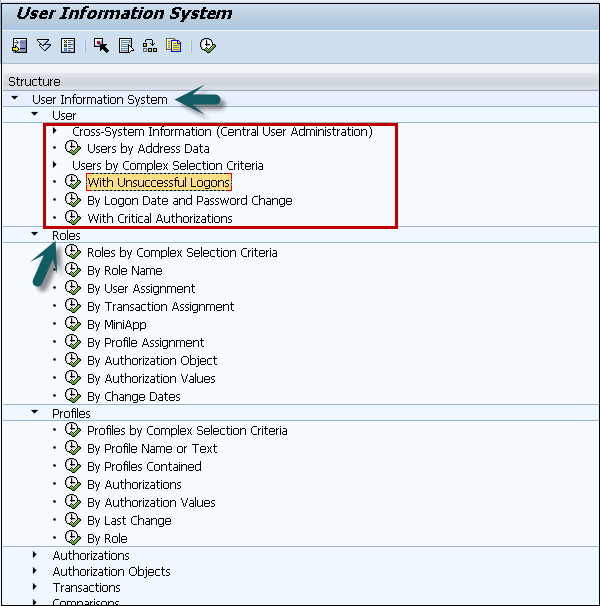
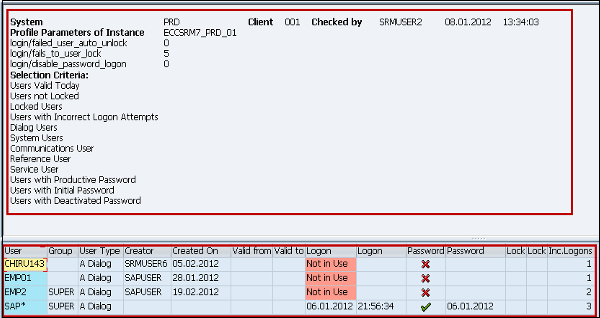
To enter the user information system and to check wide range of functions related to user history, use T-code SUIM
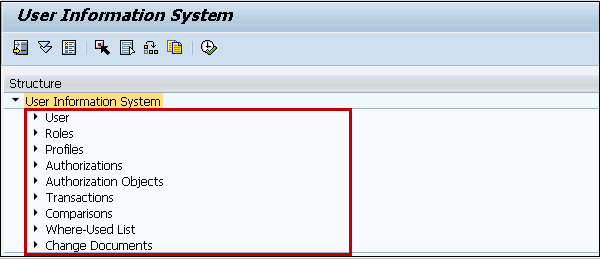
You can expand each of the section to see the Change history. Various change/audit logs can be checked using the User Information System.
To view Business Partner history, you can use T-code BP