- RichFaces - Home
- RichFaces - Overview
- RichFaces - Environment Setup
- RichFaces - Architecture
- RichFaces - Basic Concepts
- RichFaces - Rich Skin
- RichFaces - Input Components
- RichFaces - Output Components
- RichFaces - Iteration Component
- RichFaces - Selection Components
- RichFaces - Menu Components
- RichFaces - Rich Tree
- RichFaces - Error Handling
RichFaces - Rich Skin
RichFaces comes with a new feature to control the look and feel of your website in a centralized manner, called Rich Skin. Skin is a high level implementation of old CSS files, which is more convenient for the back-end developer to control the look and feel of the website. There are some built-in skins available, which can be customized according to your choice.
Built-in Skin
There are a number of built-in skins available in the RichFaces component jar file. Following are some built-in rich skin available.
- Default
- Plain
- emeraldTown
- blueSky
- wine
- japanCherry
- ruby
- classic
- deepMarine
- NULL
In the following example, we will implement classic skin. It is very easy to implement any of the above-mentioned skins. Before proceeding further, please add the skin in the web.xml file using the line of code given below. We can add any skin of our choice from the above list. We just need to modify the <param-value> tag with the appropriate skin name.
<context-param>
   <param-name>org.richfaces.skin</param-name>
   <param-value>classic</param-value>
</context-param>
After adding this, please create a SkinExample.xhtml file and add the following line of code into it.
<?xml version = '1.0' encoding = 'UTF-8' ?>
<ui:composition xmlns = "http://www.w3.org/1999/xhtml"
   xmlns:h = "http://java.sun.com/jsf/html"
   xmlns:f = "http://java.sun.com/jsf/core"
   xmlns:ui = "http://java.sun.com/jsf/facelets"
   xmlns:a4j = "http://richfaces.org/a4j"
   xmlns:rich = "http://richfaces.org/rich">

   <f:view>
      <h:head>
         <title>Rich Faces Built in Skin</title>
      </h:head>

      <h:body>
         <h:form>
            <rich:panel style = "width:60%">
               <rich:tabPanel switchType = "AJAX">
                  <rich:tab header = "Name">
                     Tutorials Point
                  </rich:tab>

                  <rich:tab header = "Features">
                     Best Place to learn
                  </rich:tab>
               </rich:tabPanel>
            </rich:panel>
         </h:form>
      </h:body>

   </f:view>
</ui:composition>
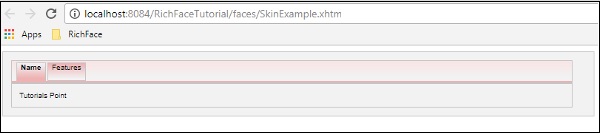
Once we run this page, following will be the output in the browser, where each tab dynamically propagates to generate a different output. Once you hit the next tab, it will show a different output.

In the above example, <rich:panel> creates a panel where we are creating different tabs using <rich:tab>. The <rich:tabPanel switchType = "AJAX"> provides AJAX transition of the used tab.
Creating/Modifying the Skin
Skin is nothing but an extended version of CSS design, which will be applied to the webpage at runtime. In the previous section, we learned some basic in-built functionality of the skin. In this section, we will create our own skin or modify the existing skin. Skin in the RichFaces can be customized at the following three levels.
Skin property file − All the skins are generated through different property files mentioned under rechfaces-a4j-4.5.17.Final jar file. All we need to do is create a same property file and keep it under our source folder and edit its property. We need to change our web.xml accordingly to reflect on our new skin property in the website.
Component style sheet − Implement new CSS file of choice and use it in the application.
Overwrite style class − One can overwrite the style by directly mentioning the style properties in the xhtml file.
Let us consider an example. We will customize our previous classic skin. Create a property file inside the source package and name it custom.skin.properties. Following are the entries of this property file that were copied from other property files available in the jar file mention above.
#Colors
headerBackgroundColor = #black
headerGradientColor = #DF5858
headerTextColor = #FFFFFF
headerWeightFont = bold

generalBackgroundColor = #f1f1f1
generalTextColor = #000000
generalSizeFont = 10px
generalFamilyFont = Arial, Verdana, sans-serif

controlTextColor = #000000
controlBackgroundColor = #ffffff
additionalBackgroundColor = #F9E4E4

shadowBackgroundColor = #000000
shadowOpacity = 1
panelBorderColor = #C0C0C0
subBorderColor = #ffffff

tabBackgroundColor = #EDAEAE
tabDisabledTextColor = #C47979
trimColor = #F7C4C4
tipBackgroundColor = #FAE6B0
tipBorderColor = #E5973E

selectControlColor = #FF9409
generalLinkColor = #CF0000
hoverLinkColor = #FF0000
visitedLinkColor = #CF0000

# Fonts
headerSizeFont = 11px
headerFamilyFont = Arial, Verdana, sans-serif
tabSizeFont = 11
tabFamilyFont = Arial, Verdana, sans-serif
buttonSizeFont = 11
CHAPTER 11  SKINS 223
buttonFamilyFont = Arial, Verdana, sans-serif

tableBackgroundColor = #FFFFFF
tableFooterBackgroundColor = #cccccc
tableSubfooterBackgroundColor = #f1f1f1
tableBorderColor = #C0C0C0
tableBorderWidth = 1px

#Calendar colors
calendarWeekBackgroundColor = #f5f5f5
calendarHolidaysBackgroundColor = #FFF1F1
calendarHolidaysTextColor = #980808
calendarCurrentBackgroundColor = #808080
calendarCurrentTextColor = #ffffff
calendarSpecBackgroundColor = #f1f1f1
calendarSpecTextColor = #000000

warningColor = #FFE6E6
warningBackgroundColor = #FF0000
editorBackgroundColor = #F1F1F1
editBackgroundColor = #FEFFDA

#Gradients
Gradient Type = plain
Depending the skill level, we can change any attribute in this property file. We can add new Style class or edit the existing one. Once we are done with the creation of the new property file, it is time to add the same in the web.xml file. Following is the entry of the web.xml, which should point to our skin.
<context-param>
   <param-name>org.richfaces.skin</param-name>
   <param-value>custom</param-value>
</context-param>
Note − Make sure the new property file is present inside the source directory, otherwise it will throw a runtime error saying NoClassFound Exception.
Go ahead and run the previous file named SkinExample.xhtml. Following will be the output in the browser, where we will able to see that the entire look and feel of the website has changed to Ruby as a new property file was copied from ruby.properties file.
Changing the Skin at Runtime
In this example, we will change the skin at run time. Create a skin class like the following.
import javax.faces.bean.ManagedBean;
import javax.faces.bean.RequestScoped;

@ManagedBean
@RequestScoped

public class skinBean {
   private String skin;
   public skinBean() {
      this.skin="plane";
   }
   public String getSkin() {
      return skin;
   }
   public void setSkin(String skin) {
      this.skin = skin;
   }
}
Then change the web.xml file as follows, to populate the skin name at runtime.
<context-param>
   <param-name>org.richfaces.skin</param-name>
   <param-value>#{skinBean.skin}</param-value>
</context-param>
After doing so, we need to change the configuration files of the JSF application. The files can be located under web-INF folder. Add the following bean property to it.
<managed-bean>
   <managed-bean-name>skinBean</managed-bean-name>
   <managed-bean-class>SkinBean</managed-bean-class>>
   <managed-bean-scope>session</managed-bean-scope>

   <managed-property>
      <property-name>skin</property-name>
      <value>plain</value>
   </managed-property>
</managed-bean>
Following is the xhtml file code.
<?xml version = "1.0" encoding = "UTF-8"?>
<!DOCTYPE html>
<html xmlns = "http://www.w3.org/1999/xhtml"
   xmlns:h = "http://java.sun.com/jsf/html"
   xmlns:a4j = "http://richfaces.org/a4j"
   xmlns:f = "http://java.sun.com/jsf/core"
   xmlns:rich = "http://richfaces.org/rich">

   <h:head>
      <title>TODO supply a title</title>
   </h:head>

   <h:body>
      <h:form>
         <div style = "display: block; float: left">
            <h:selectOneRadio value = "#{skinBean.skin}" border = "0"
               layout = "pageDirection" title = "Changing skin" style = "font-size: 8;
               font-family: comic" onchange = "submit()">
               <f:selectItem itemLabel = "plain" itemValue = "plain" />
               <f:selectItem itemLabel = "emeraldTown" itemValue = "emeraldTown" />
               <f:selectItem itemLabel = "blueSky" itemValue = "blueSky" />
               <f:selectItem itemLabel = "wine" itemValue = "wine" />
               <f:selectItem itemLabel = "japanCherry" itemValue = "japanCherry" />
               <f:selectItem itemLabel = "ruby" itemValue = "ruby" />
               <f:selectItem itemLabel = "deepMarine" itemValue = "deepMarine" />
            </h:selectOneRadio>
         </div>

         <div style = "display: block; float: left">
            <rich:panel >
               <rich:panelMenu style = "font-family: monospace; font-size: 12;">
                  Changing skin in runtime
               </rich:panelMenu>

               <rich:panelMenu  style = "font-family: monospace; font-size: 12;">
                  This is a result of the modification "blueSky" skin
               </rich:panelMenu>
            </rich:panel>
         </div>
      </h:form>
   </h:body>

</html>
The above piece of code will produce the following output in the browser.

In the above example, initially we are selecting plain, hence it is pointing to plain. Once you propagate through the radio button, it will change the color accordingly.
