- RichFaces - Home
- RichFaces - Overview
- RichFaces - Environment Setup
- RichFaces - Architecture
- RichFaces - Basic Concepts
- RichFaces - Rich Skin
- RichFaces - Input Components
- RichFaces - Output Components
- RichFaces - Iteration Component
- RichFaces - Selection Components
- RichFaces - Menu Components
- RichFaces - Rich Tree
- RichFaces - Error Handling
RichFaces - Iteration Component
In the previous chapters, we have learned about the different input and output components. In this chapter, we will learn how to iterate through different data structures in the website.
<rich:dataTable>
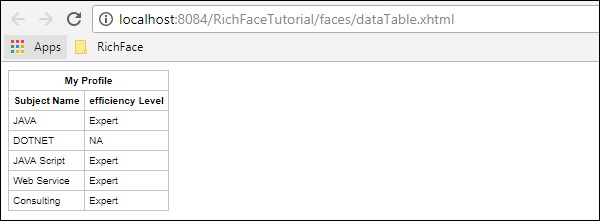
This tag is used to render a table as a result in the website. In the following example, we will render a subject table along with the pro-efficiency level.
<?xml version = '1.0' encoding = 'UTF-8' ?>
<html xmlns = "http://www.w3.org/1999/xhtml"
   xmlns:h = "http://java.sun.com/jsf/html"
   xmlns:f = "http://java.sun.com/jsf/core"
   xmlns:ui = "http://java.sun.com/jsf/facelets"
   xmlns:a4j = "http://richfaces.org/a4j"
   xmlns:rich = "http://richfaces.org/rich">

   <h:head>
      <title>Rich Data Table</title>
   </h:head>

   <h:body>
      <h:form>
         <rich:dataTable value = "#{subject.subjectListObj}" var = "record" >
            <f:facet name = "header">
               <h:outputText value = "My Profile" />
            </f:facet>

            <rich:column>
               <f:facet name = "header">Subject Name</f:facet>
               <h:outputText value = "#{record.subjectName}"/>
            </rich:column>

            <rich:column>
               <f:facet name = "header">efficiency Level</f:facet>
               <h:outputText value = "#{record.efficiency}"/>
            </rich:column>
         </rich:dataTable>
      </h:form>
   </h:body>

</html>
We need to change our subject.java accordingly to render the list. Following is an example of subject.java.
import java.util.ArrayList;
import java.util.List;
import javax.faces.bean.ManagedBean;
import javax.faces.bean.ManagedProperty;
import javax.faces.bean.RequestScoped;

@ManagedBean
@RequestScoped

public class Subject {
   String SubjectName;
   private String efficiency;

   private List<Subject> subjectListObj=new ArrayList<>();
      public Subject() {
   }
   public Subject(String SubjectName,String efficiency ) {
      this.SubjectName = SubjectName;
      this.efficiency= efficiency;
   }
   public String getSubjectName() {
      return SubjectName;
   }
   public void setSubjectName(String SubjectName) {
      this.SubjectName = SubjectName;
   }
   public List<Subject> getSubjectListObj() {
      subjectListObj.add(new Subject("JAVA","Expert"));
      subjectListObj.add(new Subject("DOTNET","NA"));
      subjectListObj.add(new Subject("JAVA Script","Expert"));
      subjectListObj.add(new Subject("Web Service","Expert"));
      subjectListObj.add(new Subject("Consulting","Expert"));
      return subjectListObj;
   }
   public void setSubjectListObj(List<Subject> subjectListObj) {
      this.subjectListObj = subjectListObj;
   }
   public String getEfficiency() {
      return efficiency;
   }
   public void setEfficiency(String efficiency) {
      this.efficiency = efficiency;
   }
}
The above example will generate the following output in the browser.
<rich: dataDefinitionList>
This is the tag used to generate the data definition from a model. This tag is not supported by JBoss since the invention of RichFaces 4. If you are still using RichFaces 3, then you can use this tag in the following manner.
<rich:dataDefinitionList var = "car" value = "#{dataTableScrollerBean.allCars}"
   rows = "5" first = "4" title = "Cars">

   <f:facet name = "term">
      <h:outputText value = "#{car.make} #{car.model}"></h:outputText>
   </f:facet>

   <h:outputText value = "Price:" styleClass = "label"></h:outputText>
   <h:outputText value = "#{car.price}" /><br/>
   <h:outputText value = "Mileage:" styleClass = "label"></h:outputText>
   <h:outputText value = "#{car.mileage}" /><br/>
</rich:dataDefinitionList>
In the above example, dataTableScrollerBean is a Java class that is used to generate different values of the car. This is similar to the previous tag where we populated a bunch of object value using the <datatable> tag.
<rich:dataOrderedList>
RichFaces 4 came up with a wide moderation from RichFaces 3. <dataOrderedList> is a tag used to render a list in an ordered manner. This too is suppressed in RichFaces 4 because the ordering of an object or a list is much more easier and less time consuming, if done in Java. If your application uses RichFaces 3, then you can use this tag in the following manner.
<rich:panel style = "width:500px">
   <f:facet name = "header">
      Using rich:dataOrderedList
   </f:facet>

   <rich:dataOrderedList value = "#{airlinesBean.airlines}" var = "air">
      #{air.name}, #{air.code}
   </rich:dataOrderedList>
</rich:panel>
In the above example, airlinesBean is a Java bean class with a method named airlinesBean(). This method returns an object of type air. Later, we can use this air object to populate different properties in a table format.
<rich:dataList>
As the tag name suggests, this tag will be used to render an unordered list into the browser. However, like <orderedList> this tag is also suppressed in the latest version of RichFaces. We can easily render a list into the browser using <a4j:Repeat> and <rich:dataTable> tag in the following way.
<a4j:repeat value = "#{managedBean.subjectList}" var = "sub">
   <h:outputText value = "#{sub}"/>
</a4j:repeat>
In the above example, we are rendering a list which is an output of the method called subjectList(). If your application is built in RichFaces 3, then you can use this tag as follows.
<rich:panel style = "width:500px">
   <f:facet name = "header">
      Using rich:dataList
   </f:facet>

   <rich:dataList value = "#{airlinesBean.airlines}" var = "air">
      #{air.name}, #{air.code}
   </rich:dataList>
</rich:panel>
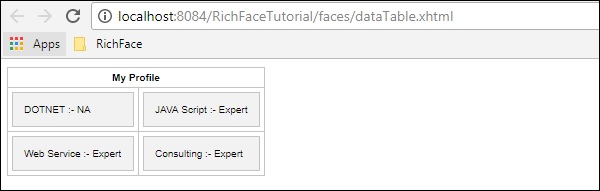
<rich:dataGrid>
Using the <datatable> tag you will be able to render a list as a table, however, <dataGrid> will help you render an object or a list. In the previous example of <rich:datatable>, just change the xhtml page as follows and see what is the output of the same.
<?xml version = '1.0' encoding = 'UTF-8' ?>
<html xmlns = "http://www.w3.org/1999/xhtml"
   xmlns:h = "http://java.sun.com/jsf/html"
   xmlns:f = "http://java.sun.com/jsf/core"
   xmlns:ui = "http://java.sun.com/jsf/facelets"
   xmlns:a4j = "http://richfaces.org/a4j"
   xmlns:rich = "http://richfaces.org/rich">

   <h:head>
      <title>Rich Data Table</title>
   </h:head>

   <h:body>
      <h:form>
         <rich:panel>
            <rich:dataGrid value = "#{subject.subjectListObj}" var = "record"
               columns = "2" elements = "4" first = "1" >

               <f:facet name = "header">
                  <h:outputText value = "My Profile" />
               </f:facet>

               <rich:panel>
                  <rich:column>
                     <f:facet name = "header">Subject Name</f:facet>
                     <h:outputText value = "#{record.subjectName}"/>
                  </rich:column>

                  <rich:column>
                     <f:facet name = "header">efficiency Level</f:facet>
                     <h:outputText value = "#{record.efficiency}"/>
                  </rich:column>
               </rich:panel>

            </rich:dataGrid>
         </rich:panel>
      </h:form>
   </h:body>

</html>
The above piece of code will yield the following output in the browser.
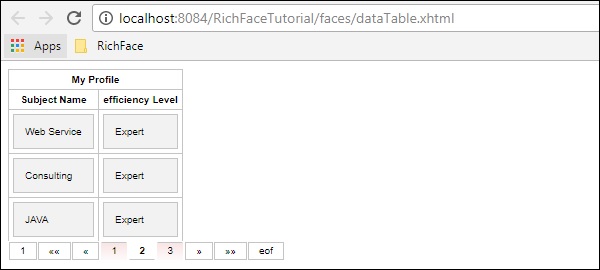
<rich:datascroller>
This tag helps to create a scroll bar while populating the table data. It is pretty similar to the pagination functionality of the JSF. Modify the previous dataTable example in the following manner.
<?xml version = '1.0' encoding = 'UTF-8' ?>
<html xmlns = "http://www.w3.org/1999/xhtml"
   xmlns:h = "http://java.sun.com/jsf/html"
   xmlns:f = "http://java.sun.com/jsf/core"
   xmlns:ui = "http://java.sun.com/jsf/facelets"
   xmlns:a4j = "http://richfaces.org/a4j"
   xmlns:rich = "http://richfaces.org/rich">

   <h:head>
      <title>Rich Data Table</title>
   </h:head>

   <h:body>
      <h:form>
         <rich:dataTable value = "#{subject.subjectListObj}" var = "record"
            rows = "3" id = "MyTable">

            <f:facet name = "header">
               <h:outputText value = "My Profile"/>
            </f:facet>

            <rich:column>
               <f:facet name = "header">Subject Name</f:facet>
               <h:outputText value = "#{record.subjectName}"/>
            </rich:column>

            <rich:column>
               <f:facet name = "header">efficiency Level</f:facet>
               <h:outputText value = "#{record.efficiency}"/>
            </rich:column>
         </rich:dataTable>

         <rich:dataScroller for = "MyTable" maxPages = "3">
            <f:facet name = "first">
               <h:outputText value = "1" />
            </f:facet>

            <f:facet name = "last">
               <h:outputText value = "eof" />
            </f:facet>
         </rich:dataScroller>
      </h:form>
   </h:body>

</html>
In the above example, you can add your style for a good look and feel. We have implemented separate <dataScroller> tags with different facet value. Following will be the output of the above file. Update the style sheer attribute in order to synchronize the table and the data scroller.