- RichFaces - Home
- RichFaces - Overview
- RichFaces - Environment Setup
- RichFaces - Architecture
- RichFaces - Basic Concepts
- RichFaces - Rich Skin
- RichFaces - Input Components
- RichFaces - Output Components
- RichFaces - Iteration Component
- RichFaces - Selection Components
- RichFaces - Menu Components
- RichFaces - Rich Tree
- RichFaces - Error Handling
RichFaces - Basic Concepts
In this chapter, we will see some basic concepts of RichFaces and we will learn how RichFaces deal with the processing of AJAX requests and many other functionalities.
Processing AJAX Request
As mentioned earlier, RichFaces provides rich UI components that enables AJAX functionalities in the web application even without implementing any AJAX codes. All these AJAX capabilities are introduced via a4:j tag library. <a4j:commandLink> , <a4j:commandButton>, <a4j:support>, and <a4j:poll> are the four tags that help the developer include AJAX functionalities into the web application. We will learn more about tag libraries in a subsequent chapter.
Partial Tree Processing
In a conventional AJAX application, all the input fields will be processed as different nodes of a tree, however, in RichFaces we have an option of partially submitting the tree nodes and validating the required fields.
Let us consider an example to understand more about this. Suppose, there are a total of five elements in HTML - Name, Employee Id, Employee salary, Employee Address, and Employee Department. Now you want to validate or process only Employee id, which can be possible using RichFaces but not possible using AJAX. You need to submit the entire form to the server. RichFaces provides an execute attribute that can identify a specific component and process the same. Following are the different levels of execute attributes available.
@all − This attribute will process all your data.
@none − This can be used when you dont want to process any of the data.
@this − This will process the requesting component only.
@form − This will process the entire form that contains the requesting component.
@region − This will process a specific region of a webpage.
Partial View Updates
Like input fields, RichFaces provides similar options to update different views. Developers can customize the view according to their choice. Like the execute attribute, there is a render attribute that works similar to the execute attribute. All these attributes work based on the ID identifier of a webpage.
Following are the different levels of render attributes available.
@all − This will update the entire component.
@none − This will not update any of your components.
@this − This will update only the requesting component.
@from − This will update the form that contains the requesting data.
@region − This will update a specific region of the webpage.
Other a4j Tags
Till now, we have discussed the conceptual properties about RichFaces application. In this section, we will learn about them in detail with hands-on examples.
<a4j:AJAX>
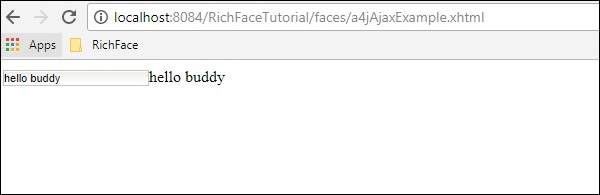
This is one of the core components that RichFaces offers. This is nothing but an extending part of JSF2.0 f:AJAX tag. This tag triggers an AJAX request whenever a JS event occurs in the webpages. Following example describes more about this tag. Create a xhtml page under the webpage folder and name it as a4jAJAXExample.xhtml. Then, paste the following piece of code.
<!DOCTYPE html>
<html xmlns = "http://www.w3.org/1999/xhtml"
   xmlns:h = "http://xmlns.jcp.org/jsf/html"
   xmlns:a4j = "http://richfaces.org/a4j">

   <h:head>
      <title>a4j:AJAX Tag Example</title>
   </h:head>

   <h:body>
      <h:form id = "form">
         <h:inputText value = "#{managedBean.message}">
            <a4j:AJAX render = "ShowMessage" />
         </h:inputText>

         <h:outputText value = "#{managedBean.message}" id = "ShowMessage"
            style = "animation-duration"/>
      </h:form>
   </h:body>

</html>
We also need to create a managed bean in order to hold the inputs from the webpage. Go ahead and create a java class under the source package directory. Following is the managedbean.java class code.
import javax.faces.bean.ManagedBean;
import javax.faces.bean.RequestScoped;

@ManagedBean
@RequestScoped

public class managedBean {
   String message;
   public String getMessage() {
      return message;
   }
   public void setMessage(String message) {
      this.message = message;
   }
}
Save both the files and run, which will yield the following output in the browser.
<a4j:param>
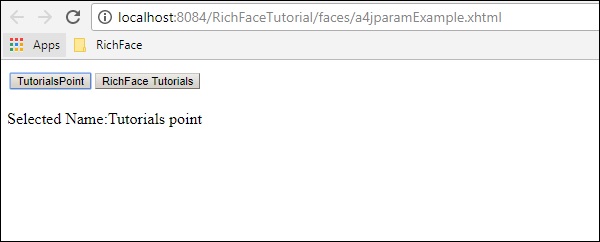
a4j:param is an extension of f:param tag. It is used to assign a value to a property or an instance variable. This tag is capable of assigning the value to the instance variable permanently. Following is the a4jparamExample.html code.
<?xml version = "1.0" encoding = "UTF-8"?>
<!DOCTYPE html>
<html xmlns = "http://www.w3.org/1999/xhtml"
   xmlns:h = "http://xmlns.jcp.org/jsf/html"
   xmlns:a4j = "http://richfaces.org/a4j">

   <h:head>
      <title>Param tag example</title>
      <meta name = "viewport" content = "width = device-width, initial-scale = 1.0"/>
   </h:head>

   <h:body>
      <h:form id = "form">
         <h:panelGrid columns = "2">
            <a4j:commandButton value = "TutorialsPoint" render = "rep">
               <a4j:param value = "Tutorials point" assignTo = "#{managedBean.message}" />
            </a4j:commandButton>

            <a4j:commandButton value = "RichFace Tutorials" render = "rep">
               <a4j:param value = "RichFace Tutorials" assignTo = "#{managedBean.message}" />
            </a4j:commandButton>
         </h:panelGrid>
         <br />

         <h:outputText id = "rep" value = "Selected Name:#{managedBean.message}" />
      </h:form>
   </h:body>

</html>
Following is the corresponding managed bean class code.
import javax.faces.bean.ManagedBean;
import javax.faces.bean.RequestScoped;
@ManagedBean
@RequestScoped
public class managedBean {
String message;
public String getMessage() {
return message;
}
public void setMessage(String message) {
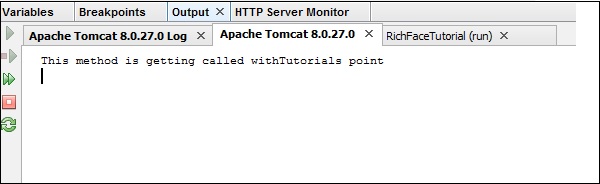
System.out.println("This method is getting called with"+message);
// we have added this line in order to check how the AJAX call
// happens to the class methods without any direct communication
this.message = message;
}
}
Go ahead and run the file. Following is the output in the browser.
Now, in the server console you will see the following output, which proves that xhtml file is communicating with the managed bean in order to set the instance variable at run time.
<a4j:commandButton>
We have already used the command button tag in our previous example. It is used to create a button inside a xhtml page, which will generate and communicate with the AJAX engine to process the specific request. It takes an input and processes the same and renders an output in the web browser.
In the previous example, we have created two buttons - TutorialsPoint and RichFace Tutorials. Our command button tag internally communicates with the managed bean and sets the required instance variables. It is also responsible for rendering the value.
<a4j:commandLink>
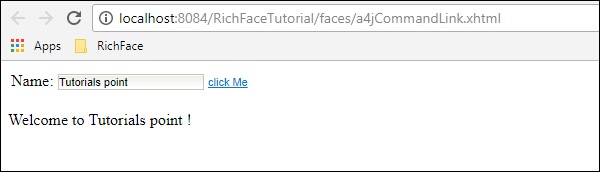
Command link works like <h:commandlink> component of JSF 2.0. The command button generates submit-based AJAX request, whenever the command link works on the JS click event. This is the only difference we have in the command button and the command link. Following example will help you understand the tag lib better. Create a4jCommandLink.xhtml file and paste the following code in it.
<?xml version = "1.0" encoding = "UTF-8"?>
<!DOCTYPE html>
<html xmlns = "http://www.w3.org/1999/xhtml"
   xmlns:h = "http://xmlns.jcp.org/jsf/html"
   xmlns:a4j = "http://richfaces.org/a4j">

   <h:head>
      <title>Example of command Link</title>
   </h:head>

   <h:body>
      <h:form id = "form">
         <h:panelGrid columns = "3">
            <h:outputText value = "Name:" />
            <h:inputText value = "#{managedBean.message}" />
             <a4j:commandLink value = "Click Me" render = "out" execute = "@form" />
         </h:panelGrid>
      </h:form>
      <br />

      <a4j:outputPanel id = "out">
         <h:outputText value = "Welcome to #{managedBean.message} !" />
      </a4j:outputPanel>
   </h:body>

</html>
No need to change anything in the managed bean class. Run this file and following will be the output in the browser.
<a4j:outputPanel>
The output panel works as a span of the HTML page. It is used to group different components of a webpage rather than specify them individually. In the previous example, we have used the output panel in order to display the message provided in the input text box. Following is the syntax of the output panel.
<a4j:outputPanel id = "out">
   <h:outputText value = "Welcome to #{managedBean.message} !" />
</a4j:outputPanel>
<a4j:region>
This is the key feature of RichFaces, that allows to process some parts of the webpage from. Using this tag, partial tree processing happens in RichFaces. It is mainly used to increase the rendering process. Following example will help you understand this in detail. Please create a a4jregionExample.xhtml file using the following code.
<?xml version = "1.0" encoding = "UTF-8"?>
<!DOCTYPE html>
<html xmlns = "http://www.w3.org/1999/xhtml"
   xmlns:h = "http://java.sun.com/jsf/html"
   xmlns:a4j = "http://richfaces.org/a4j" >

   <h:head>
      <title>Region Example</title>
   </h:head>

   <h:body>
      <h:form>
         <h:inputText value = "#{managedBean.message}"/>
         <h:inputText value = "#{managedBean.job}"/>
         <a4j:commandLink id = "one" value = "one"/>

         <a4j:region>
            <h:inputText value = "#{managedBean.message}"/>
            <a4j:commandLink id = "two" value = "two"/>
         </a4j:region>
      </h:form>
   </h:body>

</html>
Along with this xhtml page, please update our managedBean accordingly.
import javax.faces.bean.ManagedBean;
import javax.faces.bean.RequestScoped;

@ManagedBean
@RequestScoped

public class managedBean {
   String message;
   String job;
      public String getMessage() {
      return message;
   }
   public void setMessage(String message) {
      System.out.println("setMessage method is getting called with--"+message);
      this.message = message;
   }
   public String getJob() {
      return job;
   }
   public void setJob(String job) {
      System.out.println("setJob method is getting called with--"+job);
      this.job = job;
   }
}
The above piece of code will yield the following output in the browser.
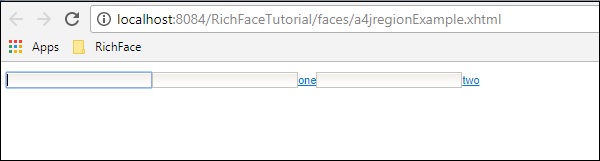
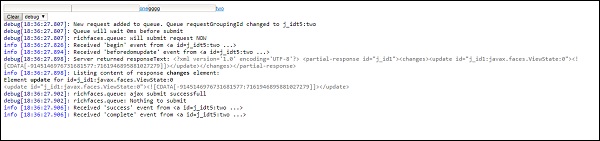
Whenever the command link one is clicked, it will process the entire form, however, when we click the command link two, only the message instance will be processed as it is enclosed within a region tag. Similarly, if we enclose the command link one in another region tag, then it will process only the first two input parameters. Following is the screenshot of the server console, whenever the command link two is clicked.

Whenever the command link one is clicked, following will be the output.

<a4j:repeat>
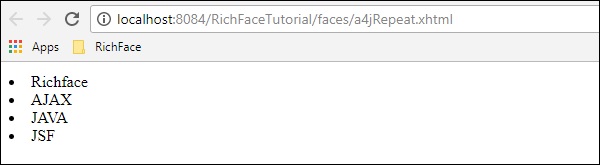
Repeat tag works exactly similar to <ui:repeat> tag of JSF. It helps to iterate over a list in the webpage. In the following example of a4jRepeat.xhtml file, we are iterating through a list from our managed bean class.
<?xml version = "1.0" encoding = "UTF-8"?>
<!DOCTYPE html>
<html xmlns = "http://www.w3.org/1999/xhtml"
   xmlns:h = "http://java.sun.com/jsf/html"
   xmlns:a4j = "http://richfaces.org/a4j">

   <h:head></h:head>

   <h:body>
      <h:form id = "form">
         <h:panelGrid columns = "1" style = "width: 640px">
            <a4j:outputPanel id = "panel" layout = "block">
               <a4j:repeat       value = "#{managedBean.subjectList}" var = "sub">
                  <li>
                     <h:outputText value = "#{sub}"/>
                  </li>
               </a4j:repeat>
            </a4j:outputPanel>
         </h:panelGrid>
      </h:form>
   </h:body>

</html>
Once you run this specific file in the browser, you will get the following output.
<a4j:status>
As the name suggests, this tag is useful whenever you want to display the status of your AJAX request in the front-end. You can include a normal text message or gif or image-based status as per your choice. For a small application such as the following, you will get a glimpse of the status in the front-end, however, whenever you are running a complex AJAX request, this status is very much visible. Please modify the a4jregionExample.xhtml as shown below.
<?xml version = "1.0" encoding = "UTF-8"?>
<!DOCTYPE html>
<html xmlns = "http://www.w3.org/1999/xhtml"
   xmlns:h = "http://java.sun.com/jsf/html"
   xmlns:a4j = "http://richfaces.org/a4j">

   <h:head>
      <title>Region Example</title>
   </h:head>

   <h:body>
      <h:form>
         <a4j:status startText = "Working..." />
            <h:inputText value = "#{managedBean.message}"/>
            <h:inputText value = "#{managedBean.job}"/>
            <a4j:commandLink id = "one" value = "one"/>

            <a4j:region>
               <h:inputText value = "#{managedBean.message}"/>
               <a4j:commandLink id = "two" value = "two"/>
            </a4j:region>

         <a4j:status startText = "Done" />
      </h:form>
   </h:body>

</html>
Whenever you are running this application, you can see a glimpse of two statuses working... and Done. These statuses will automatically disappear whenever the request is completed.
<a4j:include>/<a4j:keepAlive>
Include and keepAlive, both tags were introduced in RichFaces 3.0 but in RichFaces 4 these tags were depreciated as these functionalities can be easily achievable using different other tags used in Facelets such as <ui:include> and <ui:insert>. As the name suggests, include was introduced to include one page into another and keepAlive was introduced to control the scope of the managed bean associate with a JSF page. It is recommended to use the updated version of any software APIs and use <UI> component and annotation implementation to achieve the business goals.
<a4j:log>
As the name suggests, this a4j component helps to generate the logging info into the web browser. The following example explains more about this tag. Edit the a4jregionExample.xhtml file in the following way.
<?xml version = "1.0" encoding = "UTF-8"?>
<!DOCTYPE html>
<html xmlns = "http://www.w3.org/1999/xhtml"
   xmlns:ui = "http://java.sun.com/jsf/facelets"
   xmlns:h = "http://java.sun.com/jsf/html"
   xmlns:a4j = "http://richfaces.org/a4j">

   <h:head>
      <title>Region Example</title>
   </h:head>

   <h:body>
      <h:form>
         <a4j:status startText = "Working..." />
            <h:inputText value = "#{managedBean.message}"/>
            <h:inputText value = "#{managedBean.job}"/>
            <a4j:commandLink id = "one" value = "one"/>

            <a4j:region>
               <h:inputText value = "#{managedBean.message}"/>
               <a4j:commandLink id = "two" value = "two"/>
            </a4j:region>

            <a4j:log></a4j:log>
         <a4j:status startText = "Done" />
      </h:form>
   </h:body>

</html>
Now run the above code in the browser and following will be the output. a4j:log will generate the required logs of all levels whenever required.
<a4j:jsFunction>
This is the most advanced feature of RichFaces, where an automatic JS function can be created without any JavaScript code. The CDK will generate an automatic JavaScript code based on any JS event.
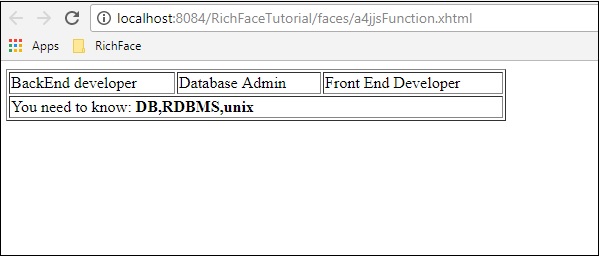
In the following example, we are creating a JavaScript function that will be called whenever we hover on a specified value.
<?xml version = "1.0" encoding = "UTF-8"?>
<!DOCTYPE html>
<html xmlns = "http://www.w3.org/1999/xhtml"
   xmlns:ui = "http://java.sun.com/jsf/facelets"
   xmlns:h = "http://java.sun.com/jsf/html"
   xmlns:a4j = "http://richfaces.org/a4j">

   <h:head>
      <title>Example of JS Function</title>
   </h:head>

   <h:body>
      <table width = "500" border = "1">
         <tbody>
            <tr>
               <td>
                  <span onmouseover = "showMySkill('core java,J2EE')"
                     onmouseout = "showMySkill('')">BackEnd developer</span>
               </td>
               <td>
                  <span onmouseover = "showMySkill('DB,RDBMS,unix')"
                     onmouseout = "showMySkill('')">Database Admin</span>
               </td>
               <td>
                  <span onmouseover = "showMySkill(
                     'JS frameworks,html,java scripts')"
                     onmouseout = "showMySkill('')">Front End Developer</span>
               </td>
            </tr>
            <tr>
               <td colspan = "3">You need to know:
                  <b><h:outputText id = "showSkillset" value = "#{managedBean.message}"/></b>
               </td>
            </tr>
         </tbody>
      </table>

      <h:form id = "form">
         <a4j:jsFunction name = "showMySkill" render = "showSkillset">
            <a4j:param name = "name" assignTo = "#{managedBean.message}" />
         </a4j:jsFunction>
      </h:form>
   </h:body>
</html>
The above code will generate the following output in the browser. Depending on the JS event, CDK will override the method named showMySkill() and the required values will be printed in the browser.
<a4j:AJAXListener>
This tag is used when you want to execute a particular listener just before rendering the result to the browser. This tag is not available in RichFaces 4 because the same functionality is available in
<rich:panel>
   <f:facet name = "header">Using a4j:actionListener</f:facet>
   <a4j:commandButton value="Submit" reRender = "#{AJAXBean.areas}">
      <a4j:AJAXListener binding = "#{AJAXBean.renderAreasListener}"/>
   </a4j:commandButton>
</rich:panel>
In the above example, on the click of the Submit button, a JS event will be created, which will call the areas method implemented inside the bean class and the corresponding result will be rendered as a result.
