- RichFaces - Home
- RichFaces - Overview
- RichFaces - Environment Setup
- RichFaces - Architecture
- RichFaces - Basic Concepts
- RichFaces - Rich Skin
- RichFaces - Input Components
- RichFaces - Output Components
- RichFaces - Iteration Component
- RichFaces - Selection Components
- RichFaces - Menu Components
- RichFaces - Rich Tree
- RichFaces - Error Handling
RichFaces - Menu Components
RichFaces provides a wide version of tags to be used for creating a menu type markup. In this chapter, we will learn some new features along with the old ones using which we can easily render a menu in the browser.
<rich:dropDownMenu>
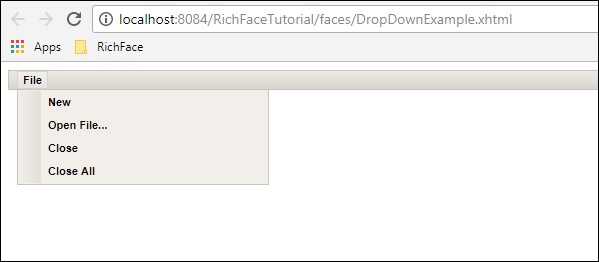
Using this tag, the developer can create a dropdown menu. This tag is useful for creating the header of a website. In the following example, we will learn how to use this tag in practical life. Create one file and name it as DropDownList.xhtml. Place the following code inside it.
<?xml version = "1.0" encoding = "UTF-8"?>
<!DOCTYPE html>
<html xmlns = "http://www.w3.org/1999/xhtml"
   xmlns:h = "http://java.sun.com/jsf/html"
   xmlns:f = "http://java.sun.com/jsf/core"
   xmlns:ui = "http://java.sun.com/jsf/facelets"
   xmlns:a4j = "http://richfaces.org/a4j"
   xmlns:rich = "http://richfaces.org/rich">

   <h:head></h:head>

   <h:body>
      <h:form>
         <rich:toolbar>
            <rich:dropDownMenu>
               <f:facet name = "label">
                  <h:outputText value = "File" />
               </f:facet>

               <rich:menuItem label = "New" />
               <rich:menuItem label = "Open File..." />
               <rich:menuItem label = "Close" />
               <rich:menuItem label = "Close All" />
            </rich:dropDownMenu>
         </rich:toolbar>
      </h:form>
   </h:body>

</html>
In the above example, we are creating one toolbar and inside that toolbar we are creating one dropdown menu. Any number of dropdown menus can be created. If you want to insert any action-based JS function, then you can implement that inside <menuItem> tag with the attribute as action. The above piece of code will generate the following output in the browser.
<rich:contextMenu>
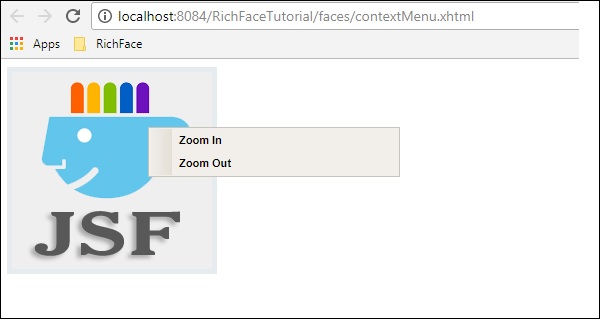
This tag is useful to generate event-based dropdown on the client side. It will not work automatically. Users need to create the JS event and then it works accordingly. In the following example, we will create the render image and then create the JS events based on the users response. Following is the xhtml file.
<?xml version = "1.0" encoding = "UTF-8"?>
<!DOCTYPE html>
<html xmlns = "http://www.w3.org/1999/xhtml"
   xmlns:h = "http://java.sun.com/jsf/html"
   xmlns:f = "http://java.sun.com/jsf/core"
   xmlns:ui = "http://java.sun.com/jsf/facelets"
   xmlns:a4j = "http://richfaces.org/a4j"
   xmlns:rich = "http://richfaces.org/rich">

   <h:head>
      <title>ContextMenu Example</title>
   </h:head>

   <h:body>
      <h:form id = "form">
         <h:outputScript>
            //<![CDATA[
               function resize(pic, coeff) {
                  var w  =  Math.round(pic.width * coeff);
                  var h  =  Math.round(pic.height * coeff);

                  if (w > 1 && h > 1 && h<1000 && w<1000) {
                     pic.width  =  w;
                     pic.heigth  =  h;
                  }
               }
               function enlarge(element){
                  resize(element, 1.1);
               }
               function decrease(element){
                  resize(element, 0.9);
               }
            //]]>
         </h:outputScript>
         <h:graphicImage value = "http://www.tutorialspoint.com/images/jsf-minilogo.png"
            id = "pic" style = "border : 5px solid #E4EAEF"/>

         <rich:contextMenu target = "pic" mode = "client" showEvent = "click">
            <rich:menuItem label = "Zoom In" onclick =
               "enlarge(#{rich:element('pic')});" id = "zin"/>
            <rich:menuItem label = "Zoom Out"
               onclick = "decrease(#{rich:element('pic')});" id = "zout"/>

        </rich:contextMenu>
      </h:form>
   </h:body>

</html>
Run the above example and select the rendered image. Following options Zoom In and Zoom out will be presented. Click the appropriate option and the required functionality will be applied to the image. The above piece of code will generate the following output in the browser.
<rich:Component Control>
This component is user-friendly whenever we want to call any other function from the RichFaces environment. This tag is used to call JavaScript-based action classes. Following example demonstrates how this tag can be used. Create a file and name it as componentContent.xhtml file. Place the following piece of code in it.
<?xml version = "1.0" encoding = "UTF-8"?>
<!--
   To change this license header, choose License Headers in Project Properties.
   To change this template file, choose Tools | Templates
   and open the template in the editor.
-->
<!DOCTYPE html>
<html xmlns = "http://www.w3.org/1999/xhtml"
   xmlns:h = "http://java.sun.com/jsf/html"
   xmlns:f = "http://java.sun.com/jsf/core"
   xmlns:ui = "http://java.sun.com/jsf/facelets"
   xmlns:a4j = "http://richfaces.org/a4j"
   xmlns:rich = "http://richfaces.org/rich">

   <h:head>
      <title>Component Control Example</title>
      <meta name = "viewport" content = "width = device-width, initial-scale = 1.0"/>
   </h:head>

   <h:body>
      <h:commandButton value = "Call the popup">
         <rich:componentControl target = "popup" operation = "show" />
      </h:commandButton>
      <rich:popupPanel id = "popup" modal = "false" autosized = "true" resizeable = "false">
         <f:facet name = "header">
            <h:outputText value = "Welcome mesage" />
         </f:facet>

         <f:facet name = "controls">
            <h:outputLink value = "#"
               onclick = "#{rich:component('popup')}.hide(); return false;"
               style = "color: inherit">

               X
            </h:outputLink>
         </f:facet>
         <p>Welcome to RICH FACE tutorial at tutorialspoint.com</p>
      </rich:popupPanel>
   </h:body>

</html>
In the above code, we are calling onclick() function using a id popup. Once we run it, it shows a button with Call the popup. Once we click the button, RichFaces internally calls the JS function and provides the following output in the browser.

