- RabbitMQ - Home
- RabbitMQ - Overview
- RabbitMQ - Environment Setup
- RabbitMQ - Features
- RabbitMQ - Installation
RabbitMQ Queue Based Example
RabbitMQ Topic Based Example
RabbitMQ Useful Resources
RabbitMQ - Quick Guide
RabbitMQ - Overview
What is RabbitMQ?
RabbitMQ is an open source message broker written in Java. It's fully compliant with JMS 1.1 standards. It is developed and maintained by Apache Software Foundation and is licensed under Apache license. It provides high availability, scalability, reliability, performance and security for enterprise level messaging applications.
JMS is a specification that allows development of message based system. RabbitMQ acts as a broker of messages which sits in between applications and allows them to communicate in asynchronous and reliable way.

Types of Messaging
There are two types of messaging options explained below for better understanding.
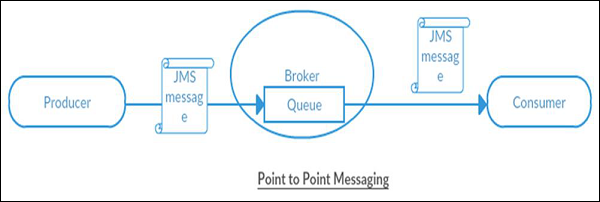
Point to Point
In this type of communication, the broker sends messages to only one consumer, while the other consumers will wait till they get the messages from the broker. No consumer will get the same message.
If there are no consumers, the Broker will hold the messages till it gets a consumer. This type of communication is also called as Queue based communication where the Producer sends messages to a queue and only one consumer gets one message from the queue. If there is more than one consumer, they may get the next message but they wont get the same message as the other consumer.
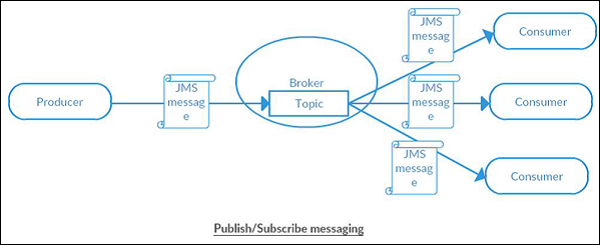
Publish/Subscribe
In this type of communication, the Broker sends same copy of messages to all the active consumers. This type of communication is also known as Topic based communication where broker sends same message to all active consumer who has subscribed for particular Topic. This model supports one-way communication where no verification of transmitted messages is expected.
RabbitMQ - Environment Setup
This chapter will guide you on how to prepare a development environment to start your work with RabbitMQ. It will also teach you how to set up JDK, Maven and Eclipse on your machine before you set up RabbitMQ −
Setup Java Development Kit (JDK)
You can download the latest version of SDK from Oracle's Java site − Java SE Downloads. You will find instructions for installing JDK in downloaded files, follow the given instructions to install and configure the setup. Finally set PATH and JAVA_HOME environment variables to refer to the directory that contains java and javac, typically java_install_dir/bin and java_install_dir respectively.
If you are running Windows and have installed the JDK in C:\jdk-19, you would have to put the following line in your C:\autoexec.bat file.
set PATH=C:\jdk-19;%PATH%
set JAVA_HOME=C:\jdk-19
Alternatively, on Windows NT/2000/XP, you will have to right-click on My Computer, select Properties → Advanced → Environment Variables. Then, you will have to update the PATH value and click the OK button.
On Unix (Solaris, Linux, etc.), if the SDK is installed in /usr/local/jdk-19 and you use the C shell, you will have to put the following into your .cshrc file.
setenv PATH /usr/local/jdk-19/bin:$PATH
setenv JAVA_HOME /usr/local/jdk-19
Alternatively, if you use an Integrated Development Environment (IDE) like Borland JBuilder, Eclipse, IntelliJ IDEA, or Sun ONE Studio, you will have to compile and run a simple program to confirm that the IDE knows where you have installed Java. Otherwise, you will have to carry out a proper setup as given in the document of the IDE.
Setup Eclipse IDE
All the examples in this tutorial have been written using Eclipse IDE. So we would suggest you should have the latest version of Eclipse installed on your machine.
To install Eclipse IDE, download the latest Eclipse binaries from www.eclipse.org/downloads/. Once you download the installation, unpack the binary distribution into a convenient location. For example, in C:\eclipse on Windows, or /usr/local/eclipse on Linux/Unix and finally set PATH variable appropriately.
Eclipse can be started by executing the following commands on Windows machine, or you can simply double-click on eclipse.exe
%C:\eclipse\eclipse.exe
Eclipse can be started by executing the following commands on Unix (Solaris, Linux, etc.) machine −
$/usr/local/eclipse/eclipse
After a successful startup, if everything is fine then it should display the following result −
Set Maven
In this tutorial, we are using maven to run and build the spring based examples to run ActiveMQ based applications. Follow the Maven - Environment Setup to install maven.
Download RabbitMQ
You can download the latest stable version of RabbitMQ from its official page. Follow the Download RabbitMQ Installer to download RabbitMQ. We've used the 4.1.2 version.
RabbitMQ - Features
RabbitMQ is one of the most popular open source message broker. It is designed to provide high availability, scalability, reliability, performance and security for enterprise level messaging applications. Following are some of the salient features of RabbitMQ.
LightWeight − RabbitMQ is lightweight and and is quity easy to install on premise as well as on cloud.
Connectivity Options − RabbitMQ supports multiple messaging protocols and can be deployed in distributed/federated configurations to meet high availability, scalability requirements.
Pluggable Architecture − RabbitMQ allows to choose a persistence mechanism and also provides options to customize security for authentication and authorization as per the application needs.
Multi-Platform − RabbitMQ provides client APIs for many popular languages like Java, Python, JavaScript, Ruby etc.
Broker Cluster − RabbitMQ can be deployed as clusters for high availability and throughput. It can be federated across multiple availability zones and regions.
Features Rich − RabbitMQ provides many advanced features for both broker and clients.
Simple Administration Interface − RabbitMQ administration console is easy to use but still provides many powerful administration features.
Enterprise and Cloud Ready − RabbitMQ supports pluggable authentication and authorization. It supports LDAP and TLS. It can be easily deployed in public as well as private clouds.
Features Rich − RabbitMQ provides many advanced features for both broker and clients. It provides plugins to support continuous integration, operational metrics, and integration to other enterprise systems etc.
Management − RabbitMQ provides HTTP API, command line tool and UI to manage and monitor RabbitMQ.
RabbitMQ - Installation
RabbitMQ is built on Erlang runtime so before installing RabbitMQ, we need to download Erlang and install it. Make sure, you are using administrative priviledge to install Erlang and RabbitMQ.
Erlang
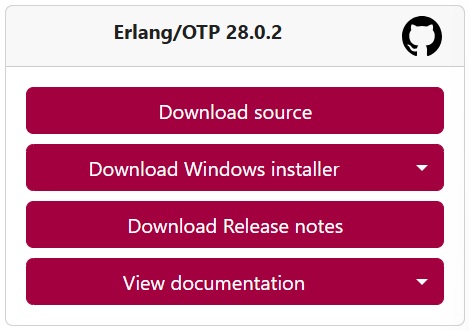
Erlang is a general-purpose programming language and runtime environment. You can download the latest version of Erlang from its home page − Download Erlang/OTP.. We are installing Erlang on Windows and downloaded Erlang/OTP 28.0.2 Installer - otp_win64_28.0.2.exe for windows.
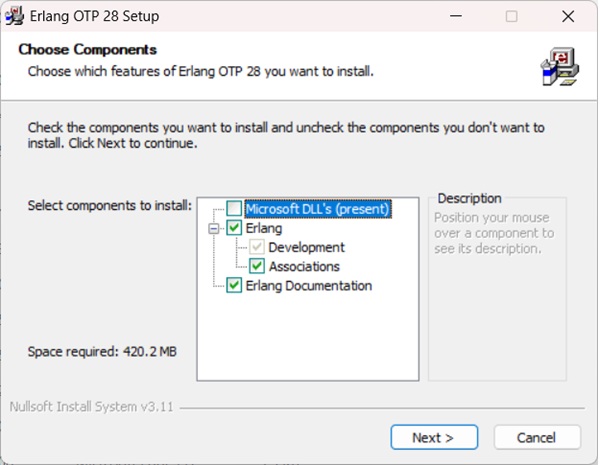
Now install the Erlang using the installer by double clicking on it and follow the default selections and finish the setup.
RabbitMQ Installation
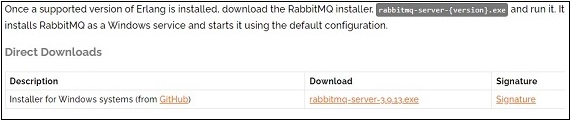
Download the RabbitMQ Latest binary from its official downloads page We've downloaded 4.1.2 as rabbitmq-server-4.1.2.zip for windows and extracted to .
Set the environment variables
We've set following environment variables −
ERLANG_HOME − C:\Program Files\Erlang OTP
RabbitMQ_SERVER − C:\Program Files\RabbitMQ Server\rabbitmq_server-4.1.2
Go to RabbitMQ Installation directory and run rabbitmq-server.bat to start the rabbitmq node−
C:\Program Files\RabbitMQ Server\rabbitmq_server-4.1.2\sbin>rabbitmq-server.bat
2025-08-02 14:00:52.802000+05:30 [warning] <0.143.0> Using RABBITMQ_ADVANCED_CONFIG_FILE: c:/Users/mahes/AppData/Roaming/RabbitMQ/advanced.config
2025-08-02 14:01:05.121000+05:30 [notice] <0.45.0> Application syslog exited with reason: stopped
2025-08-02 14:01:05.121000+05:30 [notice] <0.209.0> Logging: switching to configured handler(s); following messages may not be visible in this log output

  ##  ##      RabbitMQ 4.1.2
  ##  ##
  ##########  Copyright (c) 2007-2025 Broadcom Inc and/or its subsidiaries
  ######  ##
  ##########  Licensed under the MPL 2.0. Website: https://rabbitmq.com

  Erlang:      28.0.2 [jit]
  TLS Library: OpenSSL - OpenSSL 3.1.0 14 Mar 2023
  Release series support status: see https://www.rabbitmq.com/release-information

  Doc guides:  https://www.rabbitmq.com/docs
  Support:     https://www.rabbitmq.com/docs/contact
  Tutorials:   https://www.rabbitmq.com/tutorials
  Monitoring:  https://www.rabbitmq.com/docs/monitoring
  Upgrading:   https://www.rabbitmq.com/docs/upgrade

  Logs: <stdout>
        c:/Users/mahes/AppData/Roaming/RabbitMQ/log/rabbit@Home.log

  Config file(s): c:/Users/mahes/AppData/Roaming/RabbitMQ/advanced.config

  Starting broker... completed with 5 plugins.
Edit C:\Windows\System32\drivers\etc\hosts file using administrative priviledge and add following line to it −
127.0.0.1 rabbitmq
Check the status of RabbitMQ Server using rabbitmqctl.bat status command
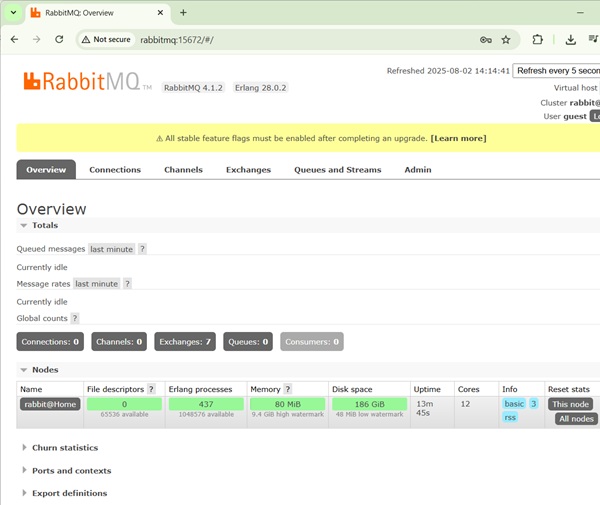
C:\Program Files\RabbitMQ Server\rabbitmq_server-4.1.2\sbin>rabbitmqctl.bat status Status of node rabbit@Home ... [] Runtime OS PID: 9800 OS: Windows Uptime (seconds): 152 Is under maintenance?: false RabbitMQ version: 4.1.2 RabbitMQ release series support status: see https://www.rabbitmq.com/release-information Node name: rabbit@Home Erlang configuration: Erlang/OTP 28 [erts-16.0.2] [source] [64-bit] [smp:12:12] [ds:12:12:10] [async-threads:1] [jit:ns] Crypto library: OpenSSL 3.1.0 14 Mar 2023 Erlang processes: 437 used, 1048576 limit Scheduler run queue: 1 Cluster heartbeat timeout (net_ticktime): 60 Plugins Enabled plugin file: c:/Users/mahes/AppData/Roaming/RabbitMQ/enabled_plugins Enabled plugins: * rabbitmq_shovel_management * rabbitmq_management * rabbitmq_management_agent * rabbitmq_web_dispatch * cowboy * oauth2_client * jose * rabbitmq_shovel * amqp_client * amqp10_client * gun Data directory Node data directory: c:/Users/mahes/AppData/Roaming/RabbitMQ/db/rabbit@Home-mnesia Raft data directory: c:/Users/mahes/AppData/Roaming/RabbitMQ/db/rabbit@Home-mnesia/quorum/rabbit@Home Config files * c:/Users/mahes/AppData/Roaming/RabbitMQ/advanced.config Log file(s) ** c:/Users/mahes/AppData/Roaming/RabbitMQ/log/rabbit@Home.log Alarms (none) Tags (none) Memory Total memory used: 0.082 gb Calculation strategy: rss Memory high watermark setting: 0.6 of available memory, computed to: 10.0838 gb code: 0.0234 gb (28.6 %) other_system: 0.022 gb (26.8 %) other_proc: 0.0199 gb (24.25 %) allocated_unused: 0.0086 gb (10.48 %) reserved_unallocated: 0.0021 gb (2.56 %) other_ets: 0.0019 gb (2.28 %) metrics: 0.0016 gb (1.96 %) atom: 0.0011 gb (1.31 %) plugins: 0.0007 gb (0.89 %) msg_index: 0.0003 gb (0.36 %) binary: 0.0001 gb (0.17 %) mgmt_db: 0.0001 gb (0.17 %) mnesia: 0.0001 gb (0.09 %) metadata_store: 0.0 gb (0.05 %) quorum_ets: 0.0 gb (0.01 %) metadata_store_ets: 0.0 gb (0.01 %) connection_other: 0.0 gb (0.0 %) quorum_queue_procs: 0.0 gb (0.0 %) quorum_queue_dlx_procs: 0.0 gb (0.0 %) stream_queue_procs: 0.0 gb (0.0 %) stream_queue_replica_reader_procs: 0.0 gb (0.0 %) connection_readers: 0.0 gb (0.0 %) connection_writers: 0.0 gb (0.0 %) connection_channels: 0.0 gb (0.0 %) queue_procs: 0.0 gb (0.0 %) stream_queue_coordinator_procs: 0.0 gb (0.0 %) File Descriptors Total: 0, limit: 65439 Free Disk Space Low free disk space watermark: 0.05 gb Free disk space: 199.7743 gb Totals Connection count: 0 Queue count: 0 Virtual host count: 1 Listeners Interface: [::], port: 15672, protocol: http, purpose: HTTP API Interface: [::], port: 25672, protocol: clustering, purpose: inter-node and CLI tool communication Interface: [::], port: 5672, protocol: amqp, purpose: AMQP 0-9-1 and AMQP 1.0 Interface: 0.0.0.0, port: 5672, protocol: amqp, purpose: AMQP 0-9-1 and AMQP 1.0
Verify the Installation
Now open http://rabbitmq:15672/ to open Management console. Login using guest/guest.
RabbitMQ - Producer Application
Now let's create a producer application which will send message to the RabbitMQ Queue.
Create Project
Using eclipse, select File → New → Maven Project. Tick the Create a simple project(skip archetype selection) and click Next.
Enter the details, as shown below −
groupId − com.tutorialspoint
artifactId − producer
version − 0.0.1-SNAPSHOT
name − RabbitMQ Producer
Click on Finish button and a new project will be created.
pom.xml
Now update the content of pom.xml to include dependencies for RabbitMQ.
<project xmlns="http://maven.apache.org/POM/4.0.0" xmlns:xsi="http://www.w3.org/2001/XMLSchema-instance"    xsi:schemaLocation="http://maven.apache.org/POM/4.0.0 https://maven.apache.org/xsd/maven-4.0.0.xsd">
   <modelVersion>4.0.0</modelVersion>
   <groupId>com.tutorialspoint.activemq</groupId>
   <artifactId>producer</artifactId>
   <version>0.0.1-SNAPSHOT</version>
   <name>RabbitMQ Producer</name>
   <properties>
      <java.version>19</java.version>
   </properties>
   <dependencies>
      <dependency>
         <groupId>com.rabbitmq</groupId>
         <artifactId>amqp-client</artifactId>
         <version>5.14.2</version>
      </dependency>
      <dependency>
         <groupId>org.slf4j</groupId>
         <artifactId>slf4j-api</artifactId>
         <version>1.7.26</version>
      </dependency>
      <dependency>
         <groupId>org.slf4j</groupId>
         <artifactId>slf4j-simple</artifactId>
         <version>1.7.26</version>
      </dependency>
   </dependencies>
</project>
Now create a Producer class which will send message to the RabbitMQ Queue.
package com.tutorialspoint.rabbitmq;

import java.io.IOException;
import java.util.Scanner;
import java.util.concurrent.TimeoutException;

import com.rabbitmq.client.Channel;
import com.rabbitmq.client.Connection;
import com.rabbitmq.client.ConnectionFactory;

public class Producer {
   private static String QUEUE = "MyFirstQueue";

   public static void main(String[] args) throws IOException, TimeoutException {
      ConnectionFactory factory = new ConnectionFactory();
      factory.setHost("localhost");
      try (Connection connection = factory.newConnection();
         Channel channel = connection.createChannel()) {
         channel.queueDeclare(QUEUE, false, false, false, null);

         Scanner input = new Scanner(System.in);
         String message;
         do {
            System.out.println("Enter message: ");
            message = input.nextLine();
            channel.basicPublish("", QUEUE, null, message.getBytes());
         } while (!message.equalsIgnoreCase("Quit"));
      }
   }
}
Producer class creates a connection, creates a channel, connects to a queue. If user enters quit then application terminates else it will send the message to the queue using basicPublish method.
We'll run this application in RabbitMQ - Test Application chapter.
RabbitMQ - Consumer Application
Now let's create a consumer application which will receive message from the RabbitMQ Queue.
Create Project
Using eclipse, select File → New → Maven Project. Tick the Create a simple project(skip archetype selection) and click Next.
Enter the details, as shown below:
groupId − com.tutorialspoint
artifactId − consumer
version − 0.0.1-SNAPSHOT
name − RabbitMQ Consumer
Click on Finish button and a new project will be created.
pom.xml
Now update the content of pom.xml to include dependencies for ActiveMQ.
<project xmlns="http://maven.apache.org/POM/4.0.0" xmlns:xsi="http://www.w3.org/2001/XMLSchema-instance"
   xsi:schemaLocation="http://maven.apache.org/POM/4.0.0 https://maven.apache.org/xsd/maven-4.0.0.xsd">
   <modelVersion>4.0.0</modelVersion>
   <groupId>com.tutorialspoint.activemq</groupId>
   <artifactId>consumer</artifactId>
   <version>0.0.1-SNAPSHOT</version>
   <name>RabbitMQ Consumer</name>
      <properties>
      <java.version>19</java.version>
   </properties>
   <dependencies>
      <dependency>
         <groupId>com.rabbitmq</groupId>
         <artifactId>amqp-client</artifactId>
         <version>5.14.2</version>
      </dependency>
      <dependency>
         <groupId>org.slf4j</groupId>
         <artifactId>slf4j-api</artifactId>
         <version>1.7.26</version>
      </dependency>
      <dependency>
         <groupId>org.slf4j</groupId>
         <artifactId>slf4j-simple</artifactId>
         <version>1.7.26</version>
      </dependency>
   </dependencies>
</project>
Now create a Consumer class which will receive message from the RabbitMQ Queue.
package com.tutorialspoint.rabbitmq;

import java.io.IOException;
import java.nio.charset.StandardCharsets;
import java.util.concurrent.TimeoutException;

import com.rabbitmq.client.Channel;
import com.rabbitmq.client.Connection;
import com.rabbitmq.client.ConnectionFactory;
import com.rabbitmq.client.DeliverCallback;

public class Consumer {
   private static String QUEUE = "MyFirstQueue";

   public static void main(String[] args) throws IOException, TimeoutException {
      ConnectionFactory factory = new ConnectionFactory();
      factory.setHost("localhost");
      Connection connection = factory.newConnection();
      Channel channel = connection.createChannel();

      channel.queueDeclare(QUEUE, false, false, false, null);
      System.out.println("Waiting for messages. To exit press CTRL+C");

      DeliverCallback deliverCallback = (consumerTag, delivery) -> {
         String message = new String(delivery.getBody(), StandardCharsets.UTF_8);
         System.out.println("Received '" + message + "'");
      };
      channel.basicConsume(QUEUE, true, deliverCallback, consumerTag -> { });
   }
}
Consumer class creates a connection, creates a channel, creates a queue if not existent then receives message from queue if there is any and it will keep polling queue for messages. Once a message is delivered, it is handled by basicConsume() method using deliverCallback.
We'll run this application in RabbitMQ - Test Application chapter.
RabbitMQ - Test Application
Start the Producer Application
In eclipse, right click on the Producer.java source, and select Run As &arr; Java Application. Producer application will start running and you'll see the output as follows −
Enter message:
Start the Consumer Application
In eclipse, right click on the Consumer.java source, and select Run As &arr; Java Application. Consumer application will start running and you'll see the output as follows −
Waiting for messages. To exit press CTRL+C
Send Message
In Producer console window, type Hi and press enter button to send the message.
Enter message:
Hi
Receive Message
Verify in Consumer console window, the message is received.
Waiting for messages. To exit press CTRL+C
Received = Hi
Send "Quit" as message to terminate the producer window session and terminate client window session.
Verification
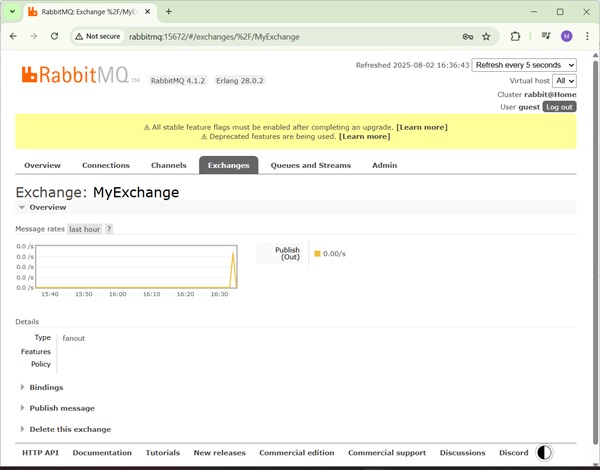
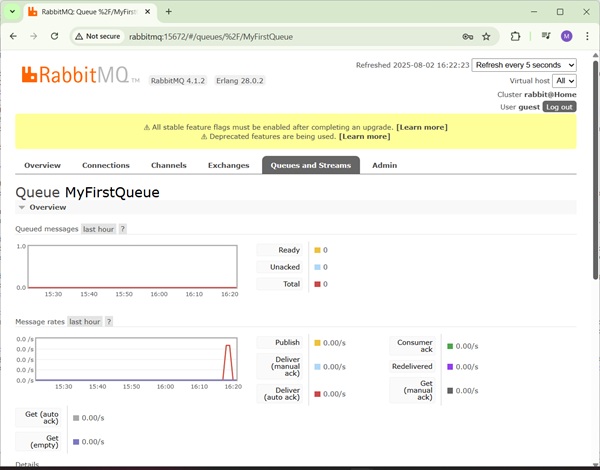
Now open http://rabbitmq:15672/ in your browser. It will ask for credentials. Use guest/guest as username/password and it will load the RabbitMQ admin console where you can check Queues to check the status. It will show messages enqueued and delivered.
RabbitMQ - Publisher Application
Now let's create a publisher application which will send message to the RabbitMQ Exchange. This exchange will deliver the message to the queue which is bound with the exchange.
Create Project
Using eclipse, select File → New → Maven Project. Tick the Create a simple project(skip archetype selection) and click Next.
Enter the details, as shown below −
groupId − com.tutorialspoint
artifactId − publisher
version − 0.0.1-SNAPSHOT
name − RabbitMQ Publisher
Click on Finish button and a new project will be created.
pom.xml
Now update the content of pom.xml to include dependencies for RabbitMQ.
<project xmlns="http://maven.apache.org/POM/4.0.0" xmlns:xsi="http://www.w3.org/2001/XMLSchema-instance"
   xsi:schemaLocation="http://maven.apache.org/POM/4.0.0 https://maven.apache.org/xsd/maven-4.0.0.xsd">
   <modelVersion>4.0.0</modelVersion>
   <groupId>com.tutorialspoint.activemq</groupId>
   <artifactId>publisher</artifactId>
   <version>0.0.1-SNAPSHOT</version>
   <name>RabbitMQ Publisher</name>
   <properties>
      <java.version>19</java.version>
   </properties>
   <dependencies>
      <dependency>
         <groupId>com.rabbitmq</groupId>
         <artifactId>amqp-client</artifactId>
         <version>5.14.2</version>
      </dependency>
      <dependency>
         <groupId>org.slf4j</groupId>
         <artifactId>slf4j-api</artifactId>
         <version>1.7.26</version>
      </dependency>
      <dependency>
         <groupId>org.slf4j</groupId>
         <artifactId>slf4j-simple</artifactId>
         <version>1.7.26</version>
      </dependency>
   </dependencies>
</project>
Now create a Publisher class which will send message to the RabbitMQ topic to broadcast it to all the subscribers.
package com.tutorialspoint.rabbitmq;

import java.io.IOException;
import java.util.Scanner;
import java.util.concurrent.TimeoutException;

import com.rabbitmq.client.Channel;
import com.rabbitmq.client.Connection;
import com.rabbitmq.client.ConnectionFactory;

public class Publisher {
   private static final String EXCHANGE = "MyExchange";
   public static void main(String[] args) throws IOException, TimeoutException {
      ConnectionFactory factory = new ConnectionFactory();
      factory.setHost("localhost");
      try (Connection connection = factory.newConnection();
      Channel channel = connection.createChannel()) {
         channel.exchangeDeclare(EXCHANGE, "fanout");
         Scanner input = new Scanner(System.in);
         String message;
         do {
            System.out.println("Enter message: ");
            message = input.nextLine();
            channel.basicPublish(EXCHANGE, "", null, message.getBytes());
         } while (!message.equalsIgnoreCase("Quit"));
      }
   }
}
Producer class creates a connection, creates a channel, declare an exchange and then asks user to enter message. The message is sent to exchange and as queue name, we are not passing queue name thus all queues which are bound to this exchange will get the message. If user enters quit then application terminates else it will send the message to the topic.
We'll run this application in RabbitMQ - Test Application chapter.
RabbitMQ - Subscriber Application
Now let's create a subscriber application which will receive message from the RabbitMQ Topic.
Create Project
Using eclipse, select File → New → Maven Project. Tick the Create a simple project(skip archetype selection) and click Next.
Enter the details, as shown below −
groupId − com.tutorialspoint
artifactId − subscriber
version − 0.0.1-SNAPSHOT
name − RabbitMQ Subscriber
Click on Finish button and a new project will be created.
pom.xml
Now update the content of pom.xml to include dependencies for RabbitMQ.
<project xmlns="http://maven.apache.org/POM/4.0.0" xmlns:xsi="http://www.w3.org/2001/XMLSchema-instance"    xsi:schemaLocation="http://maven.apache.org/POM/4.0.0 https://maven.apache.org/xsd/maven-4.0.0.xsd">
   <modelVersion>4.0.0</modelVersion>
   <groupId>com.tutorialspoint.activemq</groupId>
   <artifactId>subscriber</artifactId>
   <version>0.0.1-SNAPSHOT</version>
   <name>RabbitMQ Subscriber</name>
   <dependencies>
      <dependency>
         <groupId>com.rabbitmq</groupId>
         <artifactId>amqp-client</artifactId>
         <version>5.14.2</version>
      </dependency>
      <dependency>
         <groupId>org.slf4j</groupId>
         <artifactId>slf4j-api</artifactId>
         <version>1.7.26</version>
      </dependency>
      <dependency>
         <groupId>org.slf4j</groupId>
         <artifactId>slf4j-simple</artifactId>
         <version>1.7.26</version>
      </dependency>
   </dependencies>
</project>
Now create a Subscriber class which will receive message from the RabbitMQ Queue.
package com.tutorialspoint.rabbitmq;

import java.io.IOException;
import java.nio.charset.StandardCharsets;
import java.util.concurrent.TimeoutException;

import com.rabbitmq.client.Channel;
import com.rabbitmq.client.Connection;
import com.rabbitmq.client.ConnectionFactory;
import com.rabbitmq.client.DeliverCallback;

public class Subscriber {
   private static String EXCHANGE = "MyExchange";
   public static void main(String[] args) throws IOException, TimeoutException {
      ConnectionFactory factory = new ConnectionFactory();
      factory.setHost("localhost");
      Connection connection = factory.newConnection();
      Channel channel = connection.createChannel();
      channel.exchangeDeclare(EXCHANGE, "fanout");

      String queueName = channel.queueDeclare().getQueue();
      channel.queueBind(queueName, EXCHANGE, "");
      System.out.println("Waiting for messages. To exit press CTRL+C");

      DeliverCallback deliverCallback = (consumerTag, delivery) -> {
         String message = new String(delivery.getBody(), StandardCharsets.UTF_8);
         System.out.println("Received '" + message + "'");
      };
      channel.basicConsume(queueName, true, deliverCallback, consumerTag -> { });
   }
}
Subscriber class creates a connection, creates a channel, declares the exchange, create a random queue and binds it with the exchange and then receives message from topic if there is any. Press Ctrl + C to terminate else it will keep polling queue for messages.
We'll run this application multiple times to create multiple subscribers in RabbitMQ - Test Application chapter.
RabbitMQ - Test Topic Based Application
Start the Publisher Application
In eclipse, right click on the Publisher.java source, and select Run As &arr; Java Application. Publisher application will start running and you'll see the output as follows −
Enter message:
Start the Subscriber Application
In eclipse, right click on the Subscriber.java source, and select Run As &arr; Java Application. Subscriber application will start running and you'll see the output as follows −
Waiting for messages. To exit press CTRL+C
Start another Subscriber Application
In eclipse, again right click on the Subscriber.java source, and select Run As &arr; Java Application. Another Subscriber application will start running and you'll see the output as follows −
Waiting for messages. To exit press CTRL+C
Send Message
In Publisher console window, type Hi and press enter button to send the message.
Enter message:
Hi
Receive Message
Verify in Subscriber console windows, the message is received in each window.
Received = Hi
Send Quit as message to terminate all publisher and subscriber console window sessions.
Verification
Now open http://rabbitmq:15672/ in your browser. It will ask for credentials. Use guest/guest as username/password and it will load the RabbitMQ admin console where you can check Queues and Exchanges to check the status of messages delivered and bindings.